ismaelg
-
Posts
3,717 -
Joined
-
Last visited
Content Type
Profiles
Forums
Events
Gallery
Everything posted by ismaelg
-
Nice! I have a similar project in plans: I'll eventually work on Dale Earnhardt's 2001 Daytona C5R. You have already done bodywork, but Harold Bradford used to offer a gorgeous resin body for that. Not sure if it is still available. Will follow up this one. Thanks,
-
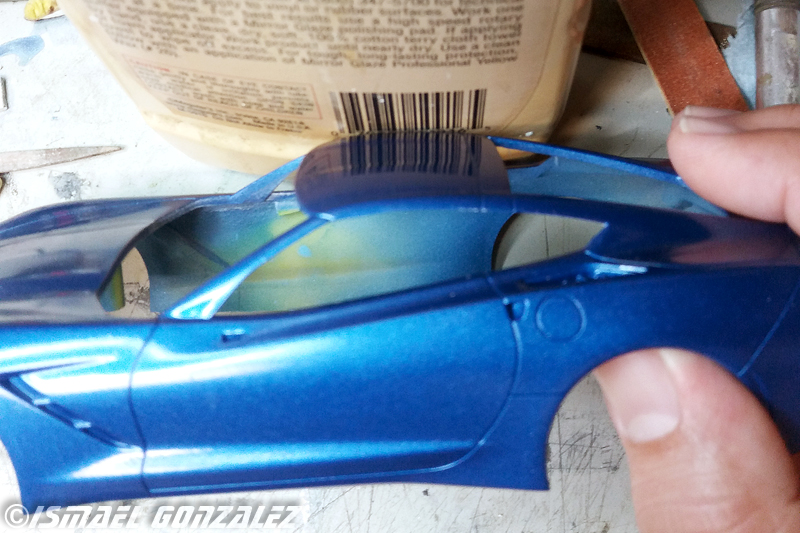
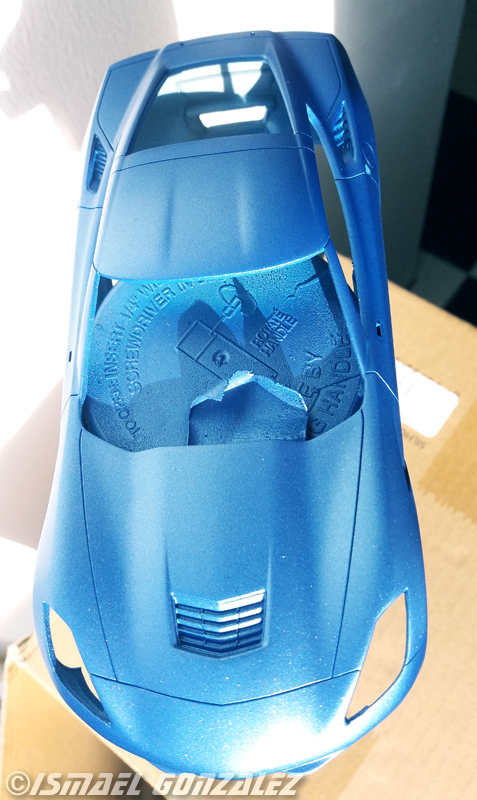
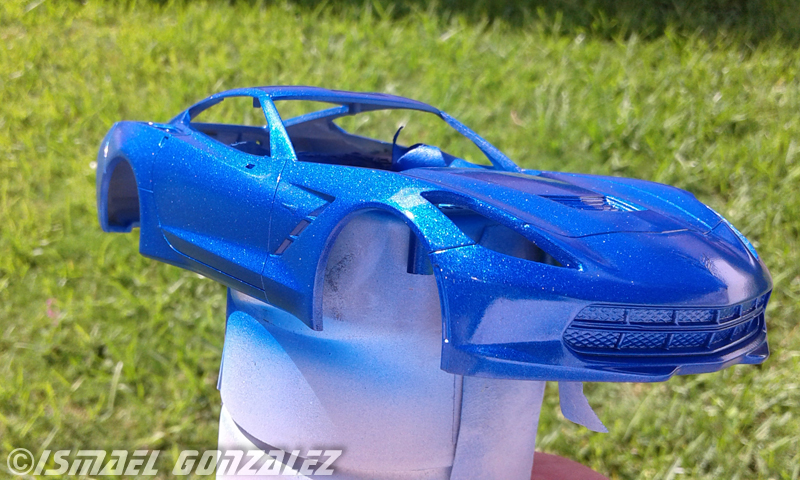
Hello, Carefully inspected after color coats. Clear was applied. Sat for a few days and tested polishing the roof. Looks good so far so I'll go ahead and start polishing the body. Abso-freaking-lutely LOVE this color! Thanks,

-
Hello, I have been away for a while and drag racing is not exactly my area of expertise. Any good sources for drag racing parts? Wheels, tires (slicks and front), hood scoops, parachute packs etc. I have some modern subject ideas I'd like to try. Thanks,
-
Hello, From what I have researched, Corky's car has a period correct similar but not identical T head engine. I believe it was sourced from an era's fire truck. While looking the same, it seems to me that Corky's frame rails may be a bit stronger inside, around the firewall area. Everything else was replicated as faithfully as possible. Corky has actually supplied tires for the original car. If I hit the Powerball, that is on the top of cars I'd commission to be built for me...... About the color, I believe the car was restored to its original color. While looking just yellow under the lights of the IMS museum, it has a hint of orange that shows in direct sunlight. Similar to what I can describe as a School bus yellow or something. I'm a photographer and my reasoning is that Panchromatic film (sensitive to all colors) was not introduced until the mid 1920's. In mono and orthochromatic films of the era, yellow would show gray while red would show black. Any hint of red (orange) would make yellow to look darker. Here is an example: The outer ring on this aircraft insignia is yellow but it shows darker in the picture than the blue ring. I think I've had this conversation with Art Anderson before... Thanks,
-
Great job on one of my favorite cars of all time! I plan to do mine someday..... Love it! Thanks,
-
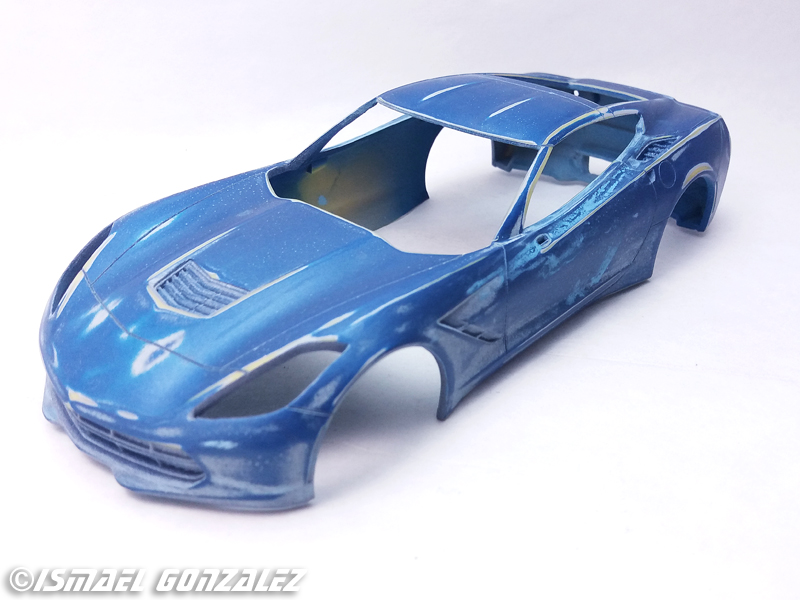
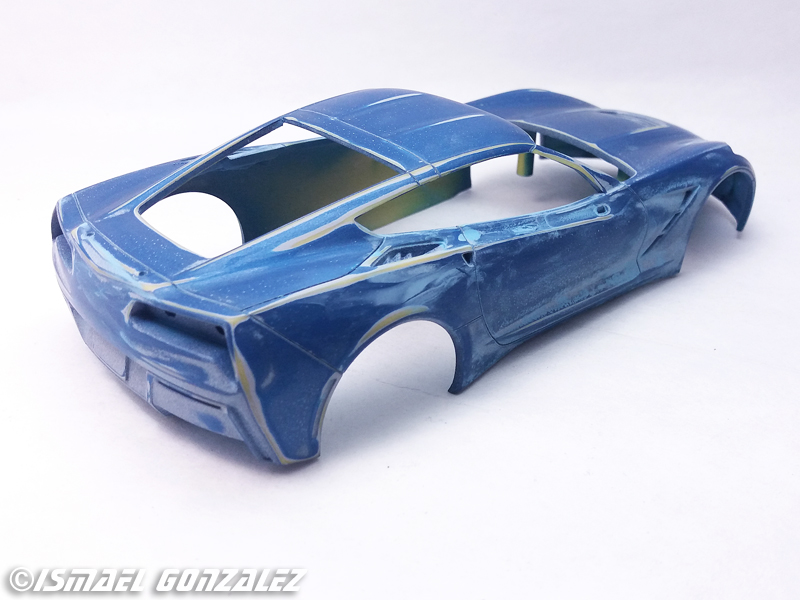
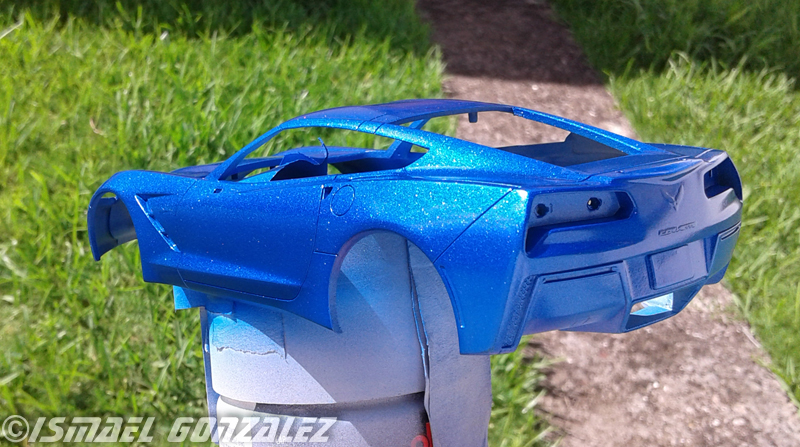
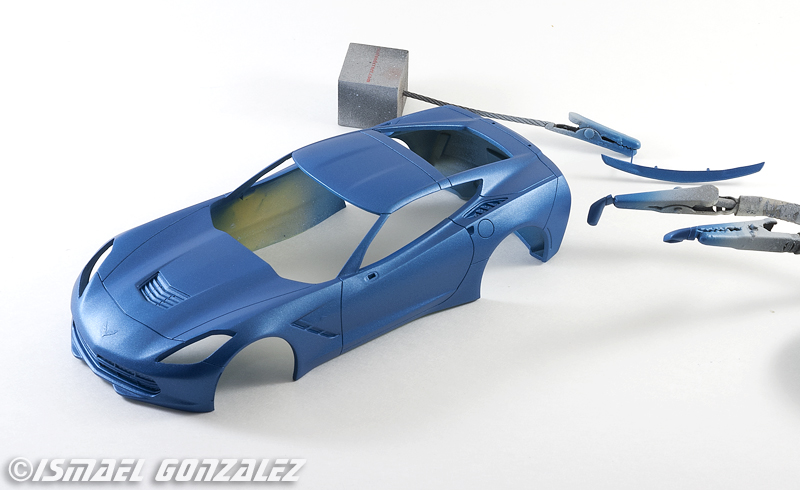
Hello, Laguna Blue Paint job, take two, in progress. This is after 2 light coats and one medium-wet coat. So far so good. Will let it sit for careful inspection before one final wet coat and eventual clear. Thanks,
-
Hello, Aaaaand we are back to square one..... or two..... I have a song in my mind: "And here I go, again on my own Going down the only road I've ever known...." Thanks,
-
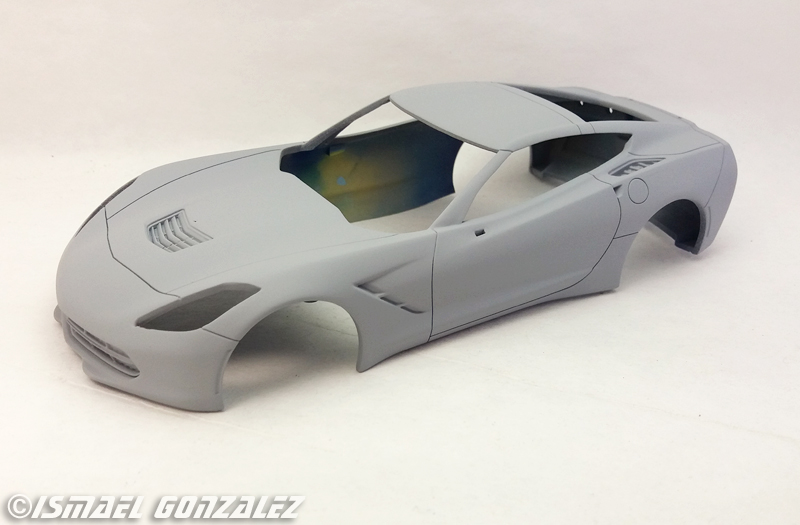
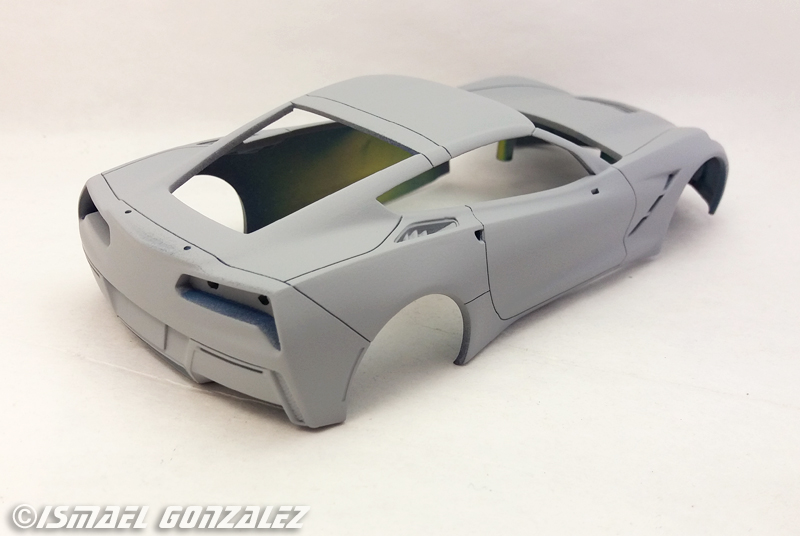
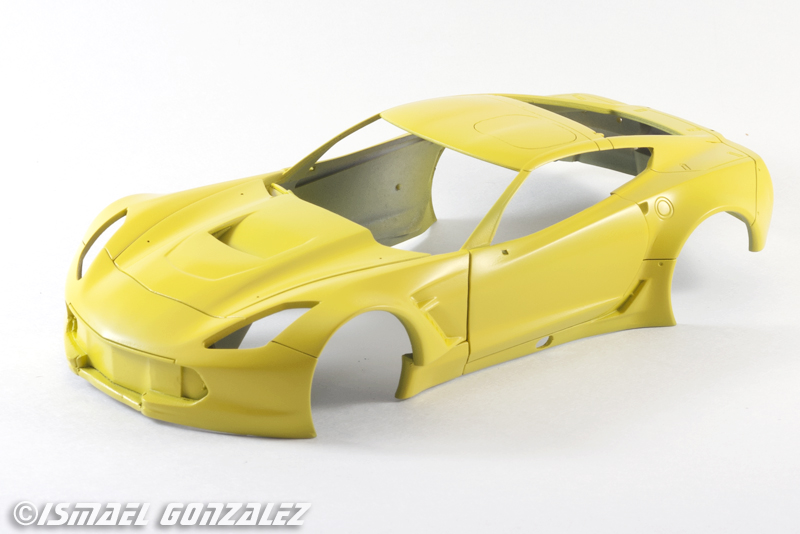
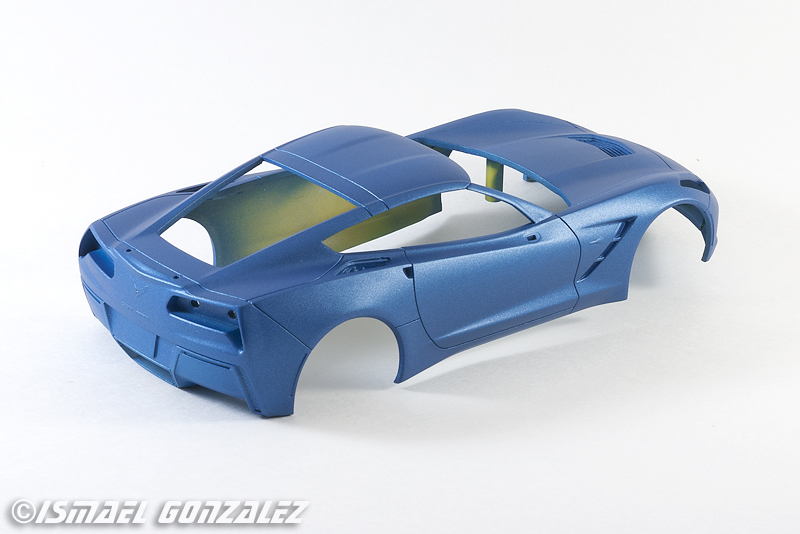
Hello, Perfect Paint job: Take 2! After painting and clearing, this was on route to become the perfect paint job. Started polishing and it was looking really awesome! But then, the next morning I took a look and the paint had blisters all over! Tiny little blisters all over the body. So after a few choice words, It is back to square one. I chose not to strip it but rather sand it down to ensure the best possible surface. Next: Primer take 2! As of now I have 3 theories as to what went wrong: The Hurricane The Government Aliens Thanks,
-
Hello, Thinking on what to do with some snap models here. What would be a good source for 1/24 - 1/25 present day drag wheel set? Both front and rear. Think 2017 COPO Camaro or something along that line. Something that would fit a new production car without cutting. I'm not very familiar since this is a bit out of my zone. Thanks,
-
Hello, After cutting it, I grabbed the axle with locking pliers and pulled the wheel, and pulled and pulled until I started hearing it tarting to crack. I concede. I'll just cut and grind the axle flush. Thanks,
-
'Nuff said...
-
Hello, Slowly churning along. Not much to be expected from this rather crude basic kit. Spent a lot of time scratchbuilding seatbelts, buckles, guides and receptors but are very hard to see. Oh well. Thanks,
-
Hello, Anybody has any tips on how to remove the wheels from the metal axle on a Maisto 1/24 diecast? I've pulled very hard to the point of almost breaking the wheel with no luck. Last resort would be cutting the metal axle. All I want is to add brake rotors to a 1/24 Maisto Corvette. Any ideas? Thanks,
-
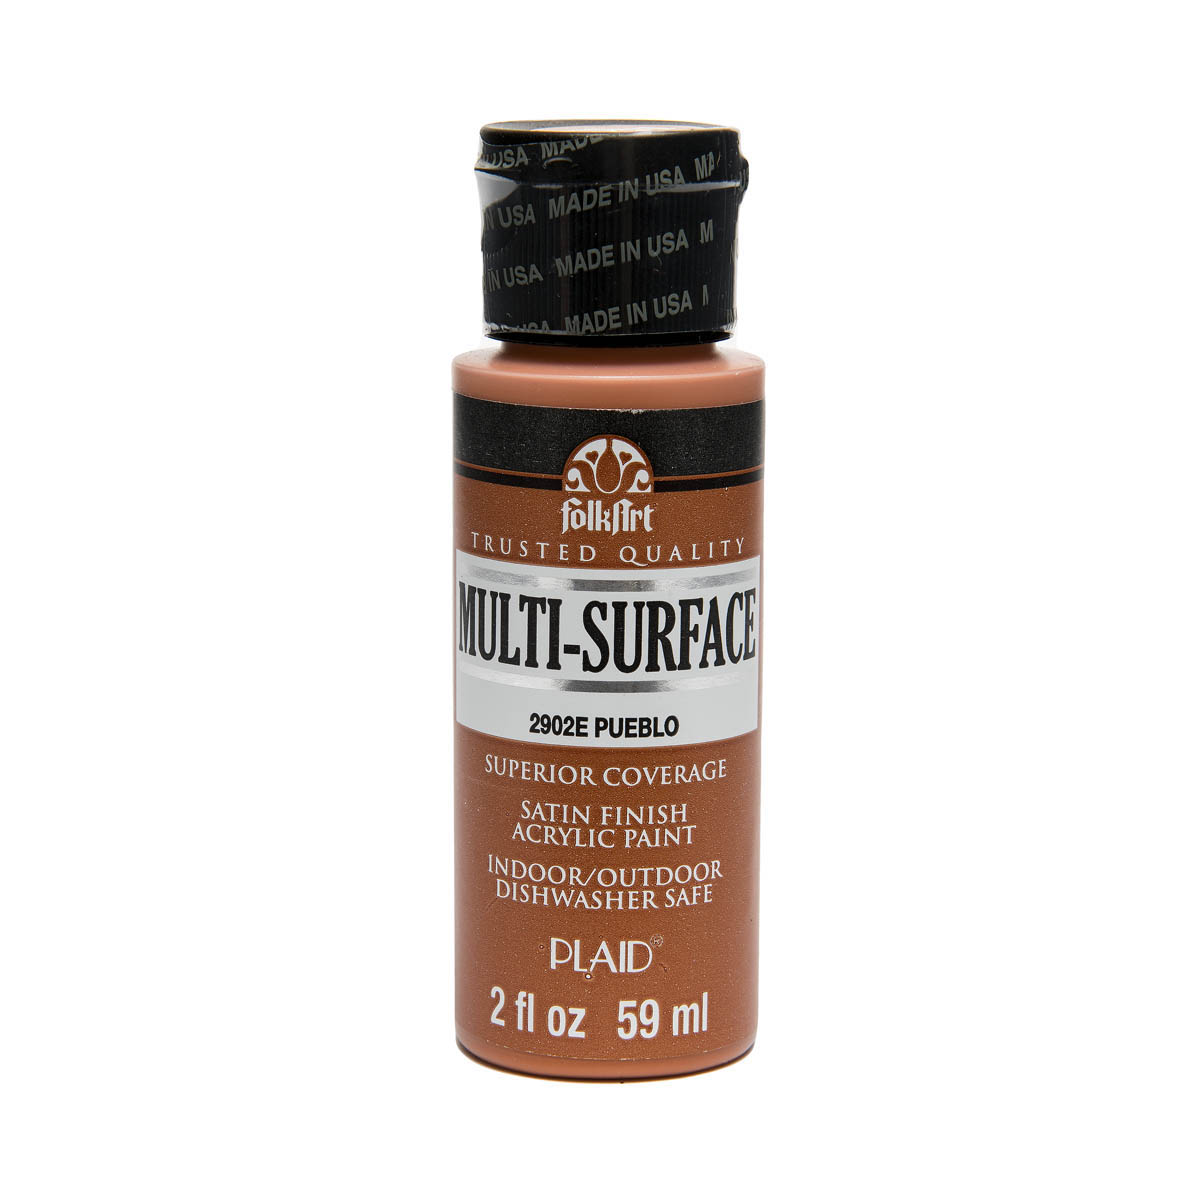
Hi Len, This is the paint I used: Folkart 2902E Pueblo. Hope this post works. Doing this from the phone is a pain. Thanks!
-
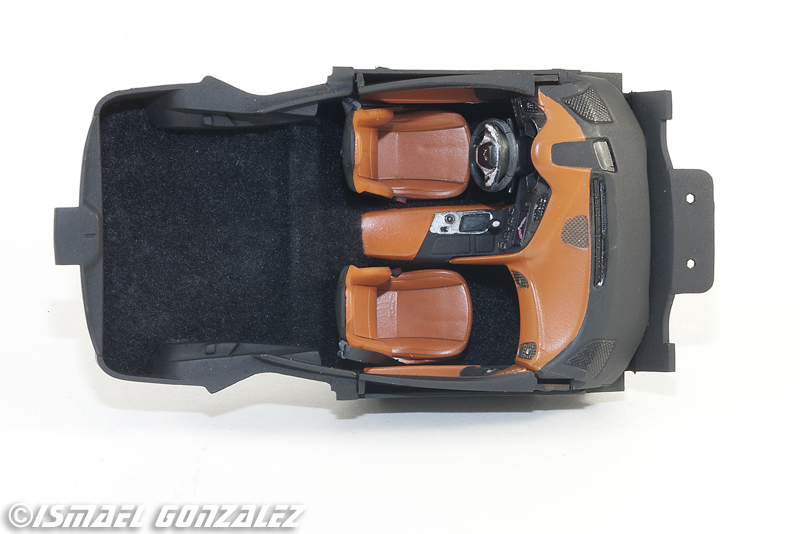
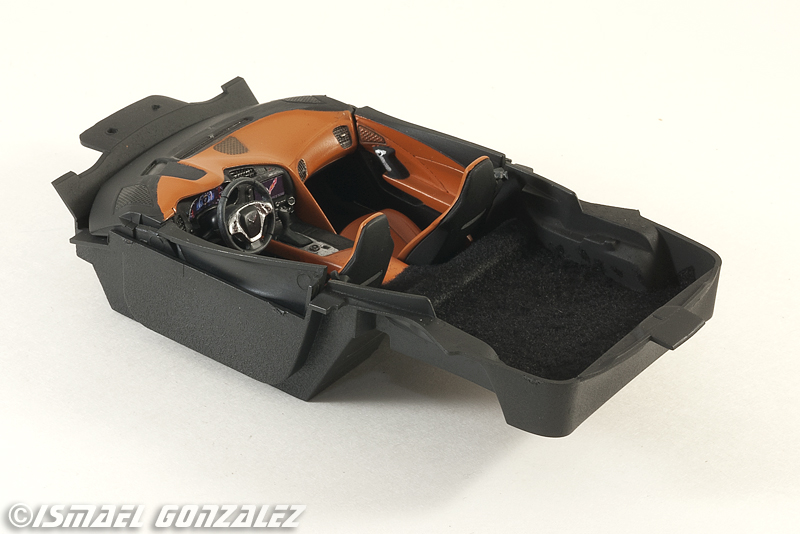
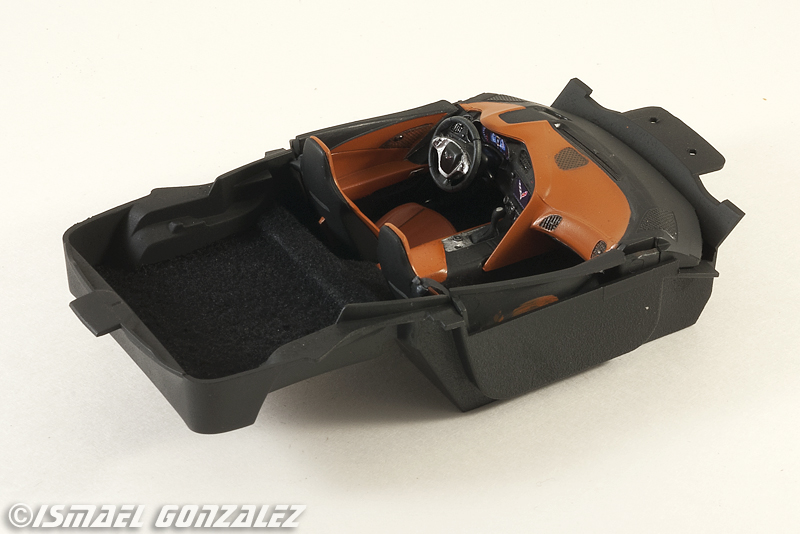
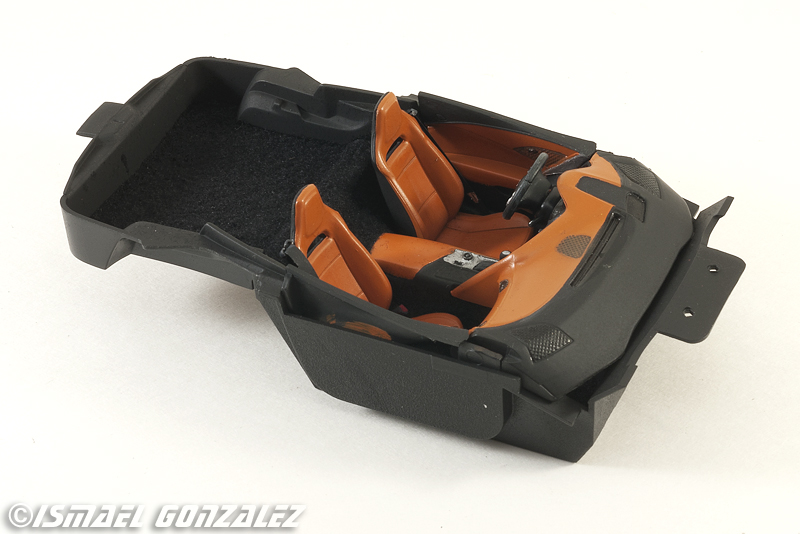
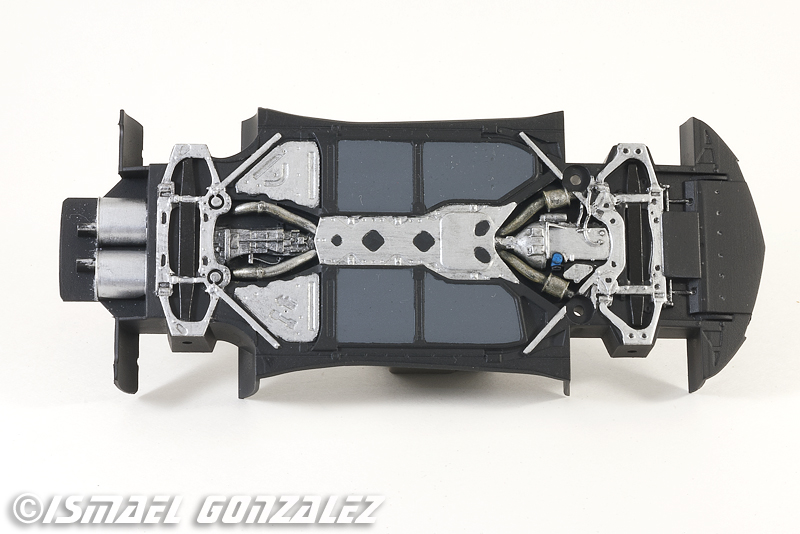
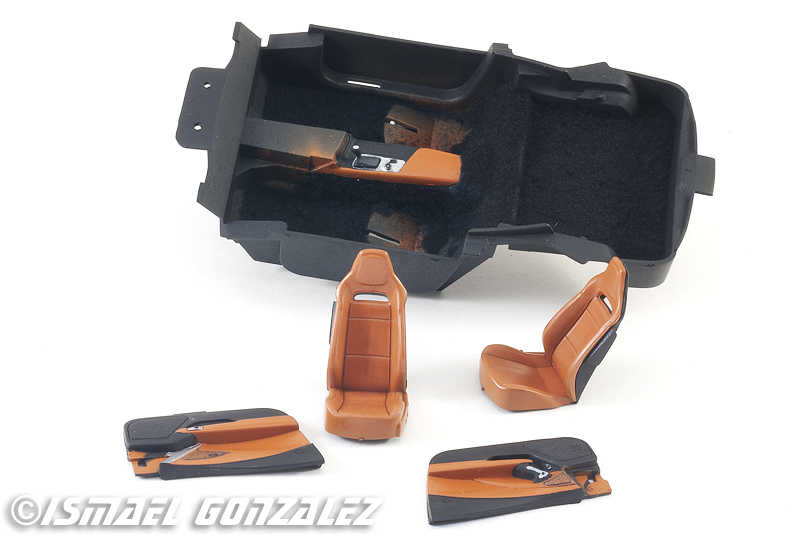
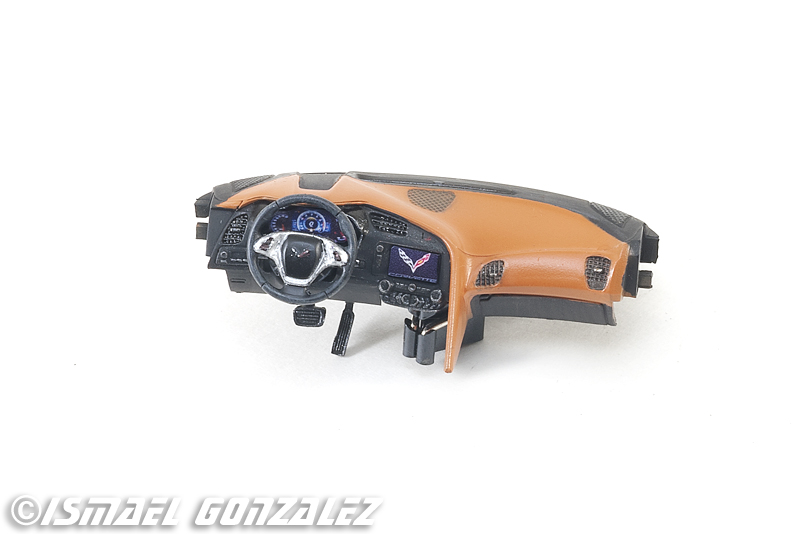
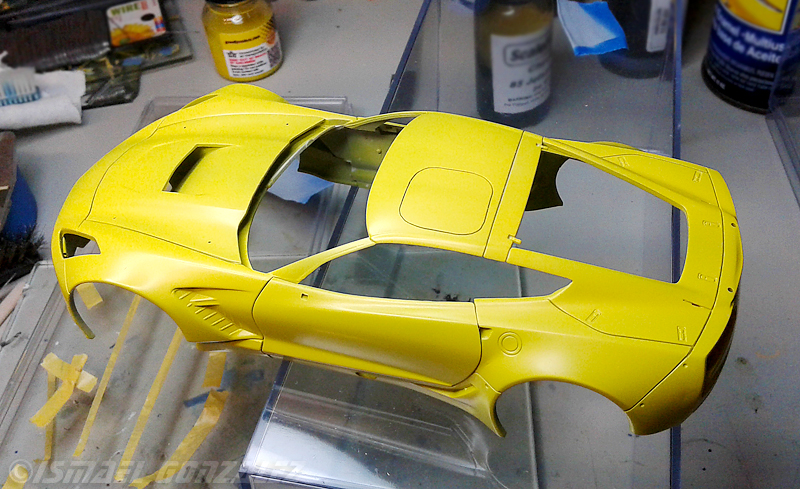
Hello, Still dealing with the aftermath of the hurricane. Some areas are still in "emergency" mode and the road ahead is long and steep. But I'm trying to get some sense of "normalcy" back. I still have no internet service at home. so doing this from the phone is a major PAIN. In the past few days, I've been working a bit on the snap 2014 C7 Corvette. This kit is a snapper on the cheap end of the spectrum. So there is not much to be expected. Details and molding are disappointing even for a snapper. The chassis is all one piece. Not much can be done with the holes for the screws. I detail paint it mostly with craft acrylics. Moving into the interior, the details and engraving are even more disappointing. I found an acrylic craft paint color called "Pueblo" which resembles the C7 Kalahari option I wanted. This was my first time airbrushing acrylic craft paint and it was harder than I thought. There is a very fine line between too dry, too wet and disastrous. The instrument cluster and the screen logo were home printed in photo paper and trimmed. I really like this interior color combo. This scheme resembles a 3LT interior option (leather covered dash, door panels etc. and suede covered steering wheel which was drybrushed with gray). Still pending are the seat belts to put together the otherwise box stock interior. The tub has black flocking. Anyways, nothing extraordinary, but it feels good to be back. Thanks,
-
Hello everybody! First things first: My models are safe. More on that later. As many of you know I live in beautiful Puerto Rico. After a brush with another hurricane 2 weeks before, on Sept 20th 2017 our lives changed forever. We got a direct hit from catastrophic hurricane Maria. This is not our first rodeo, but it has been the wildest. Strongest hurricane to visit in over a century. The amount of devastation is incomprehensible. Keep in mind, this is not a 3rd world place where 4 sticks of bamboo are called a house. Everything here is built to local, state and federal building codes emphasizing hurricane protection. But this monster was unreal. What was supposed to be a 5 hour event turned out to be a 24 hour ordeal. Freaking hurricane seems to have stopped over my house looking for directions. Max sustained winds (> 1 min) were in the 150+ MPH range, but gusts were measured at 210 MPH. The estimates are over 200,000 homes damaged, of which 70,000 completely destroyed. I have seen solid concrete houses broken and split in two. 62,000 utility poles (including wood, concrete and steel) destroyed. It is mile after mile after mile of broken poles. Four lane concrete bridges were swept away like if made of toothpicks. Everybody knew we were in for a wild ride and loose power and water. But what really took everybody by surprise, the proverbial monkey wrench, was that nobody was expecting the “Apocalyptical” collapse of ALL forms of communications. Land lines, cell phone, internet, cable providers, satellite links, Radio stations, TV, emergency two way radios, police, ambulances, 911 system… EVERYTHING was wiped out. Even the National Weather Service lost their radar so nobody knew where the hurricane was tracking. It was a new meaning to the expression “flying blind”. Forget getting in touch with your relatives when you can’t even communicate with your neighbor 3 houses down due to fallen trees. The next day, the scene was described by many as “It looks like an atomic bomb blast, without the radiation”. For many communities that became isolated, hope sounds like a Blackhawk helicopter bringing in water, supplies and help. I salute all military responders including active, Reserve, National Guard, volunteers and everybody involved. THANK YOU! I have some photos and footage. I may eventually work on a documentary on my experience. However, I would be really ungrateful if I say me and my family are in bad shape. We are better that probably 85% -90% of the population. I suffered only minor damage not even worth mentioning. Fences, trees, my old SUV lost the clear coat of the paint. It was like sandblasted! My hobby room is a concrete shed in the yard. The models were secured in a concrete closet, with 1 inch thick doors, with 2x4s anchoring the doors. This closet is inside the concrete shed with hurricane grade windows and door. Wooden roof is triple layered and I ran 4 independent steel hold down cables over it the day before. One of the cables snapped and the top layer of Ondura (like a 4’x8’ shingle) was hurt but it stood defiant and held together. I did my homework prior to the hurricane and I had all cars filled up, 400 gallon potable water reservoir with pressure pumps, 5KW generator, cash, tools, food supplies, batteries, etc. Part of my story includes doing a 6 ½ hour line at the first ATM the bank got to work. No communications imply a cash only society for weeks. Still recovering. After a few weeks, a 7 hour line at the nearest gas station. There was (is) plenty of gas supply, but distribution was affected and many gas stations were destroyed. After 35 days, I got electrical power back. After 39 days, water. But still more than 60% of the island is in darkness and there are still thousands without running water. We have been very active helping but the task is overwhelming. After 2 months, adrenaline is winding down and reality is setting in. The road ahead is long and steep. However, I must be clear: The hurricane knocked down houses, buildings, poles, bridges and trees, but not our spirit! This has brought the best of most people. Yes, we were brought to our knees but that’s how you get closer to God. We are getting back up. Yes, there has been controversy on the response at all levels: from municipalities to state to federal to Congress to the President. But please refrain to convert this into a political post. If you want something done right you do it yourself. Anyways, in my personal attempt to get some normalcy back, if there is such a thing, I’ve been back to the workbench a few minutes a day. But since I don’t have internet/cable/phone service at home yet, posting is still a challenge. Doing this from a phone is a royal pain but at least I can communicate to the outside world. Please keep us and those affected by natural disasters in your prayers. As I said it is a long steep road ahead. And a real THANK YOU to all who have helped along the way. Thanks, Ismael
-
Not as large but in direct sunlight it is quite prominent.
-
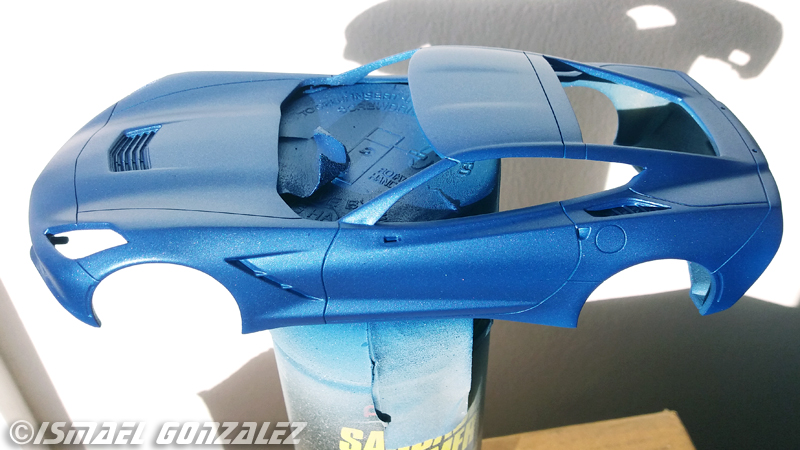
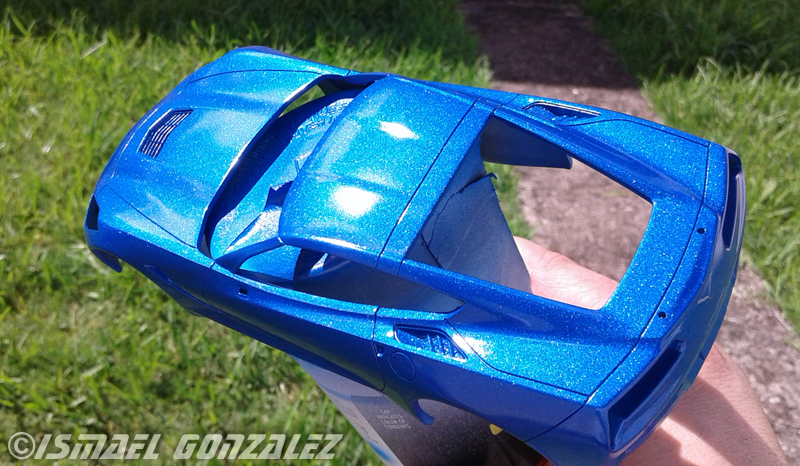
Hello, After the final color coat I applied a mist coat and a few light coats of clear. Nothing extraordinary. Then last night, I did a medium, slightly heavier coat of clear. I checked it this morning . Took it to the sun and WOW! Let's put it this way: It is so reflective it doesn't look as good in the pictures. I have finished models that don't look this good and I still haven't even looked at polishing yet. I may do one more coat of clear just to be safe then will polish carefully. Ohh! I forgot! I still have to work on the rest of the model! Unfortunately, everything has been put away due to hurricane Maria which is of great concern. Thanks,
-

Corvette C7R (Daytona winner)
ismaelg replied to ismaelg's topic in WIP: Other Racing: Road Racing, Land Speed Racers
Hello! What I hope was the last color coat. I'm mad at this stupid model, but airbrushing lacquer is sooooo satisfying..... ? Thanks, I'll let it dry for a few days before masking and painting the black areas.
-
Hello! Well, after a year, I finally got the first color coats in this a few months ago. Yesterday I lightly sanded and did what I hope are the last color coats before clear. First inspection looks good for clear. I'll inspect it again and hopefully start with the clear. I hope to finish this before the 1:1 get "Classic Car" plates Thanks,
-
Love it!
-
Corvette C7R (Daytona winner)
ismaelg replied to ismaelg's topic in WIP: Other Racing: Road Racing, Land Speed Racers
Hello? Anybody here? Hi! After 7 months, I finally got some workbench minutes. Why I keep fighting this stupid model is beyond me. Maybe I don't want to be beaten by a chunk of plastic. So Anyways, the repairs on the roof were not that smooth. The only way to fix it was sanding down to the primer and leave a huge ugly primer spot. This is how it looks after 2 or 3 light paint coats. So after careful sanding and prep I started applying light coats. I lost count but there are more than 10-12 coats here. It is getting there. I'll let it dry. I plan to do maybe a final color coat on the whole car before masking for painting the black. The more I work on it, the farther the finish line looks... Stupid model Thanks,
-
WOW! What a gorgeous build! Thanks Robert for telling me about this. I'm so glad to see my beloved hobby is in good hands! Thanks,
-
Hello, I'm still mad at the C7R so in the meantime: I don't want to depart too much from the original concept... Thanks,
-
Corvette C7R (Daytona winner)
ismaelg replied to ismaelg's topic in WIP: Other Racing: Road Racing, Land Speed Racers
Hello, Took the masking off and it is looking better than I expected. I need to put a few more coats to the whole car to ensure uniform coverage. Hard to see in the pic but some areas are still a hint darker than others. Thanks,