ismaelg
-
Posts
3,717 -
Joined
-
Last visited
Content Type
Profiles
Forums
Events
Gallery
Everything posted by ismaelg
-

Jet Sweep X5: 1/64 Jet car Resto-Mod **FINISHED**
ismaelg replied to ismaelg's topic in Diecast Corner
STOP ME!!!!!! Not yet installed, but this is what's going on..... The vertical struts will also support parachute tubes. Thanks,
-
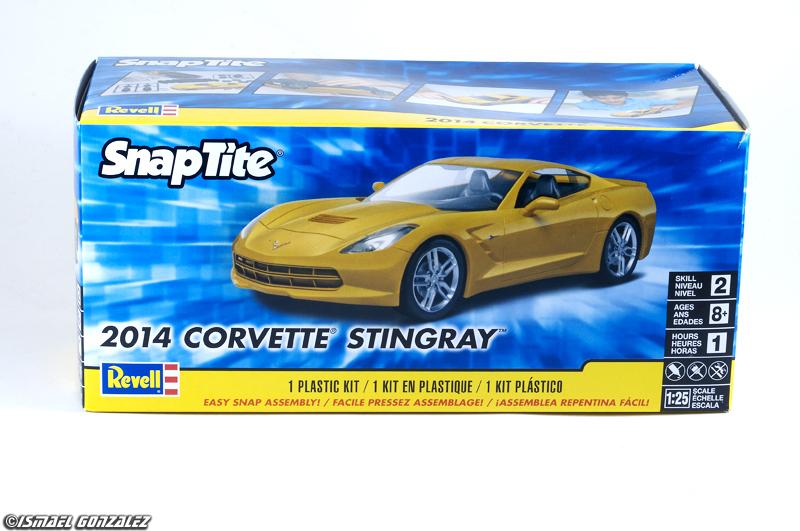
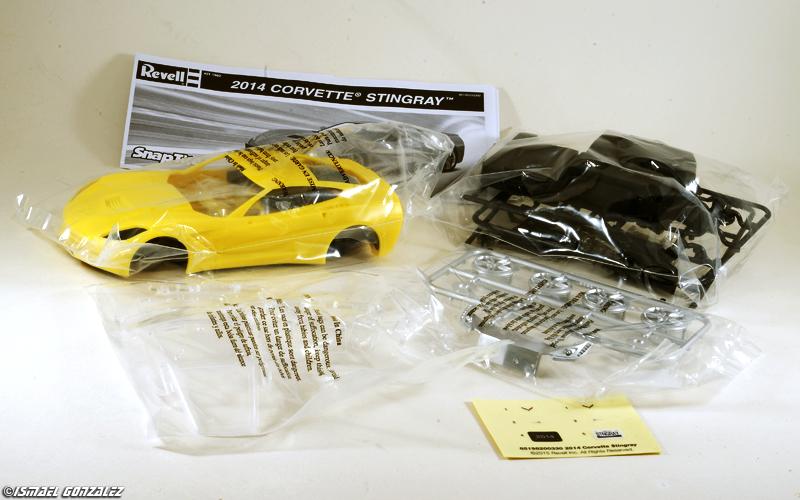
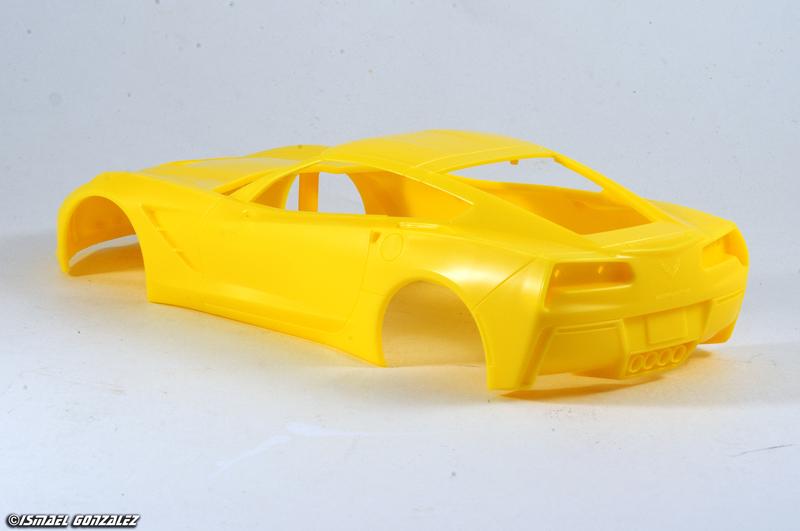
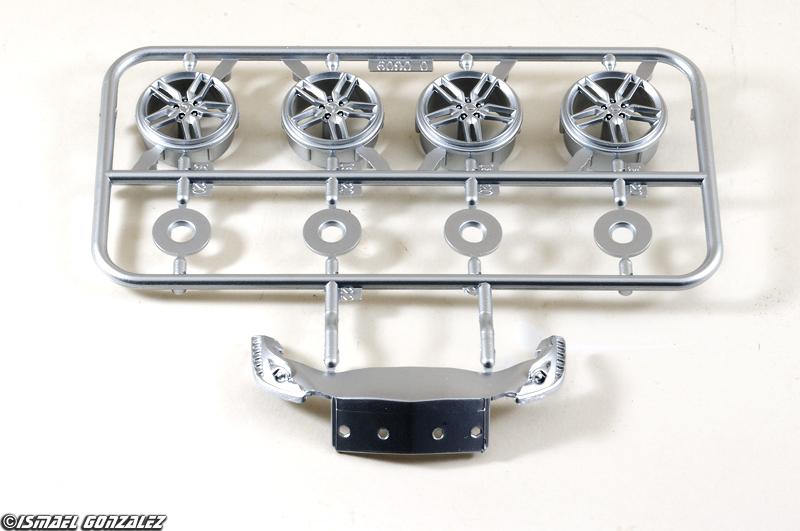
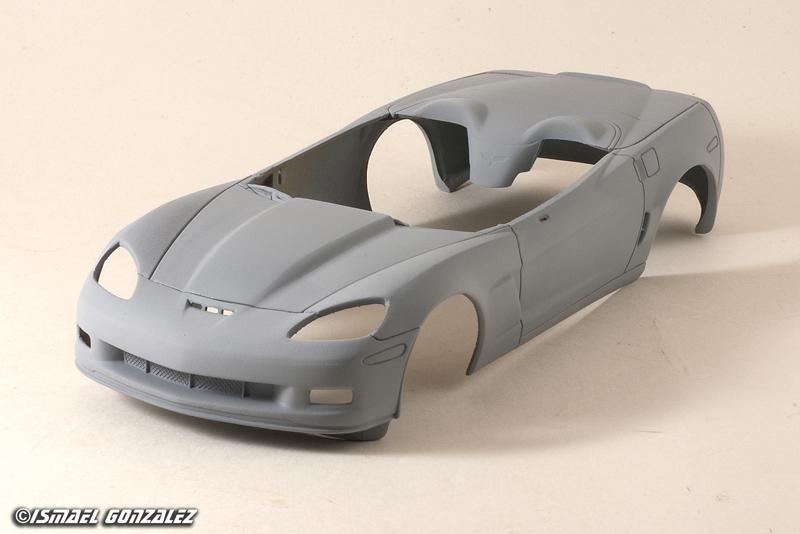
Hello, After more than a year late, Revell has finally started releasing the C7 Corvette kits. The first one out is the SNAP version seen here. The box is the small one. Mine came in the mail a bit crushed but the content was OK. Less than 40 parts. The emblems are vinyl stickers, not decals. Keep in mind, this is a snapper oriented at "almost instant gratification" to kids and first time builders. Do not expect decals or anything that may seem "complicated" Body looks good. Again, don't forget this is a snapper so most details are molded in (grilles ,exhaust, etc.) As expected the one piece chassis has some engraved detail. The interior is fairly basic with adequate detail but there is no provision for instrument decals. Again, did I mention this is a snapper? Finally, the wheels look decent. Tires are nothing to write home about. But my biggest disappointment is the lack of brakes. I know, metal axle snapper so you don't want to see calipers rolling along, BUT..... In conclusion, it should be a fun exercise until we get the more detailed version with engine, brakes etc. Now, one in Laguna blue, one in Cyber Grey and the third in........ hmmmmmm let me get back to you on that..... Thanks,
-
Revell Pre-Finished Series 2014 Corvette Stingray
ismaelg replied to Exotics_Builder's topic in Car Kit News & Reviews
The snap C7 is out. REPEAT: THE SNAP C7 IS OUT! This is NOT a drill. Just ordered by mail........ Thanks, -
Jet Sweep X5: 1/64 Jet car Resto-Mod **FINISHED**
ismaelg replied to ismaelg's topic in Diecast Corner
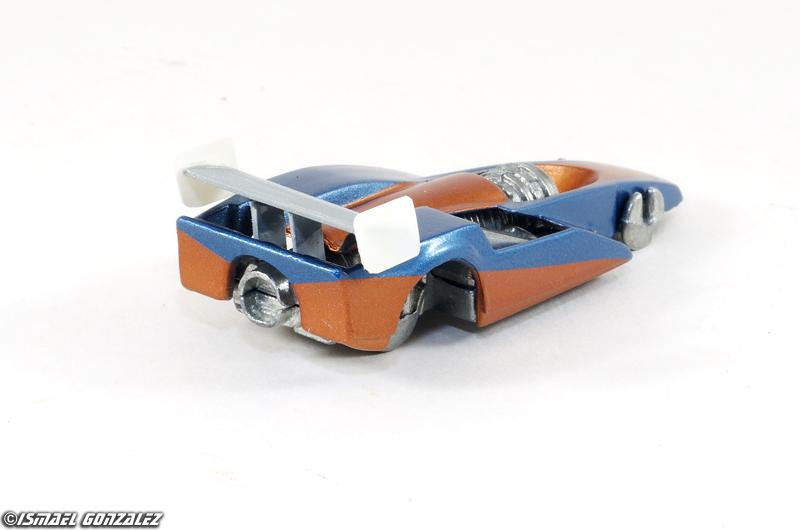
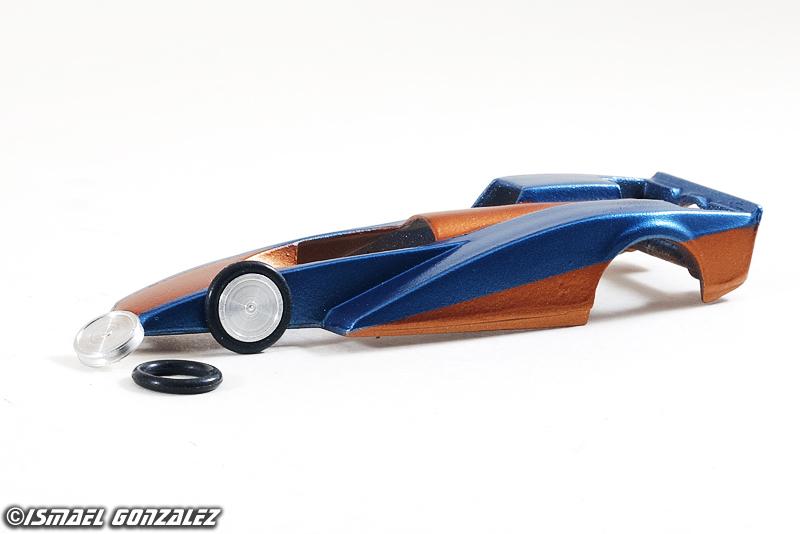
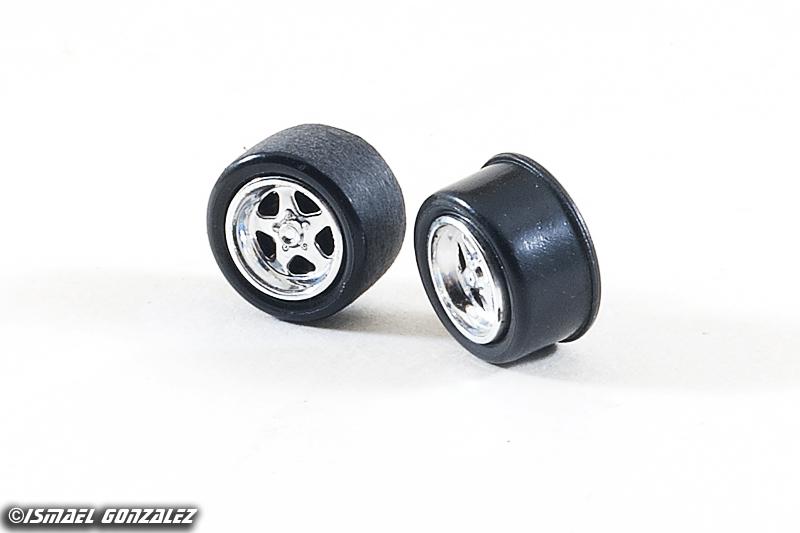
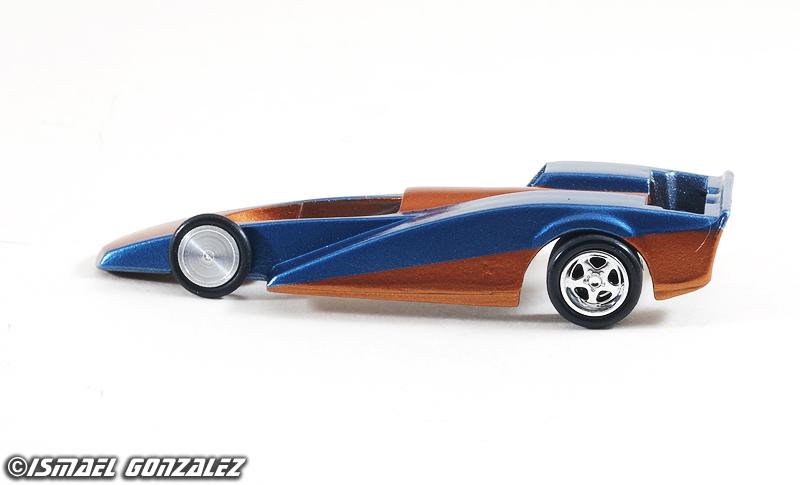
Thanks! Bill, that is aluminum turned in my mini-lathe. Now, STOP ME before I hurt myself! I machined these front wheels from aluminum to use a small O ring as tires. Then I reworked some parts box tires for the rear. reworked tire on the left, still untouched on the right. And a little mockup test: I may paint the rear wheels to tone down the chrome a bit. Keep in mind this is 1/64 ... Thanks,
-
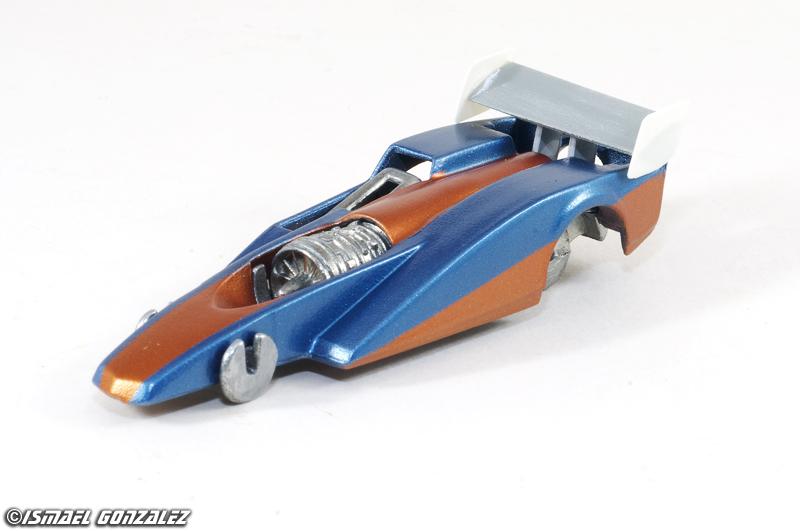
Hello! I've always been fascinated by jet and rocket powered Hot Wheels cars. My Hot Wheels collection is always growing and can be divided in 4 major categories: Corvettes, Ferraris, Jet/Rocket Cars and everything else. You may remember my Jet Threat II "resto-mod" from before. The Jet Sweep X5 is a Larry Wood designed jet car from 1985 and it seems it was only released twice. The original spectraflame olive color and the second unpainted release in 1986-87. I found this little worn puppy all alone in ebay and had to rescue it. It's missing the canopy and the rear spoiler. Axles are bent and the paint in the Ultra Hots wheels is a bit worn.... PERFECT subject for a Resto-Mod..... It is all metal so I disassembled and stripped it. The body was sanded and sprayed with automotive primer. After sanding the primer, it was painted Corvette Atomic Orange. It was then masked for a second color: Cadillac Pelham blue. While these are not the Gulf Colors nor it's scheme, it was nonetheless inspired by it. The nailbiting and nervewracking process of removing the tape was a success. Only minor touchup will be needed before clearcoating. And that is where I am as of now with the body. The base and engine hold the body together and I didn't want to bother much re-engineering it so it was left as is. However, the gap is ugly so I machined a simple turbine cone to hide the seam. I think it came out better than I expected. The inside will be painted black to hide it. Here is a mockup of how it's coming along: Still a long way to go but slowly getting there. Still pending the canopy and spoiler that have to be scratchbuilt and I'm not decided yet on what to do with the wheels/tires.... I hope to post more updates as I move along. What do you think? Thanks!
-
After countless hours of fine tuning I think it is ready for next step. Primer has been applied. Next step is to sand the primer and check for any imperfection before paint!!! By the way, during the process, the molded grille was cut out...... Like my other project, I feel as if it were finished! What do you think? Thanks,
-
2013 60th Anniversary Corvette 427 Convertible
ismaelg replied to ismaelg's topic in WIP: Model Cars
Here is a comparison with the in-progress Grand sport that has the regular hood. Thanks! -
2013 60th Anniversary Corvette 427 Convertible
ismaelg replied to ismaelg's topic in WIP: Model Cars
Finally! Body mods are done and primer was applied to the entire model. Now a light sanding of the primer and ready for paint! Thanks!
-
Revell Pre-Finished Series 2014 Corvette Stingray
ismaelg replied to Exotics_Builder's topic in Car Kit News & Reviews
Haven't heard anything yet. No sign of release. However, this showed up........ Z06 anyone? Anyone has any additional info? Thanks,
-
2013 60th Anniversary Corvette 427 Convertible
ismaelg replied to ismaelg's topic in WIP: Model Cars
Getting there! Just a hint of fine tuning for symmetry purposes........ Thanks, -
Hello, I'll be in Houston next week on meetings and the following week in El Paso. Not much spare time with a busy schedule but just in case, any good hobby shops in those areas? Thanks,
-
John Greenwood (1944-2015)
ismaelg replied to RancheroSteve's topic in General Automotive Talk (Trucks and Cars)
RIP John Greenwood. A true car guy and racing ambassador. The name brings memories of wild wide-bodied cars in the late 70's and 80's. -
2013 60th Anniversary Corvette 427 Convertible
ismaelg replied to ismaelg's topic in WIP: Model Cars
Getting there! This is how a week or so of 2 minutes a day passes look like Still needs to be thinned on the sides but going in the right direction. Thanks, -
Revell Pre-Finished Series 2014 Corvette Stingray
ismaelg replied to Exotics_Builder's topic in Car Kit News & Reviews
I know. I'm just happy to hear they even mention it. Z06 and C7R would be nice. I don't know how successful it was in sales, but I loved the C6R kit philosophy: easy enough for the casual builder, child or beginner, but good enough to be used as a foundation for a great project. Thanks, -
Revell Pre-Finished Series 2014 Corvette Stingray
ismaelg replied to Exotics_Builder's topic in Car Kit News & Reviews
THANK YOU!!! I'm getting convinced that the promo is not related to Revell at all. C7R? Thank you Revell for getting me back into the hobby Thanks, -
Revell Pre-Finished Series 2014 Corvette Stingray
ismaelg replied to Exotics_Builder's topic in Car Kit News & Reviews
Question for Tim, Gerry, Bob and those who has seen the Revell parts board display of this model: Do you have any pics or recall how the tail lights and the back of the model are? I ask because I'm trying to establish if the promo is related to this, but the chassis in the promo is completely different to what is shown in these pics. The promo is held together by 2 screws in the centerline of the almost flat chassis. That would suggest the body mold itself is different. It also seems the promo doesn't even have brakes. Could it be that the promo is made by somebody else? Thanks! -
2013 60th Anniversary Corvette 427 Convertible
ismaelg replied to ismaelg's topic in WIP: Model Cars
Thanks! This is still a bit oversize and "edgy". The idea is to file and sand it down to shape. Almost there now..... Thanks! -
Revell Pre-Finished Series 2014 Corvette Stingray
ismaelg replied to Exotics_Builder's topic in Car Kit News & Reviews
Any update on this release? I've seen closeup and detail shots of the promos. Are the promos based on this mold? If so, I'm a bit underwhelmed, in the tail lights and vents.... Thanks, -
2013 60th Anniversary Corvette 427 Convertible
ismaelg replied to ismaelg's topic in WIP: Model Cars
May not look like much but there is a lot of work here. Still quite far from done but moving in the right direction..... -
2013 60th Anniversary Corvette 427 Convertible
ismaelg replied to ismaelg's topic in WIP: Model Cars
Thanks! As for the wheels I'm still exploring a few options including some Aoshima candidates..... Thanks! -
2013 60th Anniversary Corvette 427 Convertible
ismaelg replied to ismaelg's topic in WIP: Model Cars
Hello, Modeling bench time has increased from 3 minutes a month to almost 5 minutes a month! Still quite far from my glory days of modeling but I'll take it. Moving along in this project, I would love to finish the hood mods as soon as possible but this has proven to be quite a challenge. Countless passes done and countless still pending, but at least moving in the right direction. What do you think? Thanks, -
2013 60th Anniversary Corvette 427 Convertible
ismaelg replied to ismaelg's topic in WIP: Model Cars
Hi Ben, Sorry for the late reply. I use the superfine Milliput. I've found that smaller quantities work better for me than a larger batch. I mix equal parts of each, about the size of an aspirin tablet each. I wet my hands and mix it pressing against each other and making a flat disk, like a pizza dough. Fold it over itself and press and repeat many, many, many, many, many, many, many, many, many, many, many, many, many, many, many, many, many, many, times. Since both parts are similar color in the superfine Milliput, it is hard to tell if they are properly mixed by just looking at it. So I just do it many times. Then I usually roll it and make a long and thin log. All of this while still wet. I apply it to the area and press it to rough shape. At this point it is still a bit sticky. After about 10~15 minutes I try to get it closer to final shape with a wet flat toothpick. I then usually leave it alone until the next day (in my case, it could be the next decade...). It should be rock hard by then. Keep in mind I live in the hot tropics, so I'm not sure if that affects the curing speed. Only after it is rock hard I start to file and sand it, checking progress with primer along the way. Primer has clogged my files and sandpaper more than Milliput itself. Hope this helps! Thanks, -
2013 60th Anniversary Corvette 427 Convertible
ismaelg replied to ismaelg's topic in WIP: Model Cars
Let the mess begins... or should I say, continue...... Milliput superfine white, the first of many passes..... Thanks! -
2013 60th Anniversary Corvette 427 Convertible
ismaelg replied to ismaelg's topic in WIP: Model Cars
Hello again! OK Let's see: 12 minutes of workbench time in 4 months: That averages to 3 whopping minutes a month! Combine that with a slow builder and I think I can finish this right about the time the real car gets antique car plates... Anyways, The 427 convertible uses a factory hi-rise hood, similar to the ZR1 hood but without the window. This hood was first offered as a Z06 option in 2012 (Option B92). The option was also available in 2013 (Z06 only as the previous year). All 427 convertibles had this hood. Having this been a full detail model, I would have used a ZR1 hood and fill the window (hint for a future project). But since this is a curbside I'll just add material to the hood. The plan is to get it close to shape with styrene and then finish it using Milliput. So at this rate this may only take a few more years before it is ready for primer.... Thanks, -
Revell Pre-Finished Series 2014 Corvette Stingray
ismaelg replied to Exotics_Builder's topic in Car Kit News & Reviews
I've been away from the hobby for a while so I'm not up to speed on news. Any updates on this kit? The promos were finally released. I assume the tooling is the same.... Thanks,