.JPG.c40cb340e0d081bb679636013824f0f4.JPG)
Brent
-
Posts
199 -
Joined
-
Last visited
Content Type
Profiles
Forums
Events
Gallery
Everything posted by Brent
-
.JPG.c40cb340e0d081bb679636013824f0f4.thumb.JPG.9fbd3527528a648bf878012e7a872a72.JPG) Thanks again for your comments. I was told it did make it to Russia in one piece.
Thanks again for your comments. I was told it did make it to Russia in one piece. -
Thanks everybody. Really appreciate the comments. The 1/24th scale snowmobiles are extremely hard to find. I've been watching on Ebay and nothing ever comes up.
-
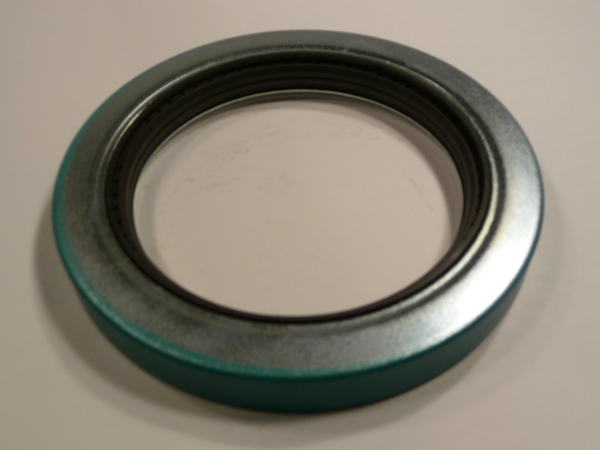
I have done my share of scratch build suspensions including all sorts of shocks. I have used springs from pens which do work. I currently am working on a stadium truck with functional suspension. I used pen springs for this one and IMO are a little flimsy looking. Another approach is go with the Nitrogen filled shock look. I did this on a Baja I built. I used pen springs for the front and Nitrogen filled duals on the back. I recently came across something while working. I was replacing a huge seal (I am a service technician) and inside the seal is a spring. I brought this seal home removed the spring, cut it in half and stretchered it. It looks fantastic! Wheel seals will have the same spring. Different sized wheel seals will have different sized springs inside.

-
Great idea!!!
-
Fantastic tutorial. I LOVE using Soldier for headers and exhaust. Now for turbos ;-). I'd like to add one thing to your fantastic tutorial. You recommended lead based soldier and I totally agree with this. For anyone that does not know they types of Soldier available you can buy an Acid Core soldier. This Soldier has an acid center to it to aid in soldiering. I have seen builders remove the acid core center and use it, I have also personally super glued the ends closed to seal the acid in. One or the other MUST be done or over time the acid will creep out and start to corrode and leave a mess of your project. To avoid this just buy Lead based Soldier as 426-Hemi has recommended. I just wanted to make everyone is aware of the Acid core soldier so no one has a bad experience and wreck their project.
-
Finished product!!! A display case was custom made and plaques to finish it all off. A video clip of them opening the gift. THEY LOVED IT!! At the end you can see him put his hands up, I was told he was welling up. Randal says "I didn't know I was going to get that reaction". Click on the link to view video clip. http://i21.photobucket.com/albums/b267/HHighfly/models/Russian%20Sled%20Trailer/th_Russiantriailerreaction_zps065d856f.mp4 Needless to say I was very honored and proud to be a part of this. I made a CD of all the pictures of the the build up and added a message from the builder. I was told the gift made it back to Russia in one piece.
-
Superclamps and Superglides installed. Almost completed. Superclamps went to a Automotive shop that does full 1:1 scale wraps. They made us up a wrap for the trailer.
-
Building the frames.
-
As soon as I checked out the pictures I knew I had to go for it. Some additional searching on the internet showed me some more details of how it opened up and tilted. Here are some in progress pictures of the build. He wanted three trailers. One for himself, one for his business partner and one for his Russian distributor. I wont bore you with the truck build up.... Started with the trailer sides. Sorry for the bad coloring, didn't have the white balance set correctly. I'll let the pictures do the talking......
-
I posted some pictures of my deck on a Snowmobile forum I frequent and Superclamps (The manufacturer) saw my post. He went crazy seeing his product reproduced in 1/24th scale and approached me. He wanted the model in the worst way and made me an offer I could not refuse. Him being a collector of snowmobile die cast toys he had a pile of the 1/24 scale sleds, the same ones I had so he added another one to the sled deck. Before I turned the truck and deck over to him I changed the deck to balsa wood and added his Superglides to the deck. Here is the finished product. I added sectionalized pieces to the ramp as well, Same as the 1:1 product would be. The Balsa wood really highlighted the Superglides. Some time went buy and Superclamps approached me and said. "I have a distributor in Russia that I went over to visit recently. They treated me like royalty while over there. I have invited them to Canada for Christmas (Russians do not celibate Christmas) and want to have a Canadian Christmas that they will never forget. The Russian distributor also builds and sells a single covered sled trailer, could you reproduce the sled trailer and build another truck for me to give to him as a Christmas gift."? I wasn't sure what I was getting into but said shoot me some pictures and I'll let you know. Here are the pictures he sent me.
-
A long story about this build. It all started with a 1/24th die cast snowmobile I had. I built a sled deck for a Chevy truck I had built. I added some products to the deck that I had on my 1:1 sled trailer called Superclamps www.superclamp.net/ This is the original build. Some pictures of the 1:1 sized Superclamps and you can also see the Superglides on the deck (they protect the wood deck from the skags on the skies)
-
A few I have, Keep them coming!!!
-
Thanks for your comments guys. Wku88. I took a long bolt with an assortment of washers and squished the tire between the washers. Mount that in a drill and spin at high speed with a medium grit sand paper. The grit of sand paper has to be fine enough that it doesn't sand all the rubber away yet not too fine or it wont do anything. You basically want to replicate high speed and friction just like the real deal. Wear a glove and be very careful you do not burn yourself or get your glove caught while holding the sandpaper. Here is another one I have done the same way.
-
This was my first time working with a Resin body. Used the Winged Express kit for chassis and cut out the side panels of the frame, not sure why, just to be different I suppose. Shoe horned a Ross Gibson McGee Quad cam engine in it. Not sure how manageable it would be to get down the track with that short wheel base. She would be one wild ride that's for sure.
-
IMO the 36 Hp shroud looks the best out of all the shrouds. Good call using it.I'm using the same in my Buggy.
-
Out standing!!! Did you get my email???
-
Awesome builds JT!!! My Dad had his drom set up with a gas generator (generator sat under the sleeper of the truck center of the frame) If you look at the truck you can see a smaller fuel tank. This was a gas tank. That tank would last an entire trip across Canada. It was a pretty cool set up. The drom had a false wall and floor and had electric heat. He had a squirrel fan set to push the air through the false wall and floor which allowed heat to be circulated through out the drom. With the Canadian winters customers could not take their plants or canned goods etc. Anything that would freeze had to be left behind. This "Heated" service was well received and was very popular. The big reef on the side of the drom was his National Van foreman of the year award. He won many provincial Van foreman awards but the National one was a pretty cool deal. In the summer months he would remove the false wall and floor. He could fit one small sized apartment of furniture in the drom. He sometimes had front axle weight issues depending what he had in the drom. He came up with the idea of installing a solenoid so he could dump the air out of the rear air bags on the back axle. As he rolled up to the scale he'd flip a switch and he could pick up 1000.00 LBS off of the front axle LOL. Sneaky LOL Another job I had was keeping all that Aluminium polished up. Back then all you had was the bar type polish and you had to work at it. The products available now make it soooo easy. (I have a snowmobile I keep polished up). I wish the products were available back then. Would have made life much easier. He'd be back for a few days and have to take off again right away. Sometimes I'd only get half the truck done. As long as it was the drivers side he was happy LOL. That was the side he saw most.....
-
Not the merlin but might get the juices flowing
-
Not the best pictures but this was my Dad's rig. Had many of good times going across Canada with him during summer breaks. Worked darn hard but was paid well. I bought the blue pickup (was totally stock) and by the time I was 17 I had it the way it looked here. I miss both trucks a lot!!! The Eagle was running a 8V silver 92 . For a while had straight pipes. With that long exhaust it was music to the ears.
-
Thanks again guys!!
-
CARtoons....55 Chevy Bel Air w/ Blown 1/16 HEMI (ALL DONE!)
Brent replied to Kennyboy's topic in Model Cars
Man this brings back some great memories. Awesome build. -
PM sent!! I am a HUGE VW guy. I own a 1966 Fiberglass dune buggy that I built myself and had an off road rail for years!! Have built many 1/25 VW. Wanting to do a high detailed build but could not get myself to part out a Enthusiast Fujimi Porsche kit.
-
Top Sportsman/PM '66 Chevy II Nova
Brent replied to Mister Twister's topic in WIP: Drag Racing Models
This thing is insane!!! -
That paint!!!!
-
Thank you all! This is great motivation to keep me at the bench and starting another project. The color is 1833MCA White Lightning Testors One coat Lacquer (rattle can). I went to go buy a similar paint in Tamiya but my local hobby shop had very poor selection in the Tamiya. SO, I thought I'd try the Testors. Had I read the can "One coat" this would have helped. I grabbed the can shook the heck out of it. Placed it in warm water for a bit as I do with my Tamiya paints (To increase the pressure slightly) and started what I thought was laying down a light mist coat. Was hard to see painting over a white primer. Before I realized what was happening the paint slid bad on me. I was about to abandon the project as I wasn't going to go down the road of CSC bath and start all the body work again. Man that paint came out like a fire hose. "One coat" ..... OK I get it now LOL. I let it dry good and started to sand the runs out of it.Re primed and went at it again, A little wiser this time