The Brush
-
Posts
265 -
Joined
-
Last visited
Content Type
Profiles
Forums
Events
Gallery
Everything posted by The Brush
-
Thanks for the comments, much appreciated
-
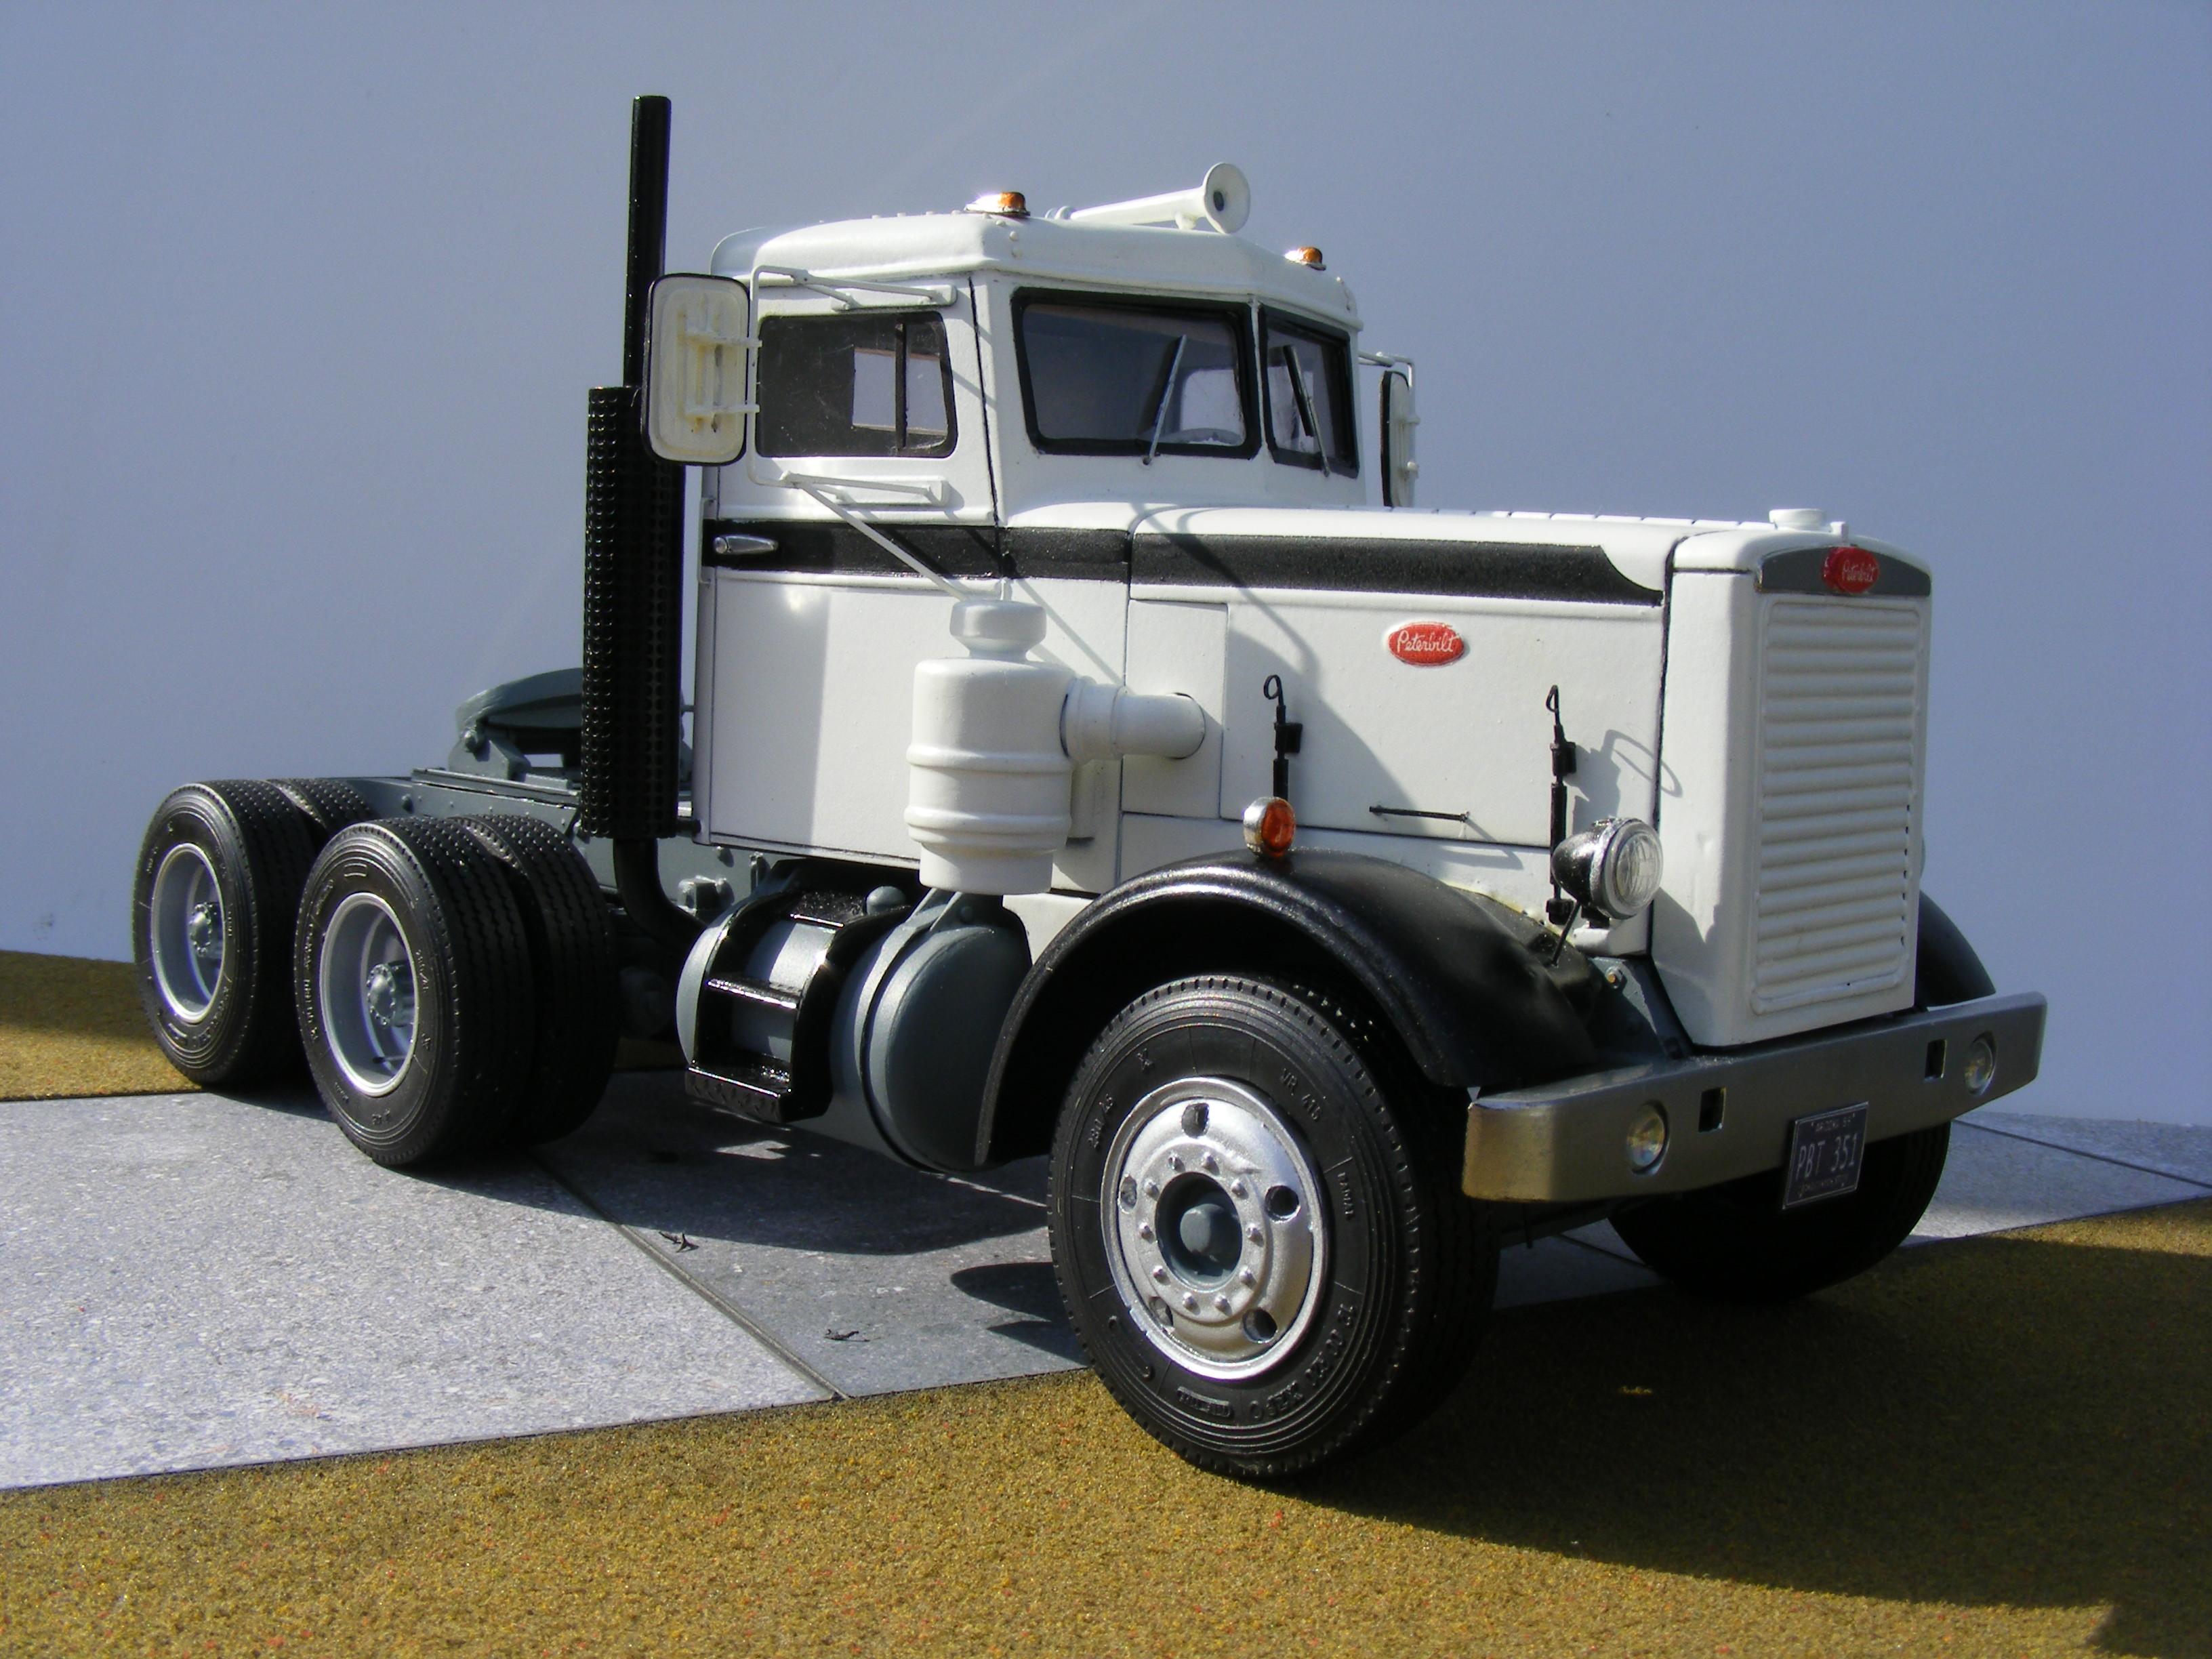
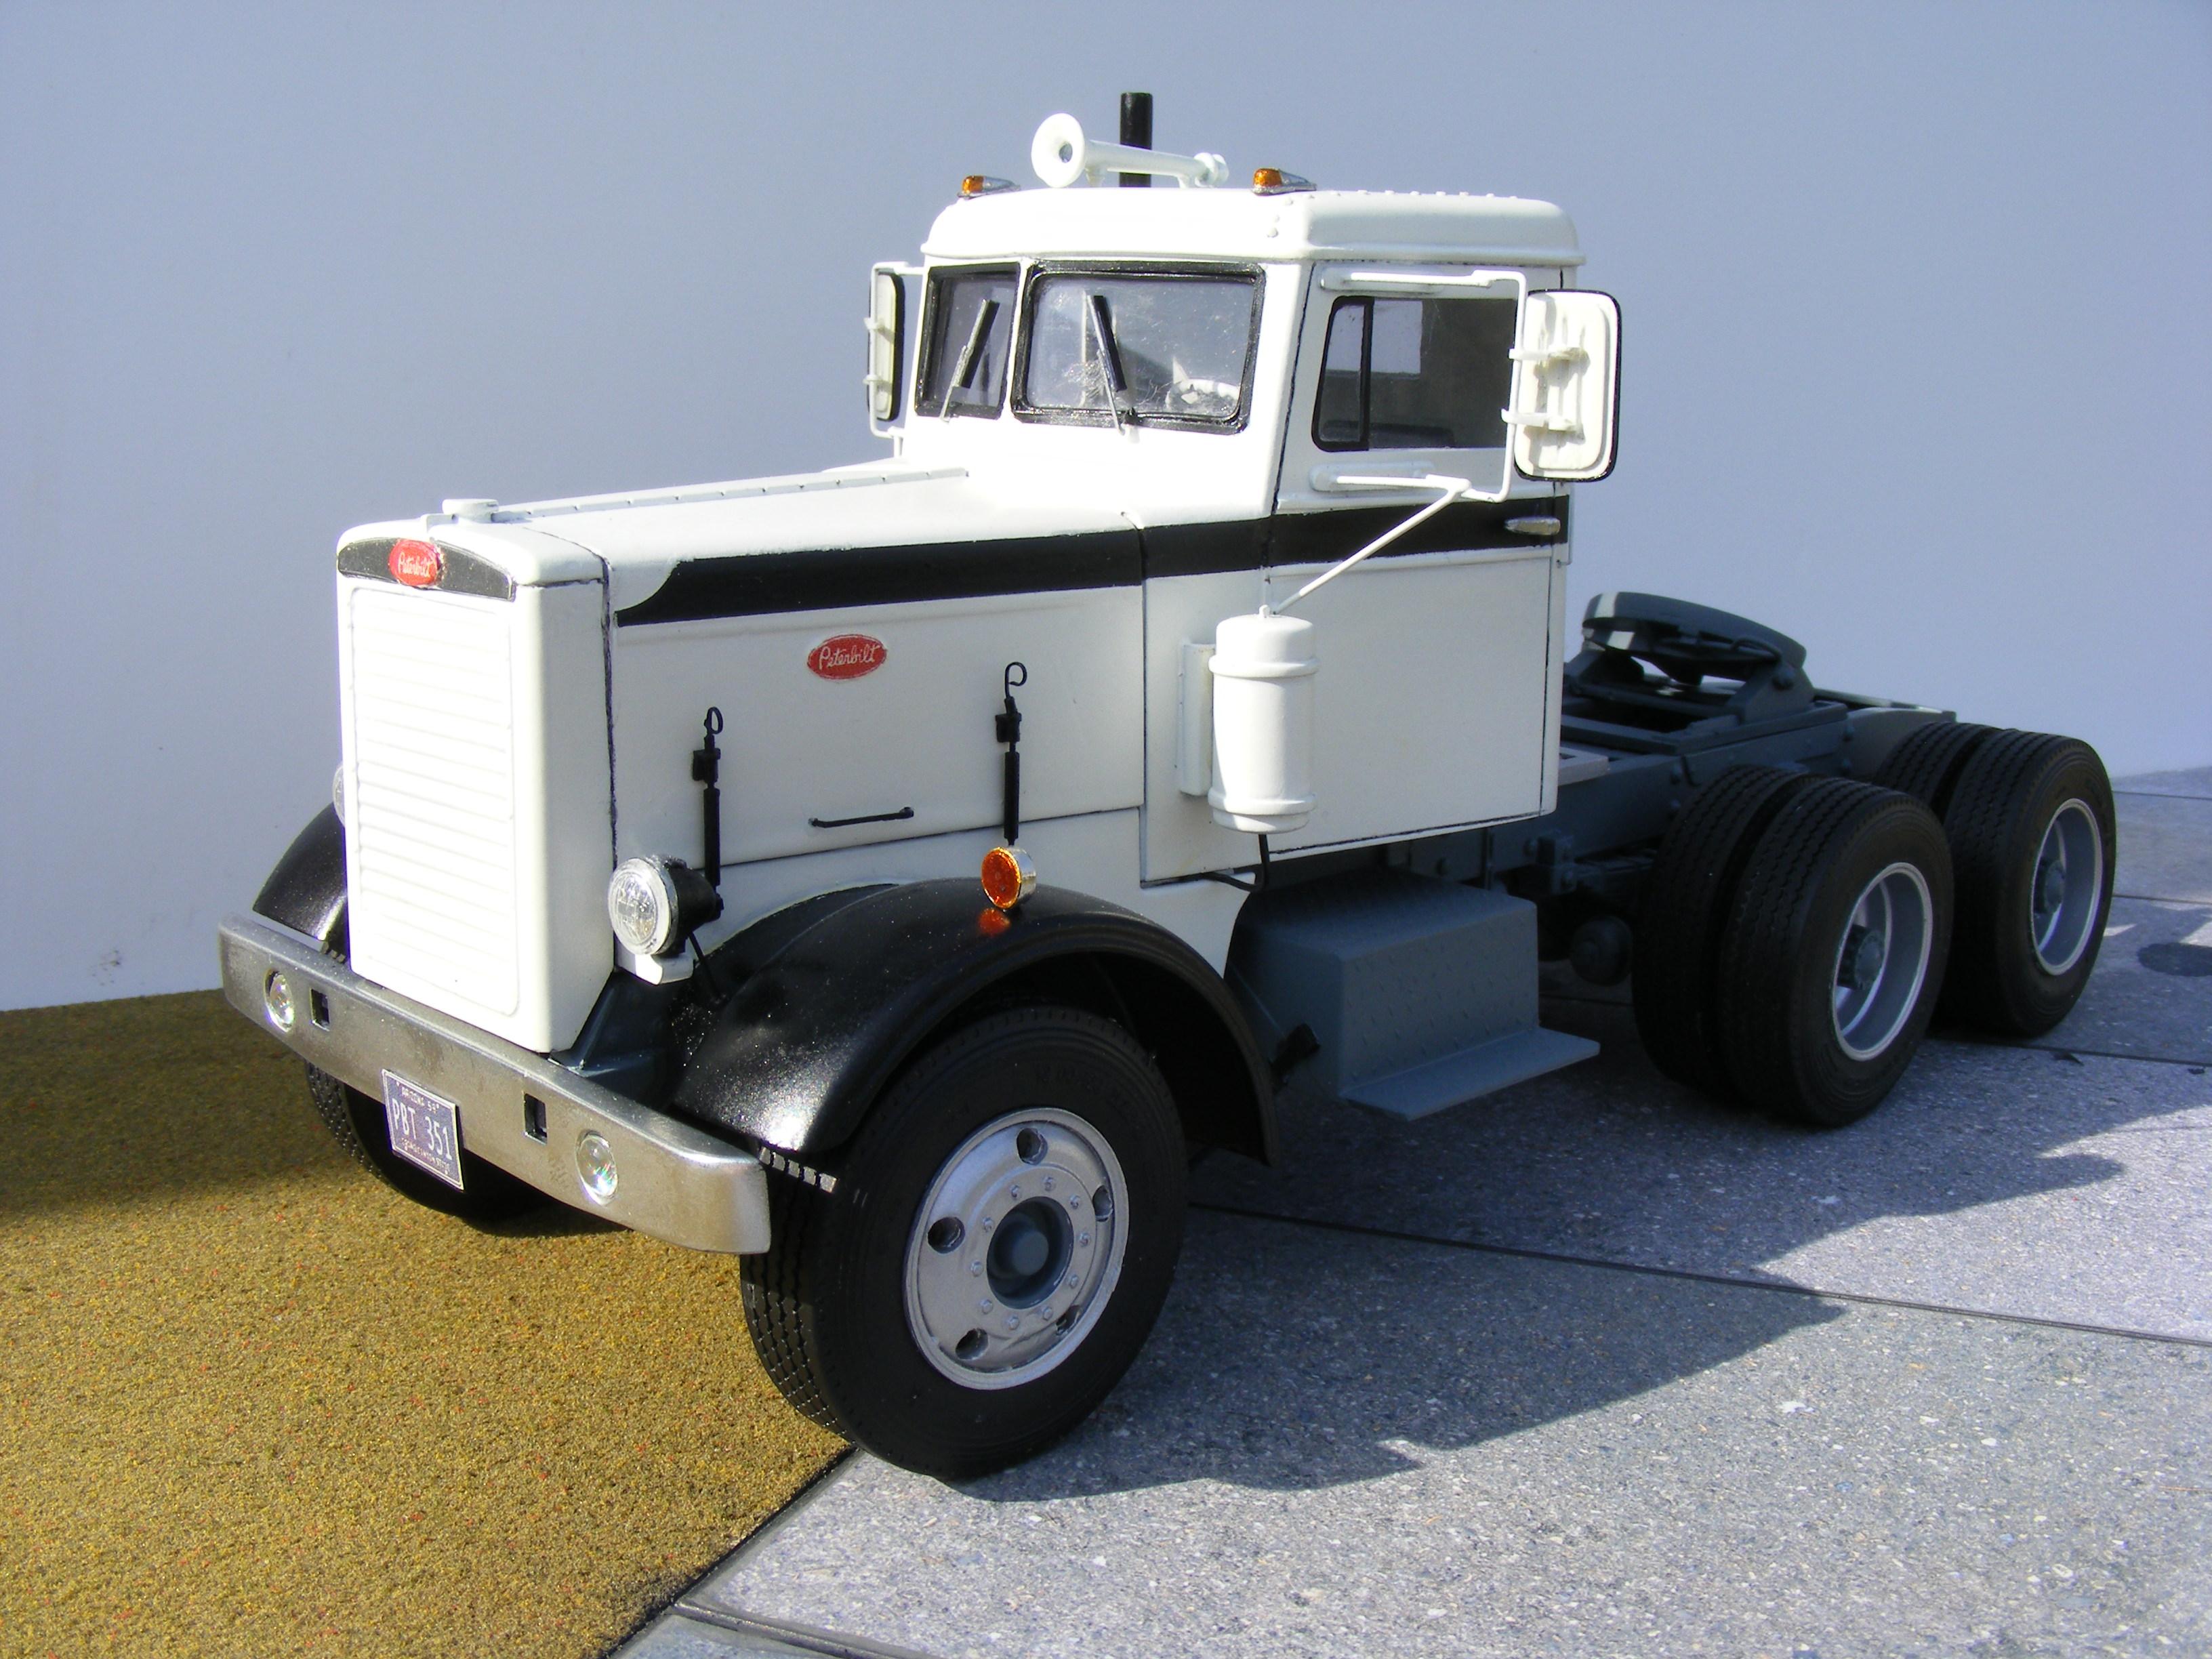
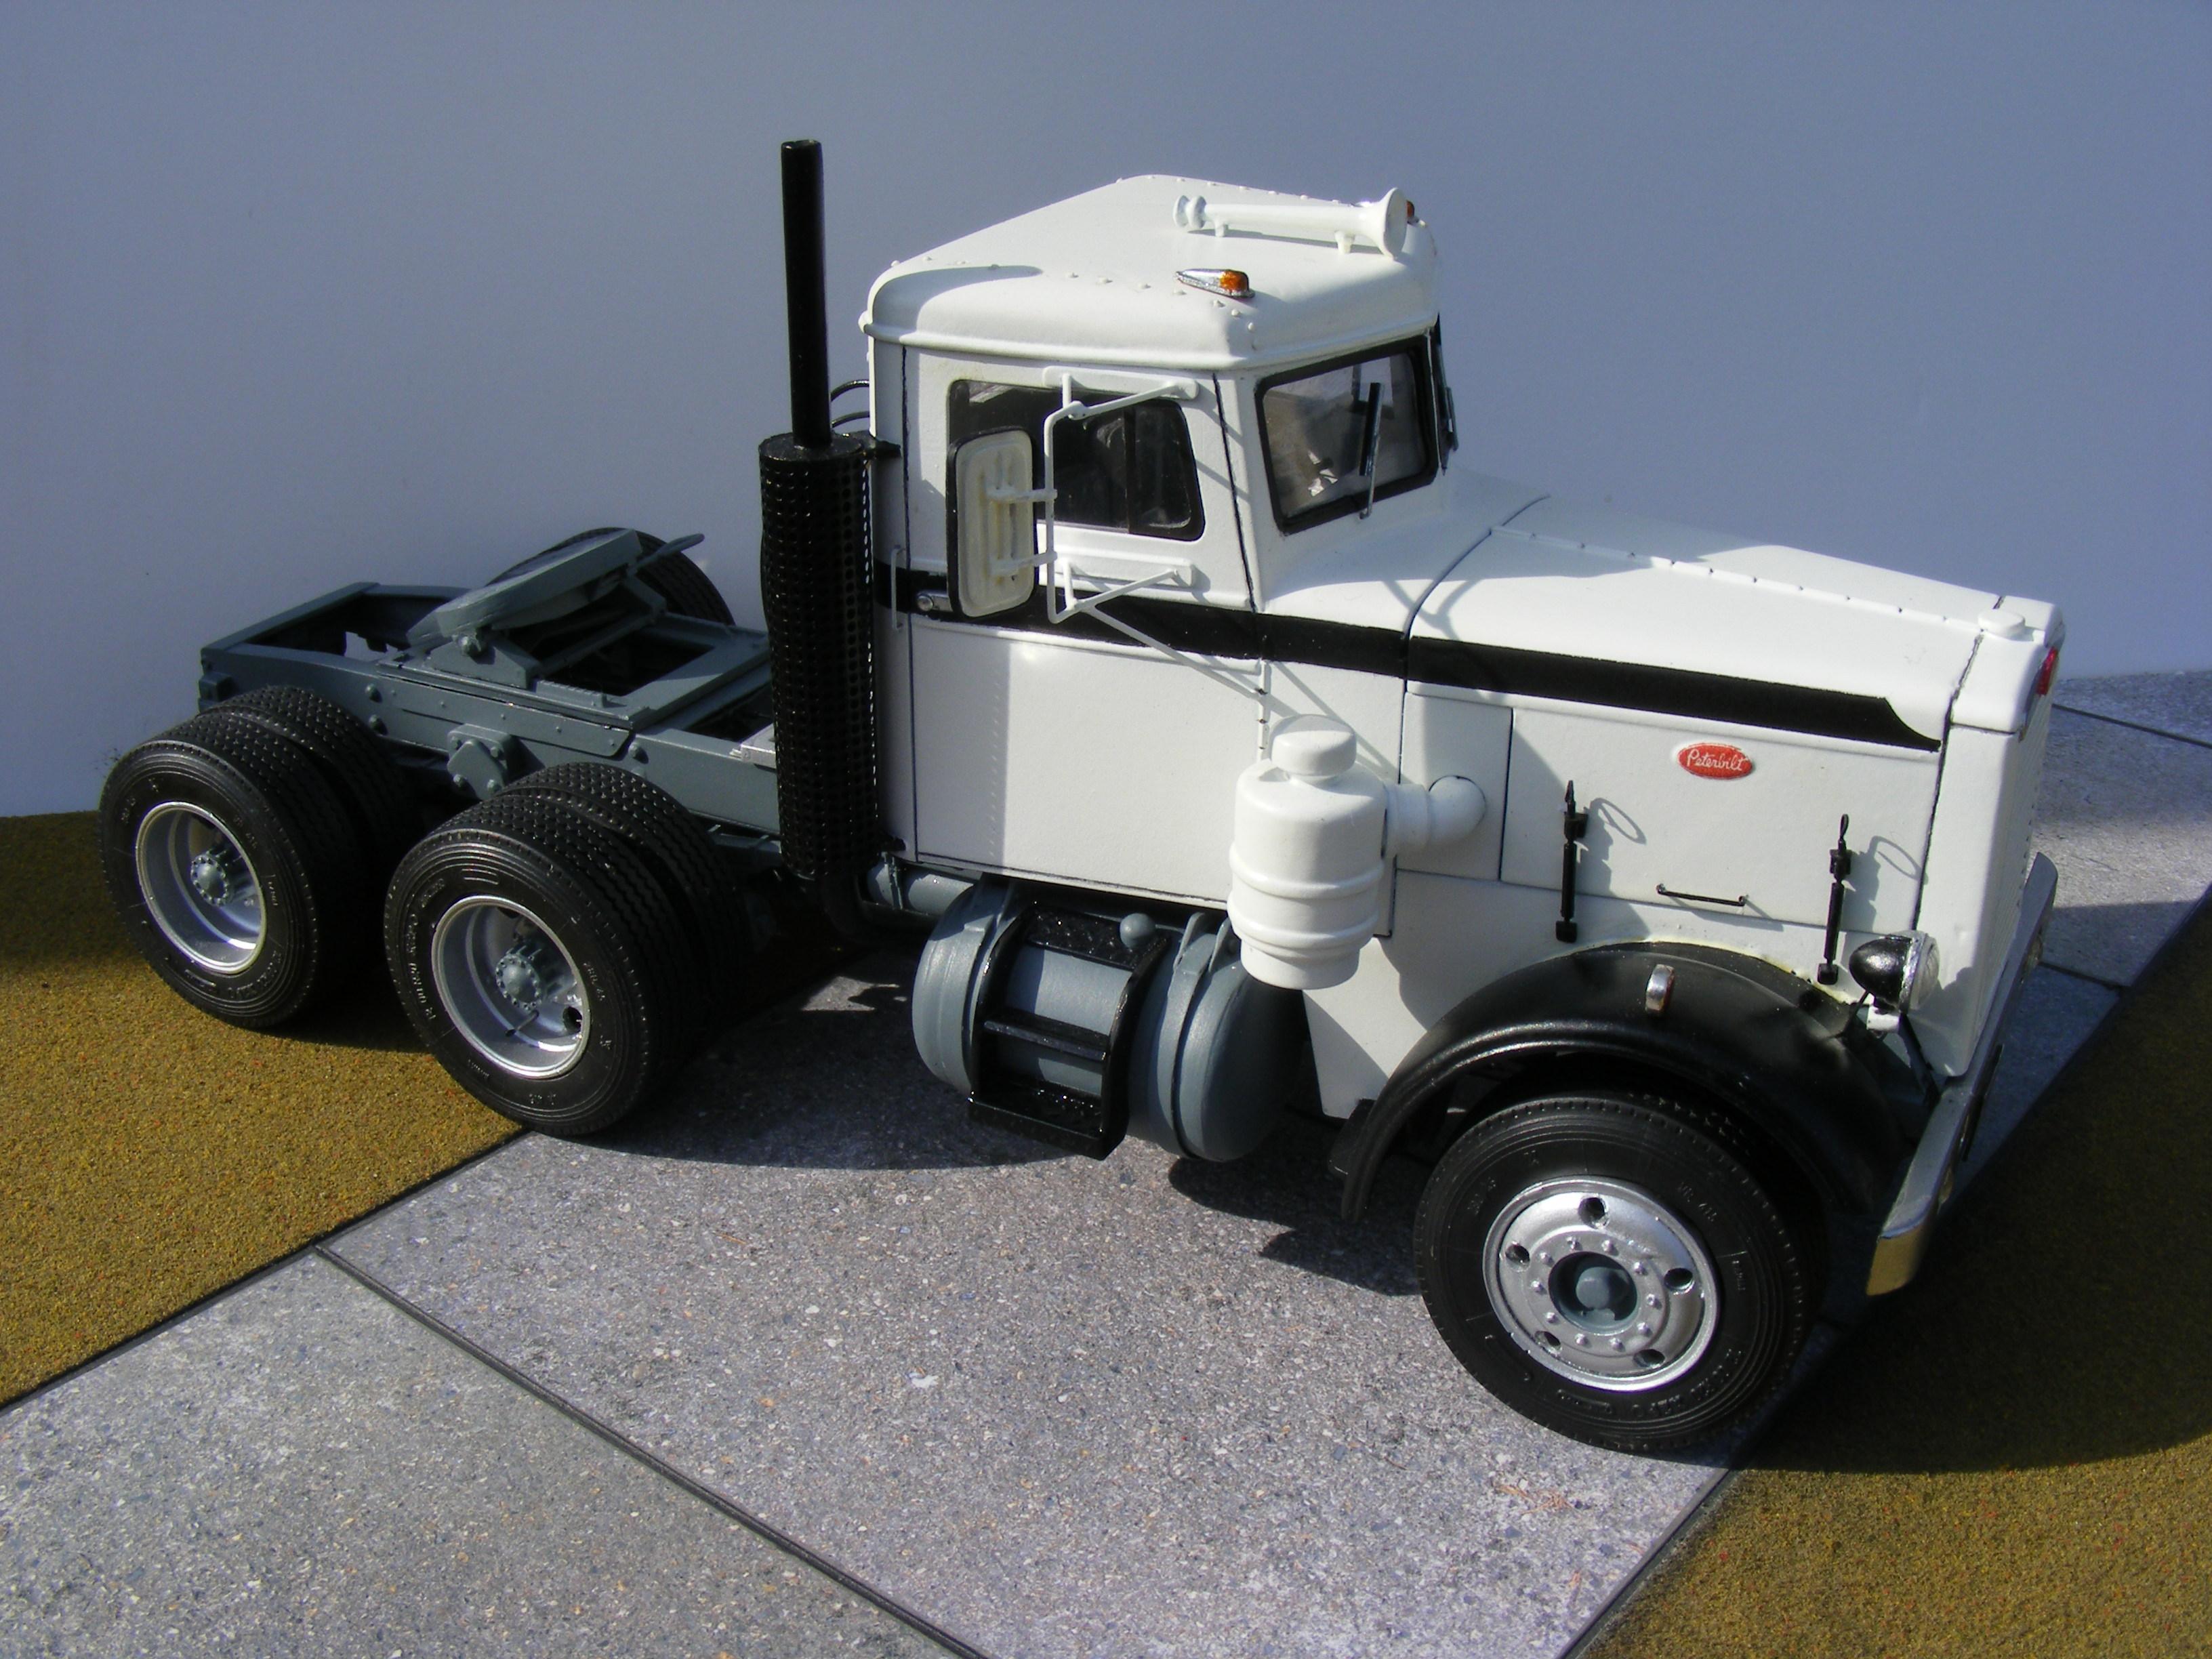
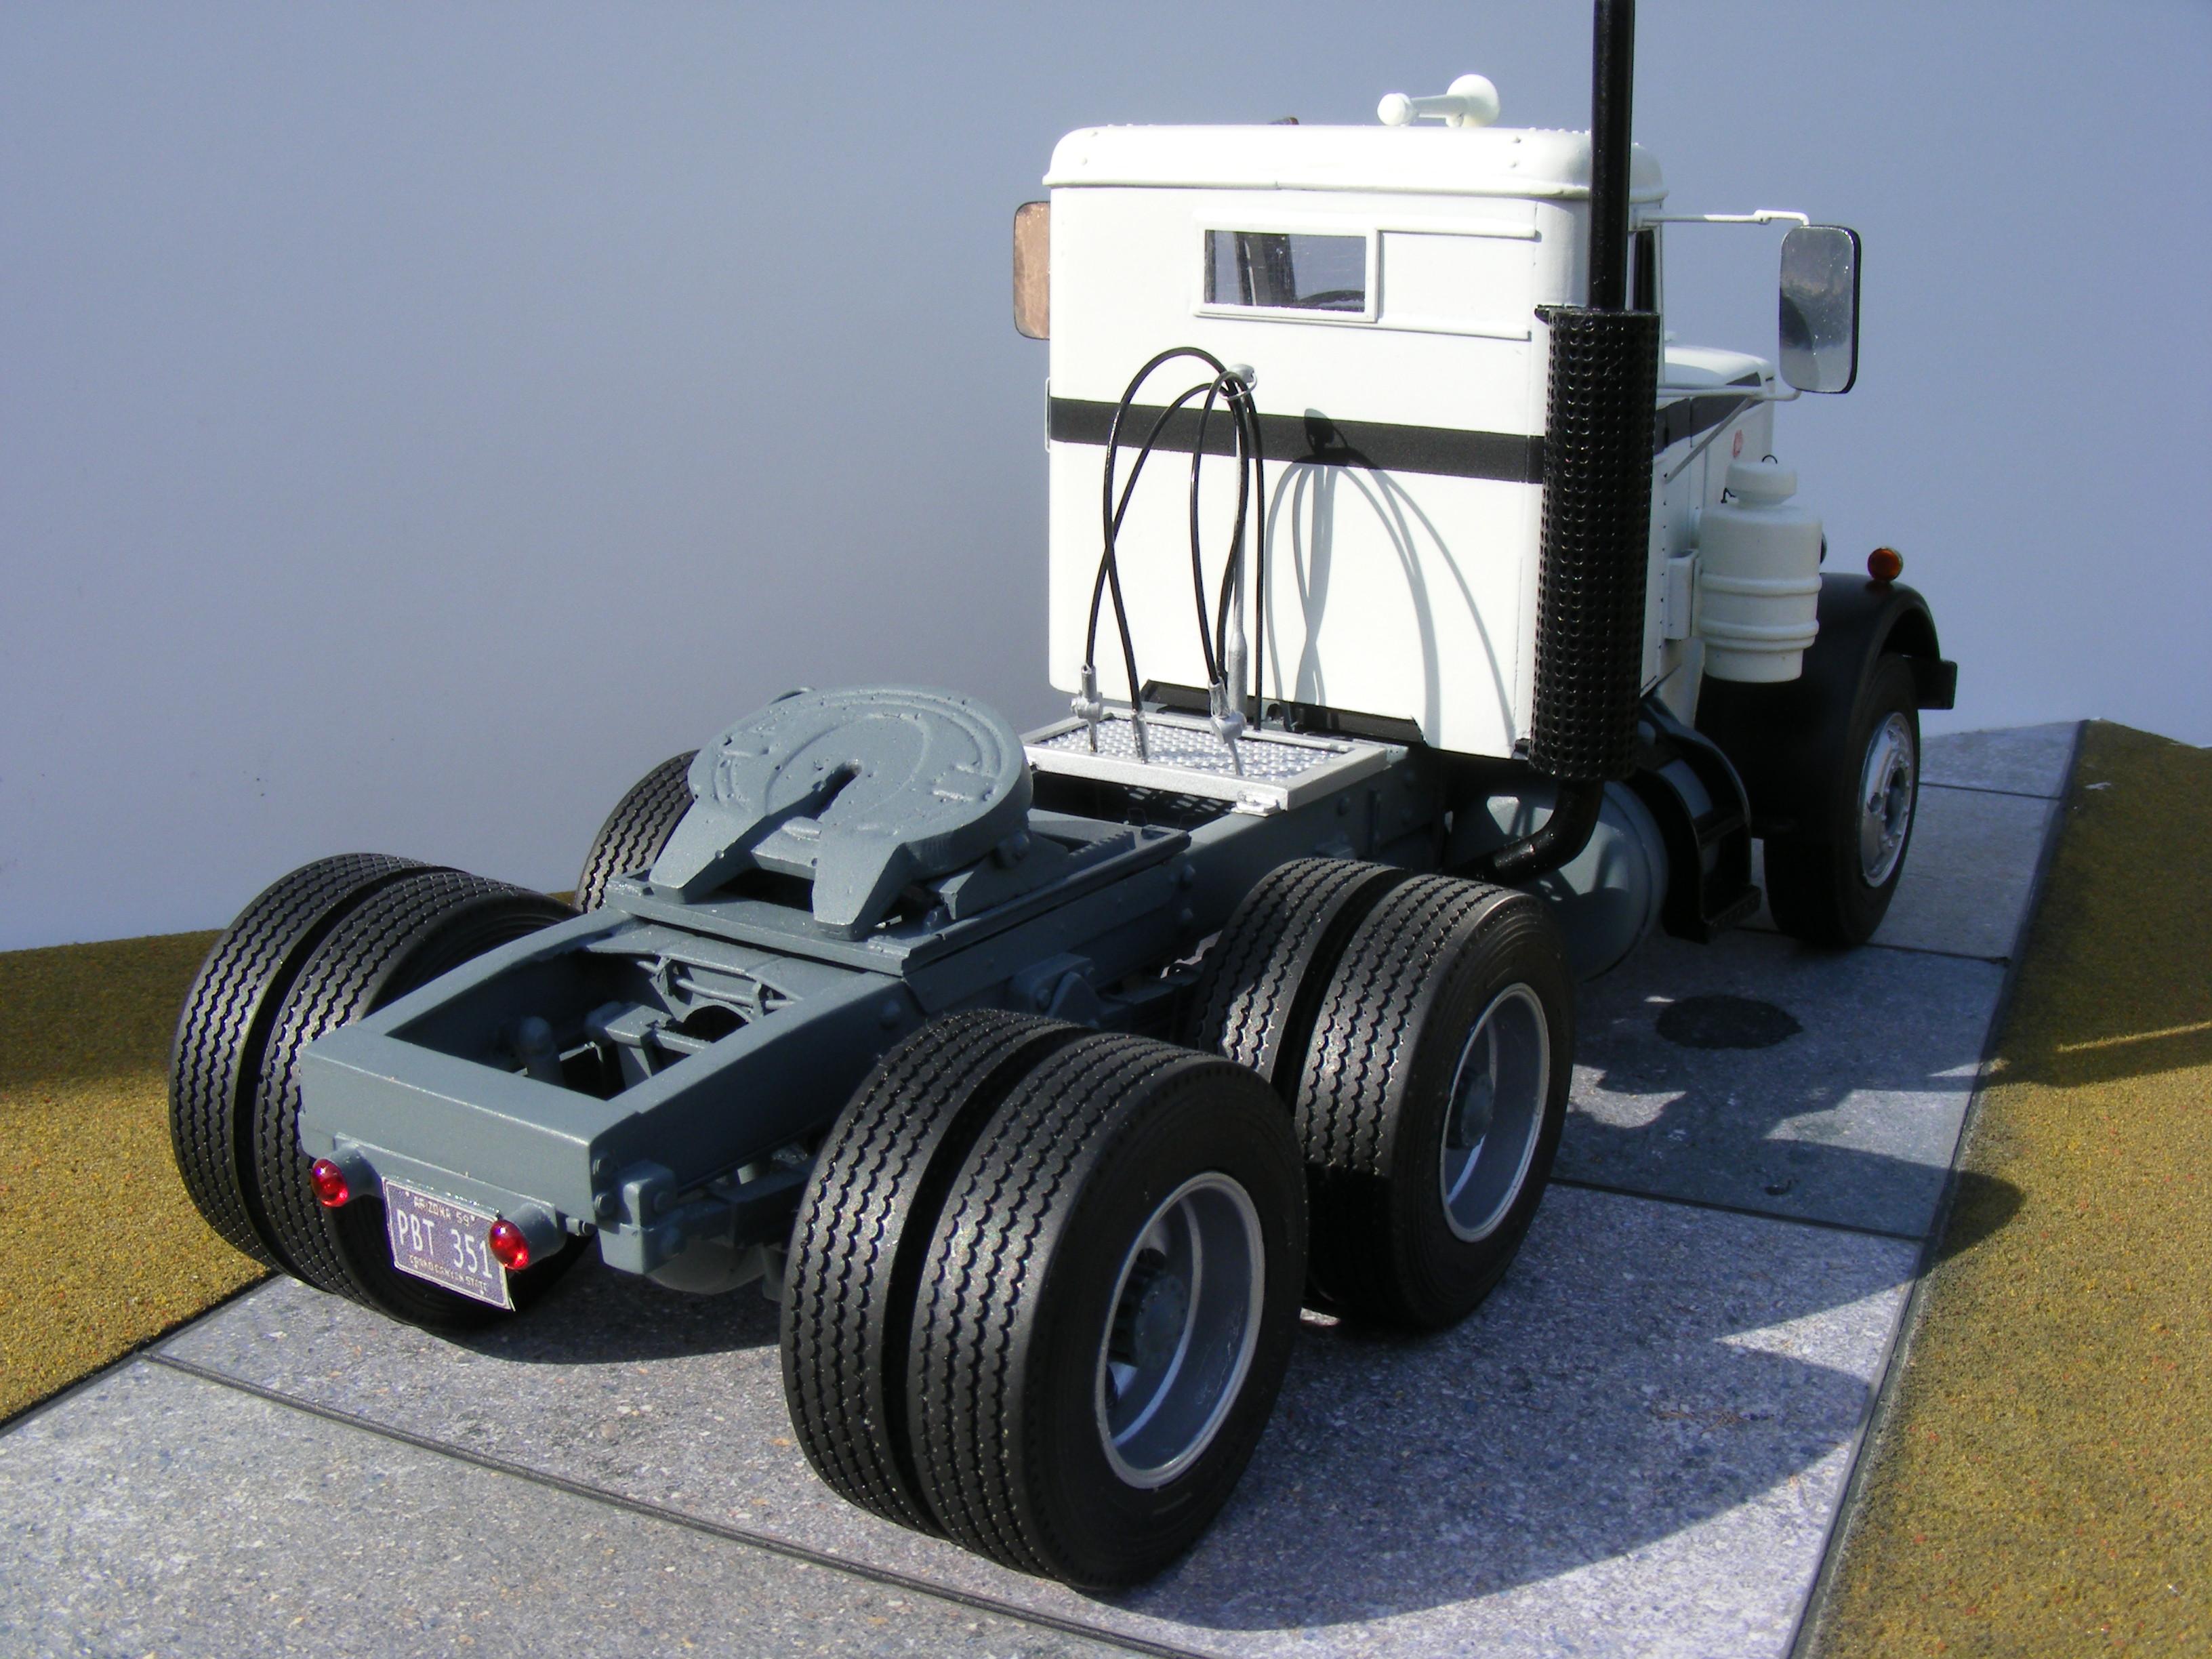
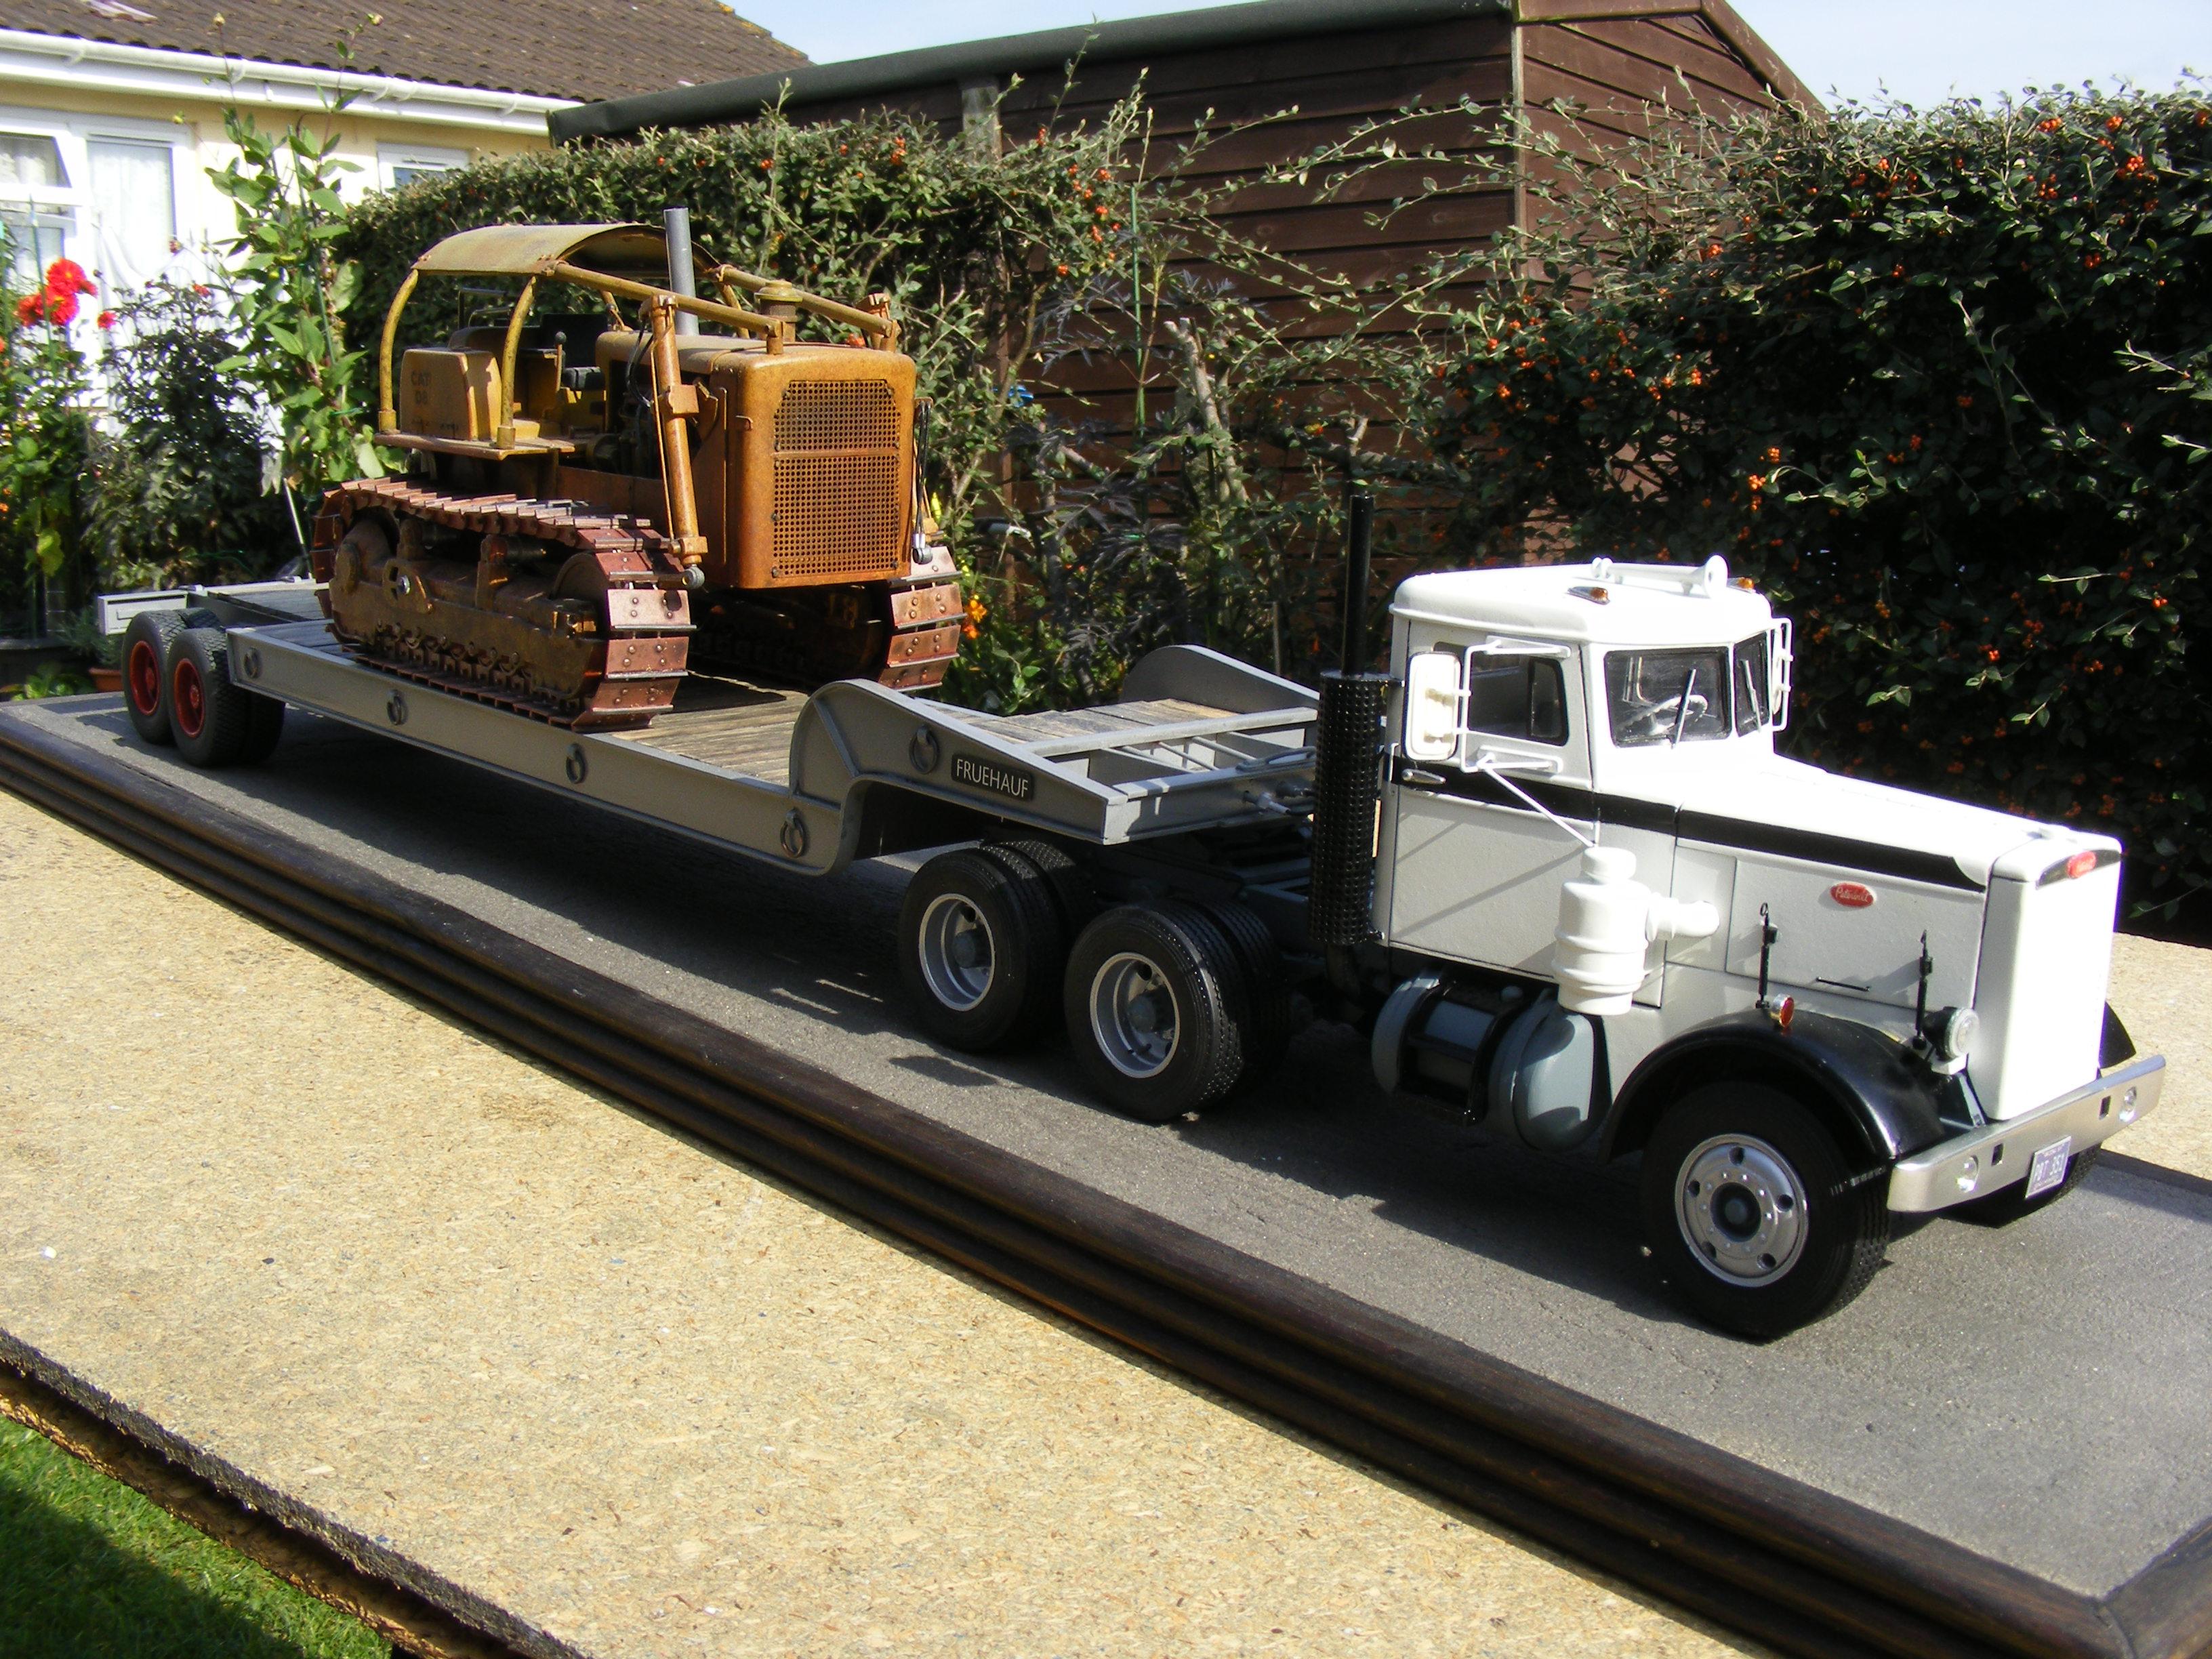
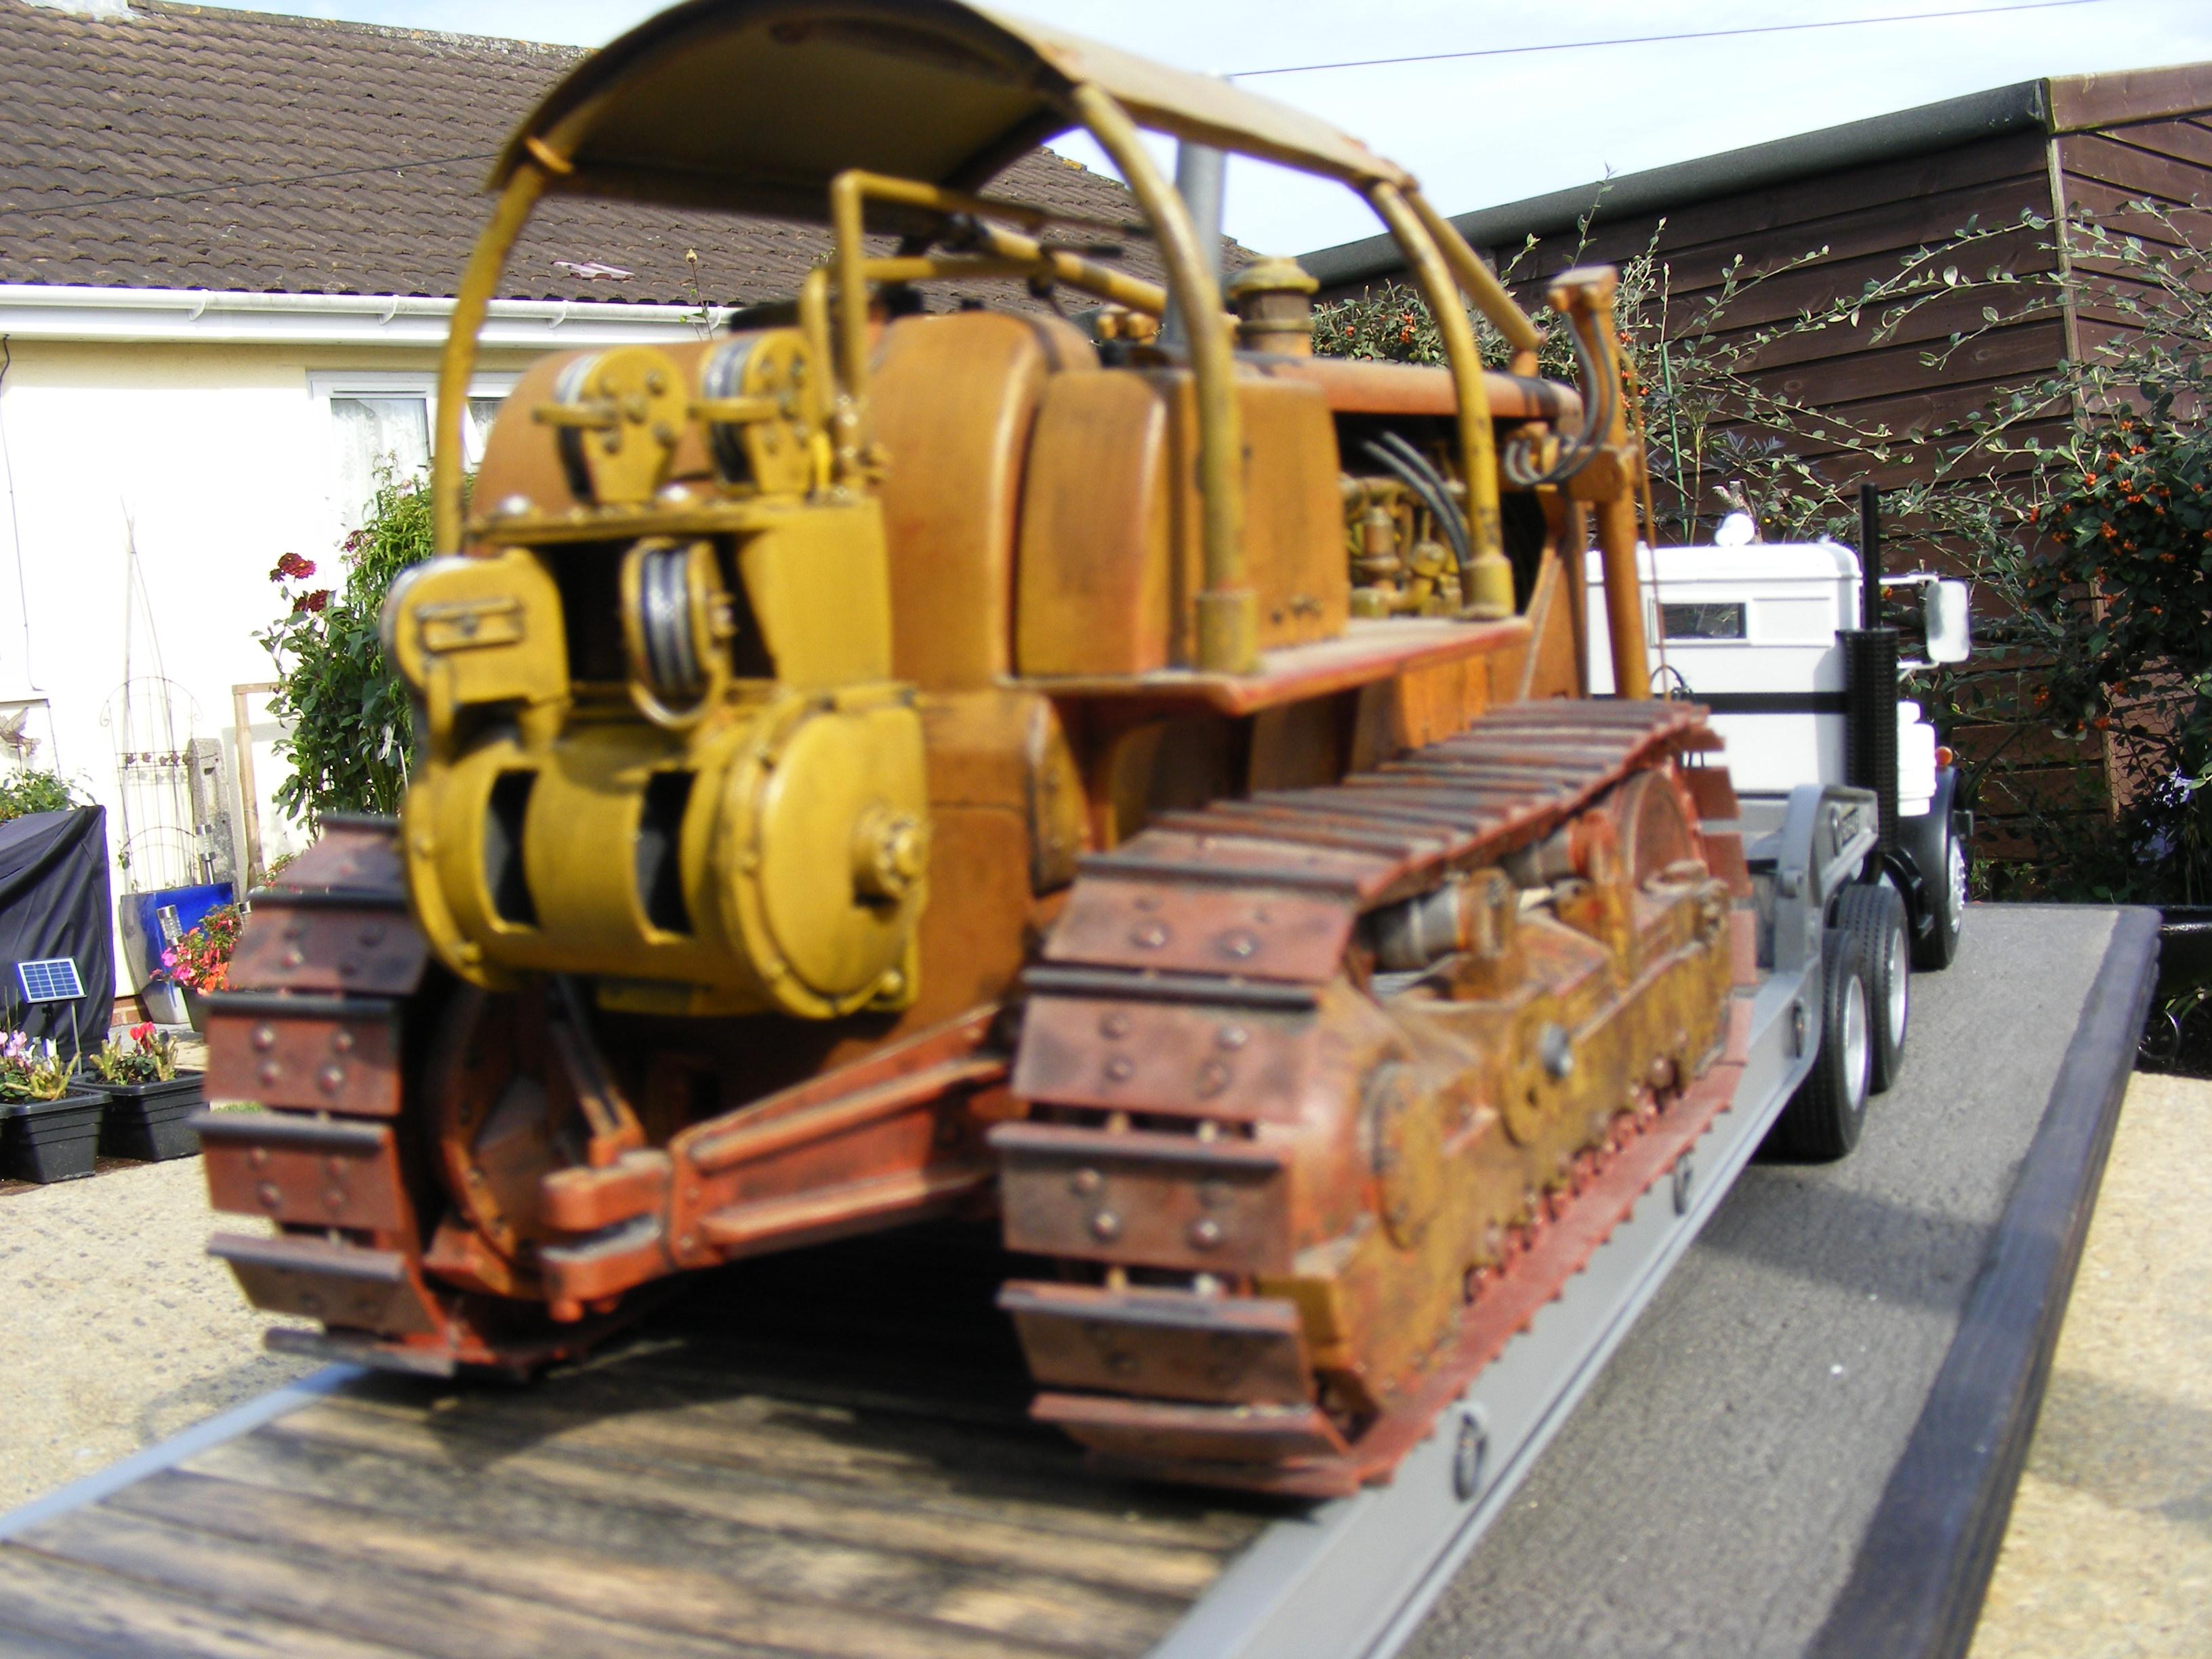
Hi, Finally taken pics of finished pete, Based on one of the first from the factory or so the photo caption said.Scratch built with homemade resin bits & few kit spare parts, I altered a amt kenworth aerodyne bumper to fit rather than a straight type. Trailer & cat dozer are another build from a few years back & just for a look to see them together. Thanks for looking.

-
My own Sundance
The Brush replied to Rockford's topic in WIP: Model Trucks: Big Rigs and Heavy Equipment
Looking good, plenty yo keep you busy. -
Watkins Kenworth 925
The Brush replied to Hmann68's topic in Model Trucks: Big Rigs and Heavy Equipment
Hi, Very clean, looks great. Well done First truck kit i bought back in the 70`s, still got it but nowhere near as good as this . -
1965 Chevy C 80 with gravel trailer
The Brush replied to leafsprings's topic in Model Trucks: Big Rigs and Heavy Equipment
I like the older day cab trucks, This is a great build well done. -
Peterbilt 352 double bunk
The Brush replied to Bronzekeg's topic in Model Trucks: Big Rigs and Heavy Equipment
Hi, Very nice builds, as always your choice of colour (color) is great. -
BRGB W900 Aerodyne
The Brush replied to Rockford's topic in Model Trucks: Big Rigs and Heavy Equipment
Hi, A superb build, With all that detail it would pass as a larger scale. Your photos are very good also. Graham. -
Your hard work has paid off, This is a gem nice one. Graham.
-
2023 BRGB TRIAXLE FREIGHTLINER WRECKER
The Brush replied to Dutzie's topic in WIP: Model Trucks: Big Rigs and Heavy Equipment
Good to see this back & coming along nicely, Impressive. -
Just Another Plain White Box
The Brush replied to Rockford's topic in Model Trucks: Big Rigs and Heavy Equipment
Hi, Another nice build, I like the wheels on this one. well done. Graham. -
Peterbilt 351
The Brush replied to The Brush's topic in WIP: Model Trucks: Big Rigs and Heavy Equipment
Thanks you, Appreciated. -
Peterbilt 351
The Brush replied to The Brush's topic in WIP: Model Trucks: Big Rigs and Heavy Equipment
Thanks for the info, I do intend to put 1mm vinyl round the outside to make the gaskets thicker. -
AMT Trailmobile Reefer
The Brush replied to Rockford's topic in Model Trucks: Big Rigs and Heavy Equipment
Very nice work on this trailer, Neat detailing & painting, well done. -
Peterbilt 351
The Brush replied to The Brush's topic in WIP: Model Trucks: Big Rigs and Heavy Equipment
Hi, thanks for the comments, After many other summer garden jobs that had to be done, I have painted all the parts & added home made decals, A few other bits need to be made yet. I glazed it with acetate & added window rubbers with 1mm round elastic from a craft shop.
-
Peterbilt 351
The Brush replied to The Brush's topic in WIP: Model Trucks: Big Rigs and Heavy Equipment
Thanks guys, Cab is now painted, just let it degas then i`ll carry on . -
Peterbilt 351
The Brush replied to The Brush's topic in WIP: Model Trucks: Big Rigs and Heavy Equipment
Thanks for your obsevation, i see your point about the axles . Put it down to a senior moment. -
Peterbilt 351
The Brush replied to The Brush's topic in WIP: Model Trucks: Big Rigs and Heavy Equipment
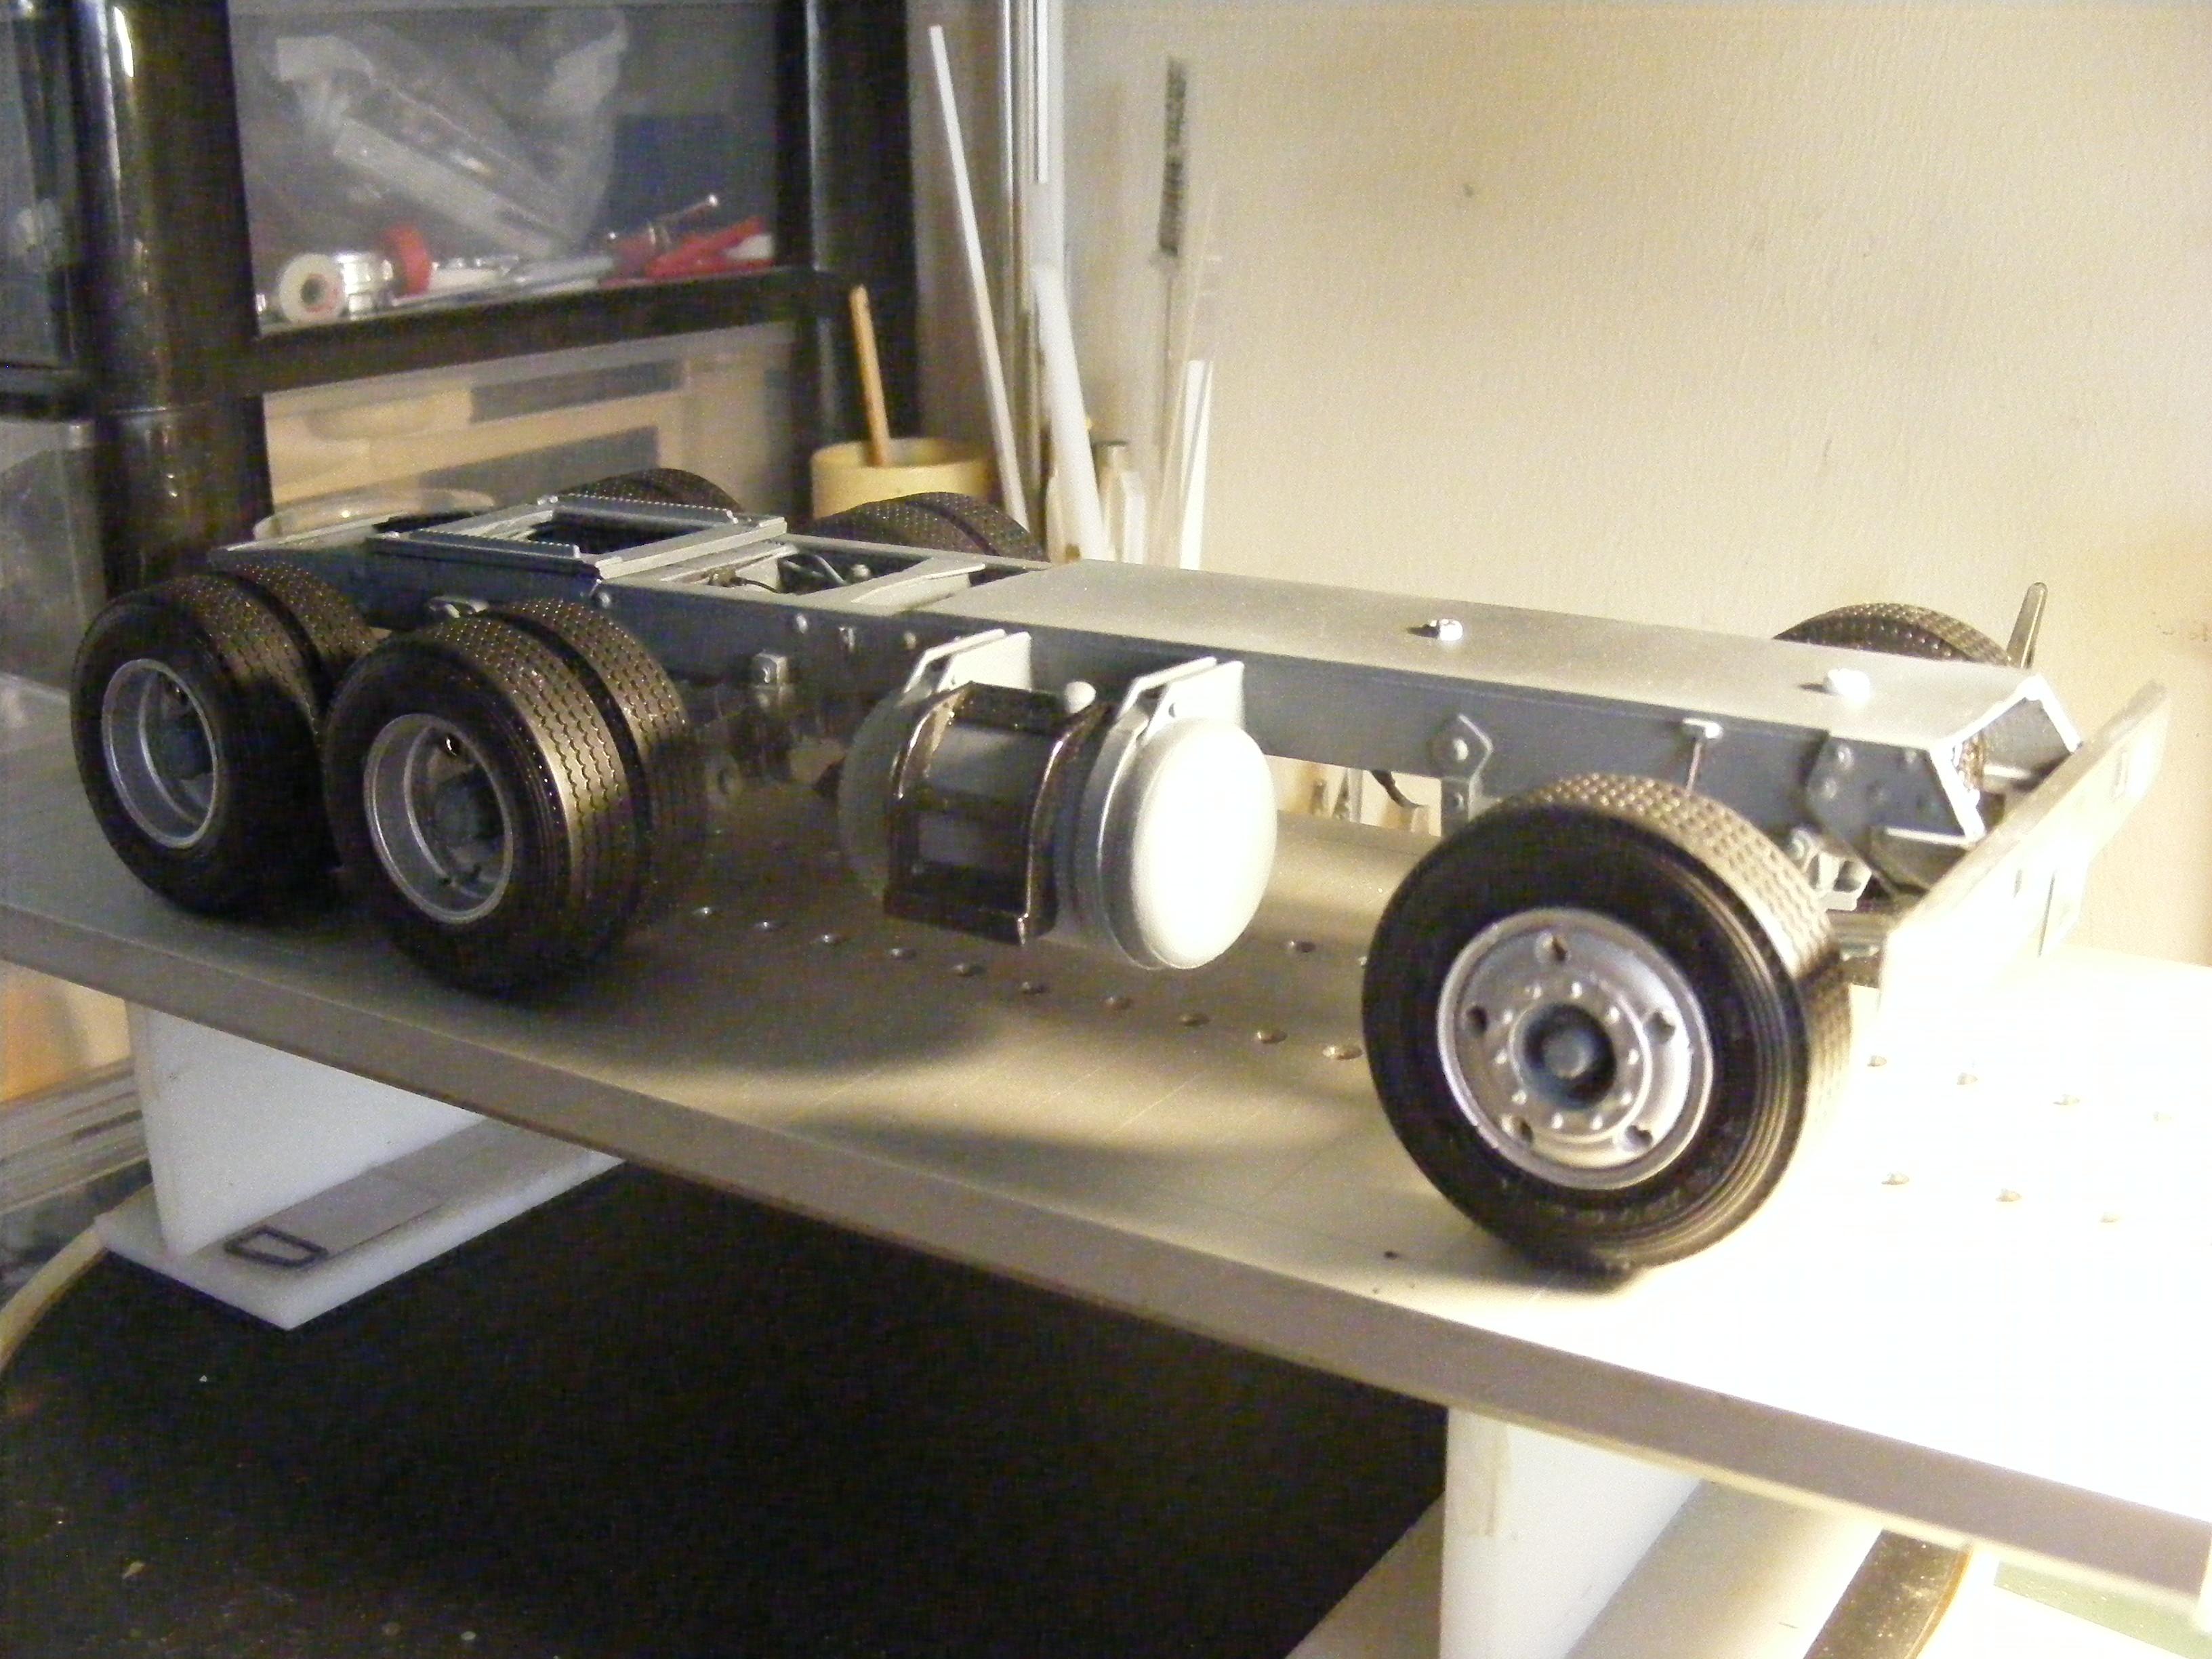
Hi heres the frame airbrushed in revell aqua color Greyish Blue. wheels are sprayed aluminium acrylic & buffed to a satin finish, bumper is alclad chrome over black laquer. The weather is good at the moment so the cab is in the paint & body shop, AKA- the garden shed being painted.
-
Peterbilt 351
The Brush replied to The Brush's topic in WIP: Model Trucks: Big Rigs and Heavy Equipment
Thank you steve. -
Now its painted it looks even better, Impressive work. Graham
-
Peterbilt 351
The Brush replied to The Brush's topic in WIP: Model Trucks: Big Rigs and Heavy Equipment
HI, Thanks for the comments much appreciated. Heres the interior I built this from pics off the web, made from the usual materials plastic card,pins & homemade resin castings this is now ready to paint & detail.
-
You are a talented builder, This is fantastic , great color choice also. Graham.
-
Very nice another gem from you, the engine is in a class of its own Great work. Graham
-
Peterbilt 351
The Brush replied to The Brush's topic in WIP: Model Trucks: Big Rigs and Heavy Equipment
Hi, After a small break to visit the wife`s inlaws what joy!! I have finally finished the frame which is now in paint. I made an error with the front shocker which is now in its rightful place, I must have had a senior moment. I put some wire supports on the front axle to stop it bending upwards. It`s curbside with half a cummins block in place, Now on with the interior. Thanks for the comments, The cab dimensions are from a downloaded spec sheet which i enlarged to scale size. The rest is from pics. More soon .
-
De-Aerodyned K100
The Brush replied to Rockford's topic in WIP: Model Trucks: Big Rigs and Heavy Equipment
Brilliant work on this k100, your attention to detail is second to none. Graham -
2023 BRGB TRIAXLE FREIGHTLINER WRECKER
The Brush replied to Dutzie's topic in WIP: Model Trucks: Big Rigs and Heavy Equipment
Looks great, Thats a nice crew cab & excellent workmanship all round, Will make an eye catching display. Graham.