Just Jim
-
Posts
237 -
Joined
-
Last visited
Content Type
Profiles
Forums
Events
Gallery
Everything posted by Just Jim
-
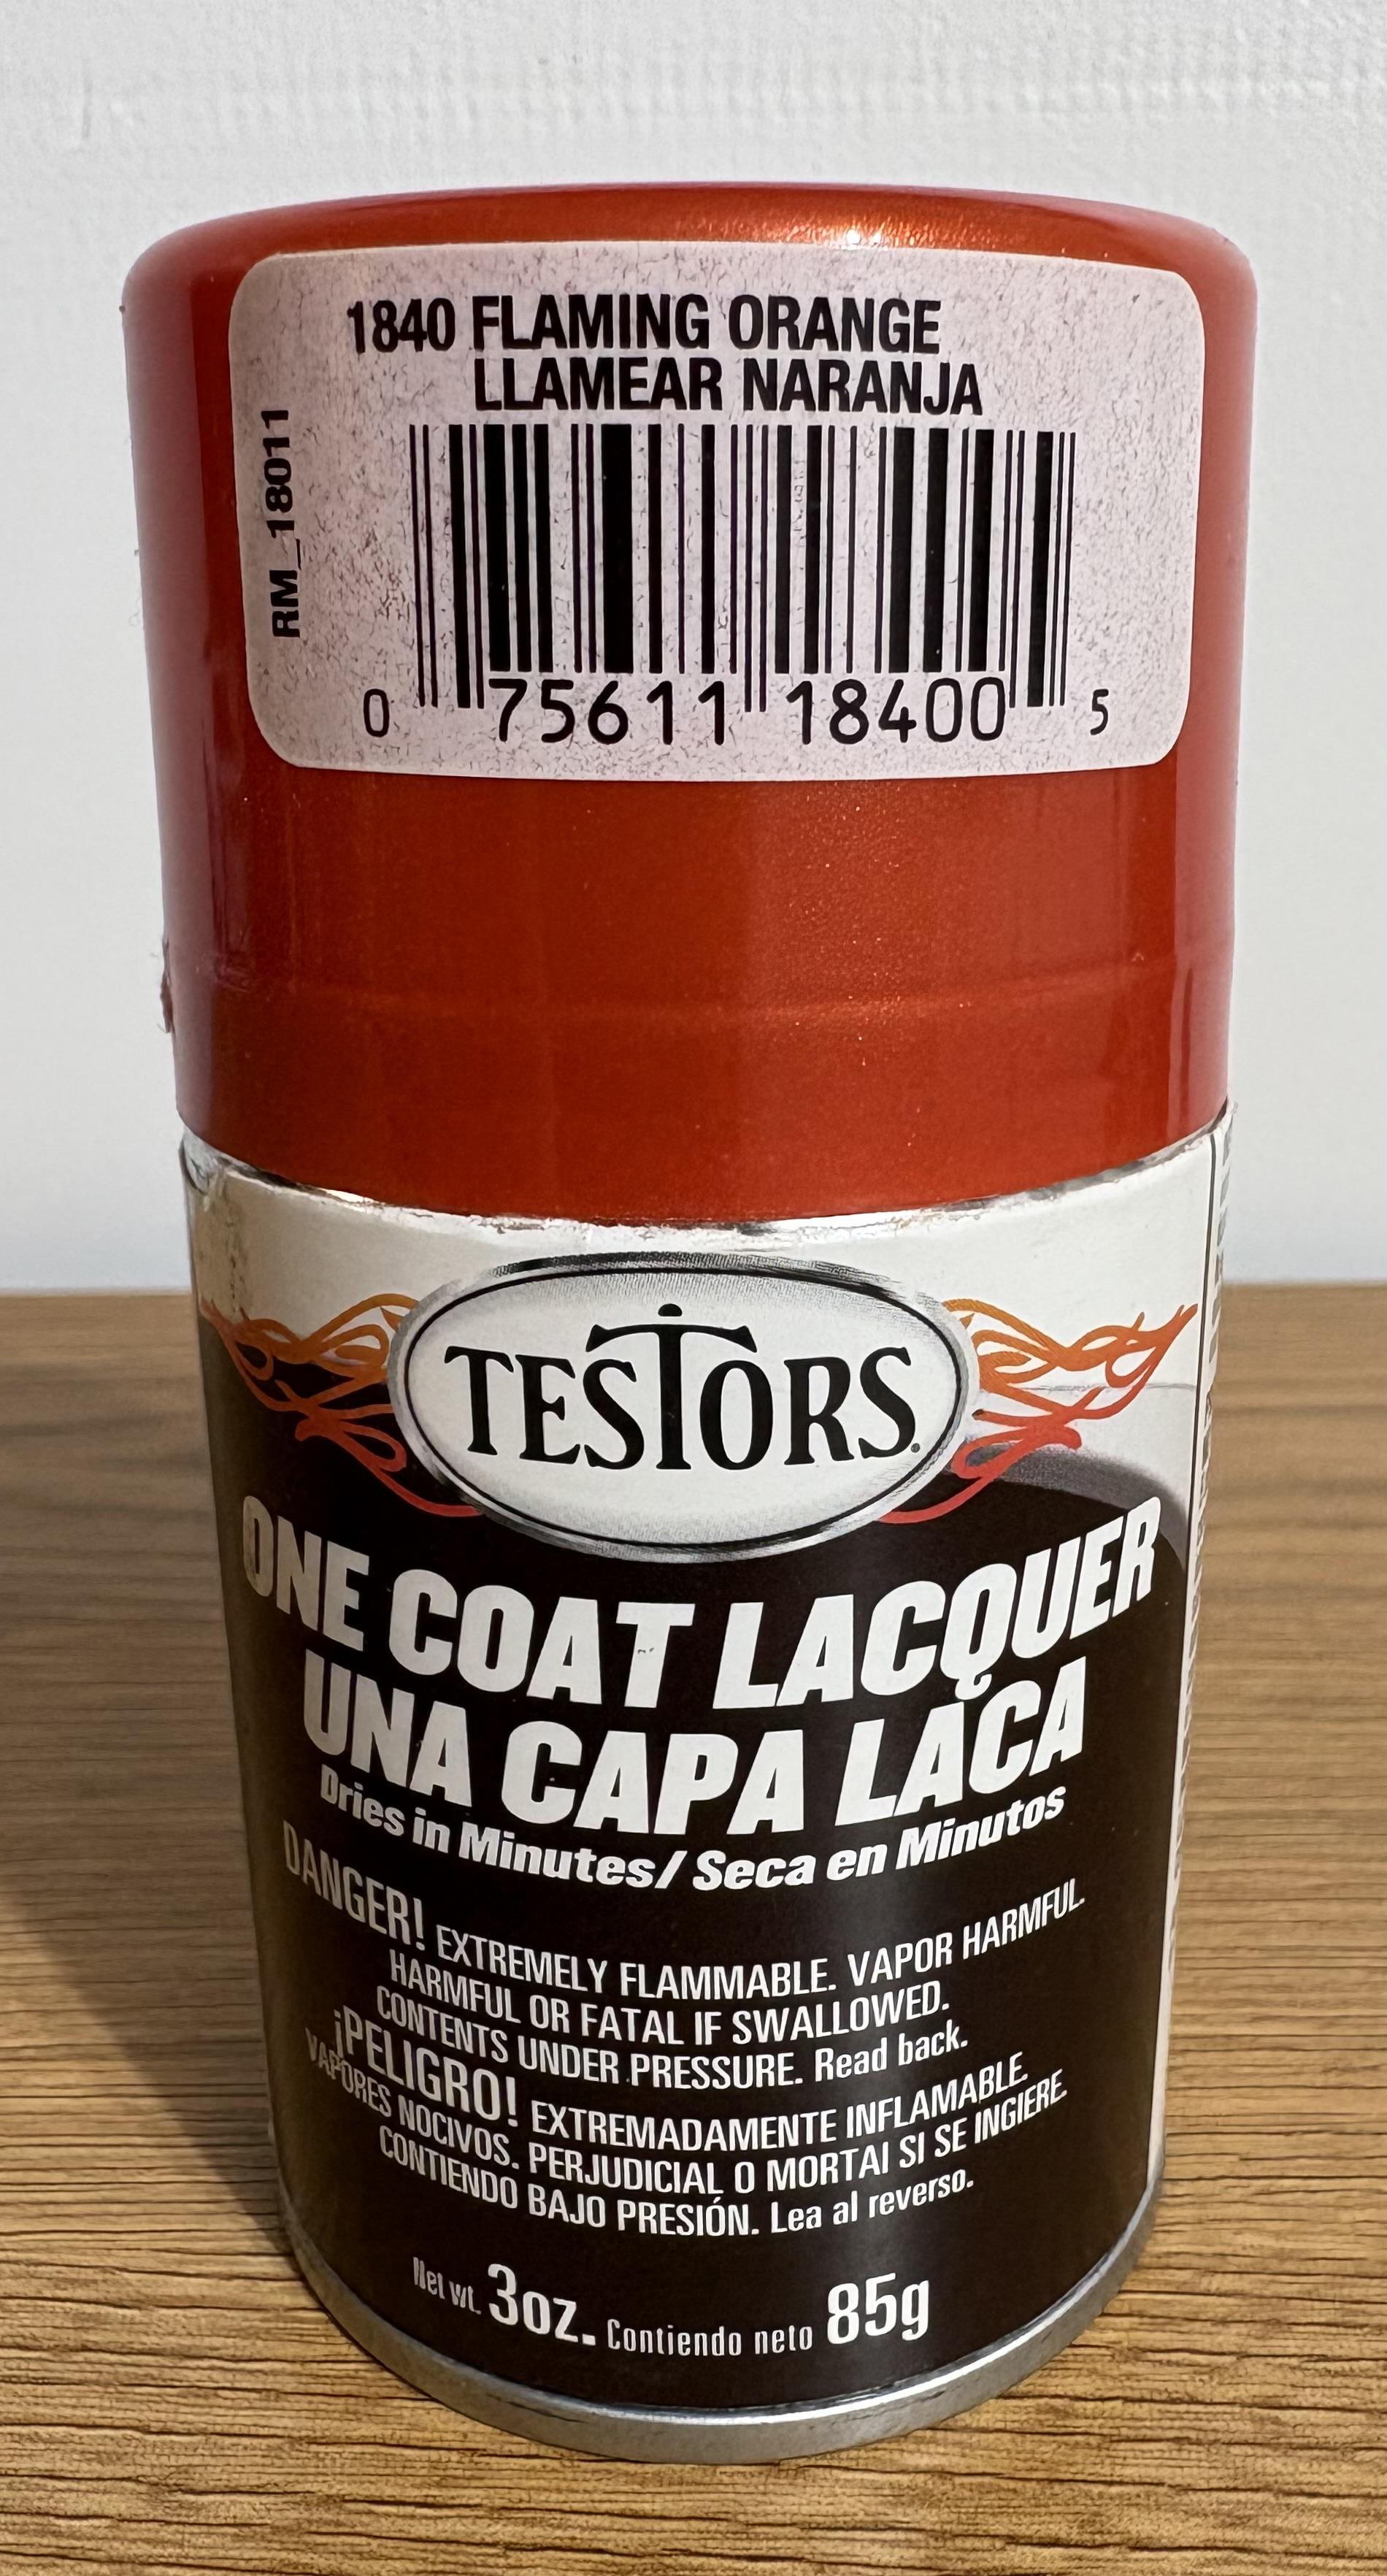
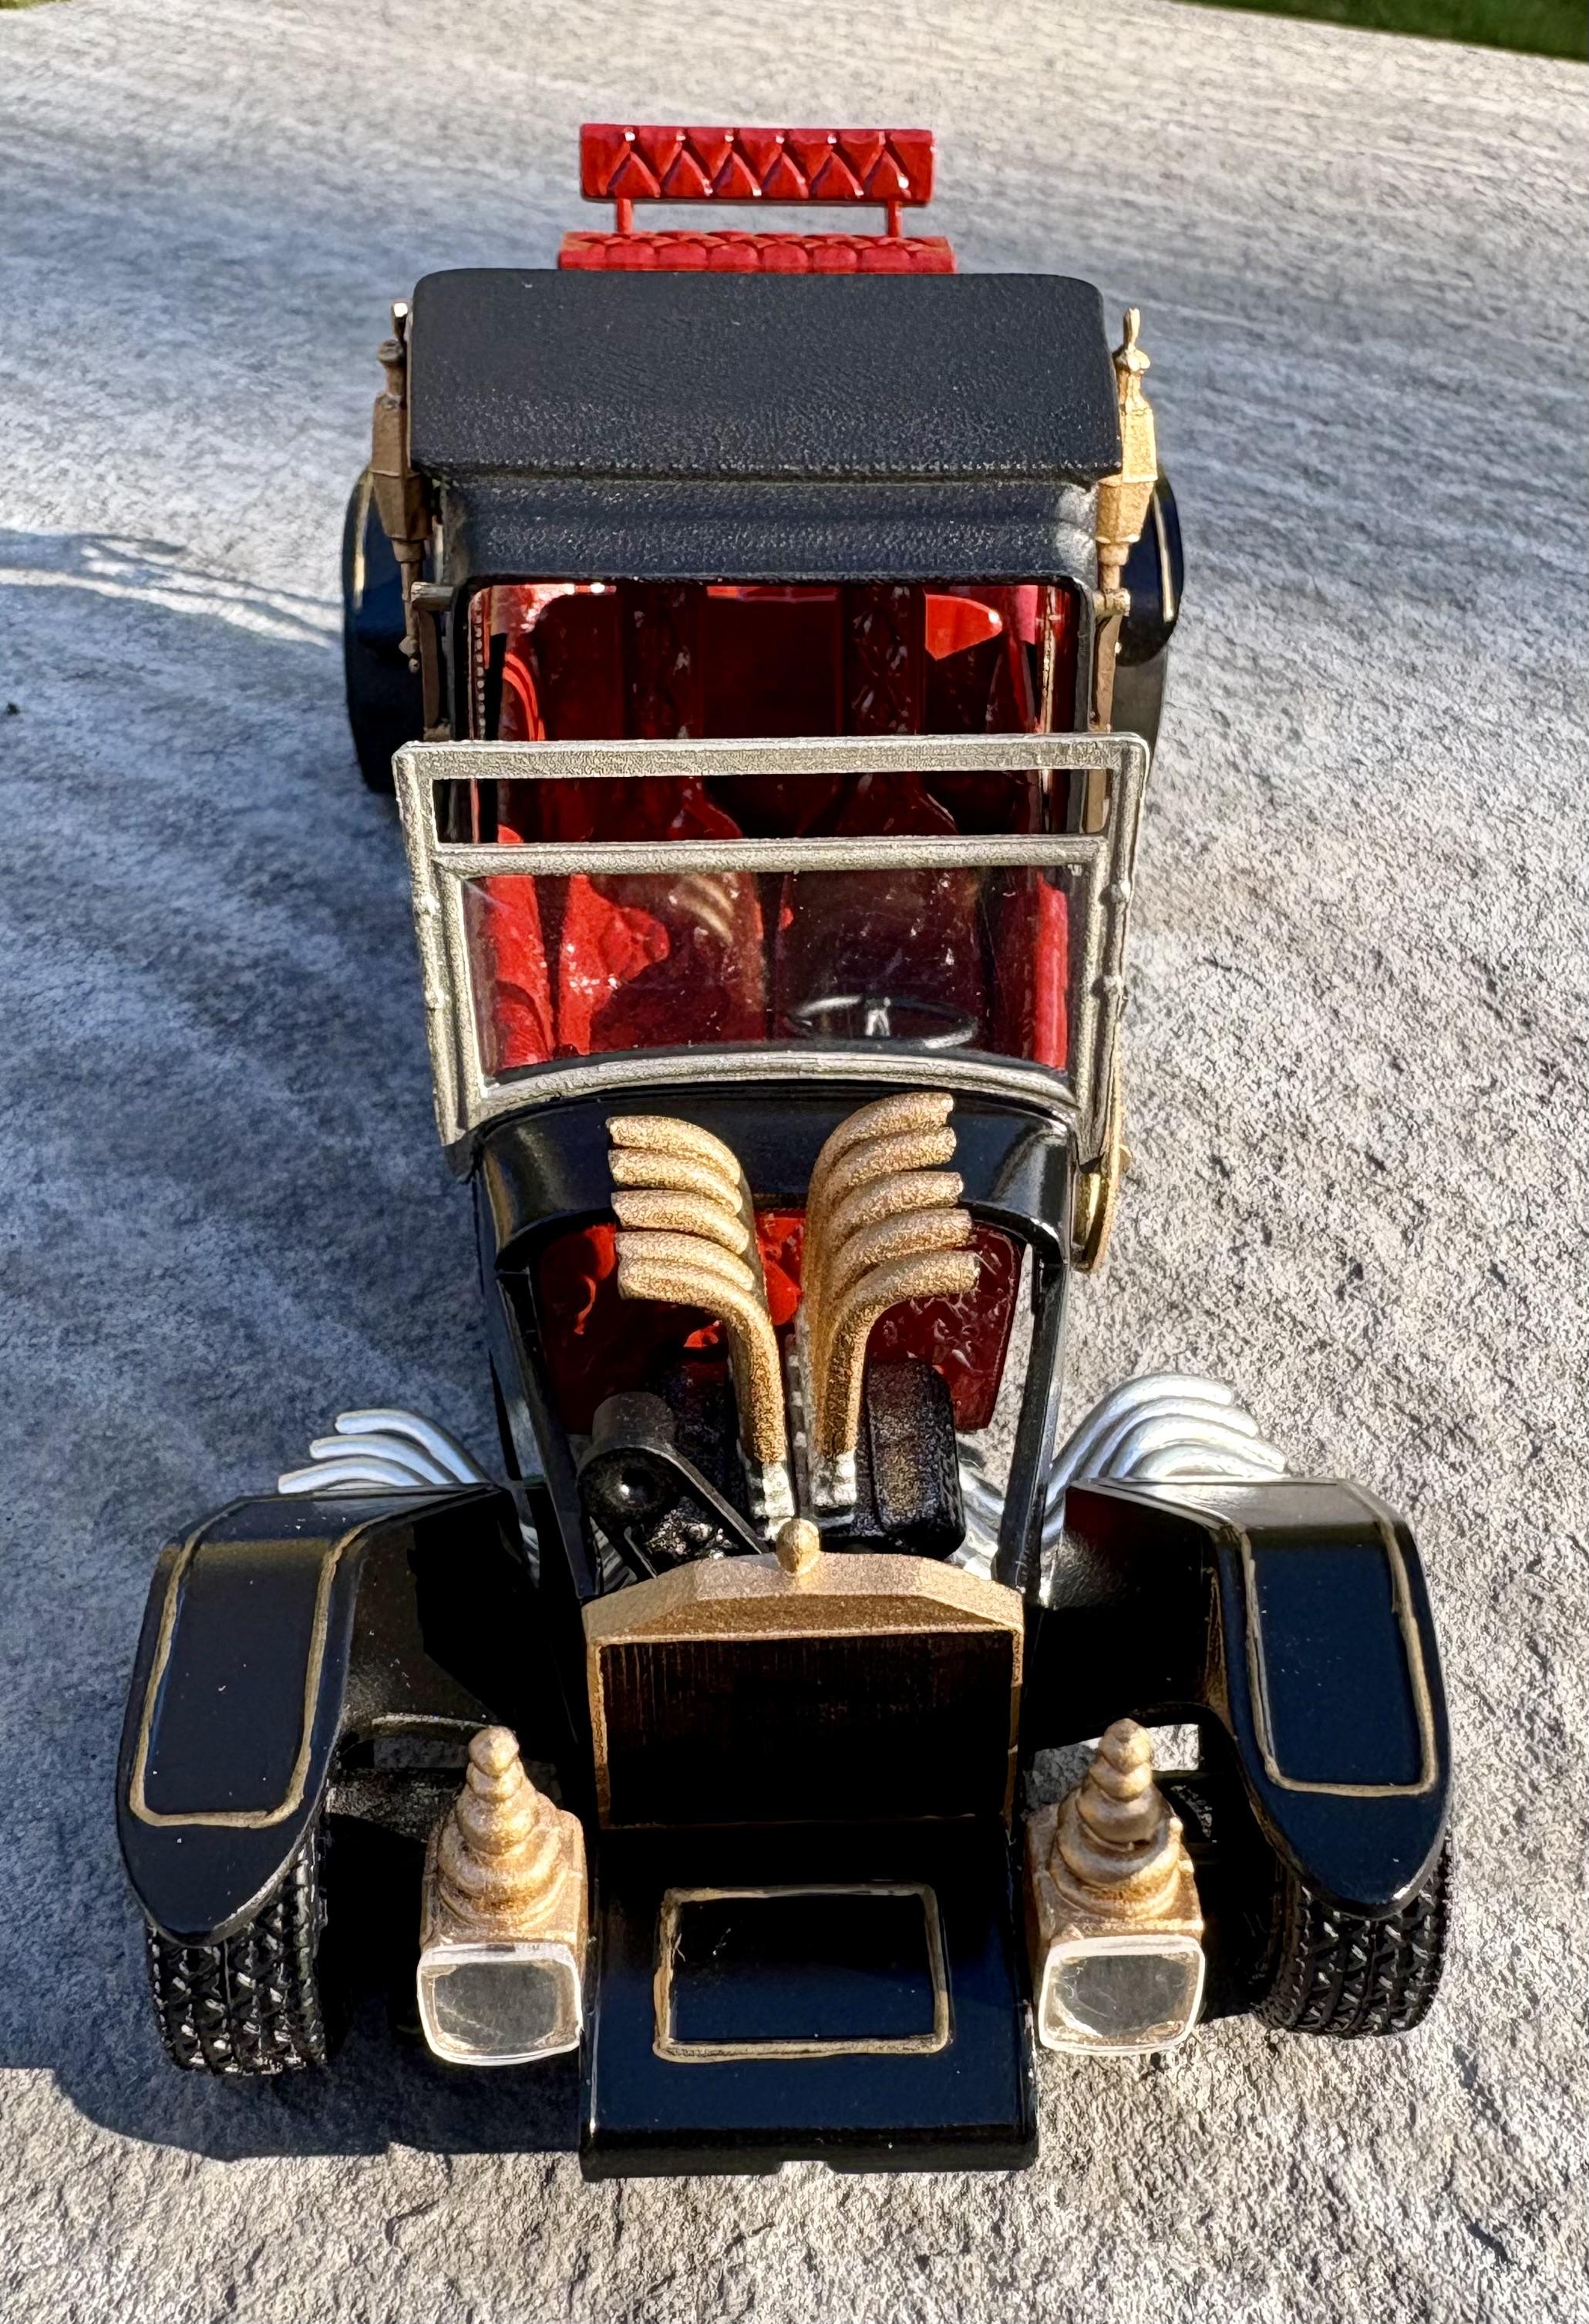
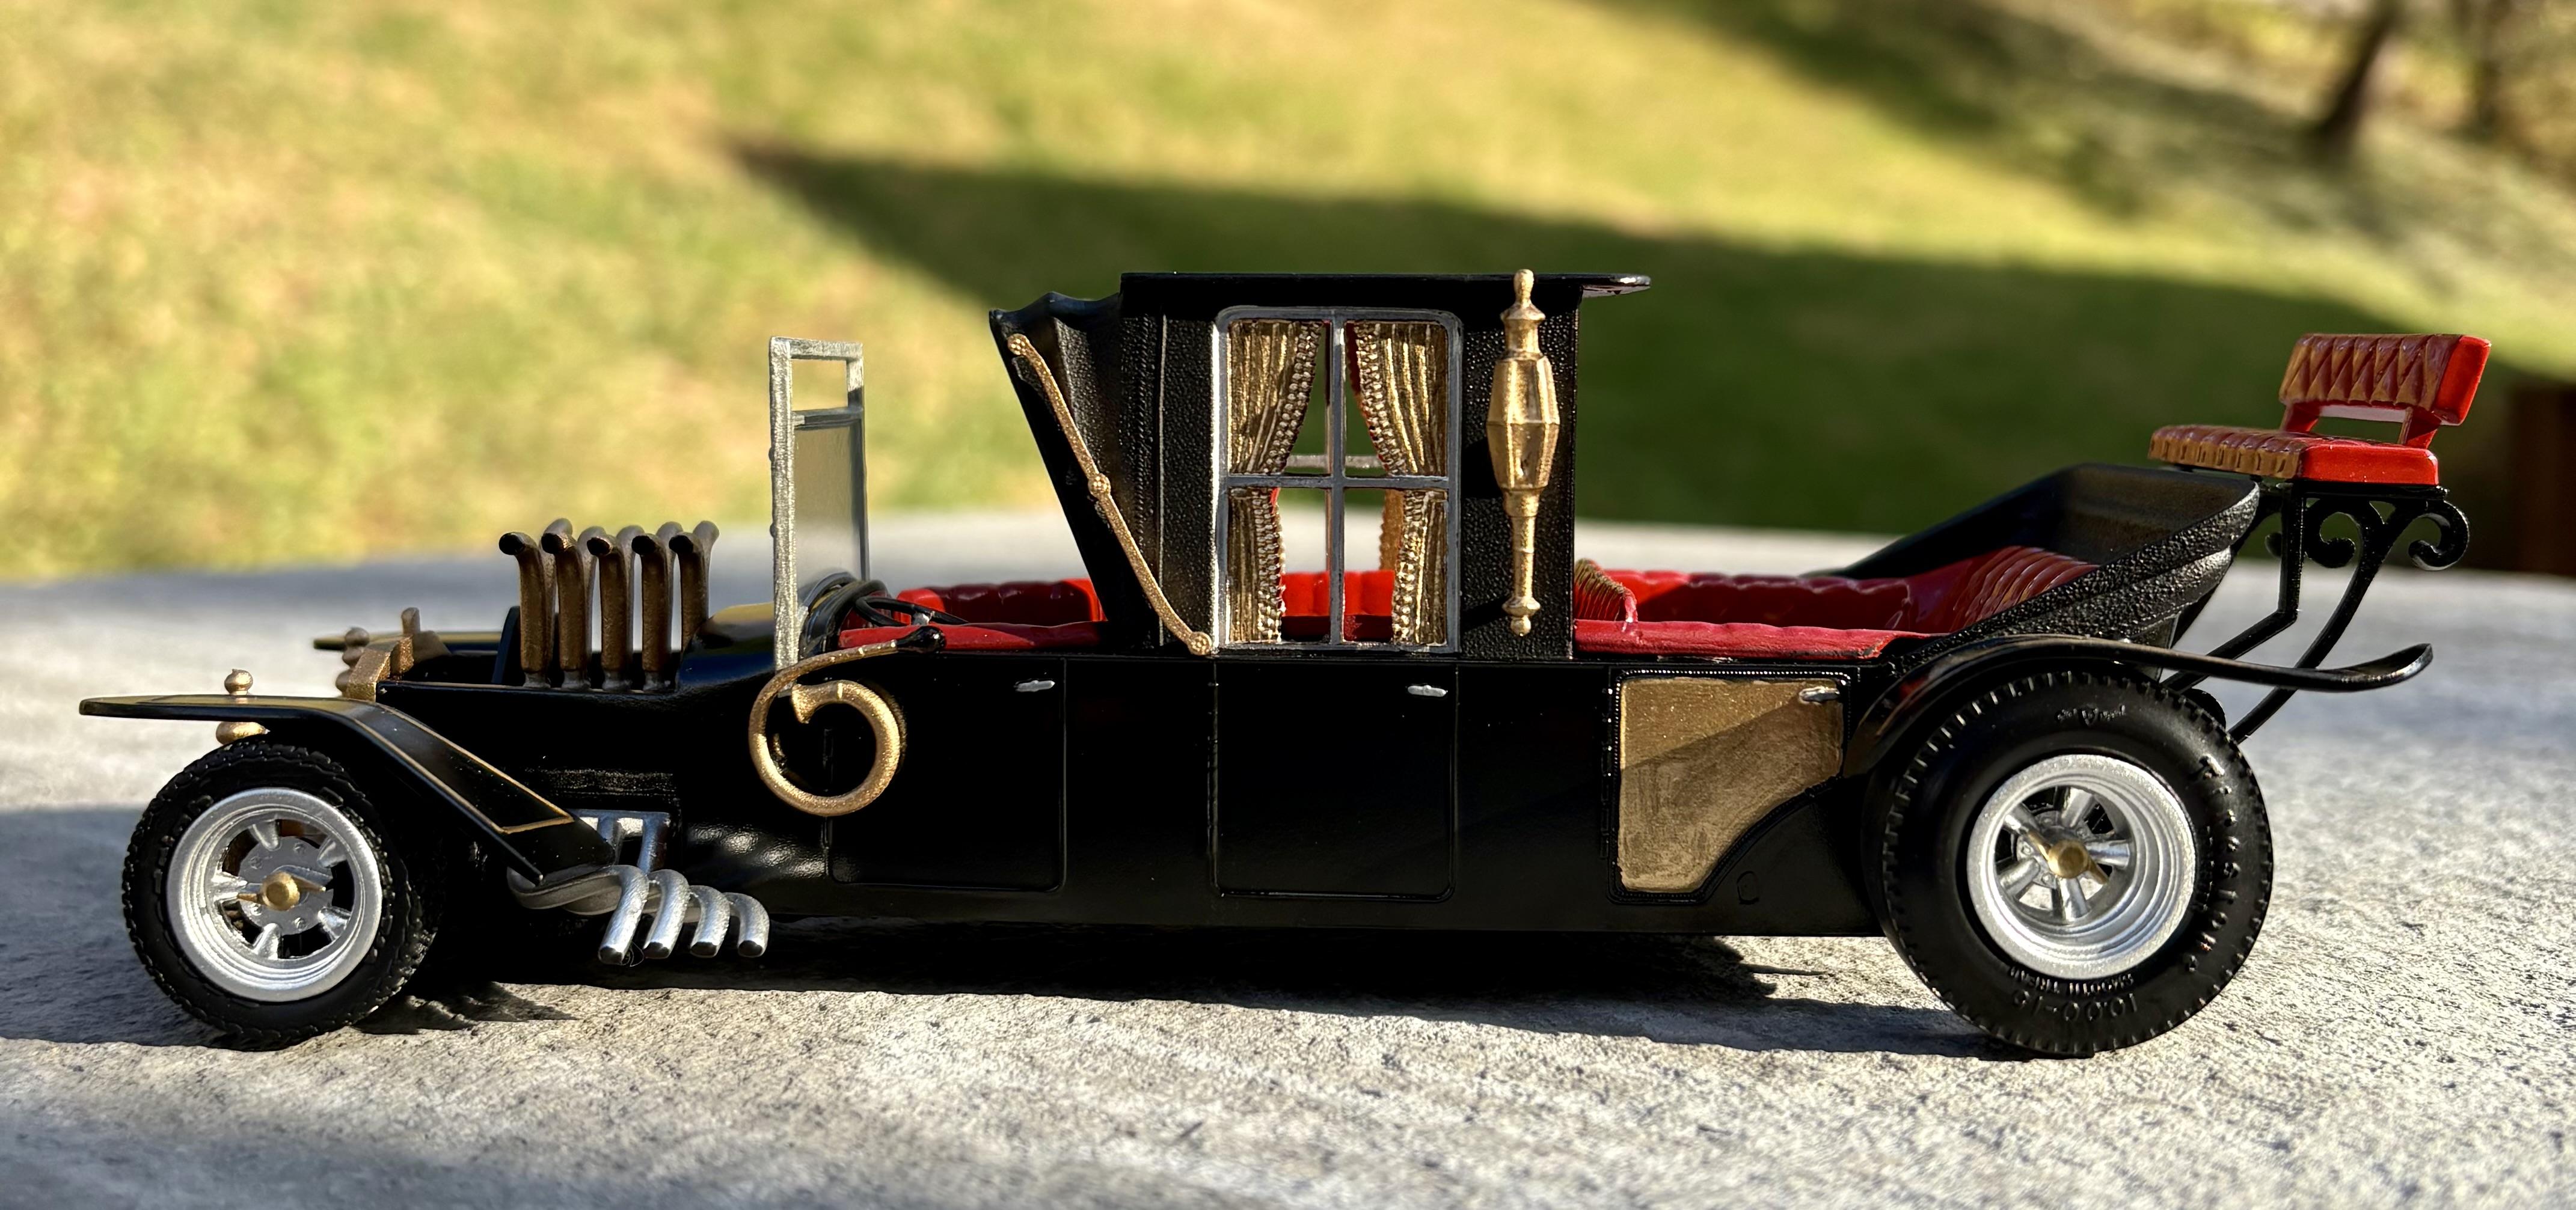
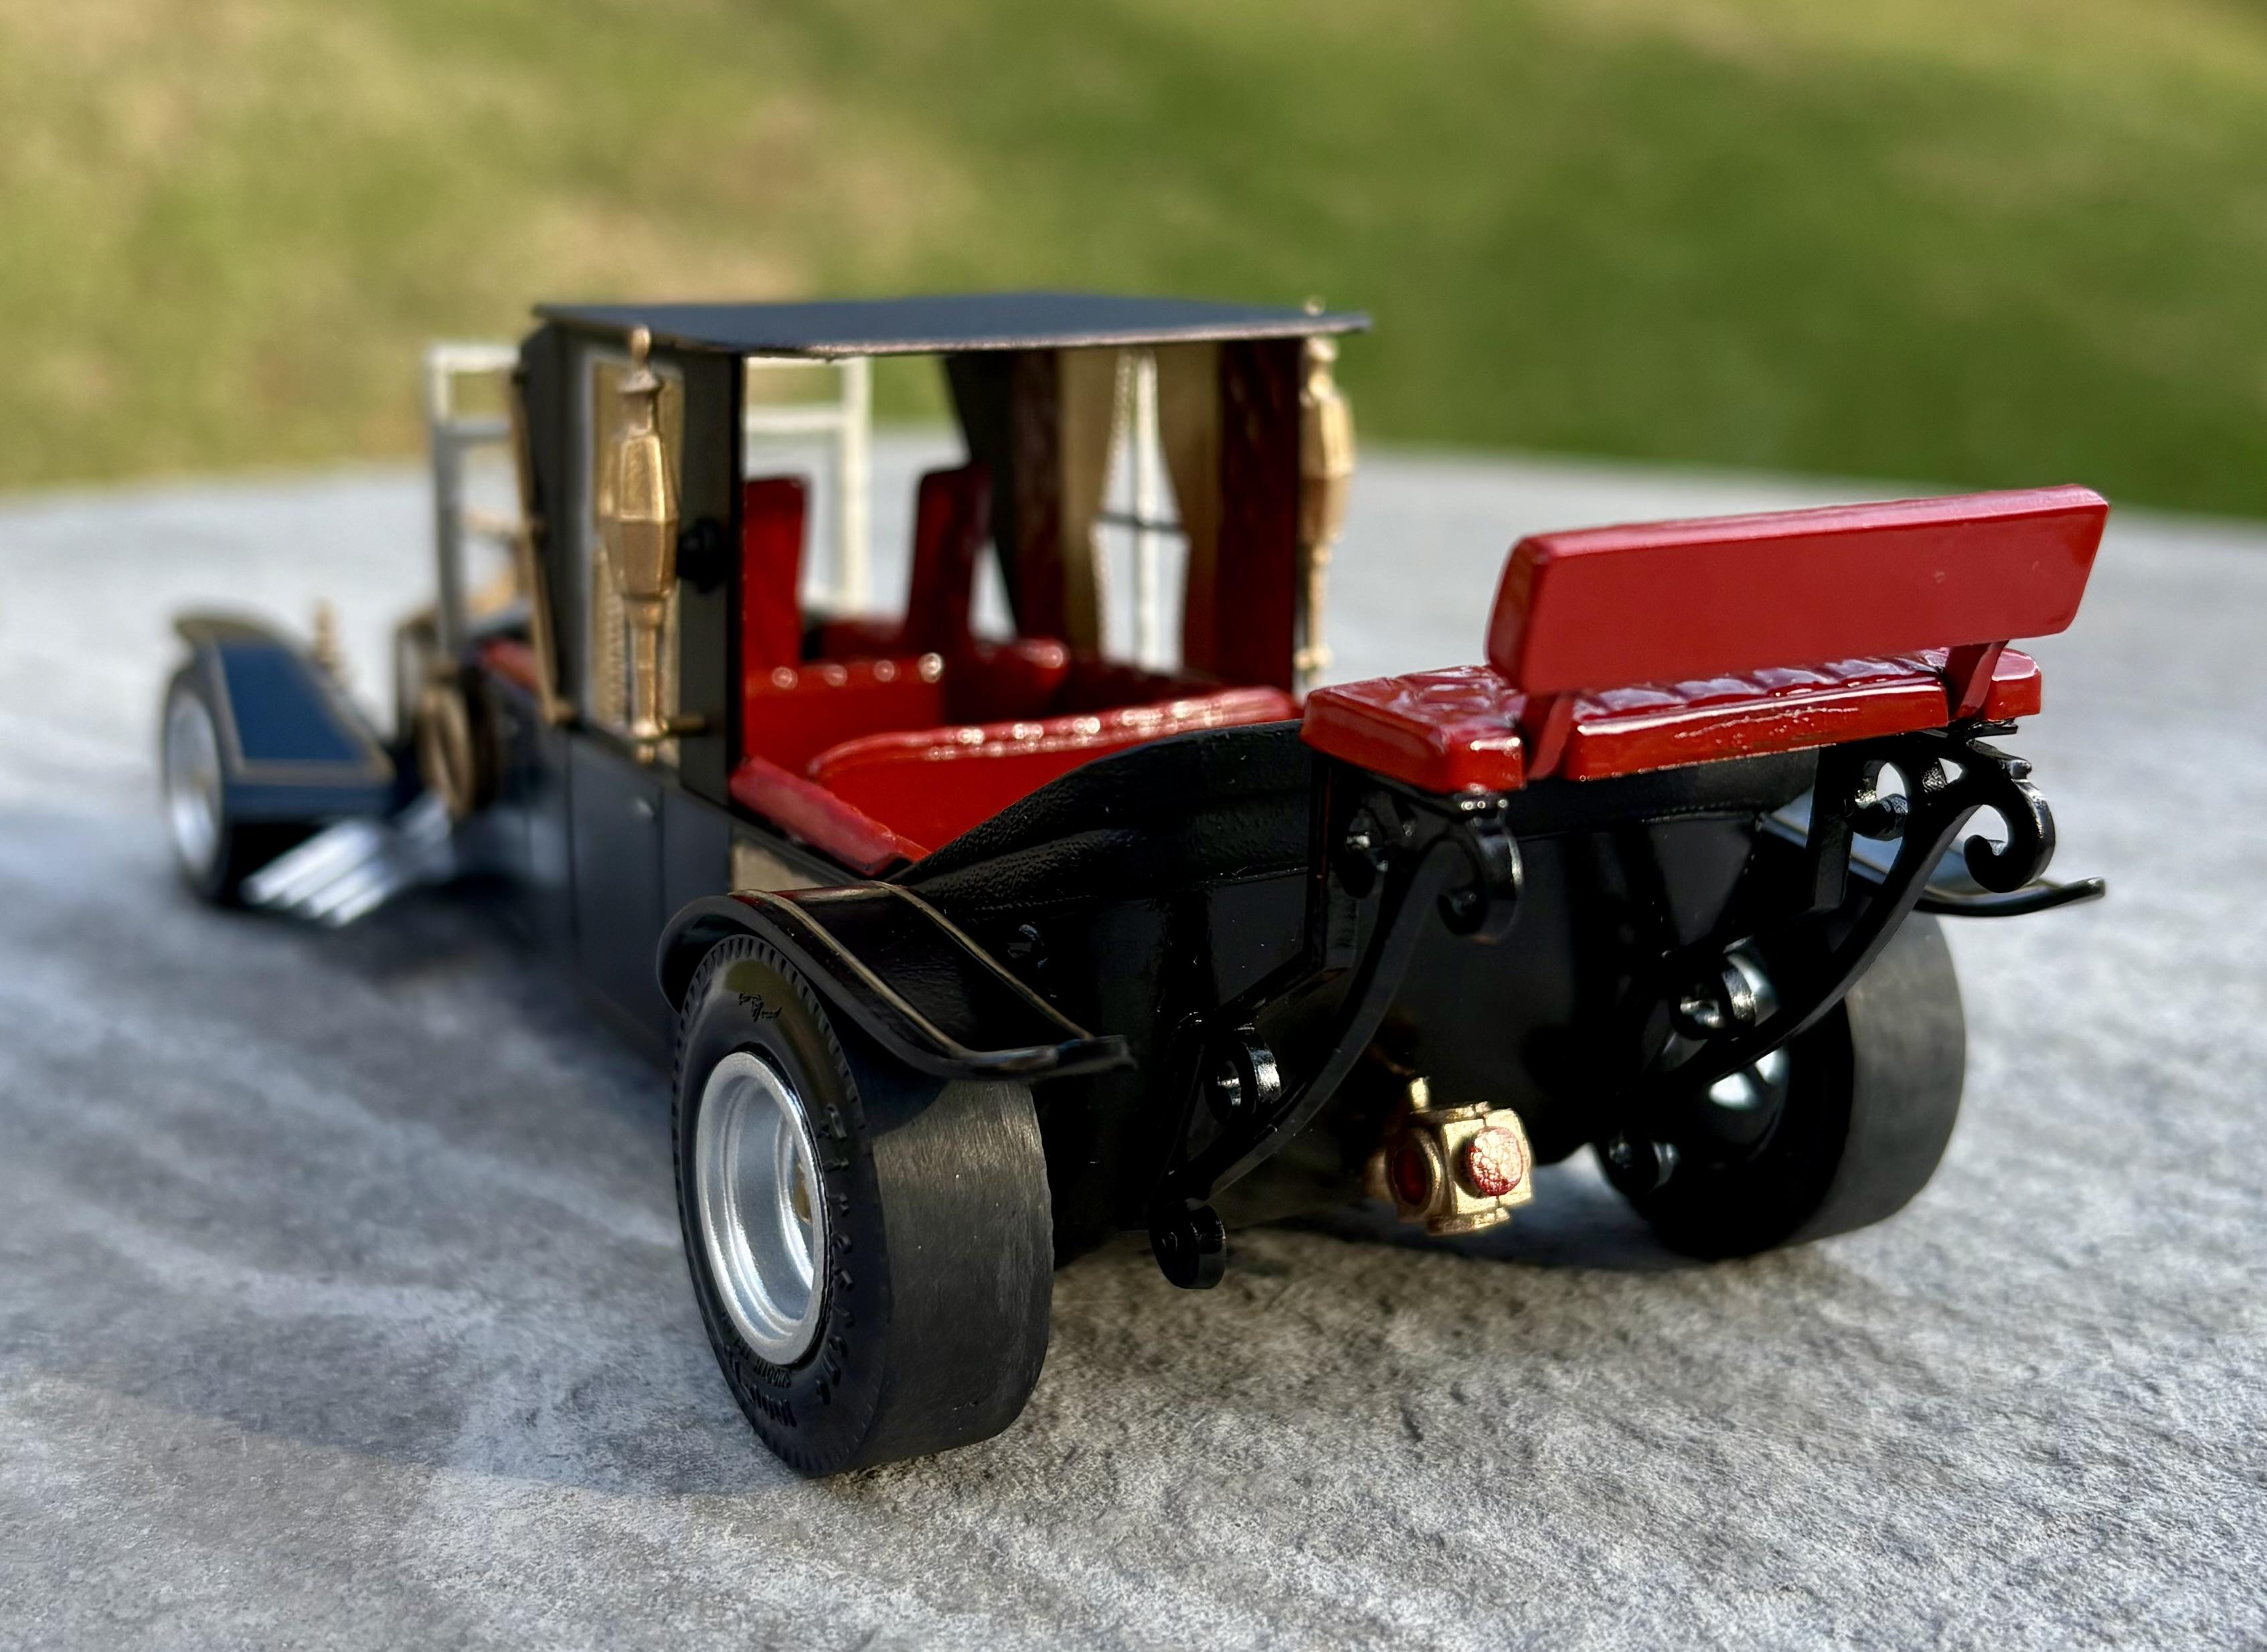
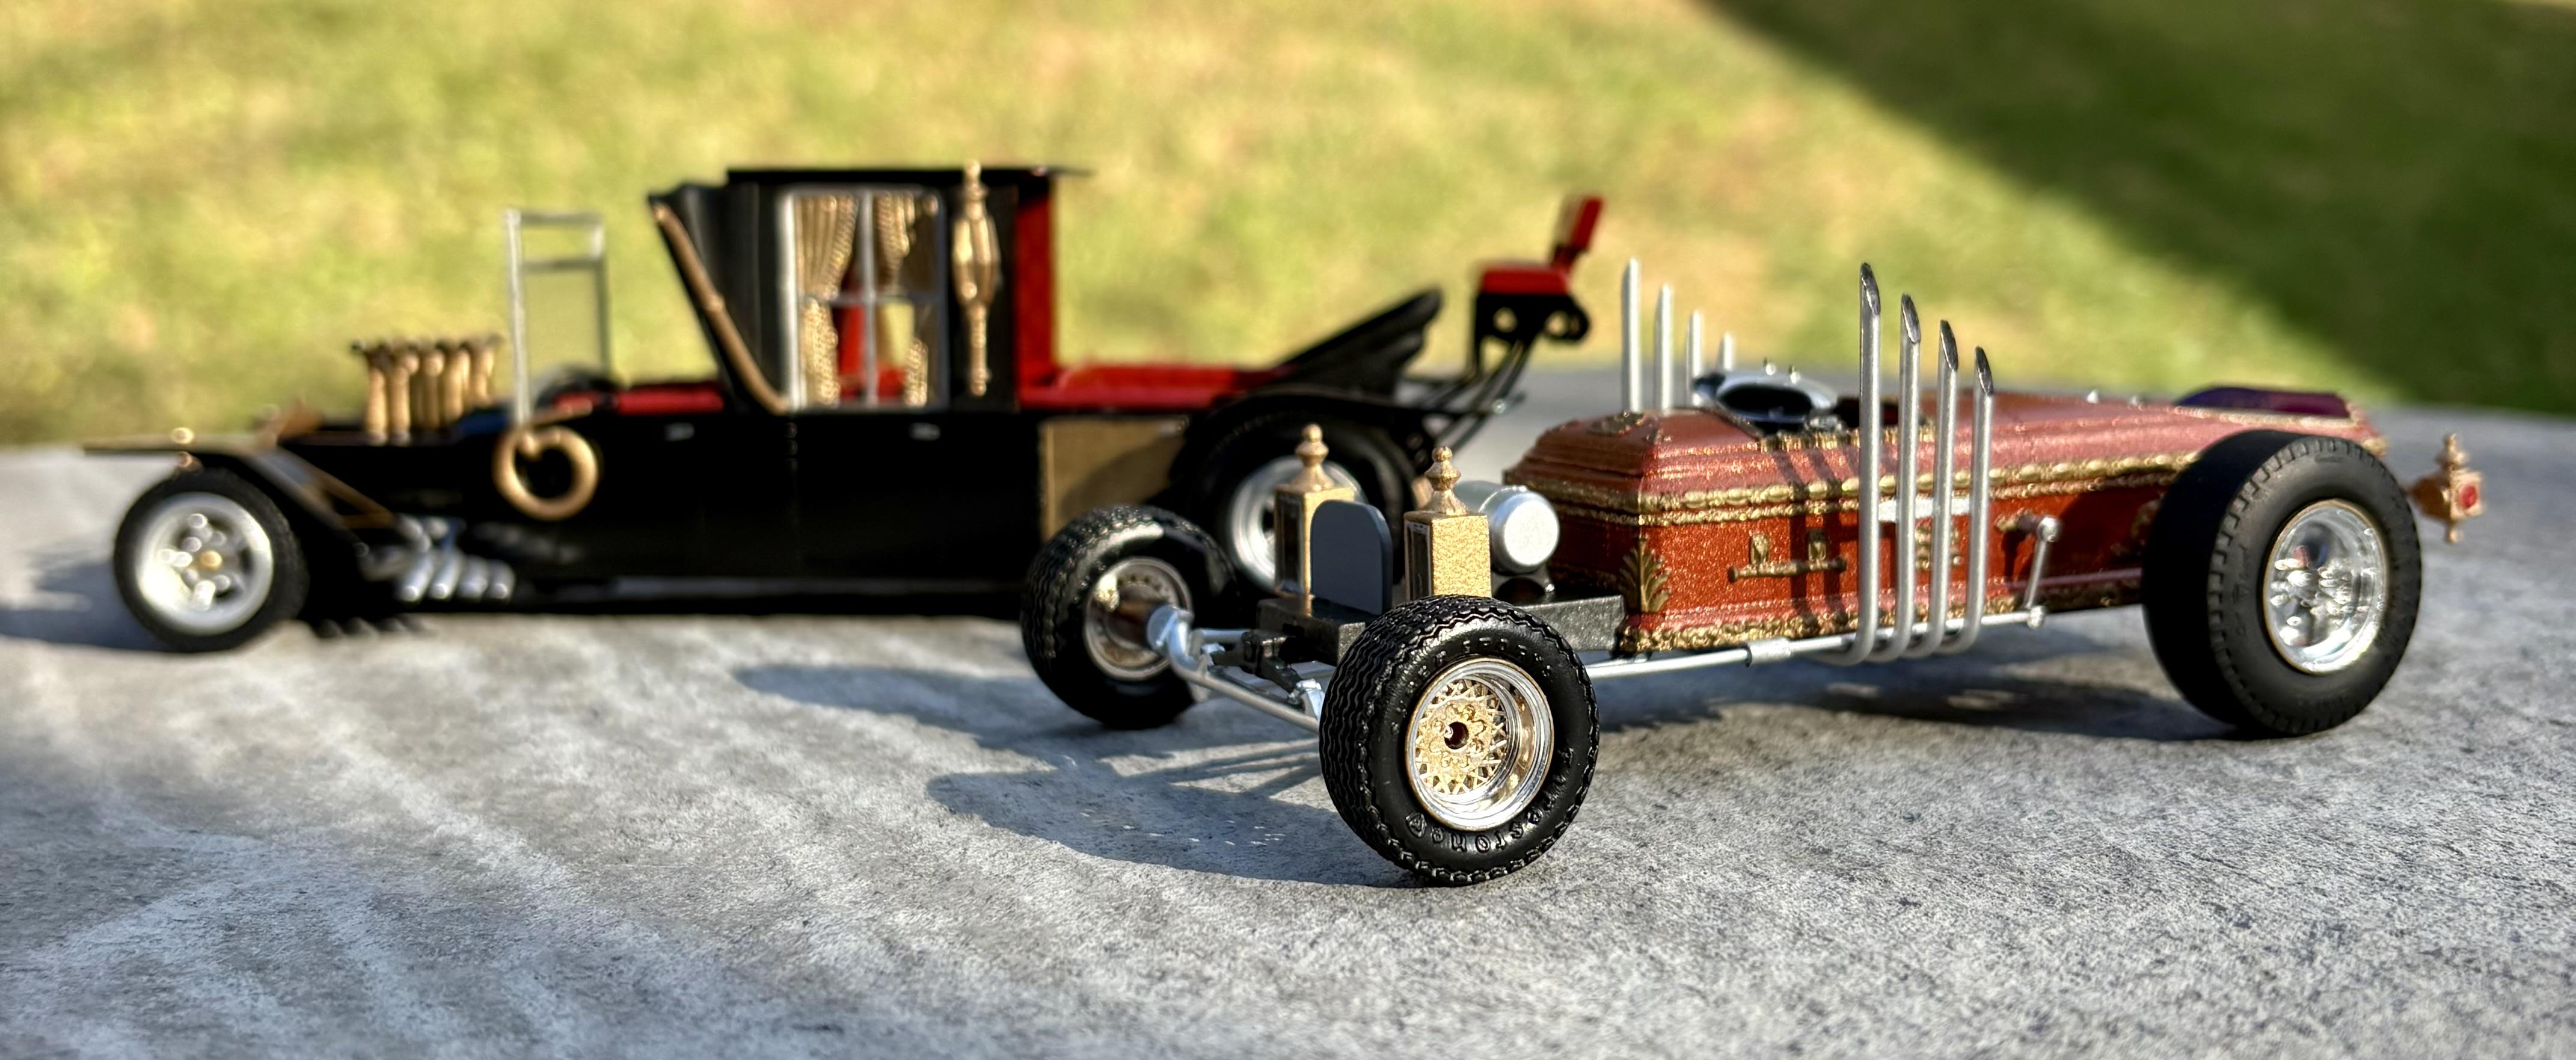
Thanks for your (and everyone’s) kind words. Answers to your questions below: Pinstriping was done by hand with a gold sharpie as was the gold trim items on the Drag-U-La Rear wheels and tires are original to both kits. Koach has different front tires but original wheels. Drag-U-La front wheels and tires are from a VW Scirocco kit. Attached a photo of the paint used on the Drag-U-La. Sprayed directly on the black plastic (i.e. no primer). A link to the Drag-U-La is below if you’re interested in seeing more photos. Thanks again for the kind words let me know if you have any other questions.

-
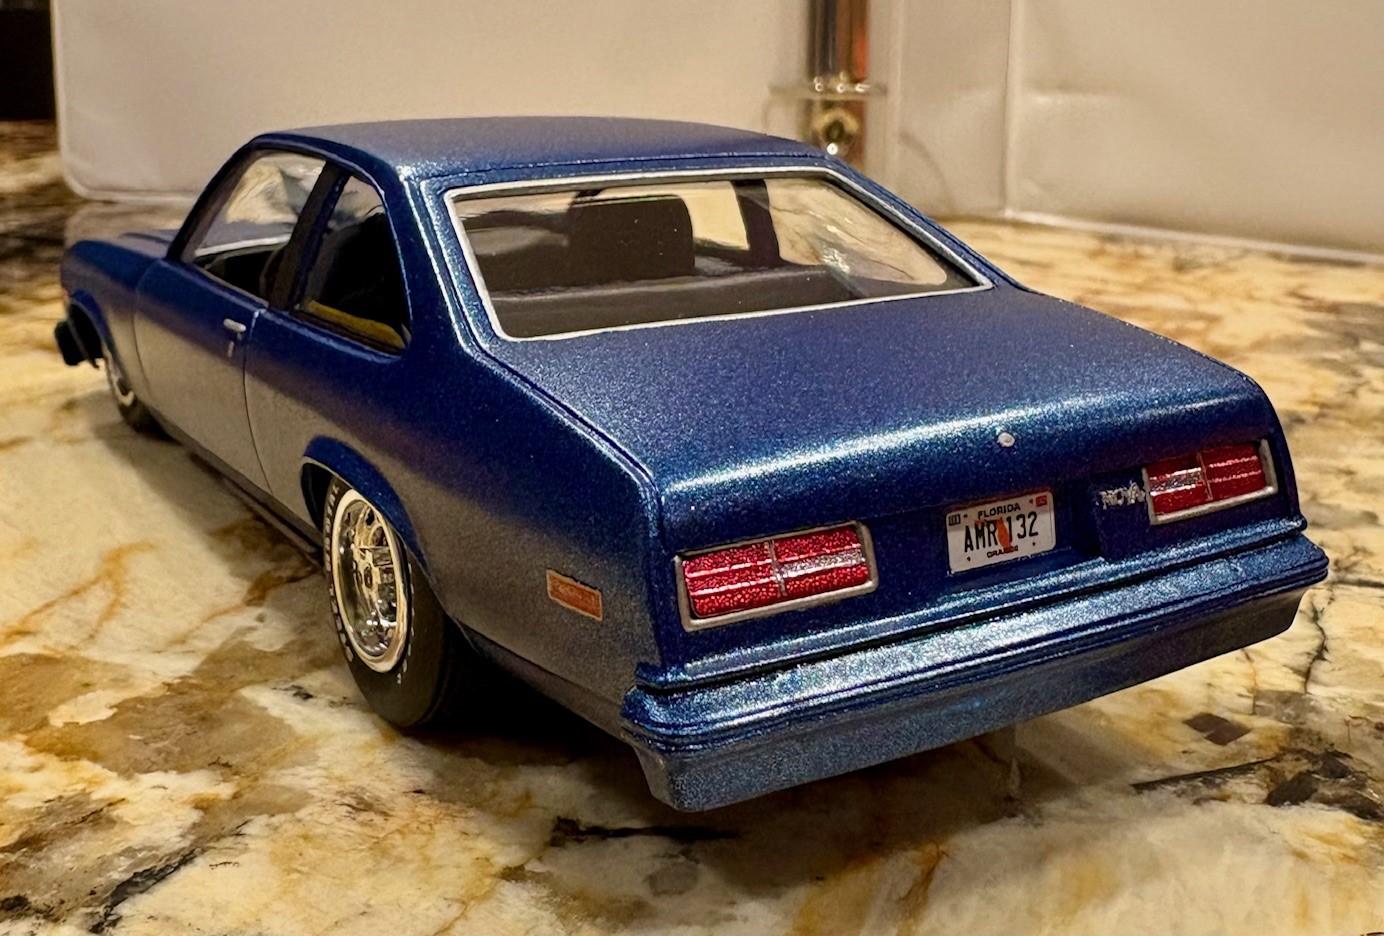
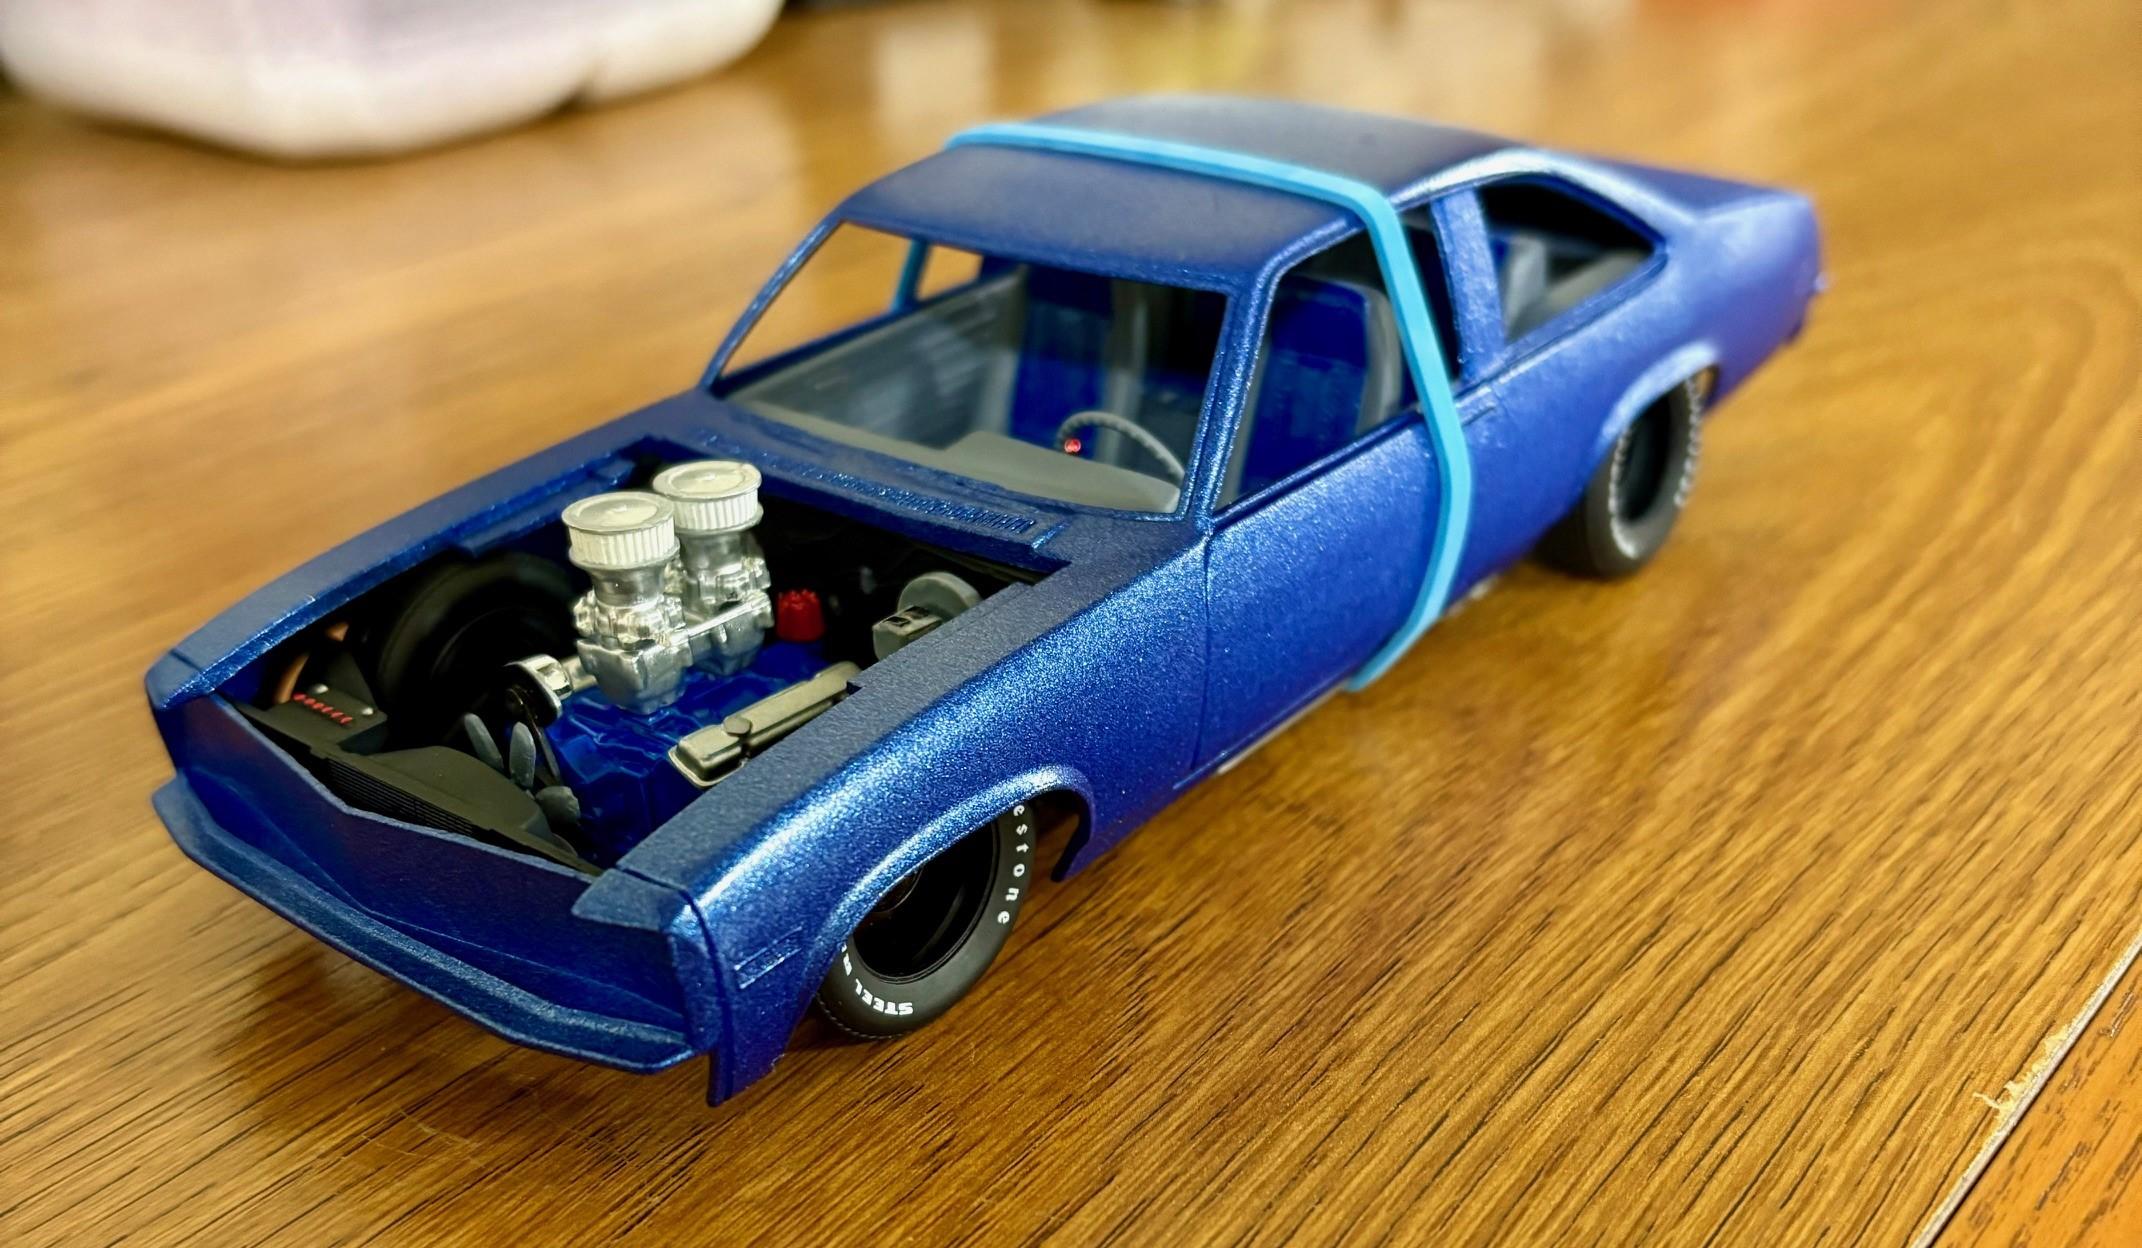
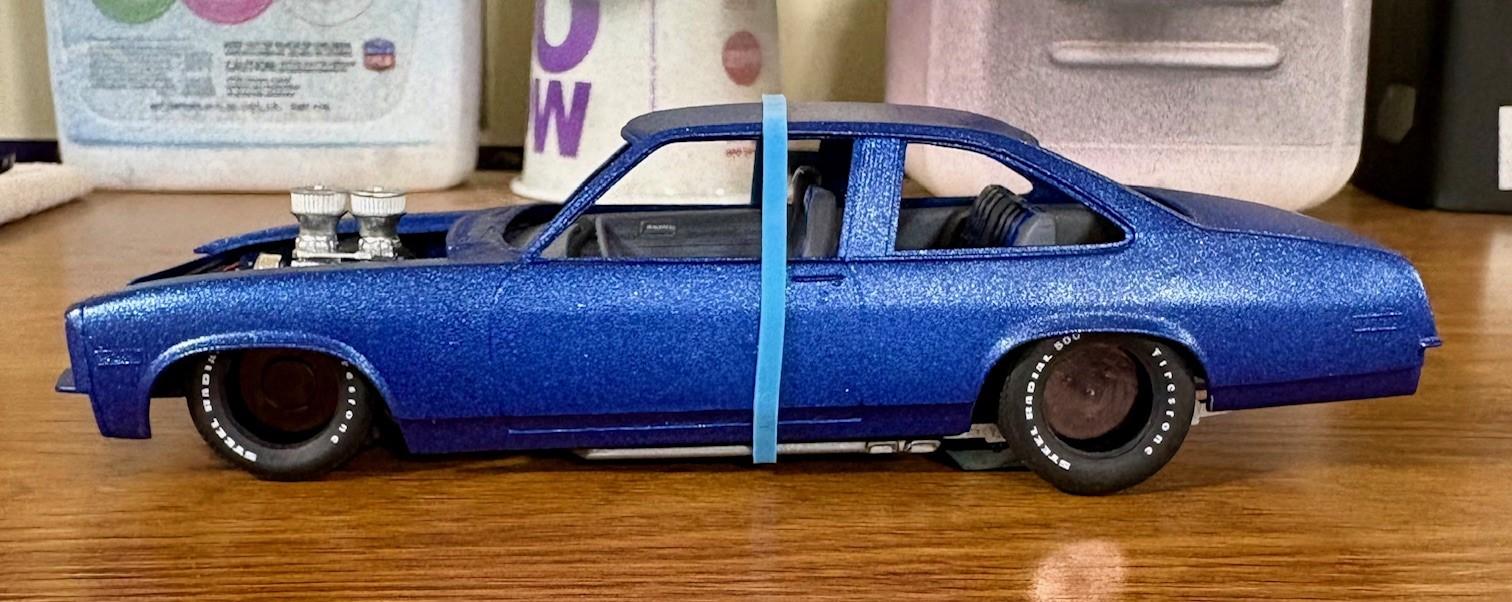
Got this one used online some time back. Not a glue bomb but had definitely been gone through. Only had half of the door steps and hood handles. So after seeing a few other non traditional builds online decided to lower it down making the missing parts unneeded. Thanks for looking.
- 10 replies
-
- 10
-

-
Thanks much appreciated
-
Thanks everyone for the kind words and recognition. It is much appreciated!
-
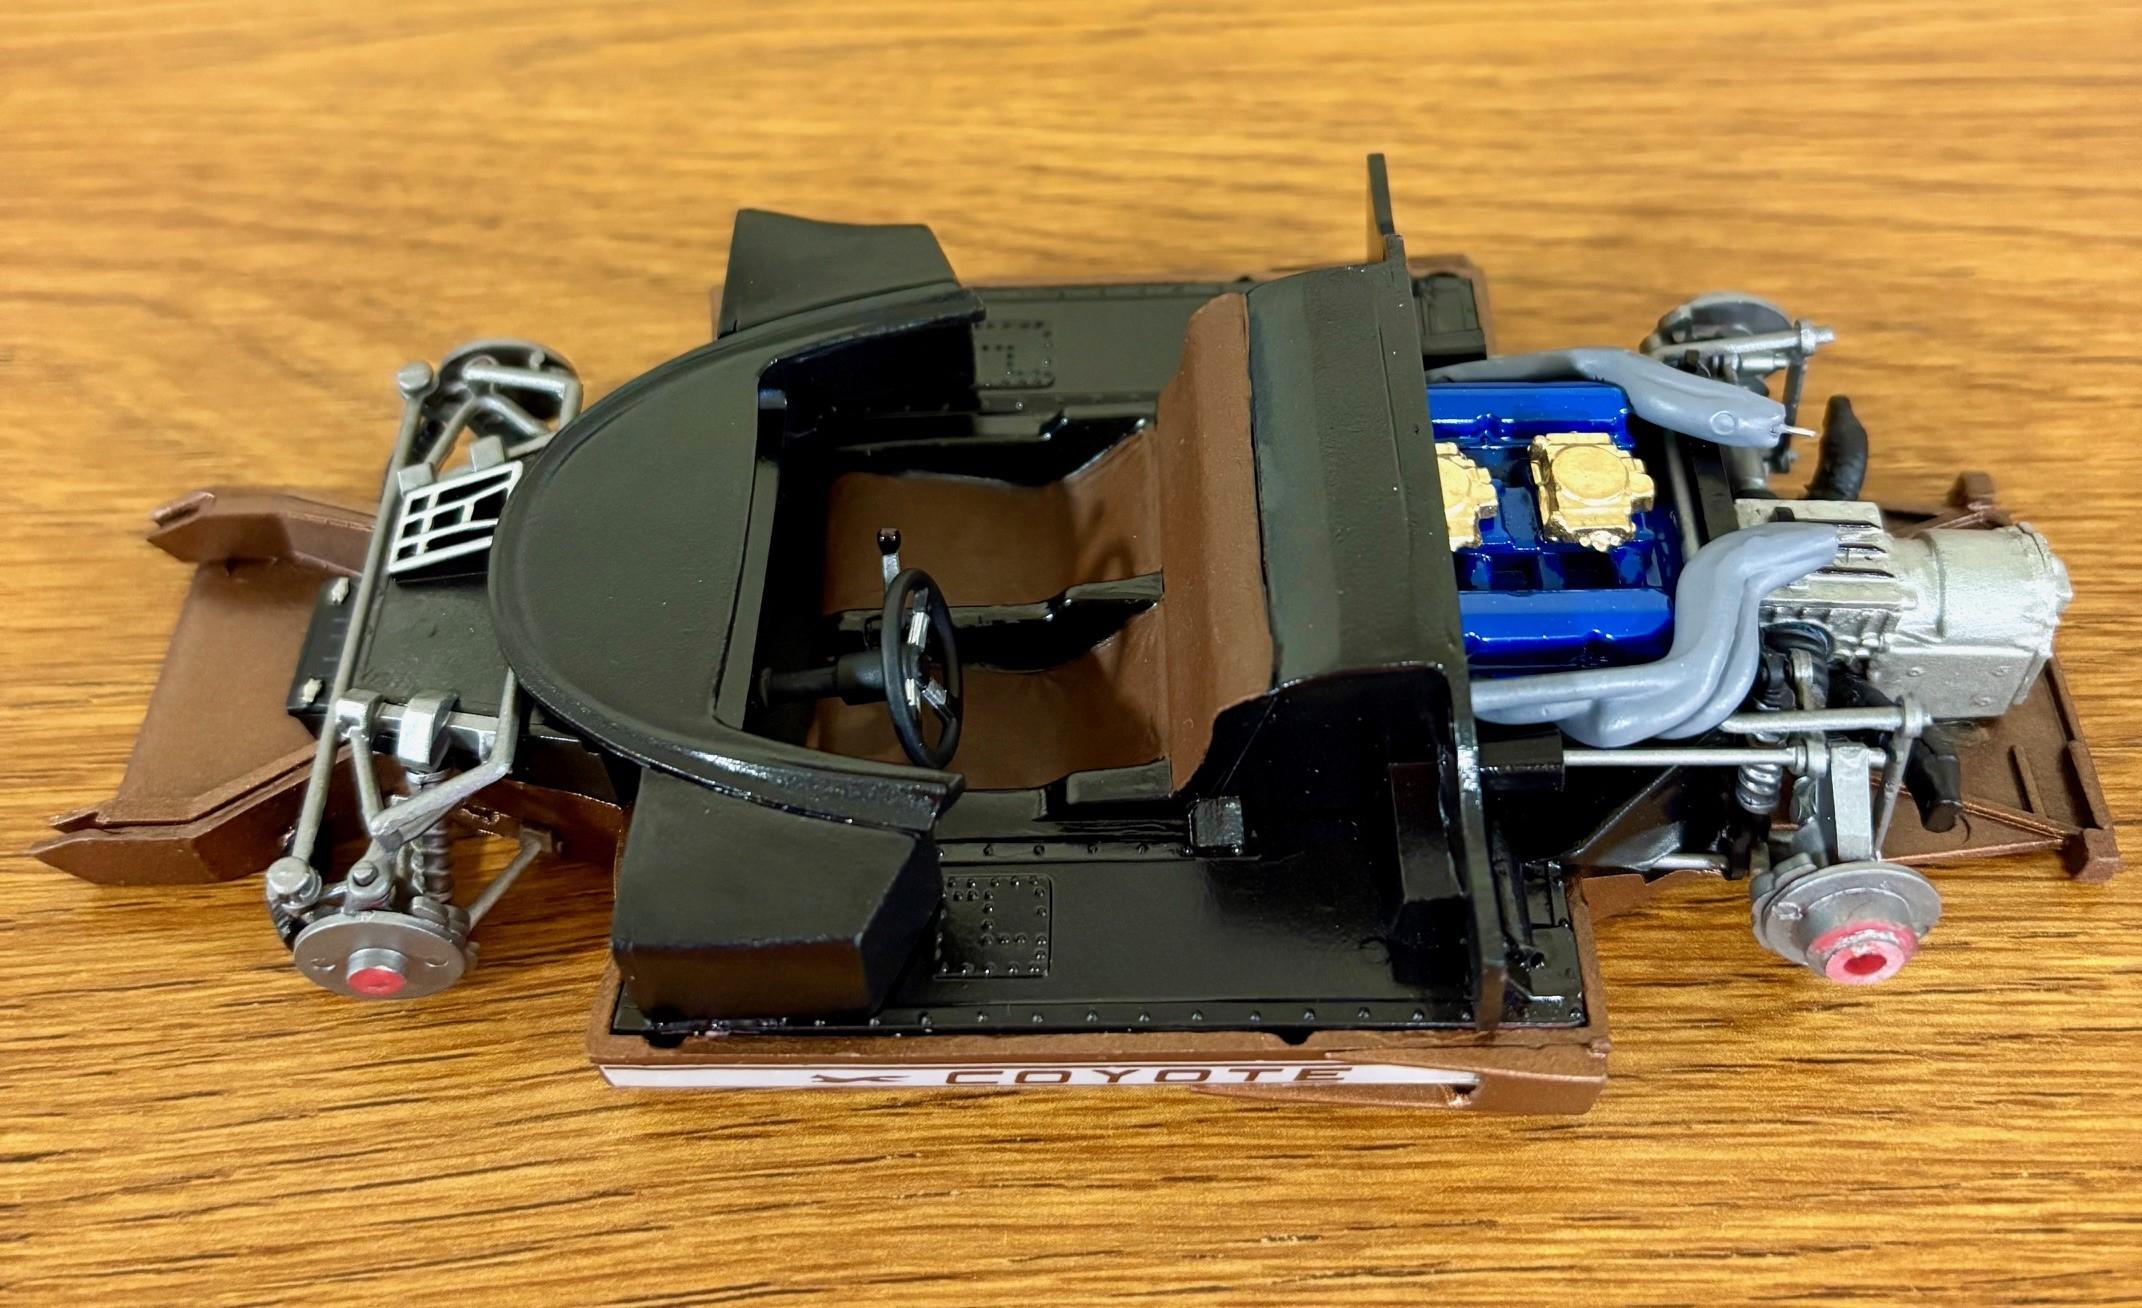
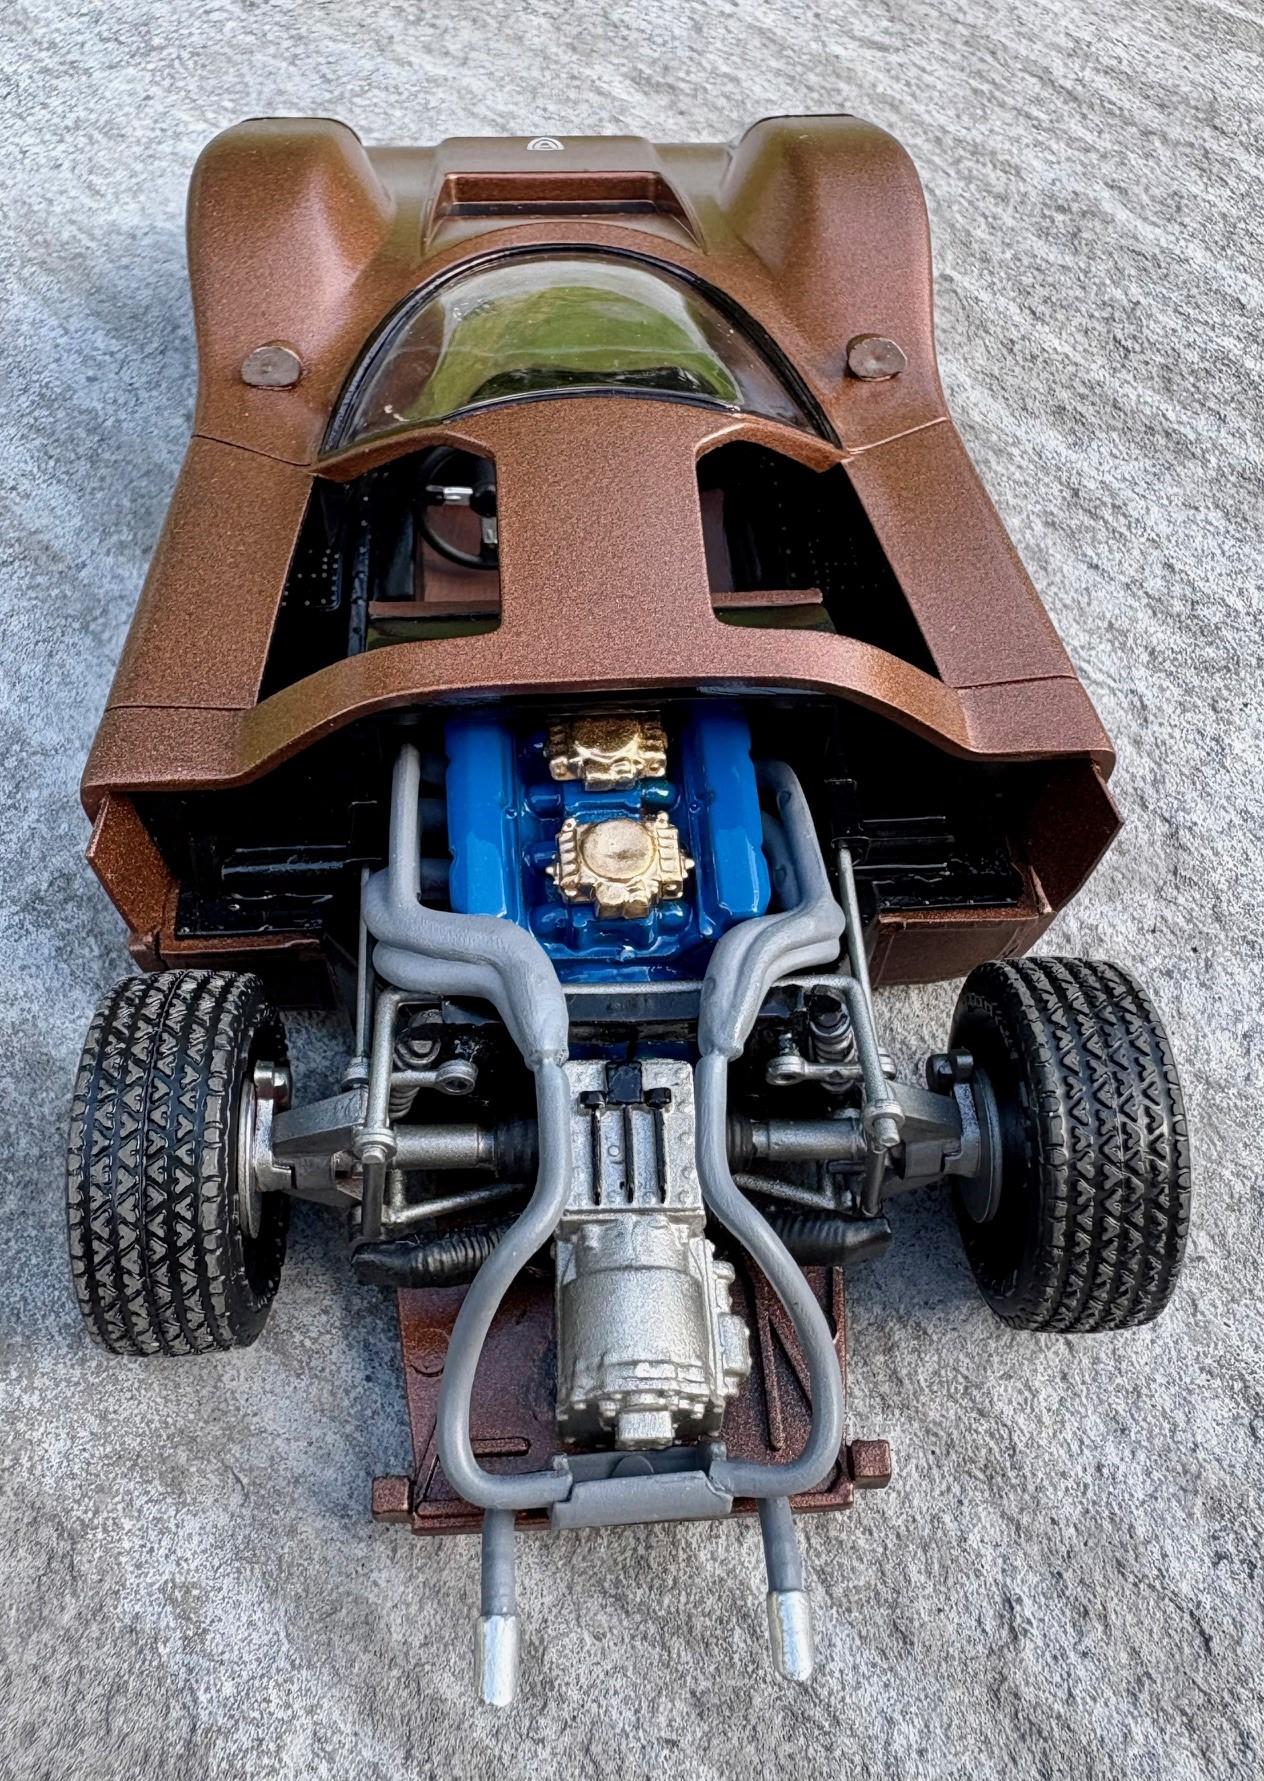
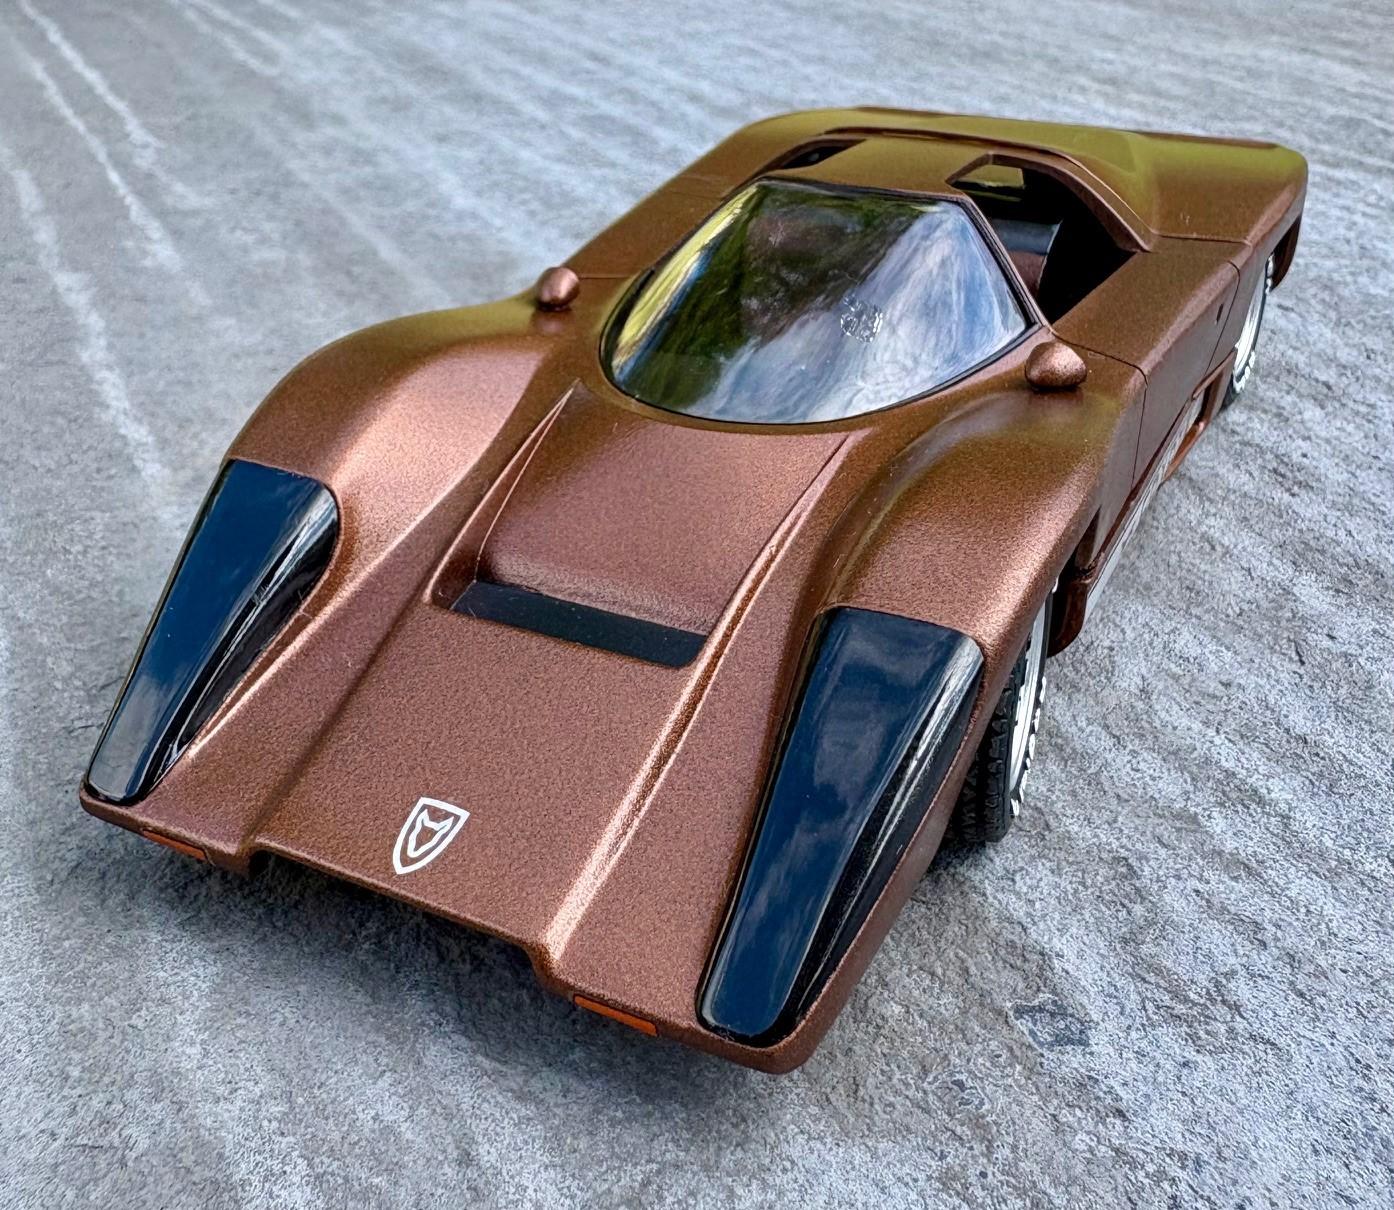
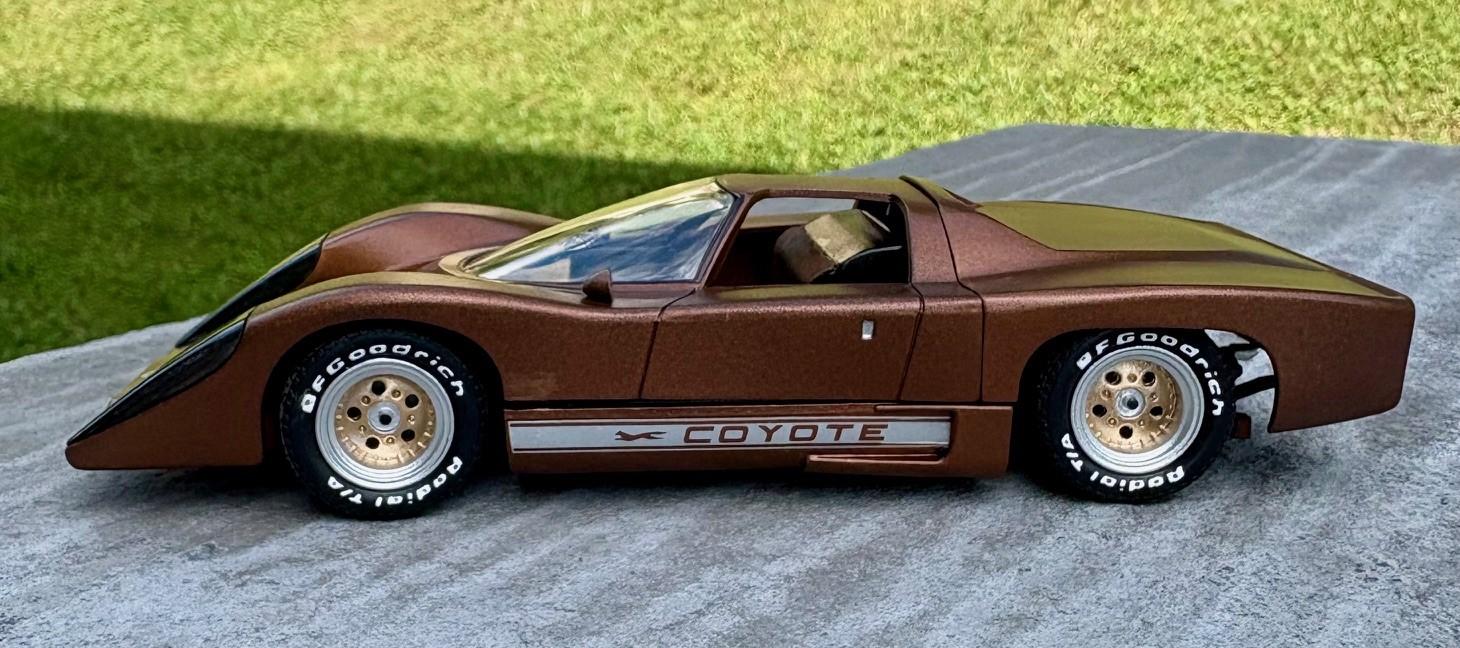
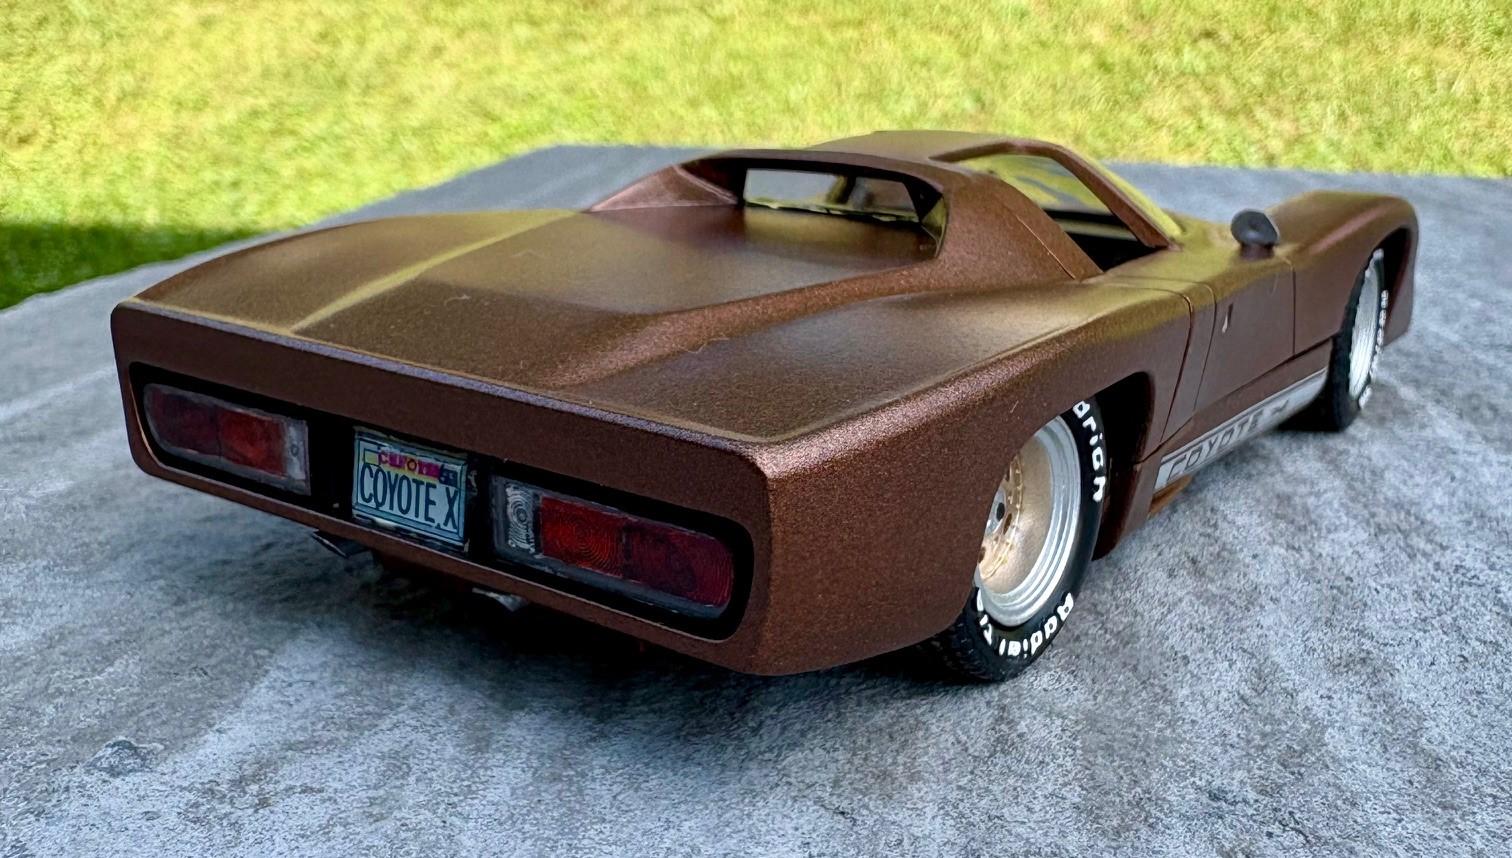
My version of the Hardcastle and McCormick Coyote X. Started as a mostly assembled Glue Bomb, disassembled, lots of fine tuning, and ended up here. If you need a challenge in your life, I recommend tackling this kit. Saw it described within the forum as "unbuildable". While that may be a bit of an exaggeration, getting it together is no small accomplishment. As always thanks for looking.
- 18 replies
-
- 24
-
-
Thanks! Hood Scoop is from a C3 Corvette. Bought the hood off eBay as an individual piece. Cut a hole in the original Camaro hood and fitted the L88 portion inside.
-
Thanks Everyone, Much Appreciated!
-
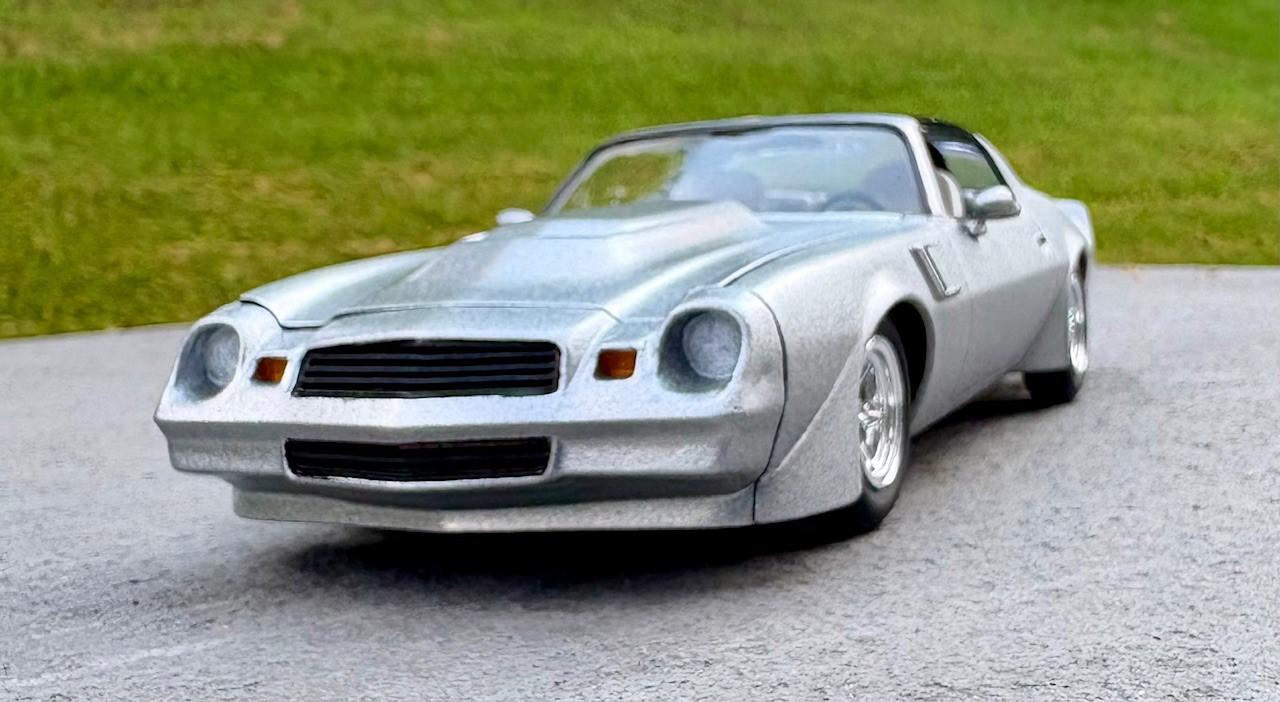
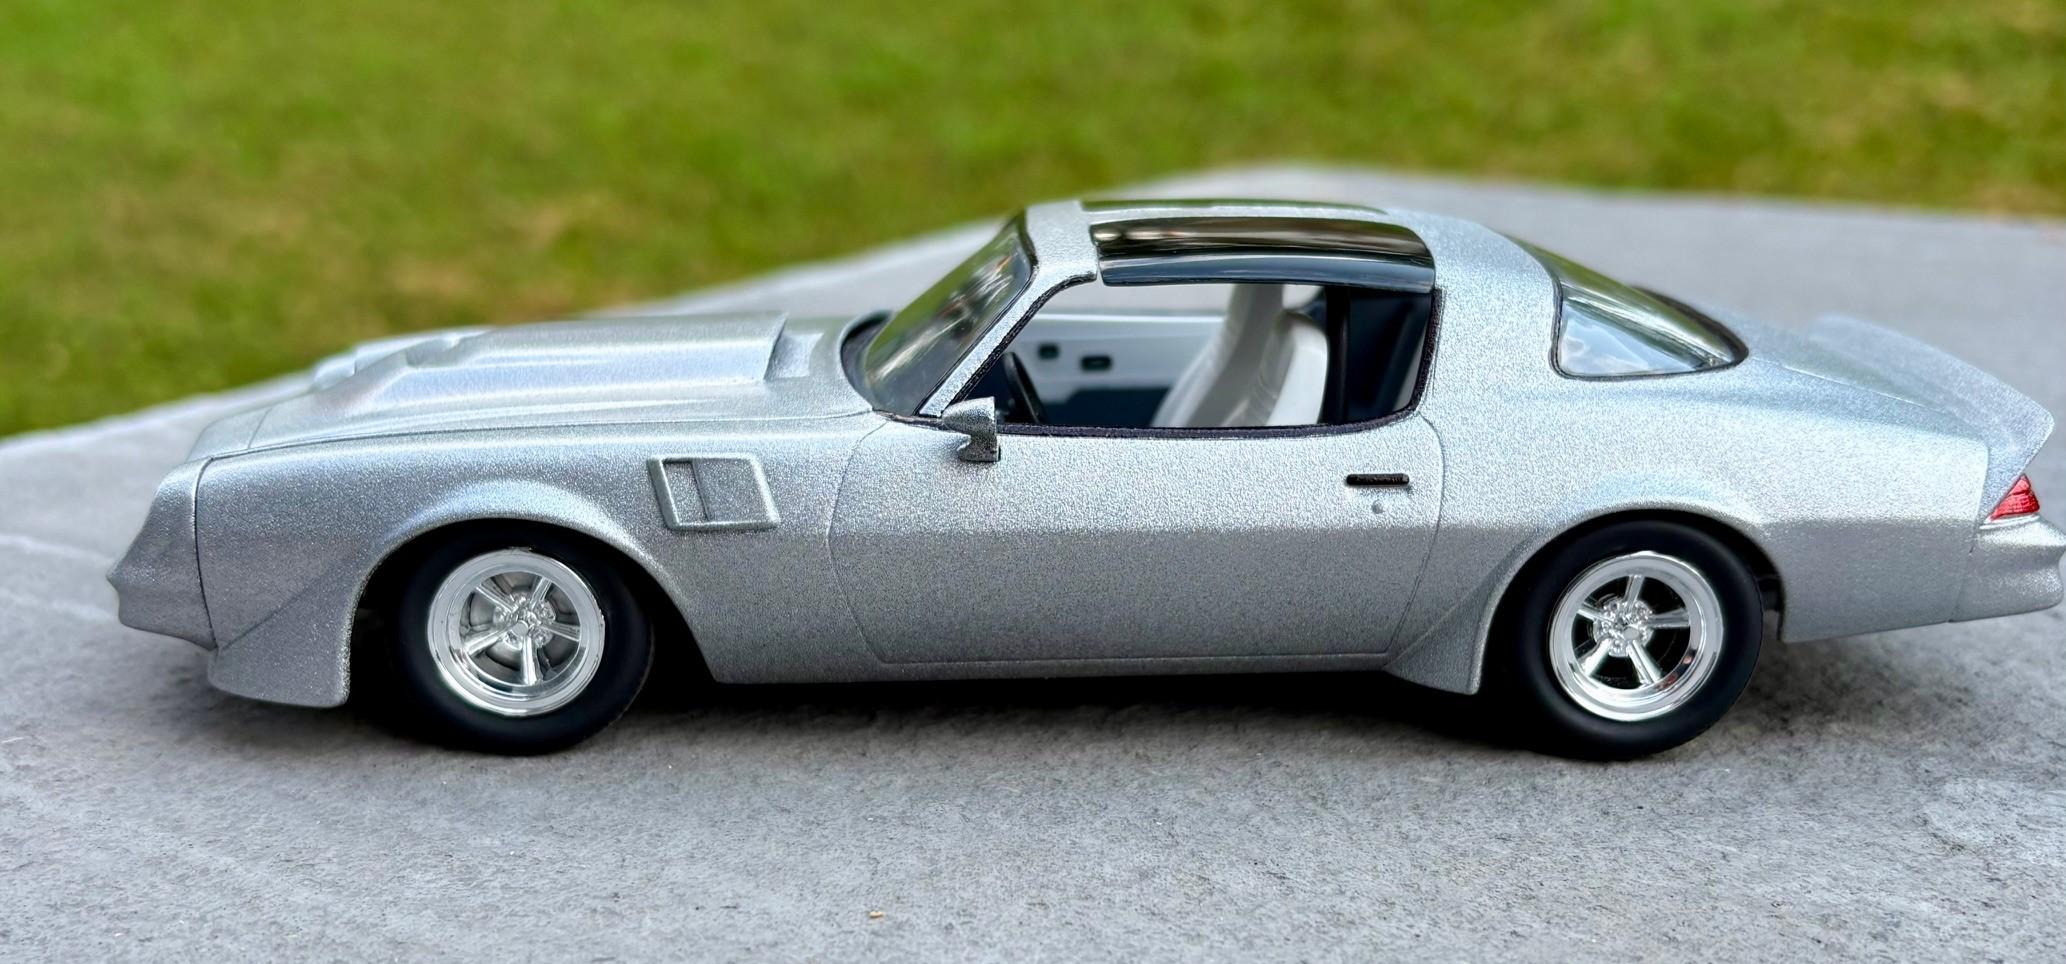
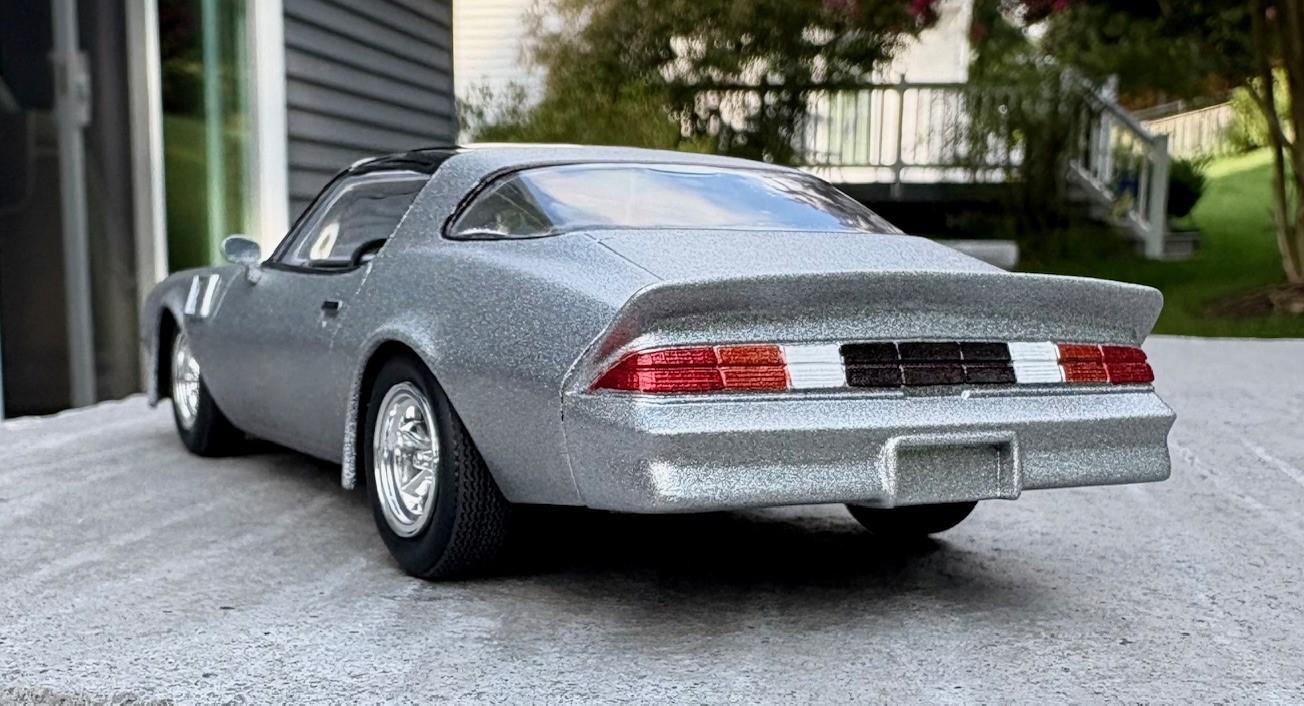
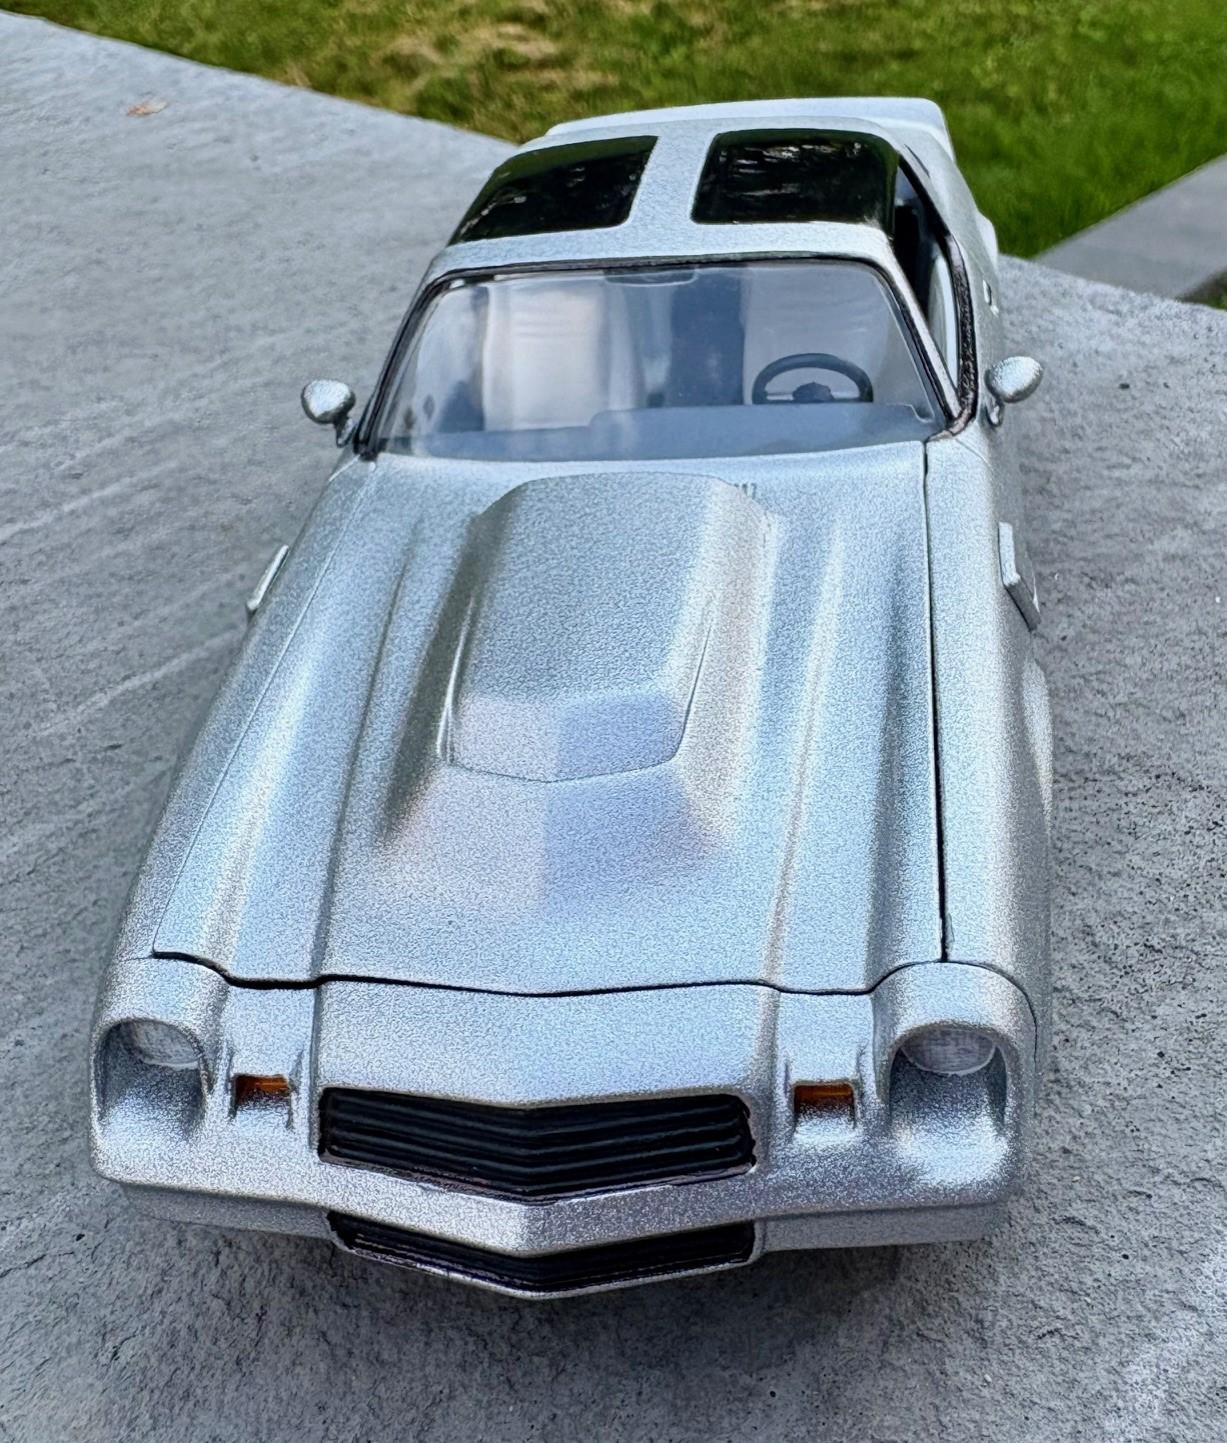
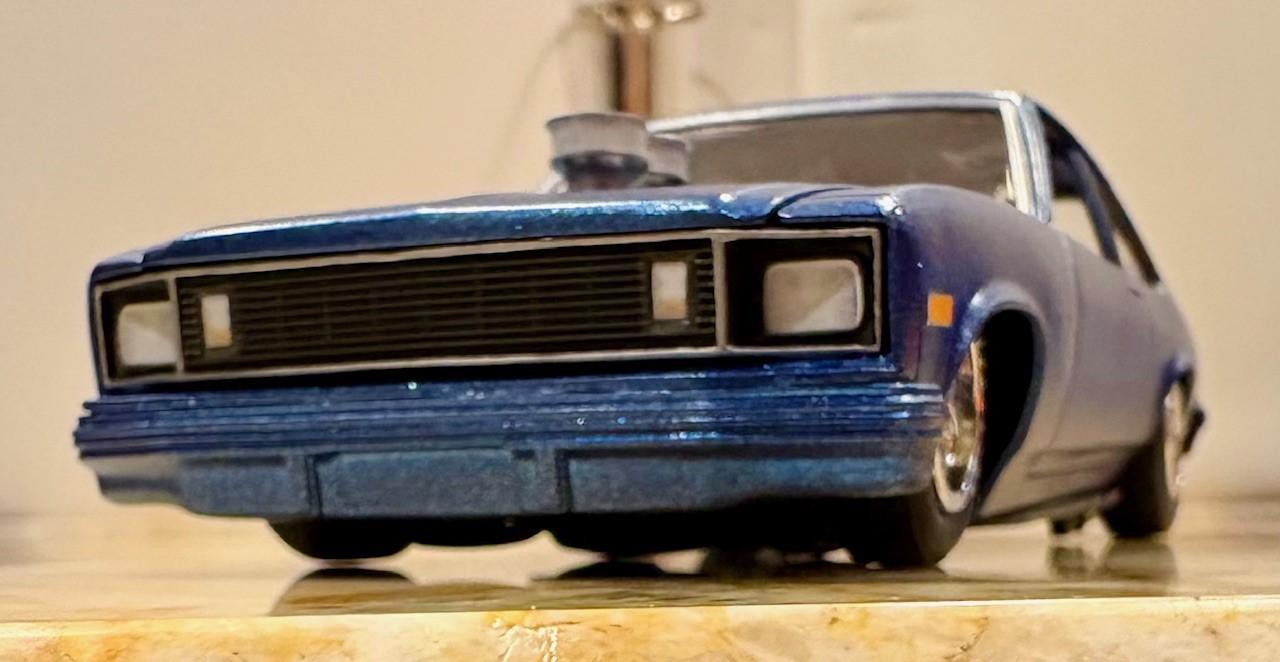
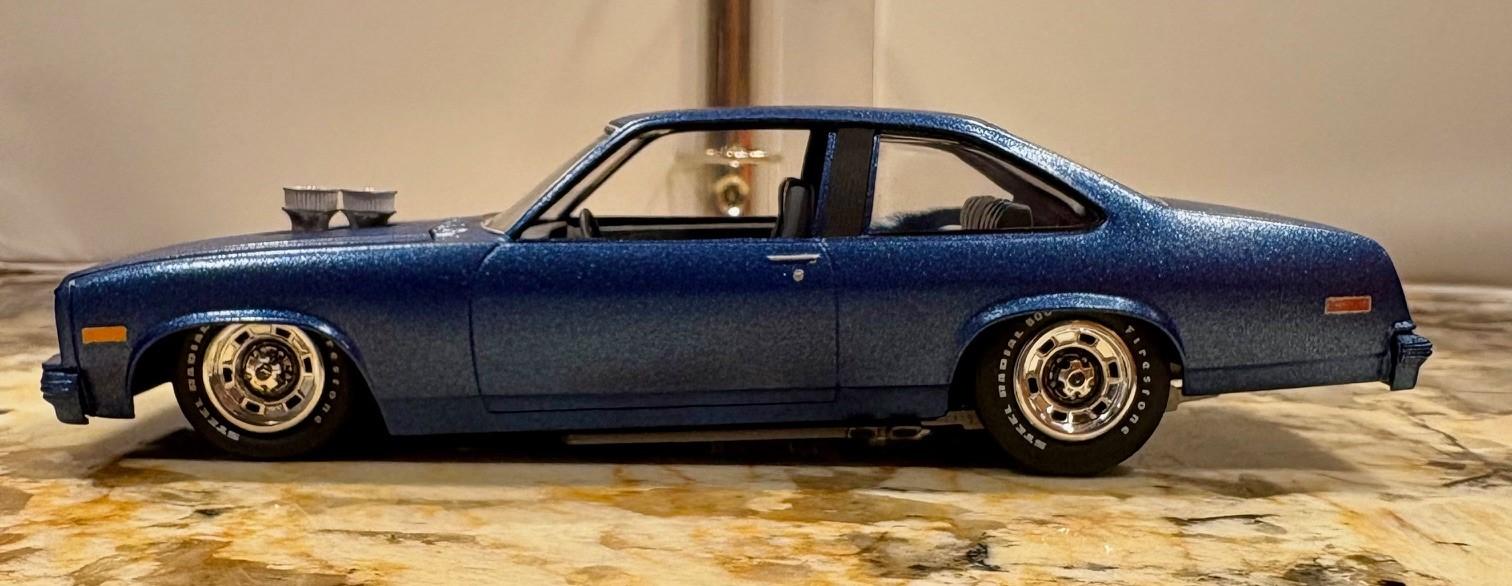
81 Camaro Snap Kit Revell tried to pass off as a Skill Level 4. Not a bad kit as long as you go into it knowing what to expect. As always thanks for looking.
-
Ford F-100 Hot Rod
Just Jim replied to Just Jim's topic in Model Trucks: Pickups, Vans, SUVs, Light Commercial
Thanks Guys, Much Appreciated! -
Who doesn't love a mock-up? Let's see yours!
Just Jim replied to Belairconvertable's topic in WIP: Model Cars
Looking to improve on the 81 Camaro Snap Kit Revell tried to pass off as a Skill Level 4. Not a bad kit as long as you go into it knowing what to expect.
-
Ford F-100 Hot Rod
Just Jim replied to Just Jim's topic in Model Trucks: Pickups, Vans, SUVs, Light Commercial
Thank you for the great compliment! When I got back into the hobby a few years ago, never thought I would be the guy who inspires others. In a world that sometimes feels overrun with noise and negativity, I'm glad to be one of the folks (there are many out there if you look) adding something positive. -
Ford F-100 Hot Rod
Just Jim replied to Just Jim's topic in Model Trucks: Pickups, Vans, SUVs, Light Commercial
Thanks Everybody, Much Appreciated! -
Ford F-100 Hot Rod
Just Jim replied to Just Jim's topic in Model Trucks: Pickups, Vans, SUVs, Light Commercial
Thanks Everybody, Much Appreciated! -
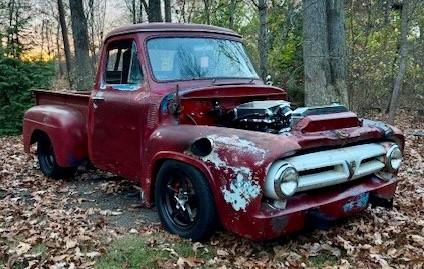
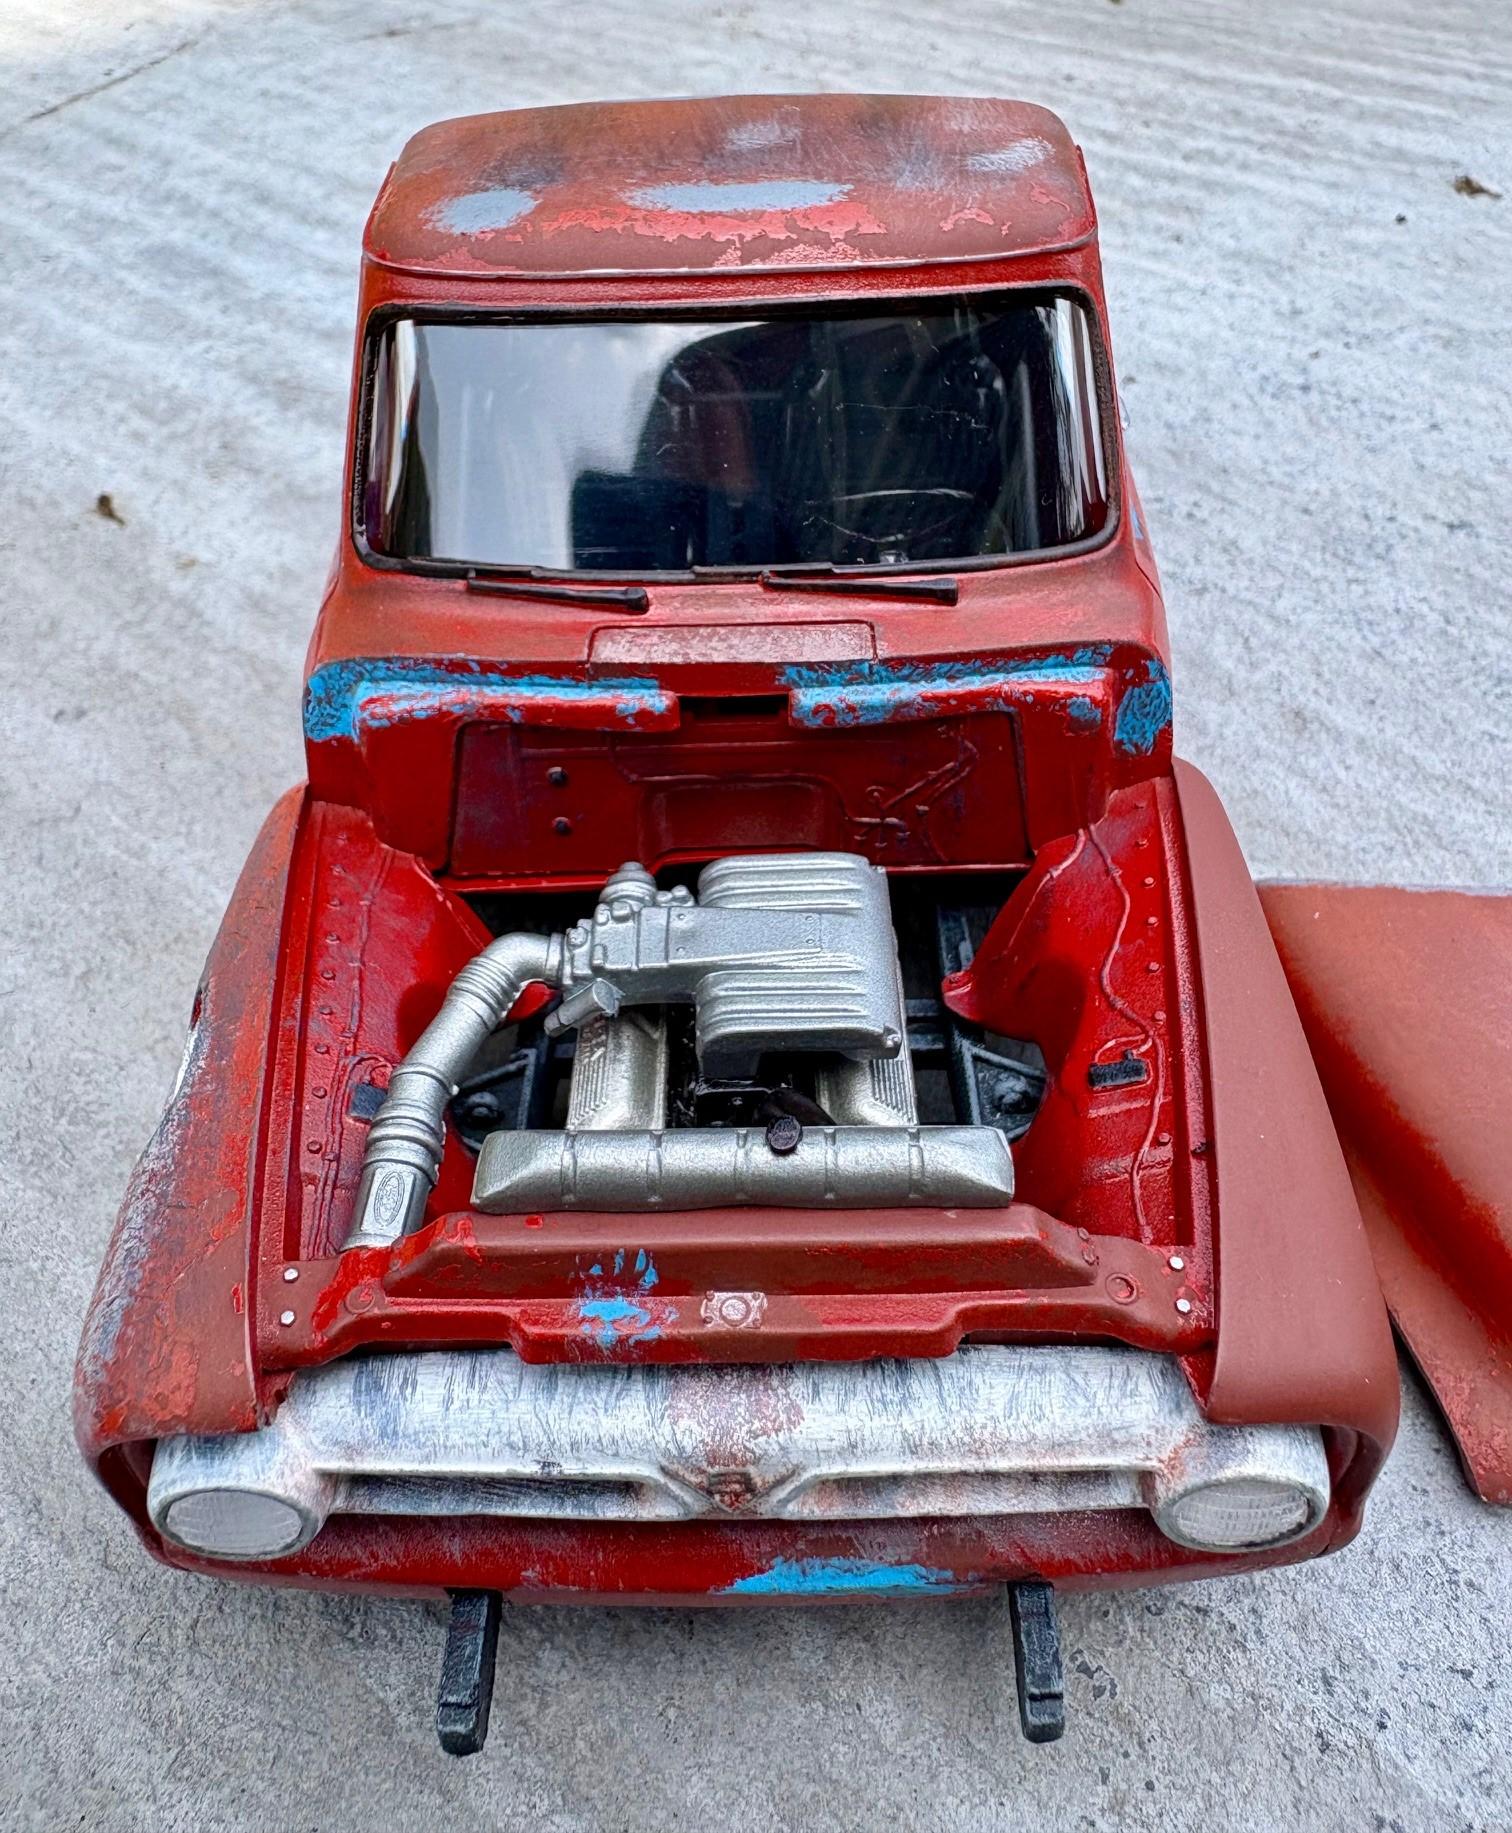
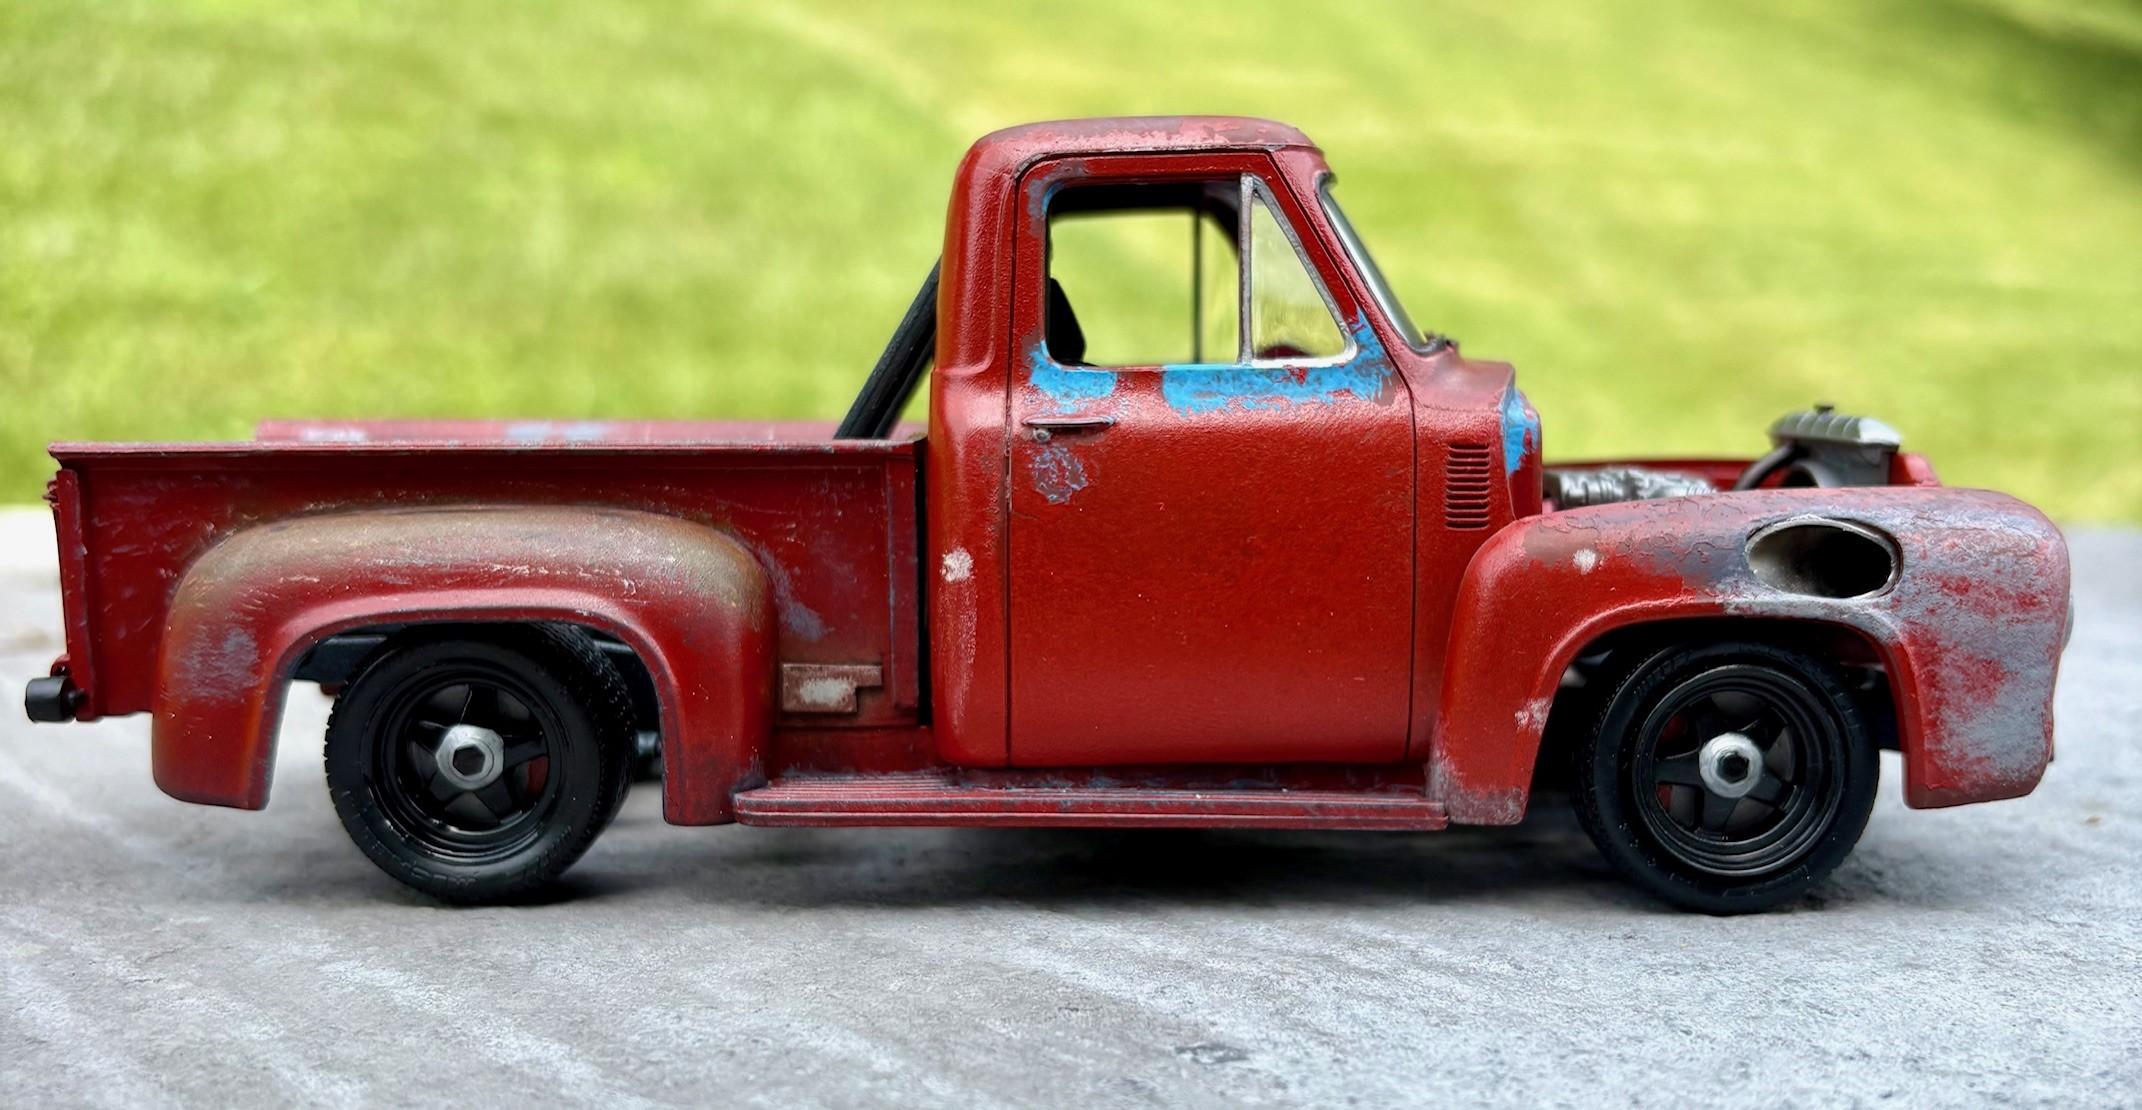
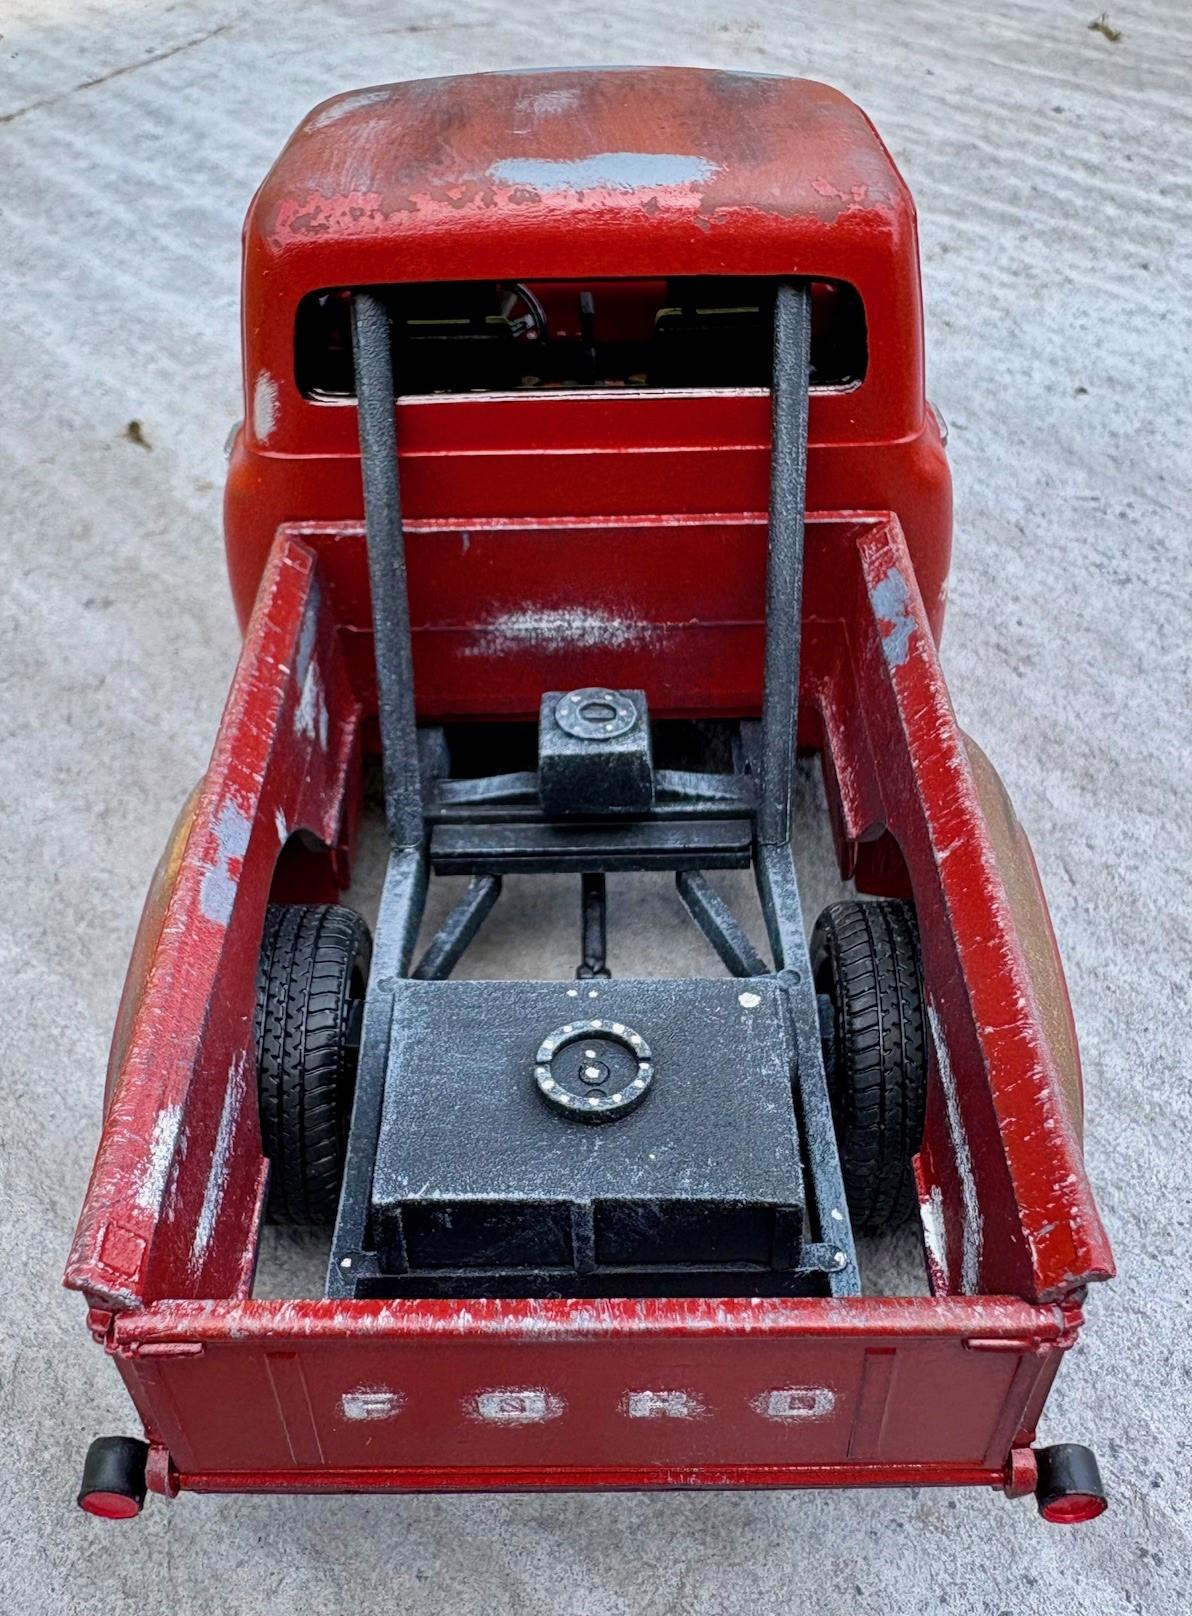
53 AMT 3in1 Body/Interior with a 55 Monogram Classic Cruiser Engine/Frame. Did my best to replicate the 1:1 shown in the picture taken in the woods. As always thanks for looking.
- 14 replies
-
- 12
-
-
Classic Toyota Celica Funny Car
Just Jim replied to Just Jim's topic in General Automotive Talk (Trucks and Cars)
Thanks for the background and classic pictures. Not sure I’ll ever have the modeling skills to pull something like that off. Only one way to find out I guess… -
Classic Toyota Celica Funny Car
Just Jim posted a topic in General Automotive Talk (Trucks and Cars)
Came across this on the web. Has anyone ever seen this before or is this guy the best kit basher ever? Can’t imagine how much one would cost if real but I’d love to have one.
-
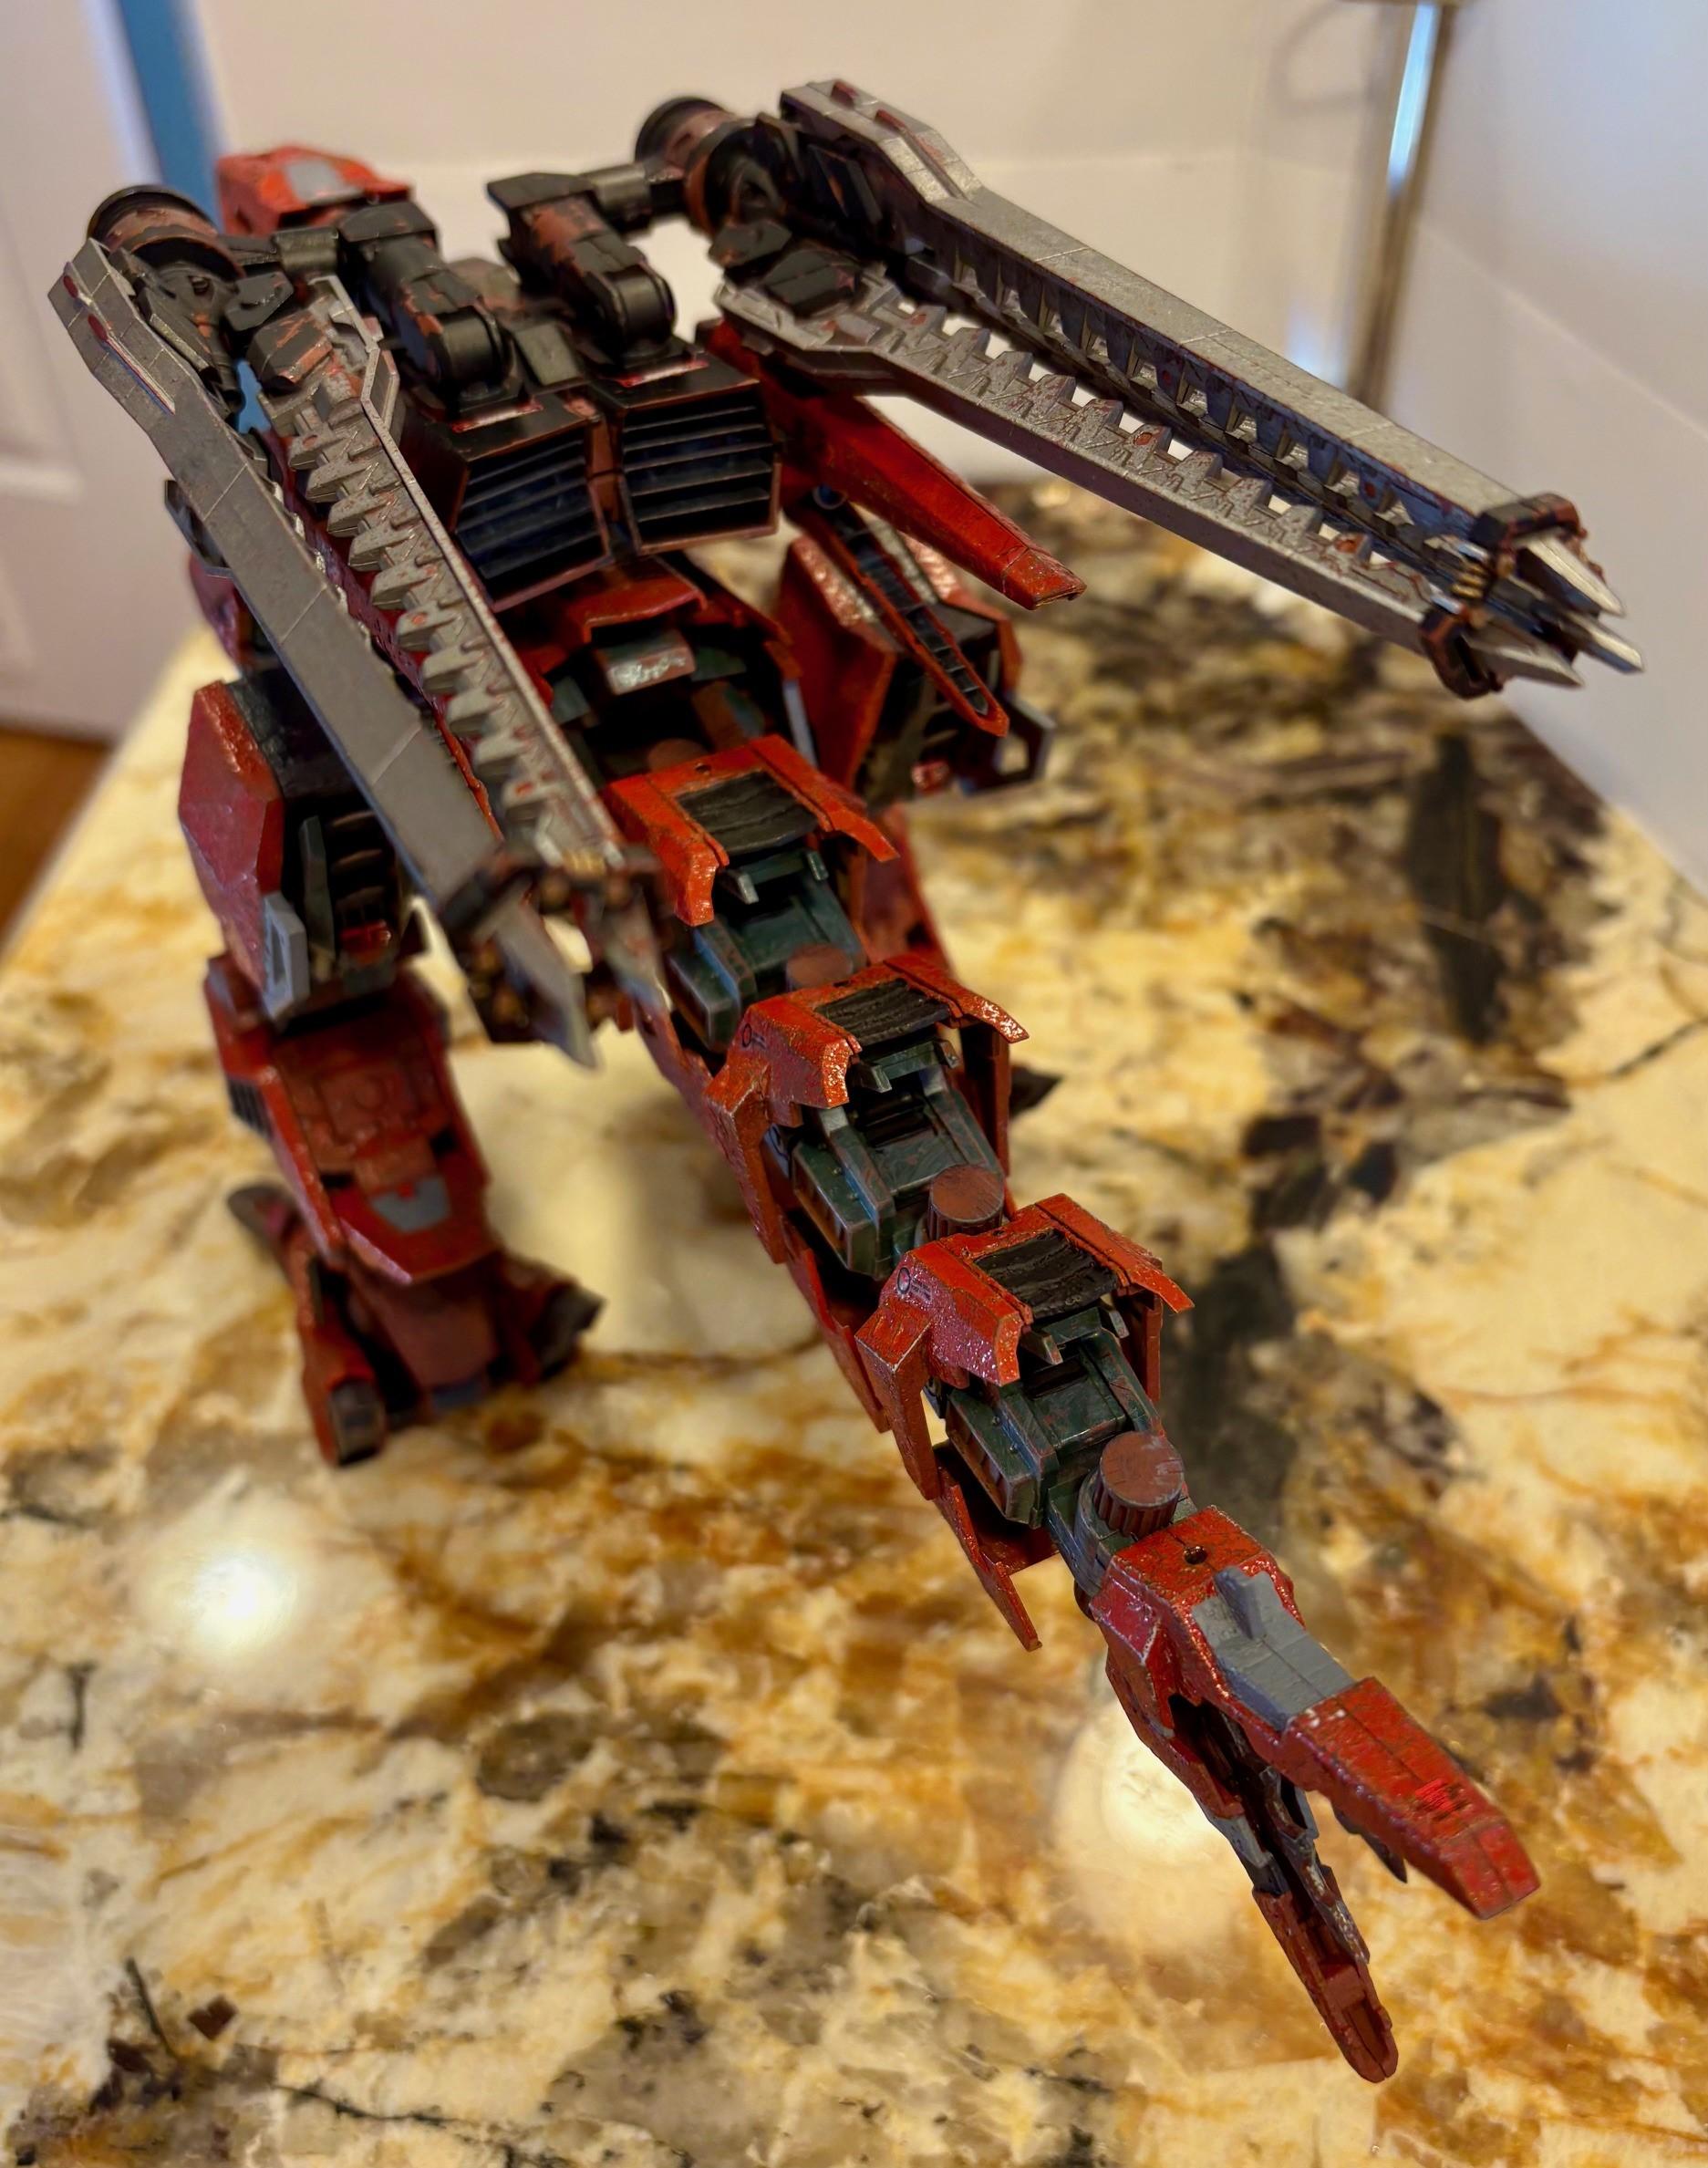
Zoid Berserk Fury
Just Jim replied to Just Jim's topic in All The Rest: Motorcycles, Aviation, Military, Sci-Fi, Figures
Thank You and thanks for sharing the Brutox it’s very cool 😎 -
Photos attached are of a Zoid Berserk Fury from the 90's Japanese Anime Zoids. First pic is what it looks like when built straight out of the box. Other 3 are my customizations. Supposed to be a battle robot. Didn't make sense to make it look brand new. As always, thanks for looking.
-
Using sprue to make spindles is a great idea, thanks for sharing! Should really help in my never-ending quest to lower every model I build. Love this hobby but I suffer from a severe lack of creativity, vision, and/or imagination. Rest assured any model car cool idea I might have was “appropriated” from someone else. So, thanks again!
-
Anybody got a complete set of front wheels for the Monogram 55 F-100 they are willing to part with? Would also like the tires if possible. Not sure I have anything cool or in demand enough to trade for something like this, but I am definitely willing to have a conversation about what I do have if anyone is interested in a trade.
-
One last mockup before final paint, trim detailing, and complete assembly for anyone interested. Everything seems to be going together like it should. The very front of the undercarriage is warped on the passenger side. If I force the body and undercarriage together, the passenger front tire just barely doesn't touch. Fortunately, this small flaw is hidden by the bumper so if I leave it be all 4 tires touch! Last 2 photos are just to see what each type of wheel looks like. I'm going with stock Chevy but the Mag Wheels would also look good. Thanks to everyone who commented / followed along. Should have photos in the under-glass section within the next couple weeks. All comments welcome.
-
Yes, pulled the bumpers in to try and achieve a cleaner look. Planning to paint them body color. Back bumper is a bit crooked in the photo will try to remedy that when I put it on permanently. Thought about notching out the body so the bumpers sat inside the bodywork (like an old Challenger) but the contour’s just wouldn’t work.
-
Sounds good hopefully the information in the post will be helpful to you but I think you and I are building very different cars ?
-
Thought I would share some of the issues I found and how I overcame them for any of you out there who plan to build this kit. Three things in the first picture. I put a small piece of sprue in the back of the body for the interior and undercarriage to rest on (see blue stripes), so they don't just fall through. Second, an illustration of how much the radiator needs to be trimmed for the undercarriage to actually touch the body in the front. In the photo I have trimmed the radiator but left the shroud so you can easily see the difference. Third, toothpicks show where I cut tabs off the hood. I could not get the hood to lay flat with them there. Of course, once I cut them out, I had to put some plastic sheeting in place to keep the hood from falling through the hole. Second picture (with the toothpicks) shows the area I am trying to get to touch by cutting the radiator. Third picture shows under the hood after radiator is trimmed. Notice how close the wheel wells are to the top of the fender. Fourth picture shows where I chose to mount the front bumper. If you are interested in a stance similar to that in the fifth picture, mount the bumper under the area just under the front grill instead of on top of it. Fifth picture just is a mock-up after I cut new holes in the undercarriage to rake and lower the car. Sixth picture is headers and side pipes. Headers wouldn't fit on the engine. Used white glue to connect any part I could get to touch the engine. Once dry, I used the same method to glue the side pipes on the under carriage and then used model glue where the headers and side pipes meet. Also, the side pipes shown in the instruction illustration are upside-down. Hopefully others out there can benefit from these lessons learned. All comments welcome.