Chris B
-
Posts
117 -
Joined
-
Last visited
Content Type
Profiles
Forums
Events
Gallery
Everything posted by Chris B
-
Thank you guys
-
Yes I am really not happy with the way he has dealt with this whole thing. Speaking with some of his colleagues they all say it is out of character for him They all said that he is a very good surgeon that take great pride in his work but unfortunately for me I'm not seeing it
-
Yes I have another followup appointment in 4 weeks so dependent on how things go that is my next step. Its just so annoying that the whole reason for choosing to have the surgery was so that I can comfortably get shoes back on without the risk of further infections and it really hasn't happened.
-
Agreed plus I needed a bit of a reminder what I had been stashing away as most of them are packed in boxes out of the Wife's prying eyes lol. Unfortunately I found out on Tuesday that the surgery on my foot did not go to plan. I have rheumatoid arthritis and for many years I have had a large lump on the inside of my left foot, like a bunion. Back in April it got an infection in it, It was a bit of a painful nightmare as no one really knew what to do about it. The infection eventually cleared up but I have not been able to wear shoes since April which is a bit of a problem as i am a service advisor/workshop controller at a local car dealership and I have been going to work since April in slippers which is not great Heath and Safety wise. I decided to have the lump removed so that it would not become infected in the future, I consulted with a couple of specialists about it and on the 26th of July I went into hospital to have the procedure carried out. All appeared to go well and 9 days later I had a follow up appointment with the surgeon, at this stage the dressings had not been removed and I believed all was OK as I hadn't been told any different. When the nurse removed the dressing I noted that the lump appeared to still be there maybe a little smaller, she commented that it was probably due to swelling. When the surgeon examined it and asked if I was happy with it and I commented that I thought I was having the lump removed and it looks like it's still there, he basically told me that on the day that I had the procedure, he run out of time to do the job properly and that when it heals I will need to have it done all over again and properly the next time. I found this a little off as I was his second patient for the day and the first one chickened out and went home, so I thought that this would mean he would have twice the time available to do a proper job on my foot. Needless to say I'm not exactly happy, the whole thing was a complete waste of time and my holiday/sick pay that I have had to use up for nothing, I am still going to have to go back to wearing slippers in fact I have had to go out and buy a bigger pair as the foot is very tender and I cant get the old ones back on. I'm heading back to work on Monday and I hope that the foot doesn't get too agitated with the lump rubbing.
-
It never ceases to amaze me the skill and work that all of you are putting into these builds. I definitely see some things that i am going to use in future builds. I can't wait to see them all completed
-
I started doing a bit more on the model 2 days ago Not much to show yet but have started to mount the rear end but unfortunately I had a bad day with the foot and spent most of the day back in the hospital for a bunch of test trying to find out why pain was so bad and why I can no longer move my toes. Back out now today and I decided to pull out all of the latest additions to the stash for a photo. I find that good for reference when buying new kits

-
Everyone is doing such a great job. Kit the jigsaw is finally starting to come together and is looking realty great. Doesn't look like its been an easy job making everything work in harmony but it really is starting to look the part. Keep up the great work everyone
-
Thanks Guys. I had the dressing changed today and all is looking good it appears to be healing and no sign of any infection so that all good, it will take a while to heal and I don't have to keep my foot elevated now so I have been spending a little time on the PC when the pain allows which is a little dangerous as I have placed a few orders for parts for up coming builds, it's hard to get parts in this part of the world and the price unfortunately doubles and the freight for even the smallest part is not cheap but it is still worth it to get good parts needed. I have a vintage Monogram 32 Ford roadster kit that is waiting for her turn and I have ordered a blown Ardun from Texas3d and the chopped top from Drag City Castings as well as a few other bits and bobs from 3Dscale parts I'm looking for a good set of wide wires for wheels but so far haven't found exactly what I like I have also ordered some wheels, smoothies with chrome hub caps a Cadillac style air cleaner and some diamond patterned seats for a 39 Chev Sedan delivery kit also waiting its turn. Foot surgery can get quite expensive. Oh well never mind. Its my intention to get back on to the phaeton after the weekend
-
Laid up a little at the moment unfortunately off work for a few weeks. Hopefully when the pain subsides and I can figure out how I can keep my foot elevated at the beach it may give me a little extra time for building
-
We have fender laws here in New Zealand We have to apply for a fender exemption I never felt much for the silly fenders either but we are starting to see the fenders of the same style as on the flamed sedan creap into the show scene here in NZ now also and I have to say that my opinion on them has changed a little now. When done Wright I think they can add to the appeal I even saw a Pop with a tilt front with the little over fenders they kept the engine bay clean and free from dirt. I've even started looking around for them in 1/24 scale so that I can add them to one of my future builds
-
Ah thank you for that info That kit was recently up for sale here on Trademe
-
Hey Kit where did you get the smoothies on the black sedan I am collecting up parts for a future build. The 39 Chev sedan delivery and that look exactly like what I am after
-
you are all doing great work, can't wait to see all of the finished models
-
Thank you rv1963
-
Yes I was surprised myself how much flash was on the chrome trees. To the point were you can't use them if you wand to do a nice job. Thanks for your comments bill-e-boy, much appreciated
-
Thankyou all for you comments. I am by no means a quick builder your following along really gives me some drive to carry on.
-
Continuing on with the rear axle I fashioned some spring mounts on the axle to accommodate the original Phaeton rear transverse spring. I'm not that happy with the look the spring is way too narrow for my liking I hunted through my parts box and found a rear spring from the Monogram 29 Ford roaster pickup that I think will fit the build much better and should be a much cleaner install I've Just got to remove the existing mounts I built and make some new spring and shock mounts and also remove the large tabs from the spring to get the desired result. I also need to lengthen the driveshaft tube.
-
Your work on this chop is outstanding Speedpro The visor the channel everything about this build is wicked I cant wait to see the finished model ? Your workmanship is inspiring
-
He does get plenty of treats, he really is such a cool dog
-
This is Louie our 7 year old Bichon Poodle cross wearing his favorite bandana
-
Thanks for your comments stavanzer
-
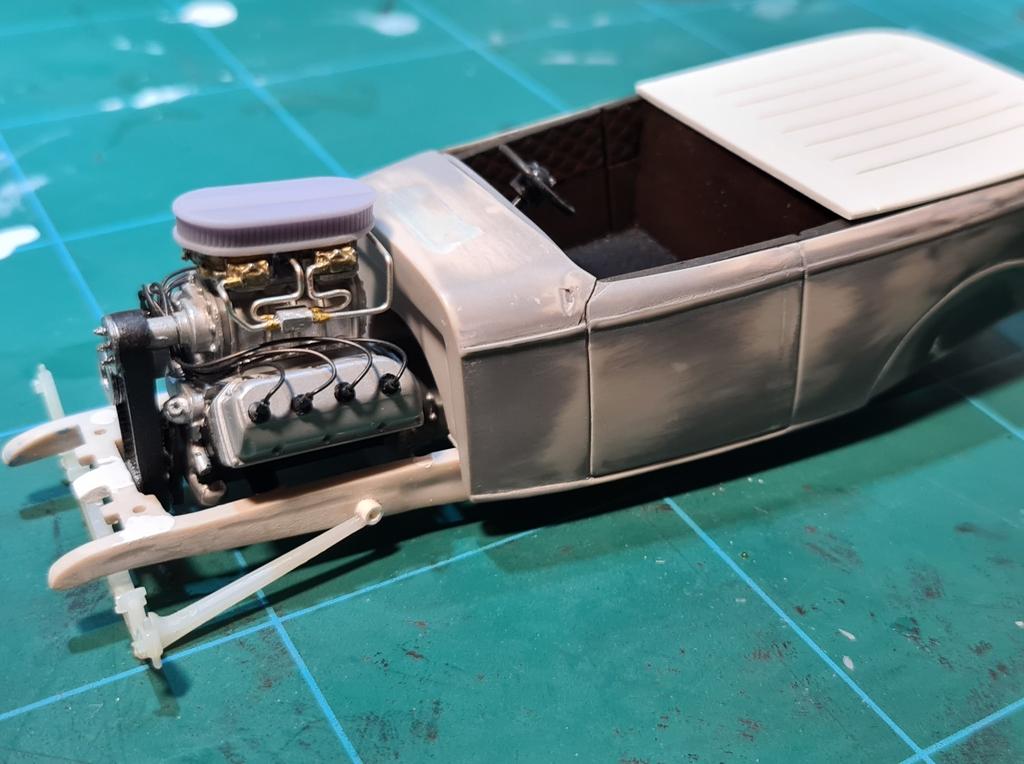
What with traveling around the country to spend time with the kids and the grandees, spending a couple of weekends putting a new gearbox in a son in laws Ute and spending time putting together a model aircraft, my other hobby and playing webmaster for the model aircraft club I belong to, progress on this build has been slow/non existent. I have managed to join the diff and quick change center together roughly and need to spend some time perfecting the union to get the required look I I really wanted to add a hilborn style bug catcher scoop to the engine but have struggled to find one with the correct spacing for the carbs. I played around with a couple of resin printed scoops but was not happy with the result so I started to look for an alternative. I purchased several different styles of air cleaners for Off The Sprue an am still undecided which to use I also purchased some other goodies from Off The Sprue and Model Car Garage And my kit stash as also grown a little since my last post I'm off to visit Family in another town again this weekend and then I hope that time will free up a little for me so that I can get to spend some time modeling again
-
Nice start Jason Cant wait to see where this one goes. Its gona be a beast with that motor in there
-
Instead of laying the mold down on a flat surface, I carefully clamped the two halves of the mold together and stood the mold on its side with 1 & 2 parallel to the ground at the top and injected the resin into 3 with a syringe until resin came out of both 1 & 2 the air that was being trapped would have been forced out of 1. Hopefully you understand my explanation. I think that it is likely that I will be casting more parts in the future so I have started collecting parts to make a vacuum chamber and a pressure pot. nothing flash just a hand operated automotive vacuum pump and an old pot with an acrylic lid and the pressure pot made out of 100mm PVC pipe with screw on ends and a bike foot pump.
-
Killer color. outstanding work