ModWrench
-
Posts
77 -
Joined
-
Last visited
Content Type
Profiles
Forums
Events
Gallery
Everything posted by ModWrench
-
"Some people have no idea what they're doing, and a lot of them are really good at it" - George Carlin "Have you ever just looked at someone and knew the wheel was turnin’….but the hamster was dead?" - Me
-

-
Who doesn't love a mock-up? Let's see yours!
ModWrench replied to Belairconvertable's topic in WIP: Model Cars
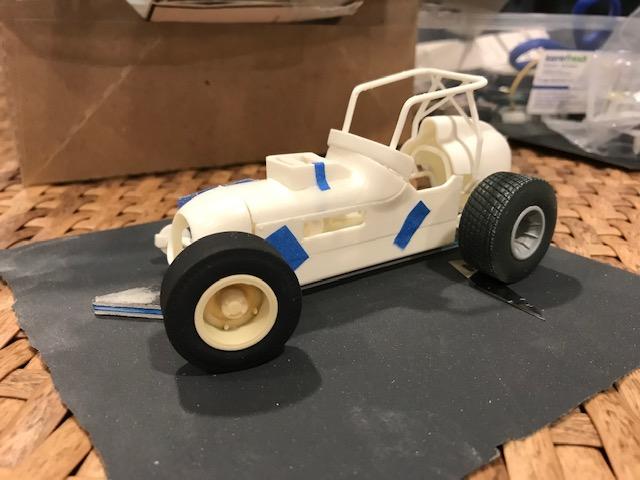
Picked up an original Grant King sprint car kit at NNL East. Haven't built one of these since I was a kid. Threw the box and a few tools in the Griswold family truckster as we headed up to Vermont last week for a little vacation. Throughout the week I was able to assemble the chassis, sand all of the body panels and tank and pretty much prep all the parts for paint. Also detailed a few things like opening up the ends of the headers for a more realistic look. Plan on replacing the kit tires with these resin rear dirt tires and wheels from Ron Coons. Need to find a better pair for the front, just had these asphalt tires with me for mock up purposes.
-
We started running this car in 2019. We purchased it used, but it's a pretty stout piece and more than meets our needs (we are not running the top-flight NASCAR tour races etc.). That first season we had two top 10 finishes, which was our best to date at that time. This is actually our second go at short-track racing in this type of car. We paired up about 20 years ago and ran a few seasons with the same style car but more powerful and expensive engines. We sold that car and pursued other projects, then got the itch again about 5 years ago and got back in the game. The current rules package for the division we run allows "built" motors (not crate engines) with 2 barrel cars on racing fuel. Still wicked expensive, but we have a good engine builder and a through maintenance program, so plenty of power for the dollars invested. The race prior to last night we finished 4th, so we are liking this current streak of good finishes!
-
Just got home after a career-best finish with our race car. First ever podium, we finished 3rd in our 30 lap A-main. Just me and the driver, so I was busting my hump in 90 degree heat all afternoon and evening. Exhausted but exhilarated!!
-
What did you see on the road today?
ModWrench replied to Harry P.'s topic in General Automotive Talk (Trucks and Cars)
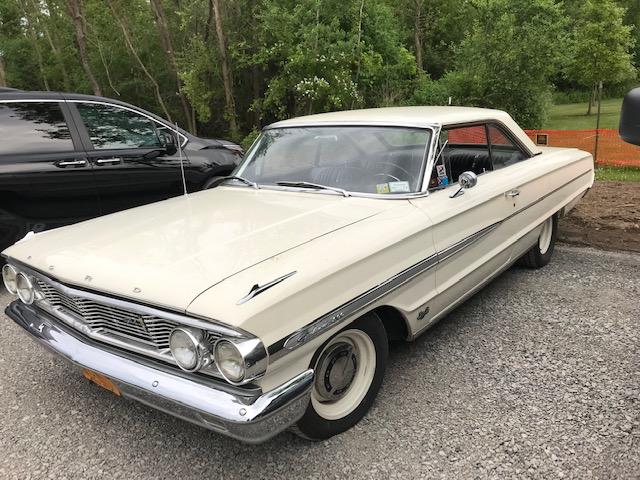
Cutlass Convertible in grocery store parking lot. 64 Galaxie 500 - has the 427 badges on it and 4 speed manual. Looked to be in really nice shape. Saw it in the parking lot in our town park at a free music concert. My wife knows me all too well - she knows I would have hung around post-concert to talk to the owner. She decided we were leaving as the band fired up the last song haha!!
-
Picking away at closing some fairly large gaps in the body panels of this Nissan Can-Am race car. Getting close to acceptable tolerances. Also got some paint on the wheels and knock-offs.
-
Perfect, thanks for the insights and answer. Much appreciated!
-
Ace - The photo I found is from the Nissan 380, the predecessor model to the 381 kit I am working on.
-
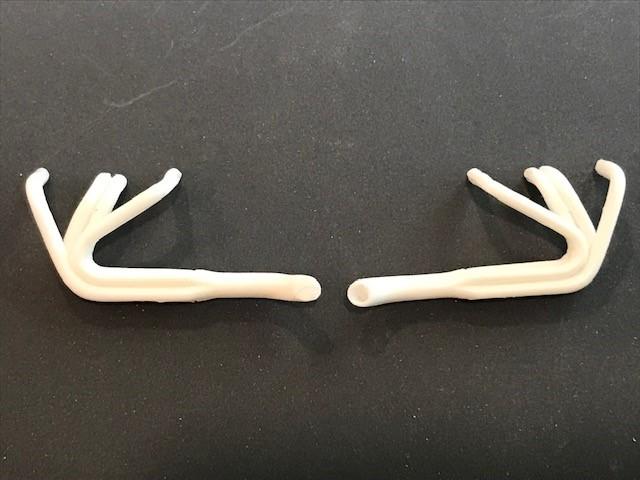
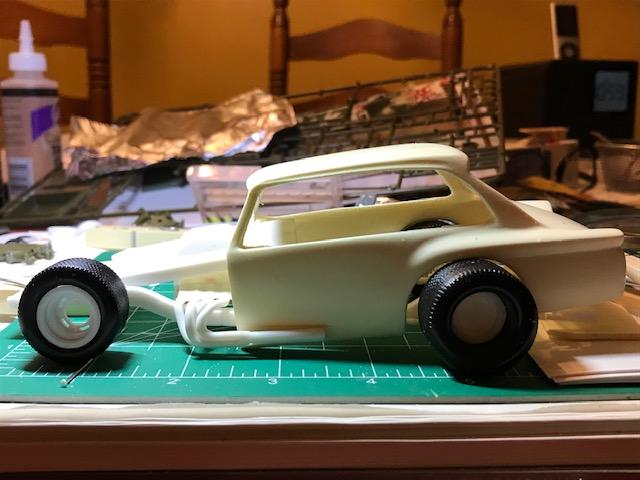
I'm sure several of you will know what they are as soon as you look the pictures, but I'm stumped. These parts are in the Tamiya 1/18 kit of the Nissan R381 Can-Am race car, circa 1969. The kit has a small block Chevy engine. There are four of these parts (C-10 on the instruction sheet), and they are located on the engine side of the rear bulkhead. Each of them have 3 buds protruding from them. I'm guessing they represent a fitting for some sort of fluid line? Are they oil filters, pumps for the hydraulic wings, part of the fuel system? I've searched the Google a bit and found a similar set up on another Can-Am car, but no explanation. What say you?
-
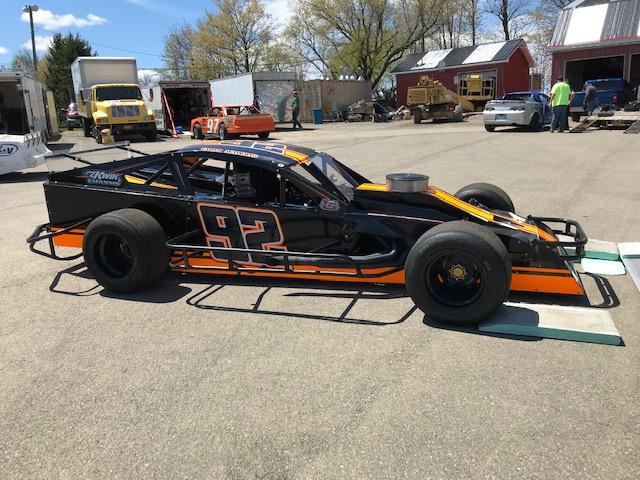
Hung a new body on my buddies race car last weekend. We took it out today for a test and tune session at the track we run at weekly. Solved a small fuel leak issue in our first session, then chased a few electrical gremlins and finally got a clean run and put some practice laps in the book. Solid run on old tires, no damage and put it back on the trailer in one piece. Overall a good day! Now need to find about 4/10th's a lap to run with the top guys in our division.
-
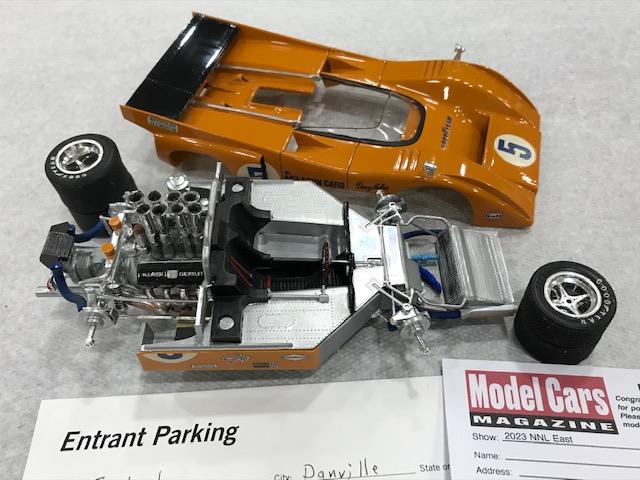
NNL EAST 2023...in case you haven't seen enough models yet :)
ModWrench replied to Howard Cohen's topic in Model Cars
I took a couple of pics at NNL East shot on my cell phone camera
-
Who doesn't love a mock-up? Let's see yours!
ModWrench replied to Belairconvertable's topic in WIP: Model Cars
Nissan R381. Tamiya 1/18 scale kit, circa 1969. Body panel alignment will need some attention.
-
Box art caught my eye, thought it looked cool and decided I wanted it.
- 39,073 replies
-
- 4
-

-
- johan
- glue bombs
- (and 1 more)
-
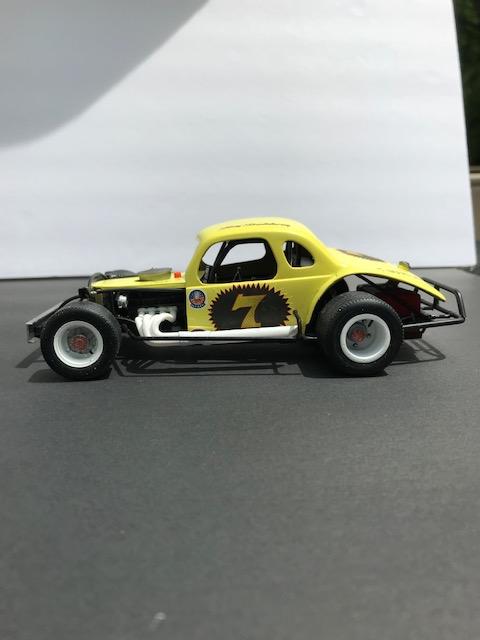
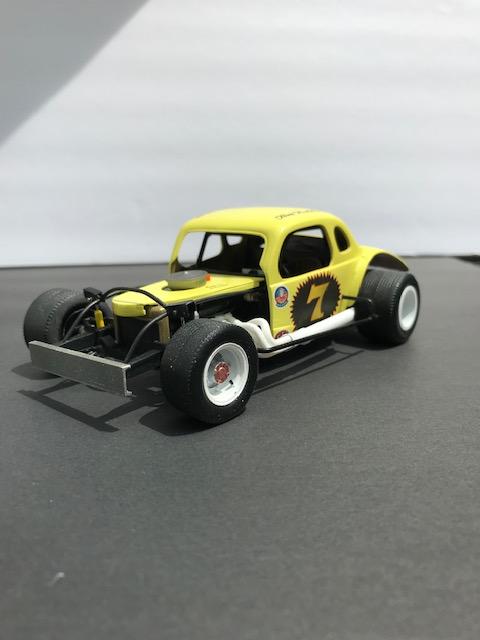
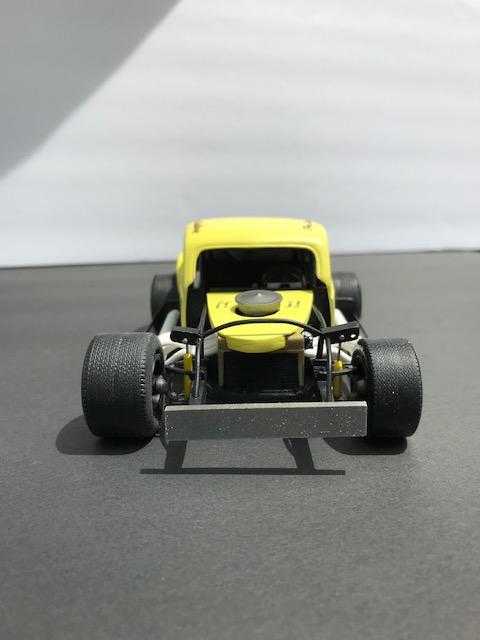
1937 Chevy Coupe Modified
ModWrench replied to ModWrench's topic in Stock Cars (NASCAR, Super Stock, Late Model, etc.)
Yeah I am really liking that Valiant and picked up another one for a dirt modified that I will tackle down the road a bit. And you're right about those MPC modified reissue kits, I've picked up a few at Hobby Lobby during their 40% off weeks for something like $16. If I only use the frame, motor, radiator and quick change that's still a good deal. -
1937 Chevy Coupe Modified
ModWrench replied to ModWrench's topic in Stock Cars (NASCAR, Super Stock, Late Model, etc.)
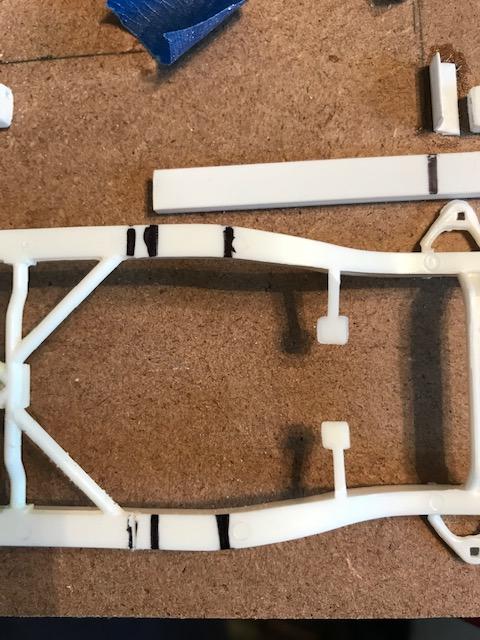
Regarding the frame length, I agree that they are too long. And in my opinion, the motor sits way too forward. The way they come in the kit, the wheelbase scales out to about 115 inches. To my eye, a wheelbase between 100-105 looks right and sets the motor back the way I remember these cars running up here in New York. For this coupe build, I removed 1/2 inch from the main rails. See the first pic below to see where I marked the frame to make the cuts. I tried to pick a section that was fairly straight and level, which was in front of the fire wall. After I cut the main rails and was ready to reconnect them, I took a length of styrene rod and shoved it down in the channel on the top of these frame rails to keep them aligned as straight as possible. I never liked the floor pan/sheet metal in these kits either, so I took a strip of styrene and boxed the rails along the top side as I fabricated the roll cage and frame bars. Because the motor was moved back, I cut the middle cross member/trans mount and slid the entire unit in one piece back to line up with the tranny in its new location. For the Valiant I am currently working on, took the same approach with slightly different measurements. Because the body is slightly longer than the coupe, on this frame I cut 1/4 inch out of the rails and then moved the motor mount back another 1/4 inch. I want the headers just slightly in front of the edge of body, so played around with the frame length and motor location until I liked it. Hope this helps. Happy to answer any other questions you might have.
-
1937 Chevy Coupe Modified
ModWrench replied to ModWrench's topic in Stock Cars (NASCAR, Super Stock, Late Model, etc.)
Thanks for the comments, much appreciated! I've started my next tribute replica. Building a Valiant bodied modified that Lou Lazarro drove in the 1973 season. -
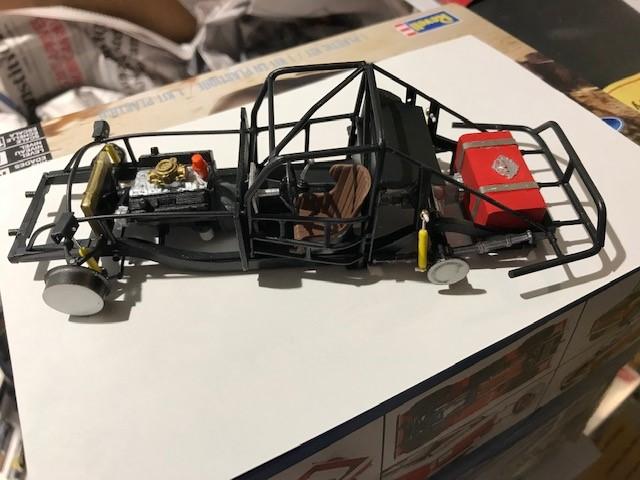
This is a replica build of a pavement modified driven by Tom Baldwin. Always liked the look of this car so decided to try and build something that paid homage to one of my favorite cars and drivers from that era. Started with the main chassis from an MPC kit, but shortened the frame rails to reflect a 100" wheelbase. Scratch built the roll cage and other frame bars, fuel cell, shocks, nerf bars and rear bumper. Added fender flares and made a hood from Evergreen sheet. Used the kit engine and headers and added the collectors and extensions (heat shrink wrap and Evergreen styrene tube). Wheels are from Big Donkey Resin and I added valve stems, tires are PPP. Body color is a "custom blend" of the $.99 acrylic craft paint I picked up at Michael's sprayed through an airbrush.
-
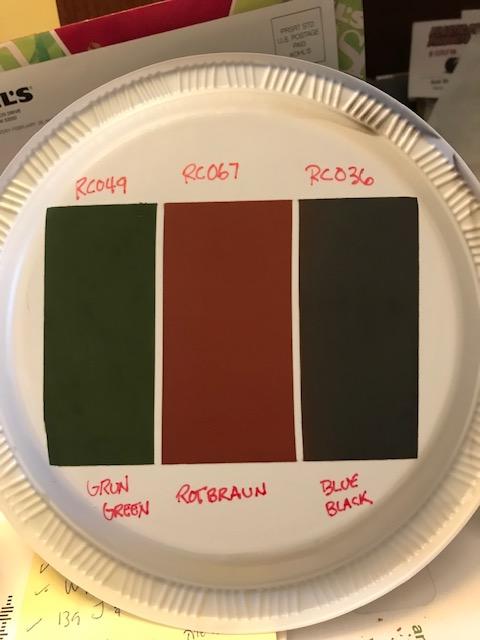
Stopped by my local hobby shop and found out that they started carrying a new brand of airbrush paint, the AK Interactive Real Colors line. It's a lacquer paint with a great selection of colors from the WWII era. Was looking for suitable colors for some hot rod builds I have planned, so picked up a few jars and did a test spray out last night. Initial reaction was very positive; thinned with a small amount of cheap lacquer thinner and laid down nice. Curious to hear if others have used this brand and what the outcomes have been. Also tested some Tamiya 2mm tape, which passed with no bleed through or ragged edges.
-
29 Ford: Race of Gentlemen presents... California Drag Racing 2023
ModWrench replied to Calb56's topic in WIP: Model Cars
I agree, the effect is realistic looking and not over the top. Weathering is all new to me too, so trying to pick up pointers whenever I see something I want to try and emulate. Looking forward to seeing this '29 come together. -
29 Ford: Race of Gentlemen presents... California Drag Racing 2023
ModWrench replied to Calb56's topic in WIP: Model Cars
Man that body looks really good!! I'm interested to know how you got that look on the top of the cowl and the top of rear quarters? -
TJ - Not a problem! I have been swamped at work this week, but will get some time this weekend to make some more progress with the build. Peter - Yes, your assumption is correct. When I started with the first rim half, I removed a couple of the plastic spokes at a time. Then drilled out the plastic nipple from the back side of the rim, ran my piano wire from the corresponding hole I had pre-drilled in the hub center out through the rim, then slipped the brass nipple in from the back side of the rim and positioned it, trimmed it and superglued it in place. Those nipples are only an 1/8" long, but look bigger in the pics. As I progressed on the first half and then started the second half, I would do them in groups of three - two that mounted on the same side of the hub, then the one that would be mounted in between those two, which ran underneath them (hope that explanation makes sense). Worked counter clockwise until I had them all installed, so the center hub remained connected the entire time. I am going to try and get the motor assembled next and add some wiring and plumbing details to that, then get the frame and front forks together before I tackle the rear rim.
-
Finished the front rim and mounted the tire. Pretty happy with the result. Started on cleaning up all of the motor parts and got a few sub assemblies glued together.
-
Finished the front rim & mounted the tire. Like how it tuned out! Got some time to clean up most of the motor parts and make a game plan on adding details to the head, carb and mag. Also started on the frame and front forks. More pics when I get a few of those parts assembled.
-
Agreed for the sand in Wildwood. The community build I created this car for is using the rules for the California TROG where the cars run 1/8 mile drags on an old pavement airfield, hence the switch to slicks.