StokeModels
-
Posts
60 -
Joined
-
Last visited
Content Type
Profiles
Forums
Events
Gallery
Everything posted by StokeModels
-
Thanks Tim!
-
Those are all fantastic builds Steve, but now I have to track down a Chrysler Imperial. ?
-
I mostly shoot with a Canon T3i that I bought back in 2012. I'm just using the basic 18-55mm lens that came with the camera. I sometimes shoot interiors with my iPhone as it has a wider angle lens.
-
Excellent choice! I'm trying to only upgrade my printer every other version so I'm waiting to see what the Mars 5 will be like but the 4 has some great specs.
-
Thanks Steve for the kind comments. Looking forward to having you guys over next week, yes the diorama will be viewable, it's too big to put away. ?
-
Thanks! Managing those reflections in the angle of the photo makes a big difference.
-
I use an old version of a software called Modo but I've been meaning to switch to Blender for a while now.
-
Thanks for all the great comments - really appreciated! Agreed, I think people put the time and effort into saving and restoring the performance versions, so we see this spec less frequently which, to me, makes it more interesting. I've got a few other posts with pictures of it but I'll try to gather some shots for a post about it. I've pretty much stopped using kit tires altogether. Being able to sand the bottoms down to get them to sit flat is really nice.
-
Thanks Phil, I'll have this one ready for inspection when you guys are over!
-
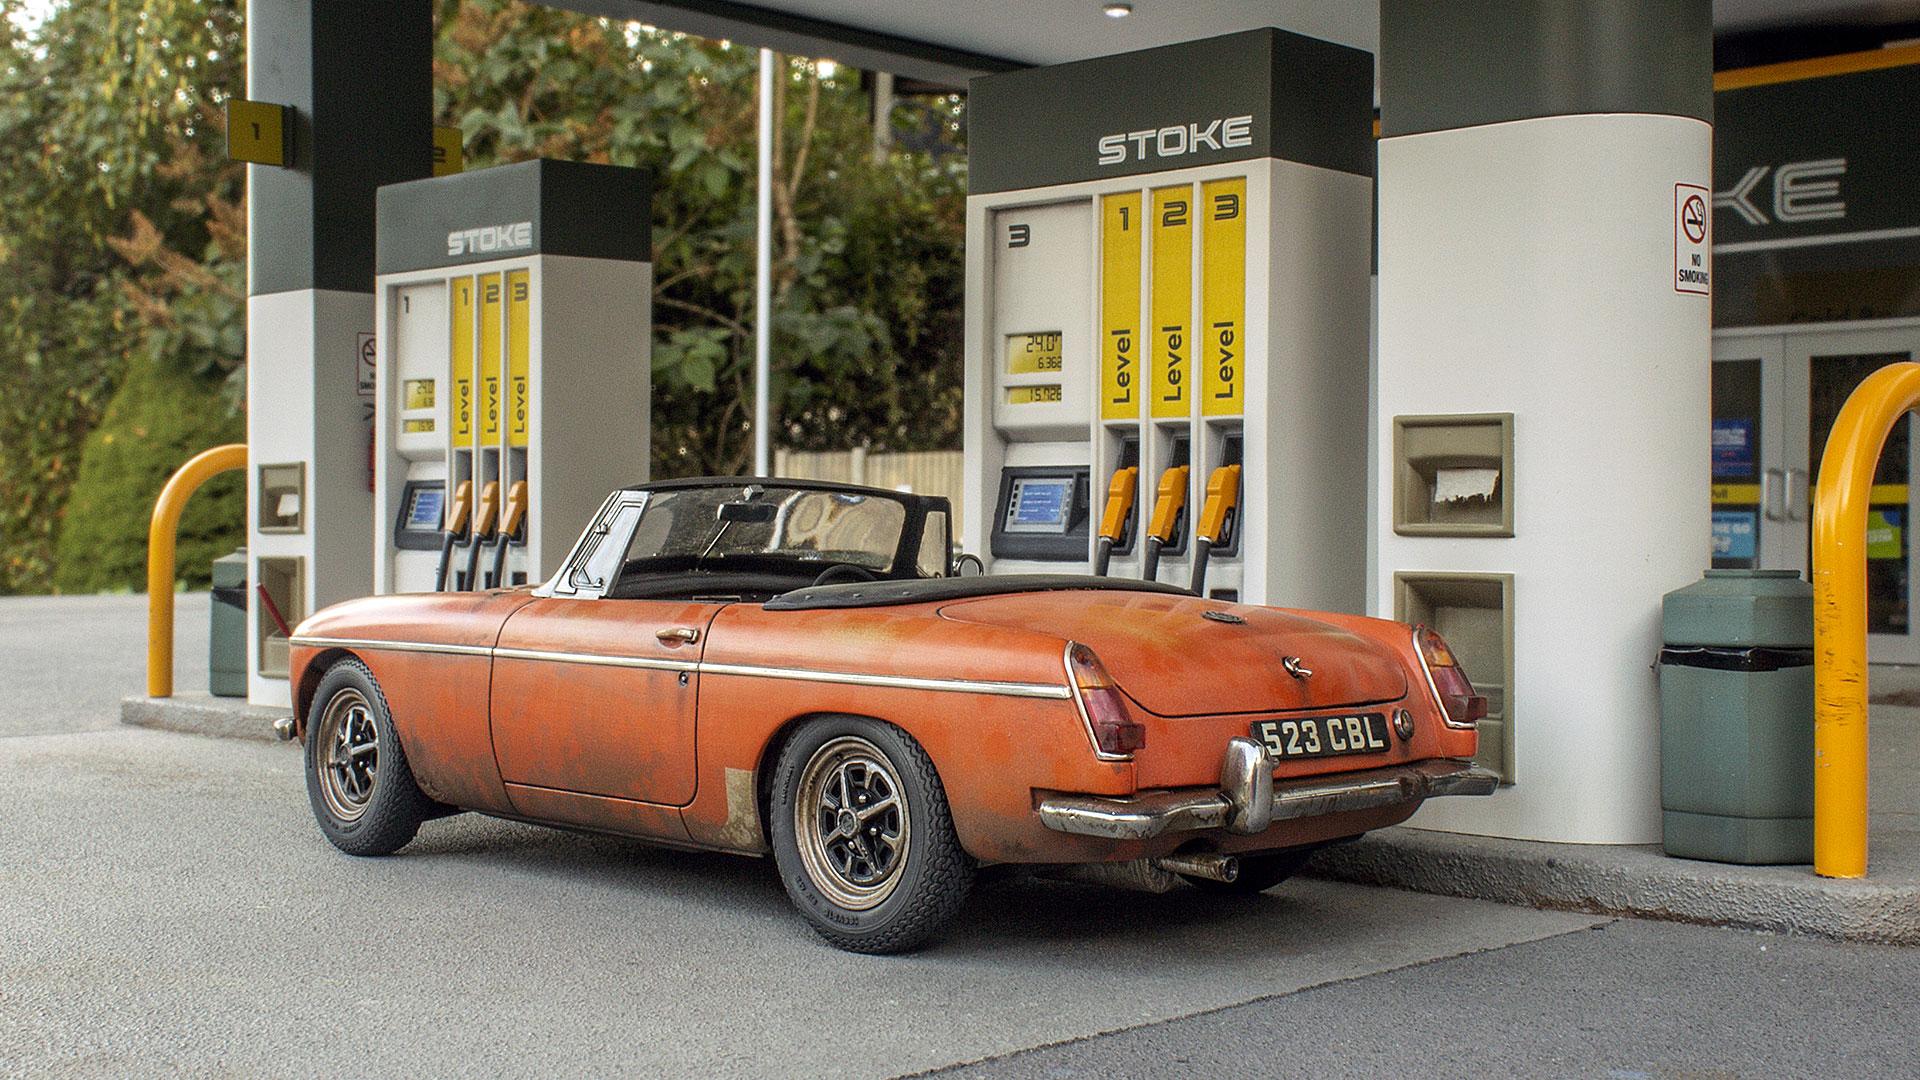
The gas station is a diorama I built to be able to photograph my builds in. It's 6' x 4' and mounted on casters so i can roll it out of the garage and into natural light to shoot in. All of the pumps and canopy are 3D printed and the 'store' portion was built just using styrene sheet.
-
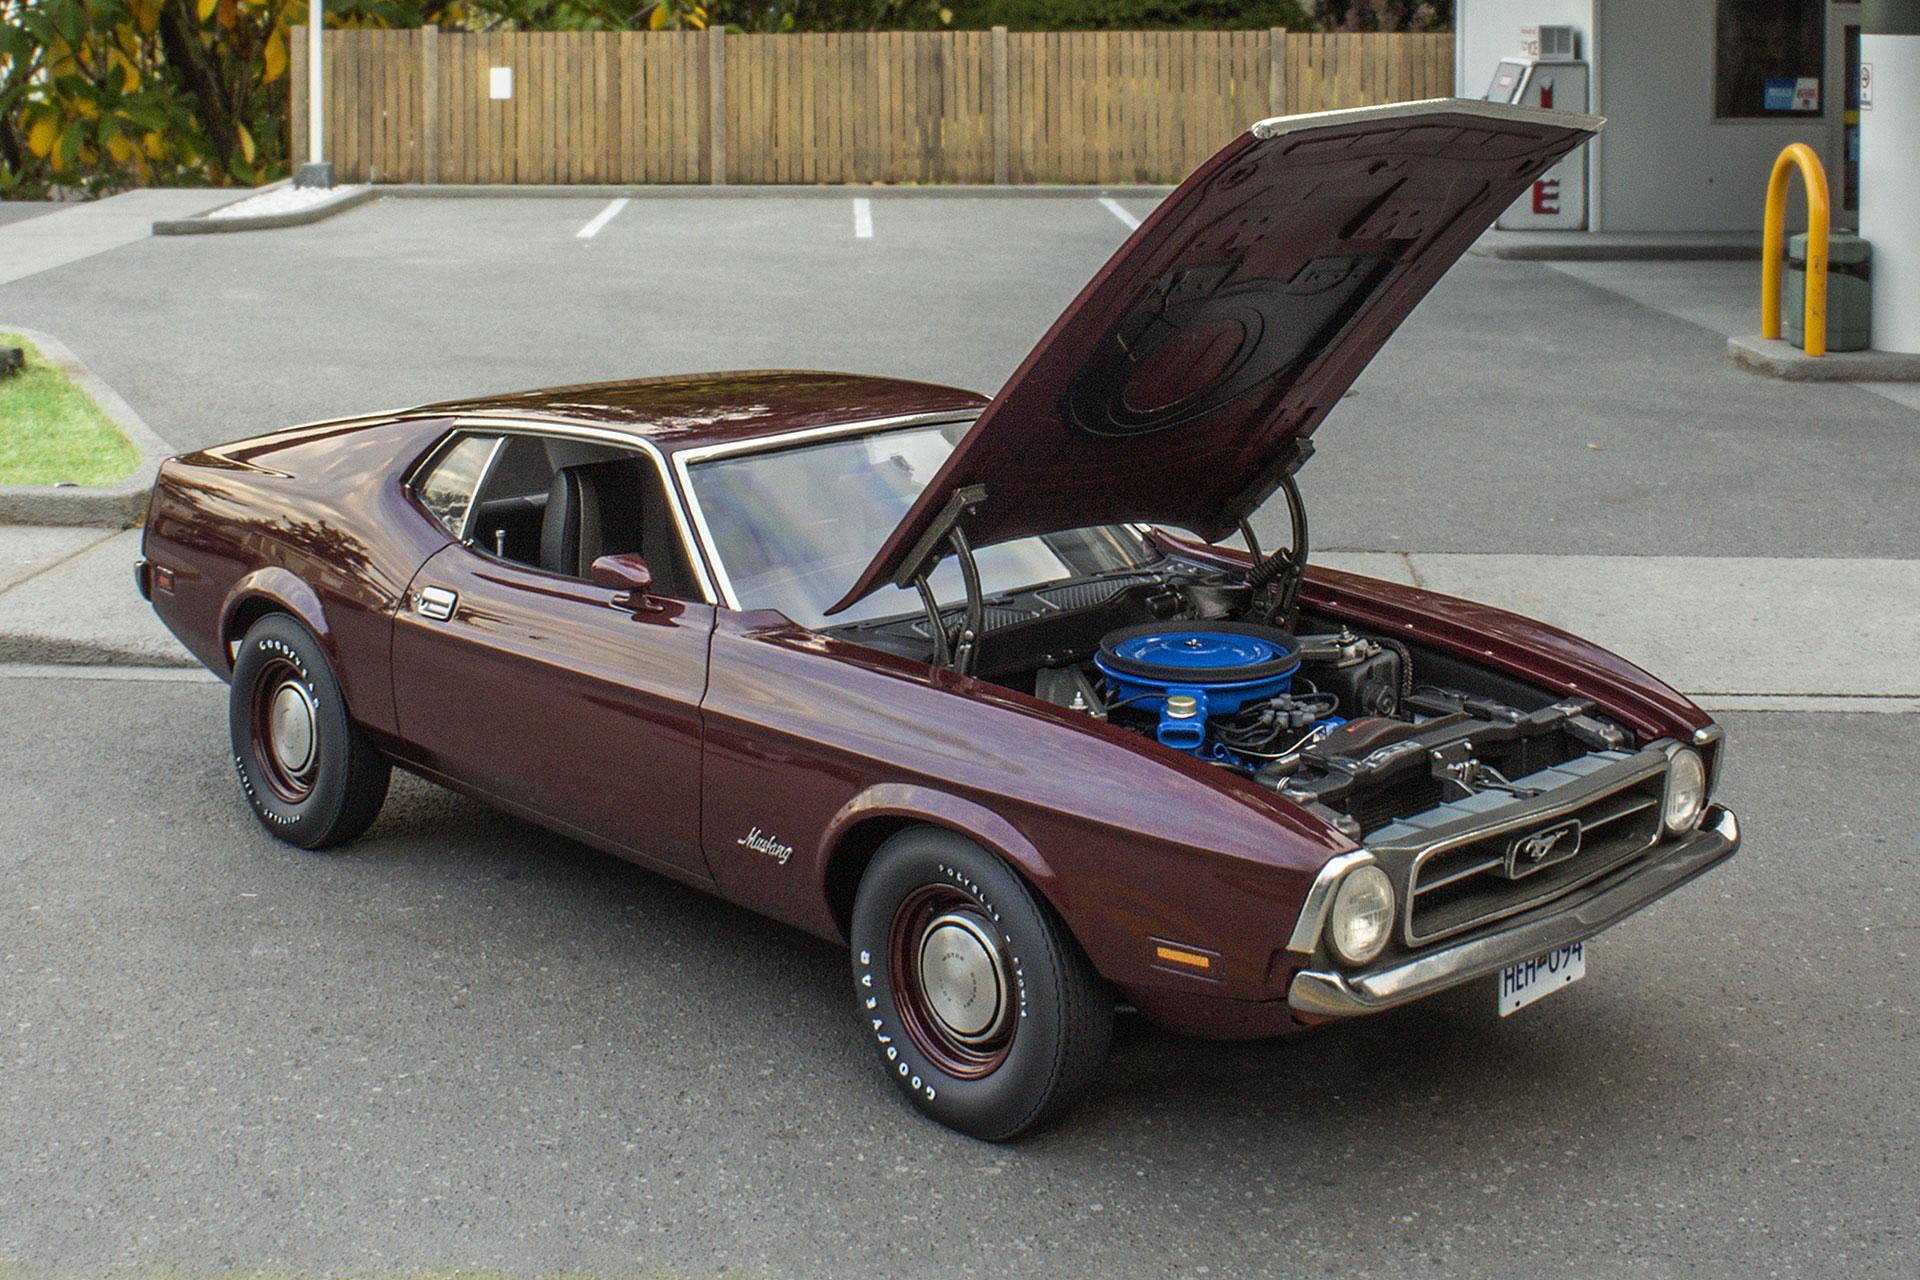
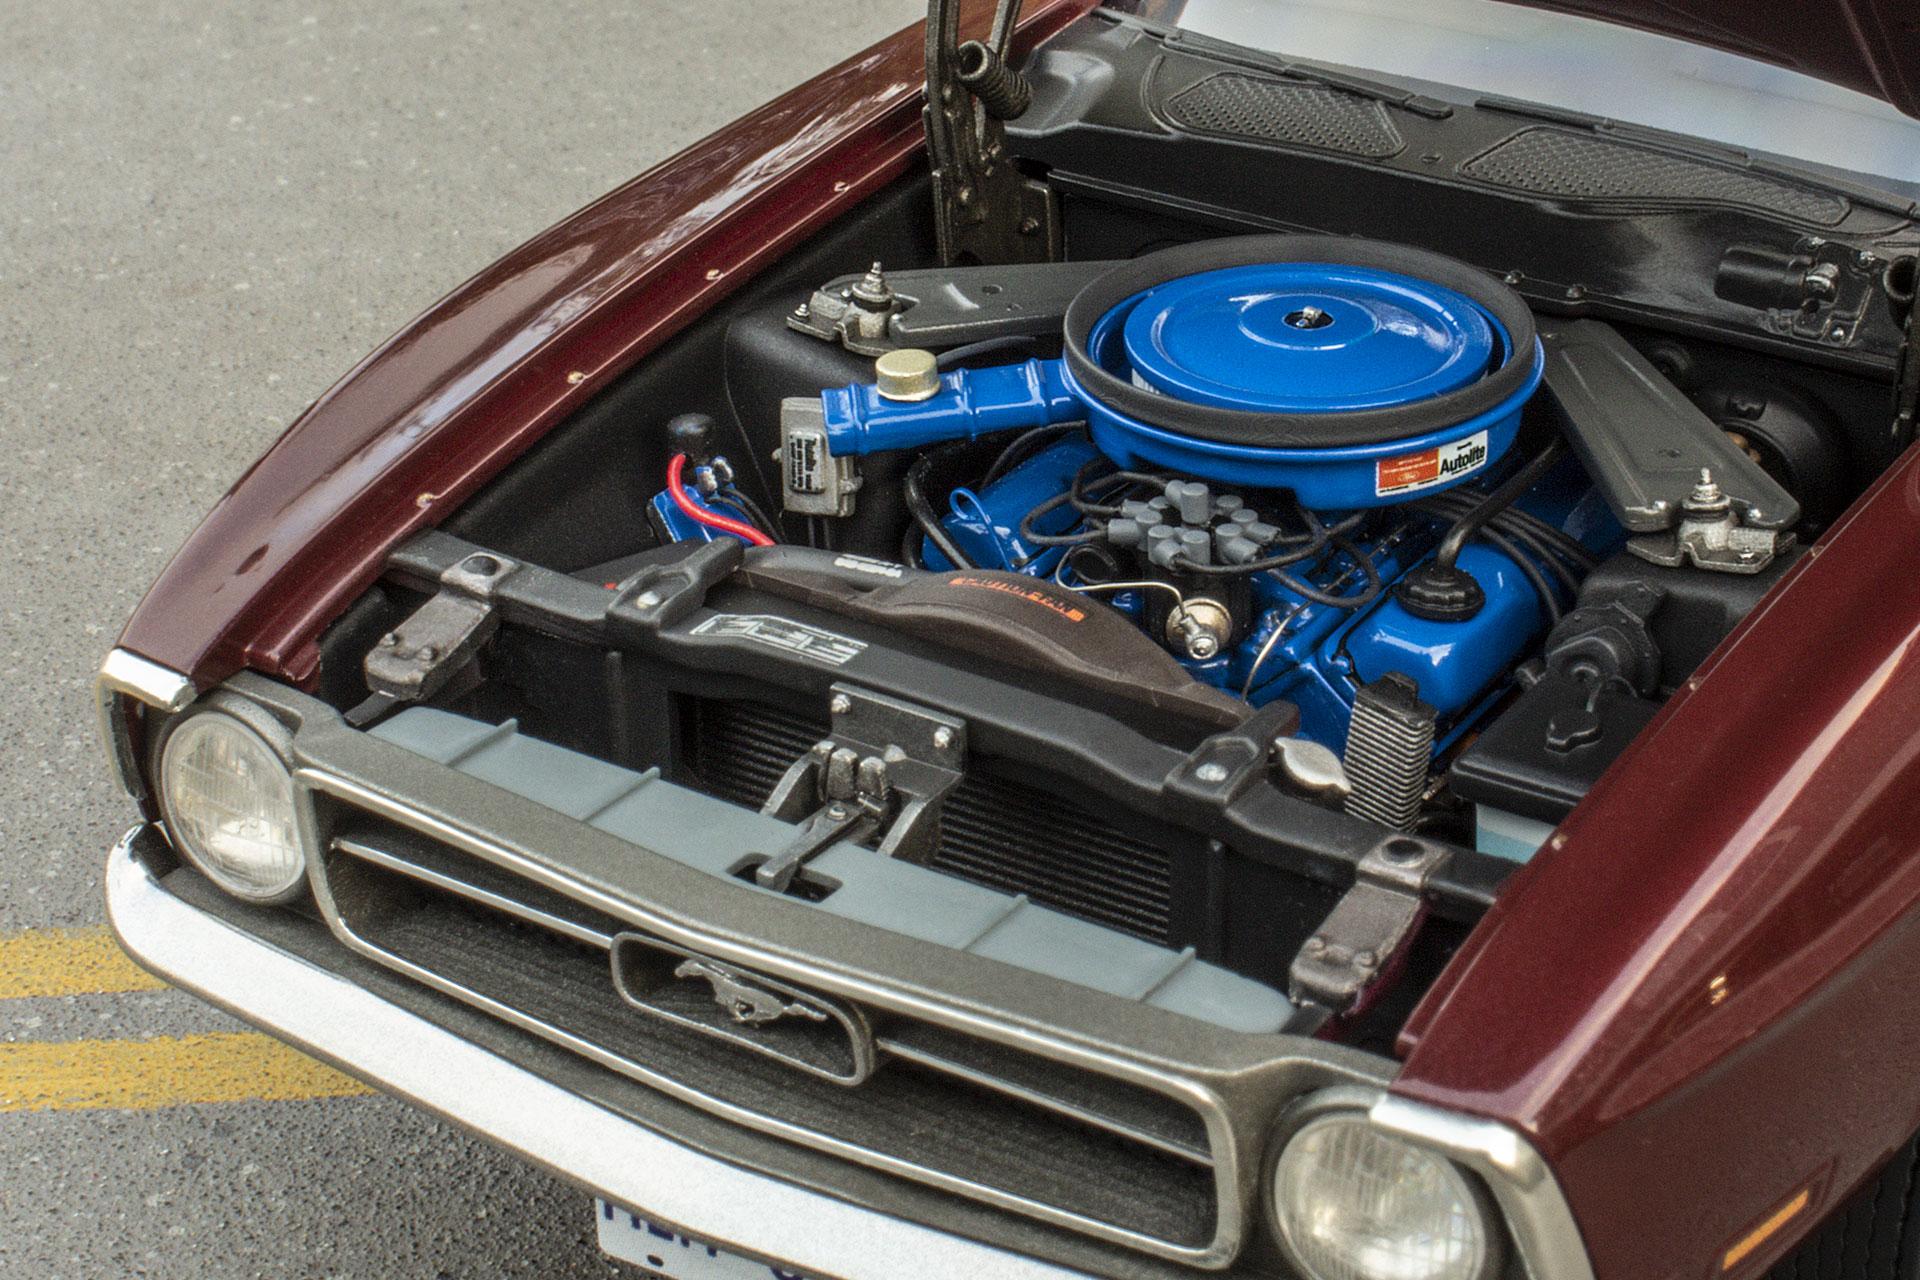
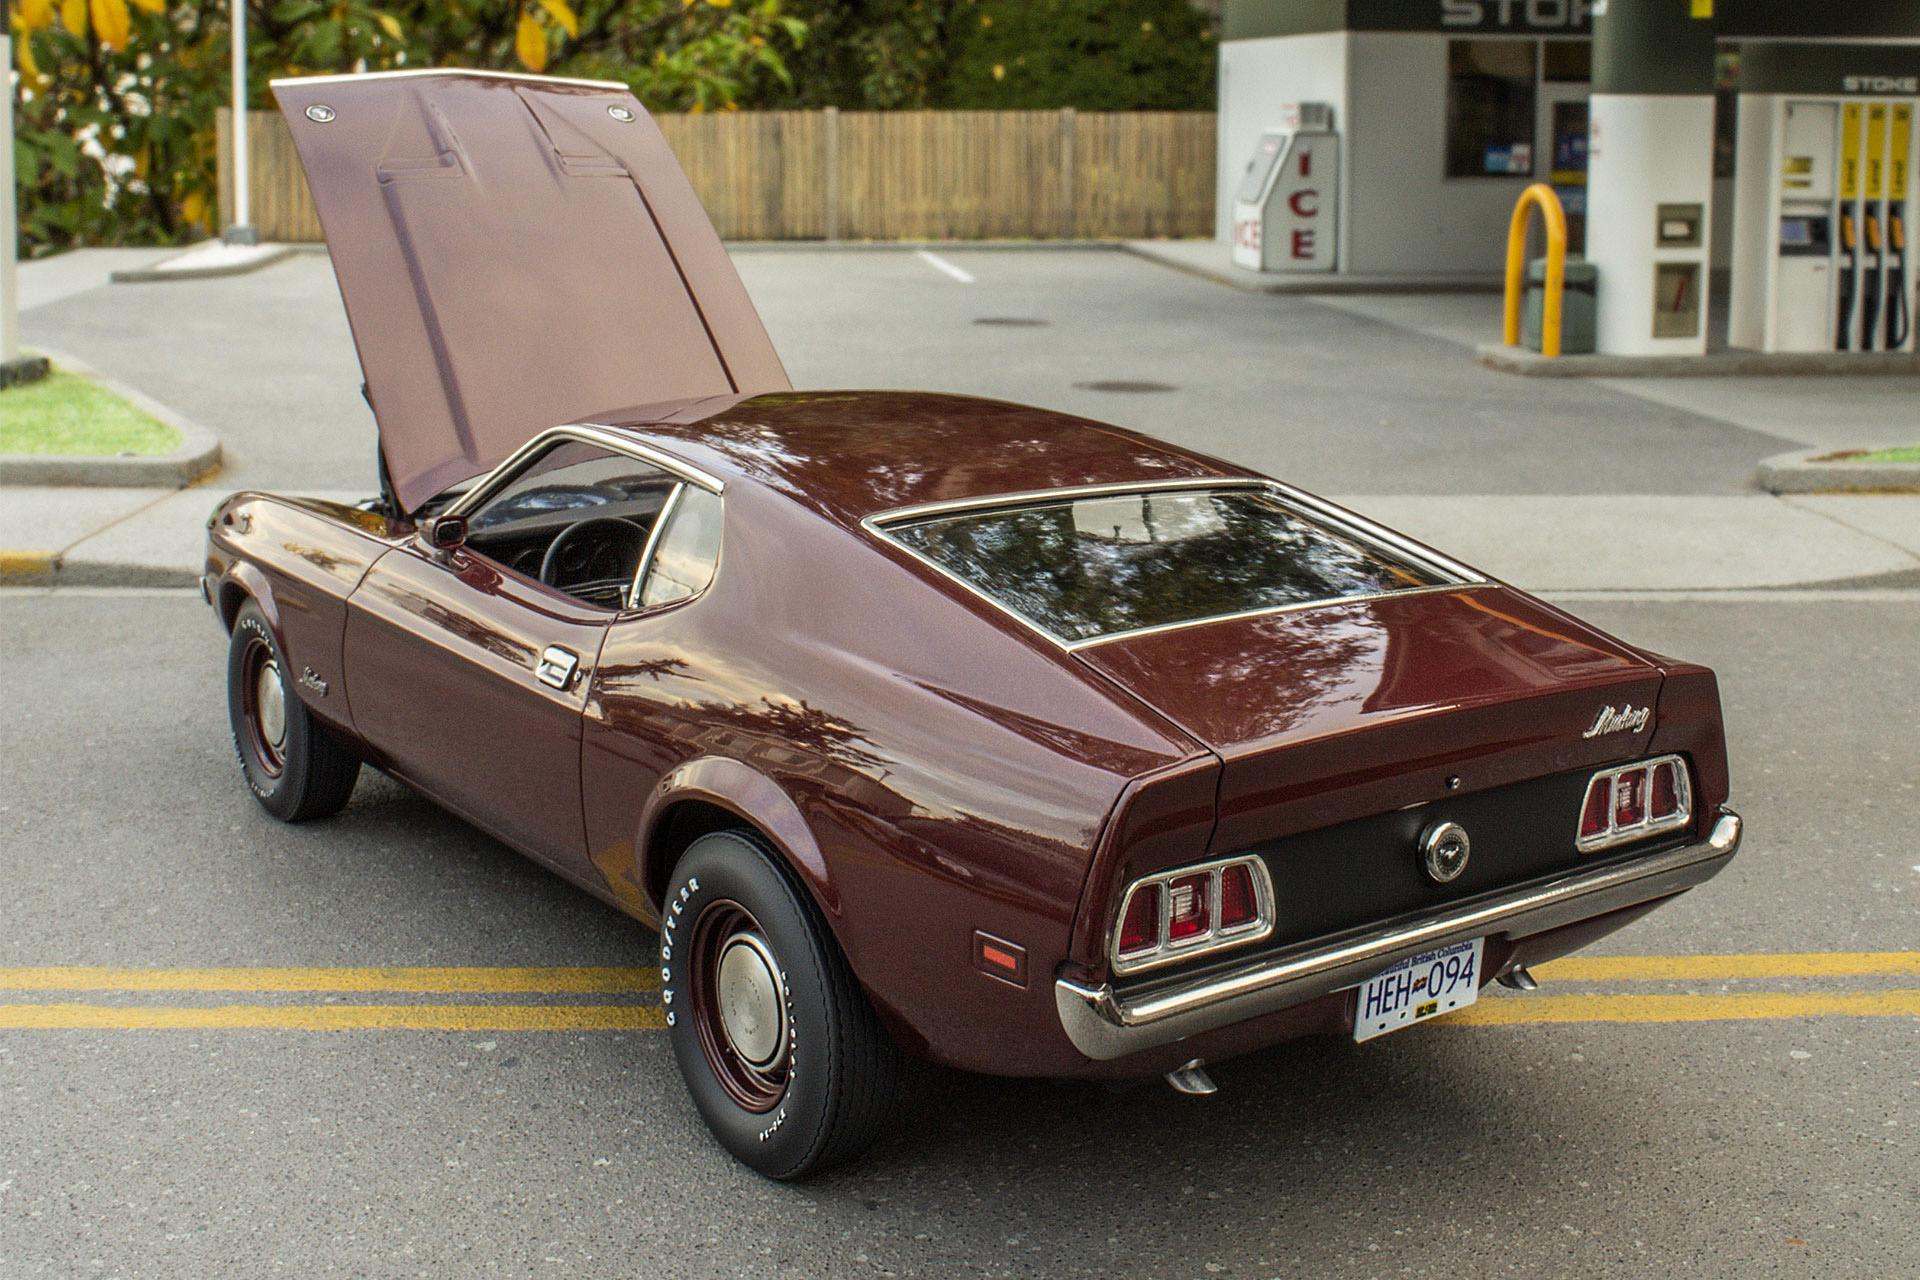
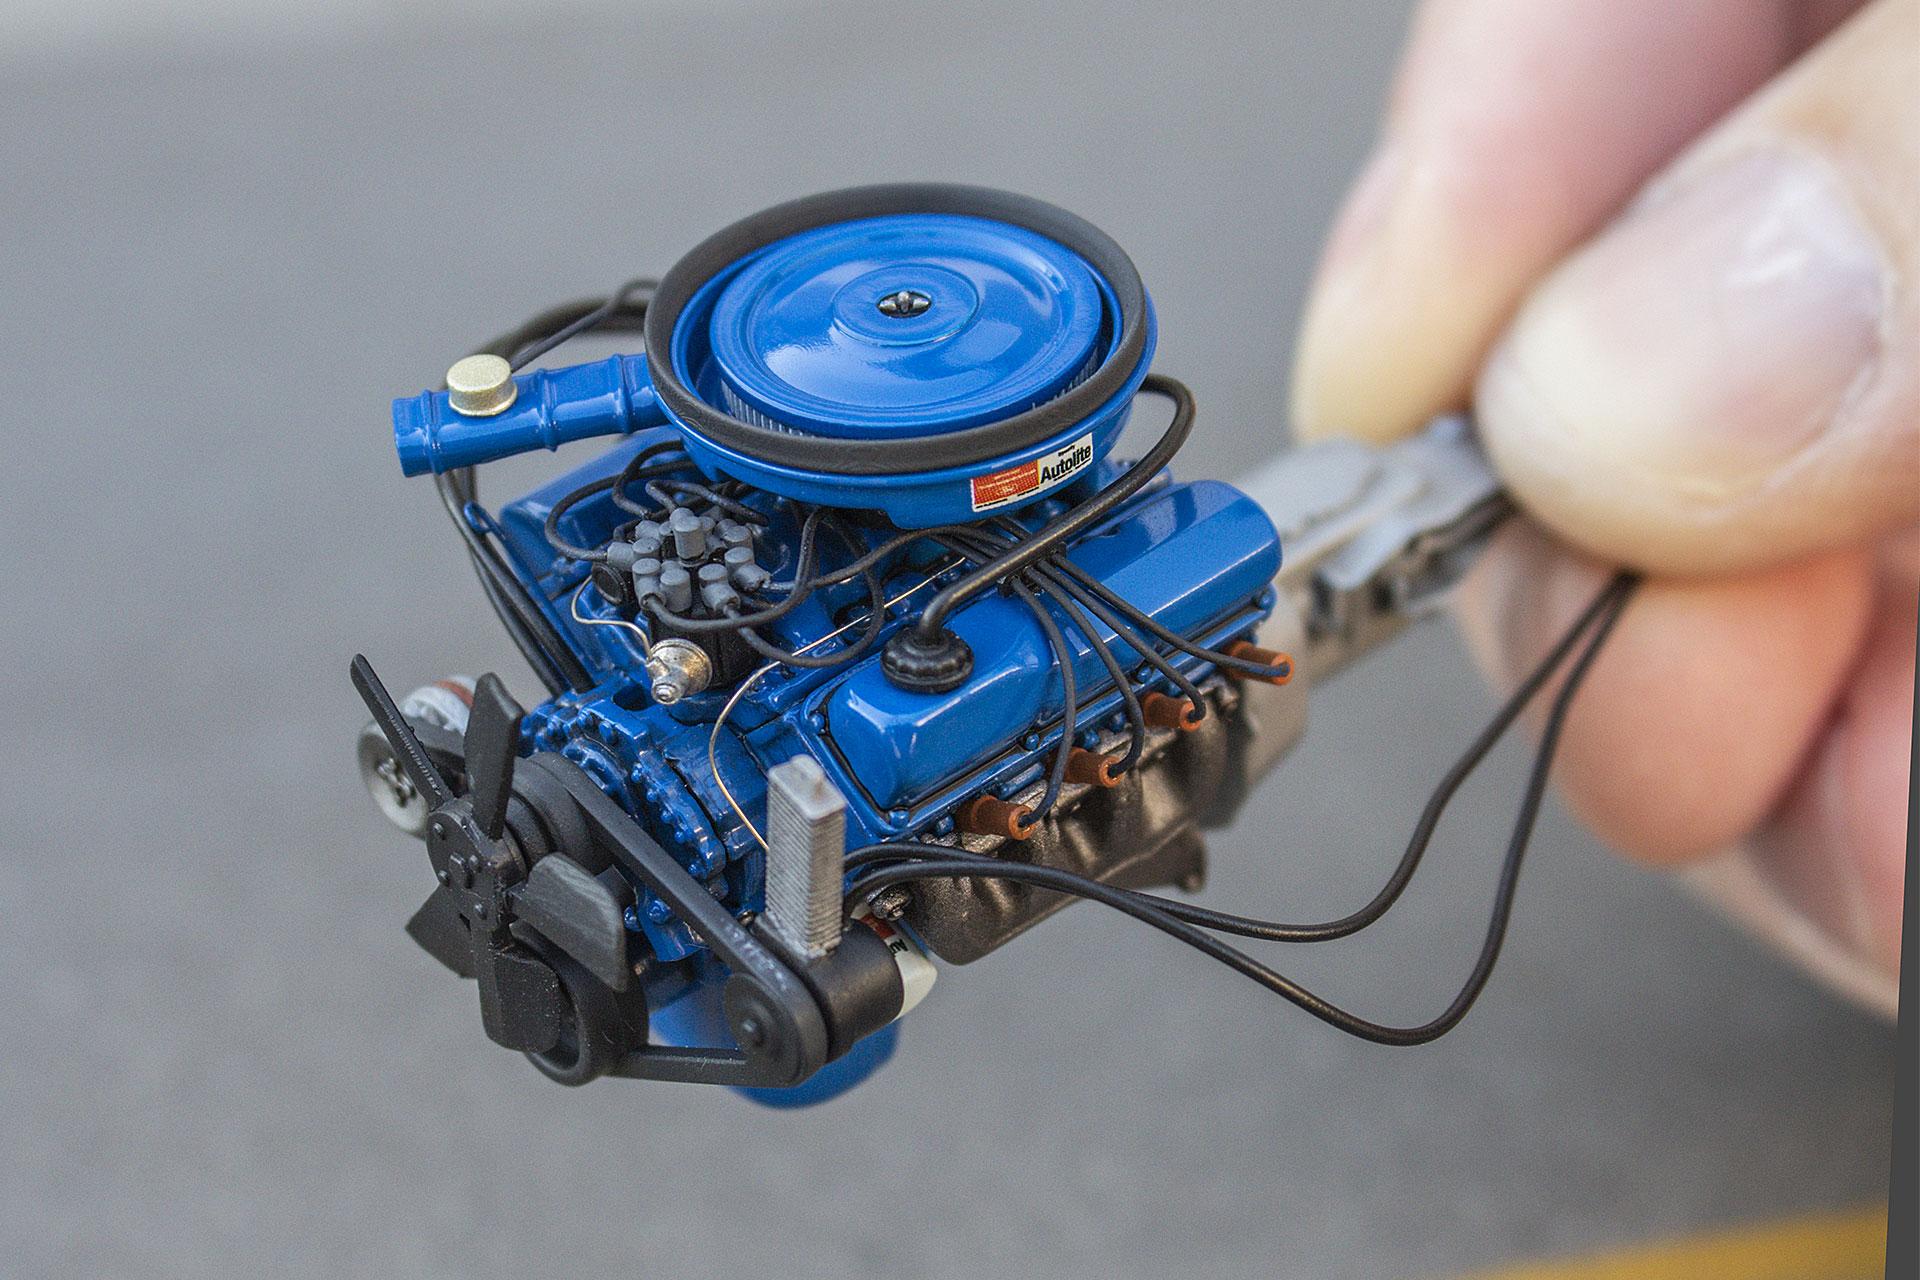
I picked up the new Revell 71 Mustang Boss 351 kit and decided to downgrade it a bit to a lower-spec version. I was really impressed with the kit, the proportions are excellent, fit and finish are good. My only complaints are a bit of softness in some of the detail and a slightly mis-registered decal sheet. Exterior colour is my best attempt at Metallic Maroon and was done with a mix of Mr Color lacquers. I was imagining someone ordering a Sportsroof with the optional Mach 1 interior trim and a 351C with Ram Air. I designed and 3D printed a new grill, wheels, tires, hubcaps and emblems to accomplish the exterior changes. The fit on the front bumper was a bit off on the kit grill but I think my new grill has pushed the front bumper out a bit, looks a little too far from the chromed hood trim. This was the first time I've added some deformation to the tires to help with the sense of weight on them. The hubcaps were 3D printed and covered in Bare Metal Foil and 'turned' gently with 6000 grit sandpaper. Under the hood, I redid the shock turrets, air cleaner assembly, ignition coil, distributor, spark plug boots, hood hinges, and added wiring, plumbing, oil dipstick and hose clamps. I smoothed out the valve covers from the kit and reshaped them to try to get closer to the ones on the 351C engine. The covers should have the Ford logo embossed into them I think but I like the look of it like this. The hood hinges have a couple of 2mm magnets on each side so I can remove them to lay the hood flat. A shot of the engine before installation. The interior was built with the addition of seat belts, door locks, embossing powder for carpet and a new 3D printed 2 spoke steering wheel. Also remade the gearshift as I lost the kit piece. I did find it as soon as I finished the build of course. Thanks for Looking!

- 79 replies
-
- 31
-

-

-
I made and printed this one myself.
-
Thanks! Yes, there was an orange one in my neighbourhood that I styled this one after - would have been around 1985 I think.
-
Yes, and this kit has the entire windshield, frame and quarter windows as one clear piece - would be very difficult to replace. It's often the most noticeable part, as well as the chunky wipers. ?
-
Thanks to all for the great comments - appreciate it!
-
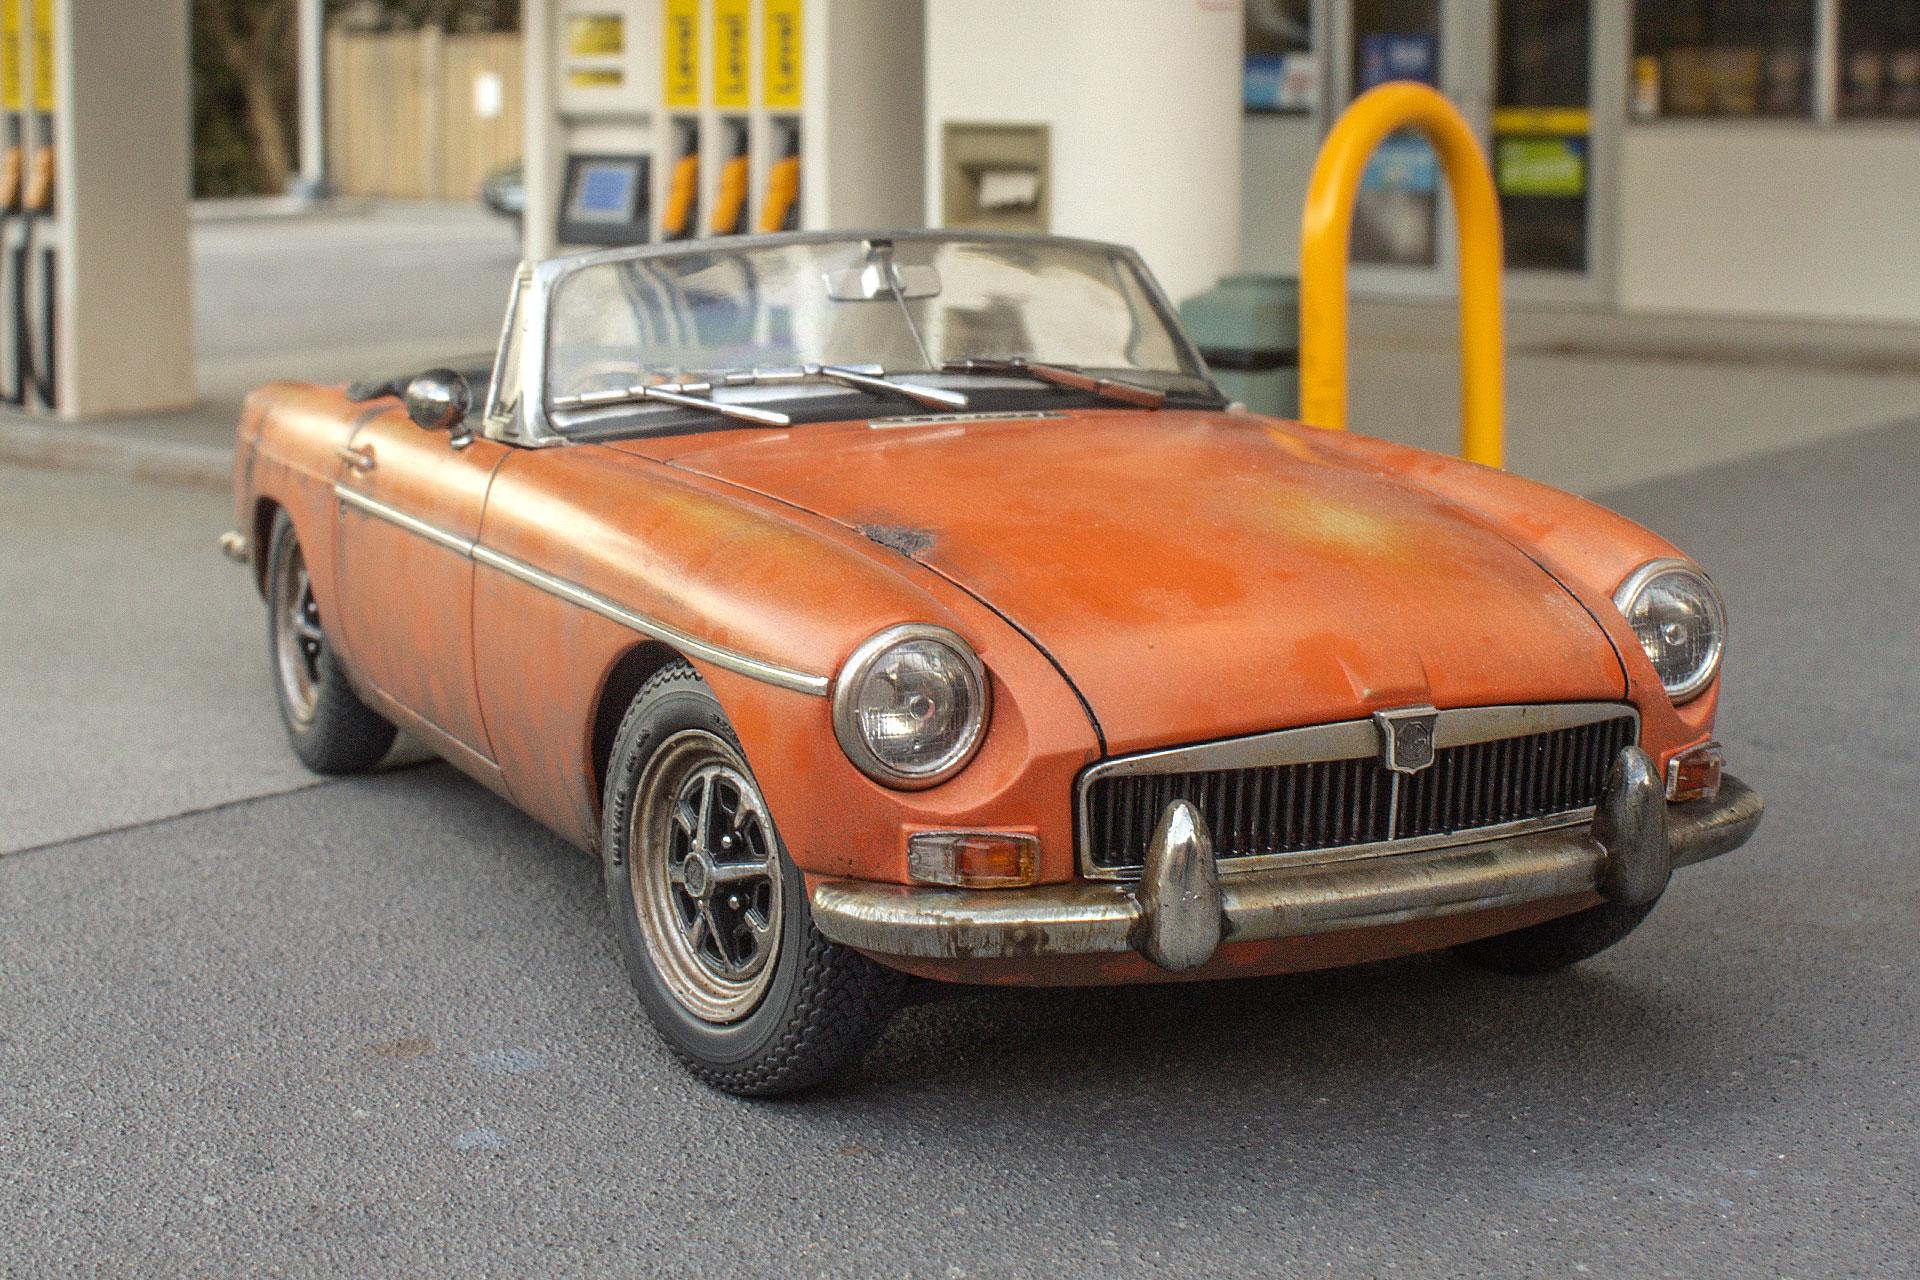
My latest build is a quick build of the Aoshima MGB kit. I wanted to do a rusty, weathered 70's-ish MGB so I started with the rubber bumper version of this kit that has the Rostyle wheels but also includes all the early MGB chrome bumpers and grill. This is almost entirely out-of-the-box with the exception of 3D printed tires and steering wheel. The interior is more accurate for an early MGB as well as a few other details but overall it feels like the hard-driven MGBs I remember driving around when I was a teenager. I carved out the back of the lower rockers and added some rust holes as well as a patched and primered portion on the left side. I heated the inside of the plastic with a soldering iron and pushed in some dents on the rear quarter and trunklid. I also filed the molded-in trim off the rear quarter panel and drilled the mounting holes. Weathering was mostly done with airbrushed lacquer and enamel washes. All of the chrome was stripped and redone with Alclad which allowed me to remove one of the rear bumper guards. Thanks for looking! Martin.
- 39 replies
-
- 19
-
-
I think despite your critiques of the kit, you've turned out a fantastic replica. I've built the Turbo version of this kit and agree that if I build another, I would strip the trim, glue it in place and then apply Bare Metal Foil after paint and polish. FWIW, I've been applying embossing powder overtop of a very wet airbrushed coat of lacquer. It provides a smoother final surface better than using glue and I can respray and add more powder if there's any thin spots. I've also been looking for a way to replicate window trim and I saw a video by A4Garage on YouTube (https://youtu.be/-ZuEDGtinhU?t=2318) where he uses Hasegawa Stainless Finish foil to do a thin strip over the black painted rubber part of the window. The Hasegawa foil is more of a vinyl than metal but it can flex around corners without breaking - definitely finicky but a pretty good result when it works.
-
Thanks to all for the great comments - appreciate it!
-
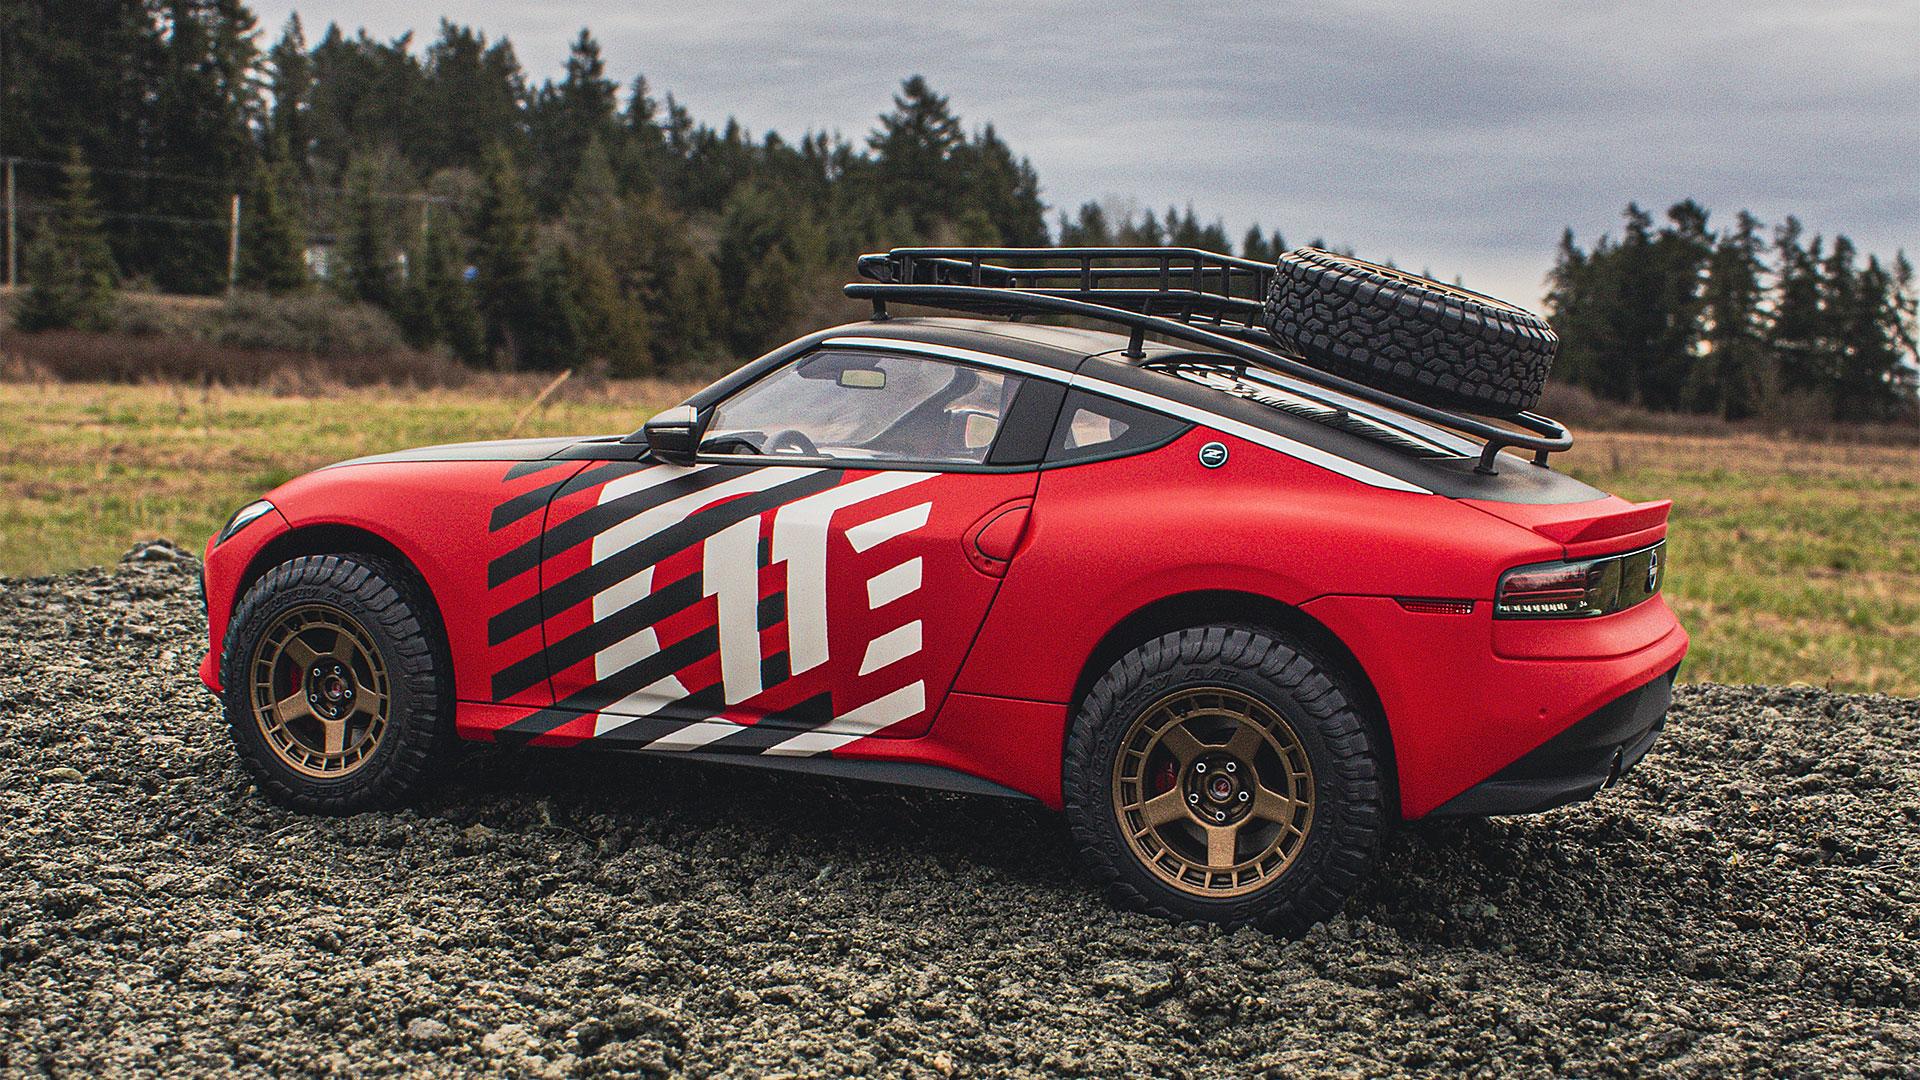
This is my latest finished build, the new 1/24 Nissan Z kit from Tamiya. It's a fantastic kit in terms of engineering, lots of well fitting, separate parts that reduce the amount of masking required, particularly in the interior. I did mine as an homage to the 1971 East Africa Rally winning 240Z. Red with the black hood and I created my own modernized take on the original door number graphics. The wheels, tires and roof rack were custom design and 3D printed. I also did a suspension lift, the majority of which was handled with lifting the subframes off the chassis. The interior was built mostly out of the box with the only real modification being adding a clear piece of plastic over the gauges. All of the red pieces here are separate pieces that didn't require any masking. Thanks for looking. Martin.
- 26 replies
-
- 18
-
-
I think the parts were all white in this version of the kit. I used Tamiya Insignia White lacquer for the interior. It has a nice soft look to it instead of being a harsh white.
-
Thanks to all for the great comments - appreciate it!
-
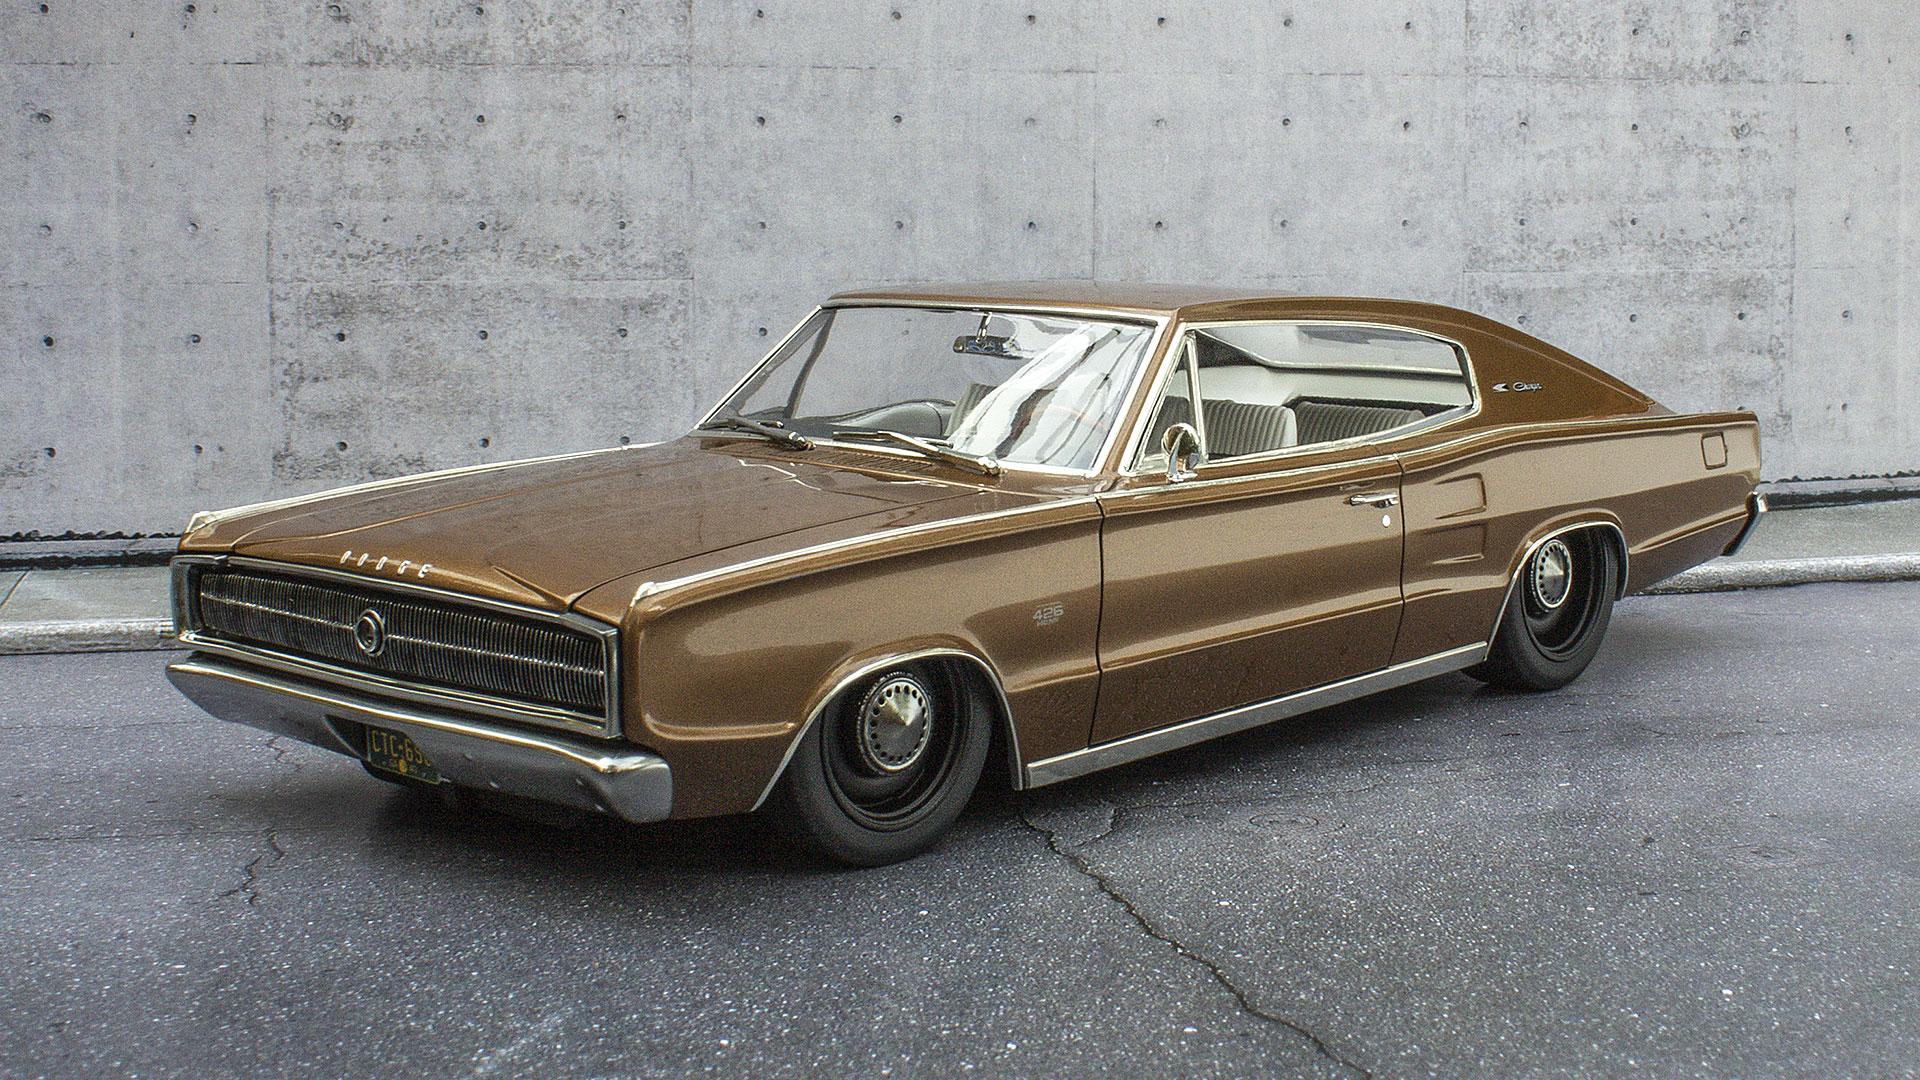
This is my build of the Foose version of the Revell 1/25 scale 1967 Dodge Charger. Mostly built out of the box with 3D printed wheels, tires, hubcaps, intake and some other engine bay pieces. The colour is pretty much a 50/50 mix of Mr Color 7 Brown and 9 Gold. All of the chrome trim is Bare Metal Foil and the bumpers and other pieces were stripped, smoothed and painted with Alclad Chrome. Tail pipes are made from aluminum tube. The drop was achieved with lowered spindles in the front and cut springs in the rear. Interior was built stock except for the 3D printed steering wheel. Seats and door panels are done in Tamiya Insignia White. The engine was built from the kit with the optional valve covers. I added a 3D printed intake setup, battery, catch tank and radiator and added some extra engine wiring and plumbing as well. Thanks for looking. Martin.
- 35 replies
-
- 21
-
-
-
Really nice build! I've done a couple of these kits and rate them quite highly.
-
Thanks David - that was exactly where I was aiming with this, used but not abandoned.
-
Thanks for all the great comments guys! Thanks Phil! I was planning to bring this one to the meeting on Thursday.