RoninUtah
-
Posts
449 -
Joined
-
Last visited
Content Type
Profiles
Forums
Events
Gallery
Everything posted by RoninUtah
-
Mid 60s Peterbilt Unilite COE
RoninUtah replied to RoninUtah's topic in WIP: Model Trucks: Big Rigs and Heavy Equipment
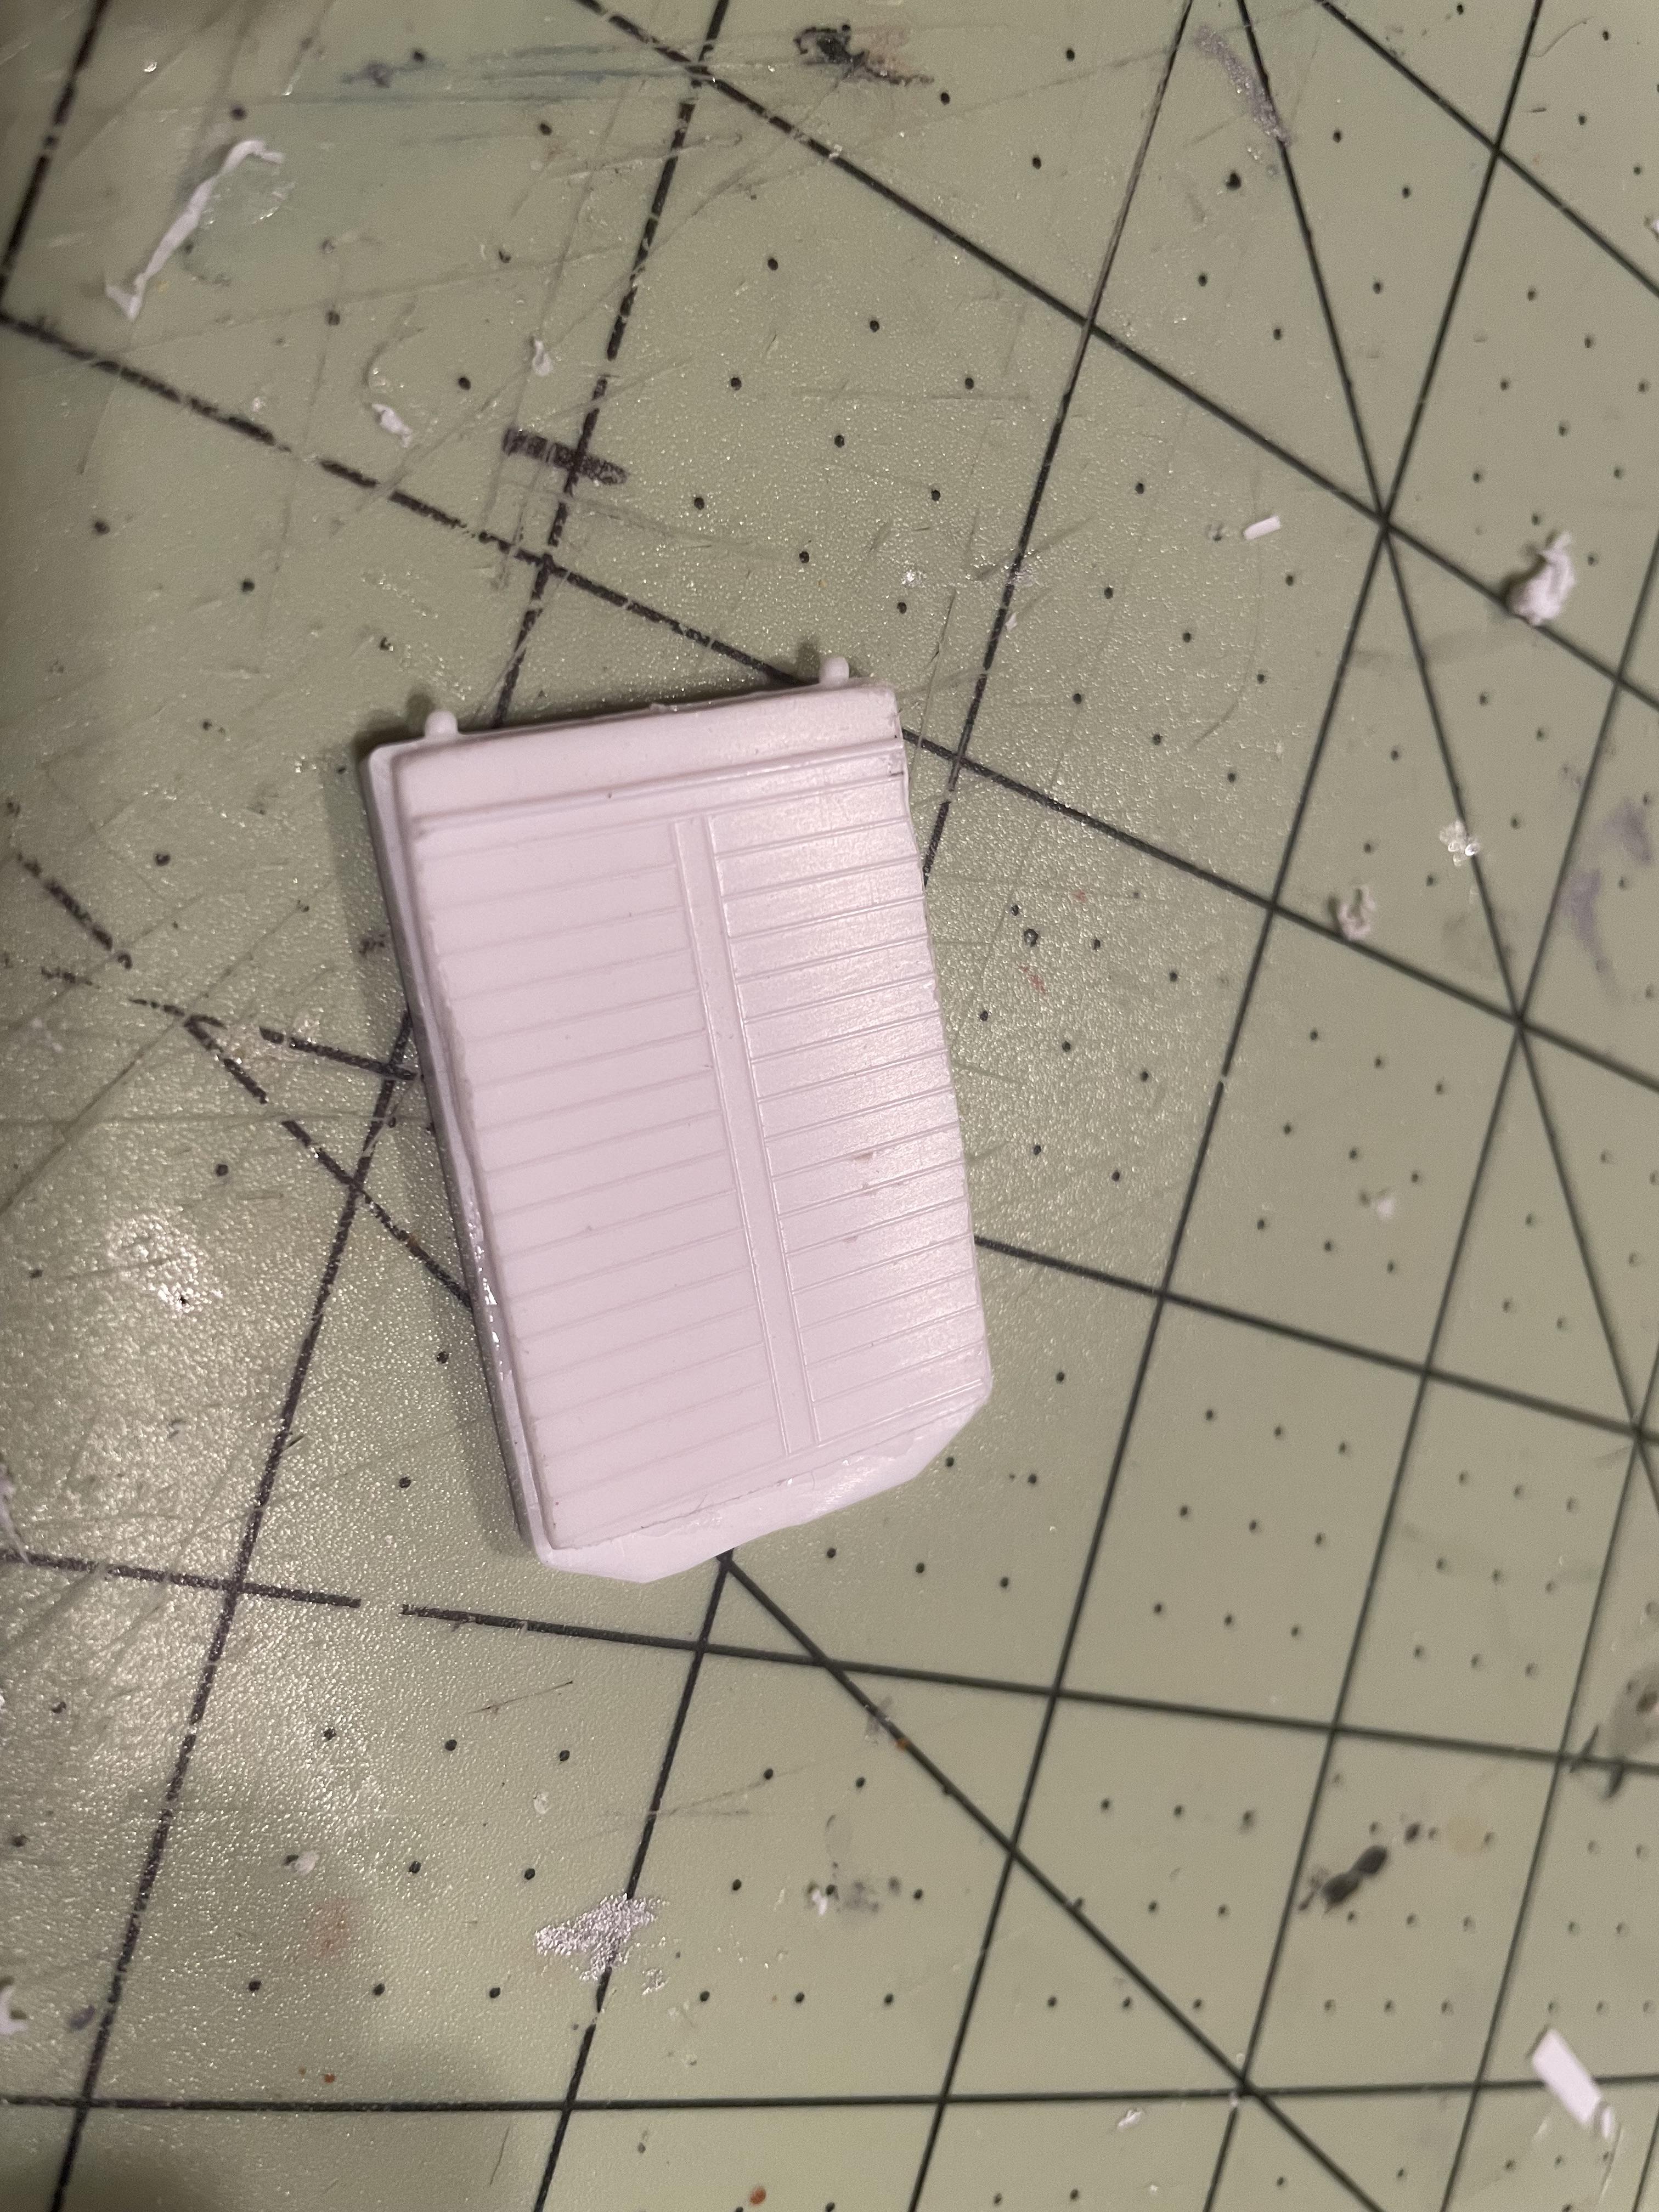
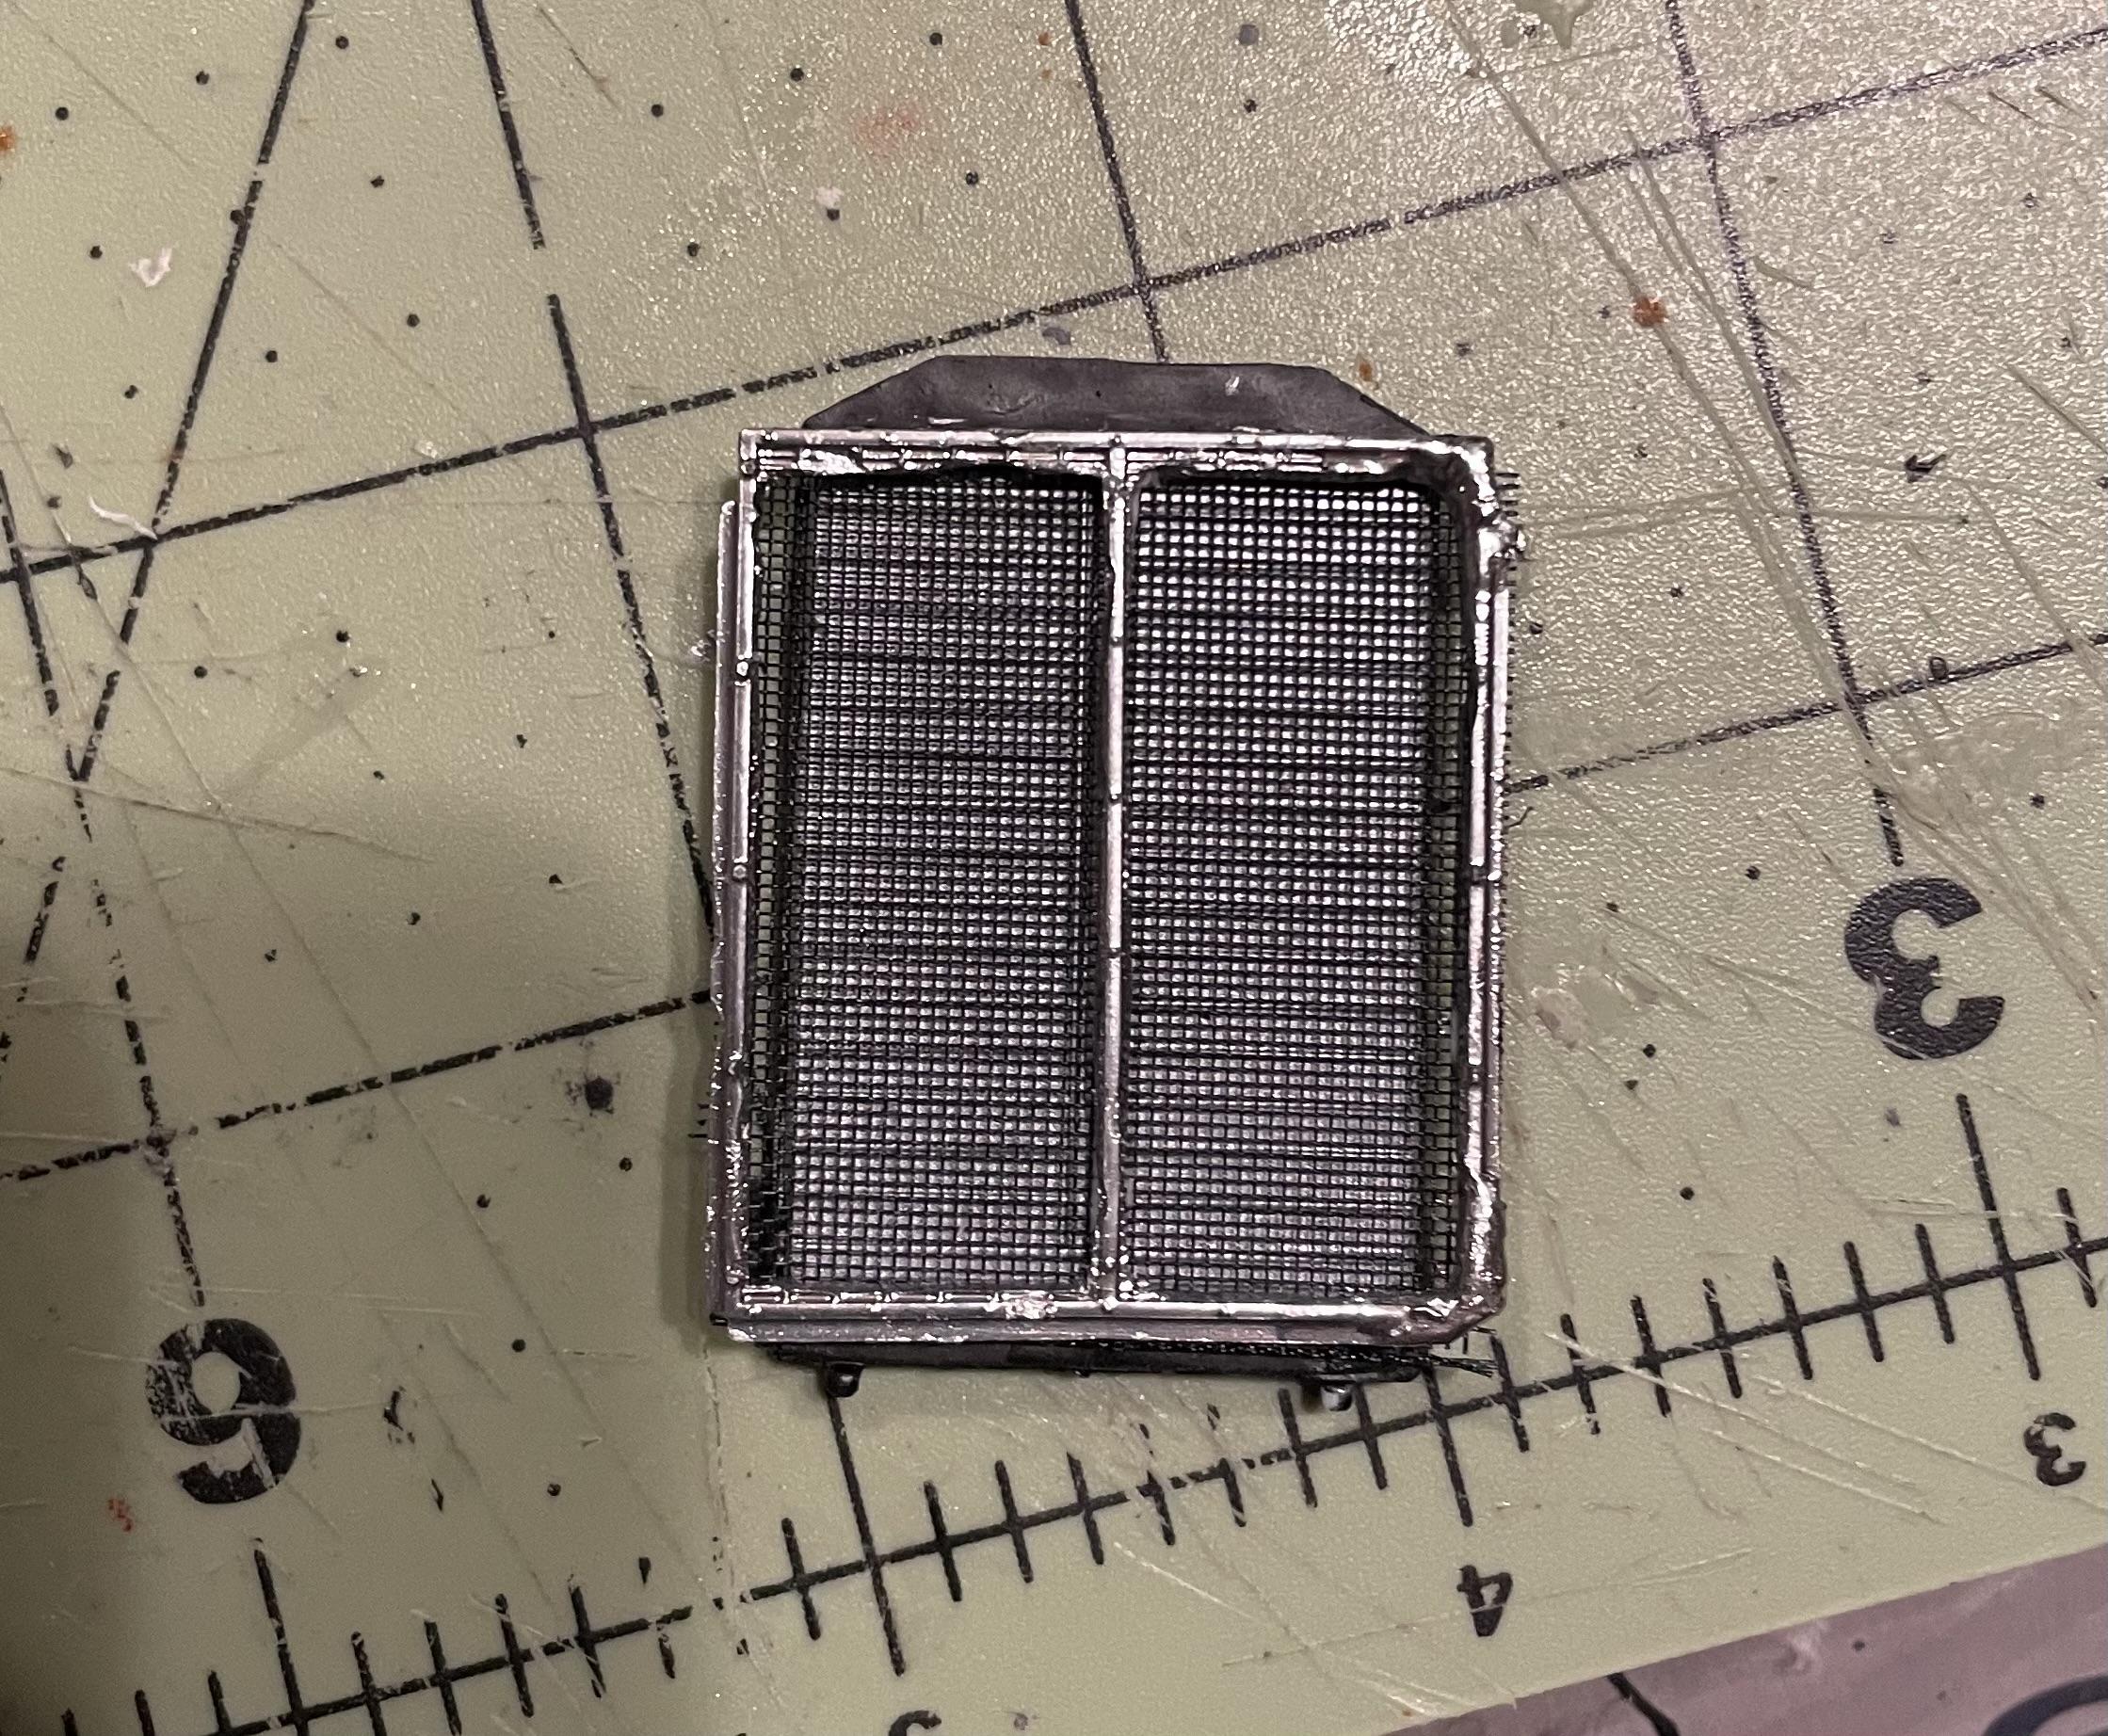
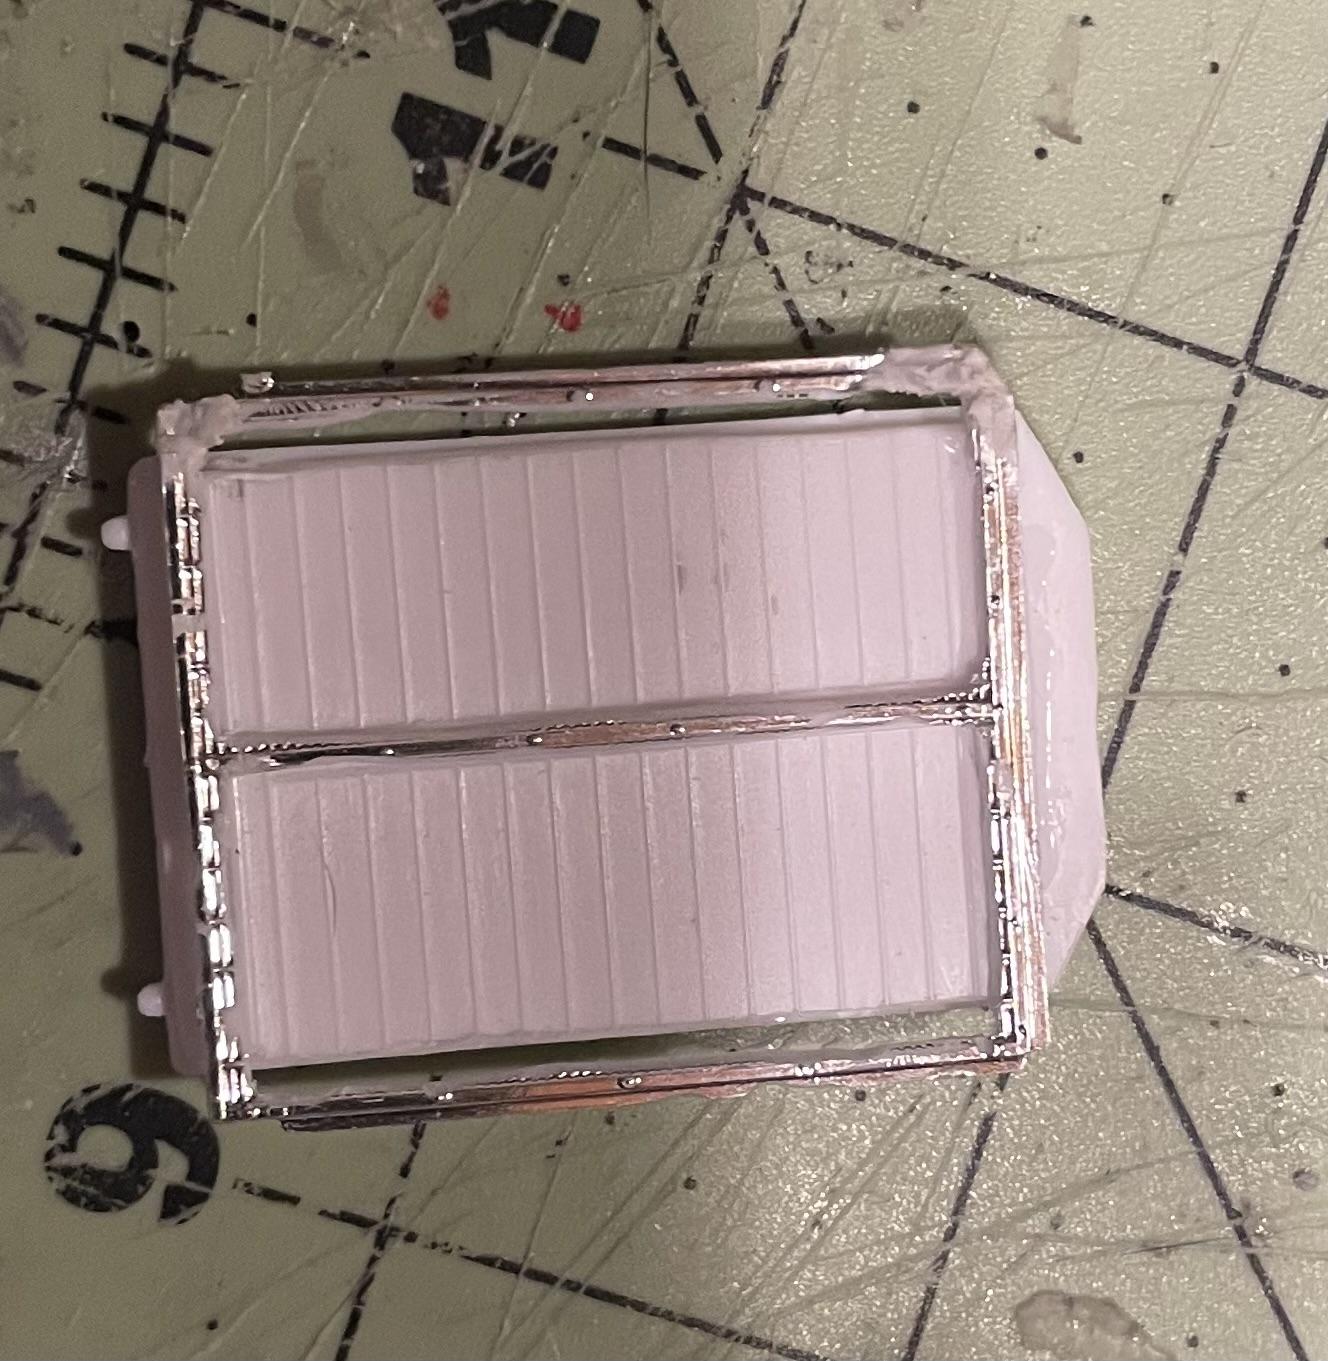
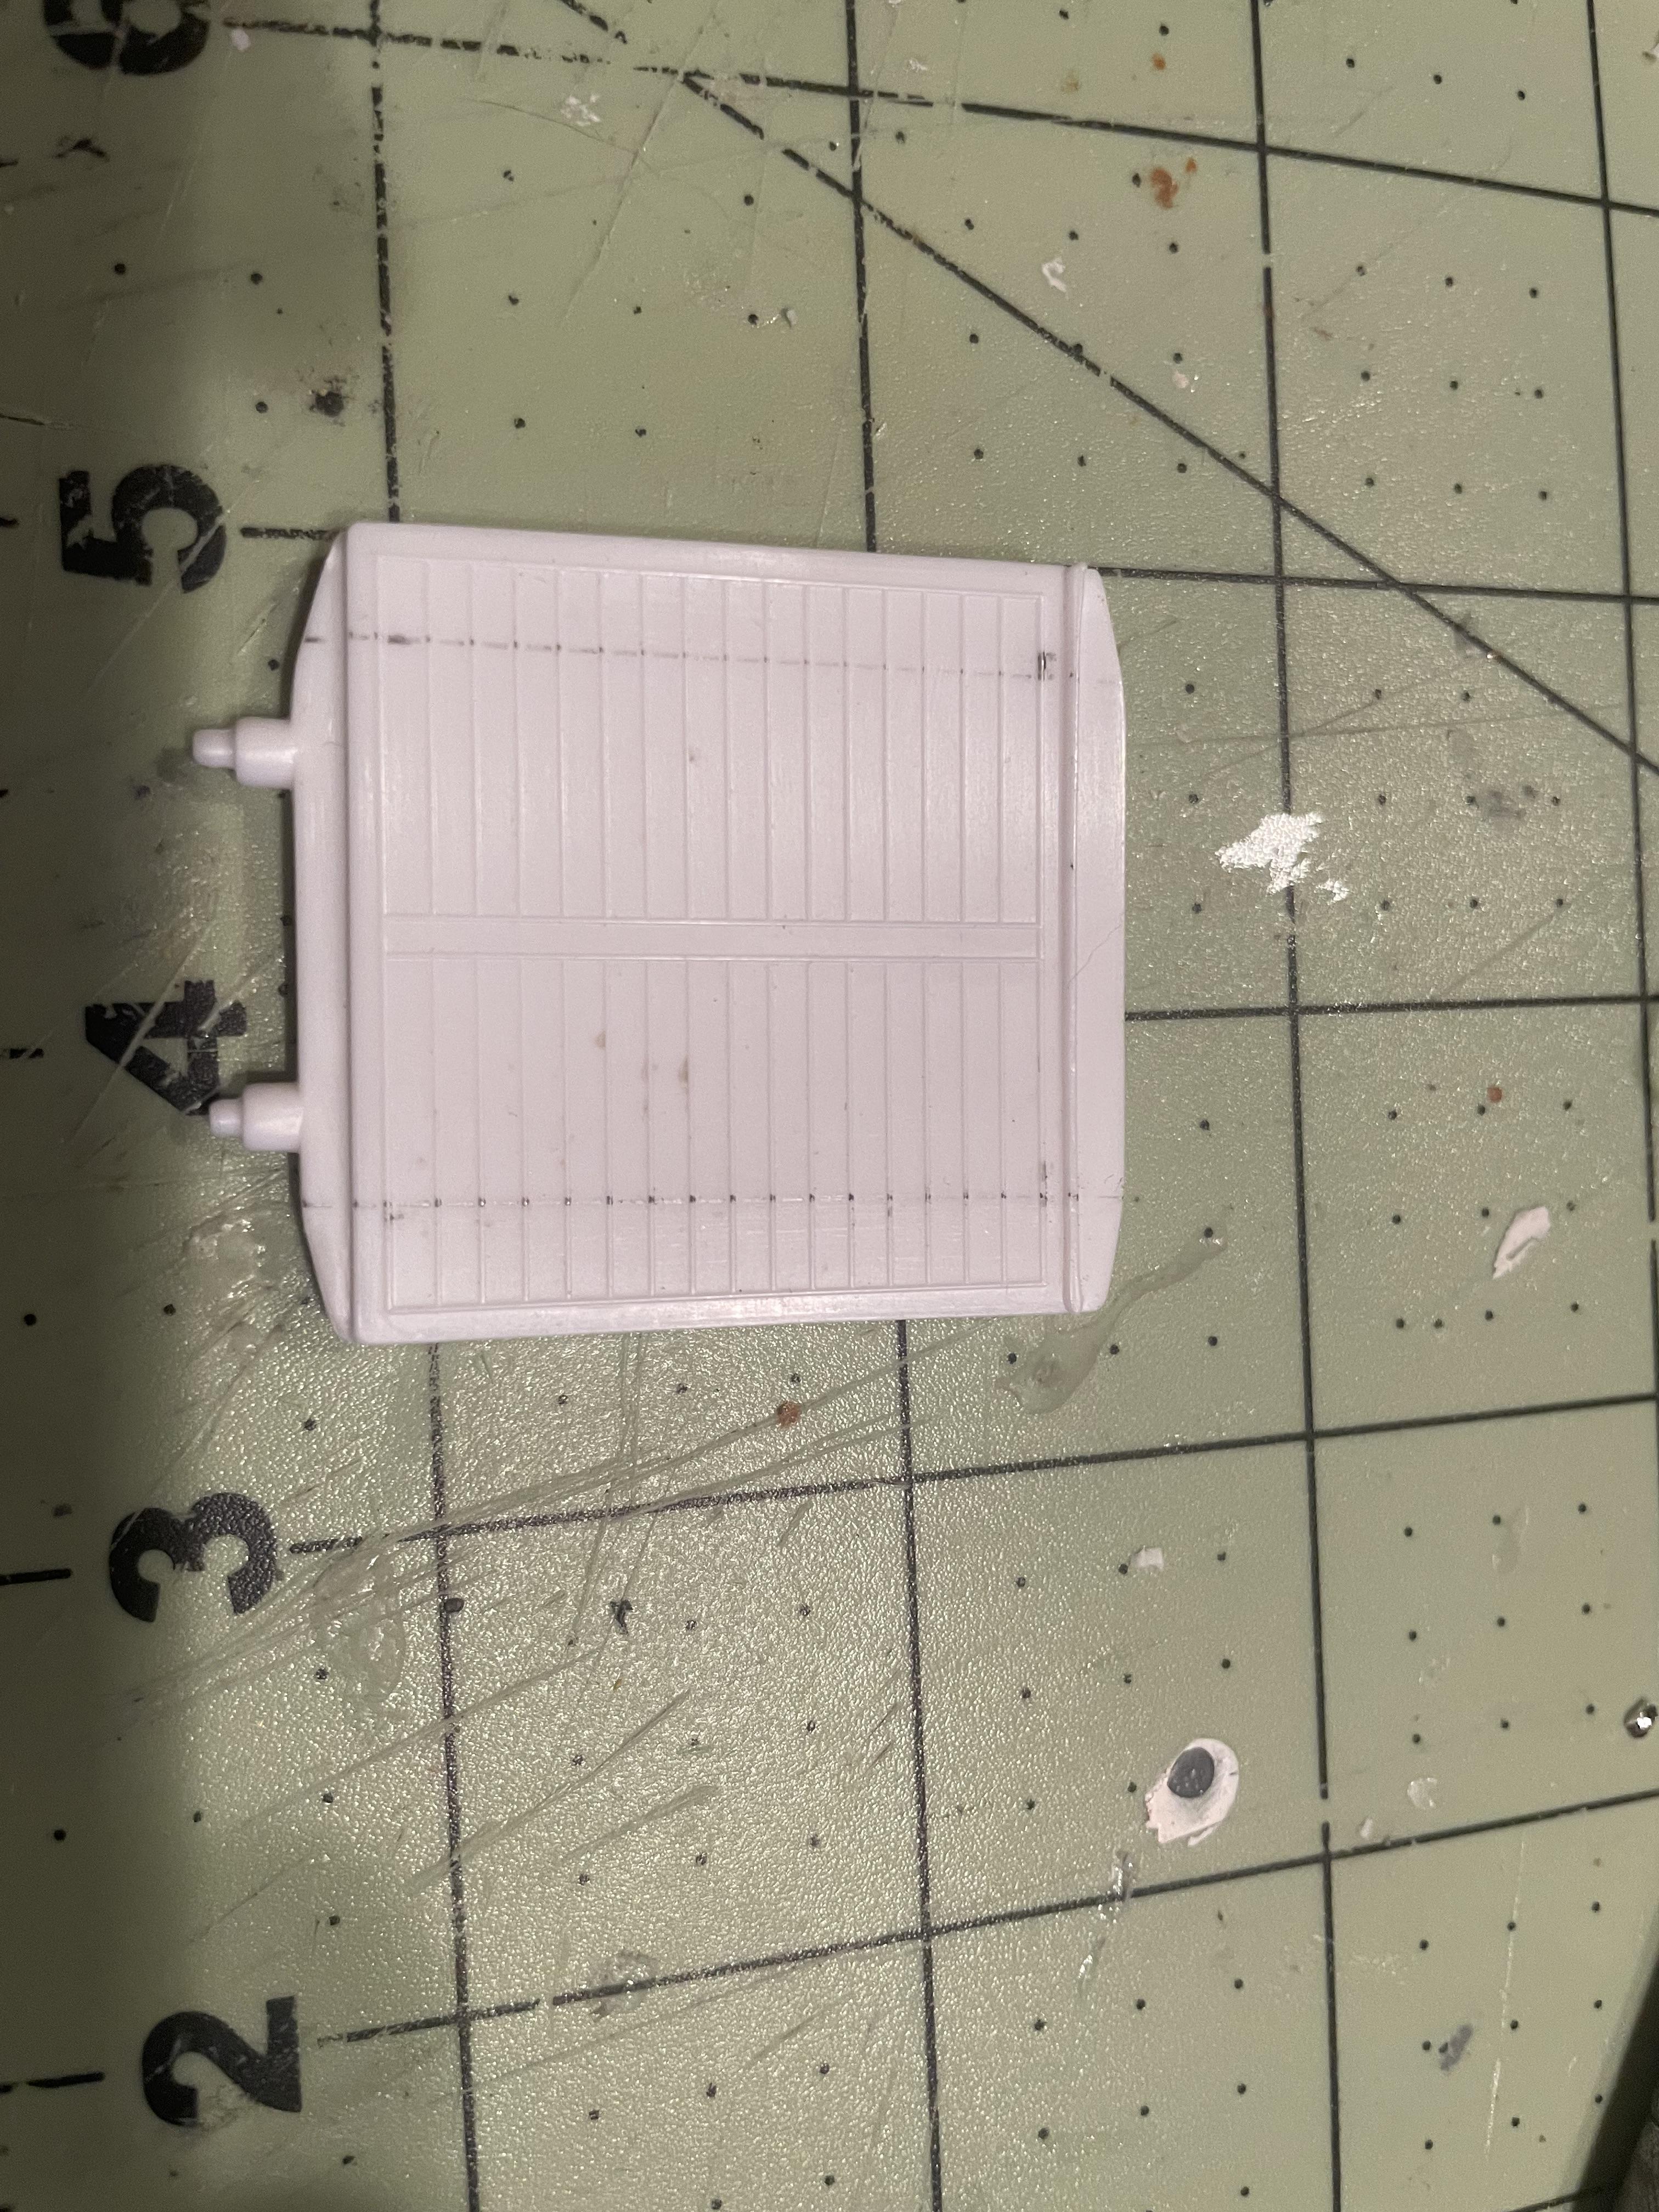
I’m literally waiting for paint to dry! So I’ve been busying myself with piddling little things in the meantime like painting fan belts and such. But here’s a fun thing- I’ve never been that crazy about AMT’s grilles- on the real trucks, the grille was really just a bug screen and you usually could see the radiator shutters behind it. So I decided to do something similar to what I did on my California Hauler a few months back, but it was complicated by the fact that the 352 grille is designed to attach to the front of the radiator. No detail on the radiator itself, and certainly no shutters! But I remembered that I had a bunch of leftover Peterbilt wrecker parts… and there was my radiator shutters! Too big, of course since it’s for a 359, but not to worry, it’s easy enough to cut to size: And attach to the 352 radiator core: I carefully cut the grille out of the frame: I then painted the shutters aluminum, rechromed the grille surround and attached some vinyl mesh to the back. Viola! I’ll attach the grille to the radiator after the cab is installed because it needs to fit just right. Keeping my fingers crossed that it will fit easily and I didn’t add too much depth to the radiator assembly. More work on the chassis next…
-
GMC Astro double bunk
RoninUtah replied to The Brush's topic in Model Trucks: Big Rigs and Heavy Equipment
Beautiful! -
The Same but “ a little “ Different
RoninUtah replied to Biggu's topic in WIP: Model Trucks: Big Rigs and Heavy Equipment
When this build is done, it will look like a real truck, dirt, grease and all, somehow magically shrunken to 1/25 of its original size! Can't wat to see it! Those White Freightliner stripes should be perfect with the colors you're going with, and they'll hide any bleed-through. Great idea! -
Mid 60s Peterbilt Unilite COE
RoninUtah replied to RoninUtah's topic in WIP: Model Trucks: Big Rigs and Heavy Equipment
Getting closer! White paint is on, now I gotta let it dry and cure a while before I can do the red.
-
Pete 359 tanker with trailer
RoninUtah replied to Jürgen M.'s topic in WIP: Model Trucks: Big Rigs and Heavy Equipment
Looking good! Are you going to give it a pintle hook and eventually make a dolly and tank trailer? -
Mid 60s Peterbilt Unilite COE
RoninUtah replied to RoninUtah's topic in WIP: Model Trucks: Big Rigs and Heavy Equipment
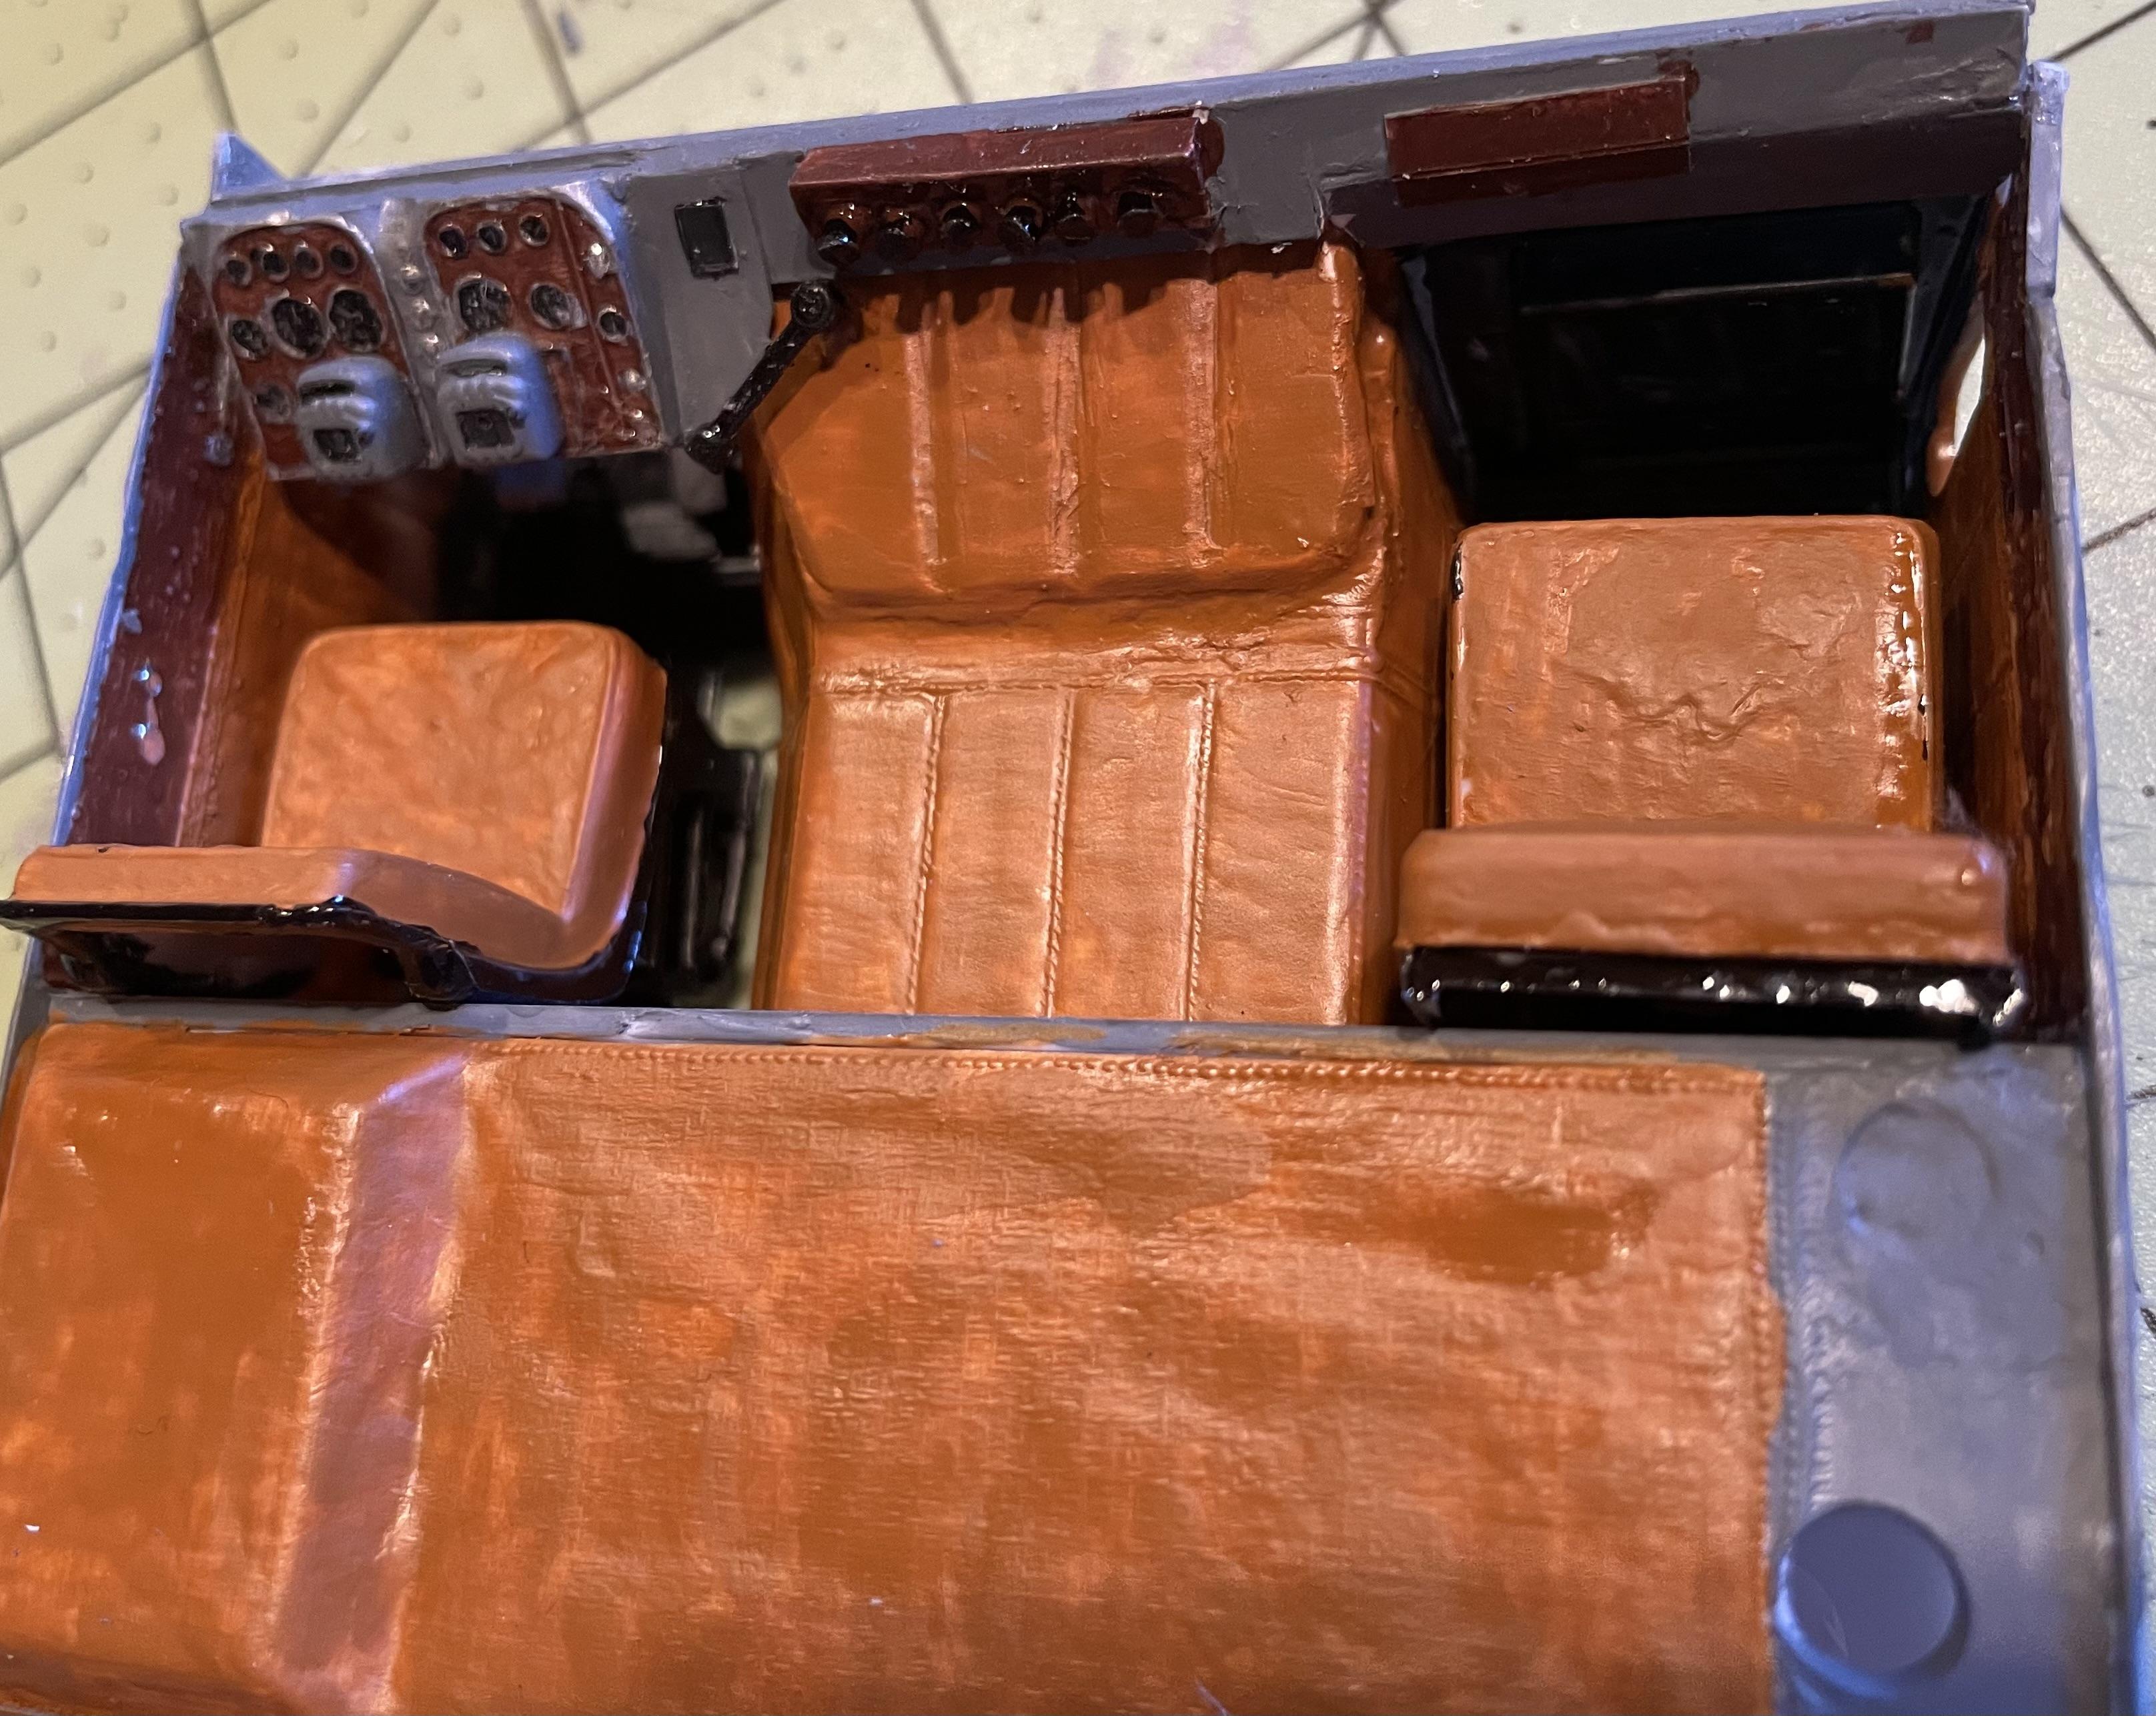
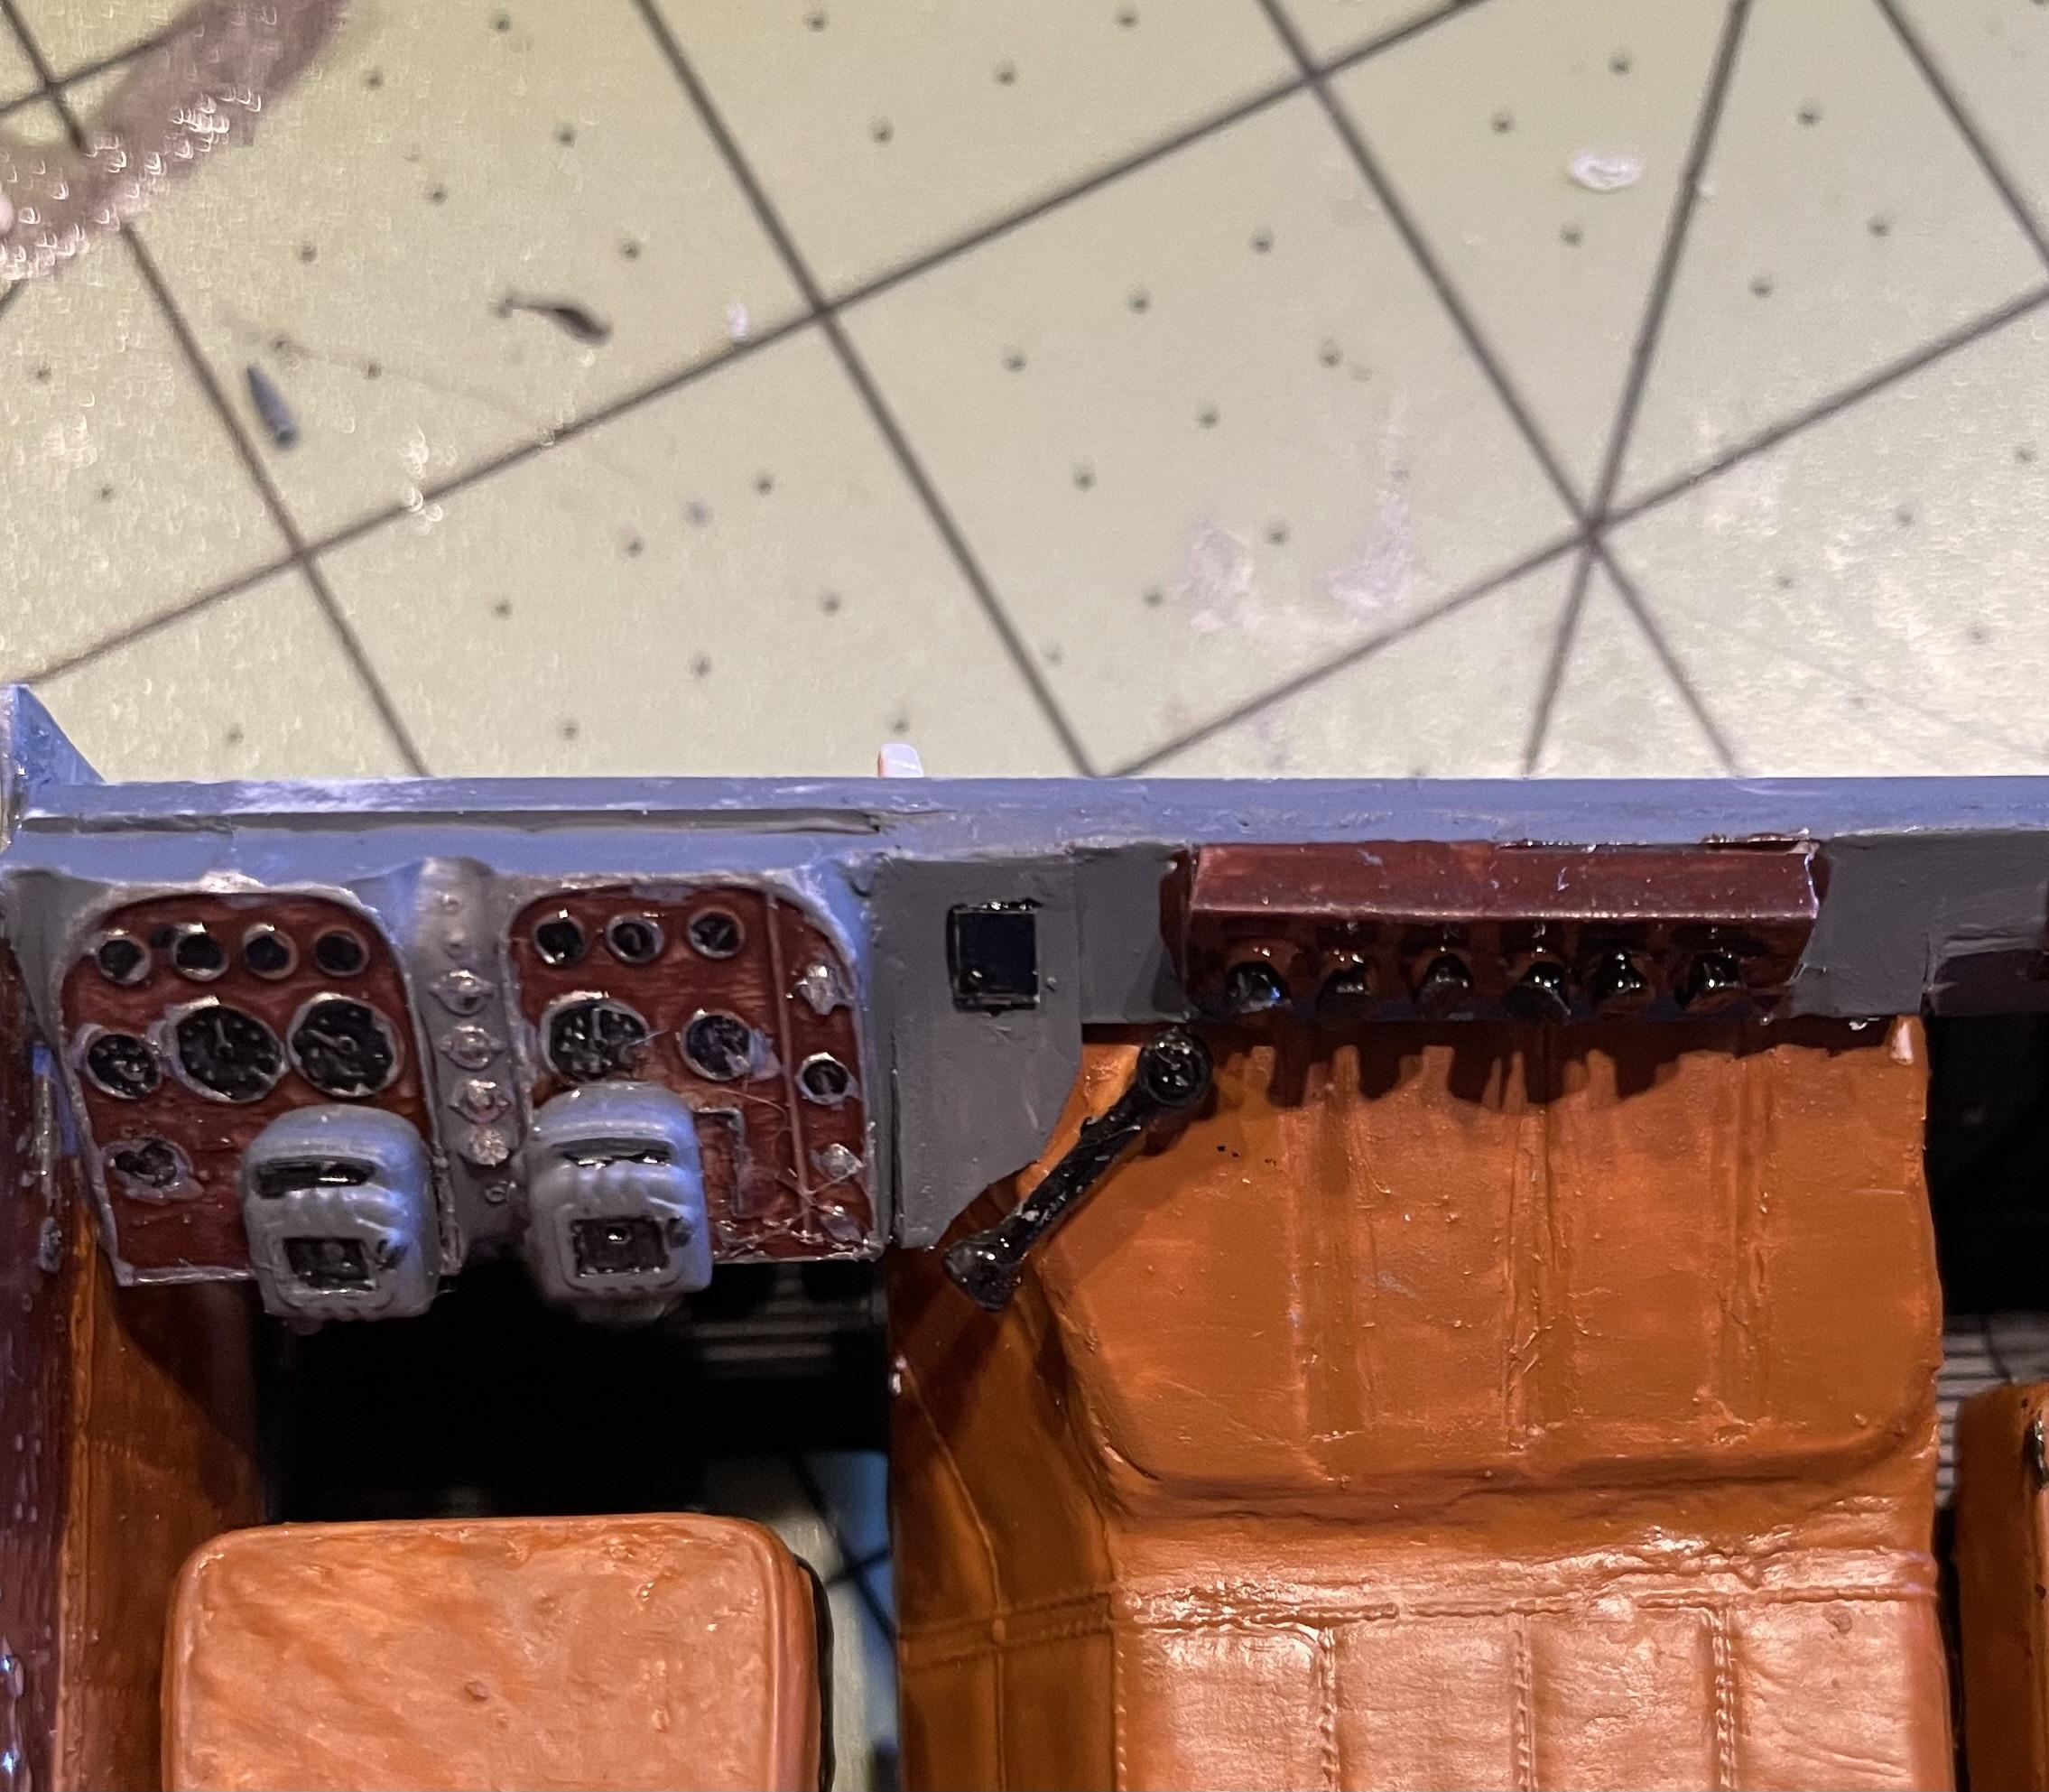
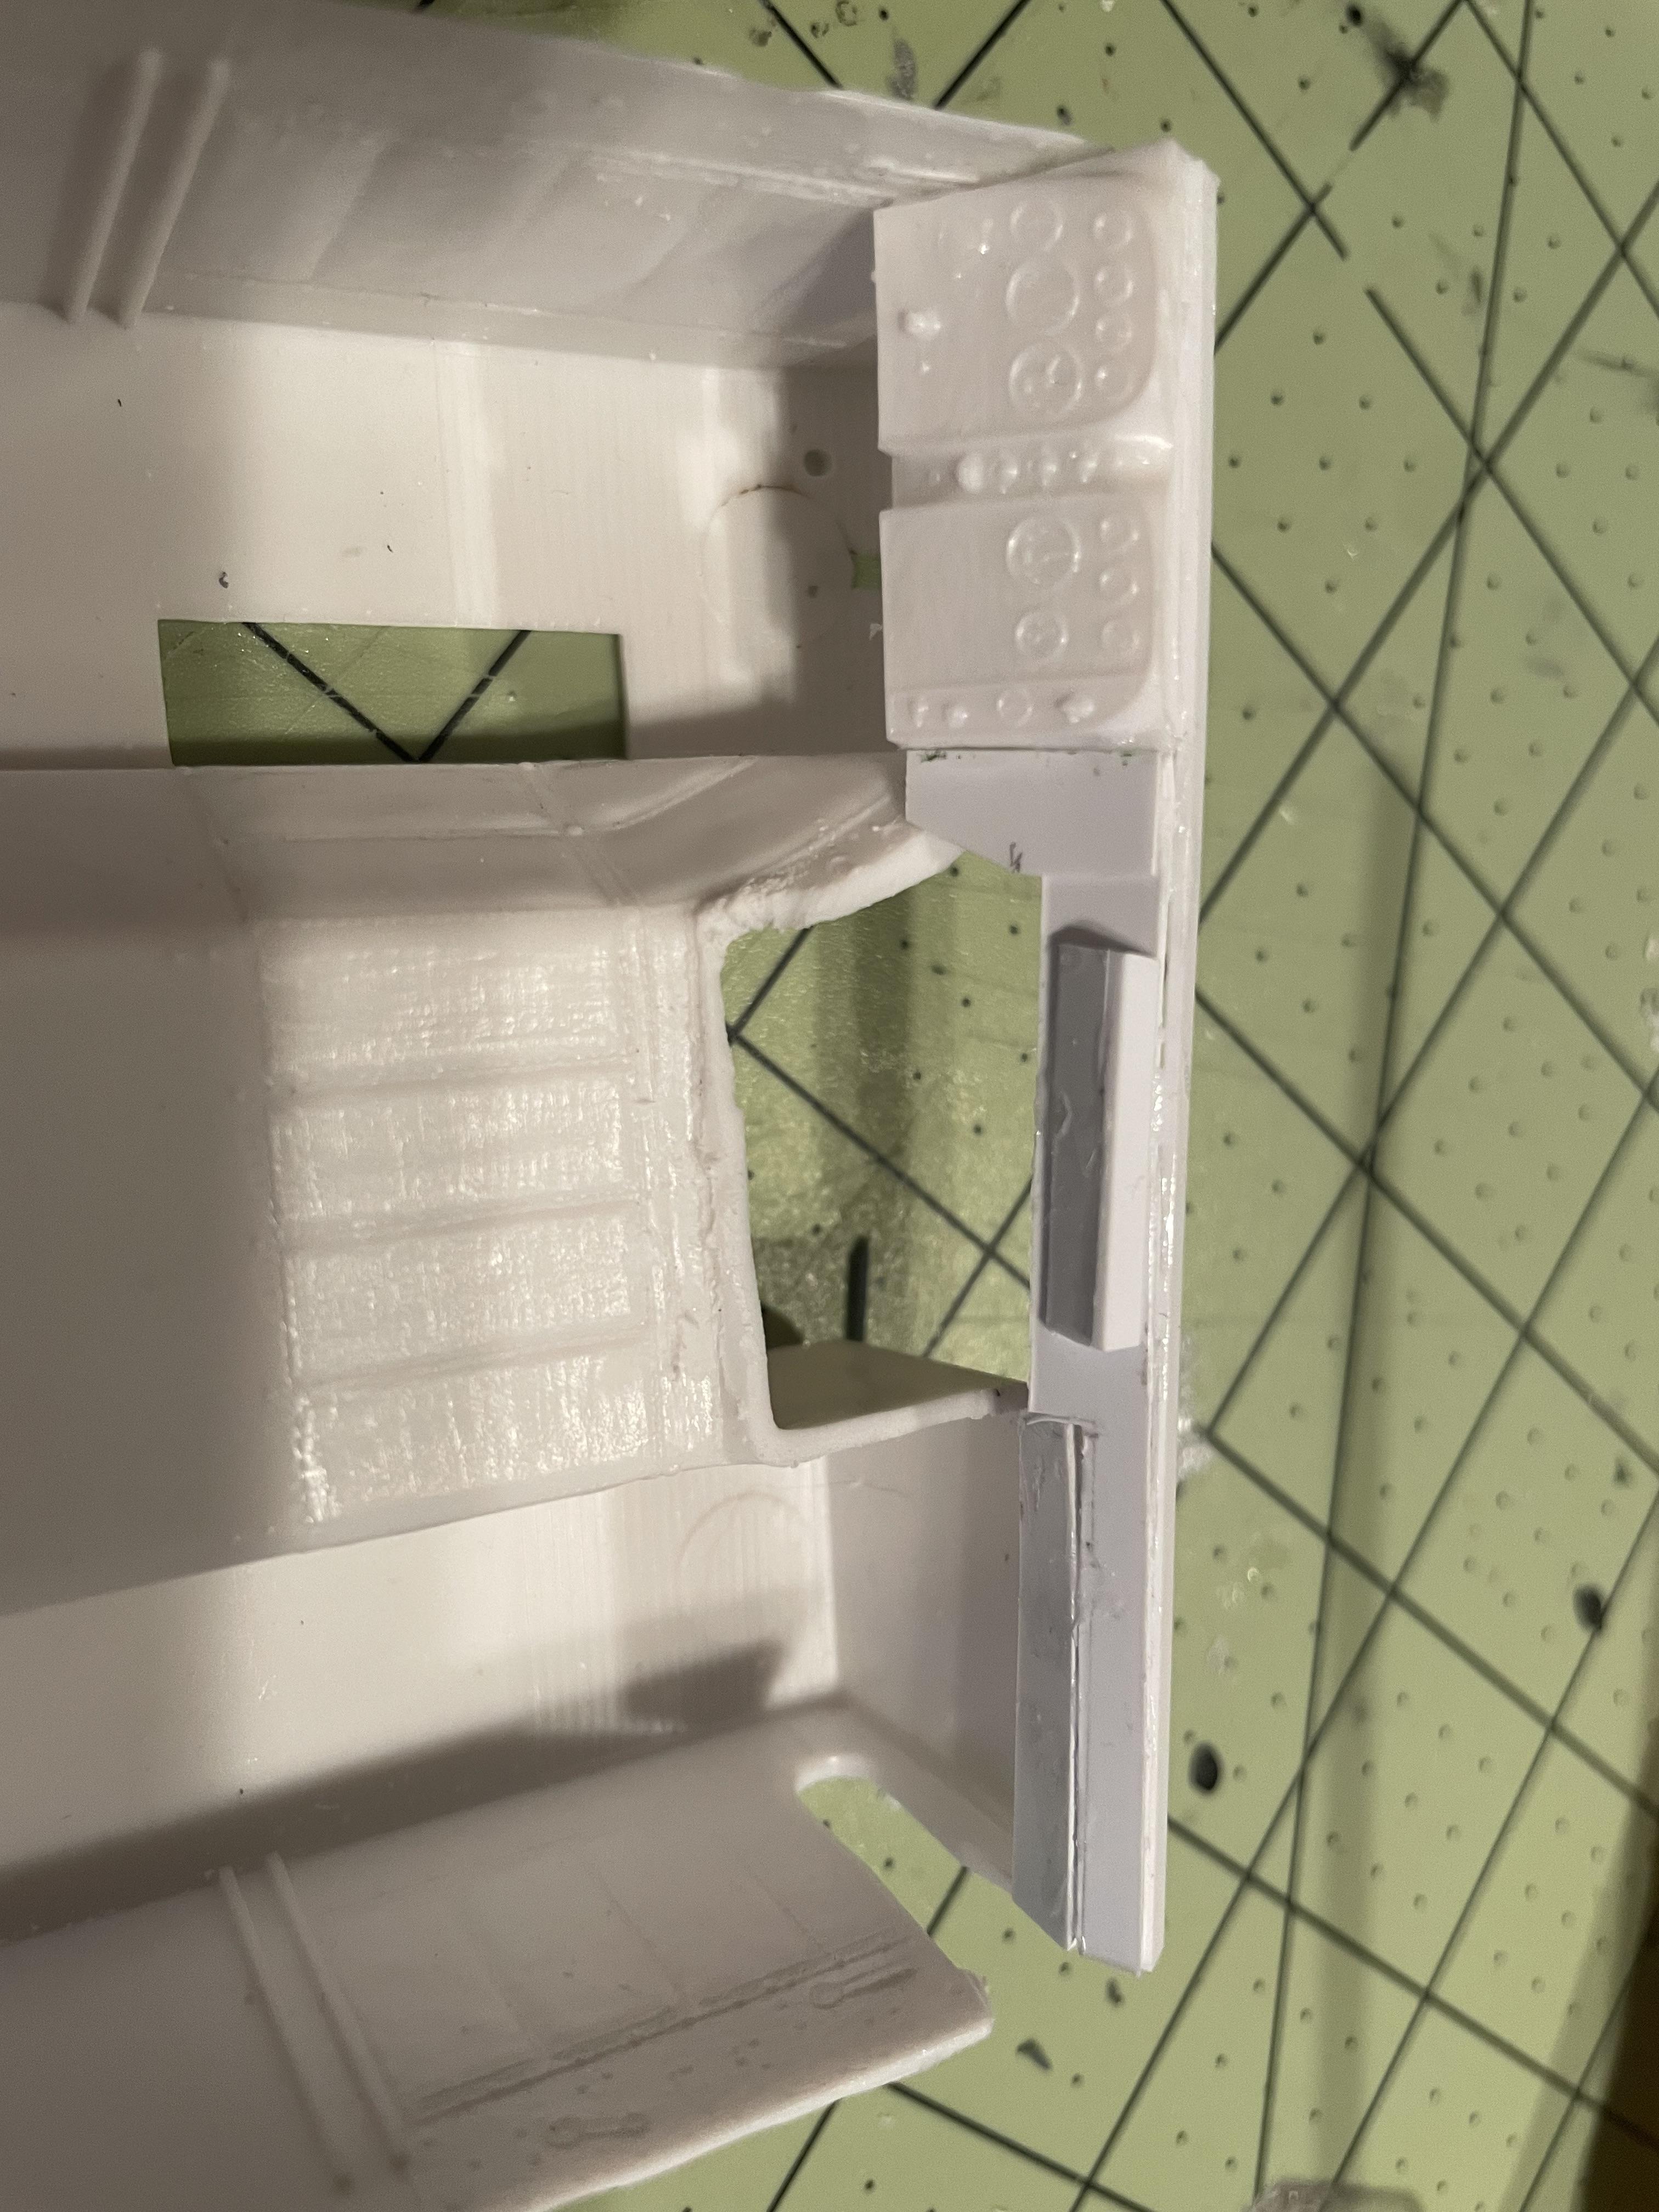
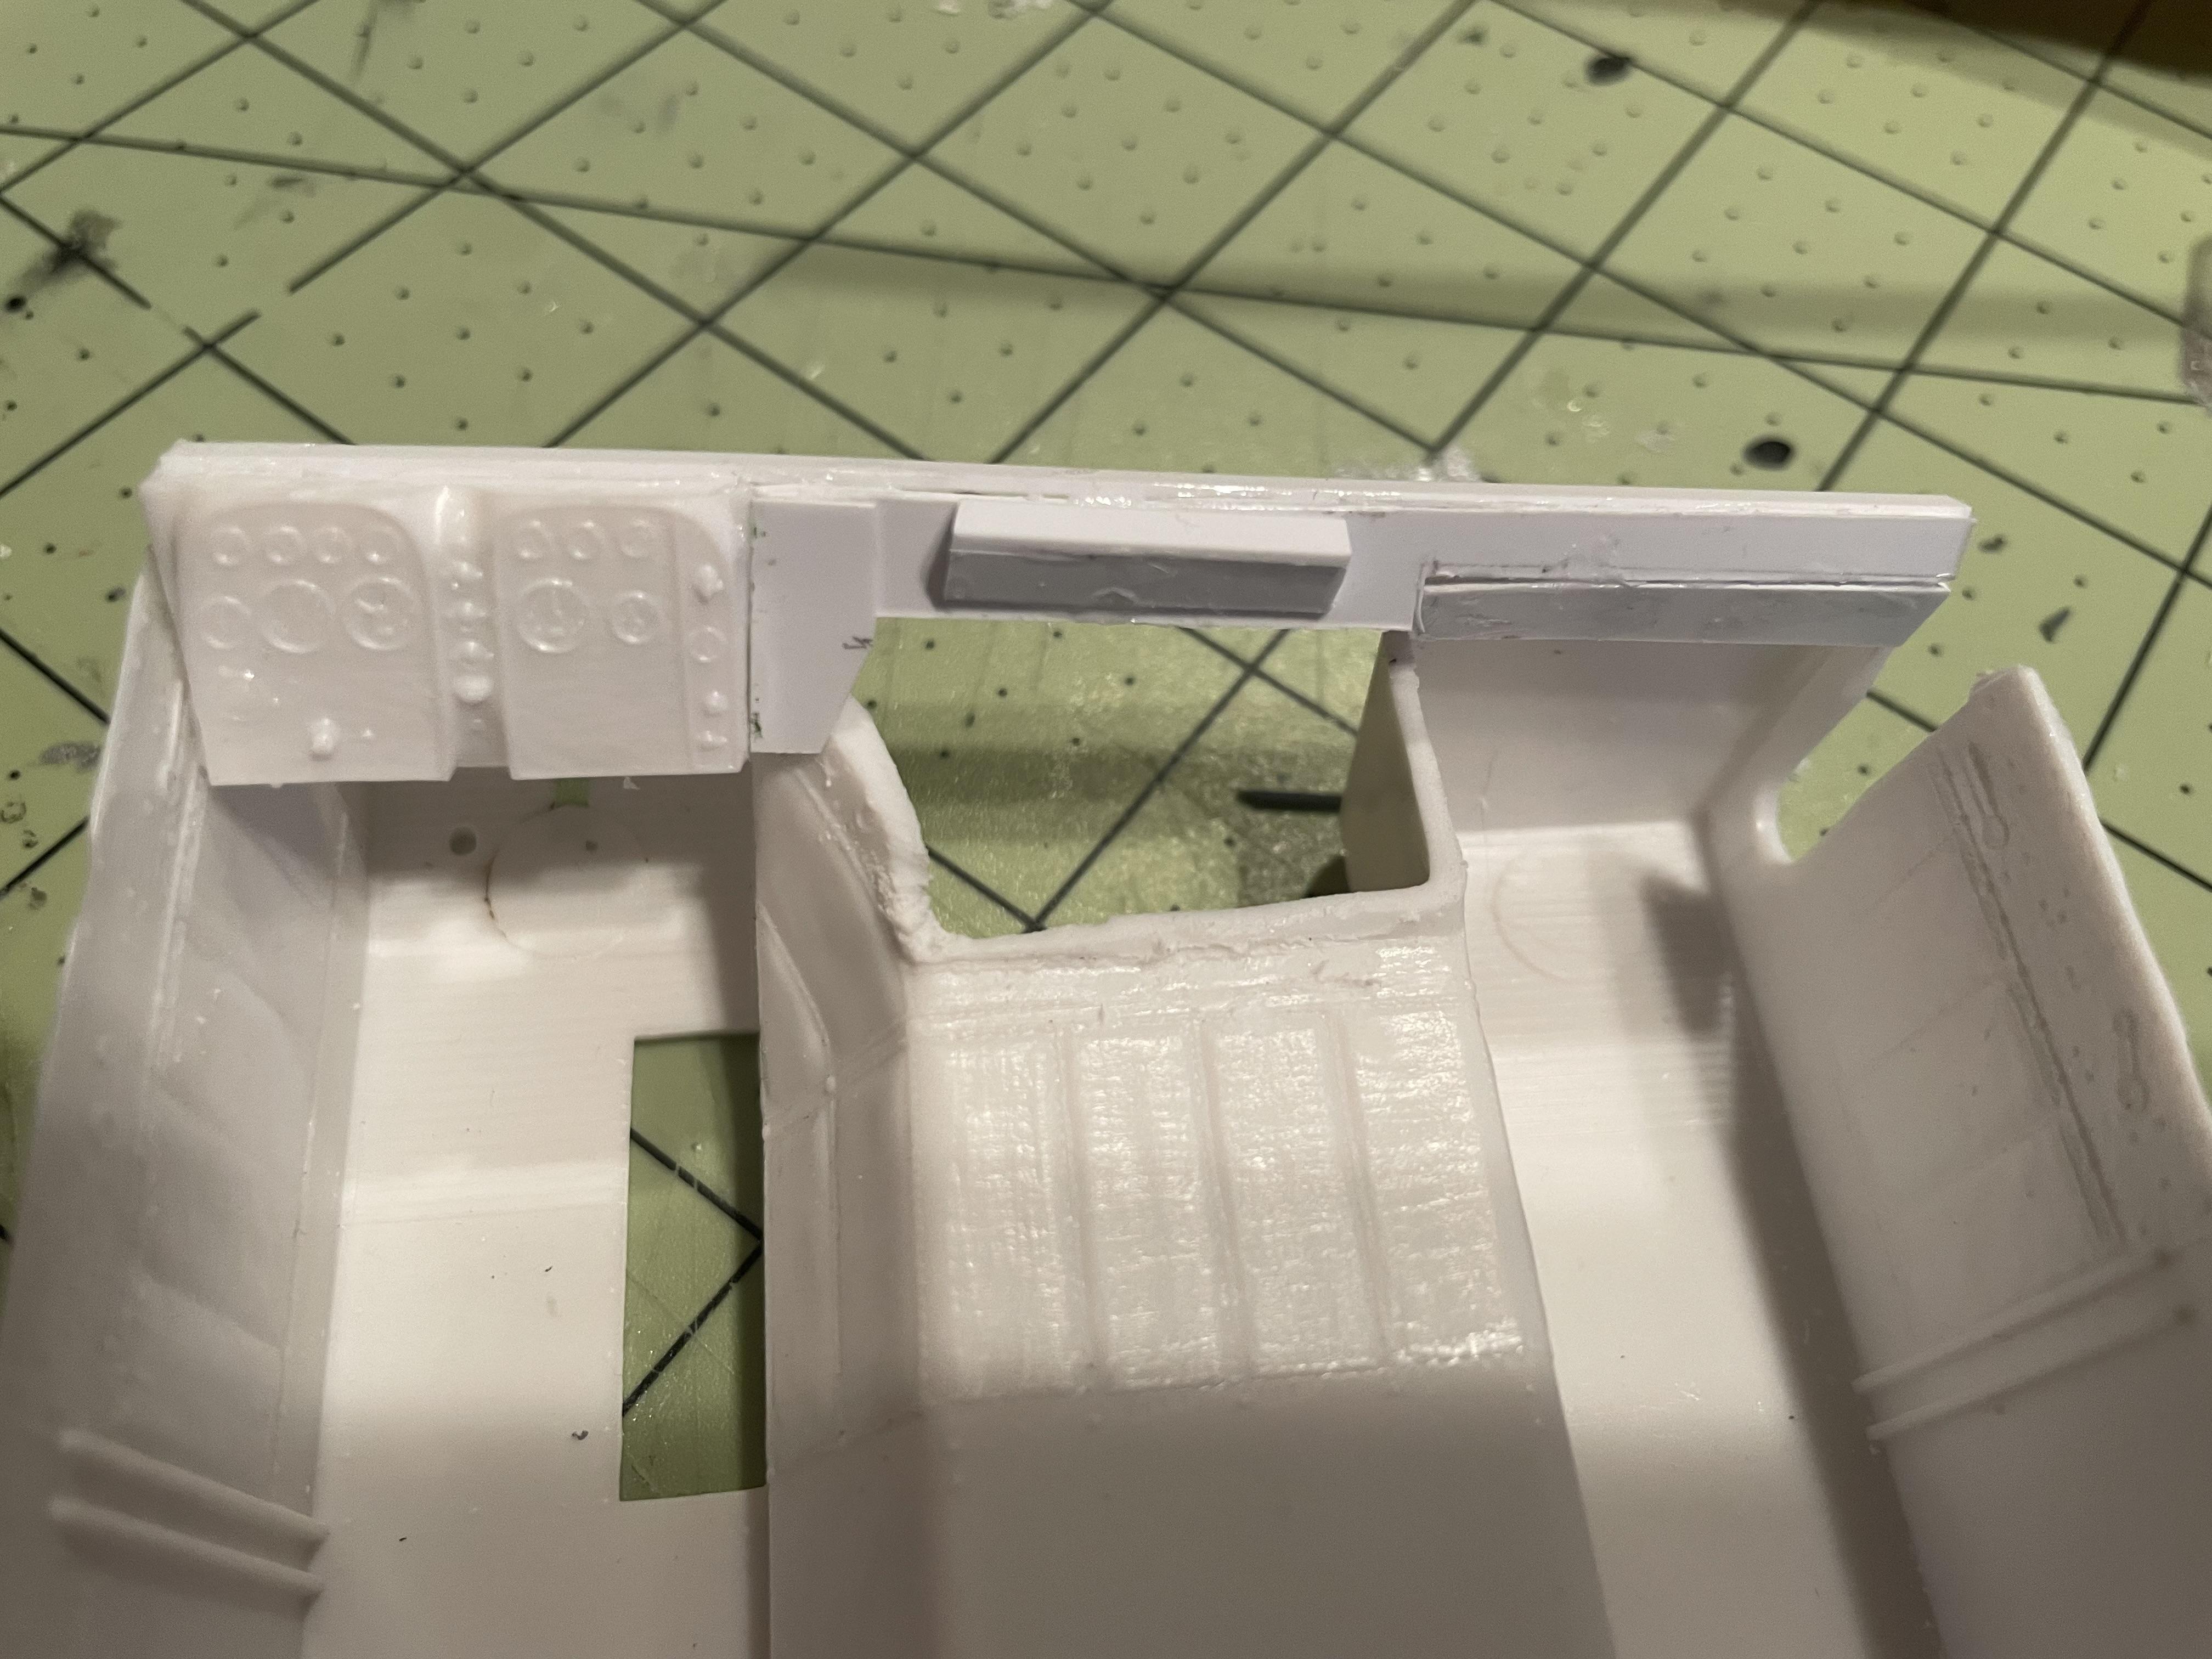
It looks like Jeff and I are neck and neck here, but I think he’s pulling ahead… He’s got me way beat in the detailing department, that’s for sure! Anyway, here is the interior tub for this one. I grafted the kit instrument cluster to a scratch built dashboard, and added 3D printed tach-o-graphs! A million thanks to Jürgen, who designed them… take a bow, buddy, they’re perfect! I fashioned a pad for the top part of the doghouse out of thick sheet styrene, shaped to fit and match. The paint is Testors flat brown- I love that stuff. It has just the right color and sheen for vinyl, and sloppy brushwork doesn’t hurt the effect. Looks like a bunch of naugas gave up their hides for this one! Actually, my dad had a Fingerhut jacket back in the 70s, same color and texture. It was the most plastic looking jacket I’ve ever seen! The steering wheel and column are drying now, they’ll go on tonight. The cab is ready for the first coat of paint, as well. It’s starting to slowly come together!
-
My 1st Big Rig "Blue Collar"
RoninUtah replied to James2's topic in WIP: Model Trucks: Big Rigs and Heavy Equipment
I did something similar my first time I tried to tackle that correction. I couldn’t get them back into the right position, though, and it wound up looking a little cock-eyed, and with weird lumps when I tried to grind and putty it all smooth again. The second time, I just ground everything off, drilled in the right places, and then built it up again. I converted it from dual headlights to singles, though, so yours will be different. Also, I suspect that you will be better at the bodywork than I was. Good luck!
-
The Same but “ a little “ Different
RoninUtah replied to Biggu's topic in WIP: Model Trucks: Big Rigs and Heavy Equipment
What color pigments do you use? Is it different for ordinary dirt at the roof/ top of the cab vs. road dirt on the underside? -
The Same but “ a little “ Different
RoninUtah replied to Biggu's topic in WIP: Model Trucks: Big Rigs and Heavy Equipment
Amazing, just the right touch of weathering. I’ve got a lot to learn here, I appreciate the tutorial! -
Mid 60s Peterbilt Unilite COE
RoninUtah replied to RoninUtah's topic in WIP: Model Trucks: Big Rigs and Heavy Equipment
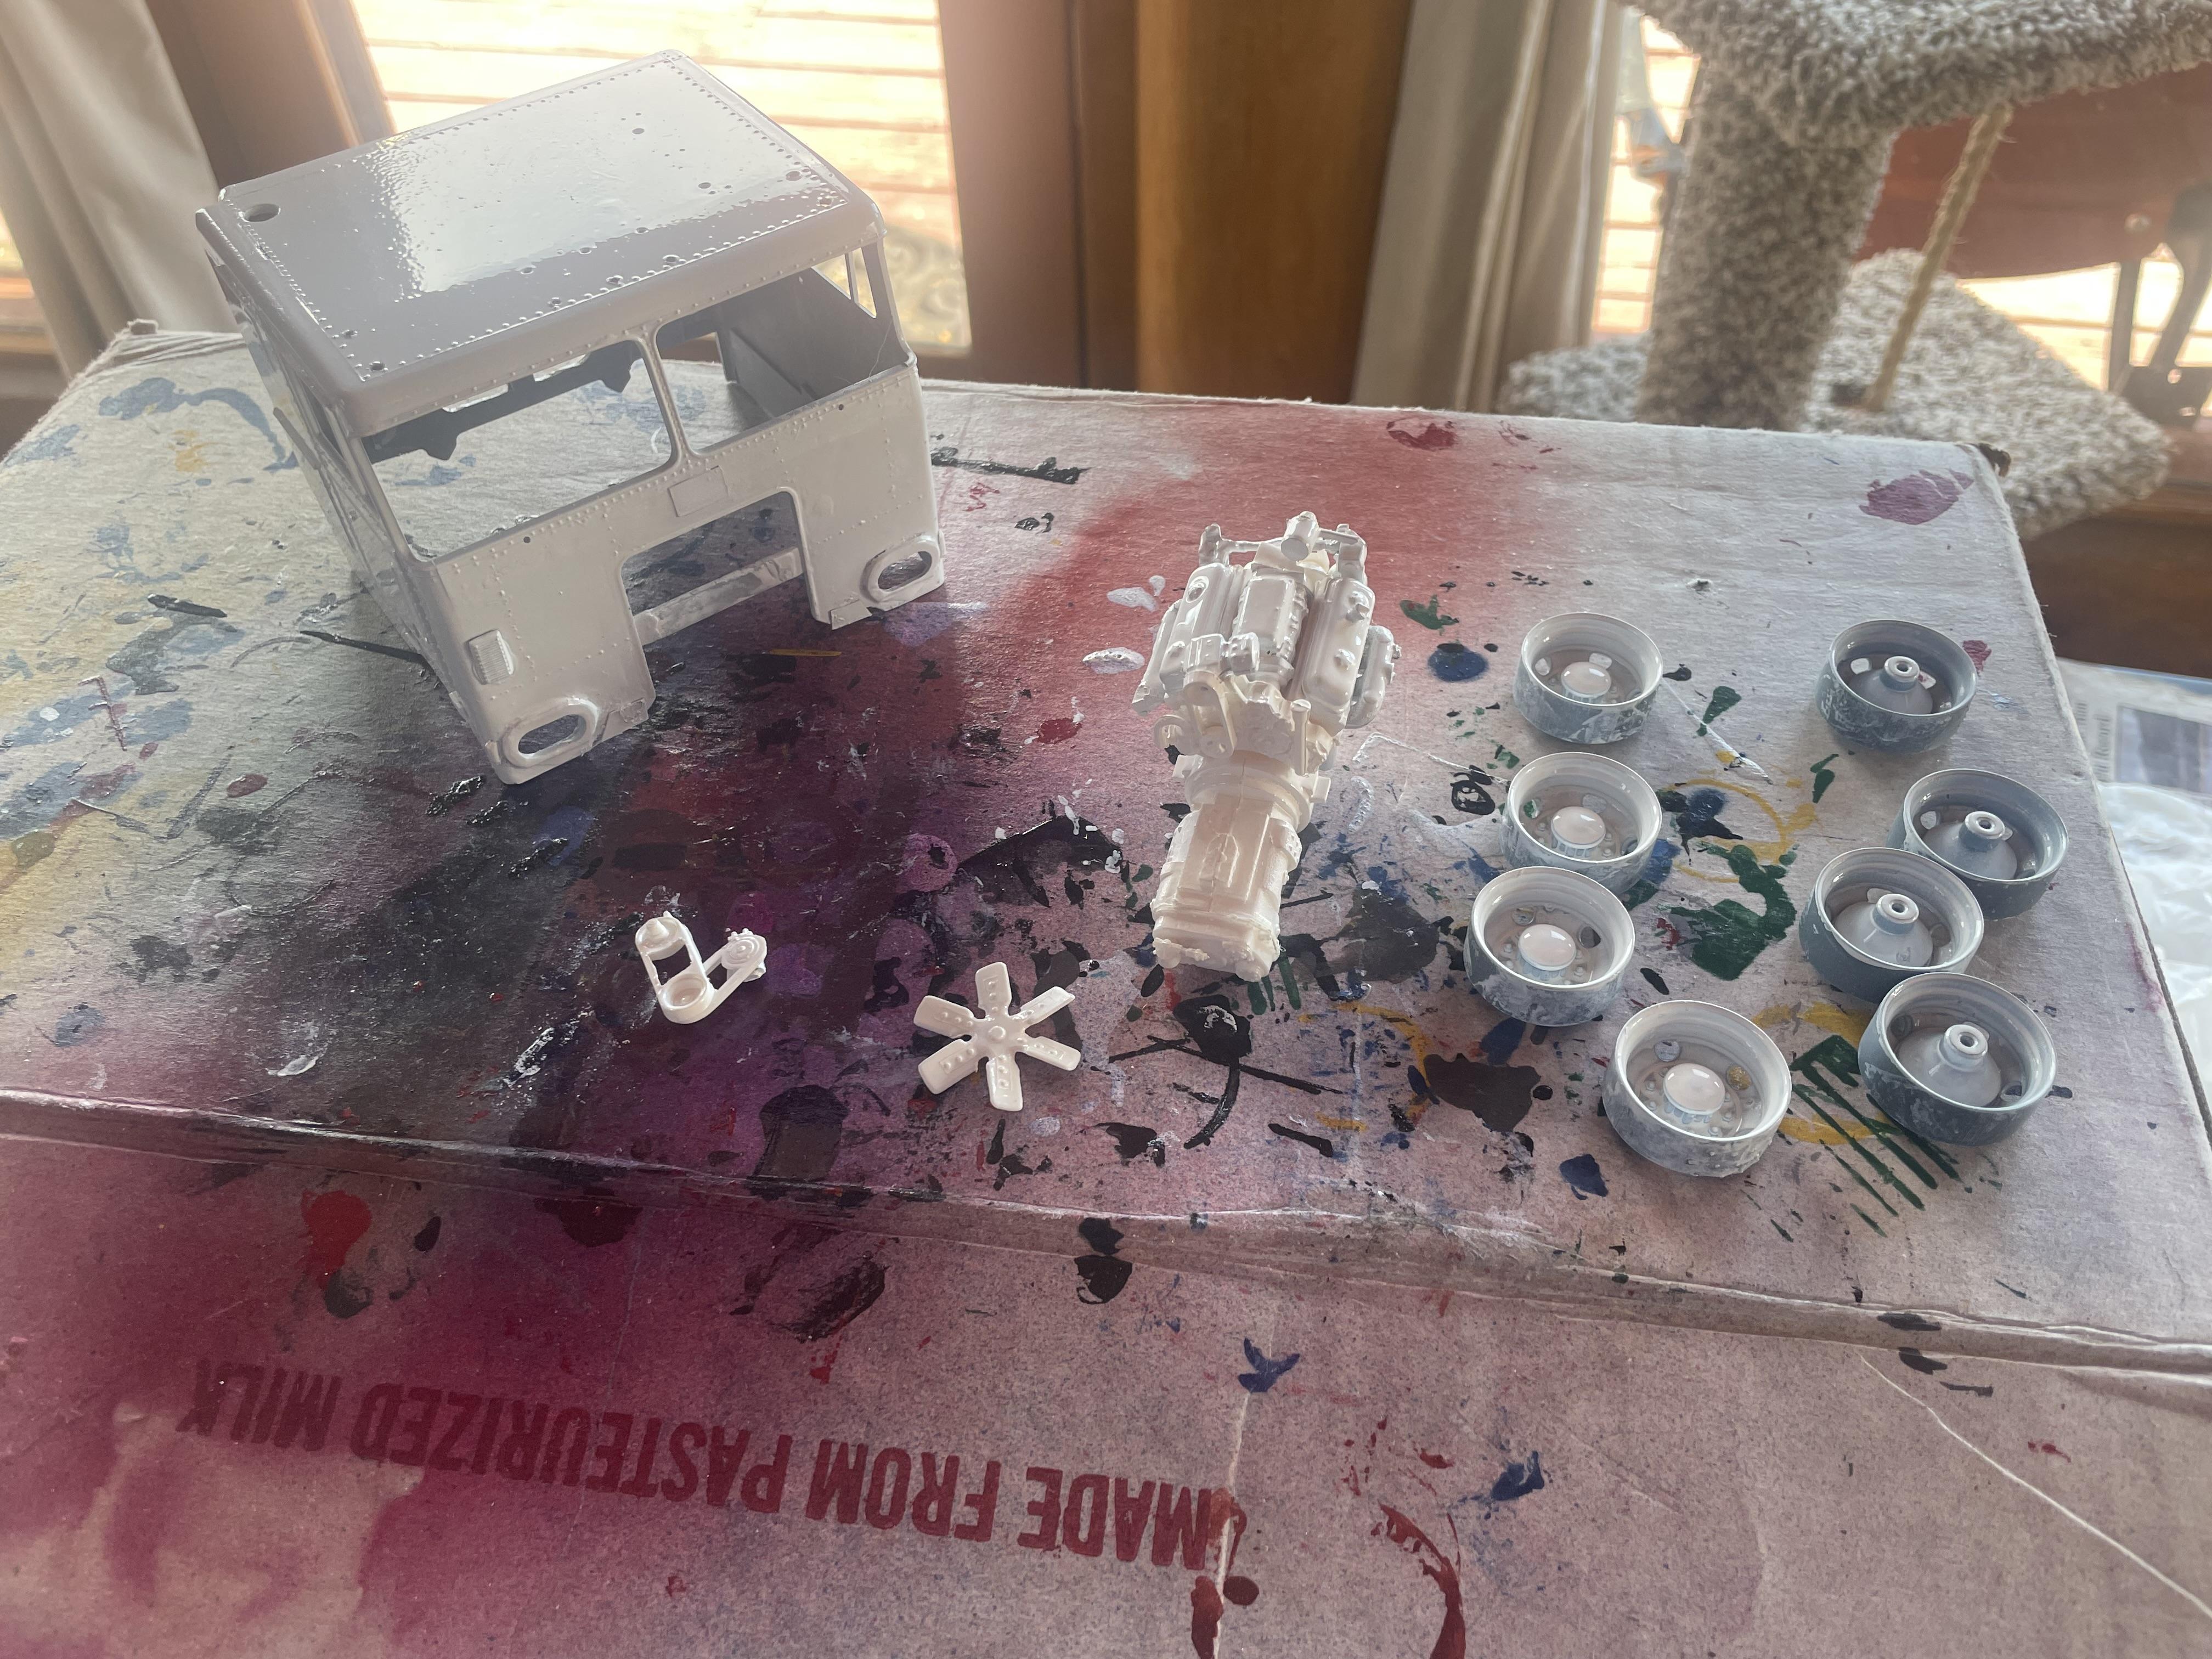
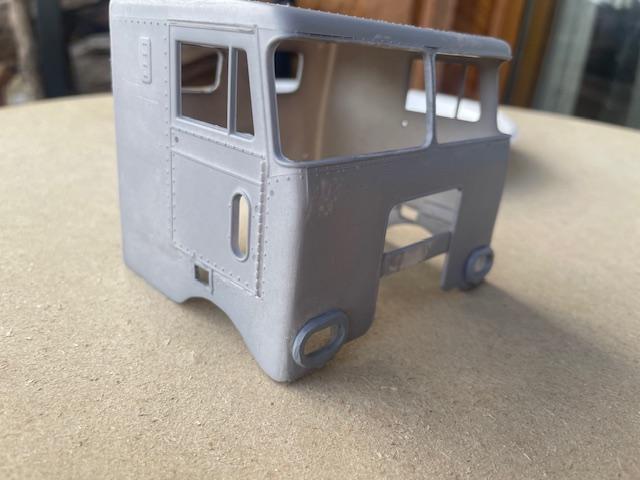
Rivets! My first time working with Archer rivets, it’s a little painstaking but not too bad. I got the 0.11 ones but they might be a little small. We’ll see when I shoot another coat of primer!
-
My 1st Big Rig "Blue Collar"
RoninUtah replied to James2's topic in WIP: Model Trucks: Big Rigs and Heavy Equipment
Yeah, the AMT White Freightliner SD/DD kit is probably my favorite donor- you get two frames for the price of one; if you can dig up another front axle and suspension somewhere you get two almost complete chassis! I must have bought a dozen of these over the years and only built two straight out of the box. And one of those wasn't exactly straight out of the box, as I backdated it to the '60s. Looks like you're doing a great job with this one, I'll be interested in seeing what you come up with! Getting rid of the seam between the two cab halves can be tricky, I never liked that idea of AMT's. -
The Same but “ a little “ Different
RoninUtah replied to Biggu's topic in WIP: Model Trucks: Big Rigs and Heavy Equipment
Can't wait to see what you do with the chassis, wheels and fuel tank! -
Mid 60s Peterbilt Unilite COE
RoninUtah replied to RoninUtah's topic in WIP: Model Trucks: Big Rigs and Heavy Equipment
I’d heard of them being called “tattle tales,” too. Nothing like today’s ELDs! Anyway, Jürgen and I are working on a scale version… stay tuned! -
Mid 60s Peterbilt Unilite COE
RoninUtah replied to RoninUtah's topic in WIP: Model Trucks: Big Rigs and Heavy Equipment
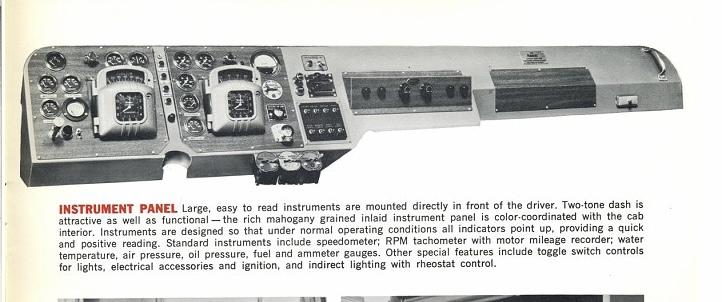
The dashboard is roughed in- it will take some putty and sanding before I can add more detail This is my reference, from an old Peterbilt brochure, courtesy of Tim Ahlborn: I hope to get kinda close…
-
The Same but “ a little “ Different
RoninUtah replied to Biggu's topic in WIP: Model Trucks: Big Rigs and Heavy Equipment
Time to change the valve cover gaskets... -
The Same but “ a little “ Different
RoninUtah replied to Biggu's topic in WIP: Model Trucks: Big Rigs and Heavy Equipment
That is one grimy engine! I can almost smell the dirty old oil just by looking at it! -
Mid 60s Peterbilt Unilite COE
RoninUtah replied to RoninUtah's topic in WIP: Model Trucks: Big Rigs and Heavy Equipment
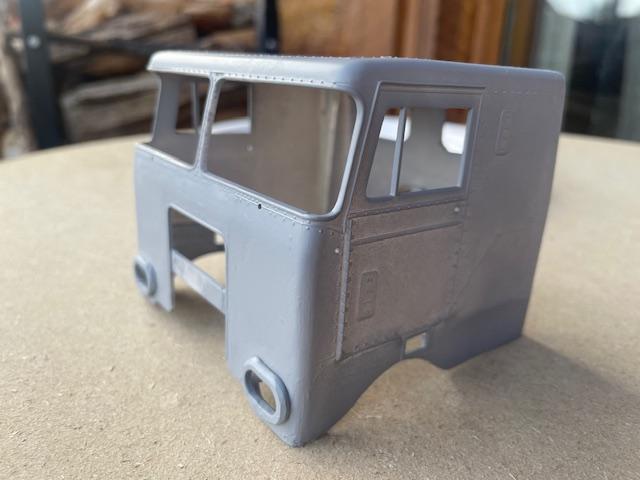
The cab accessories are attached, and it's starting to look like an old Pete! Jürgen, not to worry! I ground the headlight surrounds down and they're about where I want them now. Same with the louver, it turned out perfect, thanks a million! My rivets are supposed to be here Friday, once the go on it will be ready for primer again. Time to focus on the interior now.
-
The Same but “ a little “ Different
RoninUtah replied to Biggu's topic in WIP: Model Trucks: Big Rigs and Heavy Equipment
Wow, that chassis looks good! Great detail, the plumbing and bolt details make a huge difference. Keep it up! -
New 2024 Peterbilt 579 Hi-roof sleeper
RoninUtah replied to RoninUtah's topic in Model Trucks: Big Rigs and Heavy Equipment
Thanks, Victor! Actually, there is a T680, and it's on my list. Also an older-style (2010) Cascadia with the wide grille, and a new Volvo 860 and a Mack Anthem. I need to make some repairs to my printer, though, before I can tackle another big printing job, as some of those files are a little challenging. -
New 2024 Peterbilt 579 Hi-roof sleeper
RoninUtah replied to RoninUtah's topic in Model Trucks: Big Rigs and Heavy Equipment
Thanks, Bren, for your help and inspiration on this one. I don't think I could have done it without your guidance... not to mention your help in slicing this enormous file! -
Mid 60s Peterbilt Unilite COE
RoninUtah replied to RoninUtah's topic in WIP: Model Trucks: Big Rigs and Heavy Equipment
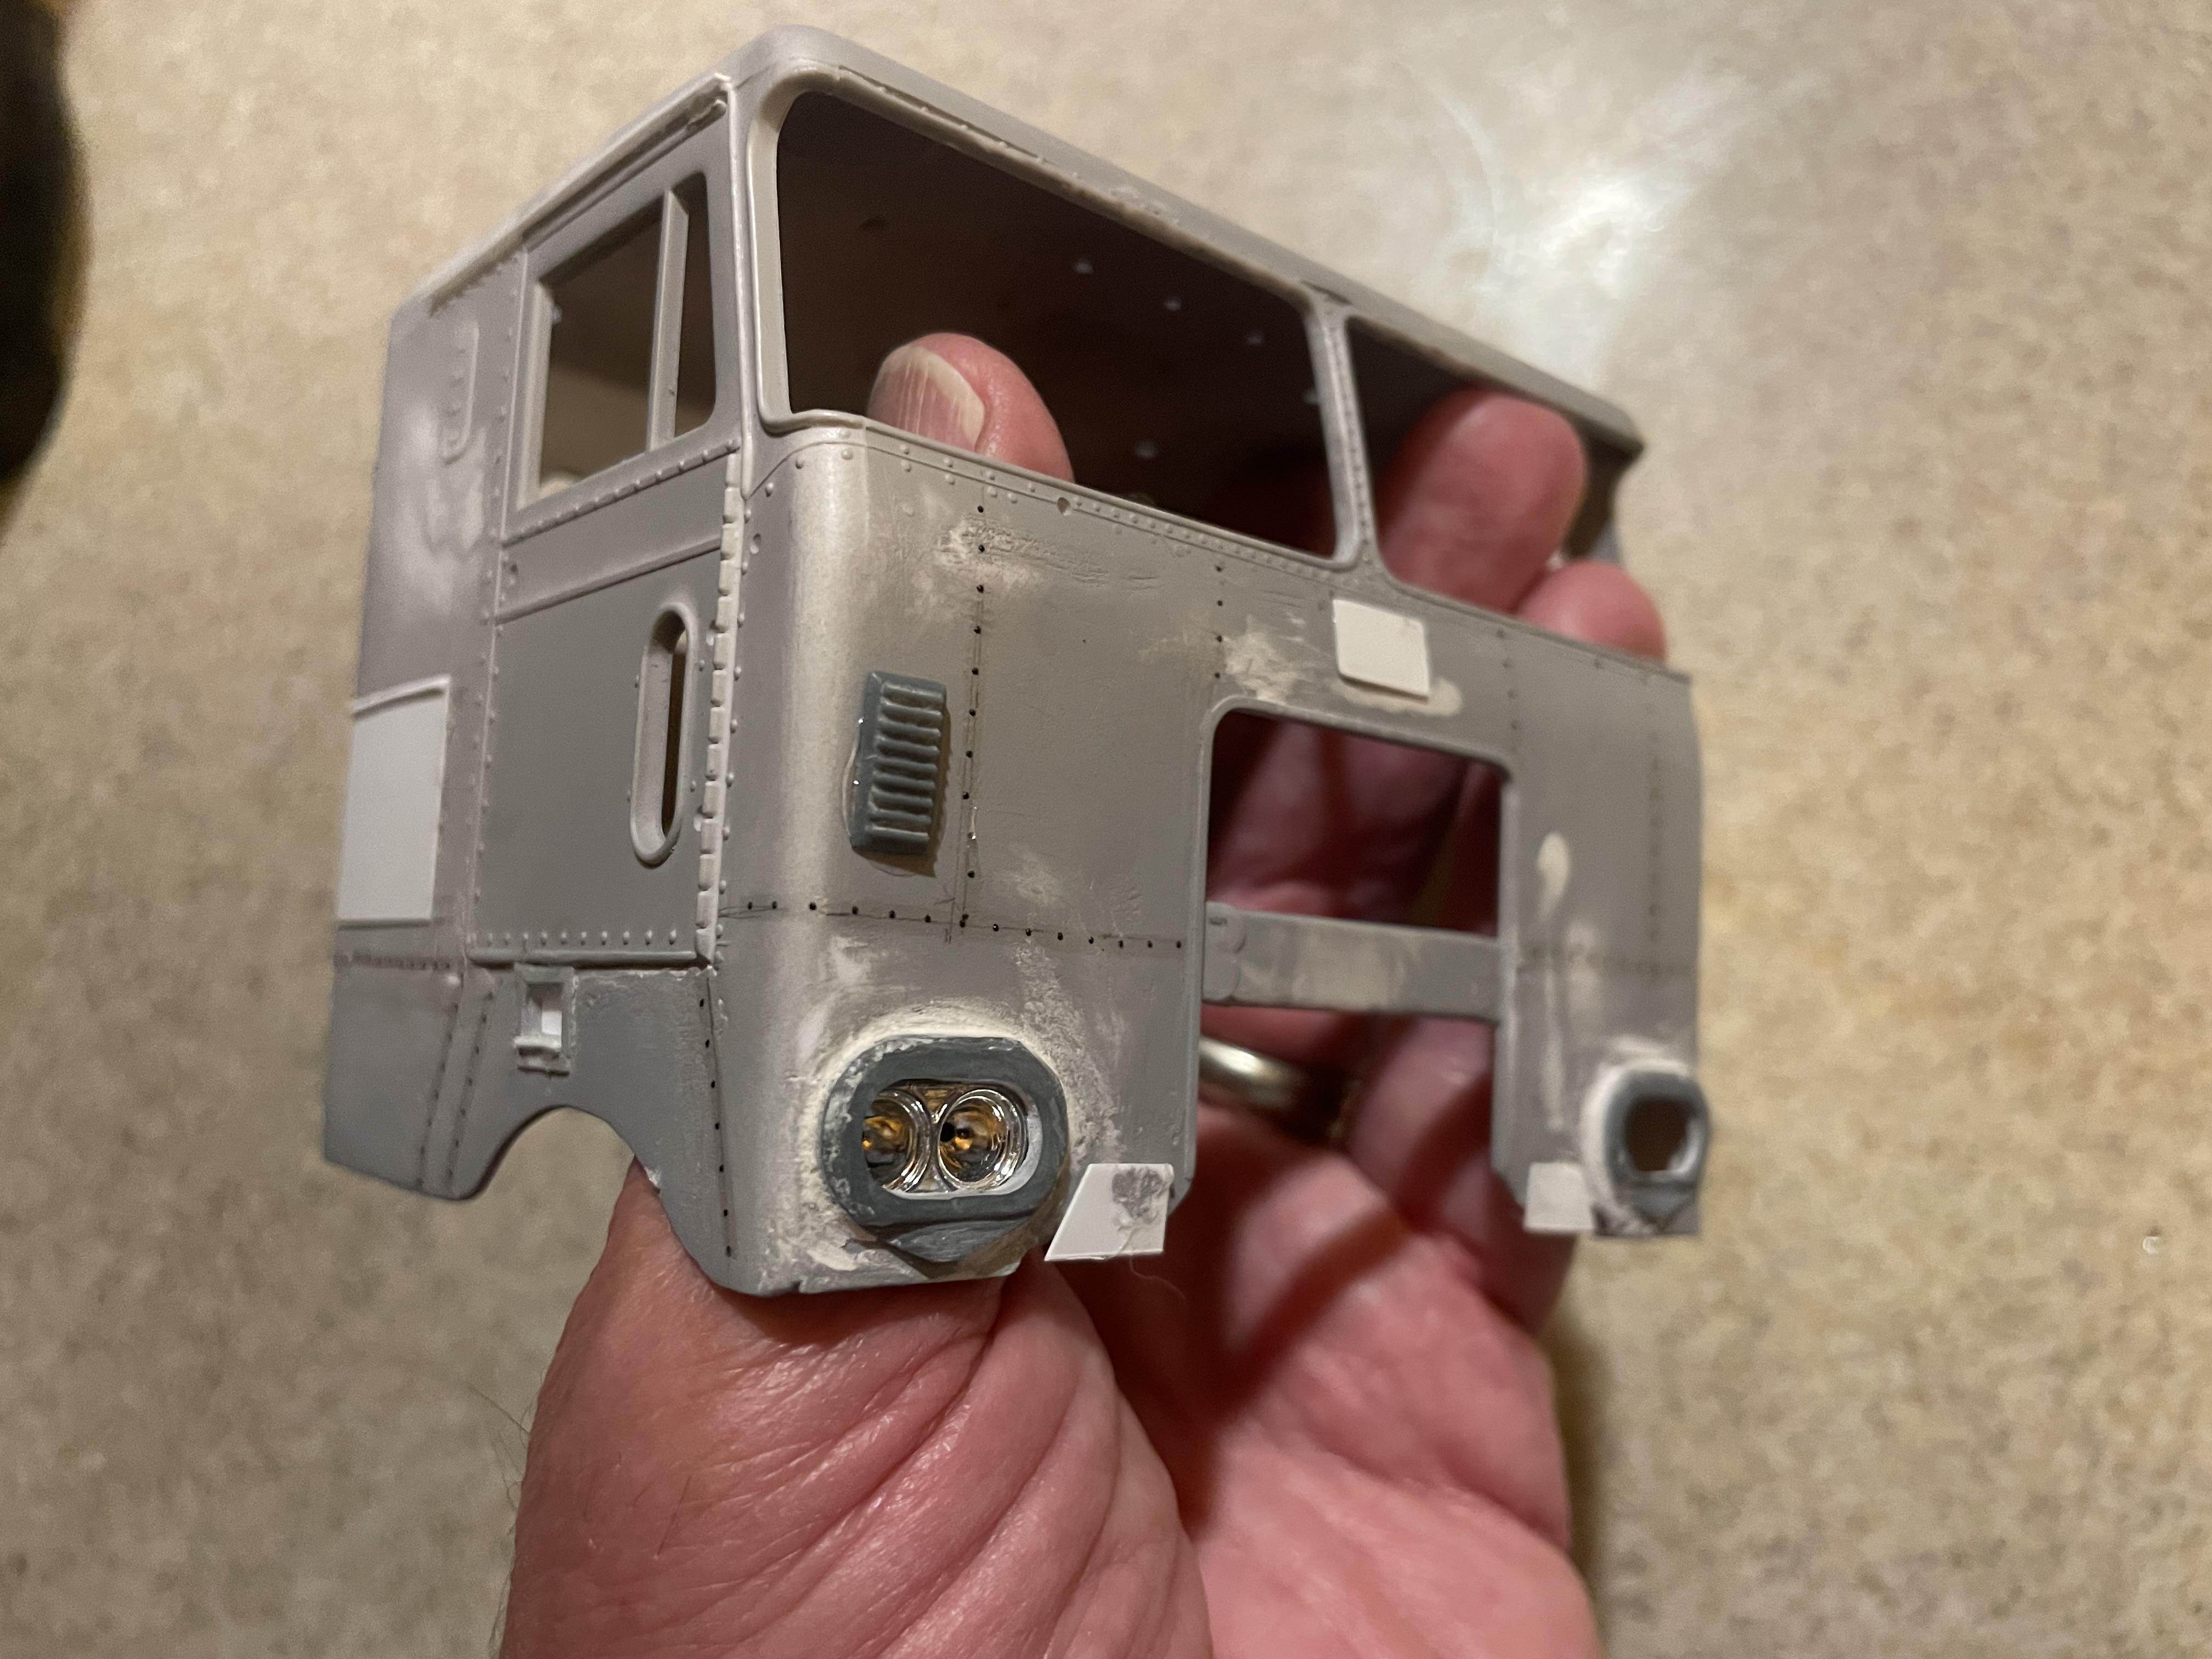
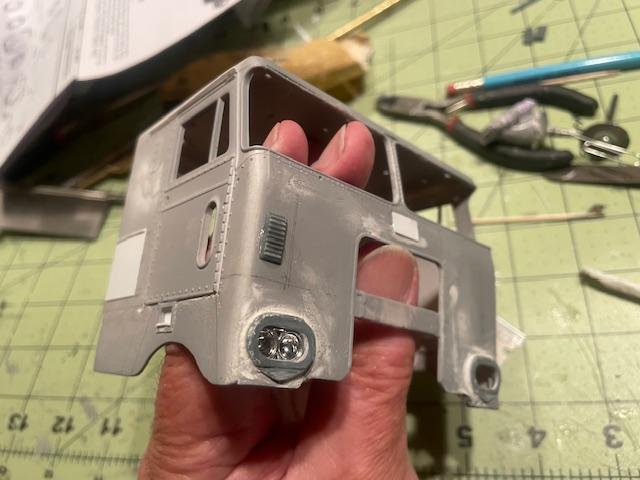
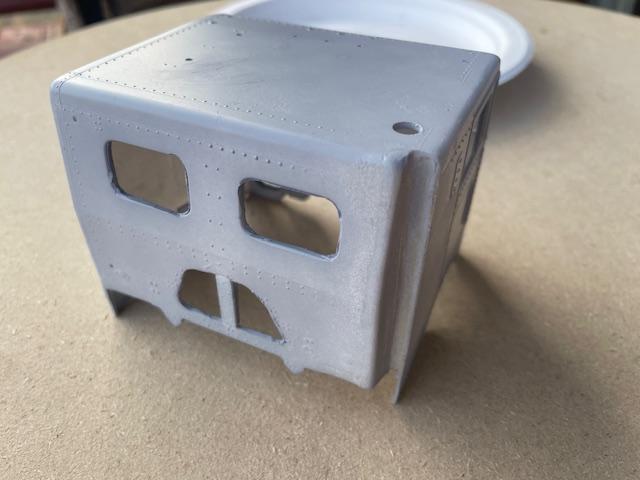
First coat of primer... so, far so good. Jürgen was kind enough to design the headlight surrounds for me, and I had a chance to print them before my printer went kaput again. They extend out a little further than I like, but I can't realistically print them any thinner. The cab will take a little more filling and smoothing- I'll build up the surface around the headlights a little to blend them in better. Then, adding the luggage doors, flap at the front under the emblem, and a 3-D printed louver (also designed by Jürgen, thanks a million!)... once I can figure out how to print that tiny piece. Rivets are on order. It's getting closer!
-
Mid 60s Peterbilt Unilite COE
RoninUtah replied to RoninUtah's topic in WIP: Model Trucks: Big Rigs and Heavy Equipment
Or maybe it's just badly drawn. -
Mid 60s Peterbilt Unilite COE
RoninUtah replied to RoninUtah's topic in WIP: Model Trucks: Big Rigs and Heavy Equipment
Right, AMT liked to throw this engine, or variants thereof, into all kinds of different kits. I've probably put together 100 of them over the years, and I suspect you have too! -
ongoing oilfield project
RoninUtah replied to cdntrucking's topic in WIP: Model Trucks: Big Rigs and Heavy Equipment
That is one tuff truck! Love where you're going with it. Very impressive! -
Mid 60s Peterbilt Unilite COE
RoninUtah replied to RoninUtah's topic in WIP: Model Trucks: Big Rigs and Heavy Equipment
Just noticed that those are White Freightliner instructions... Of course! I could also adapt the plumbing from an AMT White Freightliner kit- I have about 4 or 5 partial WF kits left over from being donors, so I might have most of the parts I need. I'll look at it more carefully, but I'm still leaning toward the Detroit.