

RoninUtah
-
Posts
449 -
Joined
-
Last visited
Content Type
Profiles
Forums
Events
Gallery
Everything posted by RoninUtah
-
Mid 60s Peterbilt Unilite COE
RoninUtah replied to RoninUtah's topic in WIP: Model Trucks: Big Rigs and Heavy Equipment
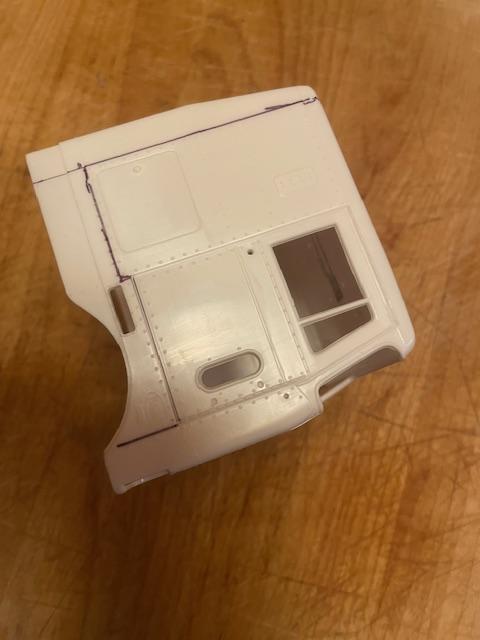
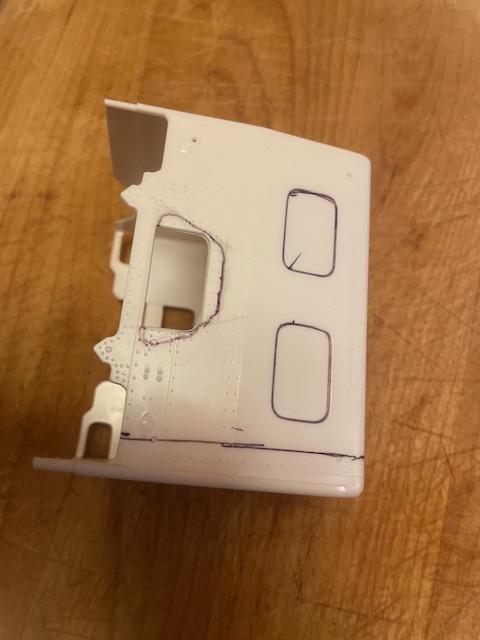
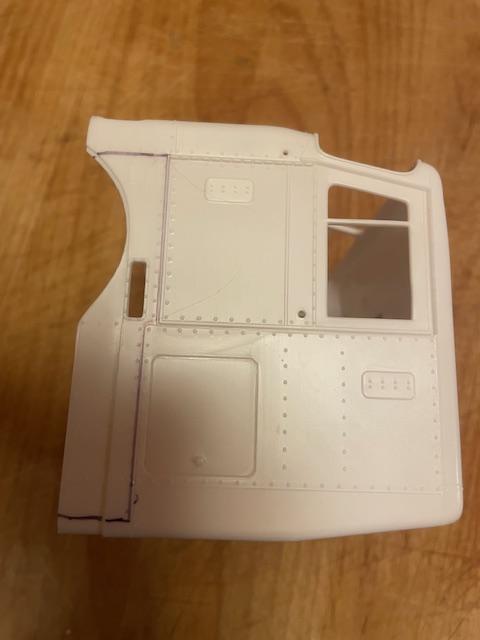
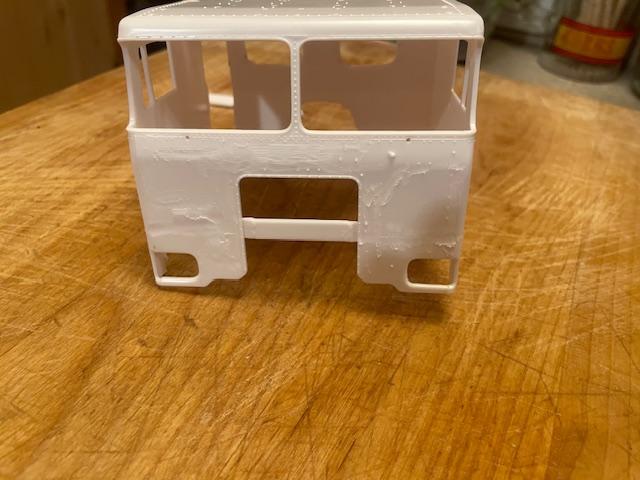
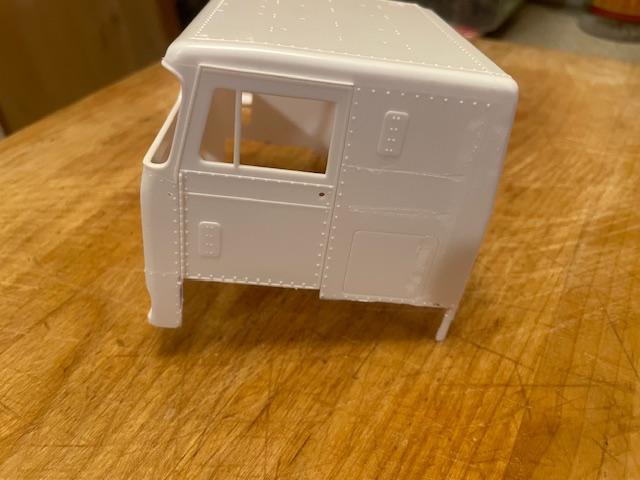
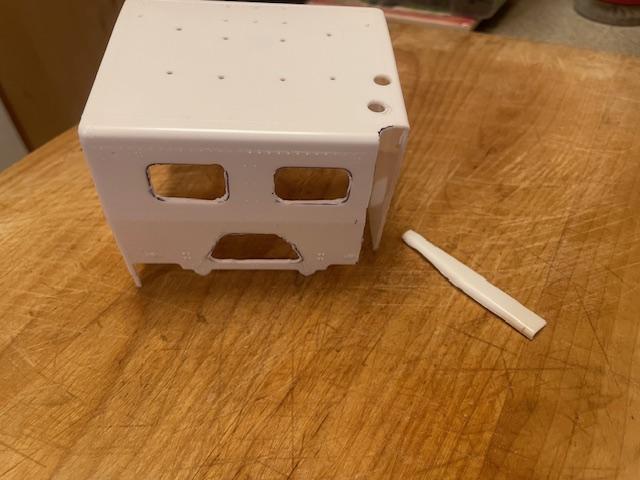
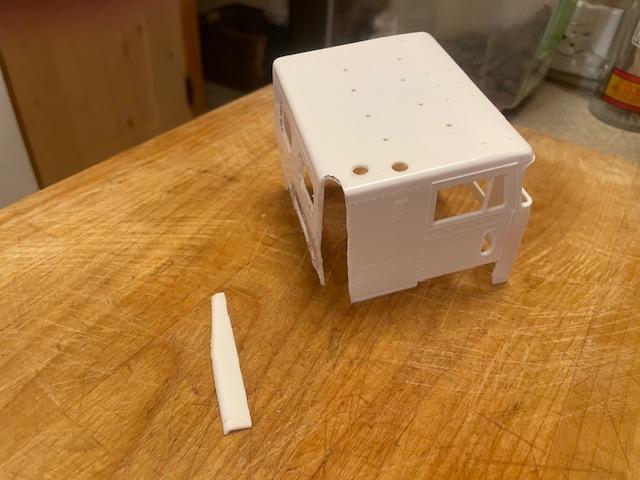
Okay, more progress... I finished the chassis and engine, nothing interesting there, just built per the instructions. I'm having second thoughts about the engine, though- this rig will have a single exhaust, since there will only be one exhaust cutout on the cab (more about that below). So, it might make more sense for a six-cylinder engine like a Cummins, which only would have one exhaust manifold to tie to. Also, I recently saw some photos of a '66 352 that had a white Cummins in it. So, maybe I'll find a Cummins in the parts box and do it as a naturally aspirated engine, painted white- I don't think there wasn't much physical difference otherwise between the 220s and 250s of the '60s and the typical AMT Cummins, except for the turbo. I stand to be corrected by any engine experts out there! Your thoughts will be welcome. So, anyway, while I'm waiting for my paint order to come in, I thought I'd get started on the cab... it'll take some surgery, since I'll be replacing the lower parts of the cab, opening the rear windows and making a cutout for the exhaust. First step is to mark where I want to make the cuts: And here it is after surgery. It's still pretty rough... I'm gonna need to buy more putty! I also ground off the louvers and rivets, etc., as those were fewer and in different locations prior to the Pacemaker. I'm saving part of the corner that I cut off to re-attach inside the exhaust cut-out. I'll use a styrene tube to close it off. Also, the hole for the air cleaner stack needed to move rearward and a little inboard. Luckily, the 352 cab is pretty boxy, with straight lines, flat surfaces and minimal curves so, hopefully, cutting and installing the plastic strips for the replacement pieces should be relatively straightforward. We'll see.
-
Mid 60s Peterbilt Unilite COE
RoninUtah replied to RoninUtah's topic in WIP: Model Trucks: Big Rigs and Heavy Equipment
that’s awesome, thanks again! Yes, a .stl file would be great, I can slice it. I’ll try to send pics the evening (U.S. Mountain time) -
Pete 352 day cab
RoninUtah replied to Jürgen M.'s topic in WIP: Model Trucks: Big Rigs and Heavy Equipment
That tractor looks great, well done! Looking forward to seeing what you do with the trailer. -
Mid 60s Peterbilt Unilite COE
RoninUtah replied to RoninUtah's topic in WIP: Model Trucks: Big Rigs and Heavy Equipment
That's awesome, Jürgen, thank you so much! I'll do that! I'll send you a private message with some sketches and photos. If you can send me a .stl file, I can print it! -
Mid 60s Peterbilt Unilite COE
RoninUtah replied to RoninUtah's topic in WIP: Model Trucks: Big Rigs and Heavy Equipment
Hi, Jürgen! Alcoa is sort of shorthand for aluminum wheels, like the 10 hole aluminum wheels you typically see these days on modern trucks and are included in most truck model kits. The earlier ones were similar, but they had five holes, such as the wheels on the 1:1 example truck photo above. In the 50s and early 60s, they were common on West Coast trucks; or you would often see Alcoa front wheels and steel rear wheels. I would love to design and print my own, except I don’t know how to design them! I just started getting into 3-D printing, but I don’t have the capacity to design. If somebody could be able to design a five-hole front Alcoa wheel based on photos, that would be great! -
Mid 60s Peterbilt Unilite COE
RoninUtah replied to RoninUtah's topic in WIP: Model Trucks: Big Rigs and Heavy Equipment
I get it, I’ll spend days planning a build in my head before I even break the wrap around the box. And then wind up changing it mid-stream! White was Peterbilt spec for all engines for a while, mostly late 60s and early 70s, I believe. I think this one might pre-date that period, and even then there were occasional exceptions. So I’m good with Alpine Green. I did paint the engine of my California Hauler 359 white, though! The frame will probably be red, cab mostly red with white stripes, bumper will be red (I’m using an old- style narrow bumper) and wheels will be white. Unless I change my mind. -
Mid 60s Peterbilt Unilite COE
RoninUtah replied to RoninUtah's topic in WIP: Model Trucks: Big Rigs and Heavy Equipment
Thanks, Jeff, I’m blushing… I think you might be overestimating my abilities! I’m still learning how to do this stuff! The 6 hole Budds is a typo- I meant to say 5 hole. They’ll be on all 3 axles, I’ve seen some reference photos that show that setup. If I could get my hands on 5-hole alcoas for the steer axle, those would be perfect! But I don’t have a source since AITM went away, and I don’t see any 3-D versions out there, either. But yeah, I’ll save the 10 hole rims for another build. For power, yeah, I’m going to use the kit 8V71, it was a standard option for this truck and I’m kinda fond of that engine. I’ve even ordered some paint in the correct Alpine Green color! -
Mid 60s Peterbilt Unilite COE
RoninUtah replied to RoninUtah's topic in WIP: Model Trucks: Big Rigs and Heavy Equipment
Thanks! The double flatbed pups would be a fun build… but I don’t have space for a lot of trailers, so I’ll probably pair this one with my 36’ ragtop trailer. Especially since it’s a tandem axle, since back then doubles were typically pulled by single rear axle COE daycab tractors, at least in California, because of length restrictions at the time. The AMT White Freightliner SD is a perfect example. -
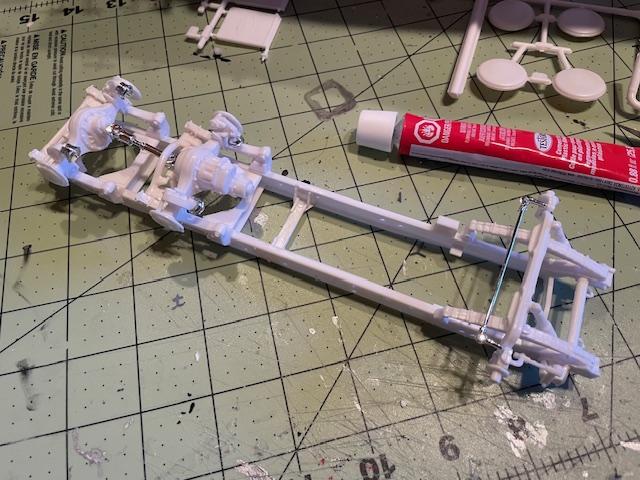
So, I'm in Peterbilt mode now- this build is one of three I have lined up- the other two are a current 579 using a 3-D printed body and a donor chassis, and a Revell wrecker- yes, the big tri-axle one with the rotator wrecker, and no, I didn't pay the crazy prices these are going for these days on eBay. That one I'll post-date to be a late 90s-early 2000s 379. I actually built an AMT Peterbilt 352 when they first came out in the early 70s, and I still have it. It held up pretty well over the years, I think, considering how inexperienced I was at the time, so I'm not planning to replace it. Here is a pic: Anyway, back to this one- Thanks to Mr. Peterbilt, Tim Ahlborn, who gave me advice and encouragement, as well as detailed directions on how to approach this build. First, a short history lesson- Peterbilt built COEs alongside conventionals, both confusingly with the same model name, from the end of the 40s to about 1960. In 1958, they came out with an all-new COE, the 352. The early 352s were built on a "unilite" body, similar to the conventionals at the time, until 1970 when the COE changed to the Pacemaker body. The Conventional Unilite cab continued to 1972, when it was replaced by the 1100 cab, so named because of the large windshield. The AMT kit dates the early 70s, and represents an early Pacemaker. The majority of the work on this build will be to backdate the Pacemaker cab to a unilite. Overall, they were very similar, but with some subtle differences, most noticeably in the headlight bezels, the lower side cab skirts, and the cargo doors. Here is an example (I plan to use a similar color scheme): I'll try to get them as close as I can by scratchbuilding. The chassis is basically the same- the AMT kit has the Peterbilt "Stabilaire" rear suspension, which first appeared around 1965, so my target date for this truck will be 1965-66. As usual for my builds, this will be a typical working truck of its day. First up is the chassis. Straight-up box build so far, but I'm leaving the wheels incomplete, as I plan to use 6-hole Budd steelies that I 3-D printed. Thanks for following, and I'll update this from time to time as I go along.
-
The Same but “ a little “ Different
RoninUtah replied to Biggu's topic in WIP: Model Trucks: Big Rigs and Heavy Equipment
Thanks! I hope to start it this weekend… I’ll start a separate thread when I do. -
The Same but “ a little “ Different
RoninUtah replied to Biggu's topic in WIP: Model Trucks: Big Rigs and Heavy Equipment
Great idea for the headliner, I'll think about using that on the build I'm planning now! I got frustrated with the Motlow pens- they only seem to work only half the time, and you never know if you're going to get a nice thick line that looks like real chrome, or something less. I buy the refill bottles, and I use a brush for small detail painting- I have a lot more control that way. When I airbrushed it, I used it straight out of the bottle, with no thinning. It cleans up super-easy with alcohol. One bottle lasts a surprisingly long time. -
The Same but “ a little “ Different
RoninUtah replied to Biggu's topic in WIP: Model Trucks: Big Rigs and Heavy Equipment
Great idea! What material did you use? On my W990 build, I used Motlow Liquid Chrome, out of the "refill" bottle. I airbrushed it (easy cleanup with rubbing alcohol), and it turned out great. -
Pete 352 day cab
RoninUtah replied to Jürgen M.'s topic in WIP: Model Trucks: Big Rigs and Heavy Equipment
Coming together nicely! I like it! -
The Same but “ a little “ Different
RoninUtah replied to Biggu's topic in WIP: Model Trucks: Big Rigs and Heavy Equipment
I couldn't agree more! Even a straight-up box build needs extra attention to get the build clean and the details right. Well said! -
The Same but “ a little “ Different
RoninUtah replied to Biggu's topic in WIP: Model Trucks: Big Rigs and Heavy Equipment
What a great subject! That’s a fascinating history, and you’re going to have a unique model when it’s done. It’s off to a great start, looking forward to seeing your progress… I’m about to start another Pete 352 build myself! -
A&N KW W990
RoninUtah replied to RoninUtah's topic in WIP: Model Trucks: Big Rigs and Heavy Equipment
They’re also PE brass, with little tabs bent to fit with those tiny resin bolts. I just glued them into place. -
Pete 352 day cab
RoninUtah replied to Jürgen M.'s topic in WIP: Model Trucks: Big Rigs and Heavy Equipment
It looks great so far, and I'm glad you're getting better! Looking forward to seeing further progress... and I think that Thermo King looks just fine, Good work! -
1950s-1960s Ragtop Trailer
RoninUtah replied to RoninUtah's topic in Model Trucks: Big Rigs and Heavy Equipment
Thanks! Although I don't know how good things really were back then- that Crackerbox Jimmy, for example: Minimal heat/ sound insulation (those 2-stroke Detroit Diesels were LOUD), no power anything, 2-stick transmission, a kidney-busting ride, and best of all, trying to sleep in that 24" bunk! It took a real gear jammer to drive that rig! -
Farm Floater Truck 1/24th scale
RoninUtah replied to Randy D's topic in WIP: Model Trucks: Big Rigs and Heavy Equipment
That’s the most amazingly realistic model truck engine I’ve ever seen! This is scale model building on a completely different level. Incredible work! -
1950s-1960s Ragtop Trailer
RoninUtah replied to RoninUtah's topic in Model Trucks: Big Rigs and Heavy Equipment
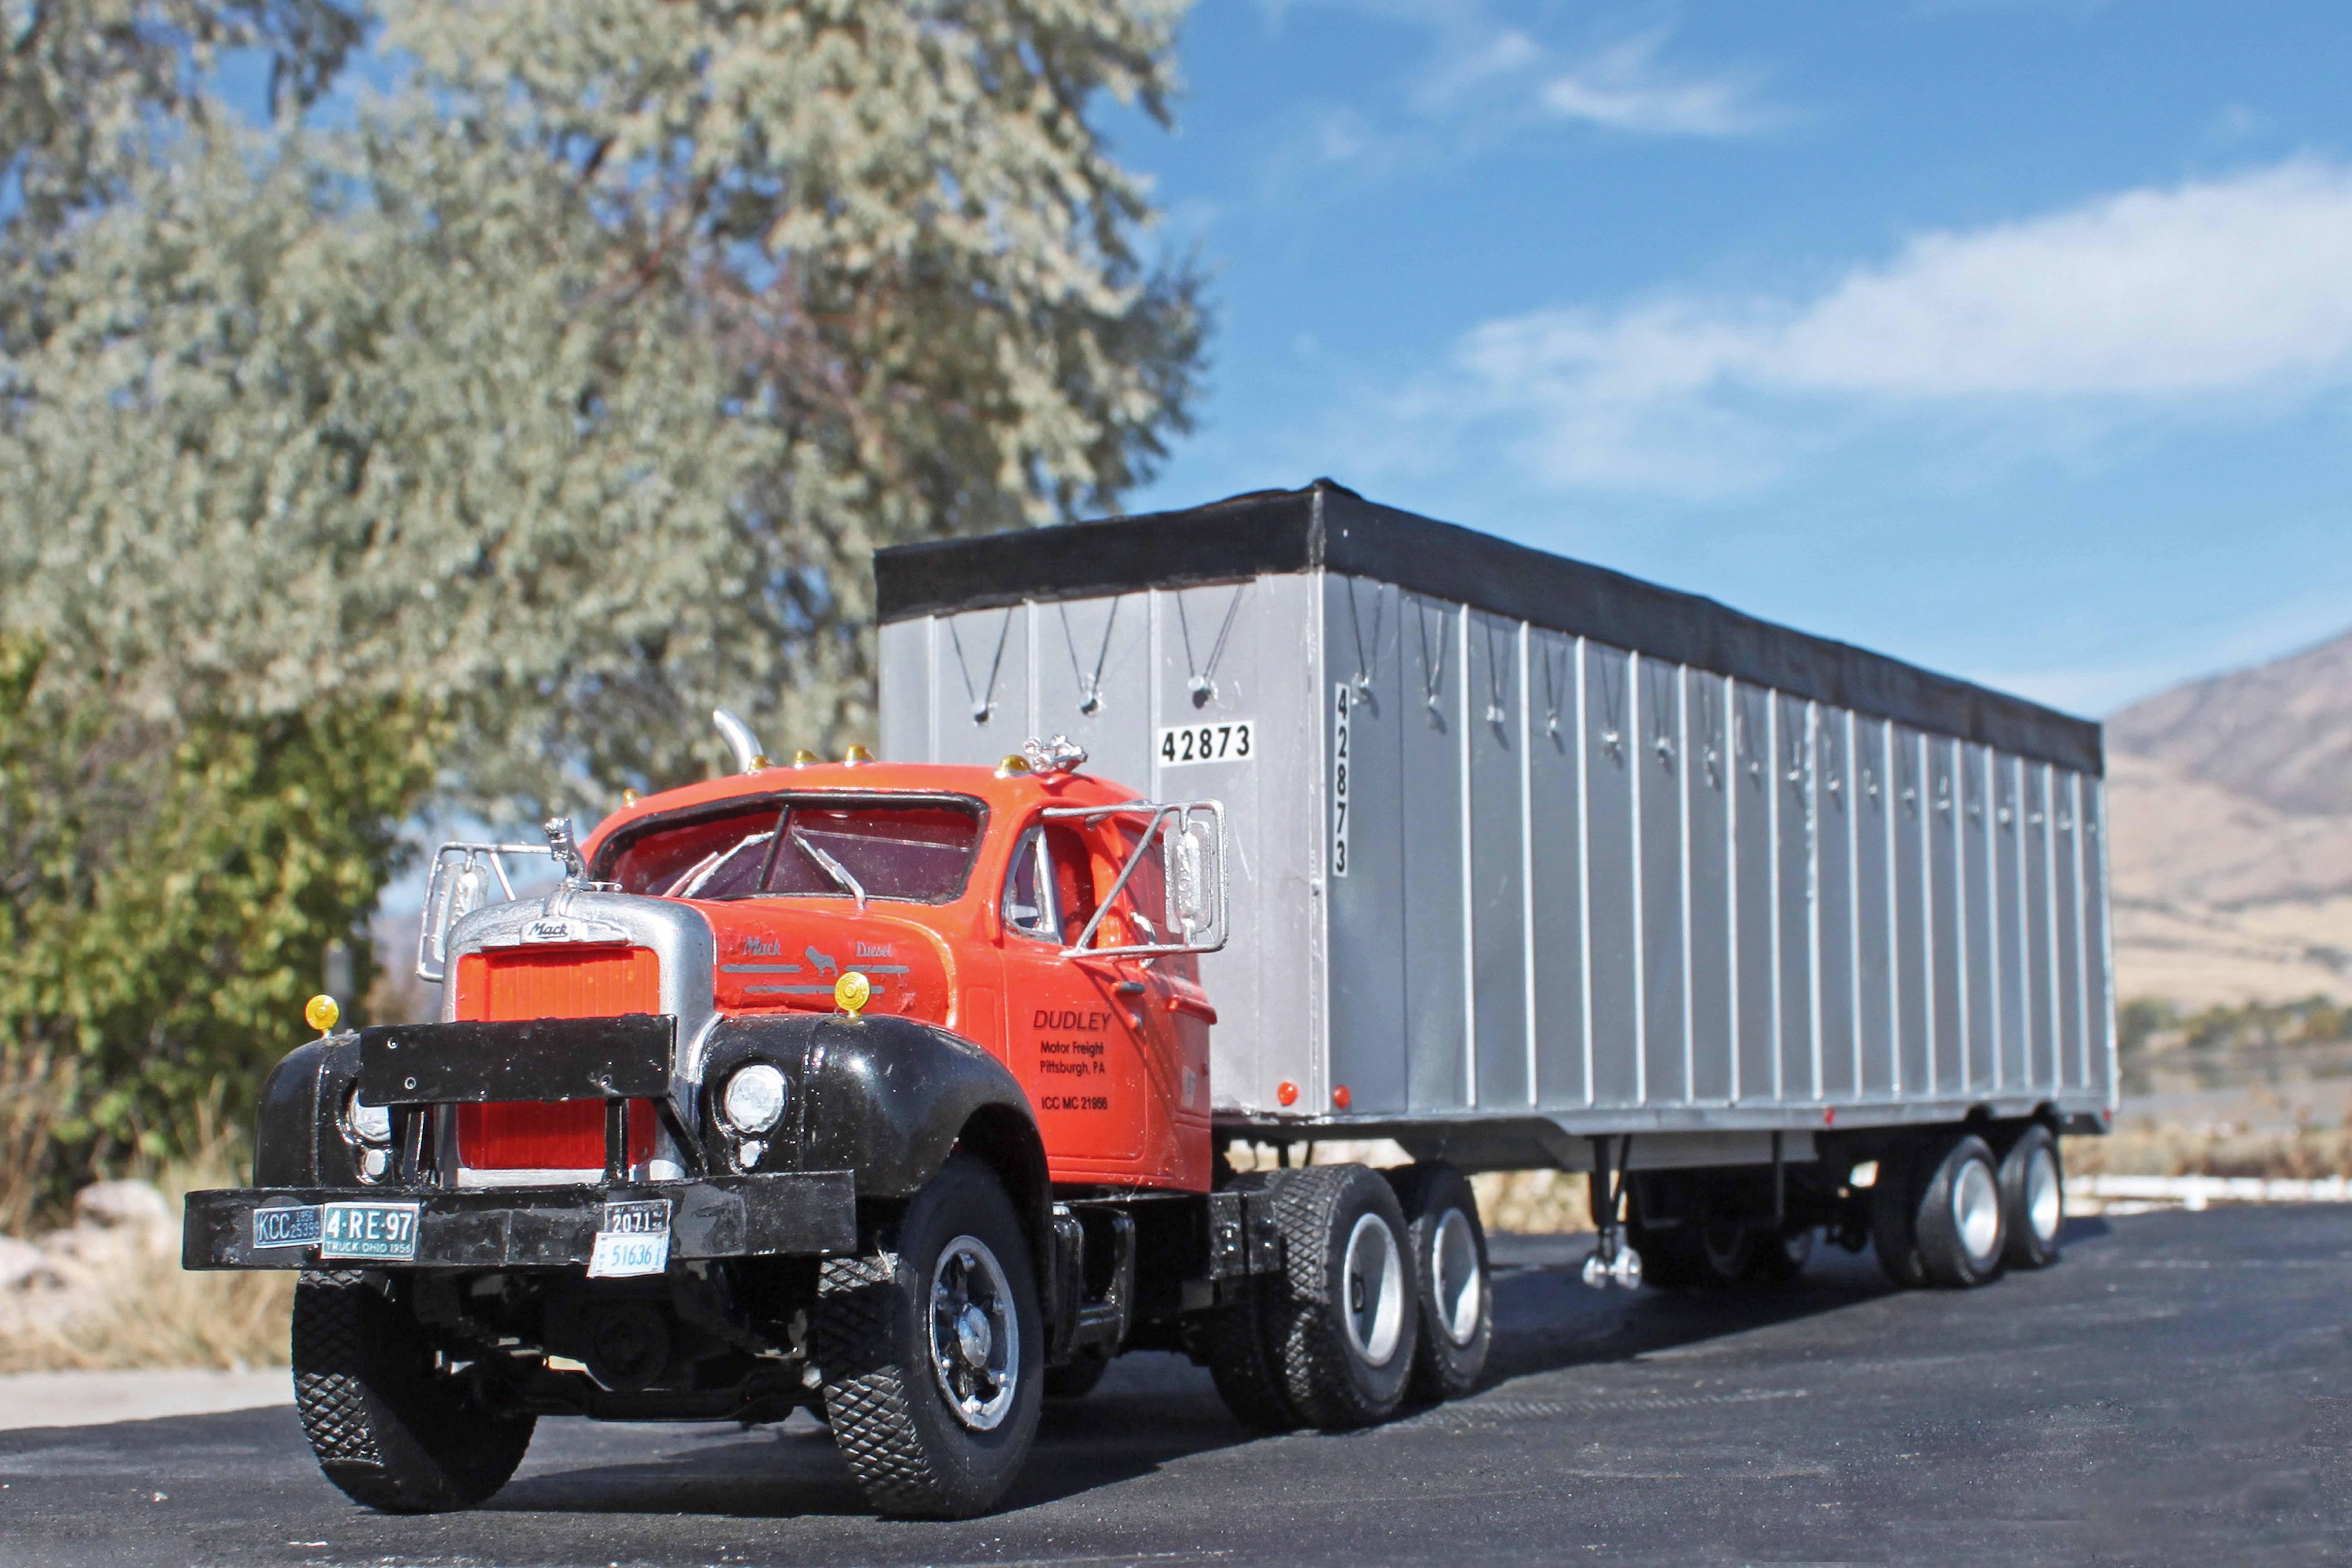
A couple more shots- showing the roof, with the "canvas" stretched across the bows. Now the trailer is being pulled by a Crackerbox Jimmy, its 2-stroke 6-71 screaming away.
-
A&N KW W990
RoninUtah replied to RoninUtah's topic in WIP: Model Trucks: Big Rigs and Heavy Equipment
Glad to help. Not sure if I didn’t get that backwards, but the point is to print out the instructions and look at them very carefully to make sure the holes are in the correct orientation before you bend the frame rails. After that, everything should fall into place if you work slowly and methodically. Good luck! -
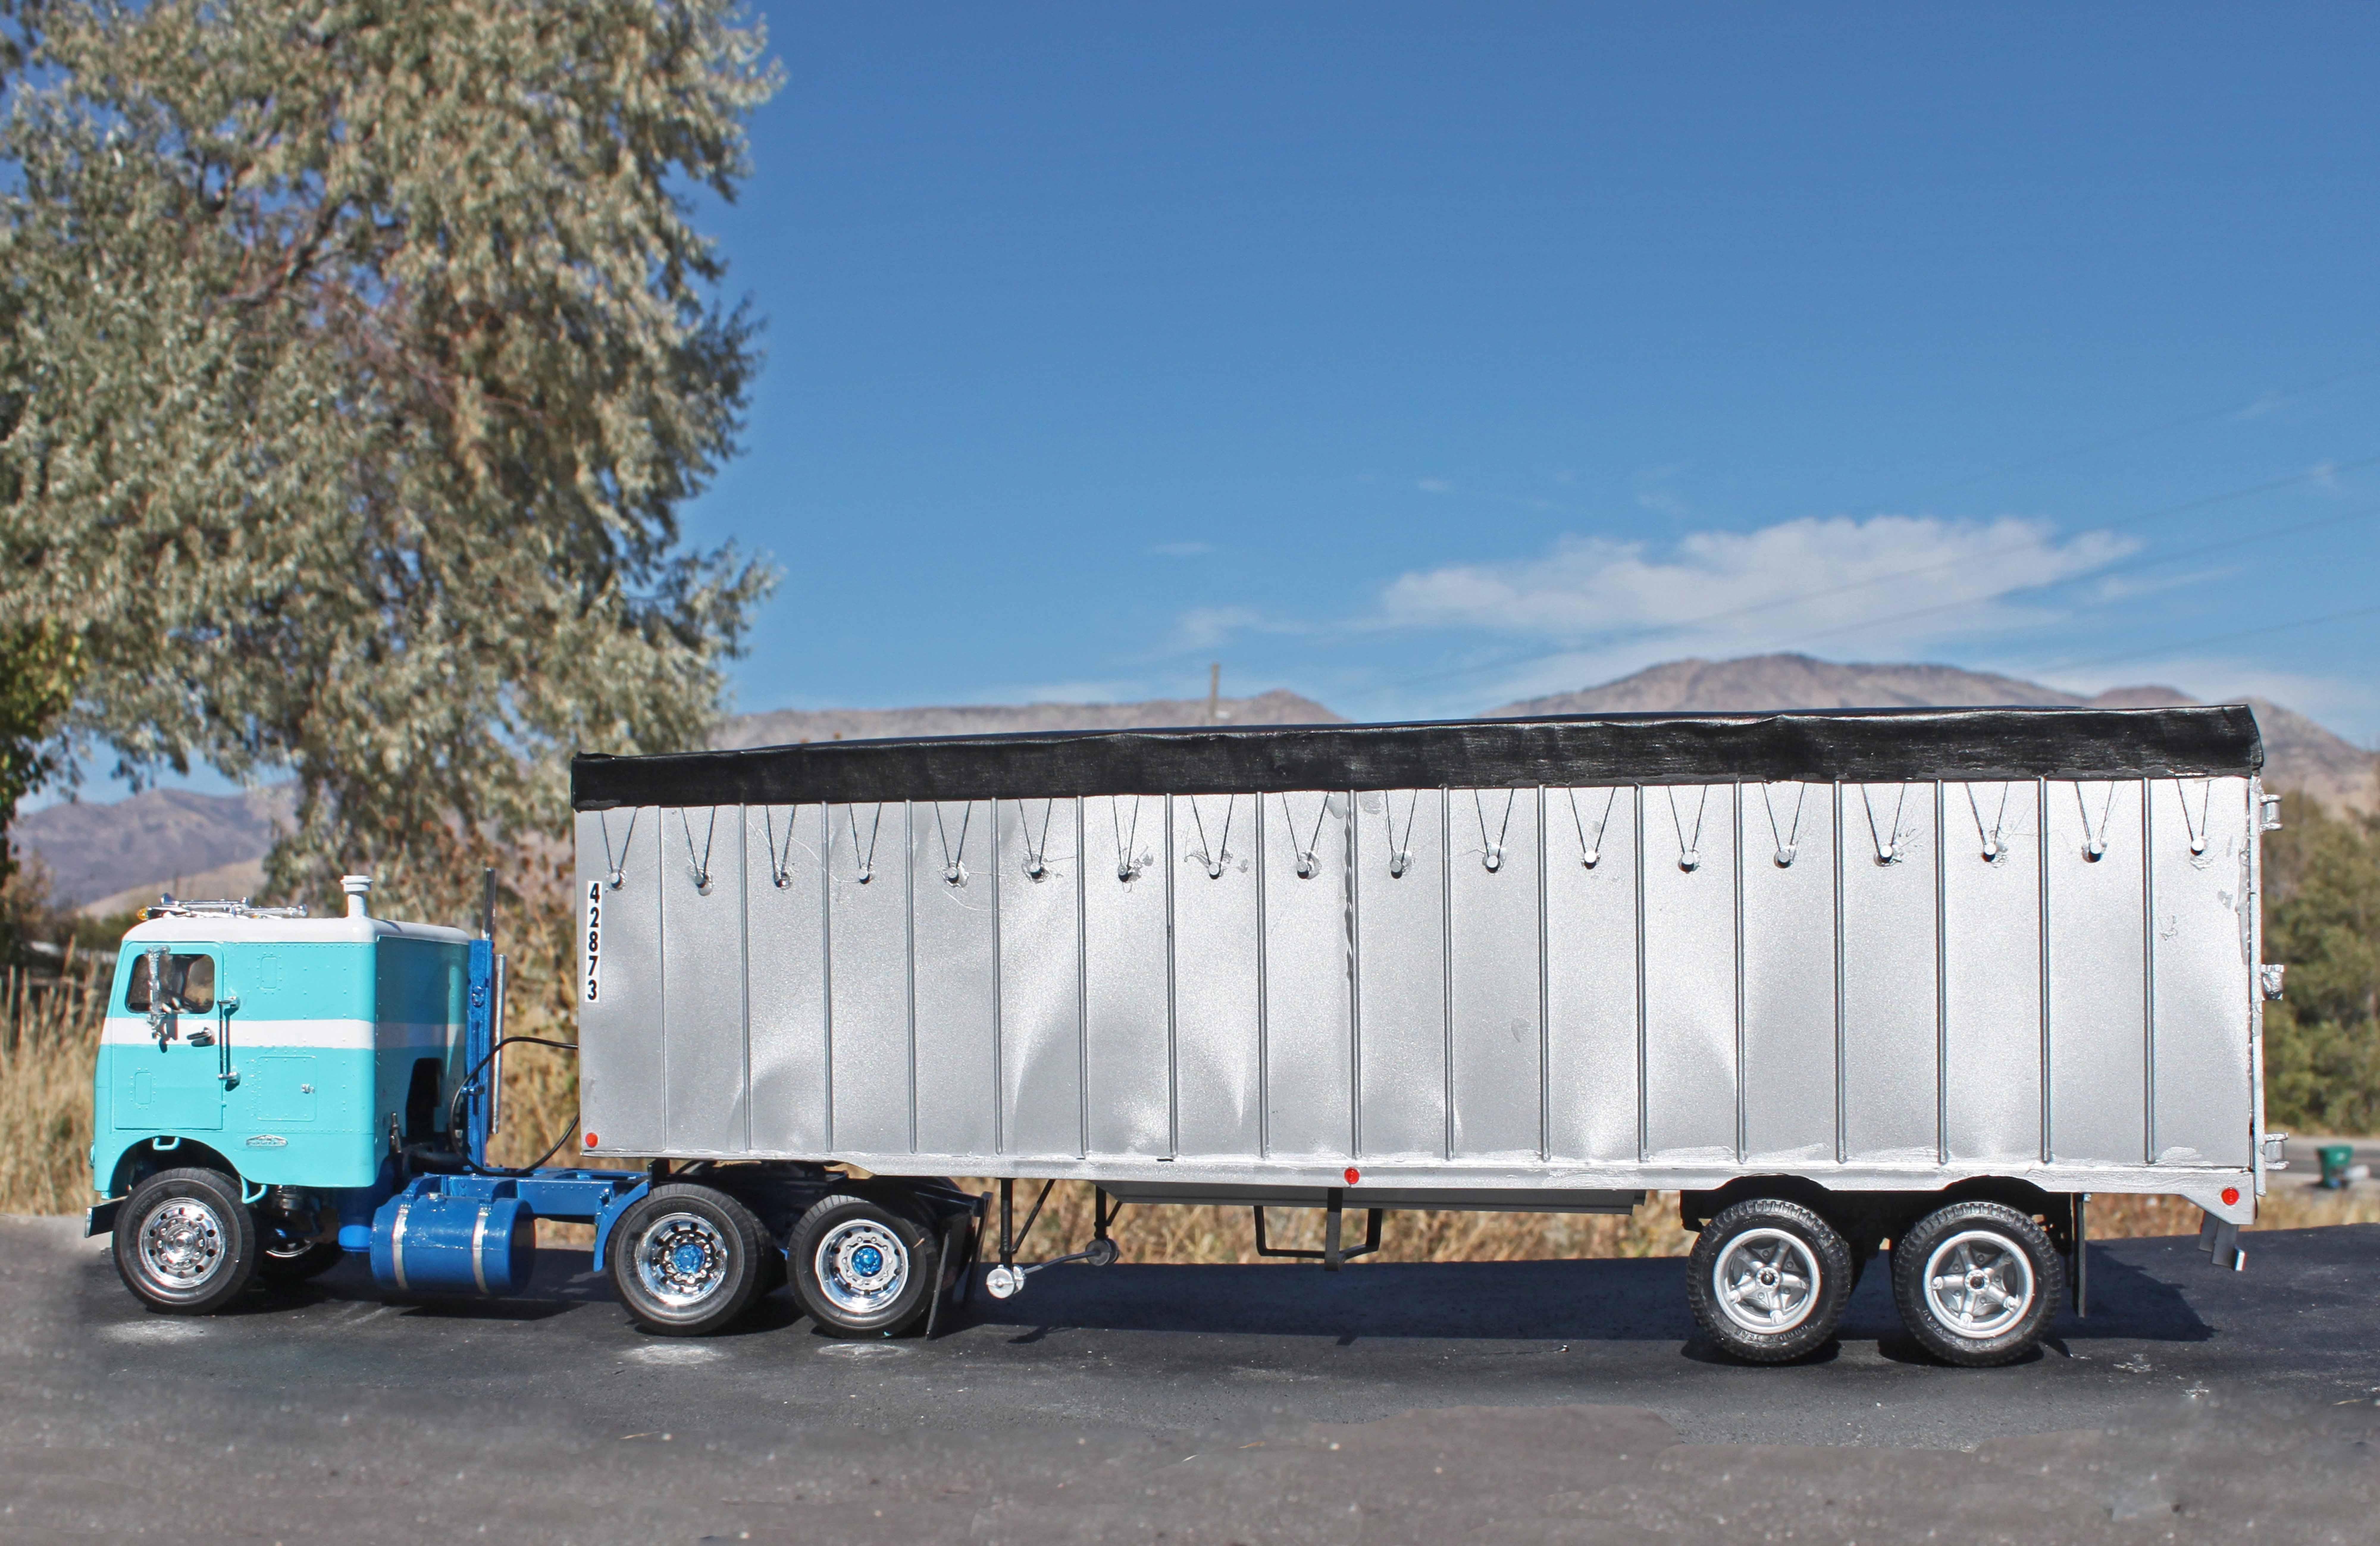
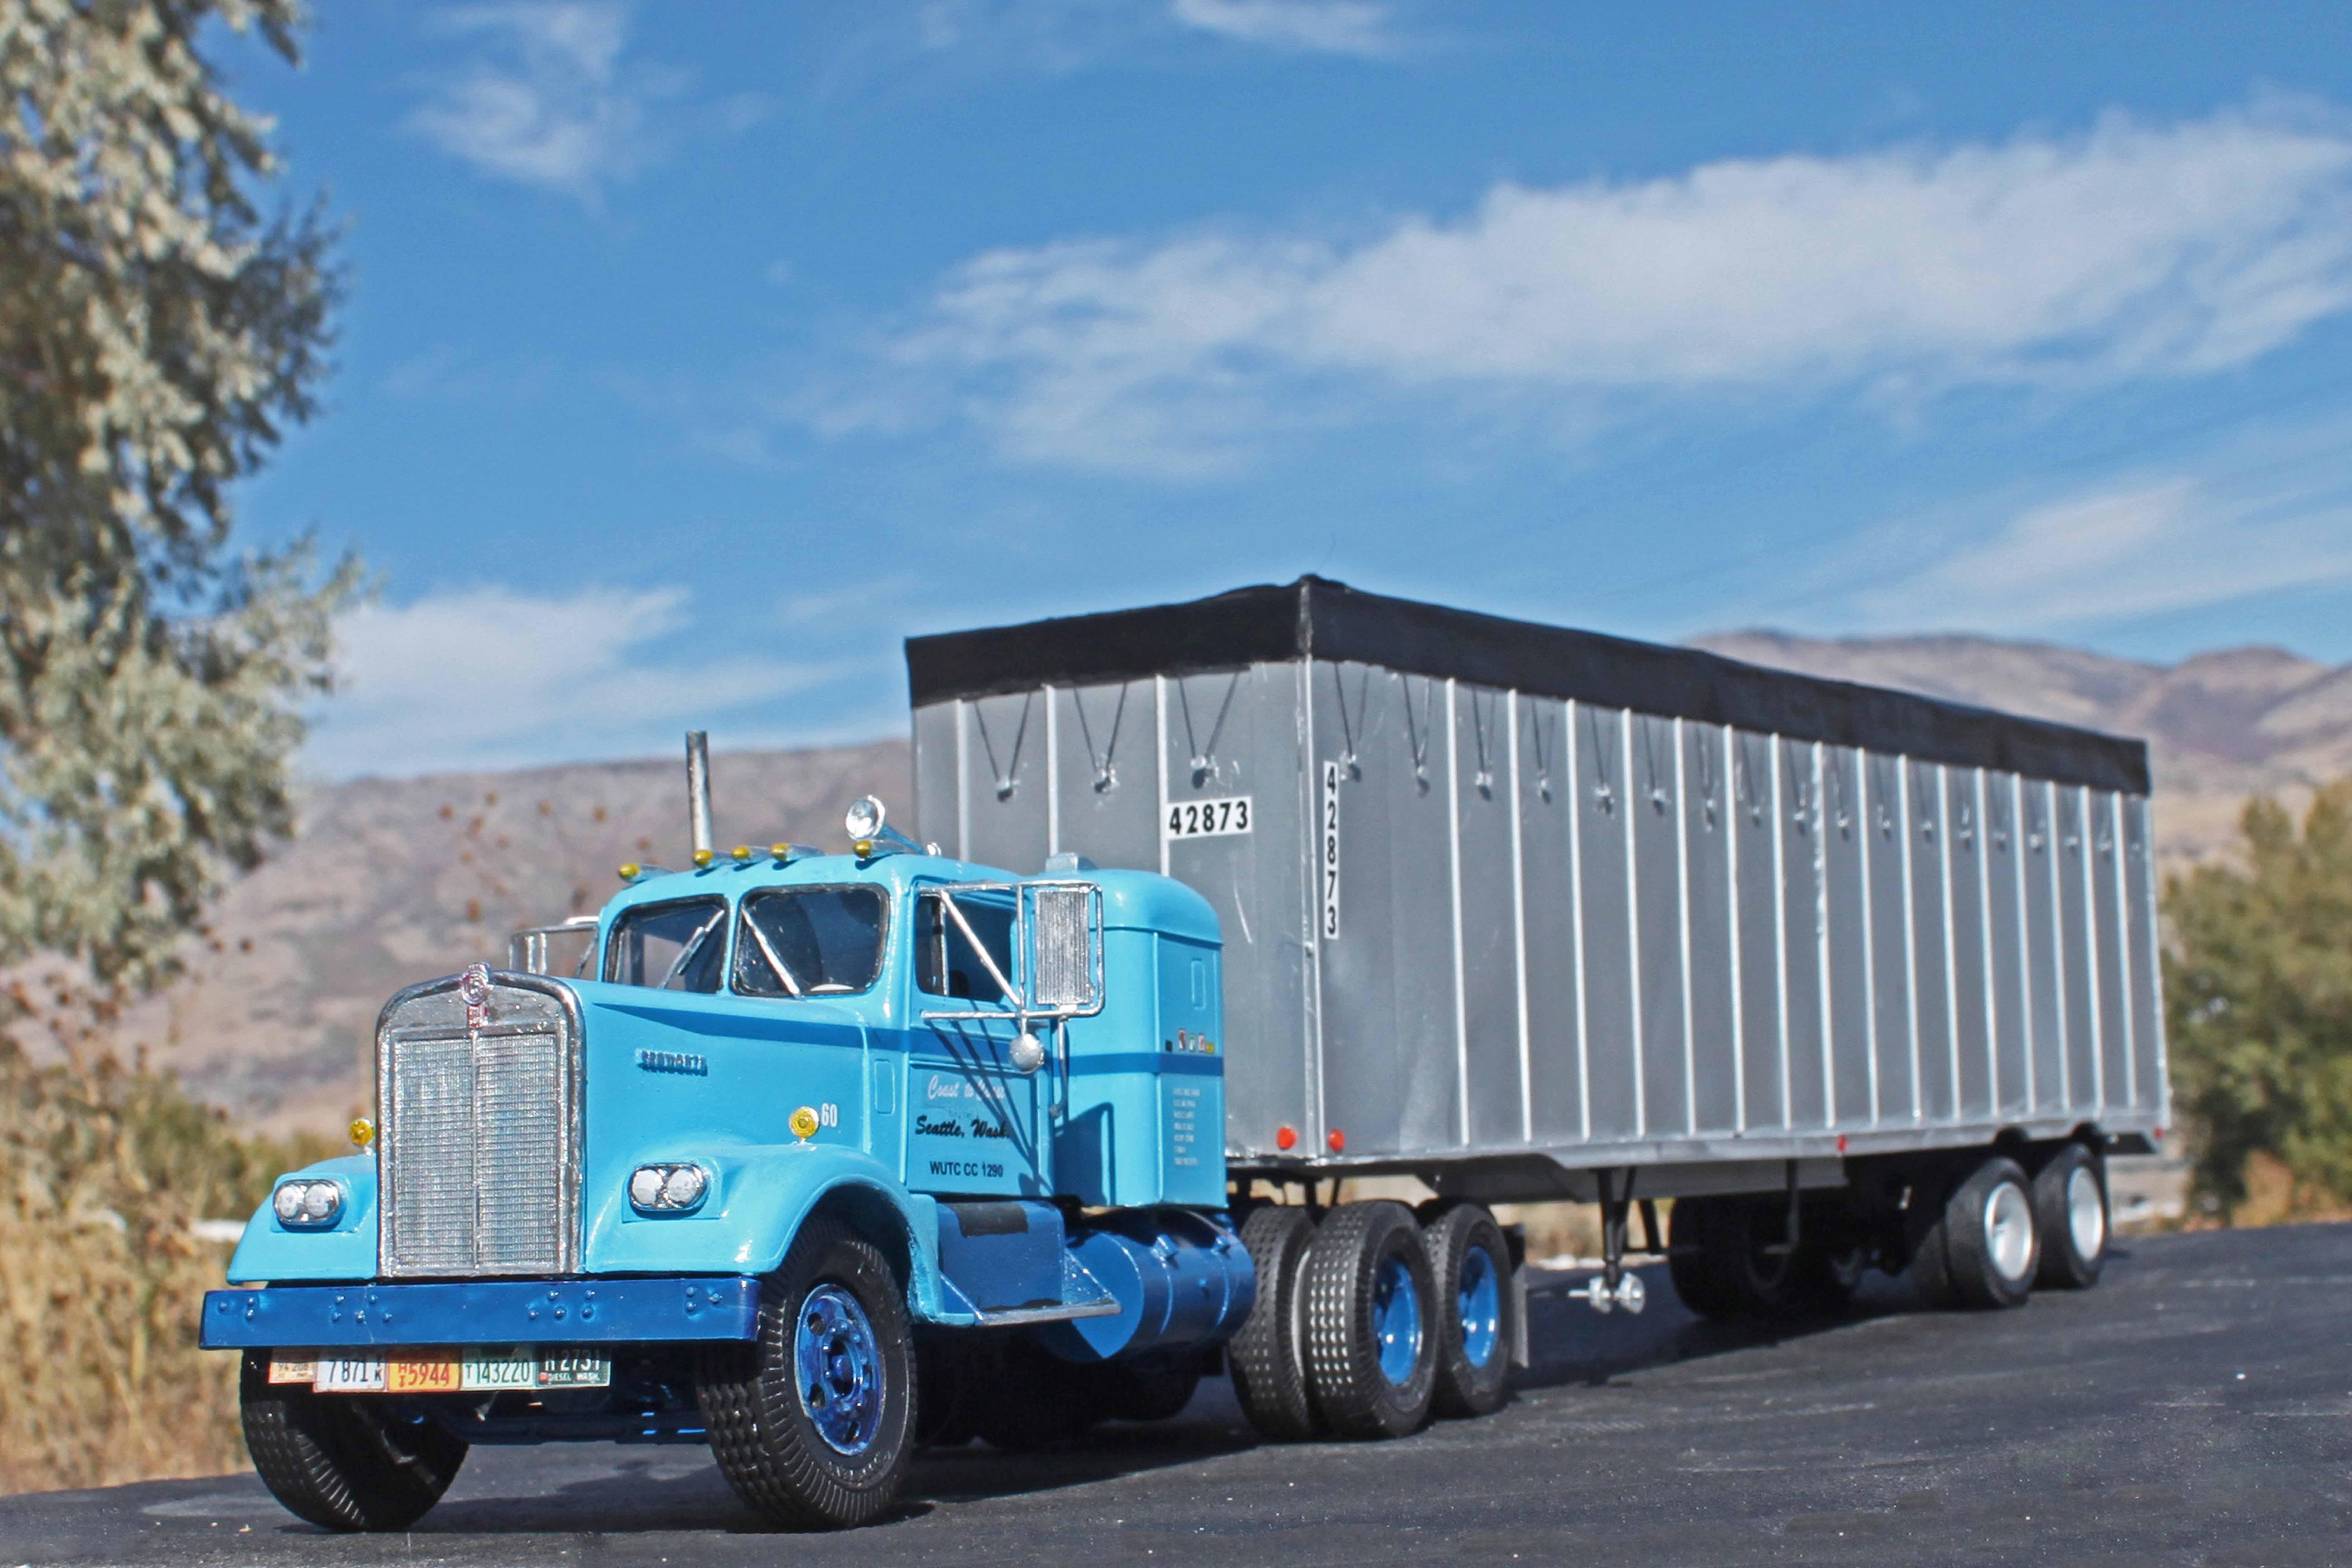
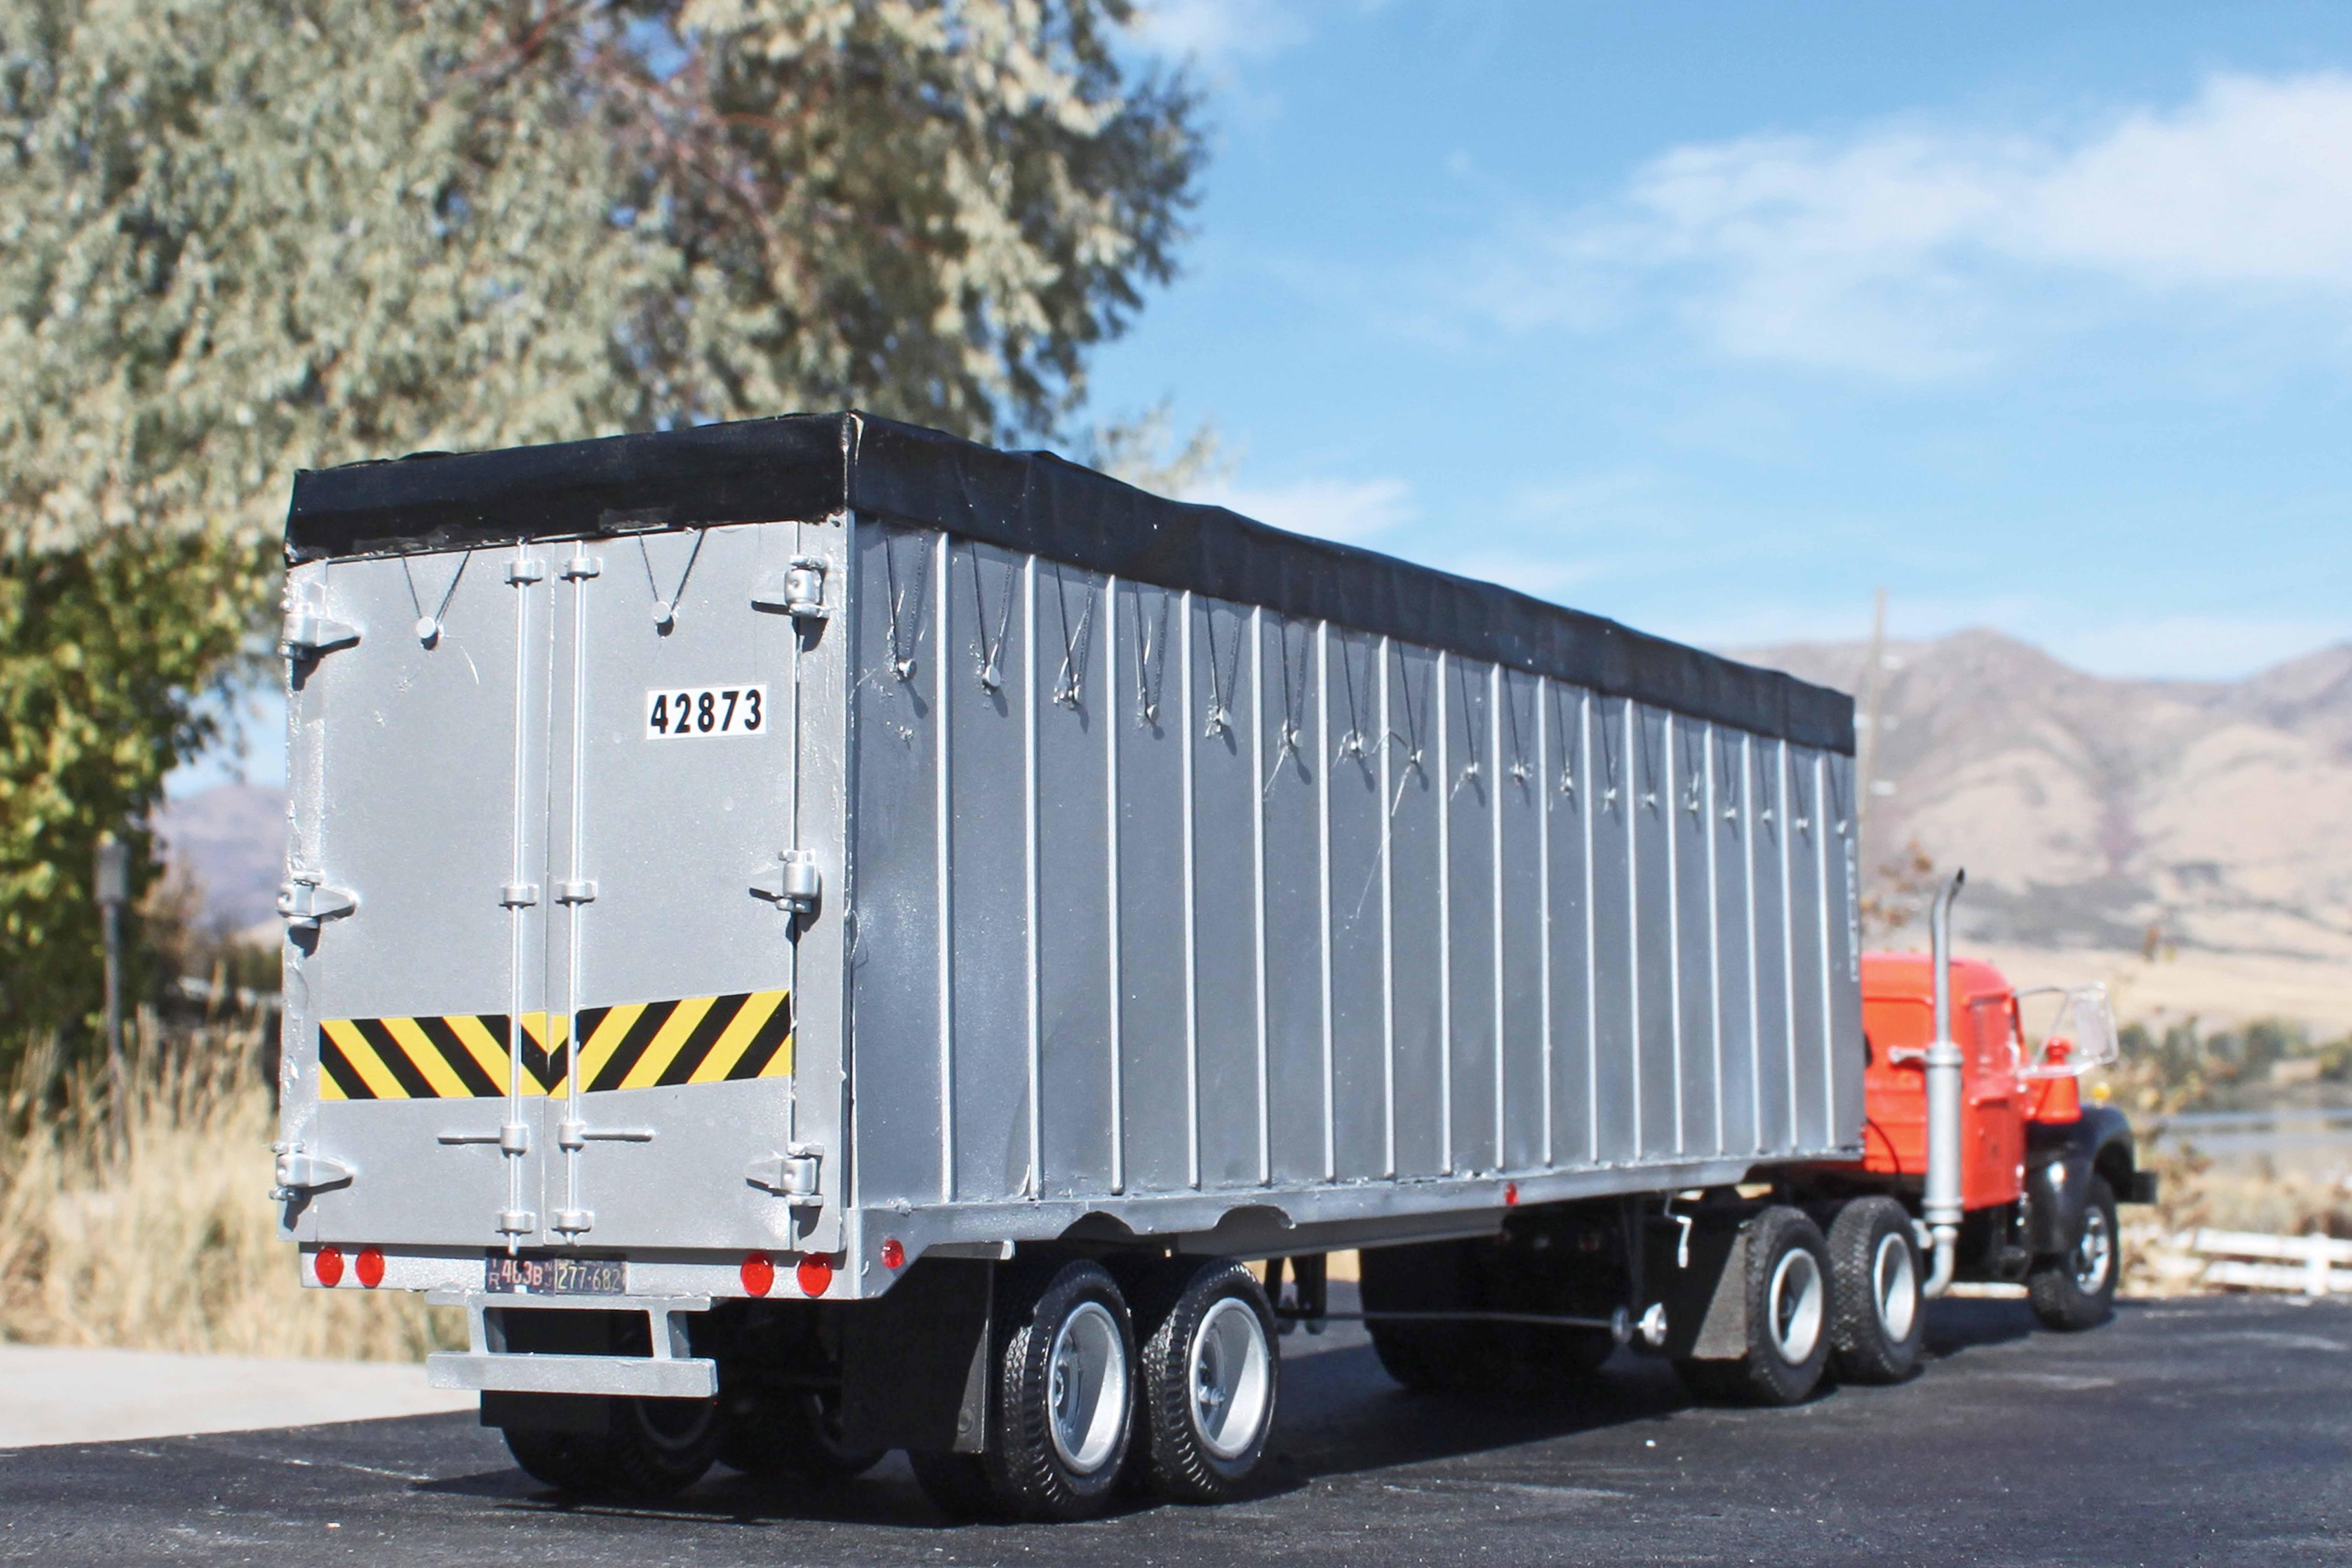
Back to the classics! This build was inspired by my mentor, Tim Ahlborn, who built a very similar one a few years ago. It's the "Big Rig" 36' van trailer, originally done by IMC in 1965, (which is period-appropriate in its own right), later released by Testors and a few others; currently by Round 2 under the AMT brand. Based on Tim's build, I lowered the suspension and kingpin position and cut wheel openings on the bottom, and added "arches" at the top shaped from old sprues. The "canvas" top is masking tape, sprayed flat black; the grommets are small tacks and the cables are ordinary sewing thread. Shown here with a variety of '50s and '60s tractors, all of which are AITM conversions on various donor chassis, except for the White Freightliner, which is the AMT Dual Drive kit, backdated to the mid-60s. Let's go back to the old days!
-
A&N Kenworth W990
RoninUtah replied to RoninUtah's topic in Model Trucks: Big Rigs and Heavy Equipment
Thank you all for the kind comments! Yeah, this was probably the most expensive kit I’ve ever bought, it was a birthday present to myself. Worth it, I think! A&N’s stuff is very pricey, but I don’t think I’ve ever seen better engineered models. -
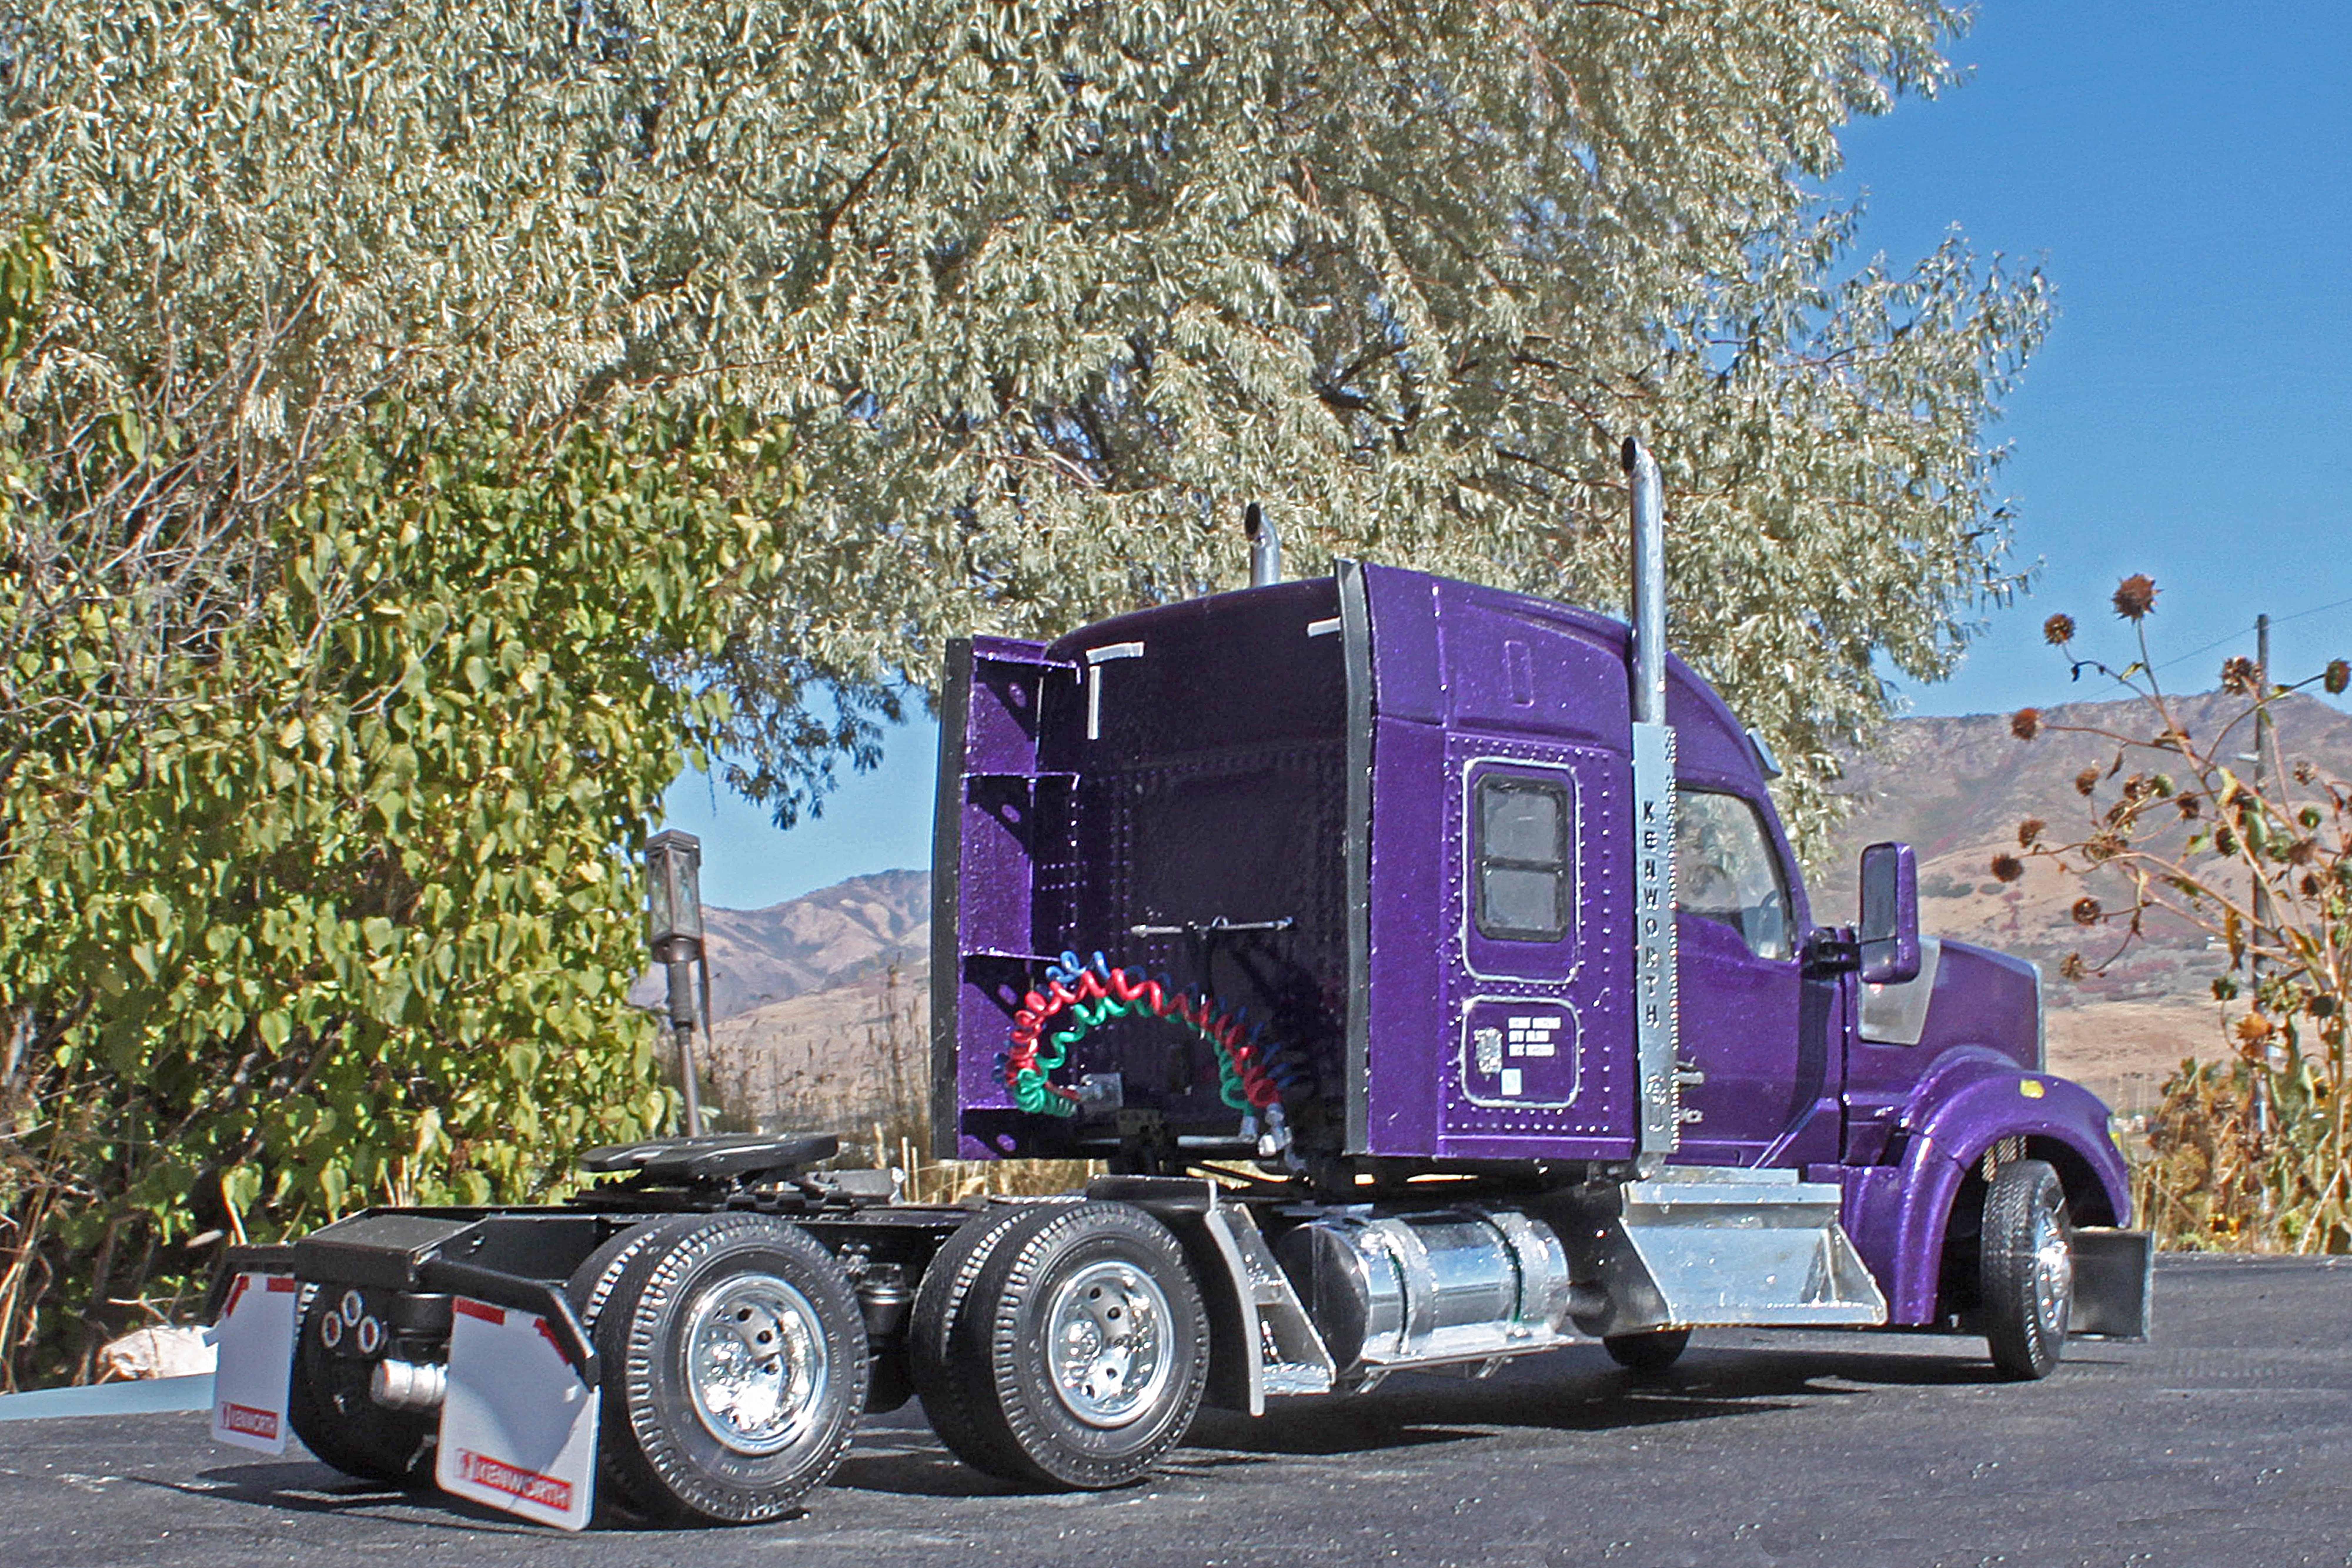
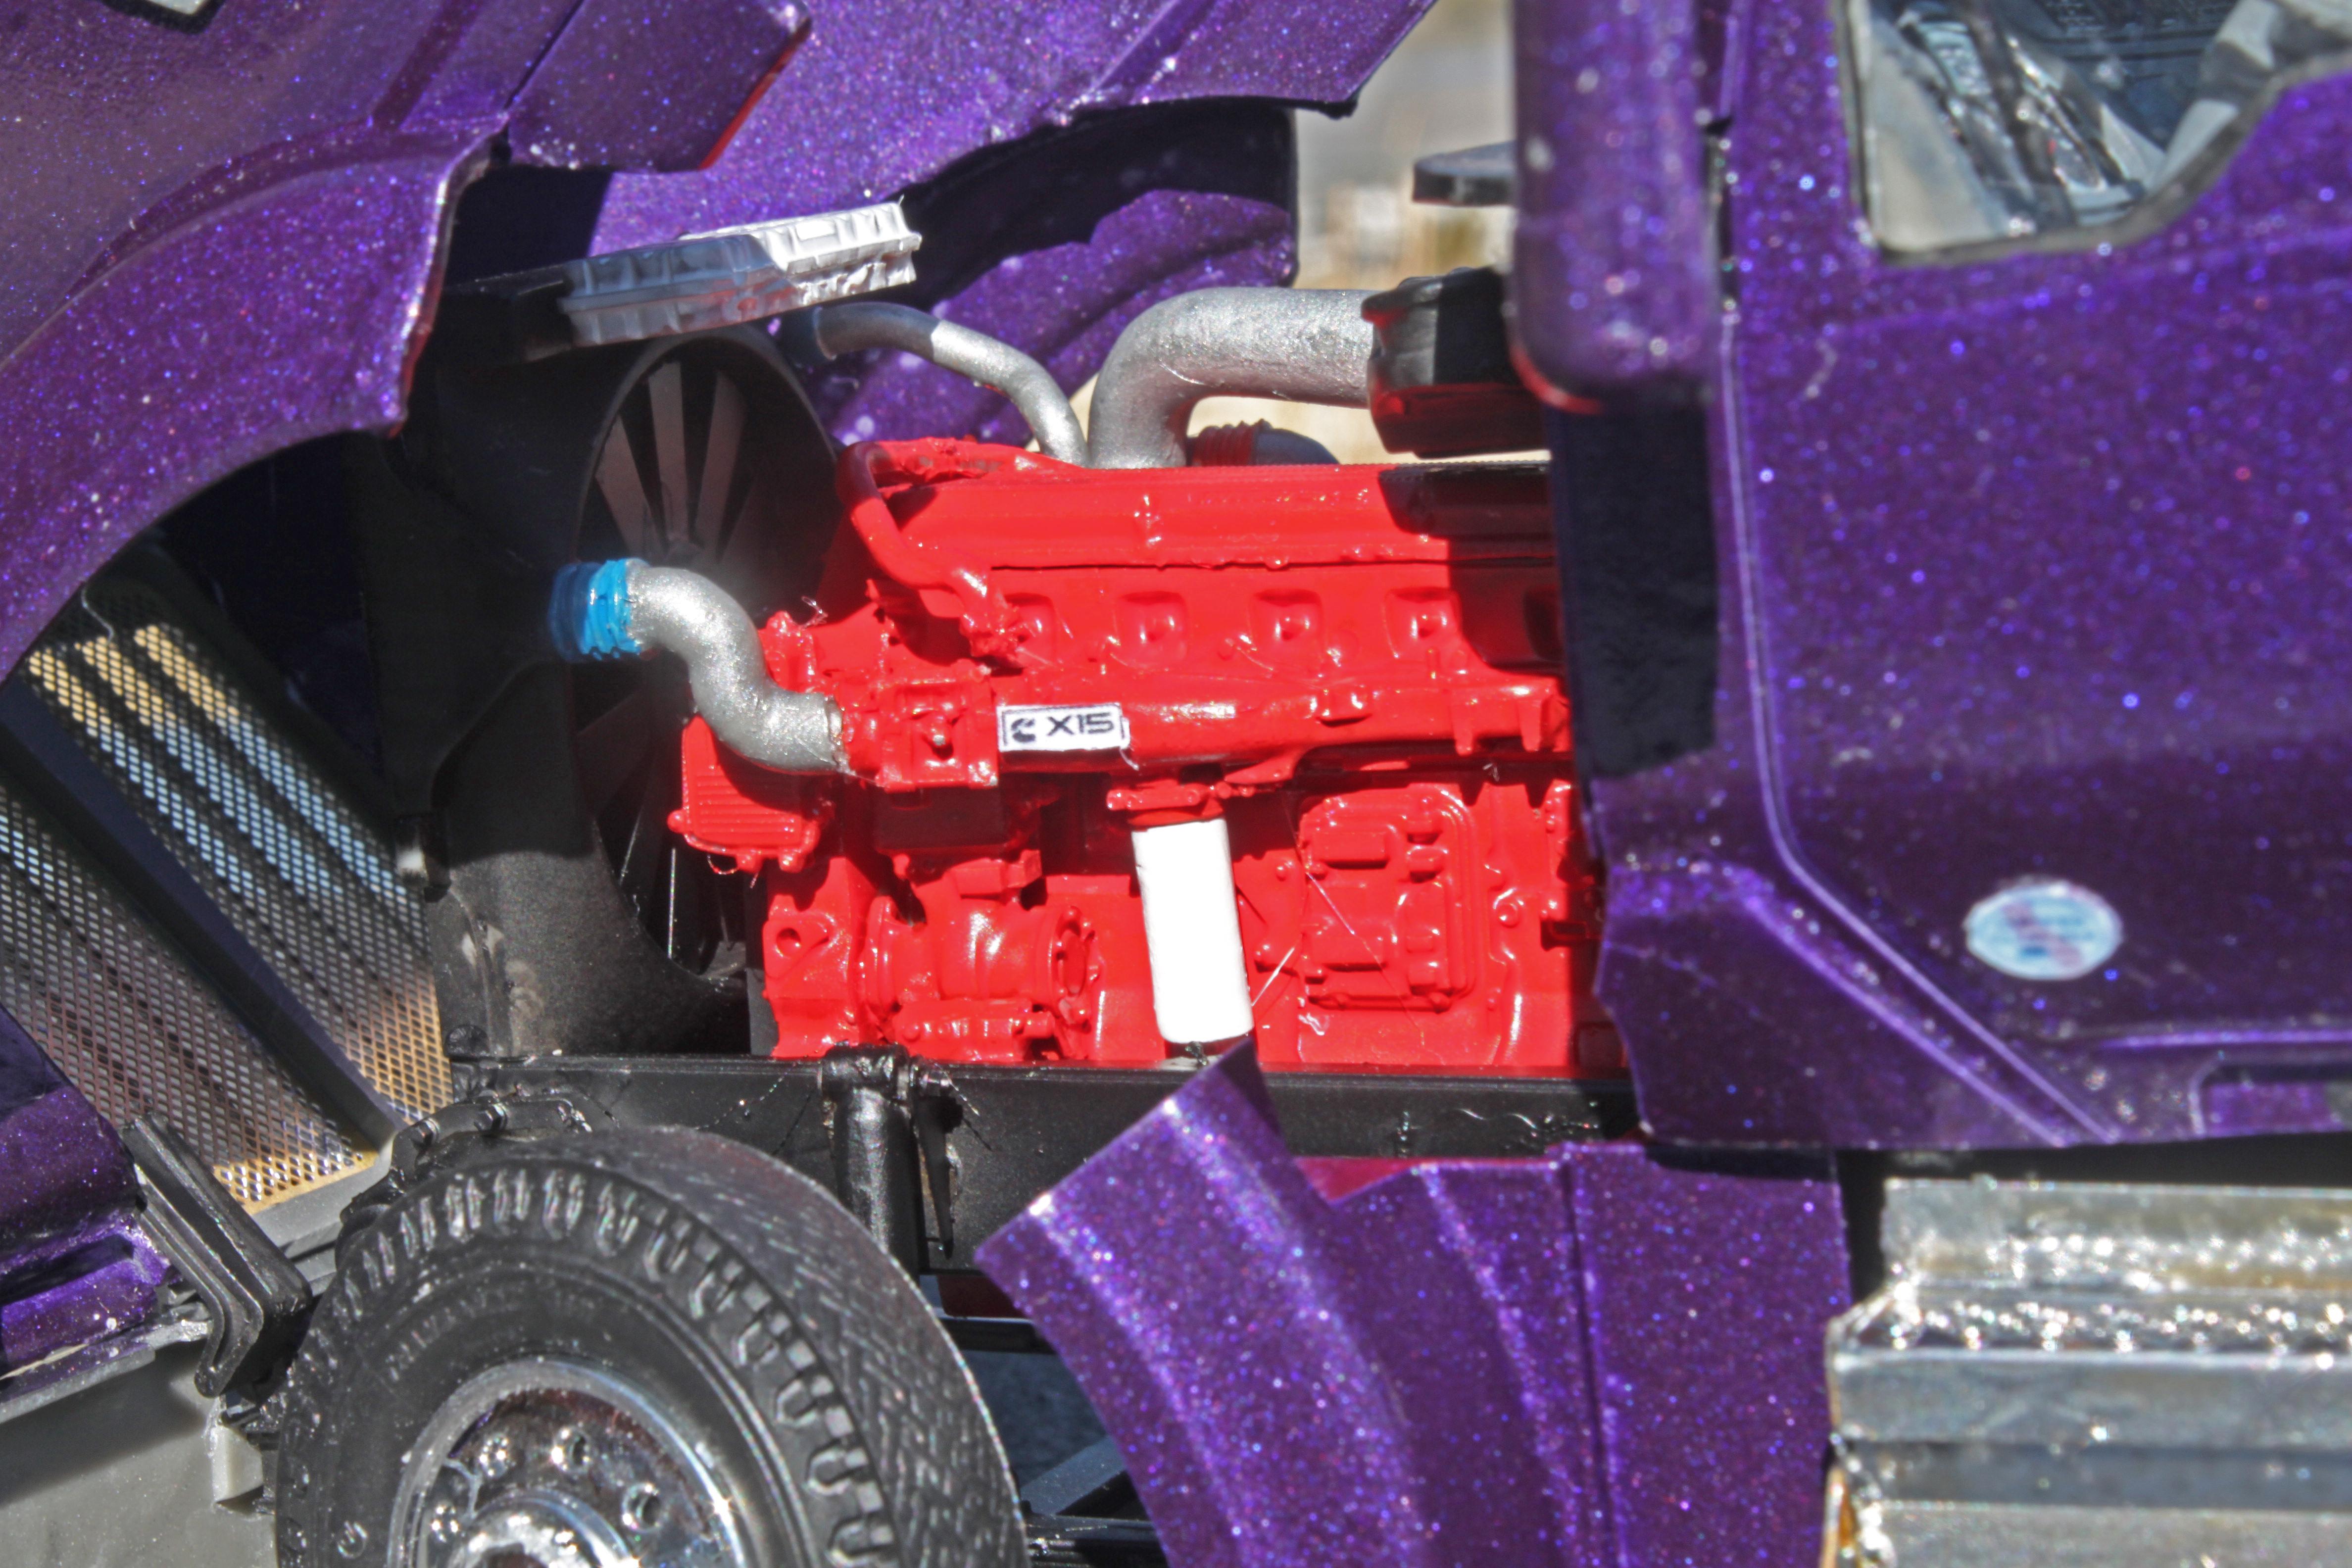
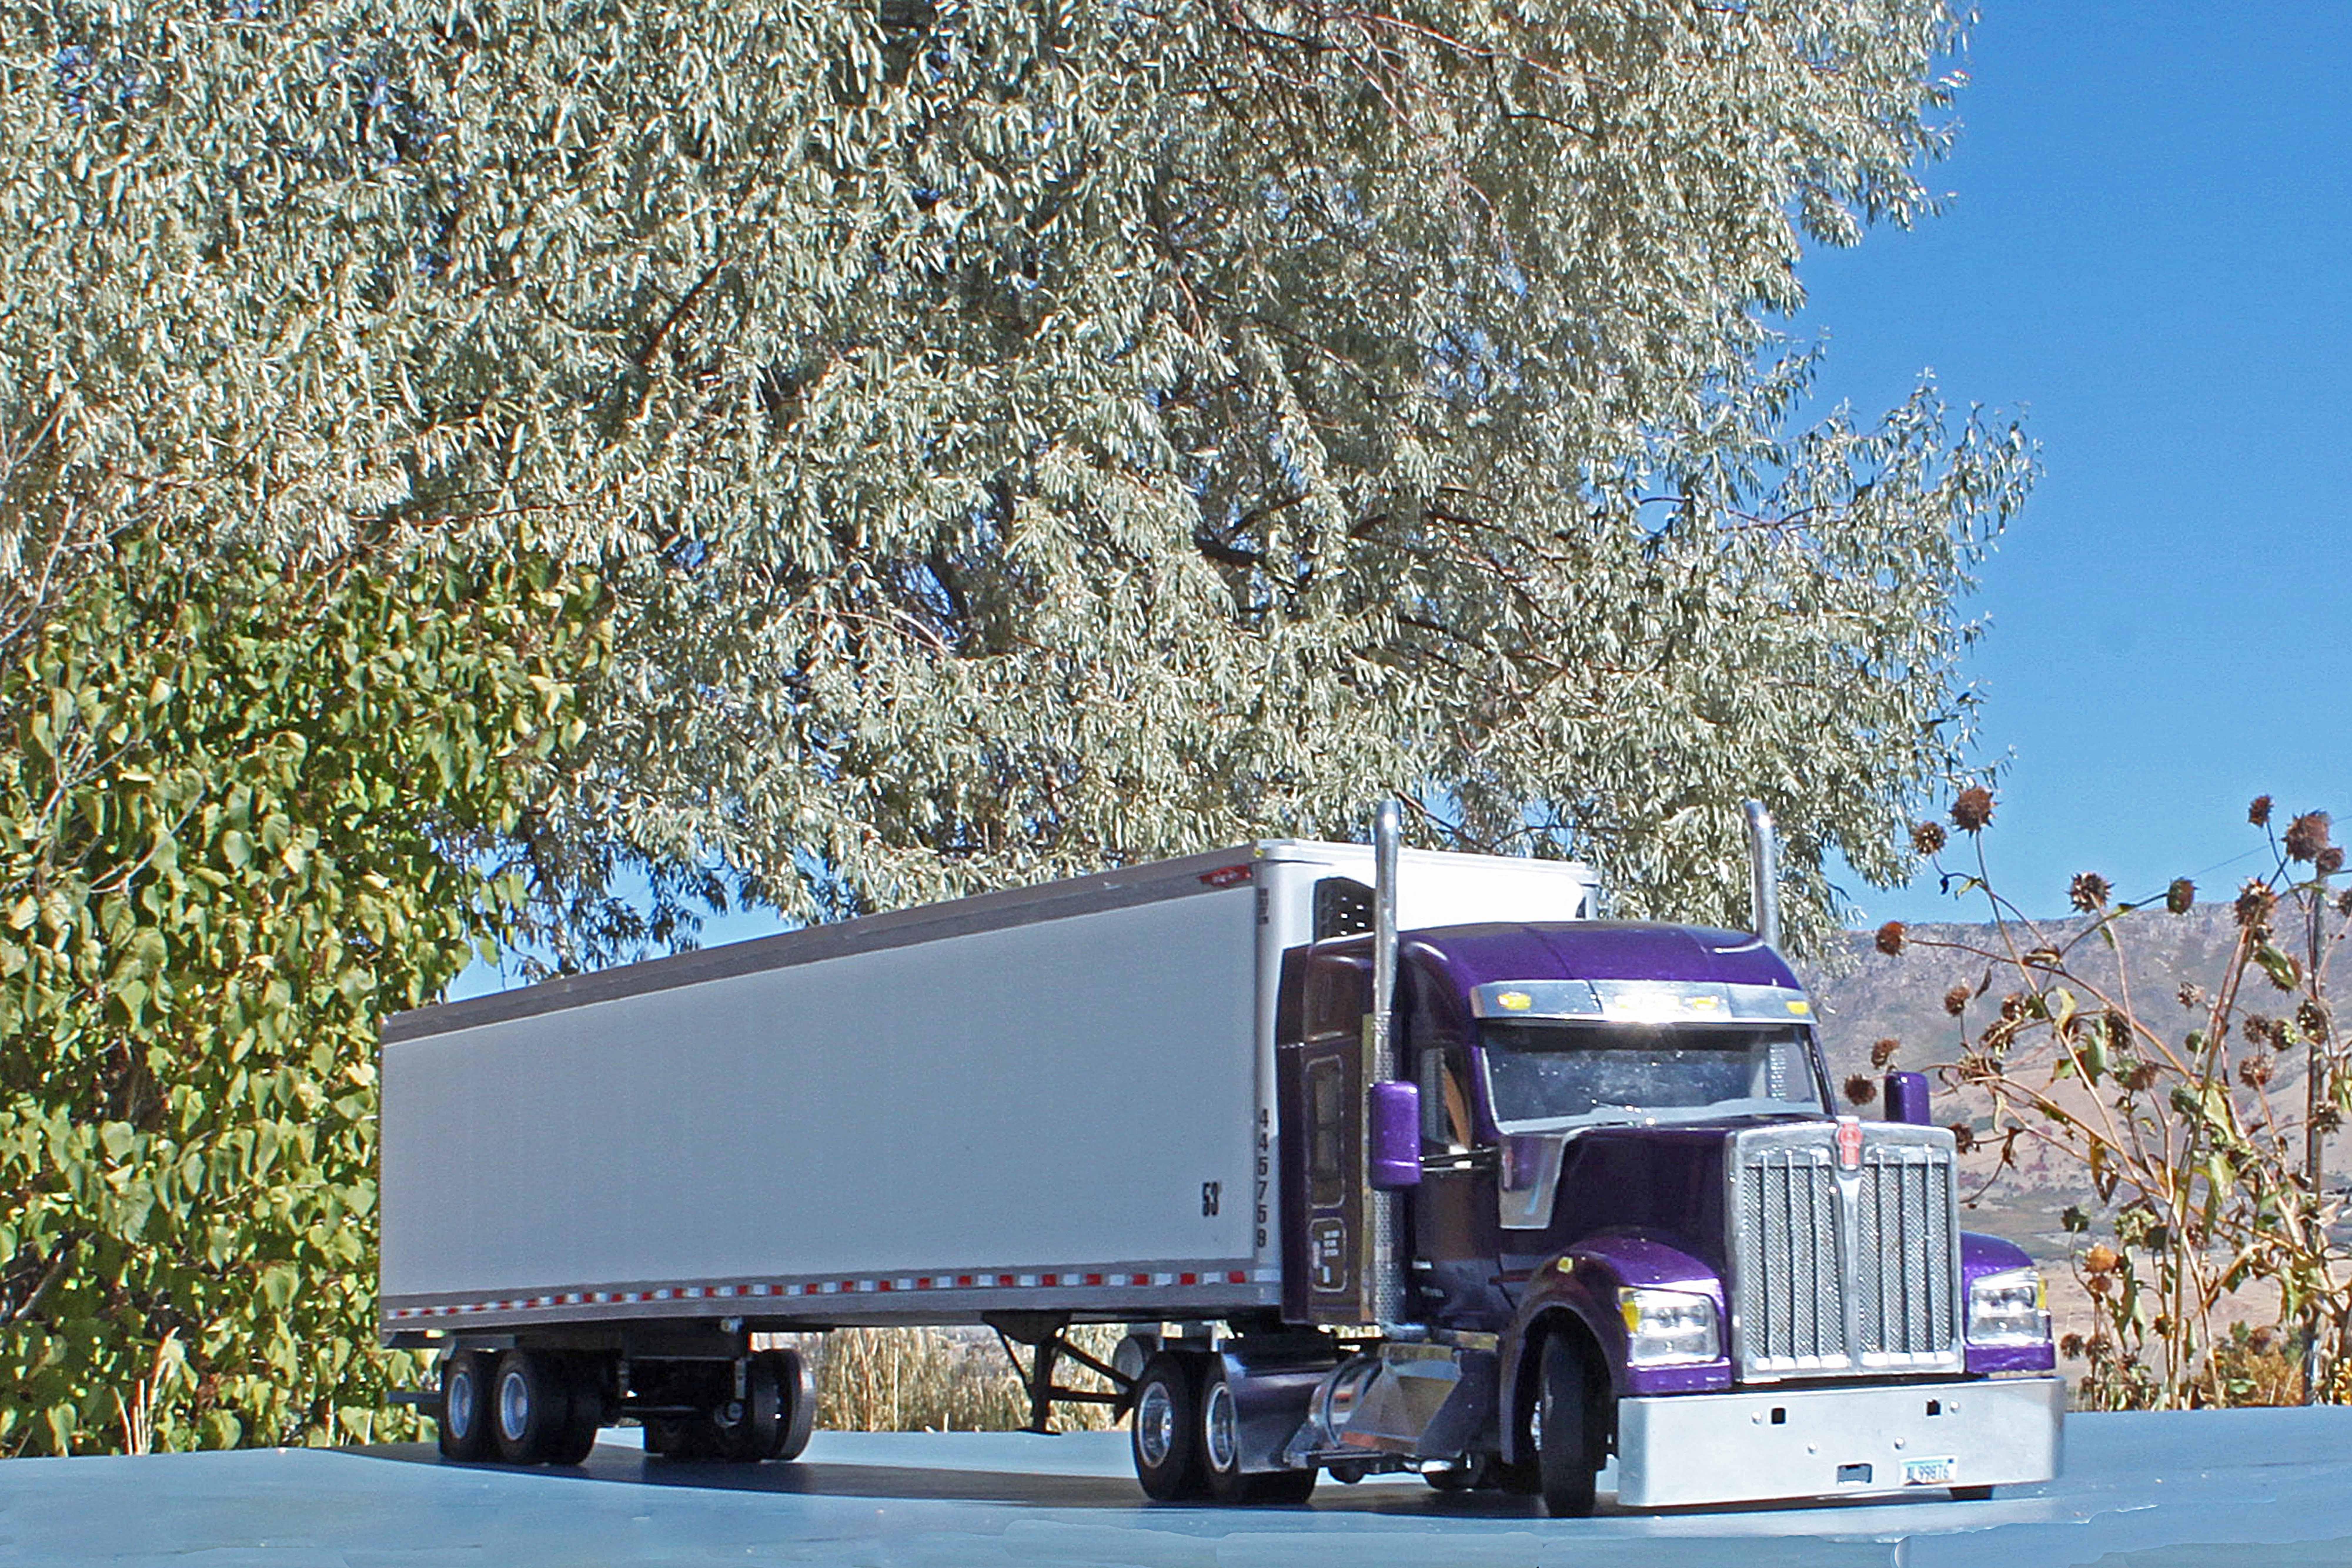
I've been posting this build in the WIP section of this forum, so some of you might have already seen it. As a recap, this is the complete kit- engine,chassis and cab- from A&N Truck Models in Latvia. I did their Freightliner Argosy last year, so I knew I'd be in for a challenging build. There are lots of PE brass parts, including most of the chassis, as well as resin parts. Everything is incredibly detailed and precision engineered- the parts fit together perfectly, but with no room for error. It takes time and patience to do this right, which is something that I'm generally not very good at. Paint is Testor's "Purpliscious" Extreme Lacquer with two coats of clear coat, along with Motlow liquid chrome- I buy the refill bottles and either brush or airbrush it, it works great. The truck itself is a late model Kenworth W990, their flagship long-nose conventional, with a mid-roof sleeper. I built it straight out of the box as a new (2023-2025) rig that just rolled out of the showroom and onto the highway in the hands of an owner-operator from Arizona. It has a Cummins X-15 with a Eaton 13 speed auto transmission. The trailer is a Moebius 53' smoothside reefer. So, enjoy! Here is another shot- Kenworths old and new: My 1955 625 High mount (An AITM conversion that I got from Dave Natalie (RIP) back in the day, alongside the W990. A lot has changed in 70 years!
-
A&N KW W990
RoninUtah replied to RoninUtah's topic in WIP: Model Trucks: Big Rigs and Heavy Equipment
The W990 is done! Posting it to Under Glass. Thanks to all who have followed this build!


.jpg.c85c4533892373d24b4cfea92f8a1a1a.jpg)
.jpg.eb936ea0d6478b10602f359f8125cd09.jpg)


