RoninUtah
-
Posts
449 -
Joined
-
Last visited
Content Type
Profiles
Forums
Events
Gallery
Everything posted by RoninUtah
-
Pete 352 day cab
RoninUtah replied to Jürgen M.'s topic in WIP: Model Trucks: Big Rigs and Heavy Equipment
Great start! I'm looking forward to seeing this one progress. -
A&N KW W990
RoninUtah replied to RoninUtah's topic in WIP: Model Trucks: Big Rigs and Heavy Equipment
Actually,no, I think that’s backwards… wait, I’ve confused myself now! -
A&N KW W990
RoninUtah replied to RoninUtah's topic in WIP: Model Trucks: Big Rigs and Heavy Equipment
Just make sure that when you make the frame rails, bend the PE brass strips in the correct direction. I did it backwards, and it cause no end of problems in lining up the accessories in the correct locations. Bend them in the direction of the printing, not away and everything will fit perfectly. -
A&N KW W990
RoninUtah replied to RoninUtah's topic in WIP: Model Trucks: Big Rigs and Heavy Equipment
When I get into a build, I don’t eat or sleep and the cat goes hungry… but I get a lot done! Just kidding, but I’ve been putting some time into this one. The chassis is ready to go on wheels and the cab and hood are almost ready for installation. With a little luck I should be wrapping this up in a couple days!
-
A&N KW W990
RoninUtah replied to RoninUtah's topic in WIP: Model Trucks: Big Rigs and Heavy Equipment
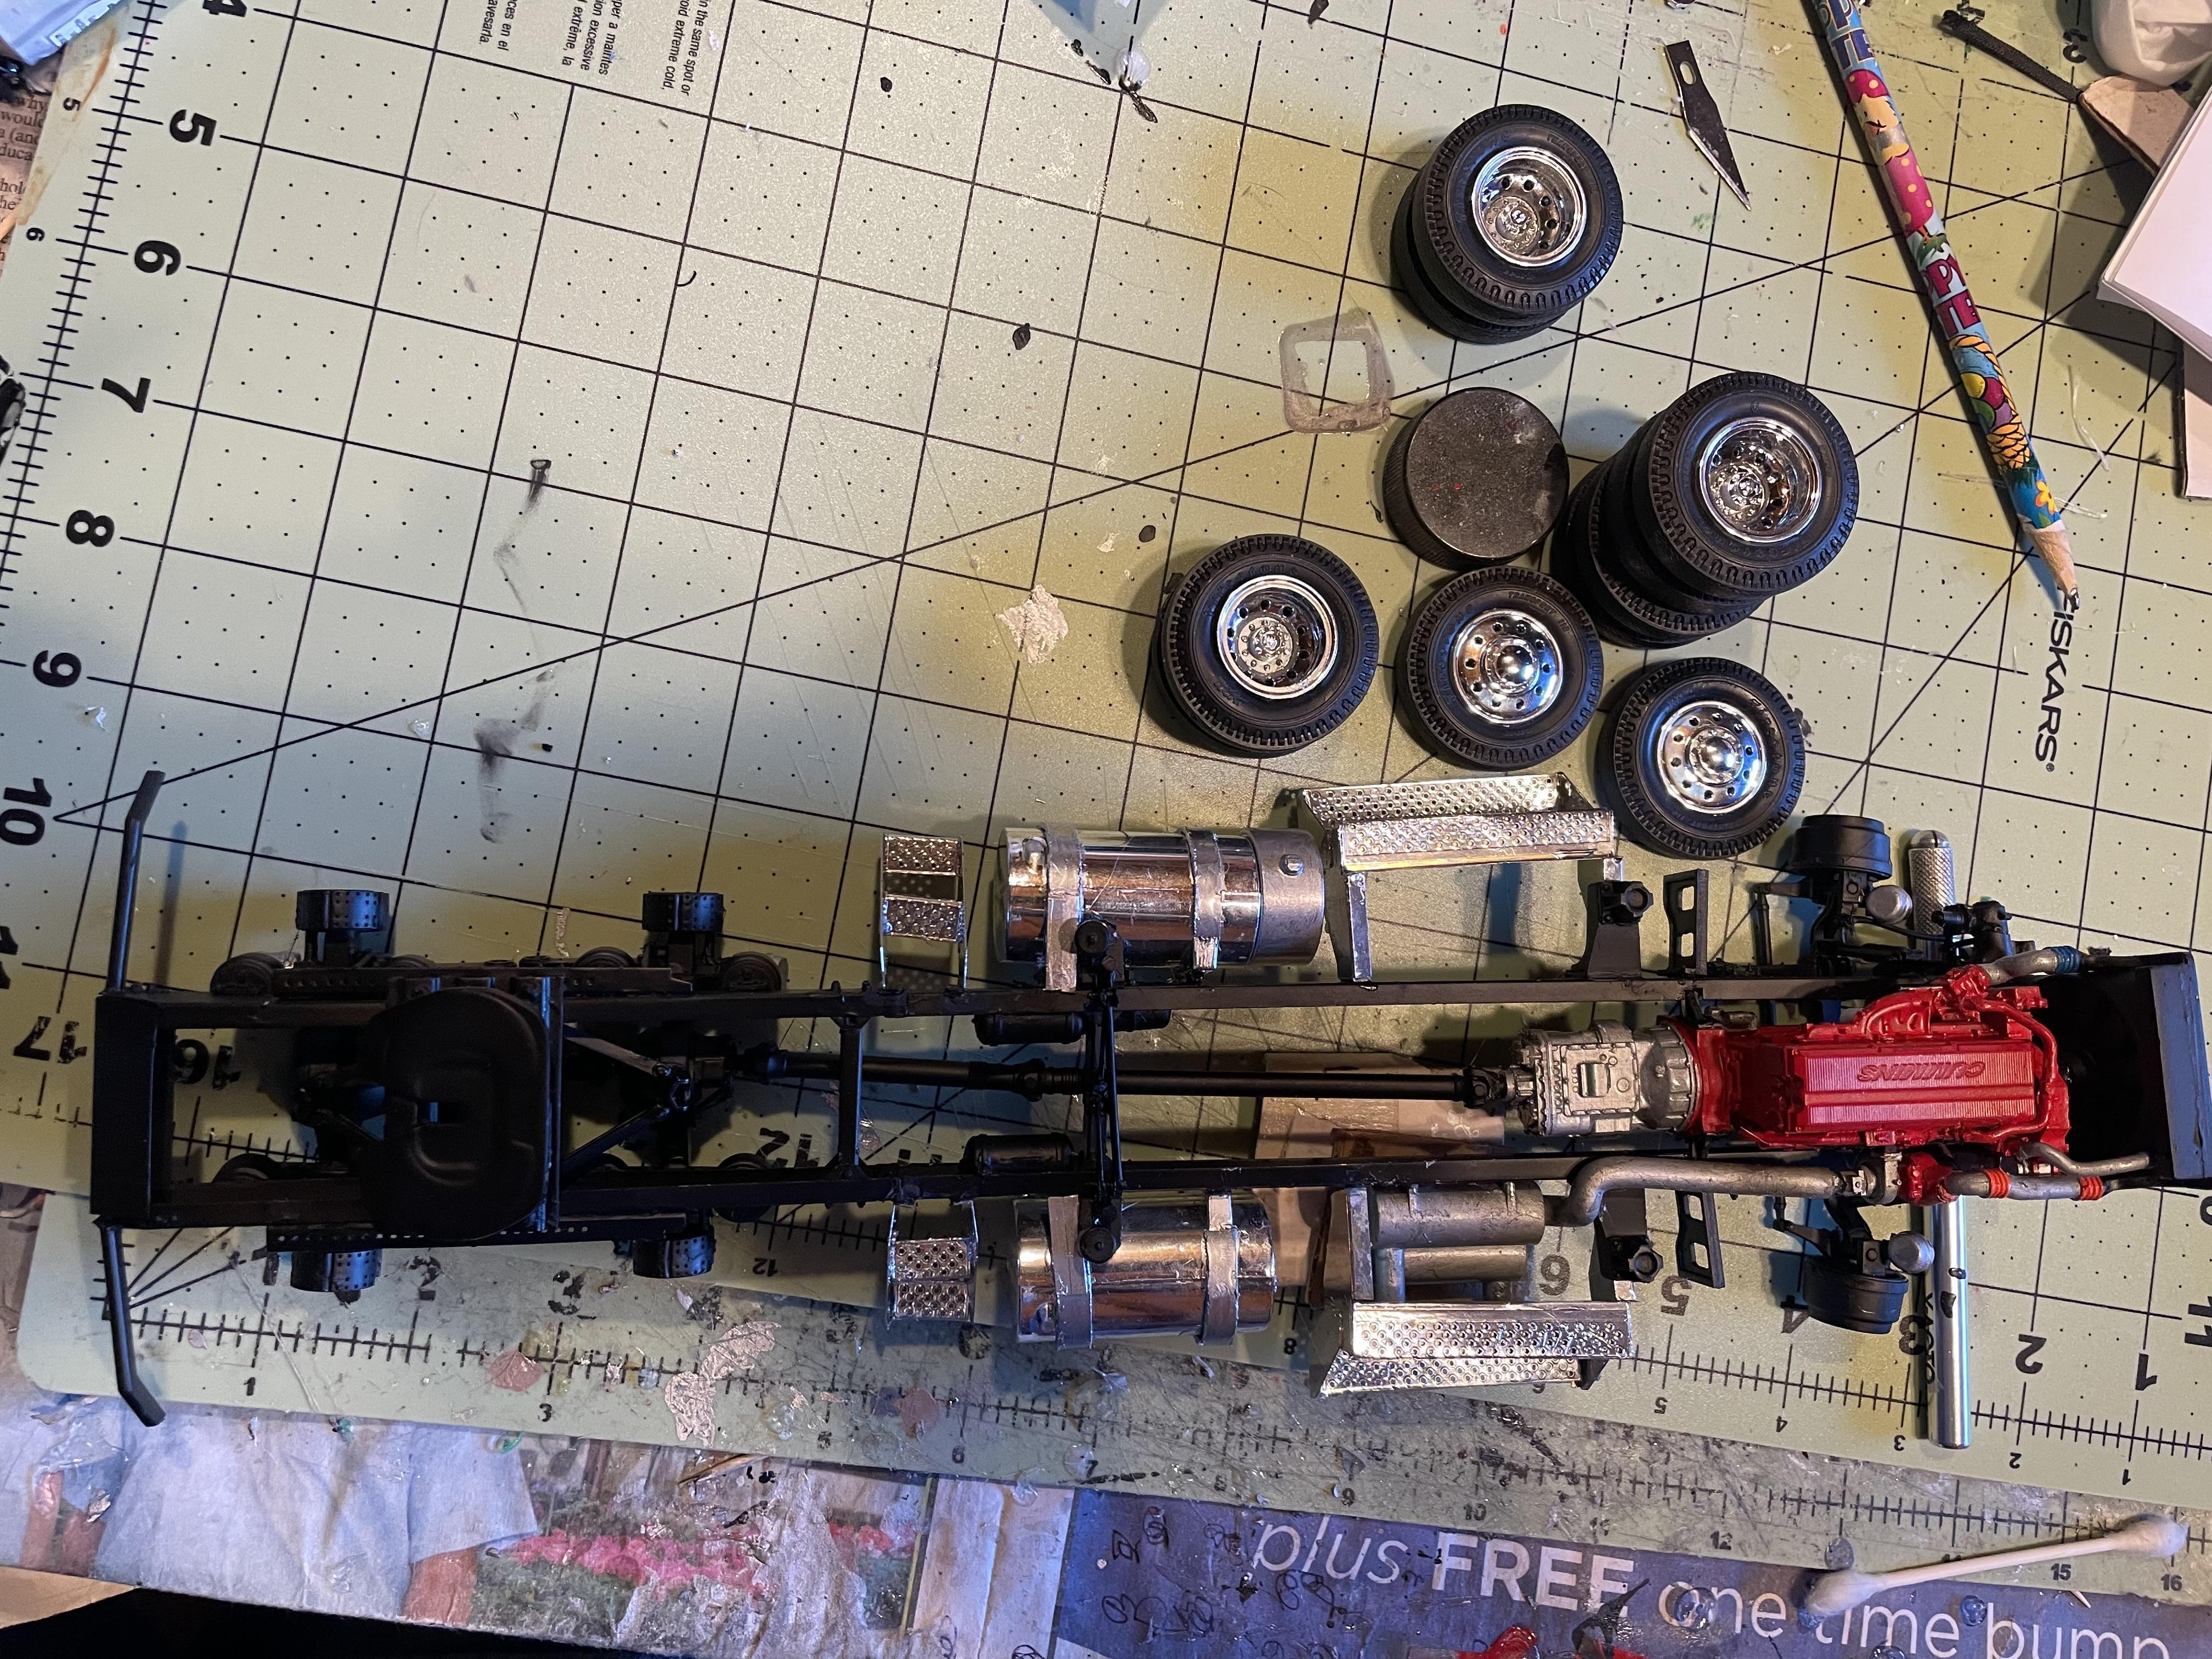
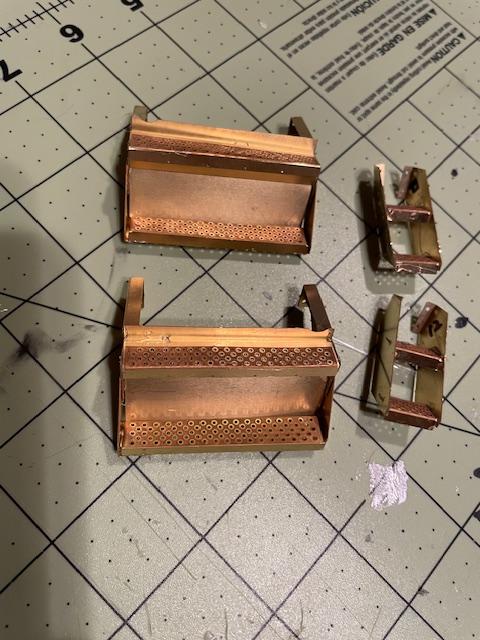
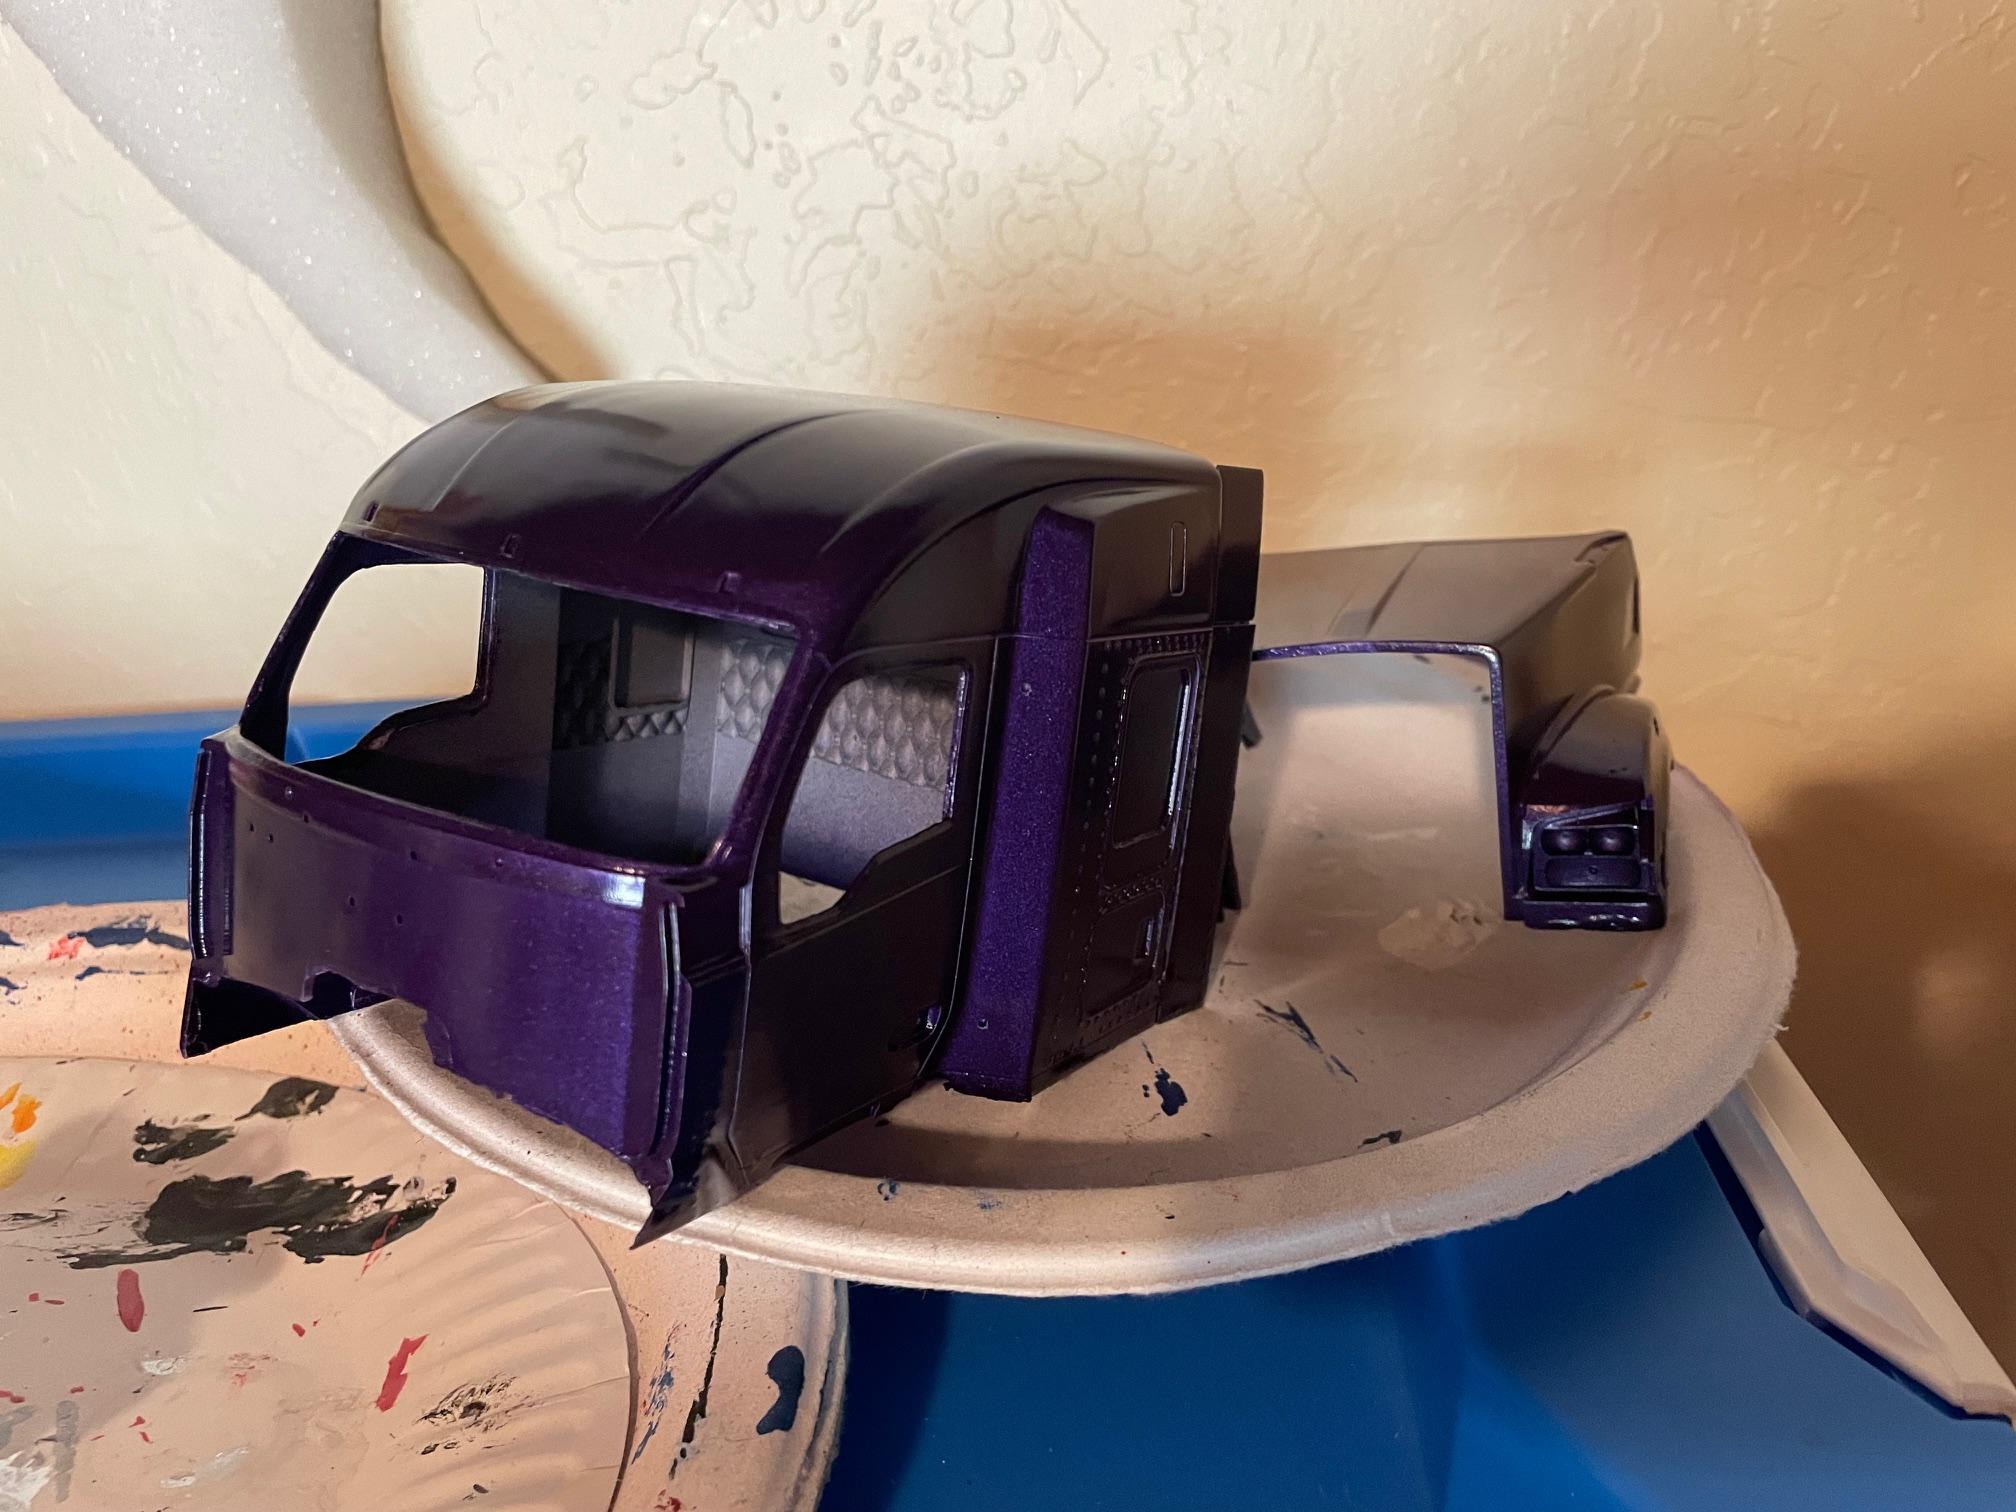
More progress: The interior is done: The seatbelt strap is a bit of cloth ribbon, threaded through little brass eyelets and then threaded through slots in the resin piece... So, I put the cab aside for the time being while I'm working on the chassis accessories- Battery/tool boxes and steps are PE brass, folded in to shape and cemented together. For some reason, the PE sheet with the fuel tanks seems to have vanished. To be honest, I wasn't too crazy about trying to bend sheets of flat brass into cylinders for the tanks- I tried that with the Argosy build and it didn't turn out very well. I have plenty of older style KW tanks of the right size in the parts box, but that left me with a dilemma- the straps on the W990 tanks are much wider and flatter than the old style tanks, and I was wondering how to deal with that. A light-bulb moment happened when I was about to toss an old prescription bottle and I realized that it was just the right diameter- so I sliced it into strips (after cleaning off the label goo). I ground down the straps on the kit tanks, cut the medicine-bottle strips to size and they slipped right on! We'll see how they look when they are chromed. BTW, the fuel tanks and the wheels will be to only styrene parts on this build. Next is chrome- the bumper, grille, headlight assemblies and hood vents all need to be chromed, as well as the exhaust stacks and shields and of course, all these chassis accessories. I hope I have enough Motlow left in the bottle to do it all; if not I have another bottle on order. Fingers crossed!
-
A&N KW W990
RoninUtah replied to RoninUtah's topic in WIP: Model Trucks: Big Rigs and Heavy Equipment
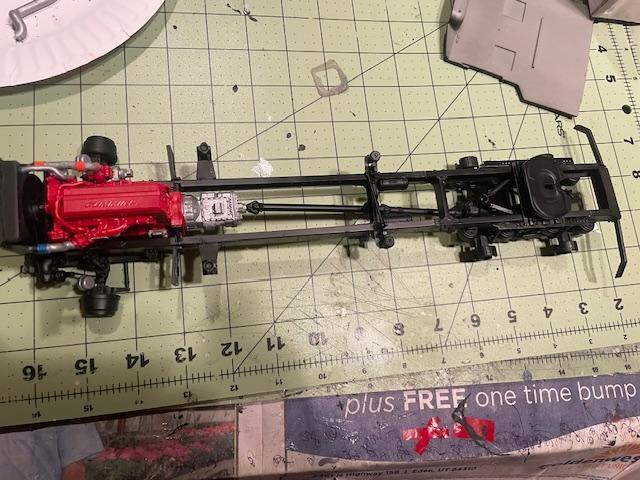
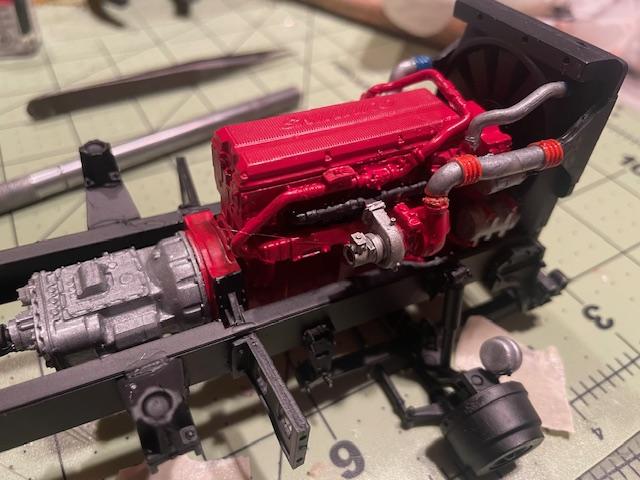
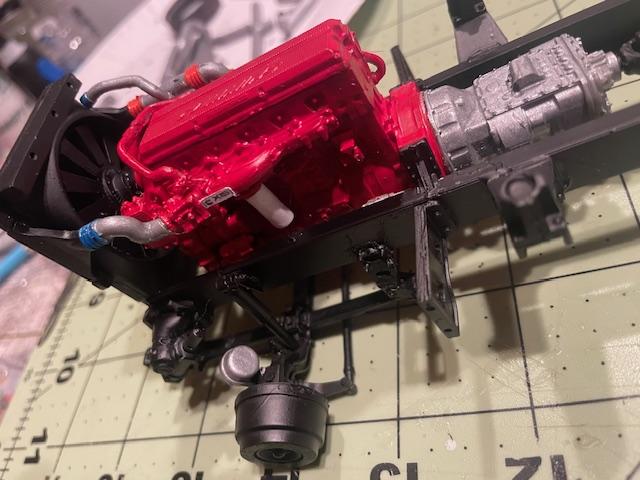
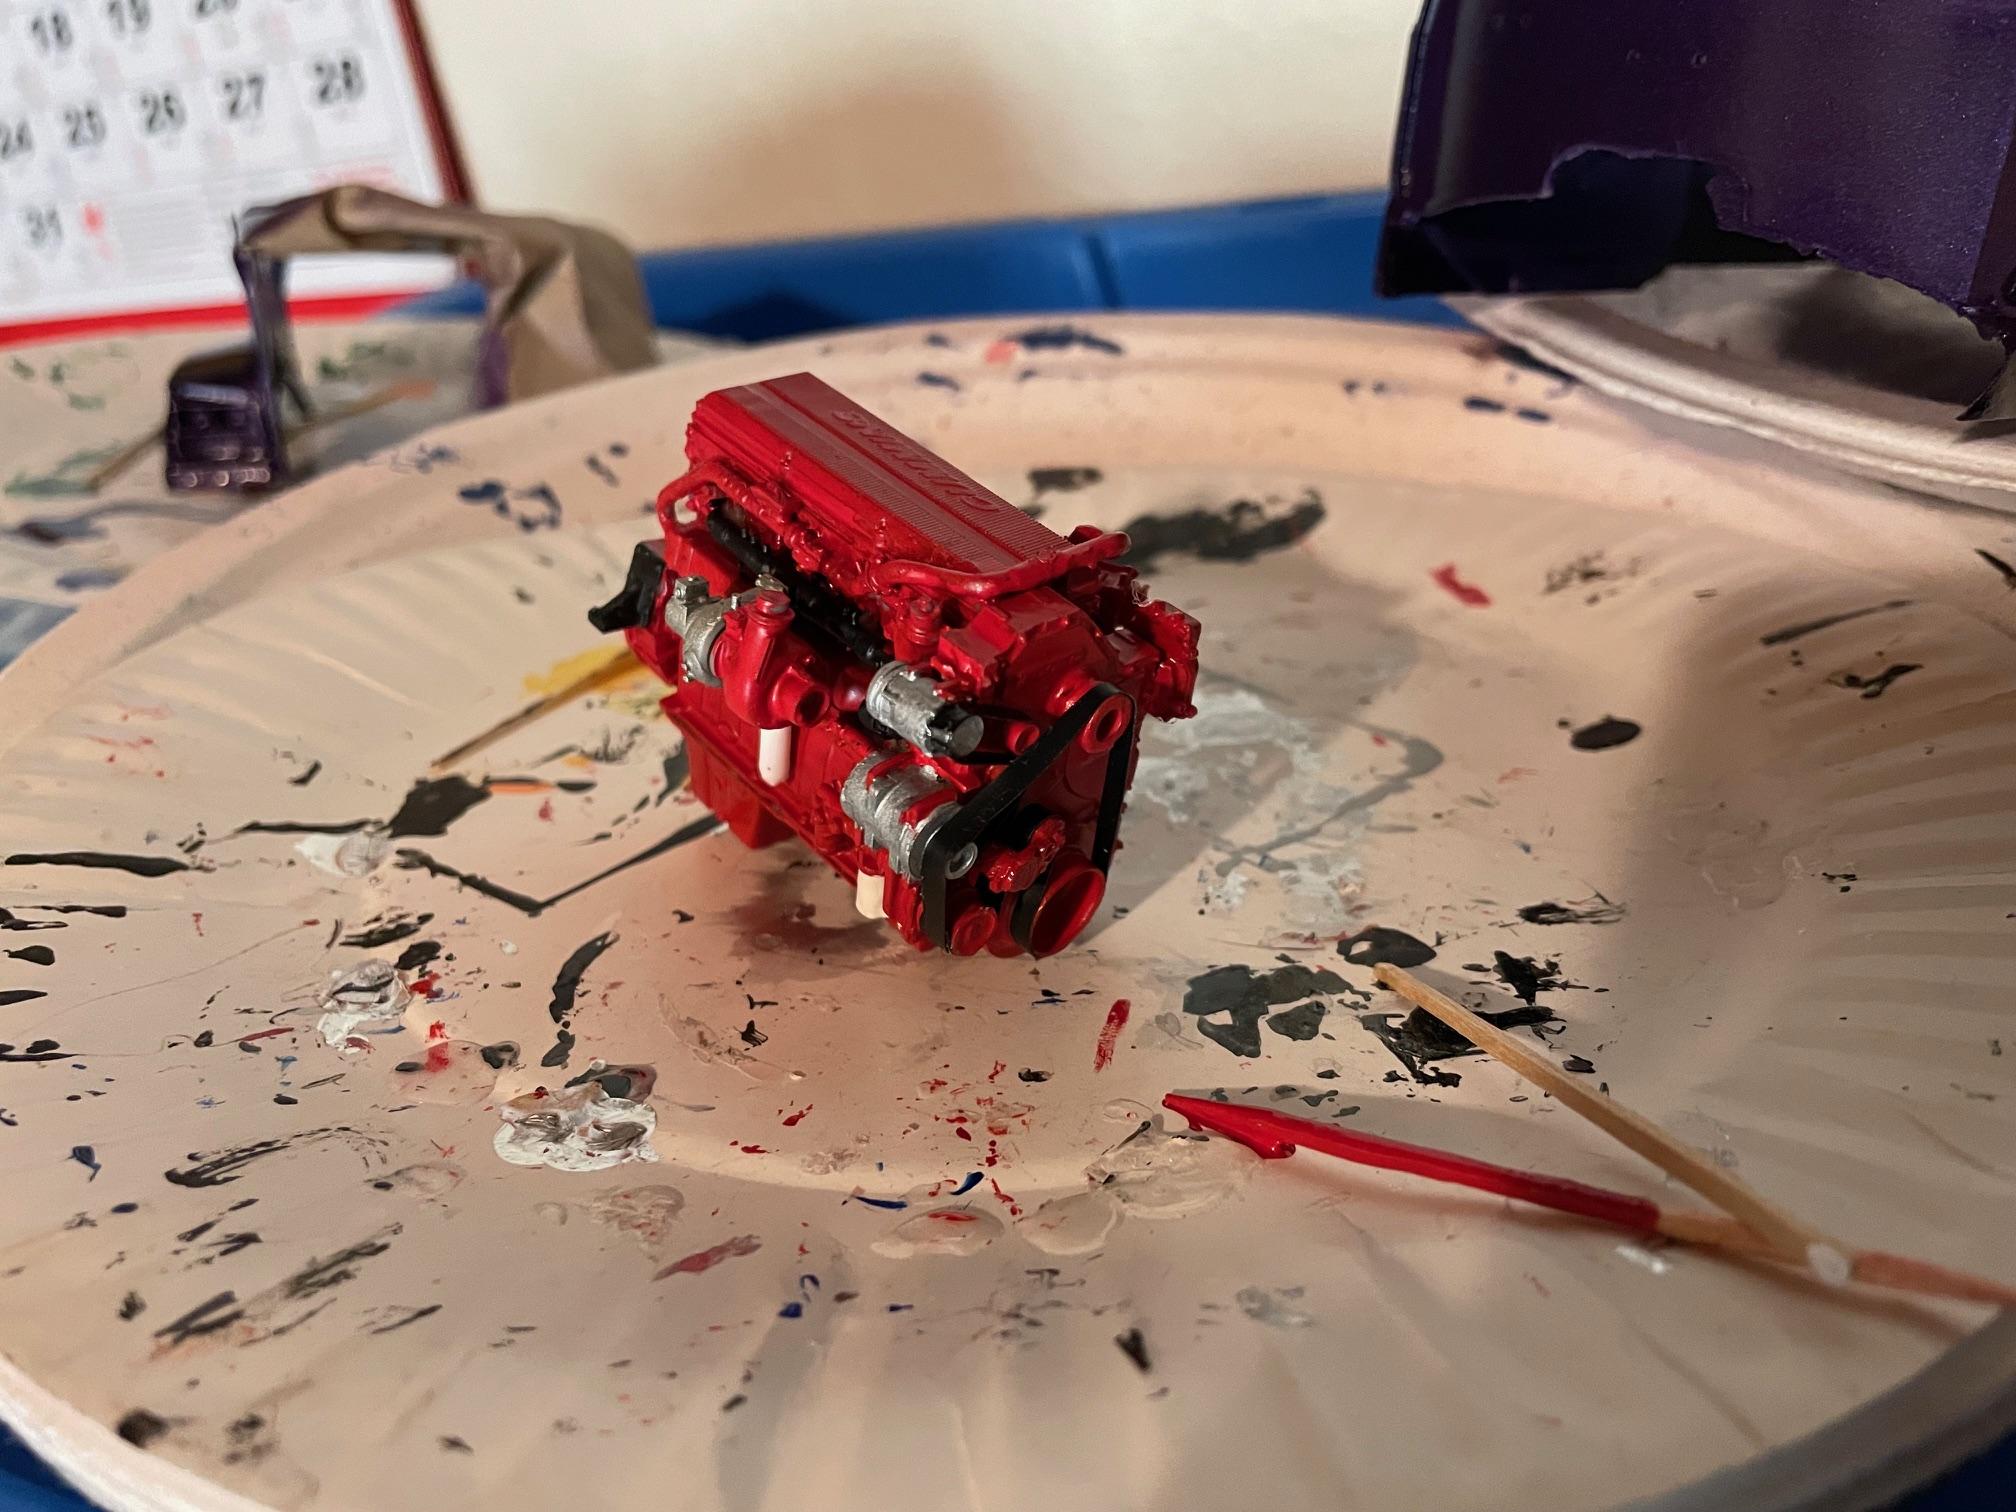
Thanks, Randy! More progress over the last couple of days- got the chassis painted and the engine and radiator installed and hooked up. Everything is fitting together nicely so far. Chassis ready for paint Chassis painted, engine and radiator installed Detail shots of the Cummins X-15 engine installed. Now on to the interior- I hope to get a lot done this weekend. Thanks for following!
-
A&N KW W990
RoninUtah replied to RoninUtah's topic in WIP: Model Trucks: Big Rigs and Heavy Equipment
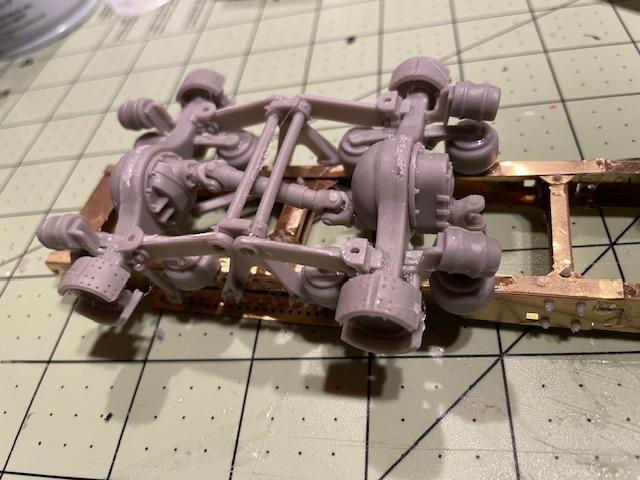
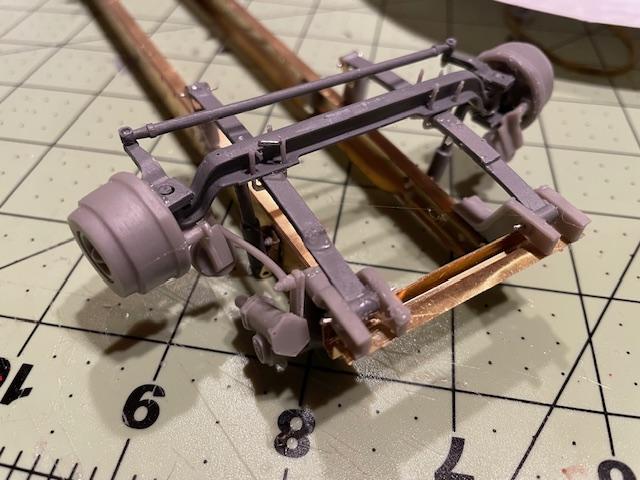
Thanks, all, for your encouragement! More progress on the chassis last night- completed the rear suspension and axles: This comes with very detailed brakes and hubs, but I'm leaving them off so the Revell wheels I'm planning to use will fit. Front suspension and steering. They recommend using bolts to attach the springs, but the little resin bolts that came with the kit were too small and brittle to work, so I cut little pieces of wire instead. The steering works just fine, if a bit sluggishly. After a momentary panic at a misplaced bag of small resin parts, I'm continuing on the chassis by adding the cab mount assembly. I'm going out of order; I'll paint the chassis before assemble the battery/tool boxes and fuel tanks, since those will be chromed. More to come!
-
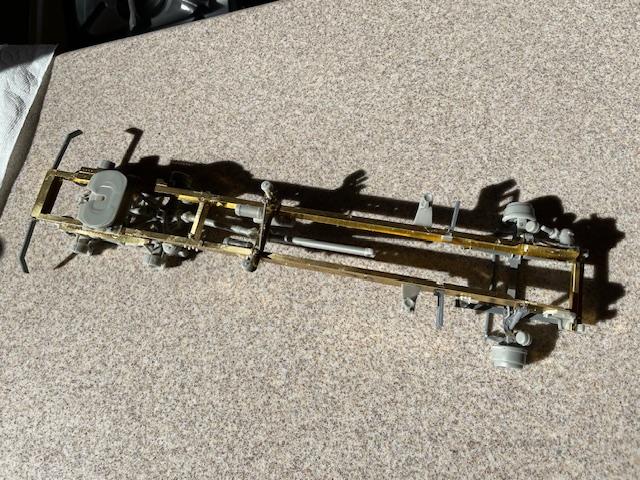
I've been putting off this build since April, but after seeing more and more W990s on the road, I decided to bite the bullet and go for it. After completing A&N's Freightliner Argosy last year, I knew what I was in for- LOTS of parts, a lot of bending PE brass pieces, and a precision kit so tightly engineered that there is almost no wiggle-room. I generally don't do build photos, but this one is different and challenging enough to be interesting. So, here are some pics from last week: Sunday: Chassis started. Also, X-15 engine almost done, Belts are electrical tape, sliced thin. I also did the paint on the outside of the cab, hood and related parts. I like to complete the painting early in the build, so it has plenty of time to cure before I start messing with it. I've been making steady progress, I'll keep y'all posted... stay tuned!
-
AMT Fruehauf Tank Trailer
RoninUtah replied to OldTrucker's topic in Model Trucks: Big Rigs and Heavy Equipment
I built the “plated” version a few months ago, and it was a lot tougher than I thought it would be. If you don’t sit the tank in exactly the right place, you’ll never get the ladder in the back to line up right… and good luck with the pipes on the bottom and the valve manifold! -
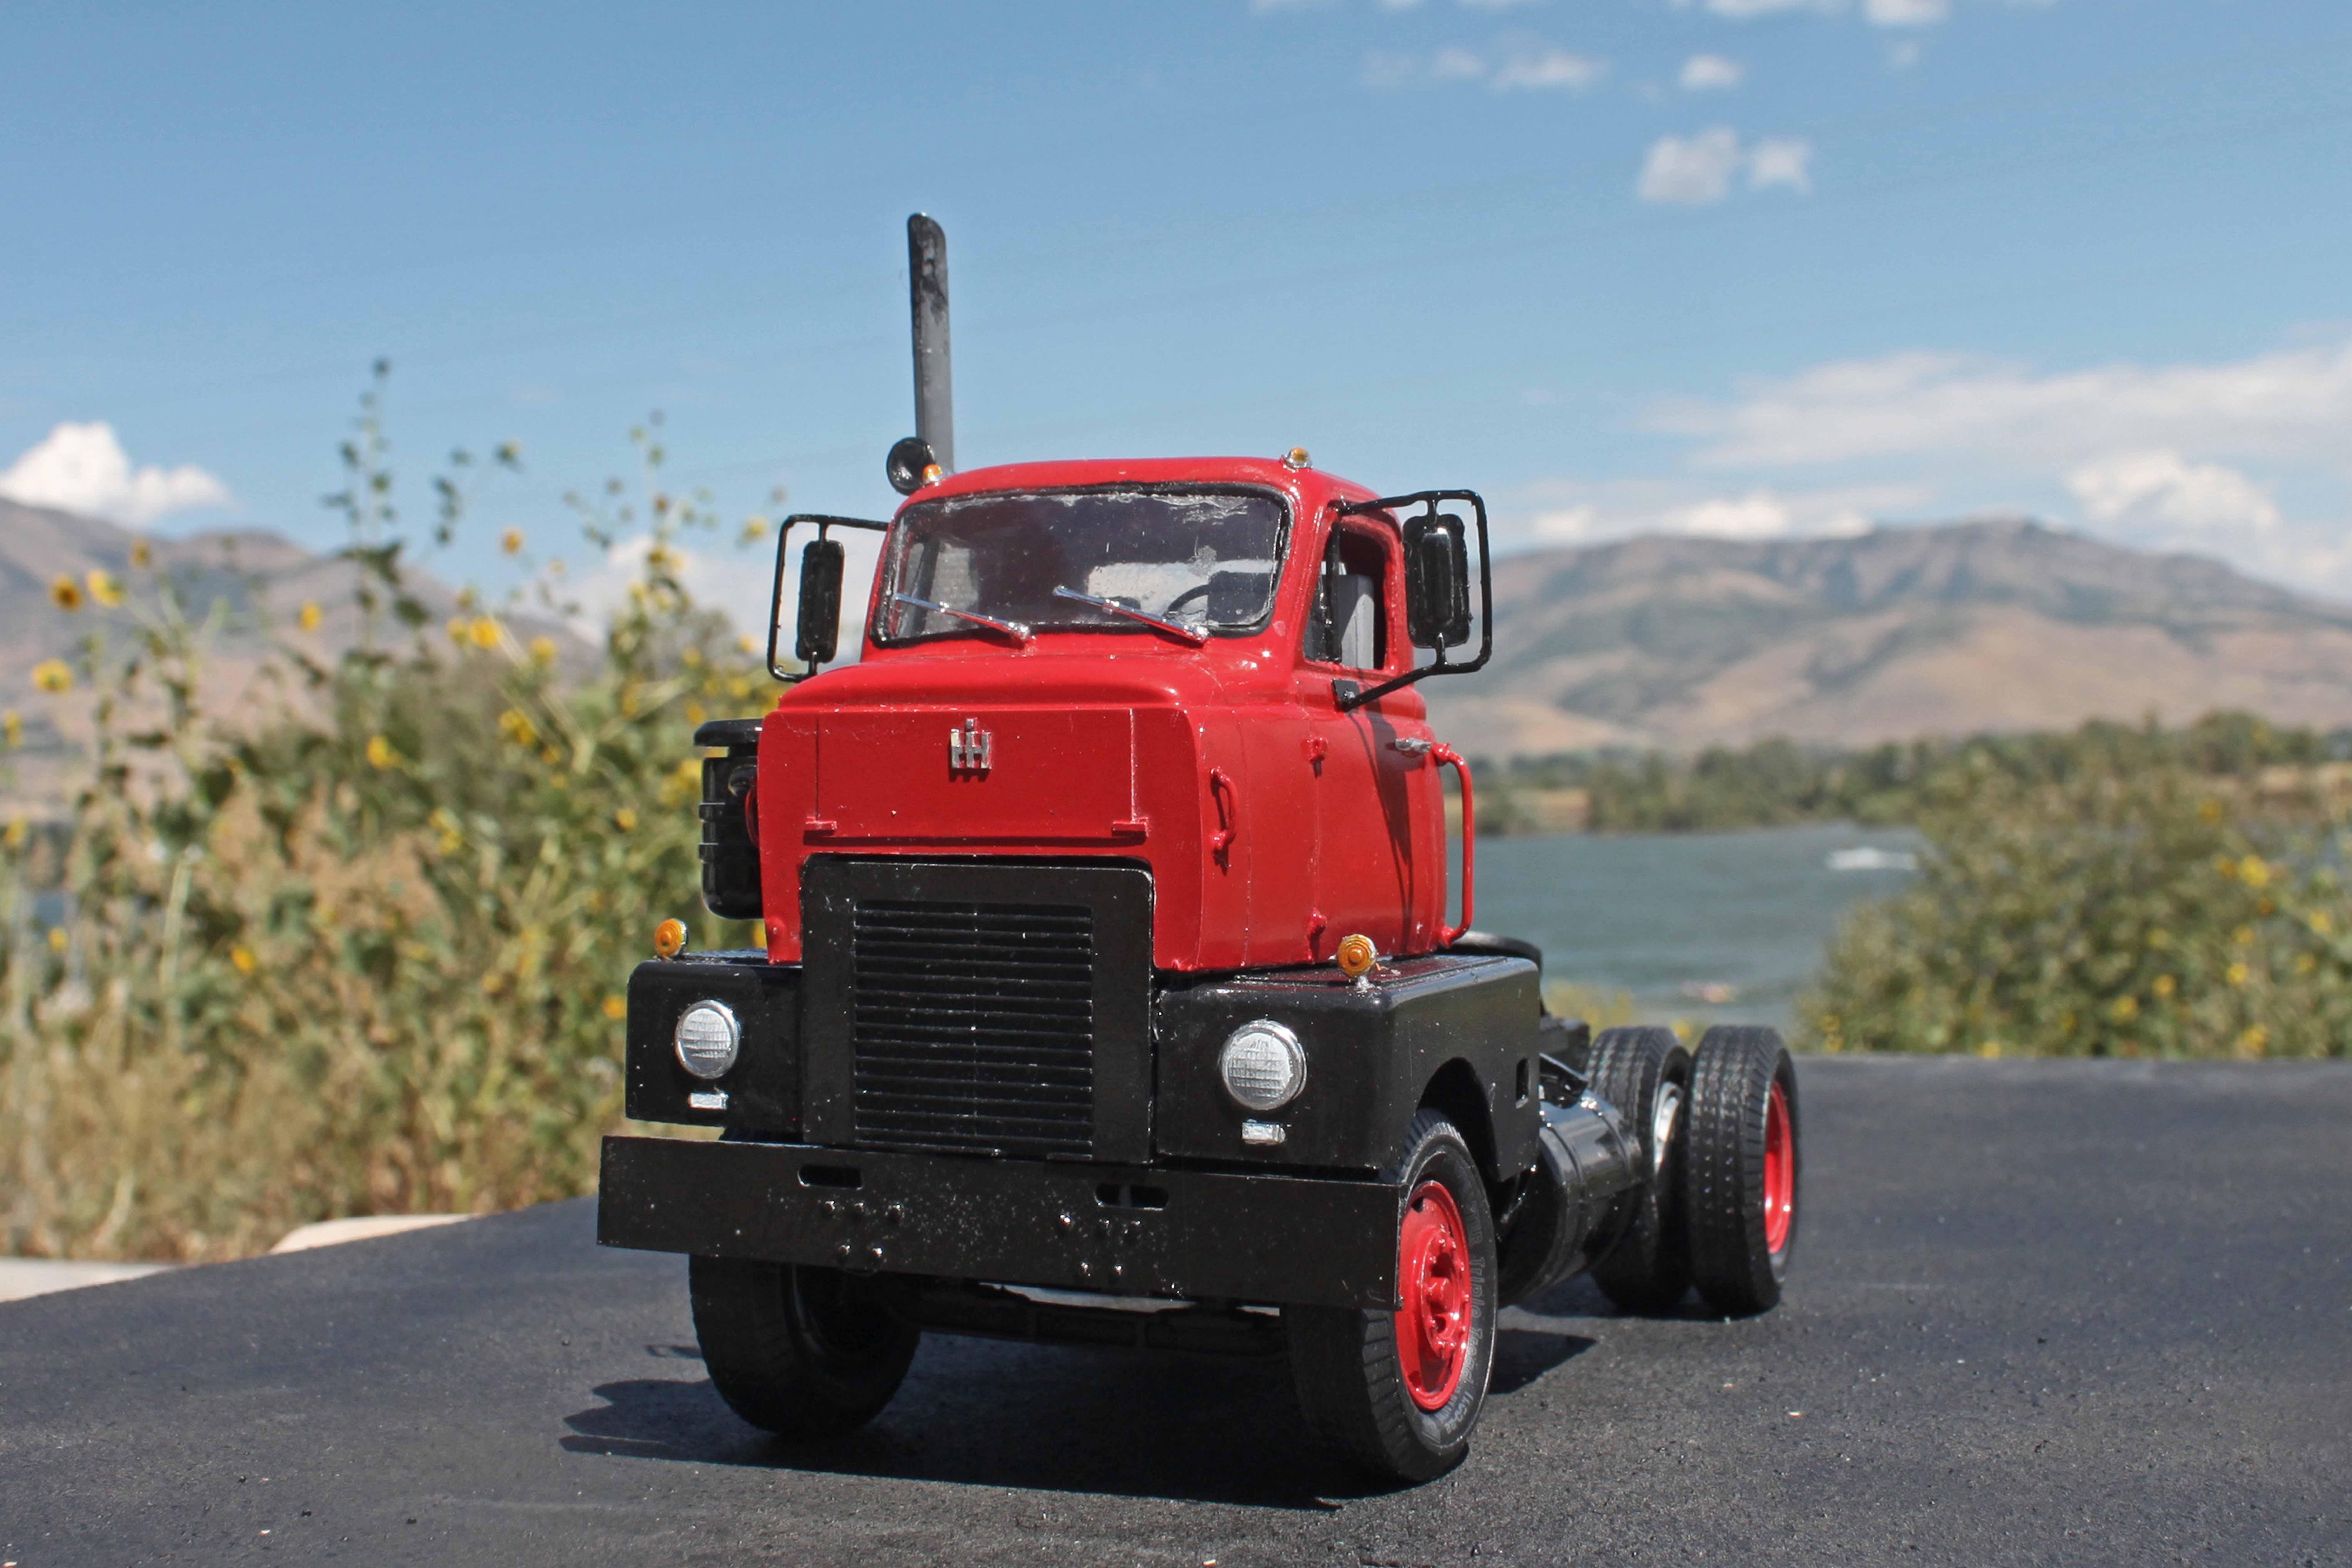
1954 International Highbinder
RoninUtah replied to RoninUtah's topic in Model Trucks: Big Rigs and Heavy Equipment
So, the IH picked up a flatbed load of steel coils and is rolling southbound. It was time for a coffee break, so the driver pulled over on a wide spot on the shoulder near the cafe, just before a his buddy from California had the same idea!
-
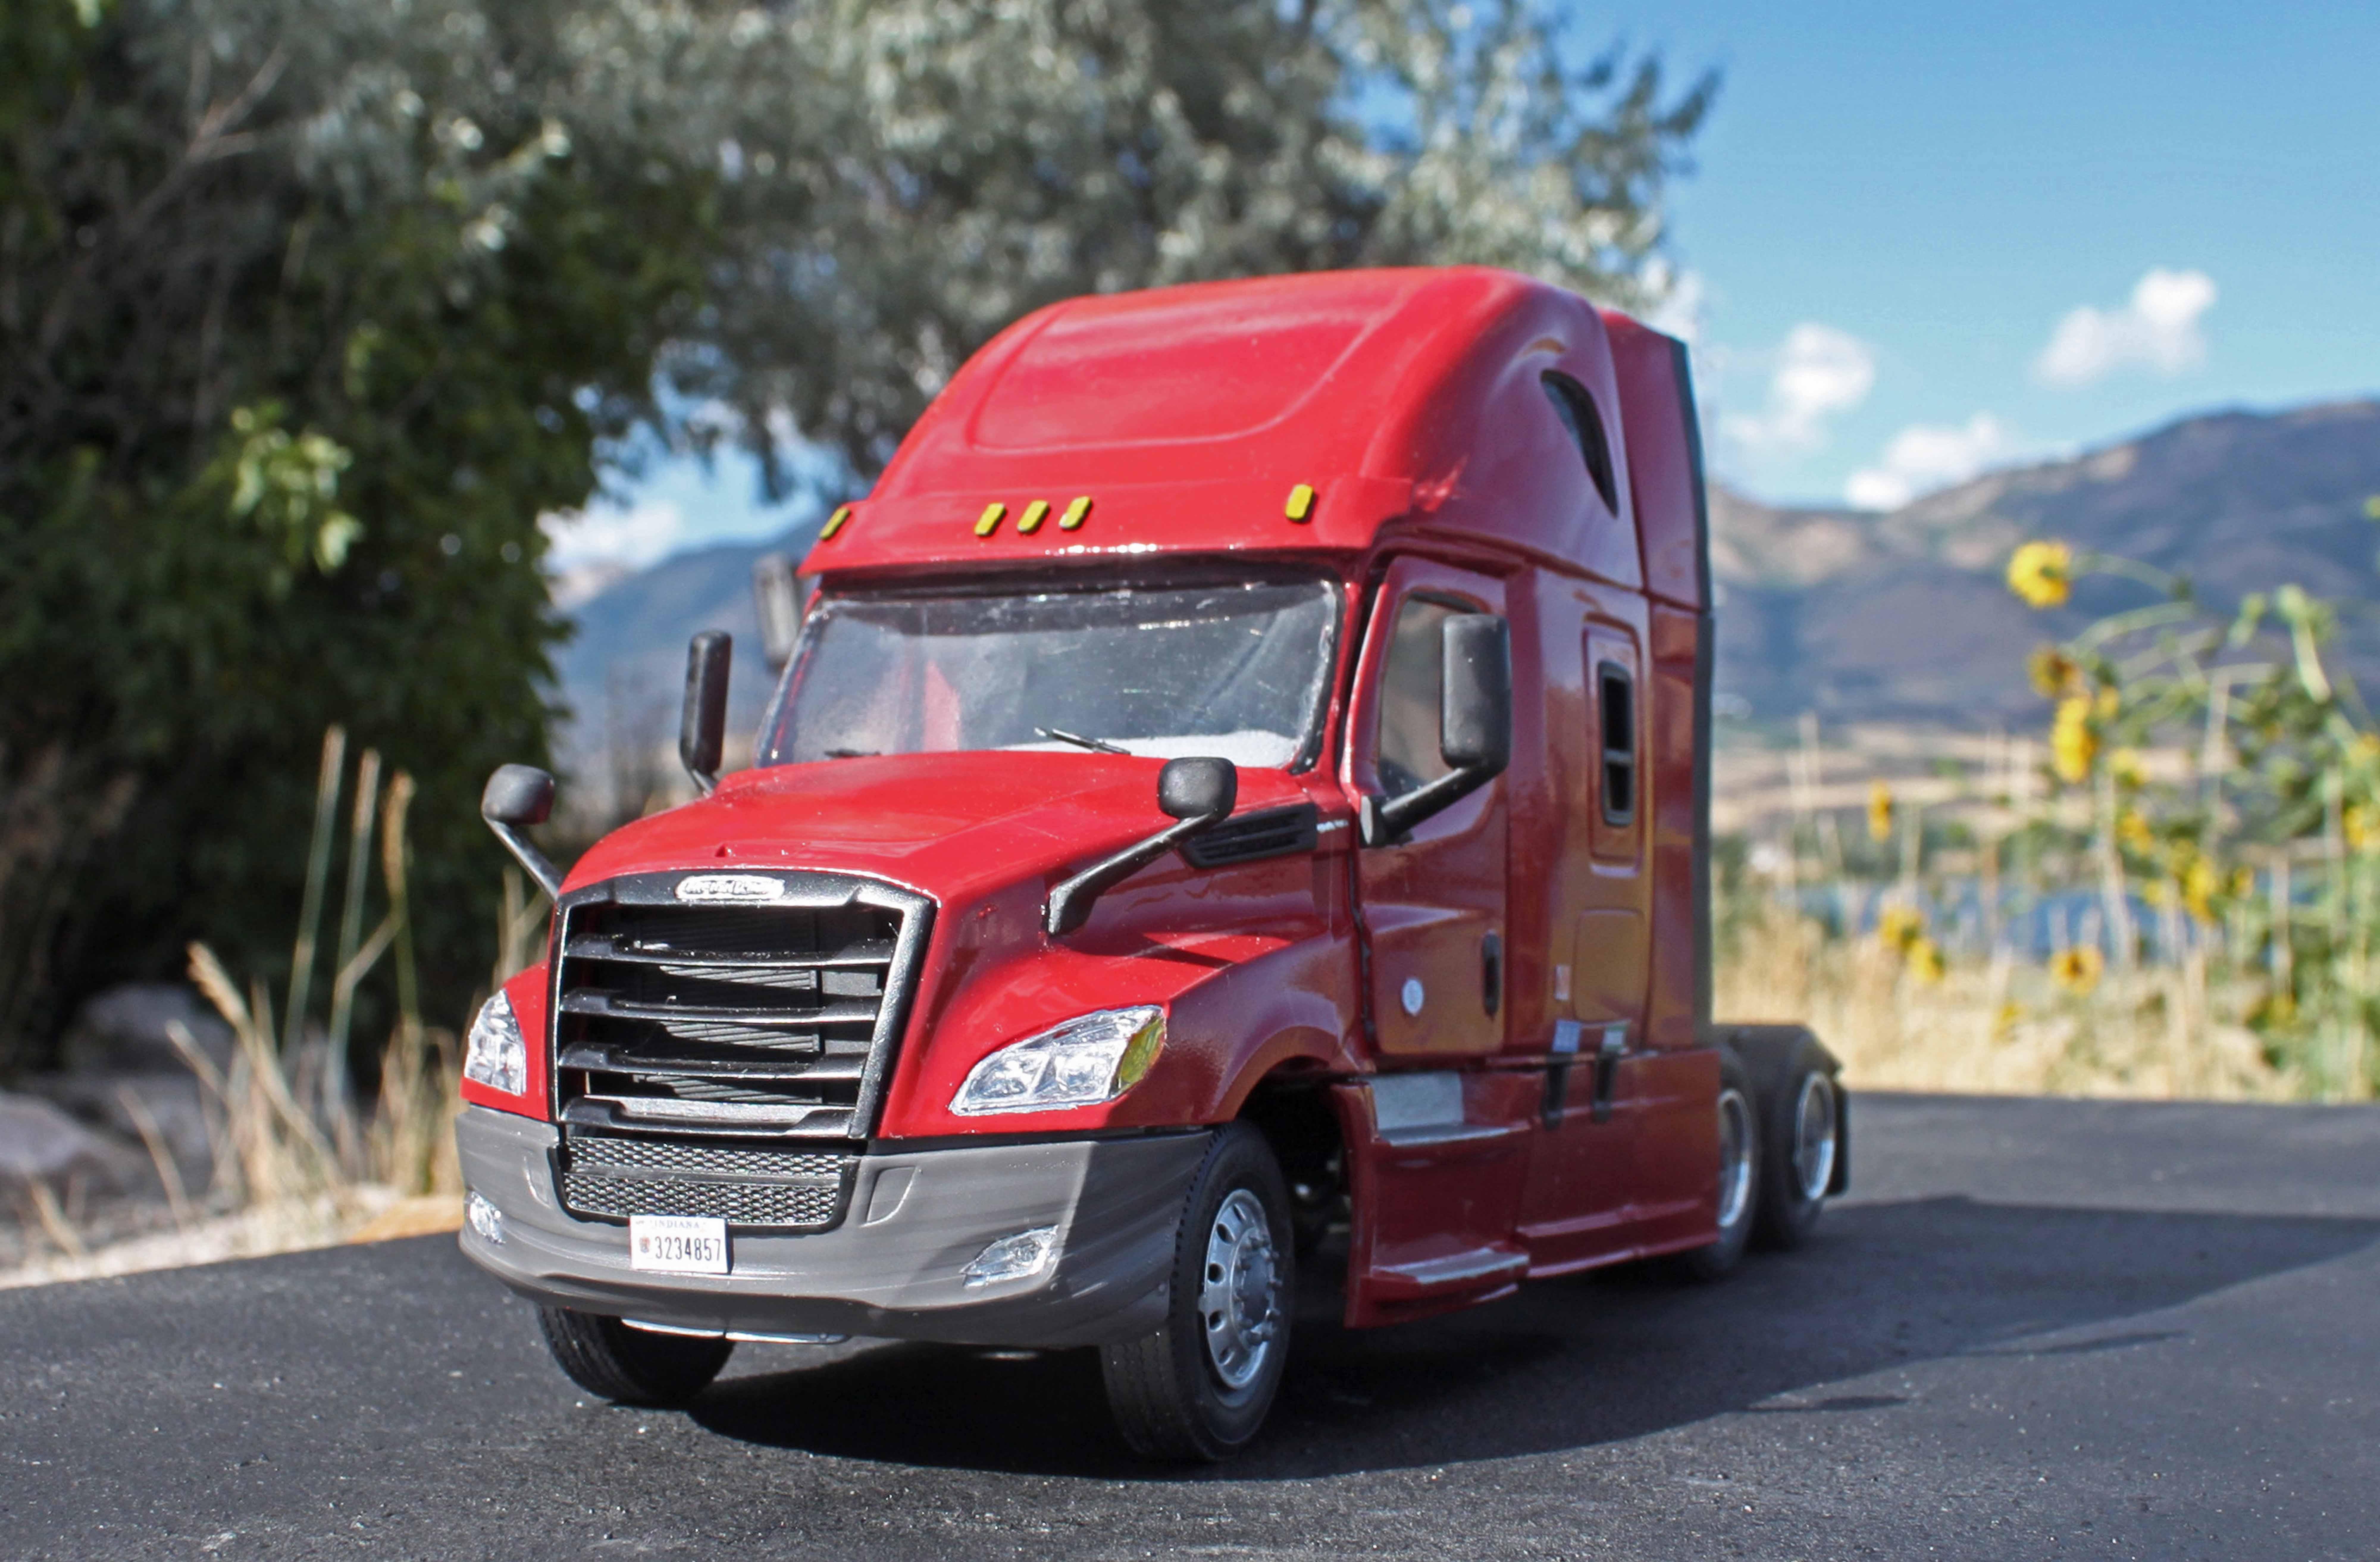
New Freightliner Cascadia!
RoninUtah replied to RoninUtah's topic in Model Trucks: Big Rigs and Heavy Equipment
Yeah, as much as I love the classic rigs of the 40s, 50s and 60s, I also love to do current trucks as well. After all, in a few decades these will be the classics! Here is a scene from a highway rest area somewhere near you...
-
New Freightliner Cascadia!
RoninUtah replied to RoninUtah's topic in Model Trucks: Big Rigs and Heavy Equipment
That's great! You're very welcome. Yours will turn out much better than mine... can't wait to see it! -
New Freightliner Cascadia!
RoninUtah replied to RoninUtah's topic in Model Trucks: Big Rigs and Heavy Equipment
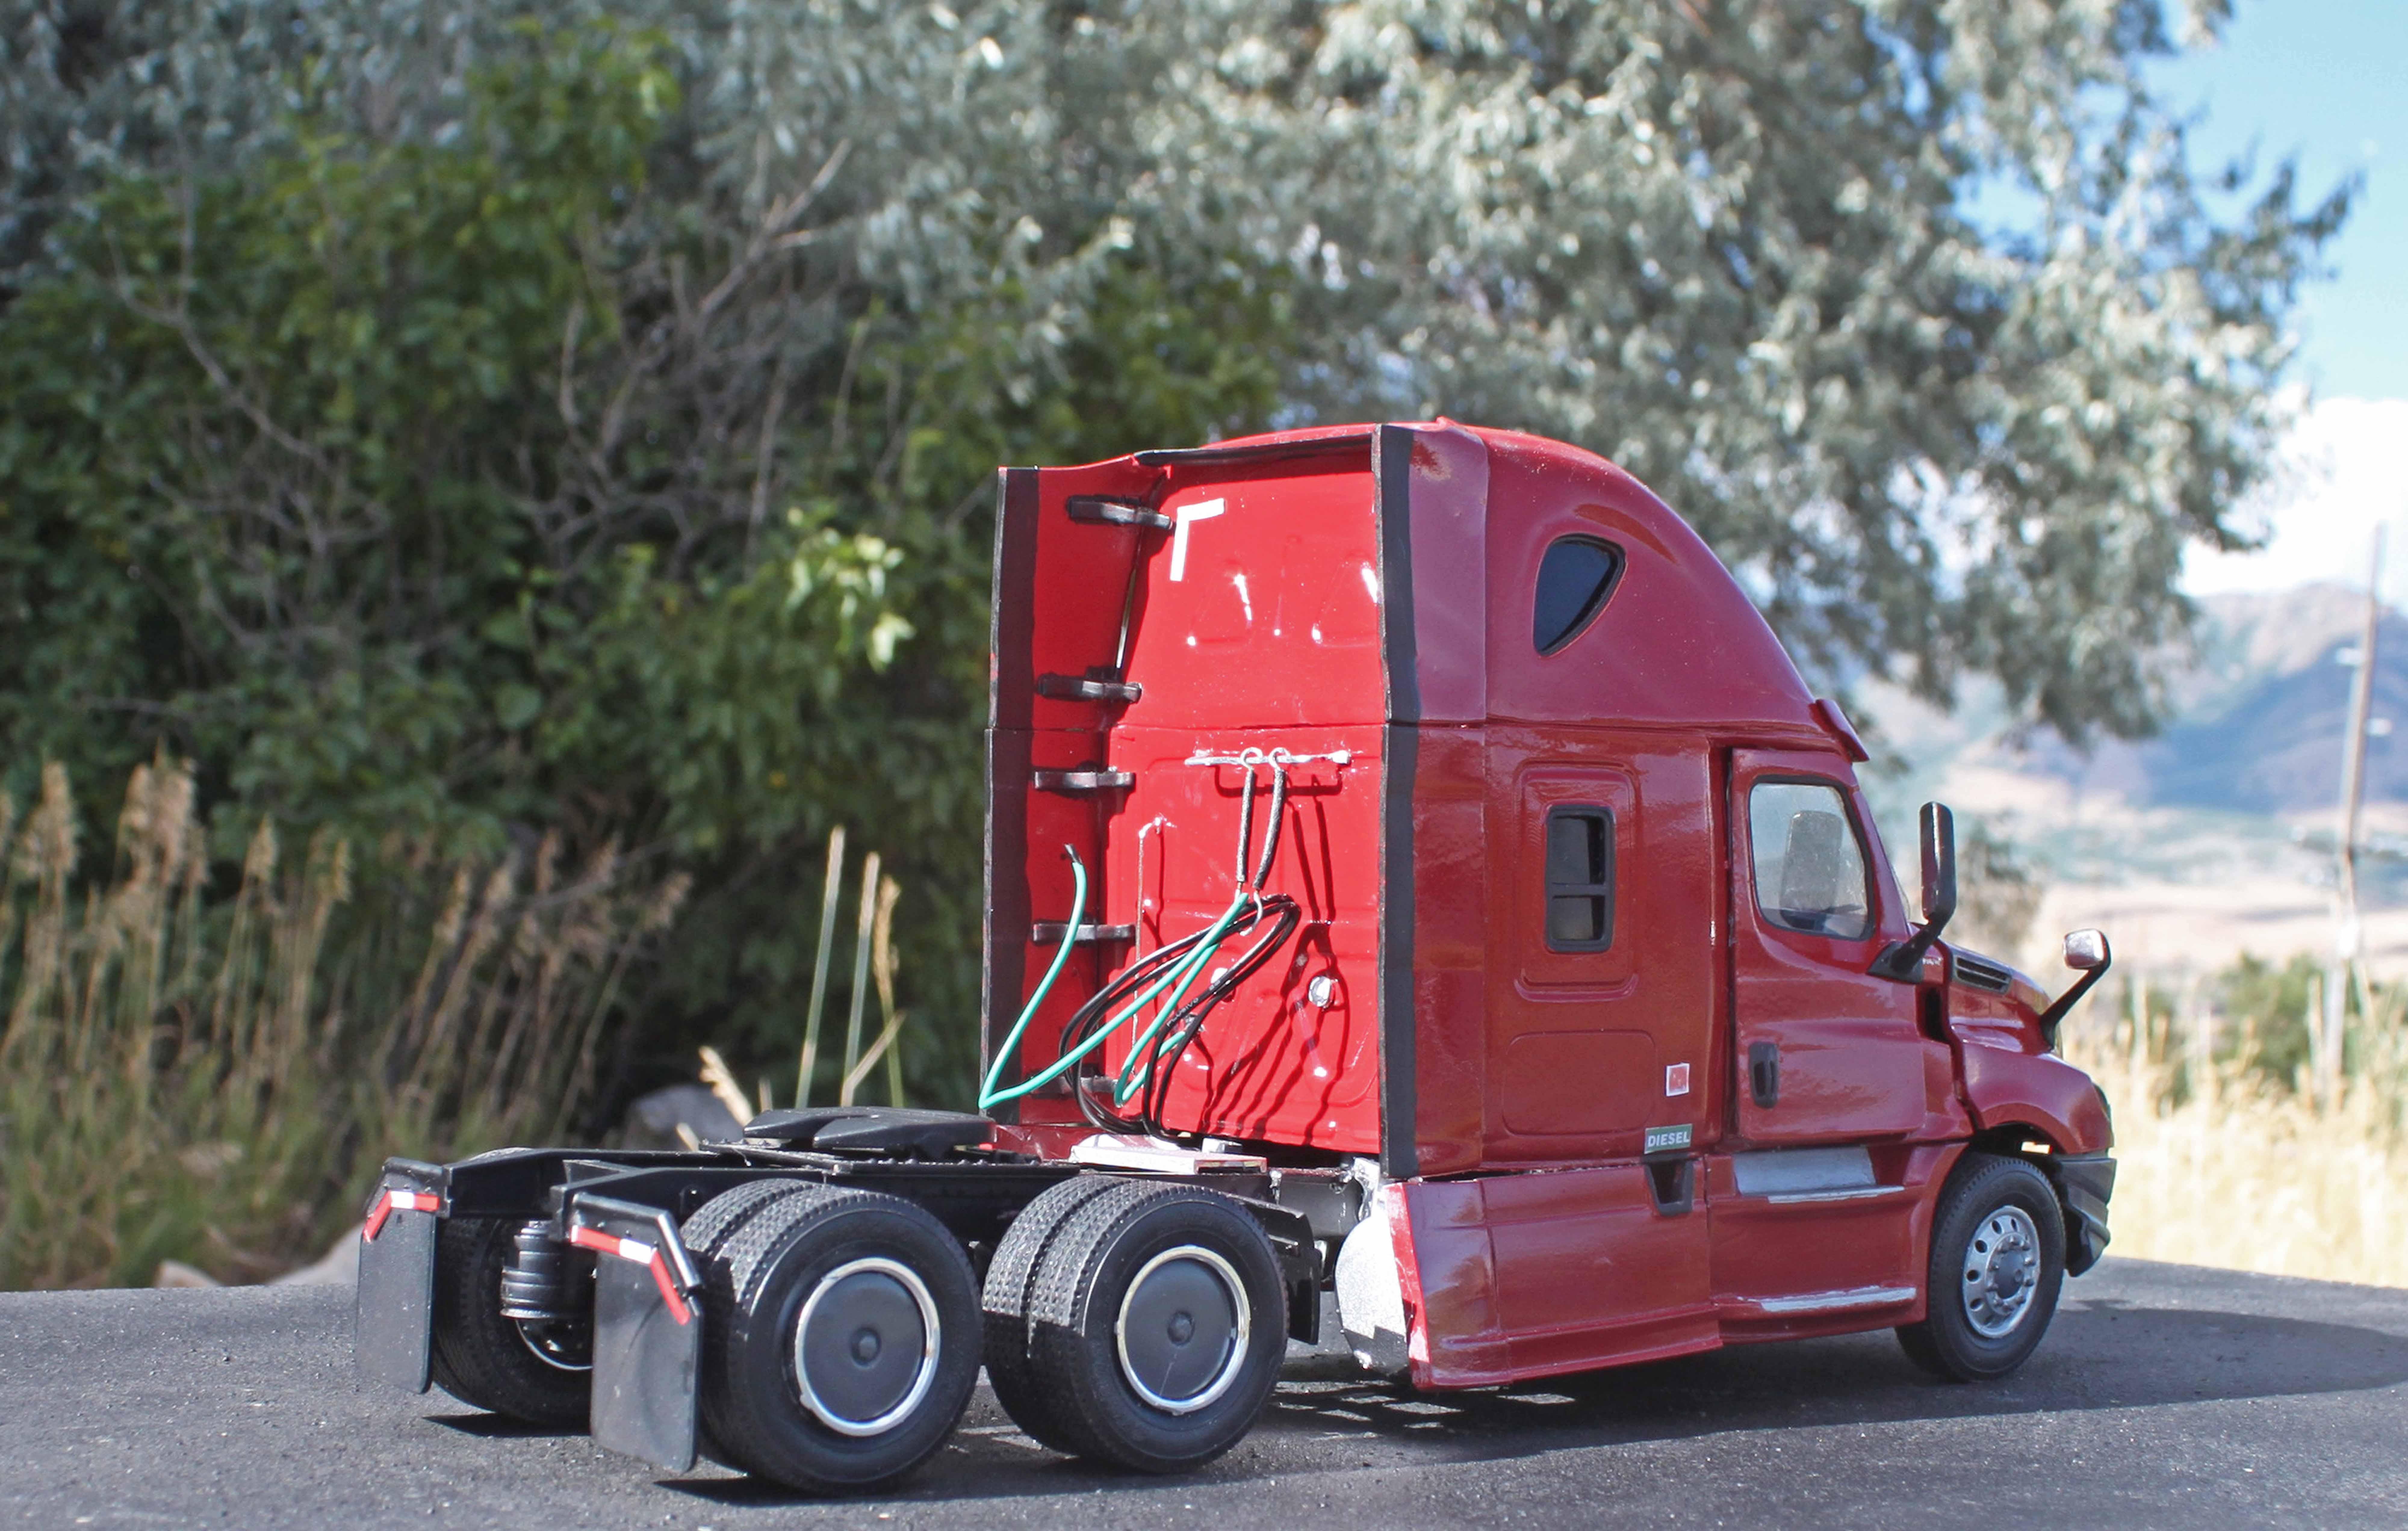
Thanks, Victor! That's interesting- I didn't know Global made a Cascadia until now- it must be a recent addition to their lineup. Still, I'm glad I went the way I did- I specifically wanted a high rise sleeper with the iconic Cascadia "teardrop" upper windows, and it looks like Global doesn't offer that. I hear they make a great product, though- I haven't built any yet but I'll have to add something from their catalogue to my fleet soon. Maybe a Mack Anthem? For this build, I made my own windshield and headlight glass; the windshield doesn't fit exactly, but then, curved glass is tough to do! The Italeri FLD 120 is nicely detailed, but it's a long wheelbase conventional so the chassis will need to be shortened for the Cascadia. As you know, the FLD 120 is a mid-90s model, so the suspension, etc. won't be exactly right, but probably close enough. Not that mine is super-accurate in that respect either! And the kit's Freightliner decals will come in handy. One word of caution... when I built the Cascadia, I accidentally picked it up wrong and the chassis snapped in two where I had spliced it after shortening it- the resin cab is extremely heavy. The Global cab is probably not as bad, but it's still something to keep in mind. I wound up adding 3/8" brass rods with epoxy to reinforce the chassis- not exactly a realistic detail but it works! Good luck, and I hope to see the results! -
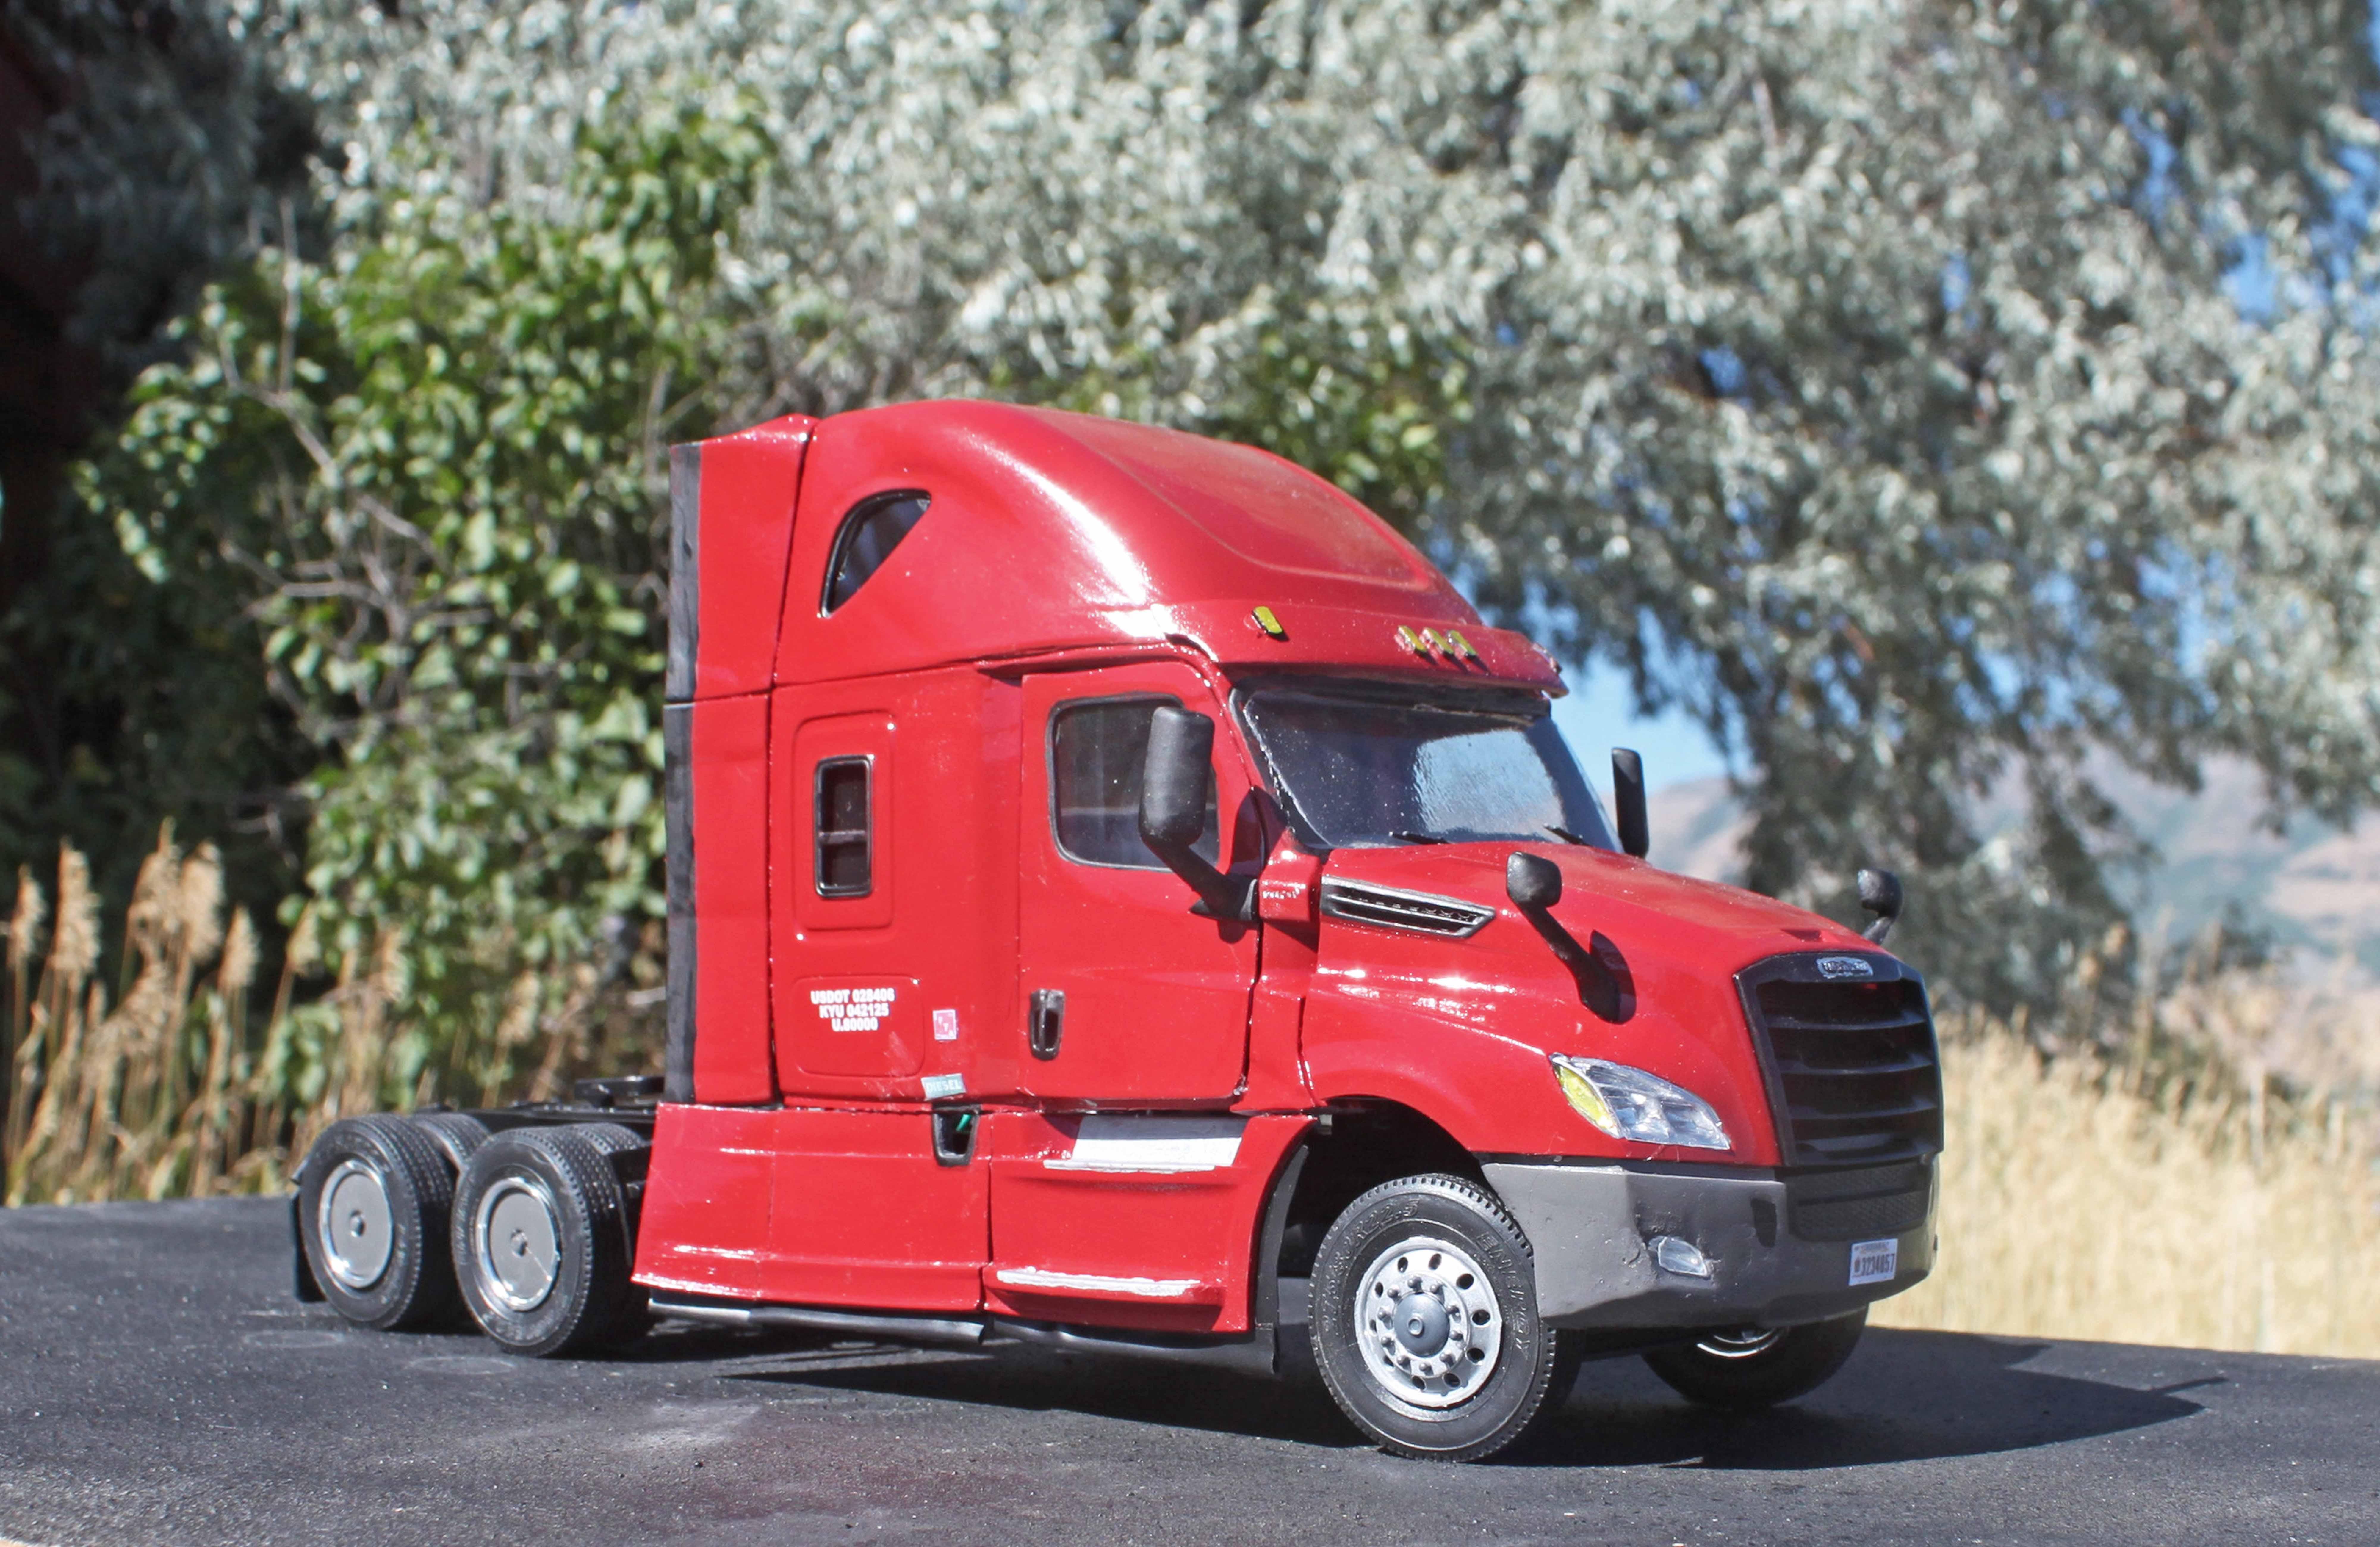
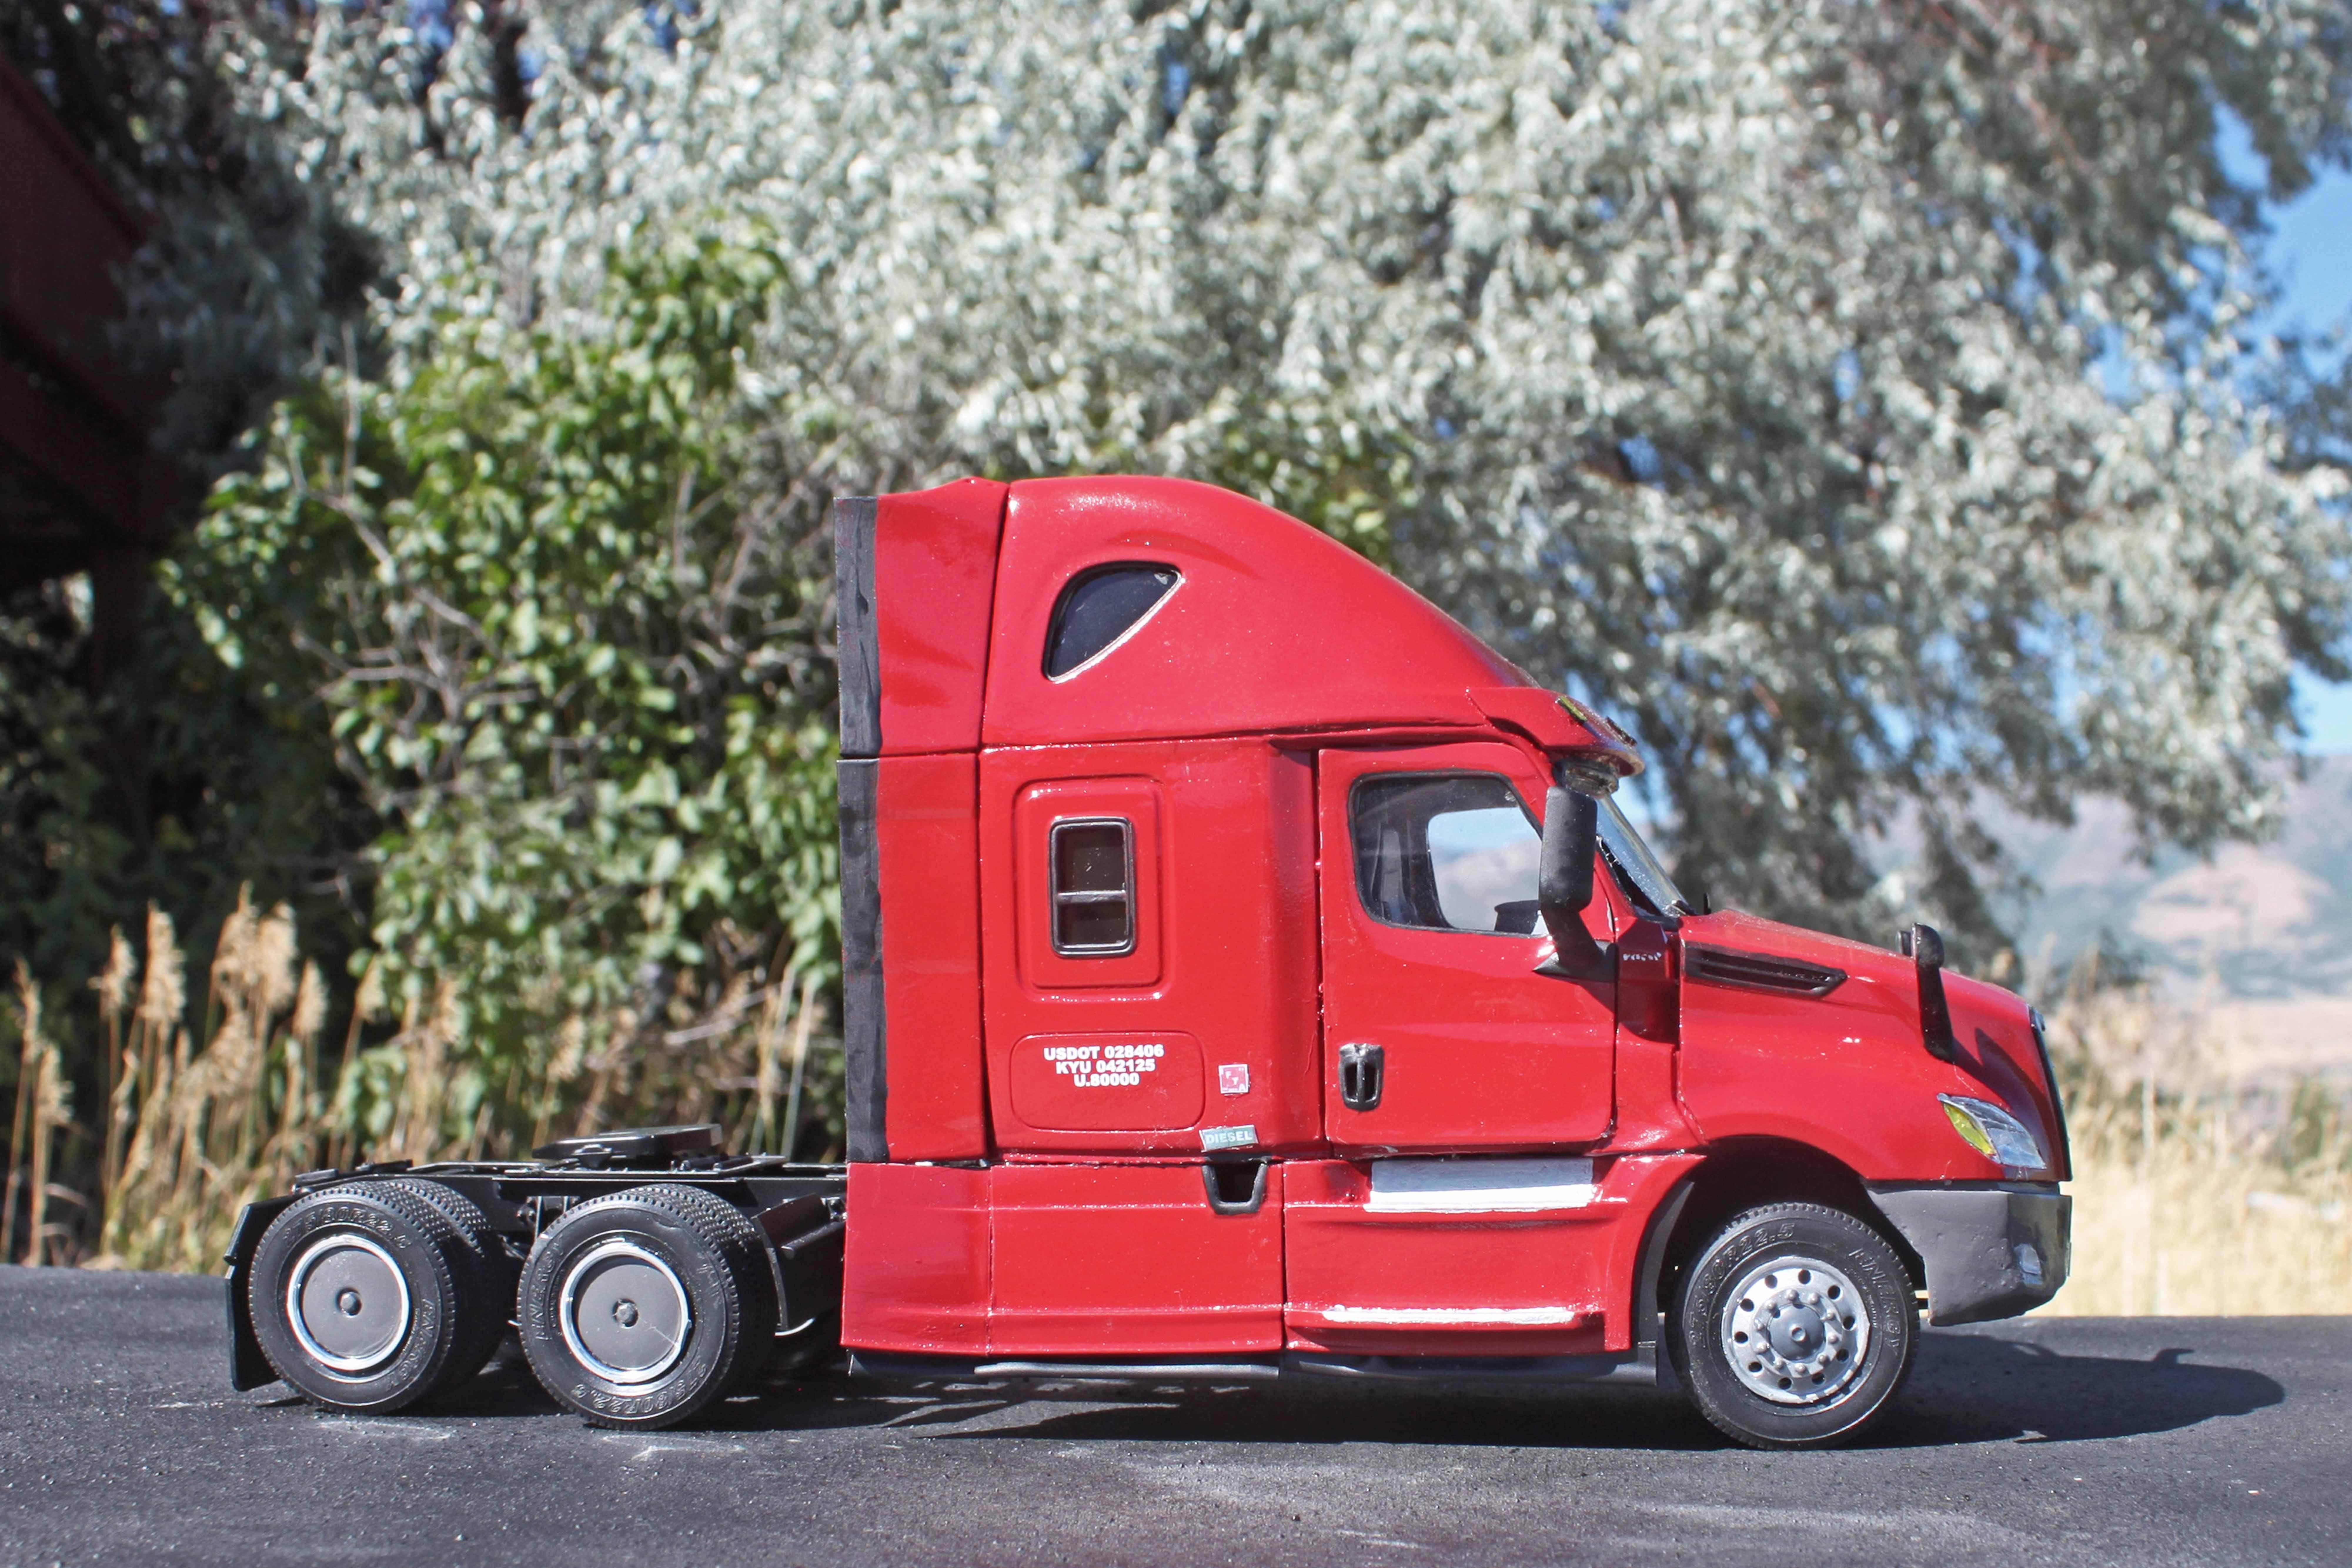
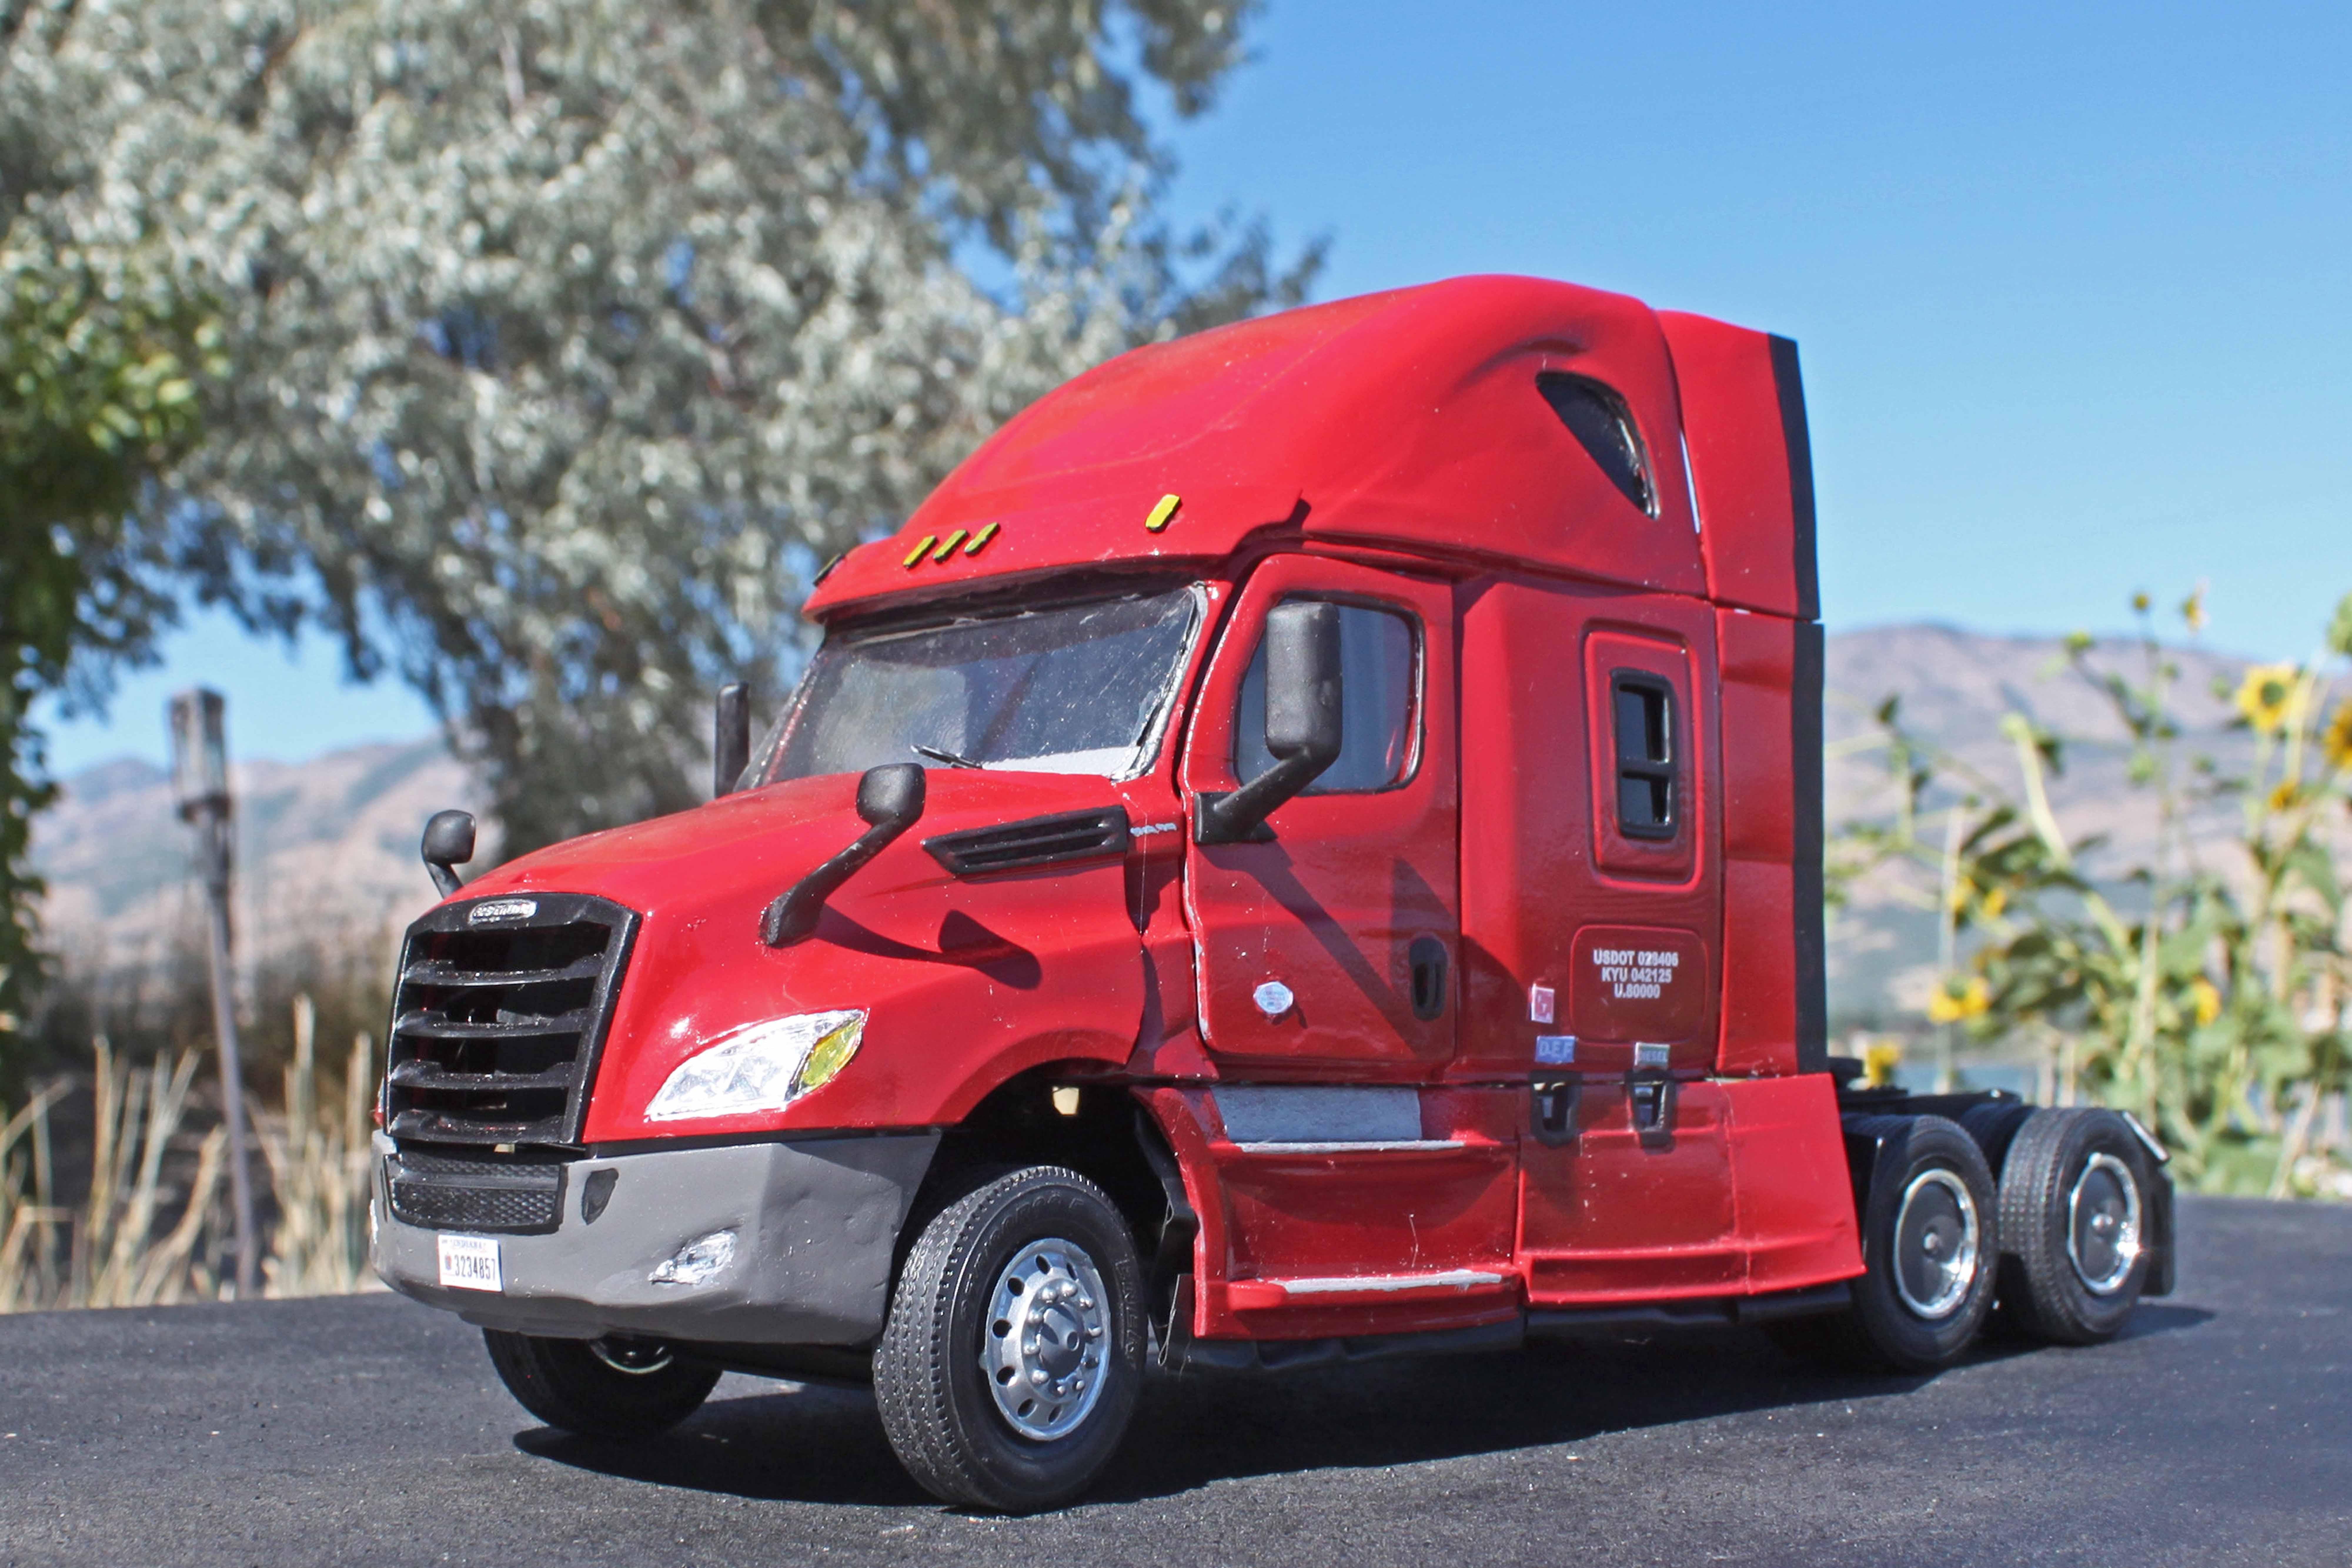
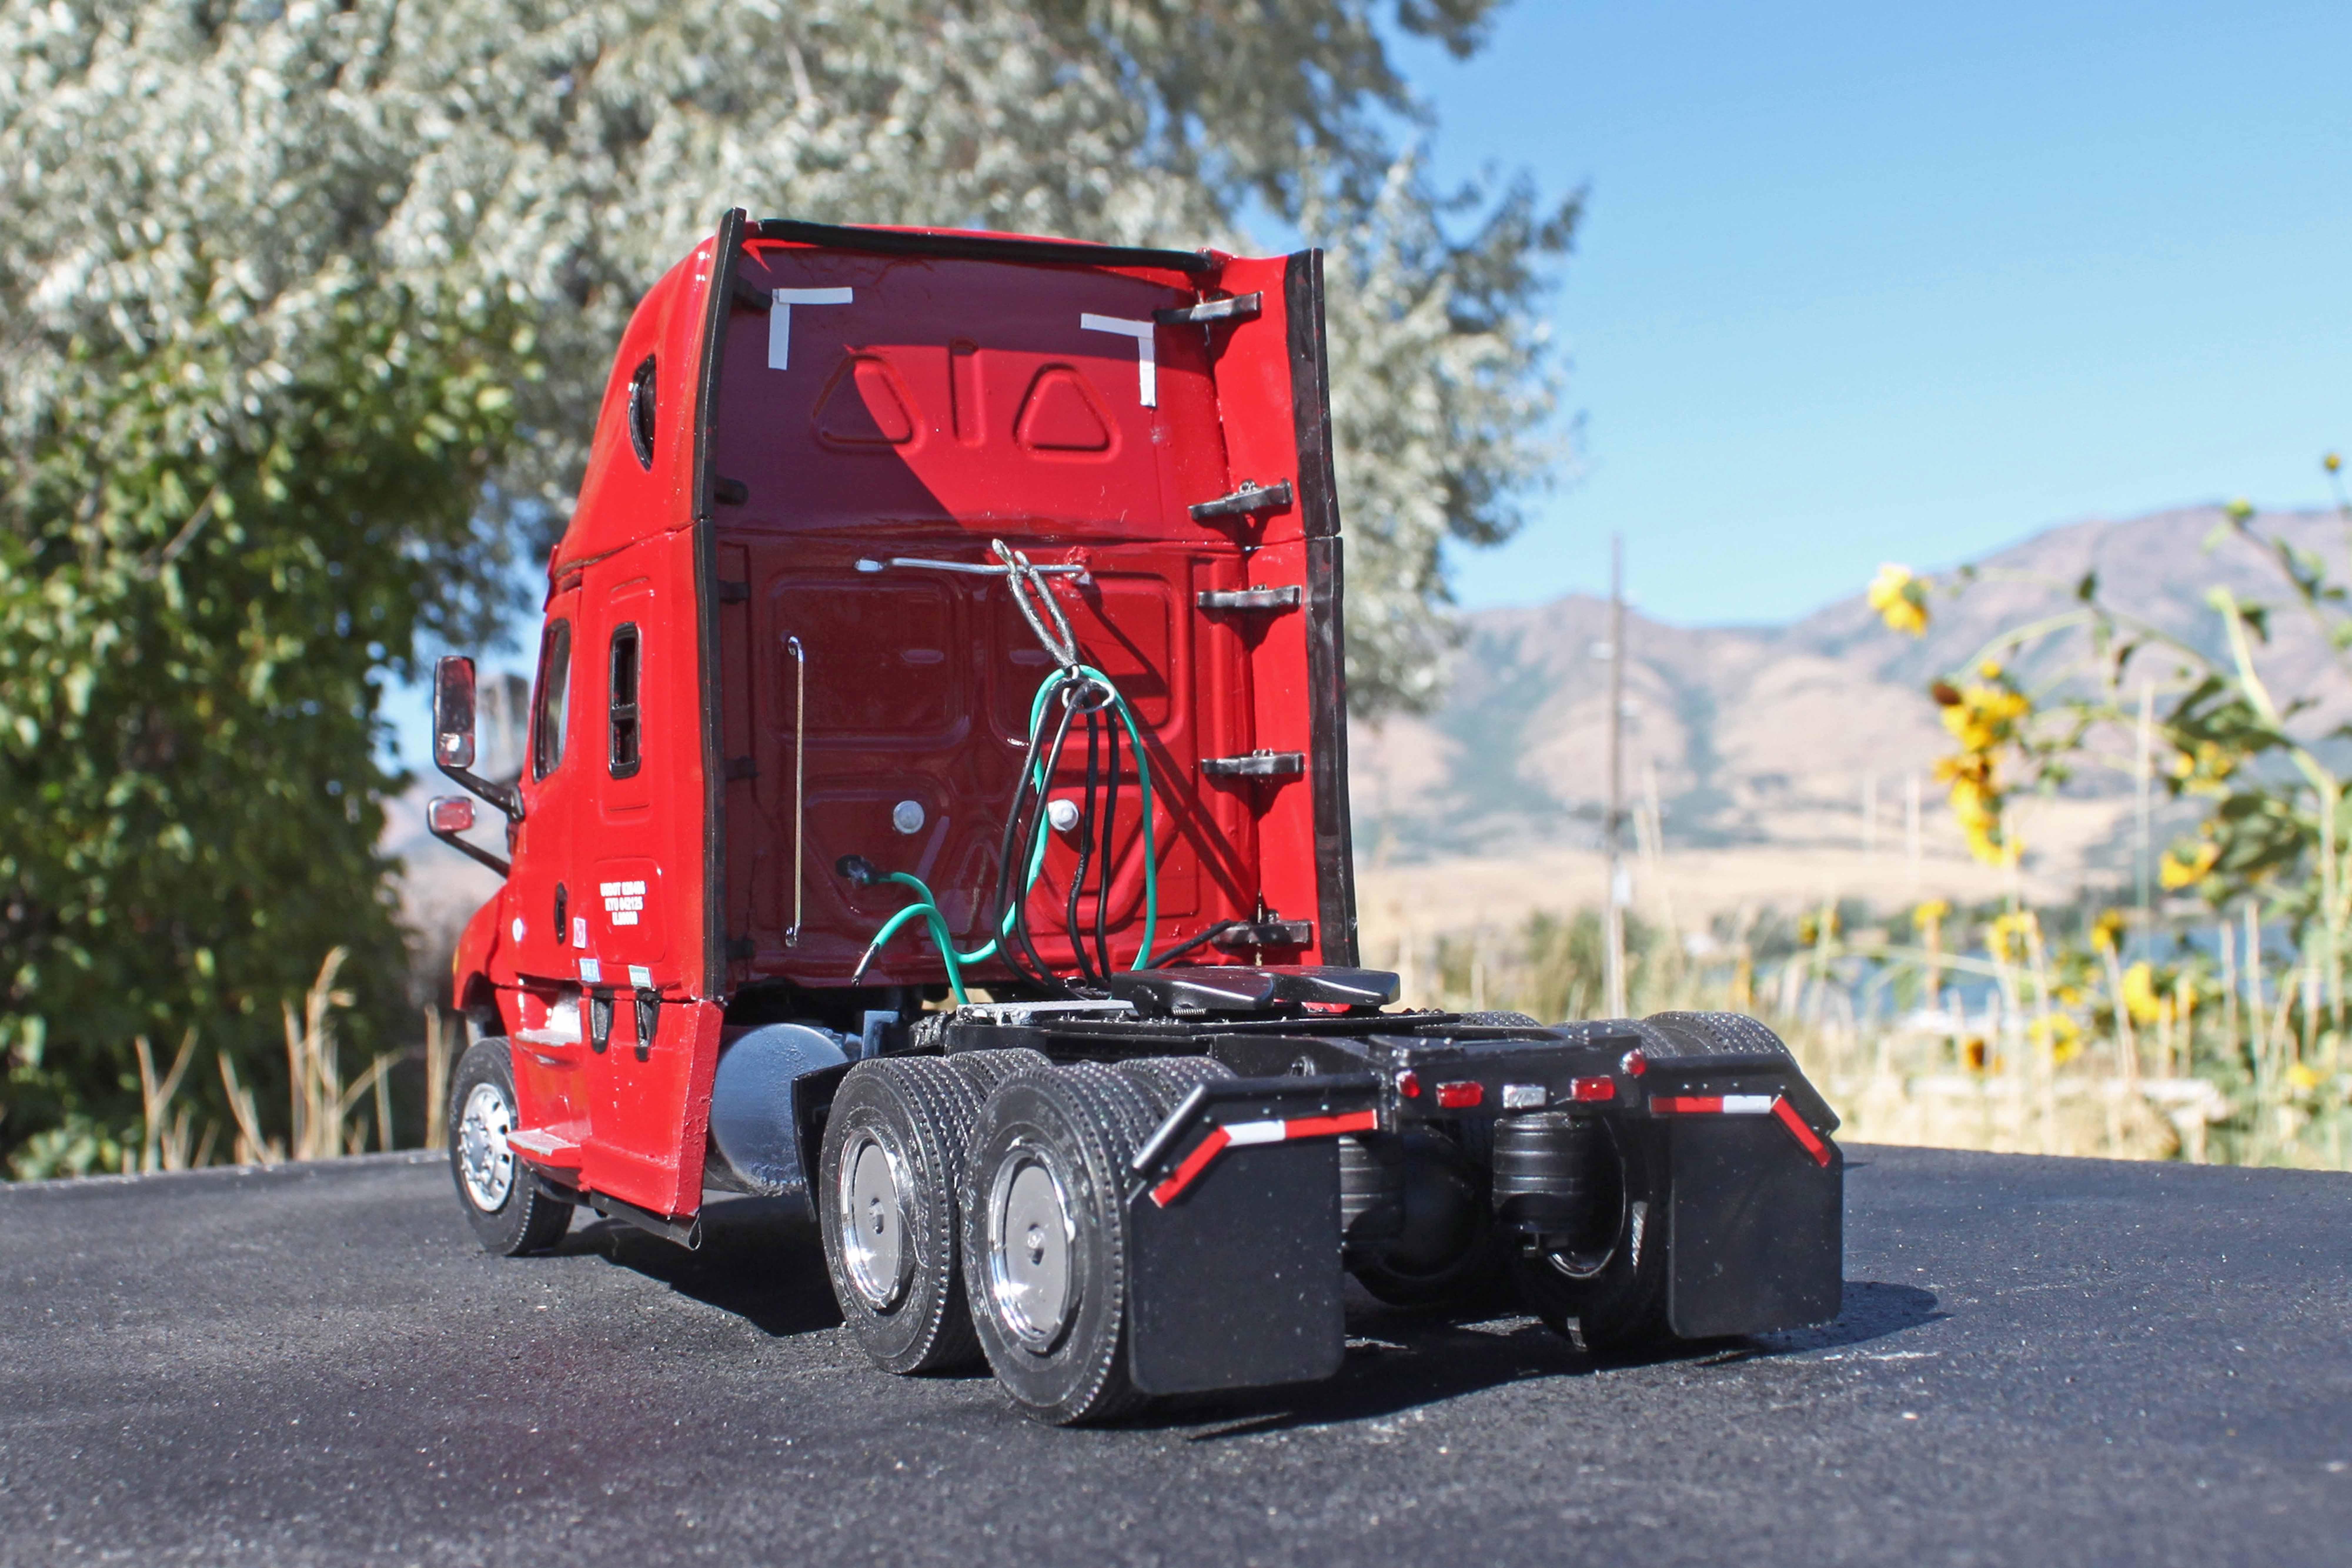
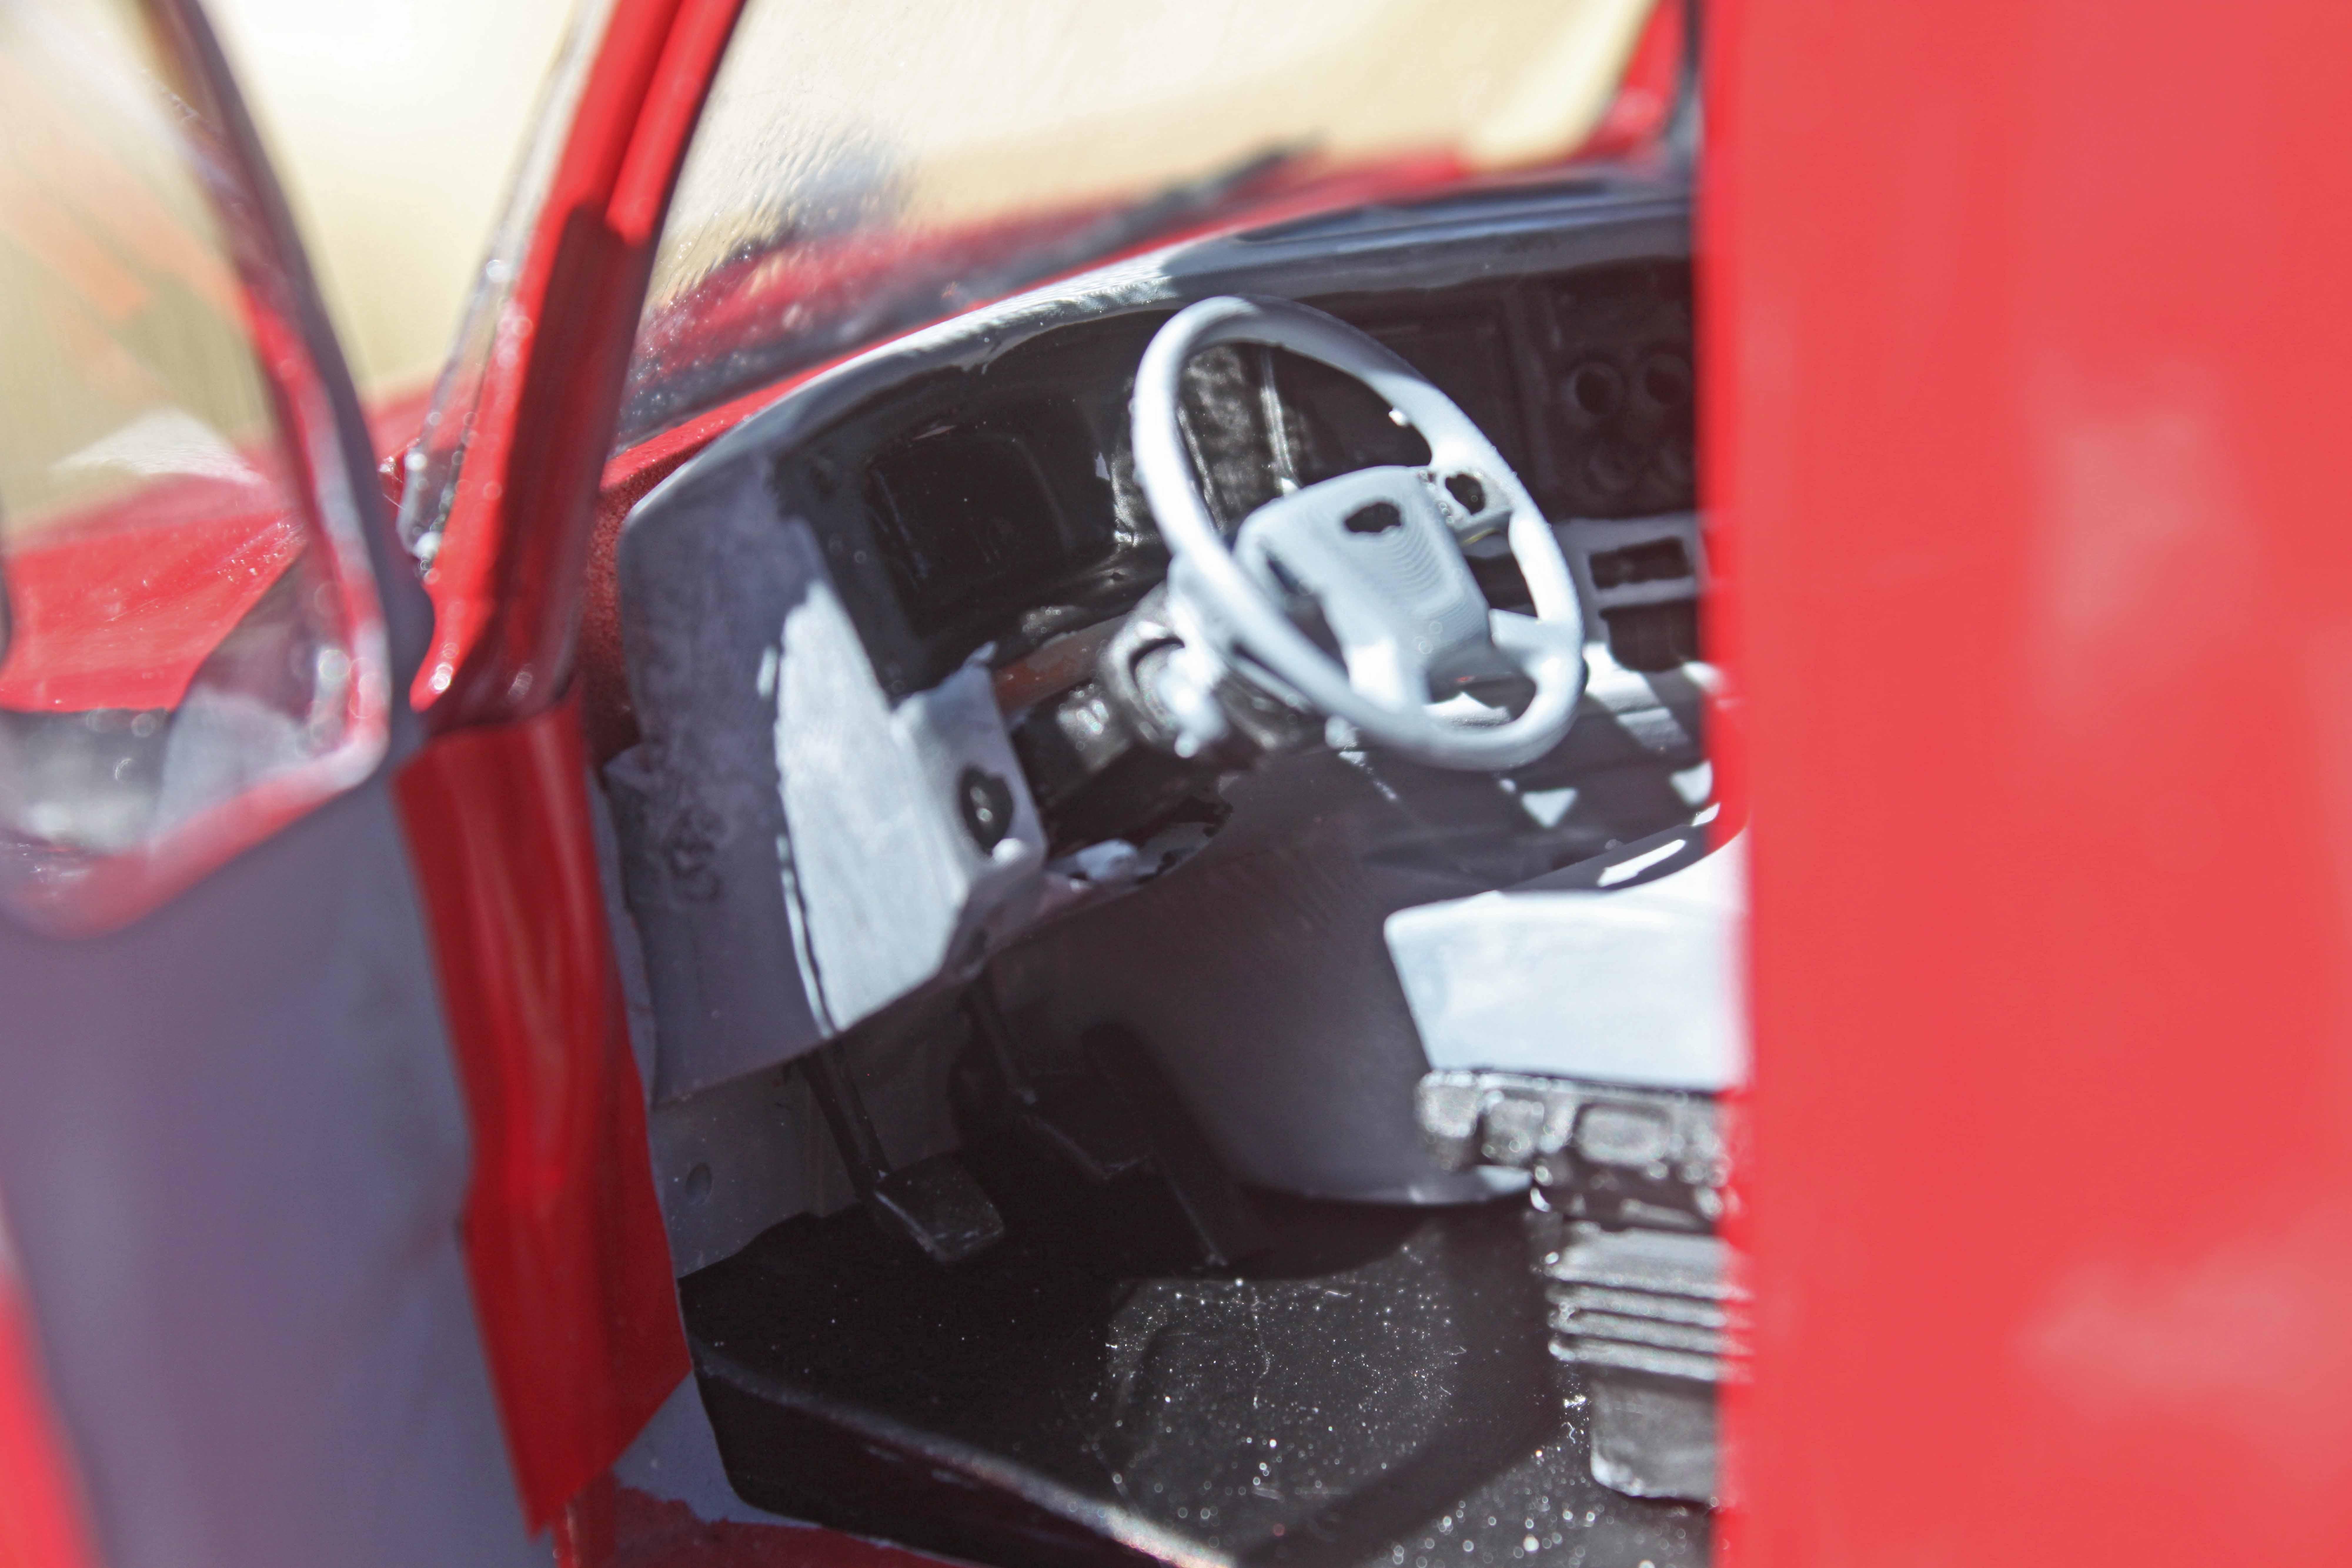
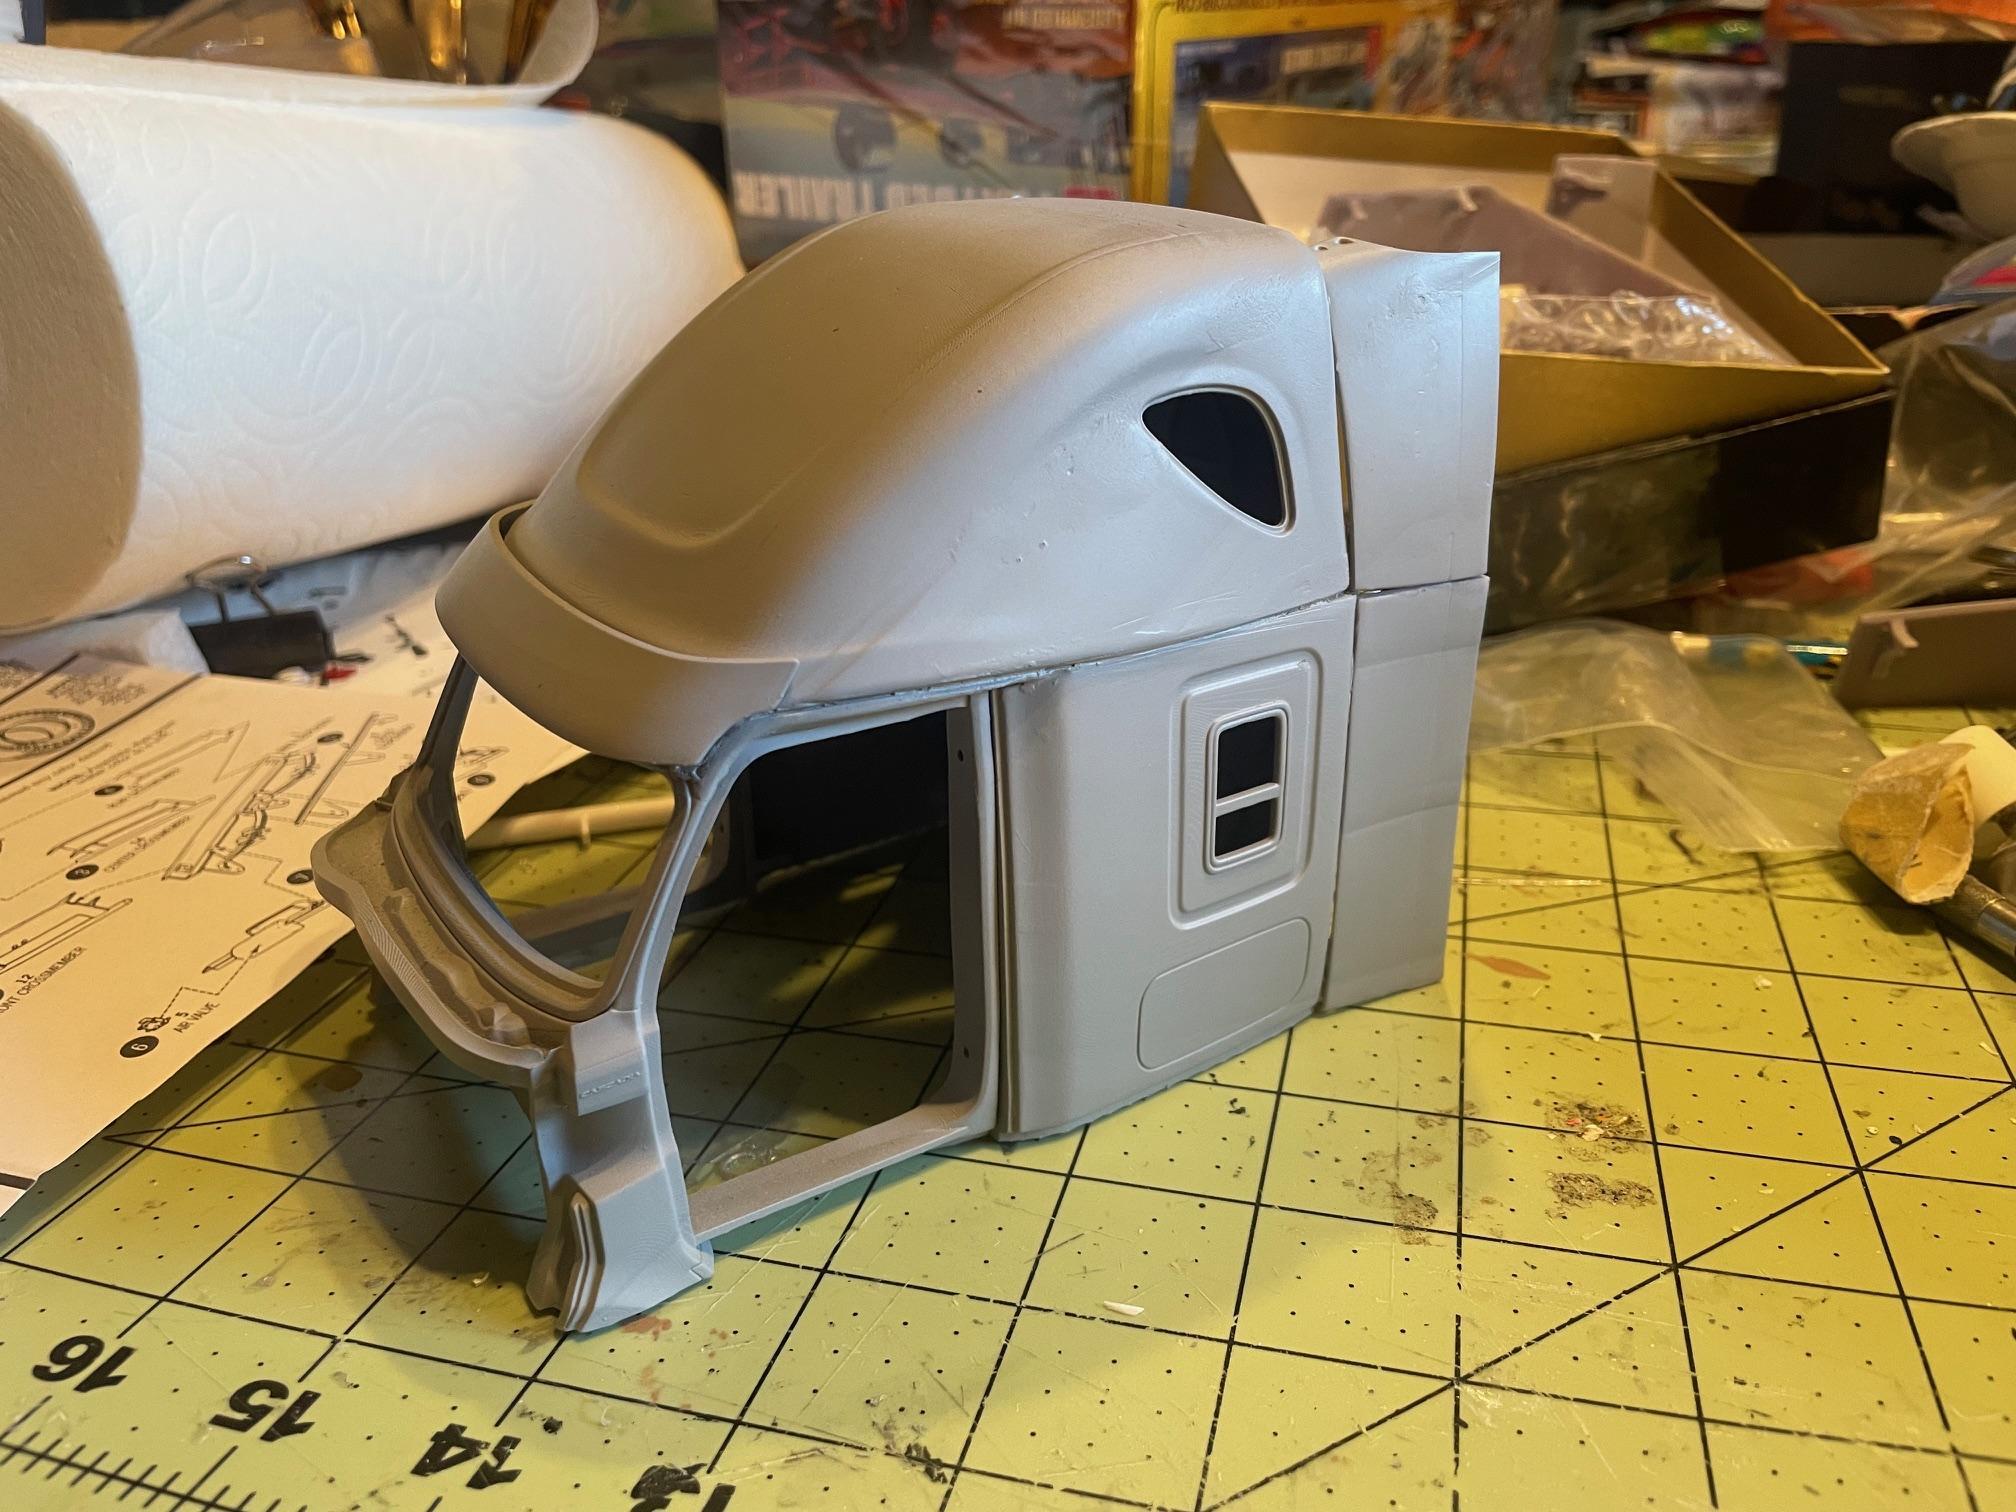
Well, in my last post about the International Highbinder, I hinted that my next build would be completely different… and this is it! Like many model truck builders, I lamented the fact that although Freighliner Cascadias represent at least 40% of the Class 8 trucks on the road (at least around here), none were available in 1/25 scale to build. In fact, except for the Moebius International Lone Star and Pro Star and the Italeri Volvo VN, there were no modern highway tractors for us at all. The rest of “Big Plastic” didn’t seem interested at all in coming out with anything new, content with regurgitating the same 70’s models they’ve been doing for years. I guess the cost of engineering, tooling, obtaining the proper licenses and gearing up for production are too scary for them to speculate on. Into the gap stepped 3D printing. In particular, the Cults 3D website, which has thousands of 3D designs by hundreds of members. It has just about every modern truck there is available for downloading and printing, of varying degrees of accuracy and quality. This build is from a 3D model by Cults 3D member “Alfa Centauri,” who has several accurately detailed and well-designed 3D models for a nominal price to download. I don't do my own printing, but I had been corresponding with Bren, a member here who does his own 3D printing, and Bren very generously offered to print the Cascadia for me. Maybe to make me shut up with my whining, I don’t know. But I deeply appreciate it! By the way, Bren has some very interesting and informative observations about 3D printing truck models on the “Truck Aftermarket/Resin/3D Printed” section of this site. It’s worth checking out. I decided to put this on an extra Moebius Lone Star Chassis I had lying around (doesn’t everybody?). I shortened the chassis to look correct with the Cascadia body, and reinforced it by epoxying brass rods to the frame rails. Resin is very heavy, the finished model weighs a little over a pound! The resin parts have thick sidewalls, due to being scaled to 1/25, so they required some grinding to fit. The edges of the doors in particular had to be ground down to a feather edge. The printing process resulted in some diagonal “streaks,” particularly on the upper cab and the bumper, which had to be ground and filled to the extent possible. The interior is minimal, consisting of a floor pan, seats and a (well detailed) dash and steering wheel combo. I supplemented those with cabinets from the Lone Star and a sleeper bunk from the parts box. The rest of the build was pretty straightforward, the parts fit together well and I added some parts box bits and improvised details. It’s a curbside model for now, but maybe I’ll get around to figuring out how to disguise the International Maxx Force engine (a POS in real life) as a Detroit DD-15. Or maybe I’ll just put a Cummins X-15 in it, which is actually a factory option for the Cascadia. There was no shortage of reference photos for this build! I designed it to be a typical present-day fleet truck, just like the hundreds of Cascadias you see every day on the highway. I based it on a C.R England tractor, but I don’t have the right decals and this truck isn’t to England’s specs anyway. But I wanted this to be typical for its type, so it’s kinda boring and plain-jane; definitely nothing you’d see entered into the Mid-America truck show. So, here it is, the elusive current Freighliner Cascadia in 1/25 scale. It was a challenging build, but I’m generally pleased with the results. And now I can stop whining!
-
3D printing for non-techies
RoninUtah replied to Bren's topic in Truck Aftermarket / Resin / 3D Printed
That’s going to be my problem too. My wife is severely allergic to any kind of chemical odors, and I honestly don’t know where in my house I can set up a 3D printing operation. -
3D printing for non-techies
RoninUtah replied to Bren's topic in Truck Aftermarket / Resin / 3D Printed
Bren, you just about have me convinced! One question- I have an elderly Mac laptop… will that work for an Elegoo Saturn if I only want to print downloaded files? -
New truck/trailer kits?
RoninUtah replied to zaina's topic in Truck Aftermarket / Resin / 3D Printed
Okay, so I owe Bren a HUGE thank you! He sent me the Cascadia prints he made from Alfa Centauri's files on the Cults site, so I decided put it on an extra Moebius Lone Star chassis I had sitting around. The chassis needed to be shortened to look right with the Cascadia body, more about that later... The body is nicely designed and fit together well with a little grinding here and there. The 3D prints are so precise that they leave little room for error: I didn't get the cab exactly centered on the frame and as a result, the right side fairings are a little too far out. I had to grind down the inner edges of the doors to a feather edge to get them to fit properly, due to the sidewall thickness of the resin. There was some diagonal streaking in the upper parts of the body and the bumper as a result of the printing process; I ground down the raised streaks on the body and filled in the valleys as best I could and it's not that noticeable now. I didn't do anything to the front bumper, and now I realize I need to take it off and work on it some with Dr. Dremel and filler putty. The interior is pretty minimal, just a (well detailed) dash/steering wheel combo, floor pan and seats. I added the cabinets from the Lone Star, cut down to fit, and a sleeper bunk from the parts box. It painted up nicely (for me, anyway) based on photos on the Freightliner website. No shortage of reference photos for this build! So, now I have the cab pretty much how I want it, but it's so heavy that it broke the frame where I spliced it after shortening it. When I fixed it, it had a pronounced dip, so I need to break it again and re-do it, adding some brass rods to the frame rails with epoxy, just to strengthen them. That'll give me a chance to re-mount the cab and hopefully the fairings will fit better. So stay tuned... My "story of the build" is to do a typical modern-day fleet truck, like the tens of thousands of Cascadias rolling down the U.S. Interstates and Canadian National Highways as we speak. I based it on a C.R. England rig, but I don't have the right decals for them and this truck isn't exactly to England's specs anyway. Again, my heartfelt gratitude to Bren - I don't have to whine about not having a modern Cascadia in my fleet any more!
-
1954 International Highbinder
RoninUtah replied to RoninUtah's topic in Model Trucks: Big Rigs and Heavy Equipment
Thank you so much, Brian! Your kind words mean a lot to me. And don’t sell yourself short: yours had incredible details, such as the swing away fenders and a detailed engine, beautifully done. Mine is just a curbside model! The other reason for opening the driver’s door going uphill back in the day was to look on the ground to see if the truck was moving! You could put a brick on the accelerator pedal and jump out and grab a cup of coffee, and then run back to catch up with a truck before it crested the hill! -
1949 White WC22 Super Power
RoninUtah replied to RoninUtah's topic in Model Trucks: Big Rigs and Heavy Equipment
Thank you very much! Yes, so was I. I love watching those old “industrial “ movies from the 40s and 50s promoting trucks on YouTube, and I was always frustrated at how common White Super Powers were back then, but none were available in 1:24 or 1:25 scale. So I was super excited when Dans came out with this one. Kudos to them! -
Model Truckin Decals Shutting down
RoninUtah replied to OldTrucker's topic in General Automotive Talk (Trucks and Cars)
Sorry to see you go, Jerry! I’ve always enjoyed working with you and your decals are top notch! -
1954 International Highbinder
RoninUtah replied to RoninUtah's topic in Model Trucks: Big Rigs and Heavy Equipment
Thanks, Jürgen! Your Conco is kinda the grandson of this Highbinder... Same manufacturer, similar weird cabover design. Yours turned out beautifully, by the way. -
Only took 50 years!
RoninUtah replied to Rockford's topic in Model Trucks: Big Rigs and Heavy Equipment
Looks great! Nice fleet of K-whoppers. Hard to believe that's 1/32! It's fun watching the show on YouTube. Truckin' was never like that, and it sure isn't now! -
1954 International Highbinder
RoninUtah replied to RoninUtah's topic in Model Trucks: Big Rigs and Heavy Equipment
Thanks, Jeff and Steve, I really appreciate your comments! Yes, trucks like this were considered to be nothing more than pieces of industrial equipment back then, with barely a nod to aesthetics or creature comforts. It took a strong guy to handle one (no power steering, two-stick transmission) and that generation of drivers is all but gone now. Incidentally, the build I'm working on now will be the polar opposite, stay tuned... -
1954 International Highbinder
RoninUtah posted a topic in Model Trucks: Big Rigs and Heavy Equipment
This is an AITM conversion I picked up from a third party not long ago- it was missing the AITM “pewter pack” and a few other parts but I had them covered from my spares box. Donor chassis is an AMT White Freightliner SD. This build is obviously not in the same league as @Driptroit 71’s masterpiece from back in 2017, but I think it fairly represents a working tractor of the 50’s, in the days before mud flaps, front wheel brakes, and… DEF? What’s that?? As a short wheelbase two-axle COE, it might have been pulling doubles on the West Coast somewhere, burning’ up the miles at 45 MPH! Cue the Red Simpson record…
-
Brings back memories! When I was a kid, my parents had a 61 Falcon wagon that exact color blue!