LennyB
-
Posts
3,211 -
Joined
-
Last visited
Content Type
Profiles
Forums
Events
Gallery
Everything posted by LennyB
-
I started the Moonraker Space Shuttle years ago, never got far and not sure what ever happened to the kit. Lost somewhere in the attic.
-
Thanks Charlie, appreciate you checking in.
-
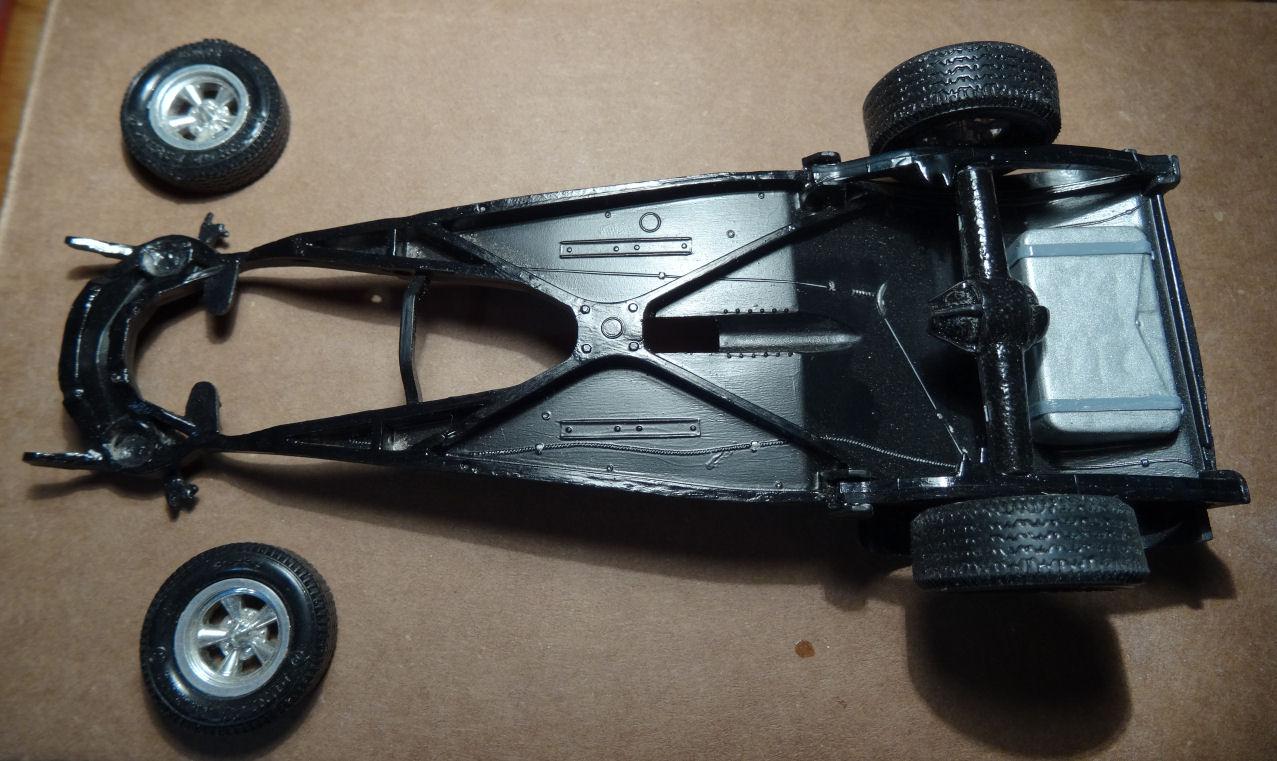
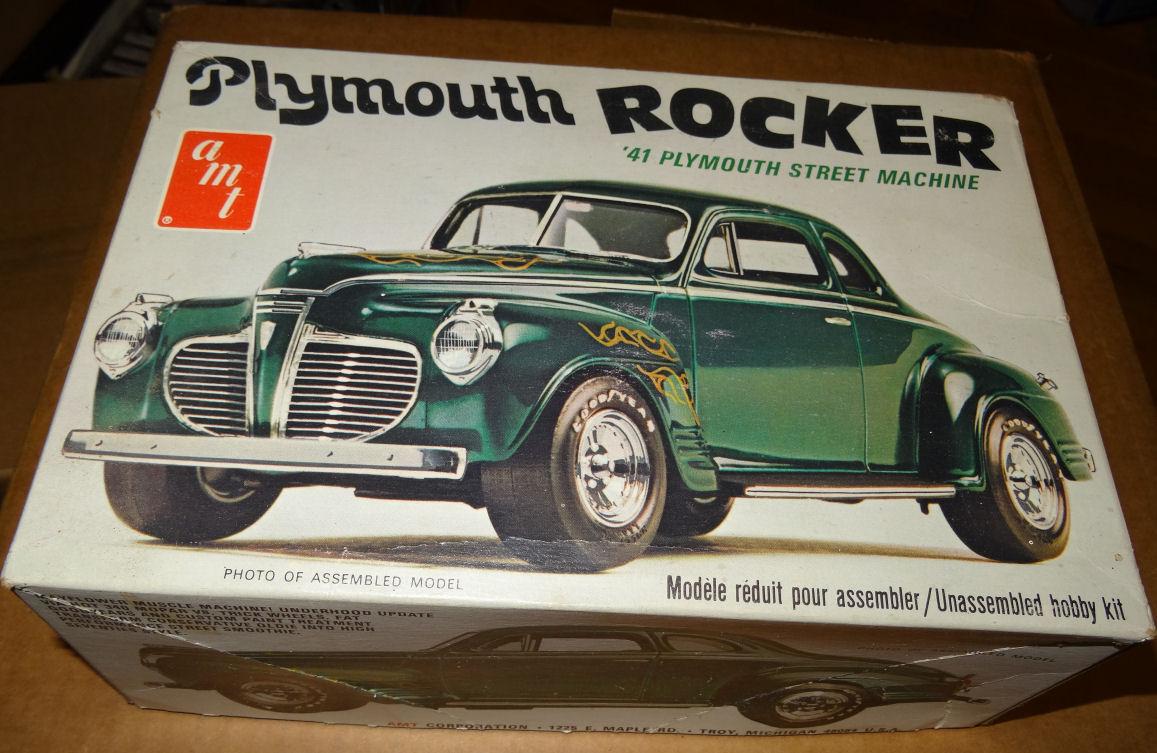
THE COUPE Wanted to step away from the body work a bit and concentrate on other areas. Pulled out the chassis pieces as I've been thinking about wheel combinations and a narrowed Ford 9" rears. Had totally forgotten I had done chassis work a couple of years back and had already selected old school Cragars. Not going to start all over with the chassis so I guess we will just go old school. Ran into a hiccup however. Found I don't have any spindles for the front end, am missing one coil spring and both the front sway bar and tie rod. That's the risk you take resurrecting a builder. I think I'm going to go with real springs for the coils and guess I will fab the rest. The kit calls for a metal axle which is OK for the rear but I want to eliminate that for the front. So new spindles would probably be needed anyway. Also have to drill out the spring pockets as they are filled with glue, can you say glue bomb? So for now let's just do a quick mock-up to get an idea of stance.

-
Just about ready to drive to Mel's Diner.
-
Jim, I think it's looking better. Headlights look like you have them fitting better also. I still experimenting with the welting. Now I'm thinking of using very small wire. This is from a grain of wheat bulb and about .030 in size. Now if I can find it in black and a little smaller.
-
 Wow, very impressive. I built a few of these when they first came out but nothing in so much detail. Really cool build. BTW: You need to update the thread title, it say 1967.
 -
David Coming along nice. That is the engine right out of the box I'm assuming. Looks really good. I only have the flathead 6 in my parts lot. I need to go to the junkyard and find a decent engine. Len
-
Nice start John, I love the color. I started building one of these years ago, painted it a similar blue and the paint job went south. Gave the body a brake fluid bath and the trunk area bulged and cracked, never had that issue with brake fluid before or since. Still have the kit unfinished in the box as there was no saving the body. Recently bought a started kit off a goodwill auction for $8 bucks, not really a great price when you factor the shipping. But it had been listed on and off for months and had no takers. I felt sorry for it and finally decided to buy it. That body is now in the brake fluid, let's hope it survives. ?
-
Jim It looks like you have the center trim bar right up at the top of the nose. It actually has a bit of body above the trim. Couldn't you just add a bit of body above the trim to close the gap?
-
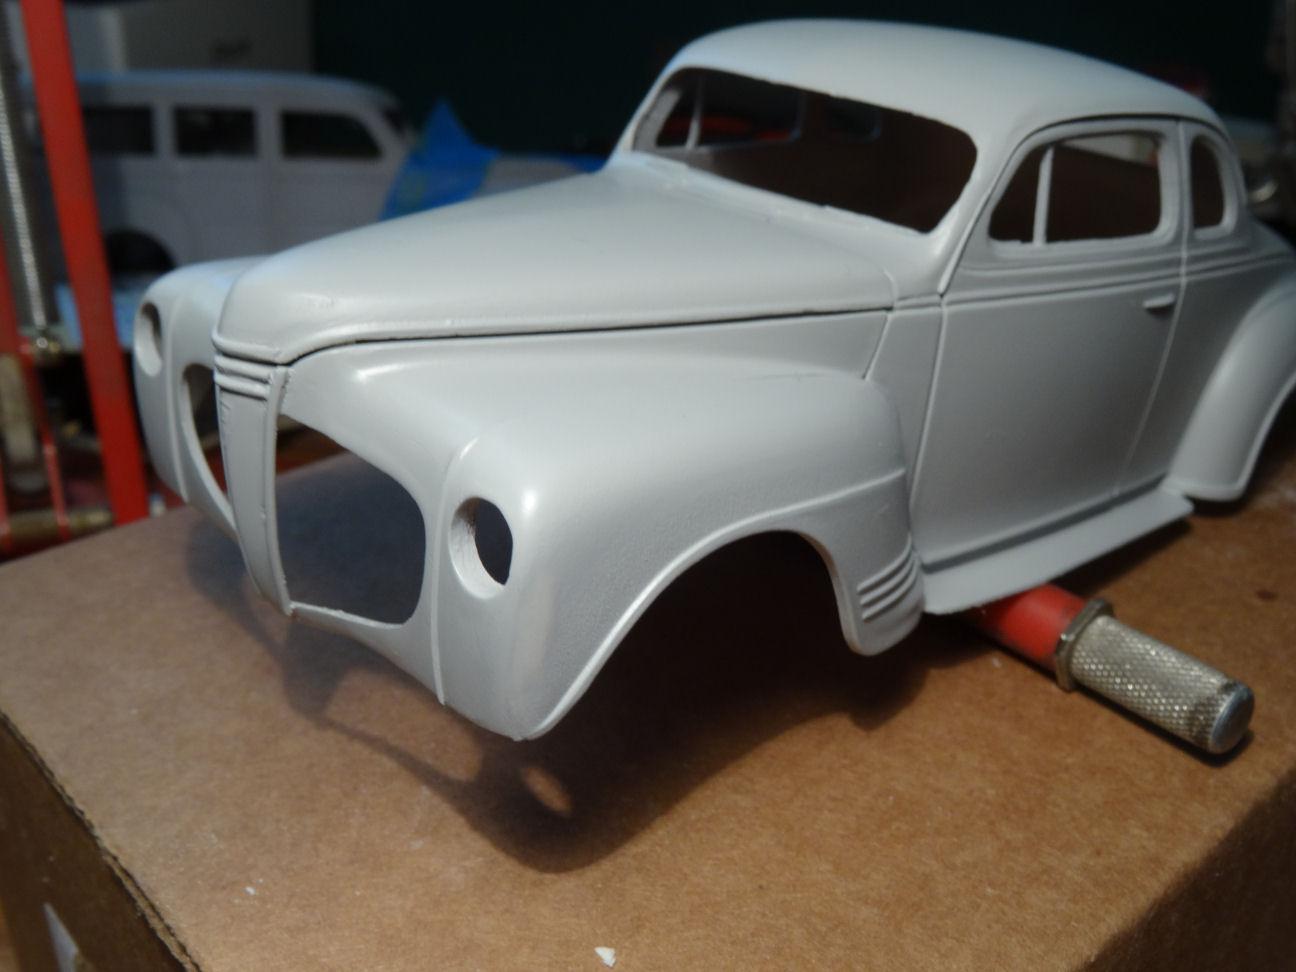
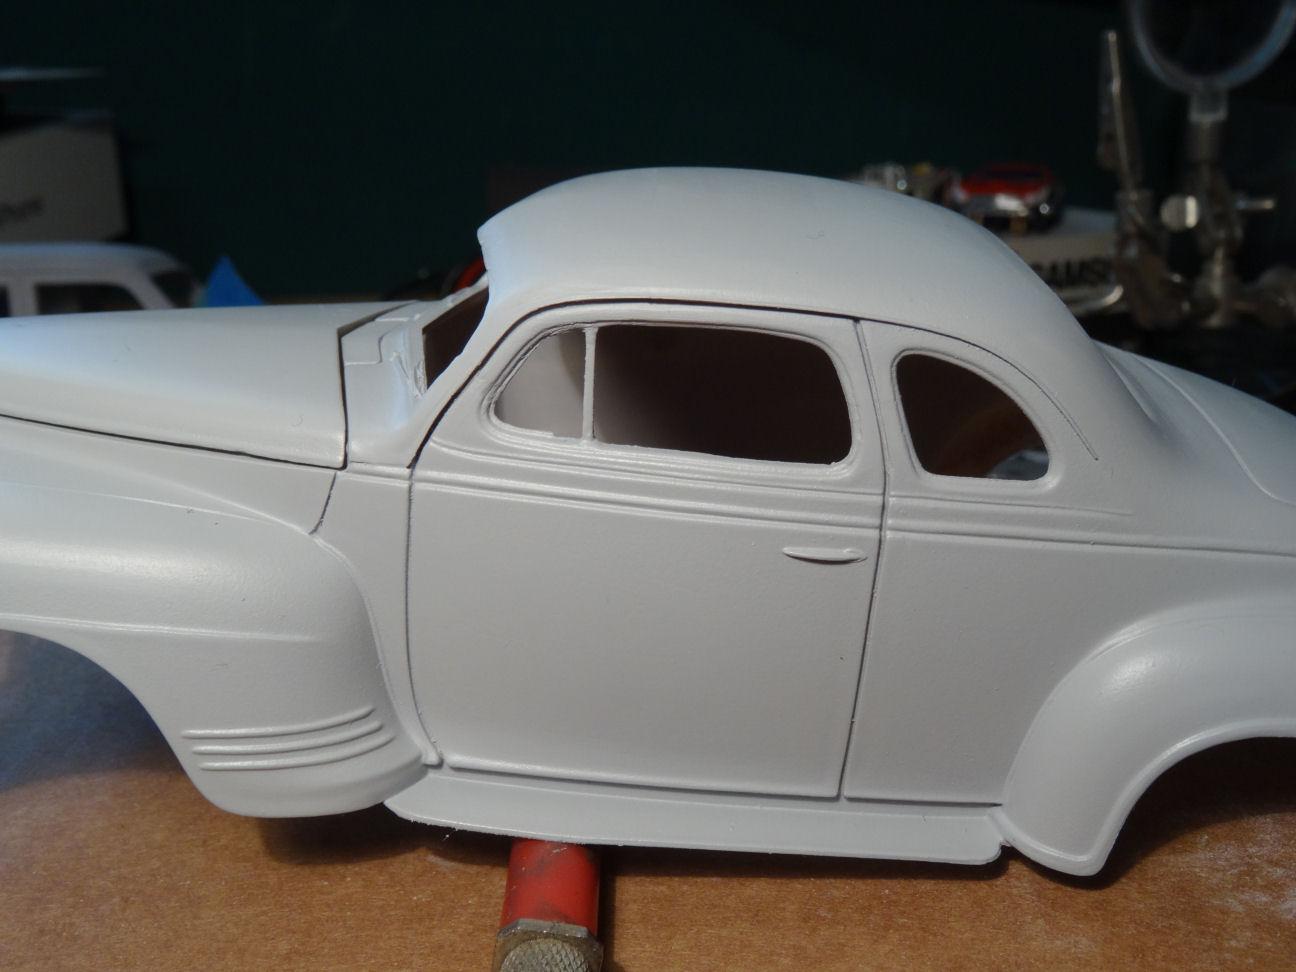
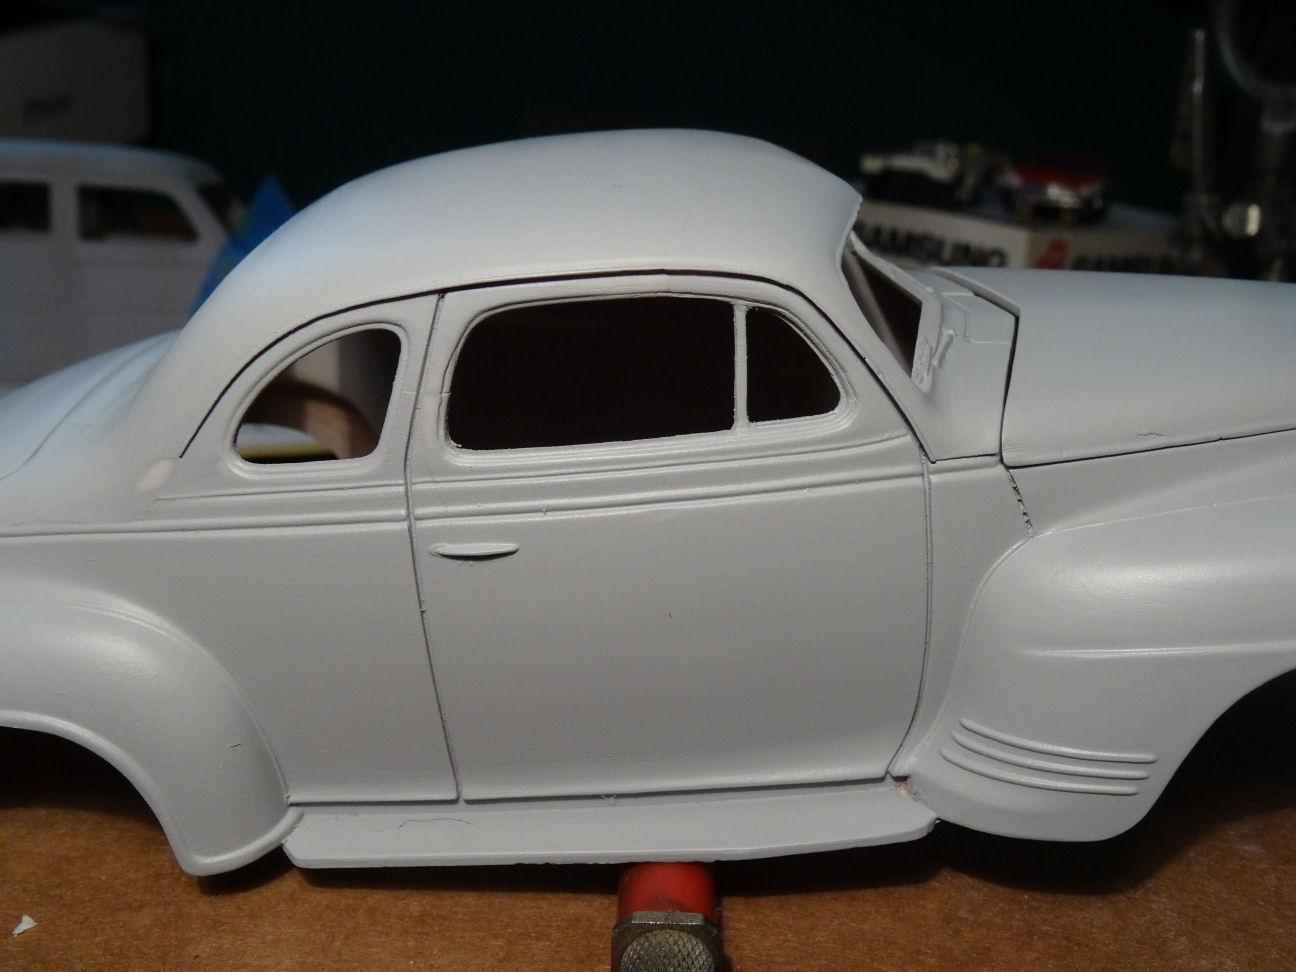
THE COUPE After some primer the coupe is starting to take shape. The top chop still needs some cleaning up on the right side. Left side is just about there Still need to figure out the fender welting issue. On the coupe right now the welting is the original kit on top and the rear of the fenders and the front piece is .040" half round. Not sure if I will leave that and do some black BMF over it after the body is painted. It's hard to see in the pics but the bead is uneven along the top. Might remove it completely as with the Woody as Customline has done and fill it in with some styrene rod. Also considered brass rod. Other considerations are solder or bead wire. Nose needs some more cleanup also. That's all for now.
-
The Woody Don't think for one minute I've neglected the Woody. It got some love this week also. The Woody is just hanging back a bit to see how the battle of the noses progresses. Meanwhile it has it's own issues, namely the hood. The hood is actually twisted and sits high on the drivers side front. Part of that problem may be my fault. The body of the Ford woody is a bit wider then the Plymouth. So rather then make the Woody body narrower, I made the rear of the hood wider. I cut a slice down the middle of the hood and added a pie shaped sliver. This afternoon I cut through that sliver, taped the hood down solid to the body re-glued it and hope that when the glue dries it retains it's shape. We shall see.... A keen eye may note that I have removed the fender welting on the Woody and right now it has a groove cut in it's place. That is for the ongoing indecision on how we are going to tackle the welting. More on that later.
-
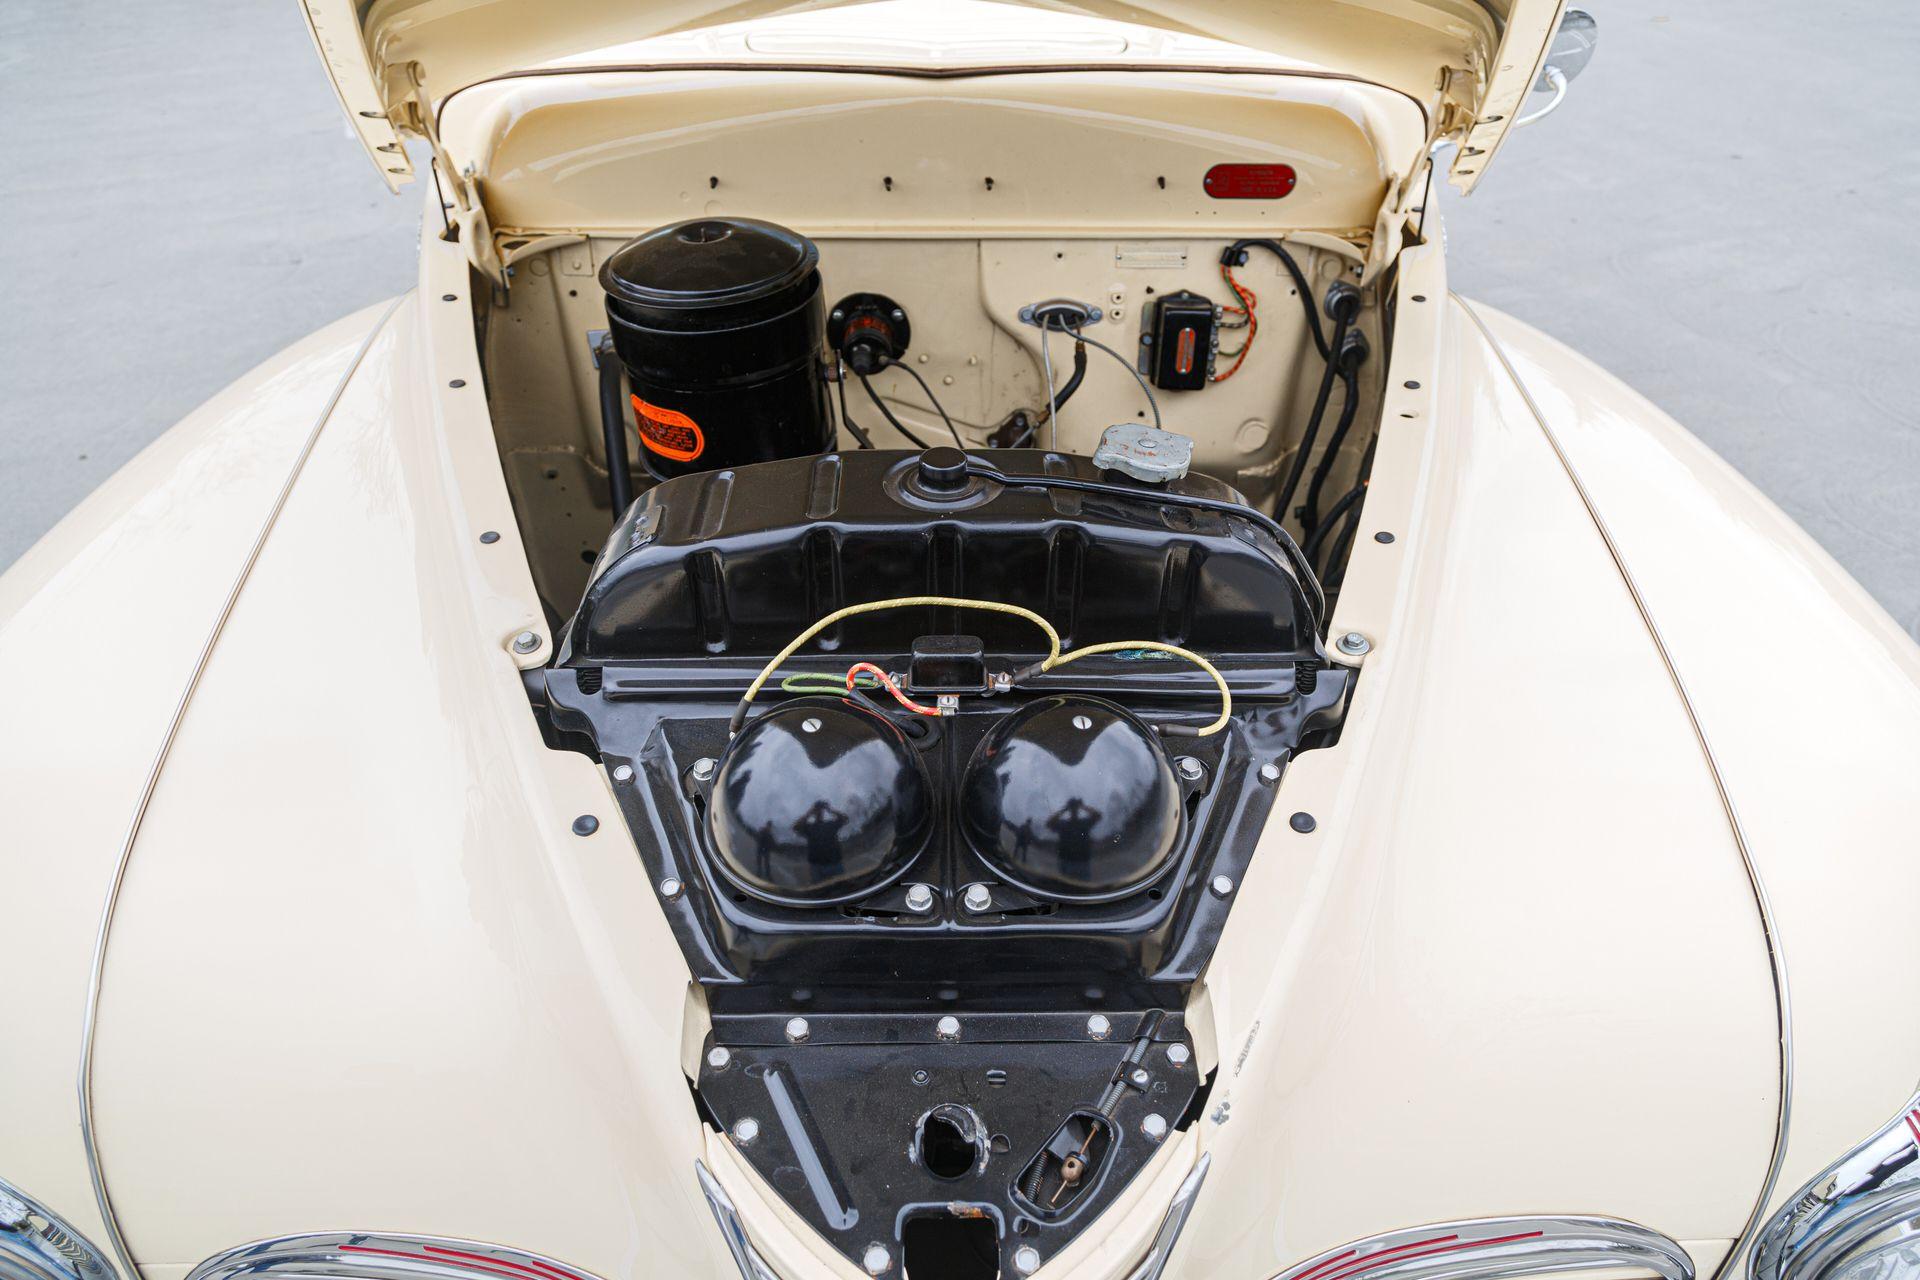
The sealed one in the attic is the original issue. Yes, I'm well aware you're not going to get a hot meal at the local diner by selling off one of these kits. ? I was thinking of putting the BMF over a bead. Tried to go out this morning and get some round stock but Hobby Lobby didn't have anything suitable, unless I wanted a 1/25th scale baseball bat. Gonna have to order some online. Not sure of the size, probably .040". Here is a shot of the wheel from the Rocker kit.
-
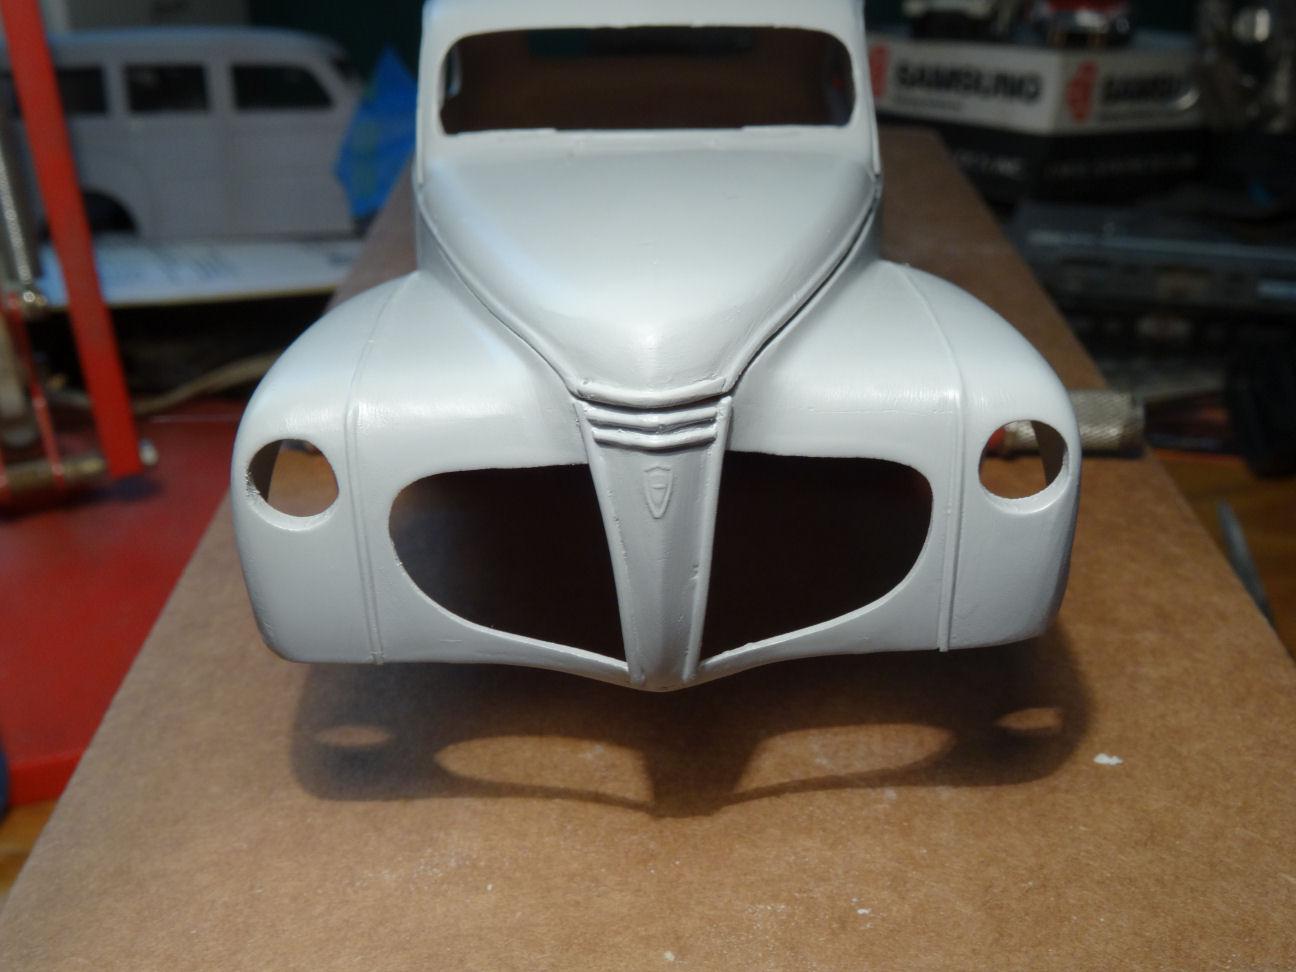
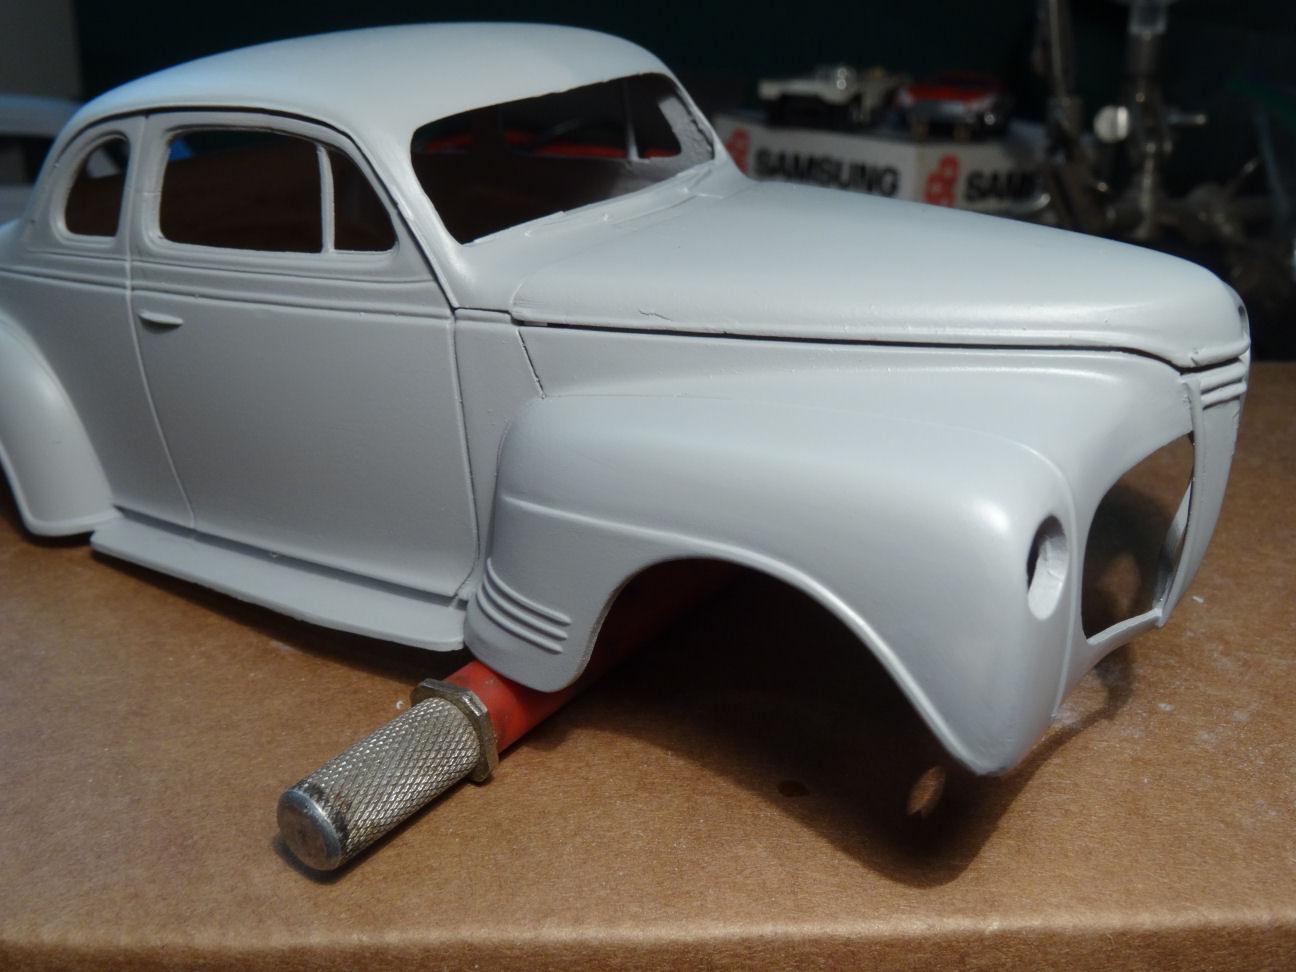
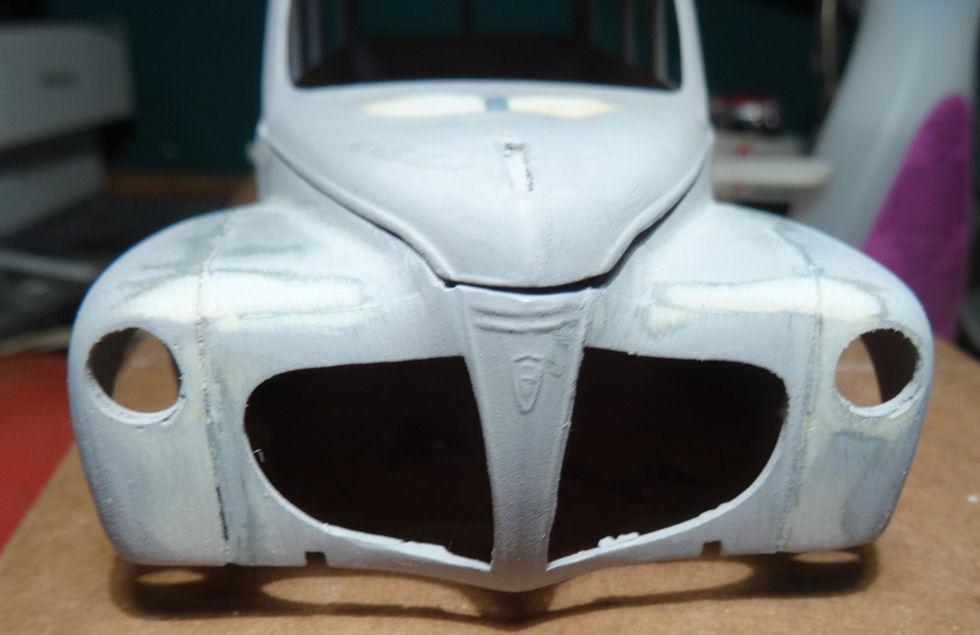
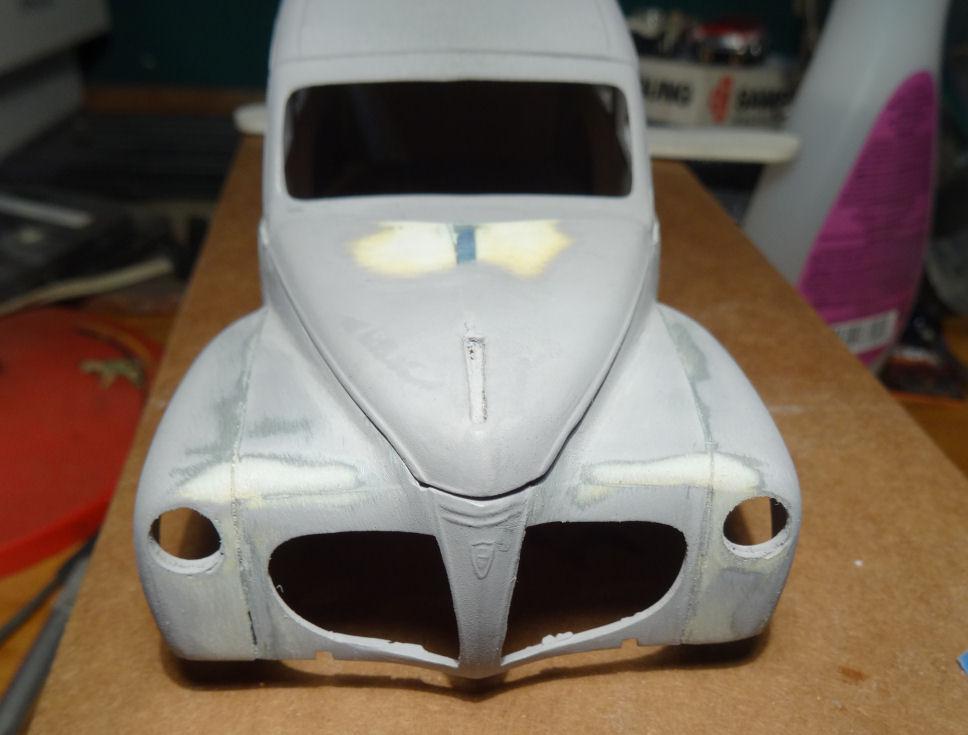
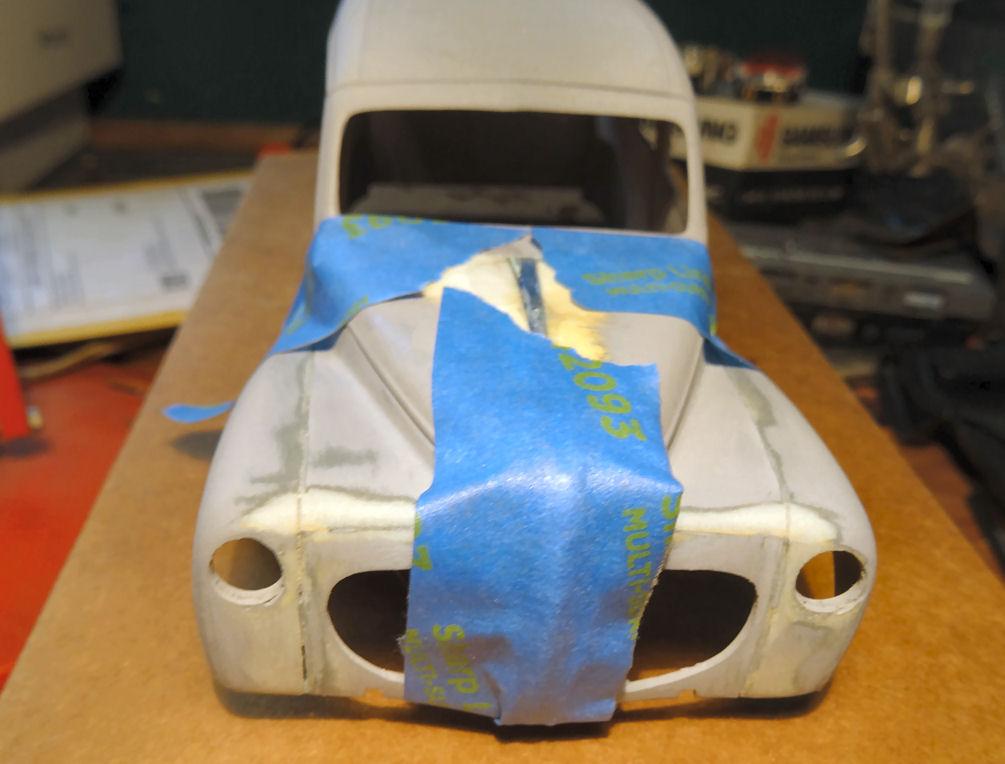
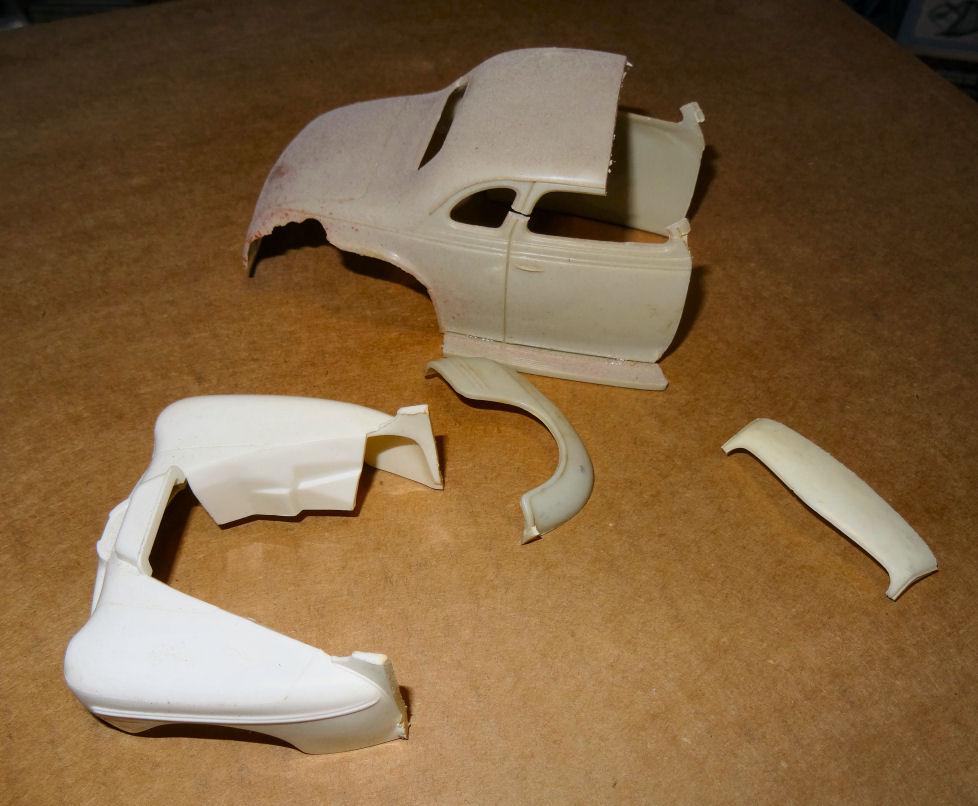
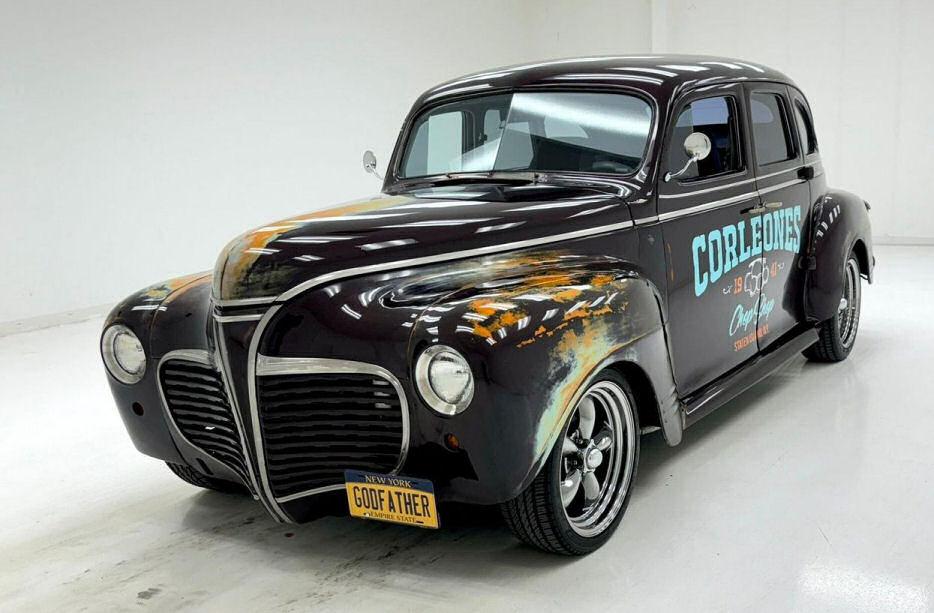
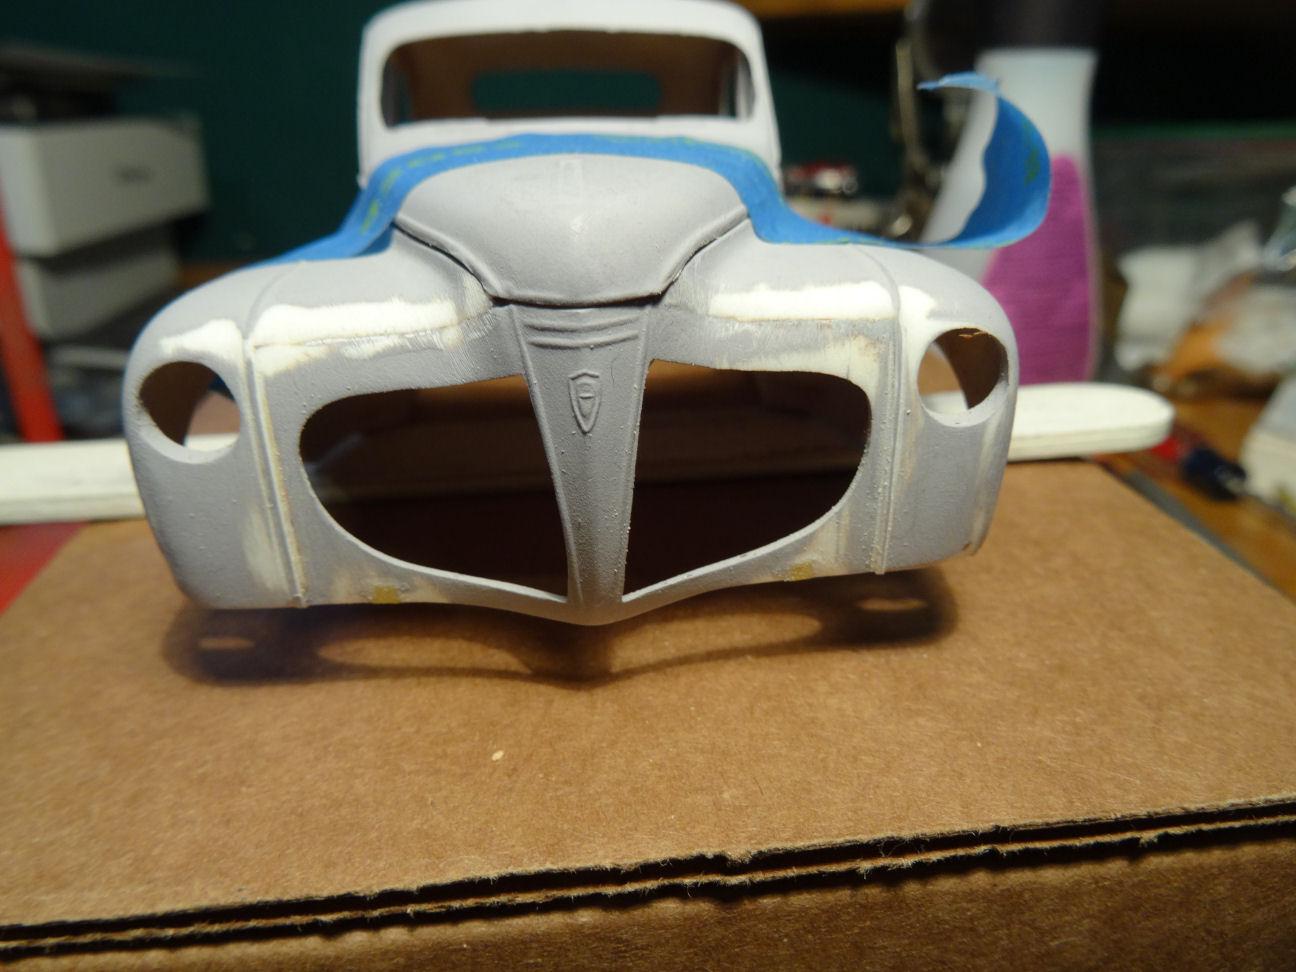
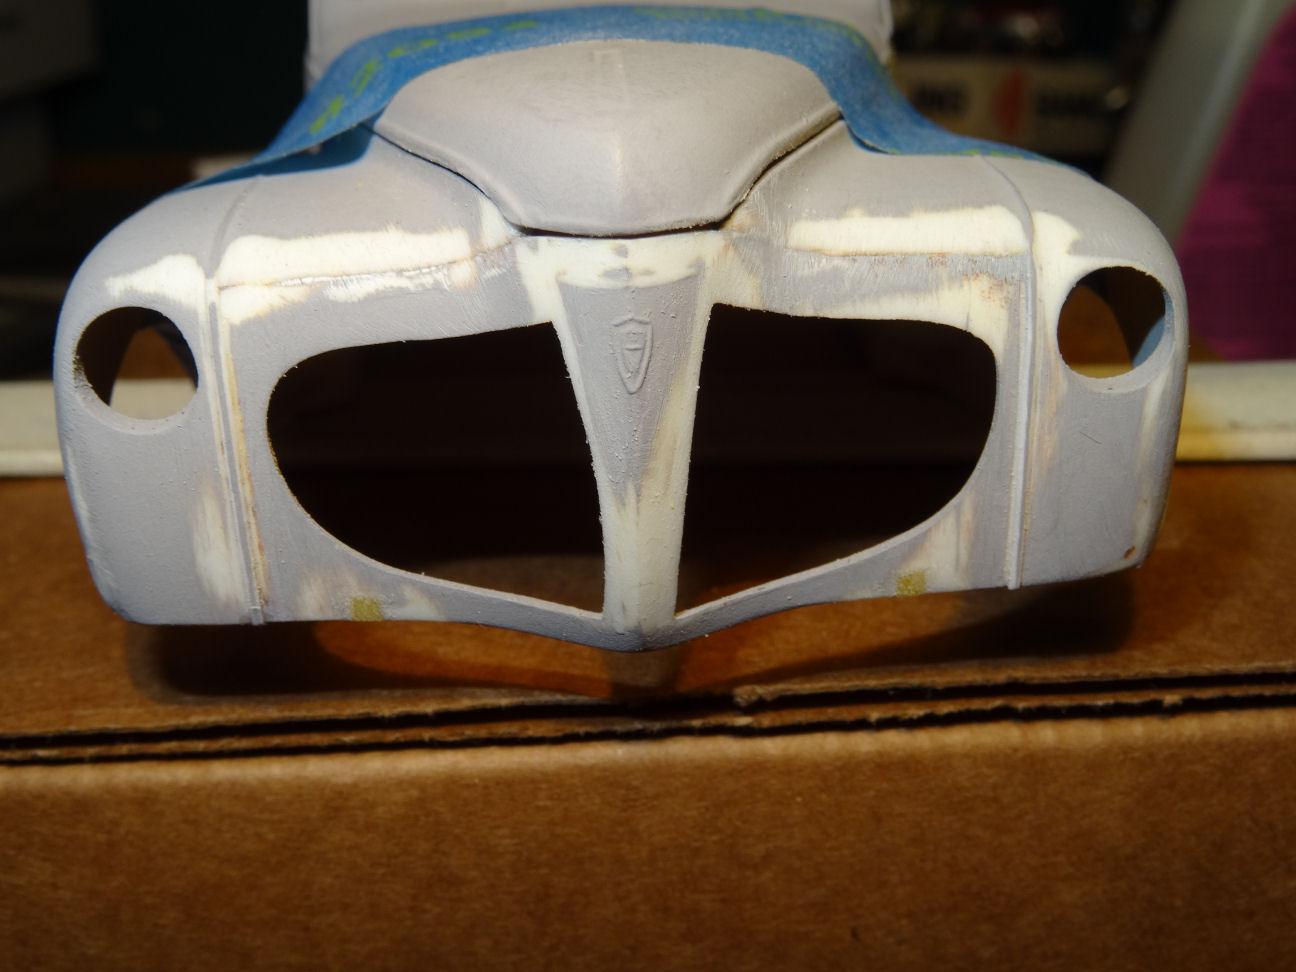
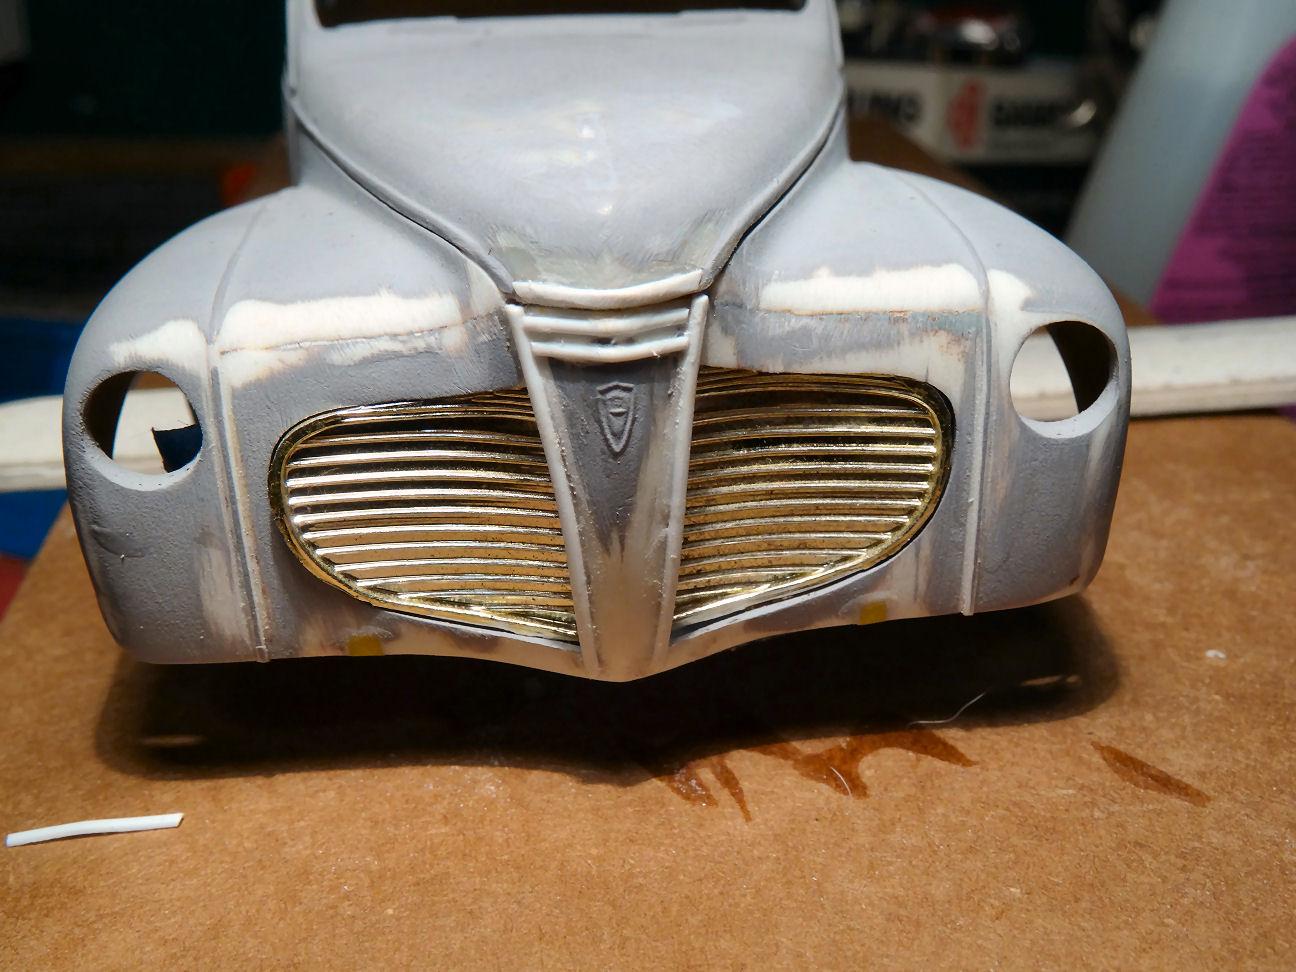
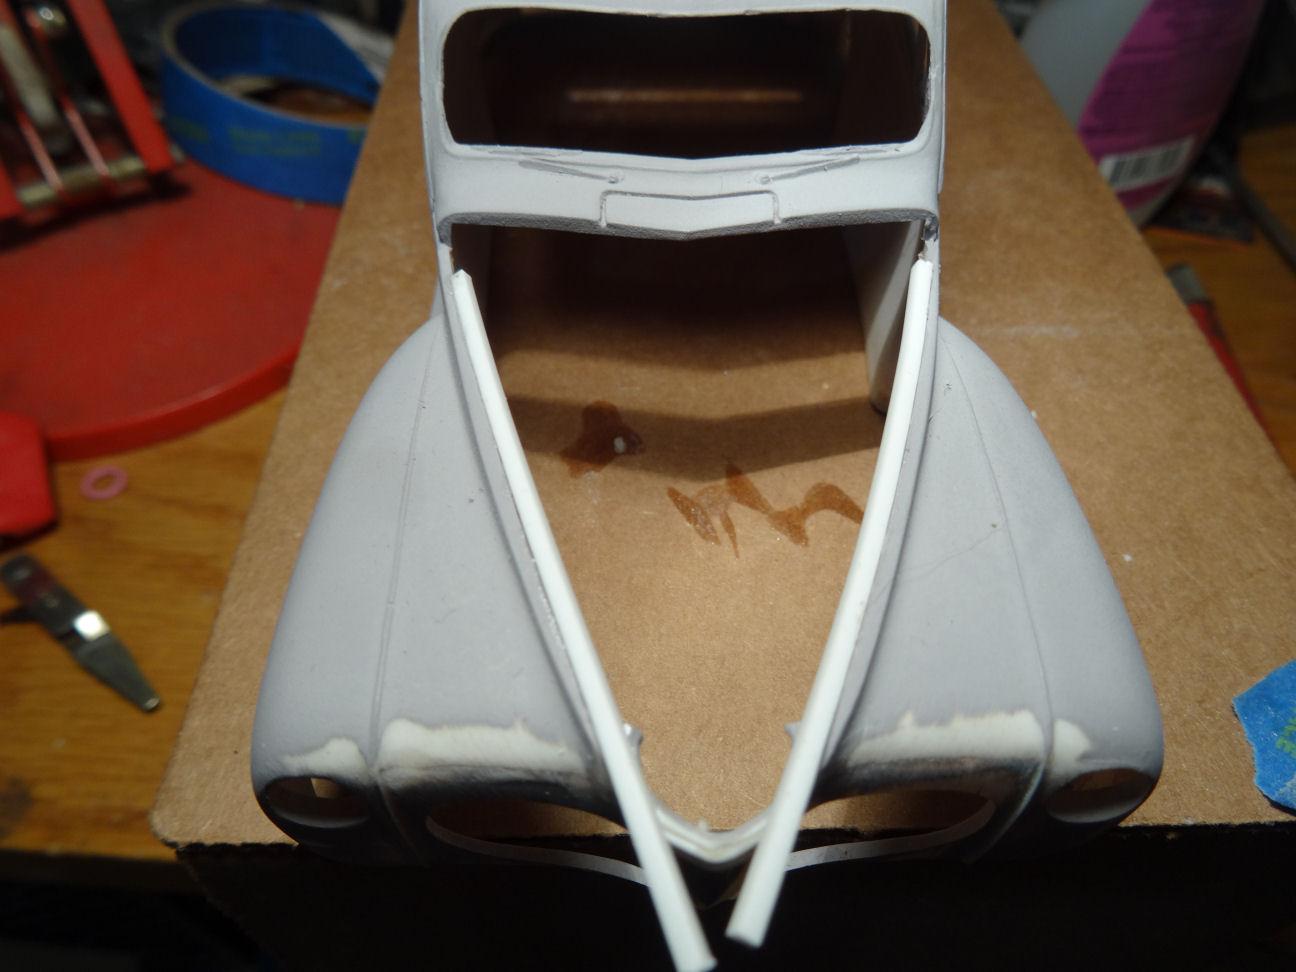
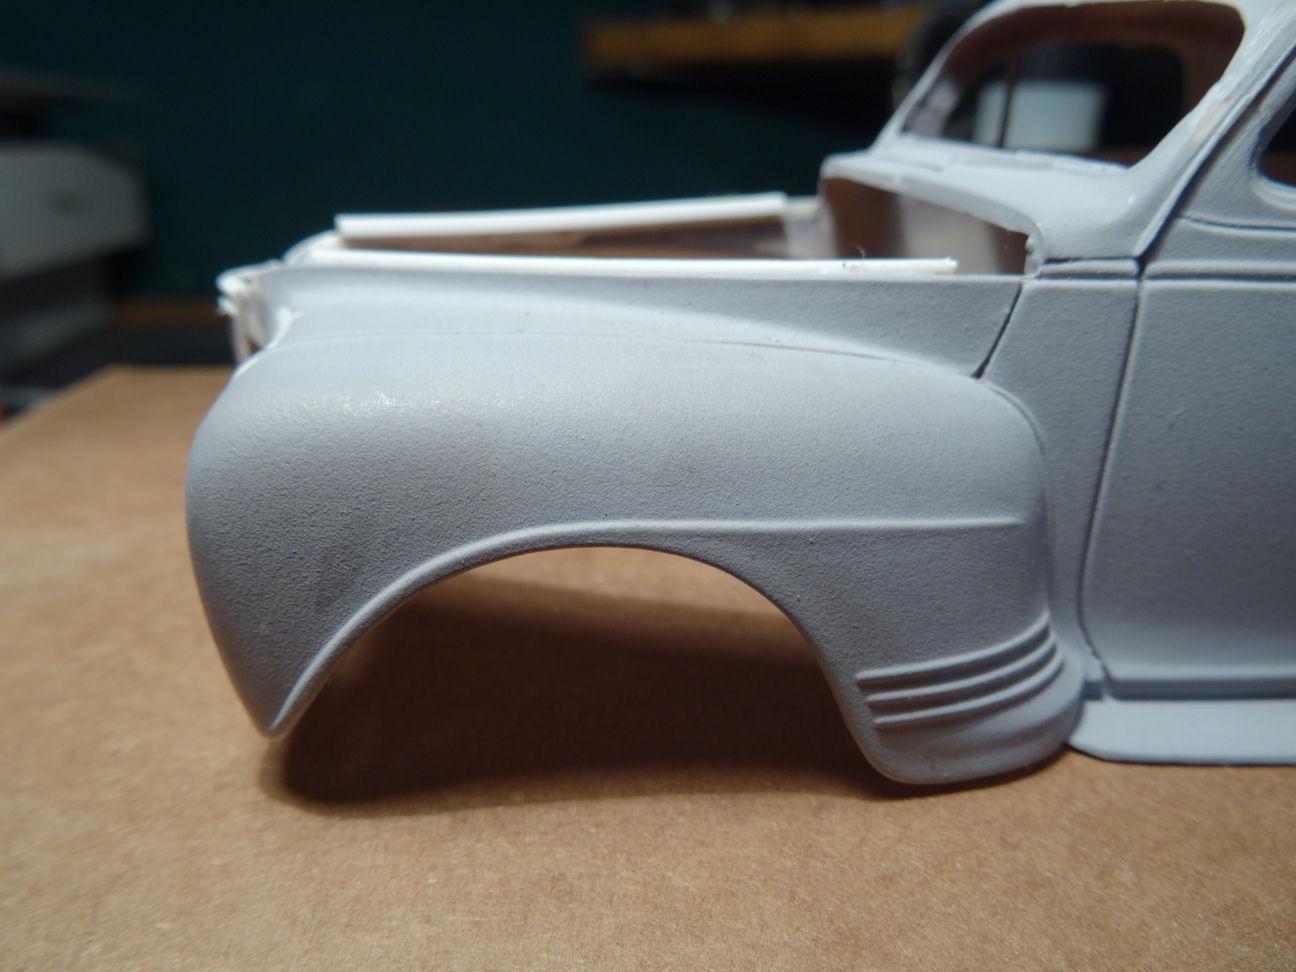
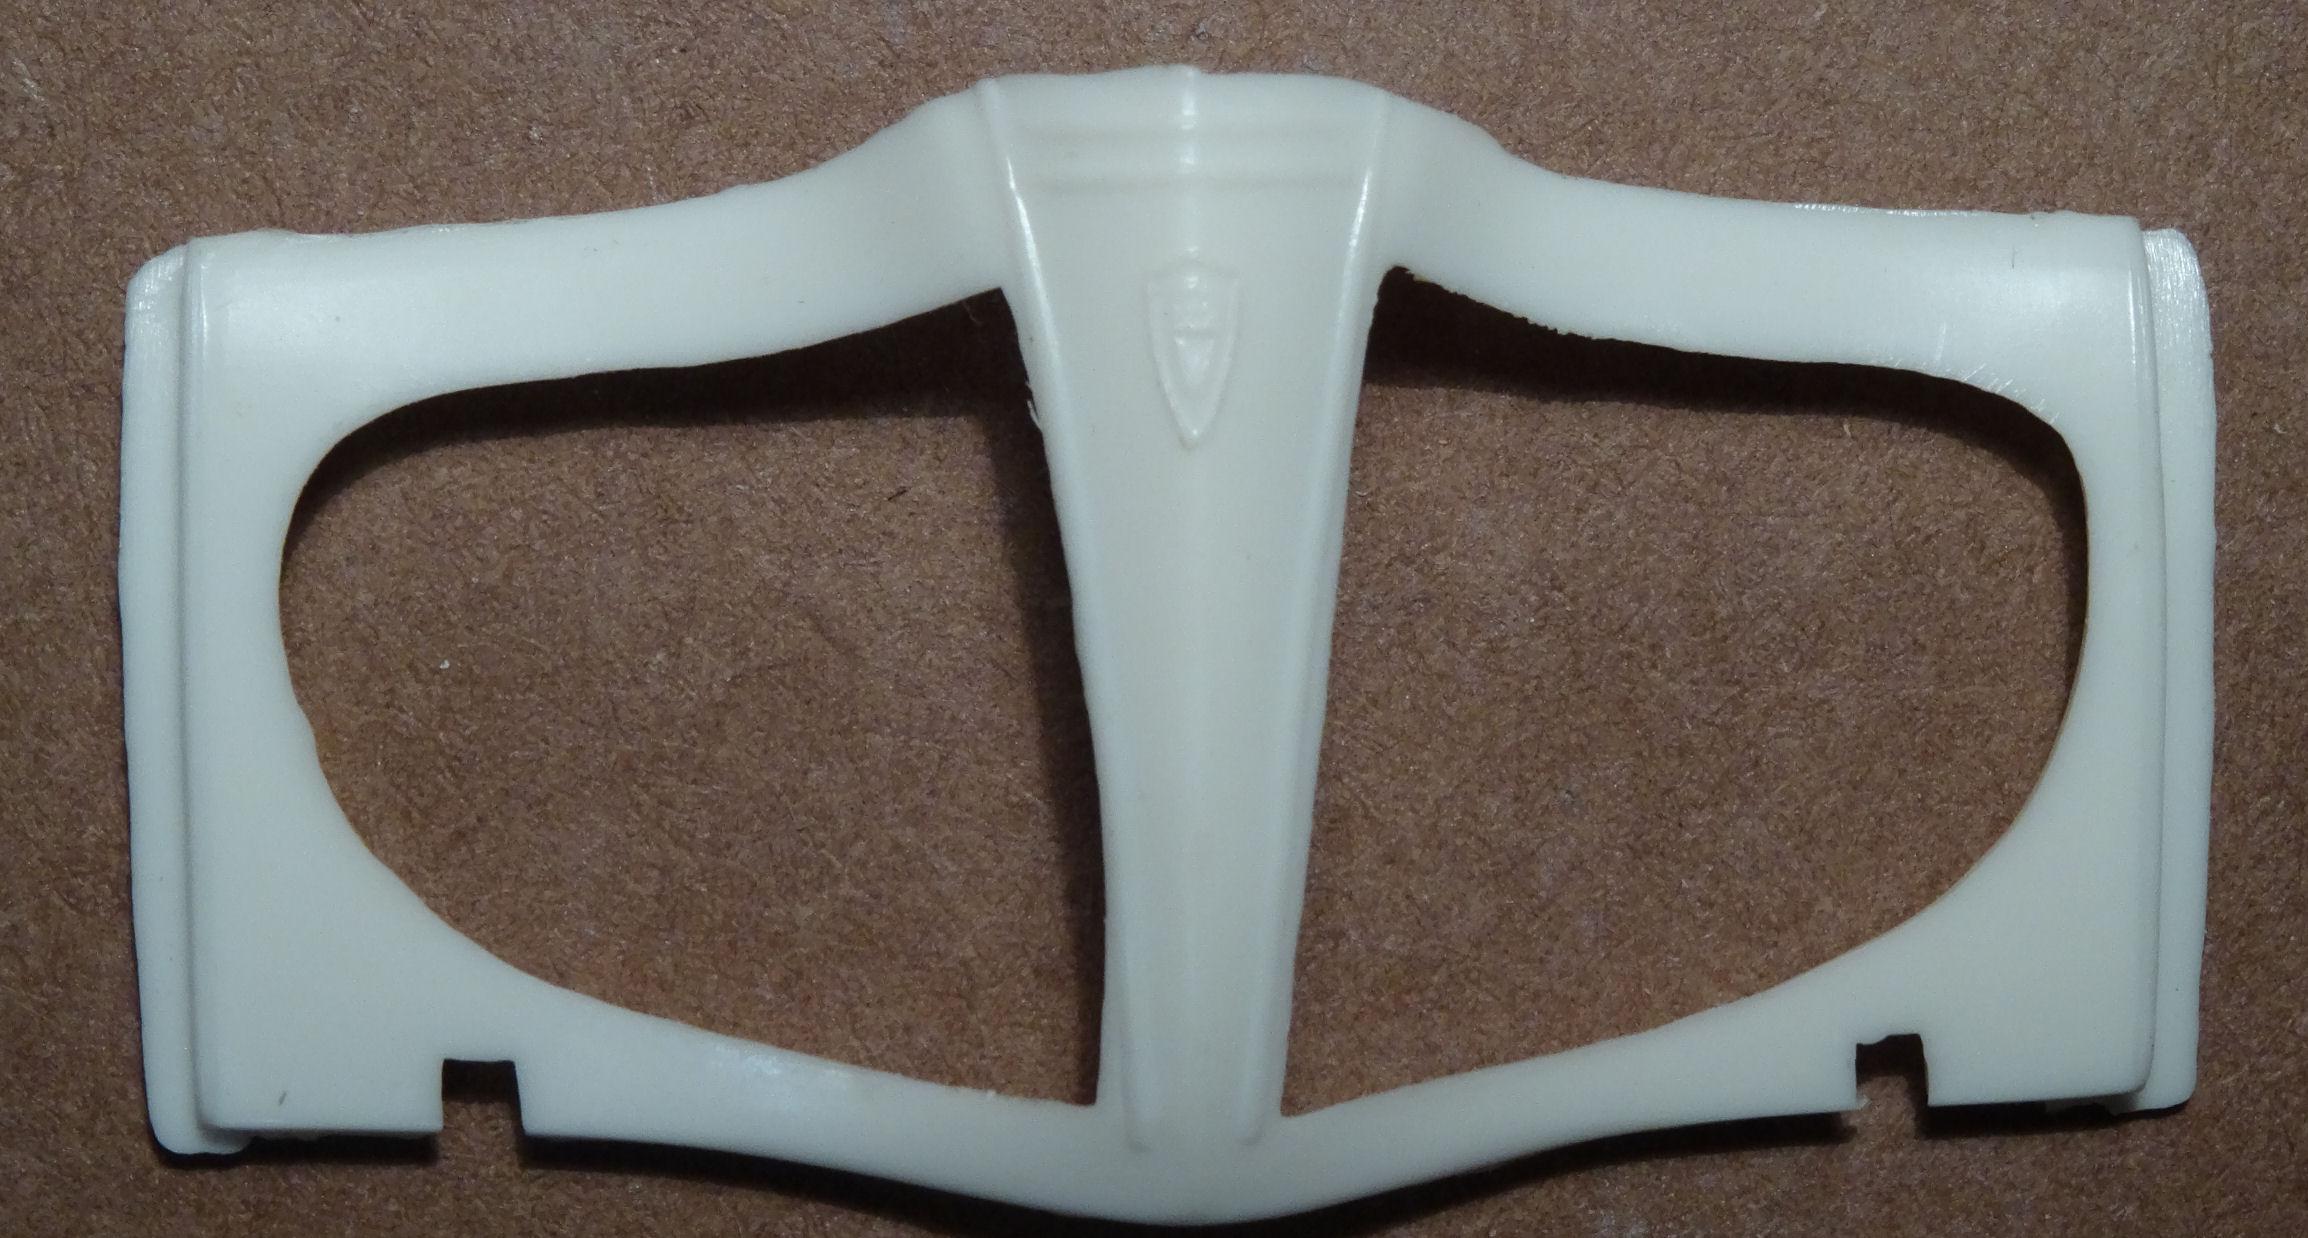
THE COUPE Spent the week mainly working on the Coupe which is a bit ironic as the Woody was the original project I started in the first place. To backtrack a bit the coupe only came about because of the bits leftover from dissecting a junk body for it's nose to marry to the Woody back half. This left me with half a coupe, and as I don't like to let anything go to waste, trying to figure out what to do with it. That half a Coupe donated the front part of it's roof to assist in the chopped top on this Coupe. So one coupe gave it's life so two others could live. What remained were these random bit of parts. I had thought about using the rear fenders on the Woody but changed my mind. Honestly, once dove into the Coupe I started having second thoughts about my first choice to get back into this hobby. A lot of issues with the kit started to reveal themselves. If you’ve followed along with Cusomline’s build you will see that we are both fighting with the nose. I guess it’s better to work out the issues now on the Coupe before I get too deep on the Woody. The Coupe is to be a resto-mod and I decided to eliminate the front bumpers so the cutouts in the body needed to be filled in. Probably the only easy fix on the nose. A little scrap plastic, a little glue and a little sanding. Found some inspiration on the net. I like the stance of the red one and the headlight treatment on the black one. Probably because of the known issues with the kit headlights LOL. The real issue with the body’s beak is the trim. The trim detail is a bit faint and off center. Also along the top center it is uneven. And the hood doesn't want to stay in place. Below is a shot of just the center section from the kit. Look at the top and the faint trim lines. Those vertical lines at either edge are meant to be the fender welting. Taking a cue from Centerline the trim has been removed and replaced with half round styrene rod. .040” for the vertical and .030” for the horizontal. Another issue with the nose is the grill itself. The inner edges have a vertical bar which is not true to the 1:1 Plymouth. So while adding the new vertical trim I placed it over this bar to try and resolve this problem Not the best fix but I feel a little better about it. The trouble with this fix as NOBLNG pointed out, the center of the nose piece is too wide compared to the 1:1 '41. And with this mod I just made it look widerI Well, we have to make concessions somewhere. But we still have issues with the hood. At first I thought about adding hinges to the hood to keep it centered. But was reminded of how the hood sits on the real '41 and had another idea. There is a wide edge under the hood upon where it rests. Those black circles are rubber bumpers. So to replicate this I added square stock along the inner edge of the hood opening and raised it slightly. This keeps the hood centered and helps to maintain an even gap. Now to do some cleanup work and hit it with some primer so we can assess where we are at. 'till next time.
-
Greg Great idea on that BMF. I was getting ready to order some of the regular BMF so I'll add a sheet of the black.
-
Went up in the attic when I go home tonight and dug out the Rocker release which is from 1978, it is the earliest one I have that isn't sealed. The grill center piece has the same issues.
-
David You have me curious now. I'm having the same issues as Jim and I thought I was working with two early releases on my project. I'll have to go up in the attic this weekend as I have one ore two un-built early releases stashed and take a look. Len
-
James, you caught my attention when you said "Original Issue 69 Cobra" so I had to take a look. I remember when this came out I got really excited and bought a whole bunch of them. However, and not to take away from your build in any way, this is not the original issue. The original issue was released in 1969 as a hardtop/convertible. Could be built either way with a separate hardtop. It was derived from the 1968 Torino Pace Car kit from the year before. This kit is actually a modified reissue of the 1969 Torino GT Fastback annual kit. Anyhow, sorry for the history lesson but very happy to see your build and it looks fantastic. Looking forward to seeing what you do with the kit the second time around.
-
Wow, haven't see one of these in a long time. Looks great, you did a super job!
-
Really nice looking build. I particularly like the color matching stripe on the camper top.
-
Very cool looking. Looks like something Ford could have done as a low budged Futura.
-
Nice to see a buildup of this. I thought about getting one. The real one is currently on display at the Saratoga Auto Museum in New York.
-
Really nice looking build. I like the color combo. Worked with a guy who owned a real one back in the day, nice riding car.
-
Neat project Mark, I especially like the interior. I have a few of these stashed away makes me want to break one out of attic prison.
-
AMT Dodge D-50 coke
LennyB replied to athlon's topic in Model Trucks: Pickups, Vans, SUVs, Light Commercial
Great looking build, brings back memories of a 1/1 one I had back in the day. Best vehicle I ever owned. Put 280K on it and it was still going strong when I got rid of it. I have one of these kits stashed away with plans to do a replica of the one I owned. -
Yes, the hood is a pain. I filed away some of the bottom of the sides on the hood to get the nose to drop down a bit. But my hood is slightly warped and it wants to drift to the left rather then sit where it belongs. Probably going to need to fabricate some type of hinges to hold it in place as it's never going to sit in the right place on it's own. This is where I'm at right now. The glue is still drying so I have to let it sit overnight before I can clean this up and shoot some primer to get a proper look at it.