GMasterG
-
Posts
114 -
Joined
-
Last visited
Content Type
Profiles
Forums
Events
Gallery
Everything posted by GMasterG
-
Richard Petty's 71 Roadrunner
GMasterG replied to GMasterG's topic in WIP: Stock Cars (NASCAR, Super Stock, Late Model, etc.)
-
Richard Petty's 71 Roadrunner
GMasterG replied to GMasterG's topic in WIP: Stock Cars (NASCAR, Super Stock, Late Model, etc.)
Now ya tell me!! I see the error of my ways. Thanks. Nice build too. You’ve set the bar for the chrome finish. Very impressive. -
Richard Petty's 71 Roadrunner
GMasterG replied to GMasterG's topic in WIP: Stock Cars (NASCAR, Super Stock, Late Model, etc.)
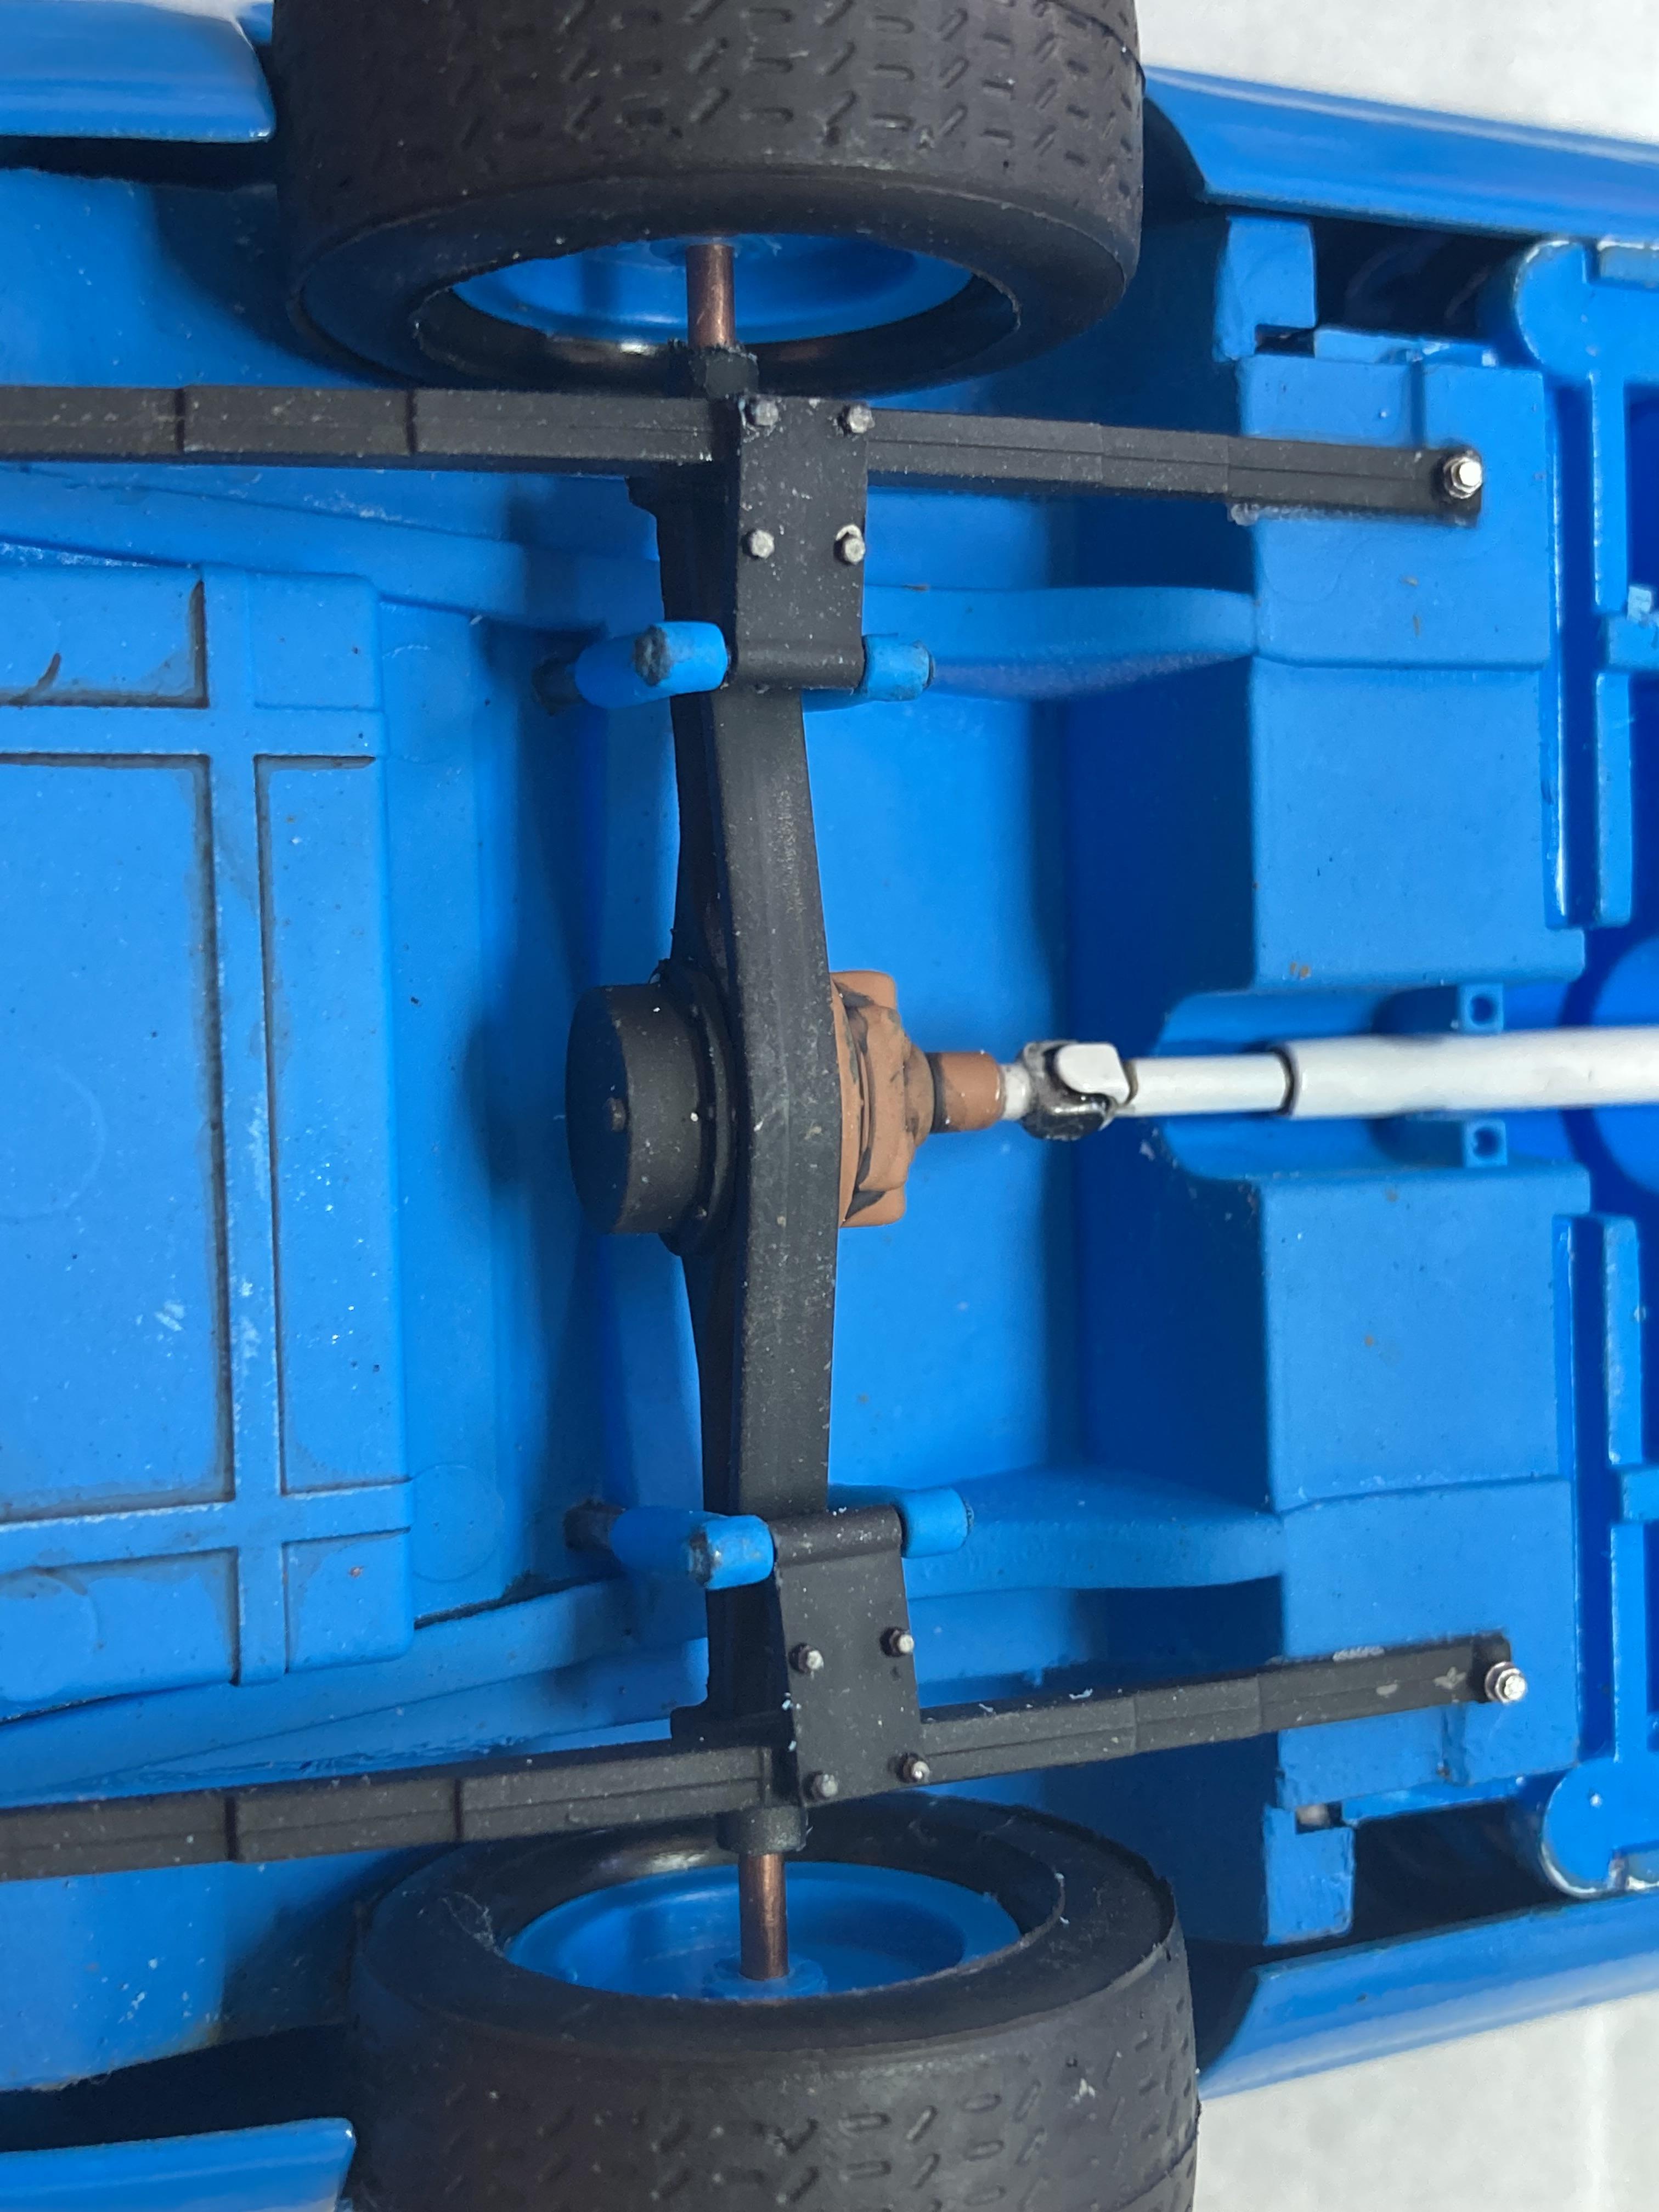
Approaching the end of this project and I’m feeling very satisfied with the quality of the individual sub-assemblies as well as the overall build. These side farings took a little time and patience so as not to dull or scrape the chrome: I don’t use the axles that come with the kit. Instead I use a couple of short lengths of 2mm brass rod. You can gently force it into the small holes in the hubs of the rear wheels to achieve a nice tight aligned fit and then you just slide the other end into the axle until you have the wheels aligned in the way that you want. Here is a picture showing the wheels sitting prose revealing the two pieces of brass tube that serve as the axles: And here are a couple of pictures of the stance that I’ve achieved on this build: I’m always holding my breath once the engine gets locked in hoping that there will be enough clearance for the hood to sit flat once the air filter is on top of the intake manifold: But that’s a task for another day.
-
Richard Petty's 71 Roadrunner
GMasterG replied to GMasterG's topic in WIP: Stock Cars (NASCAR, Super Stock, Late Model, etc.)
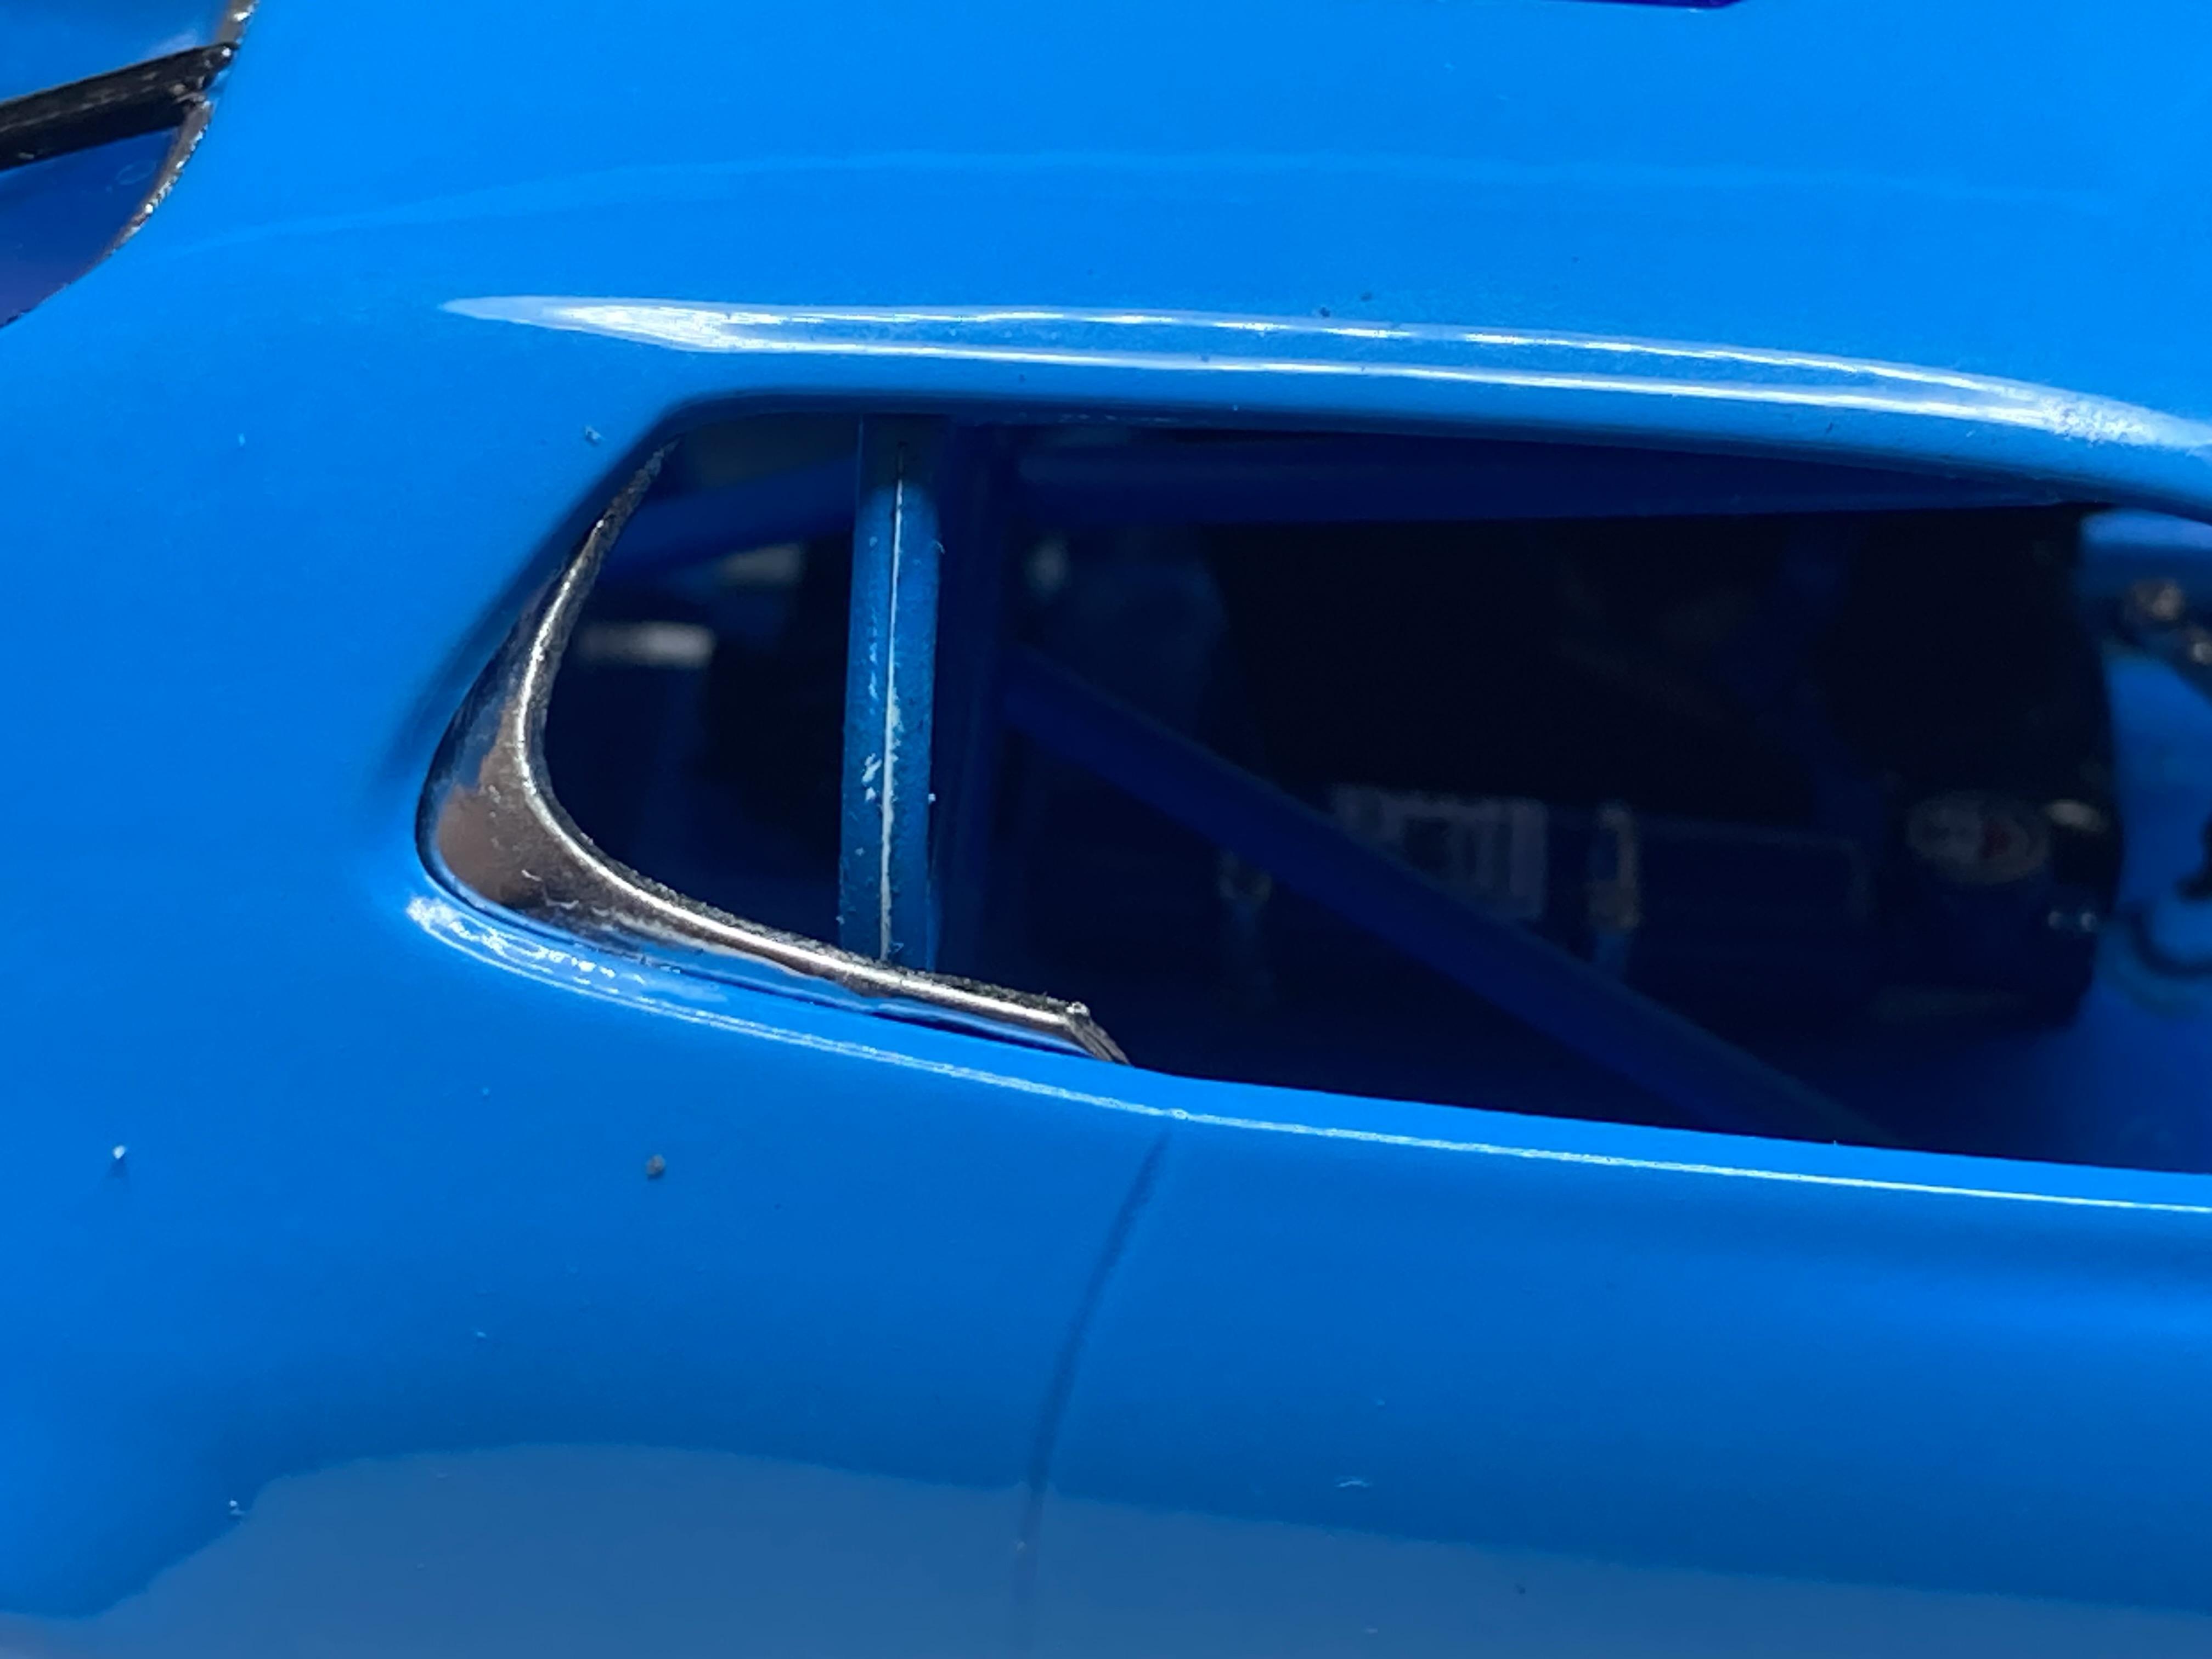
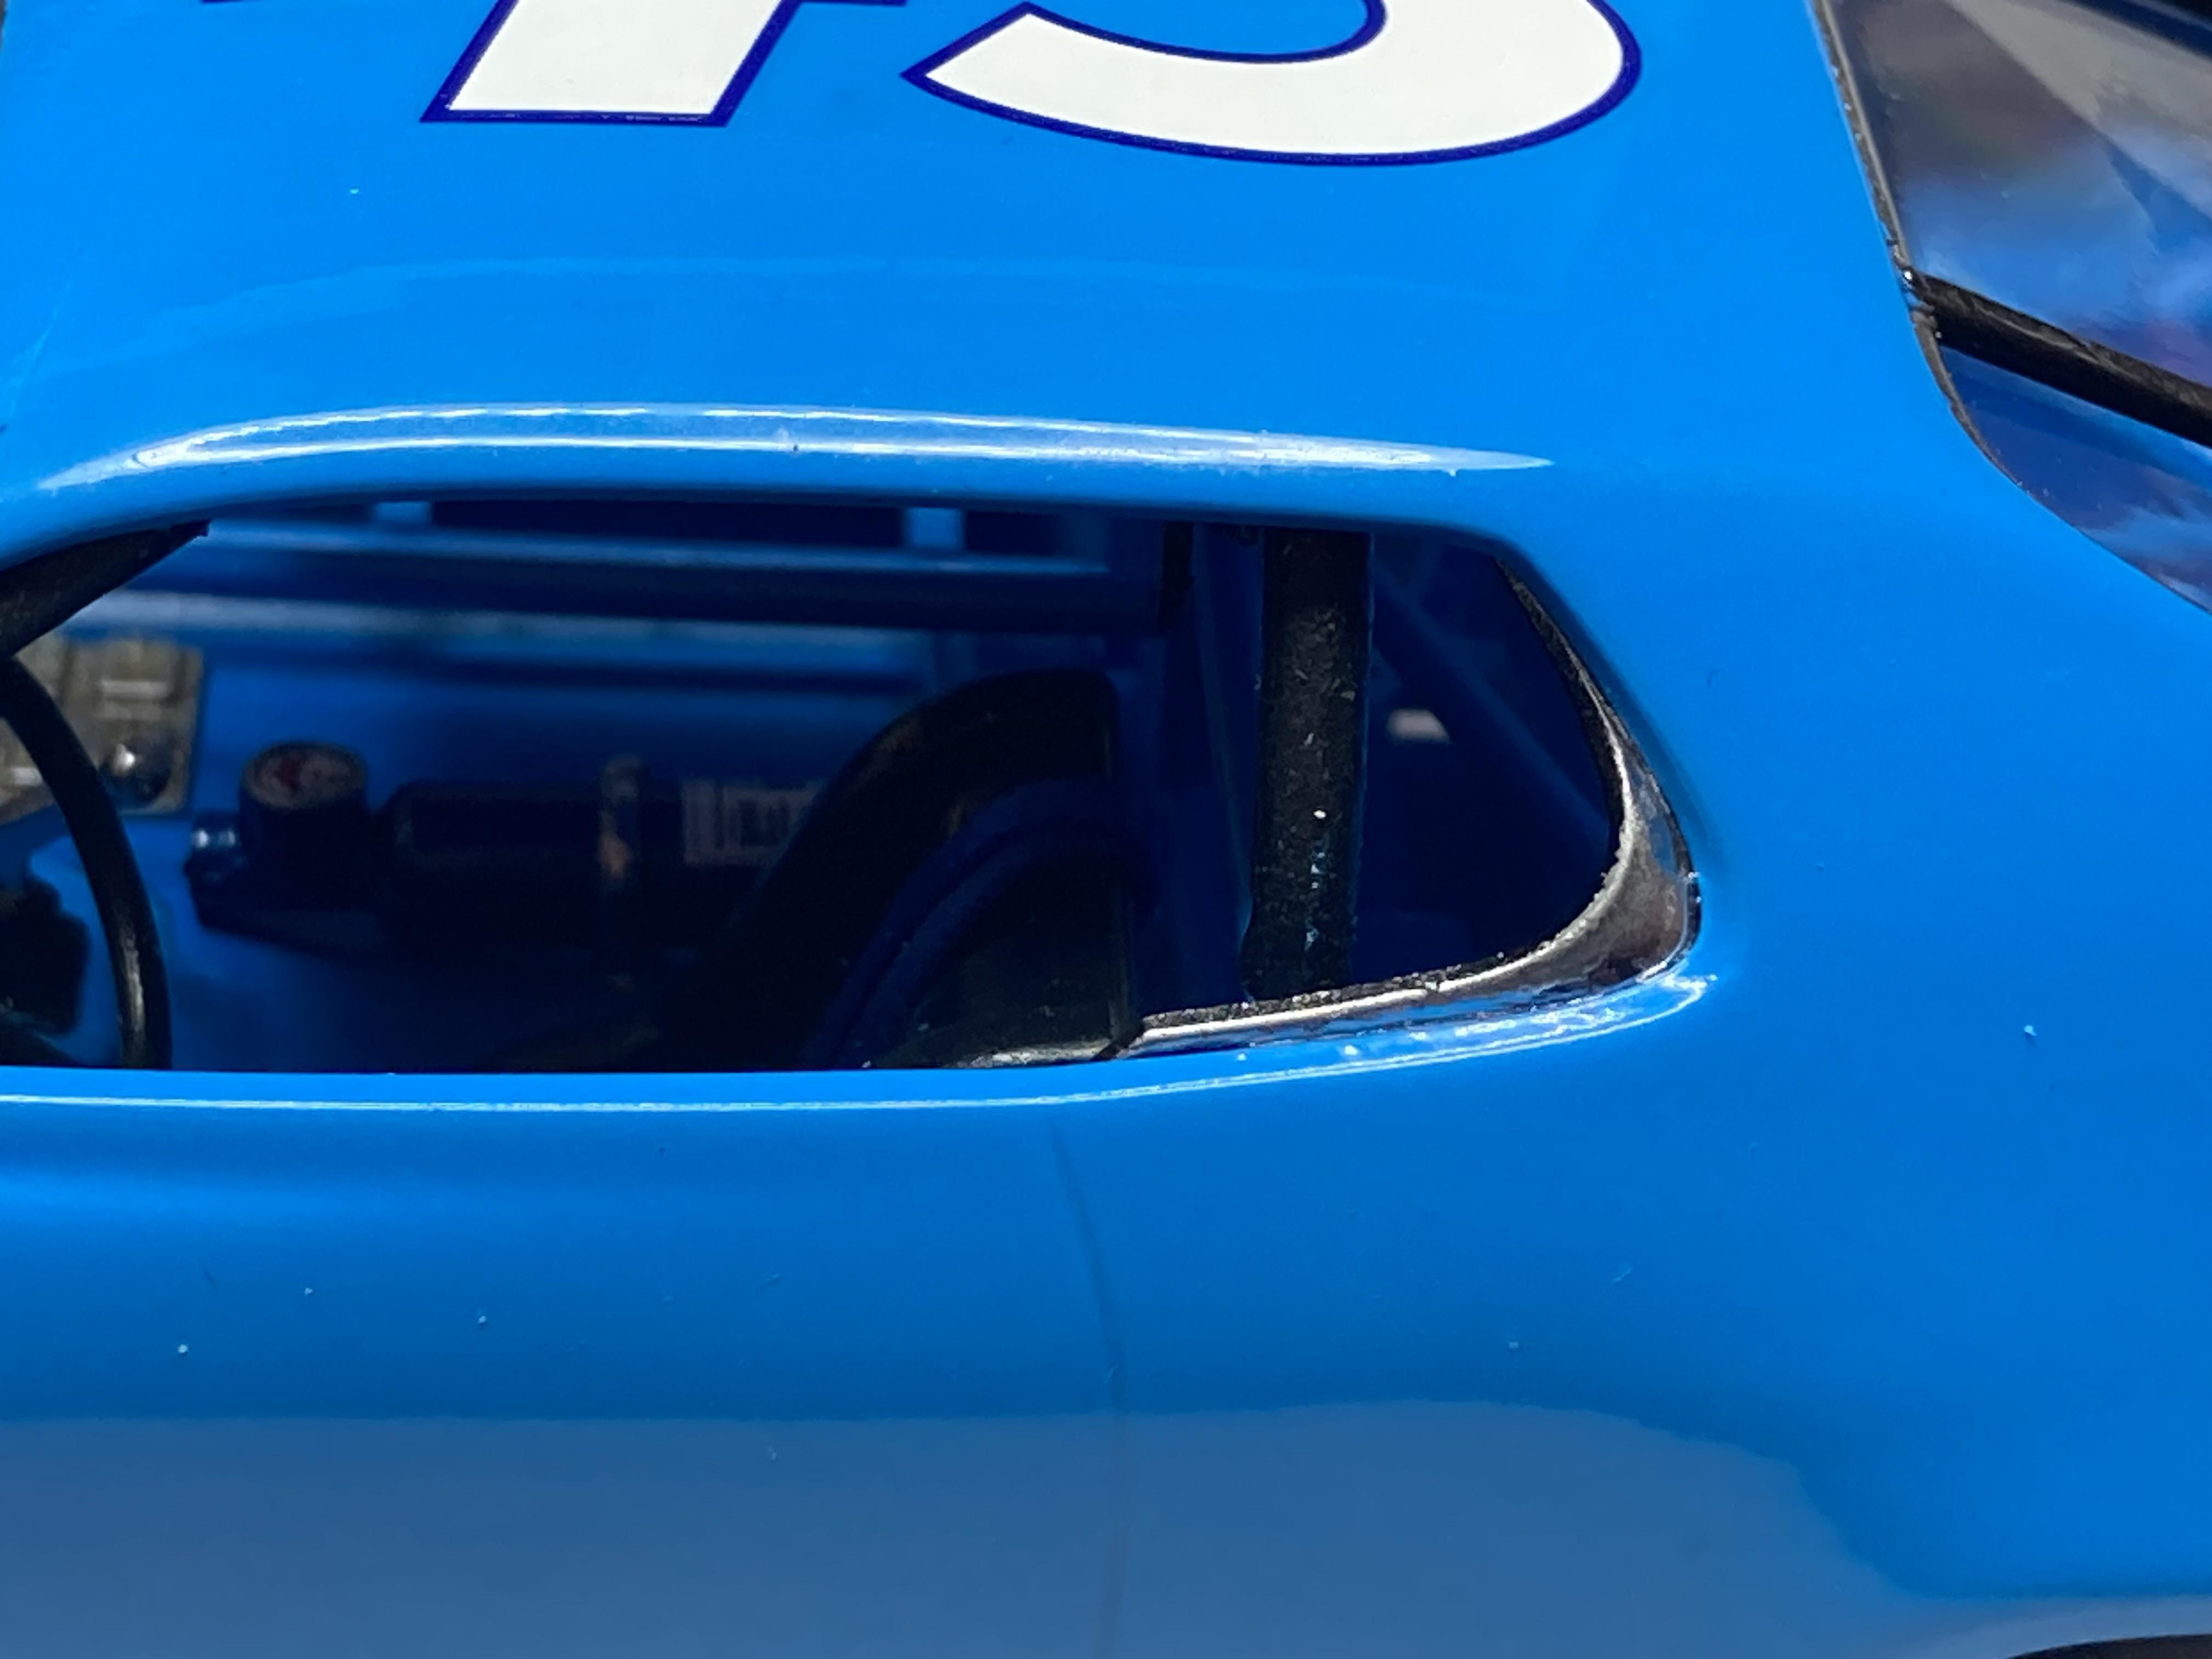
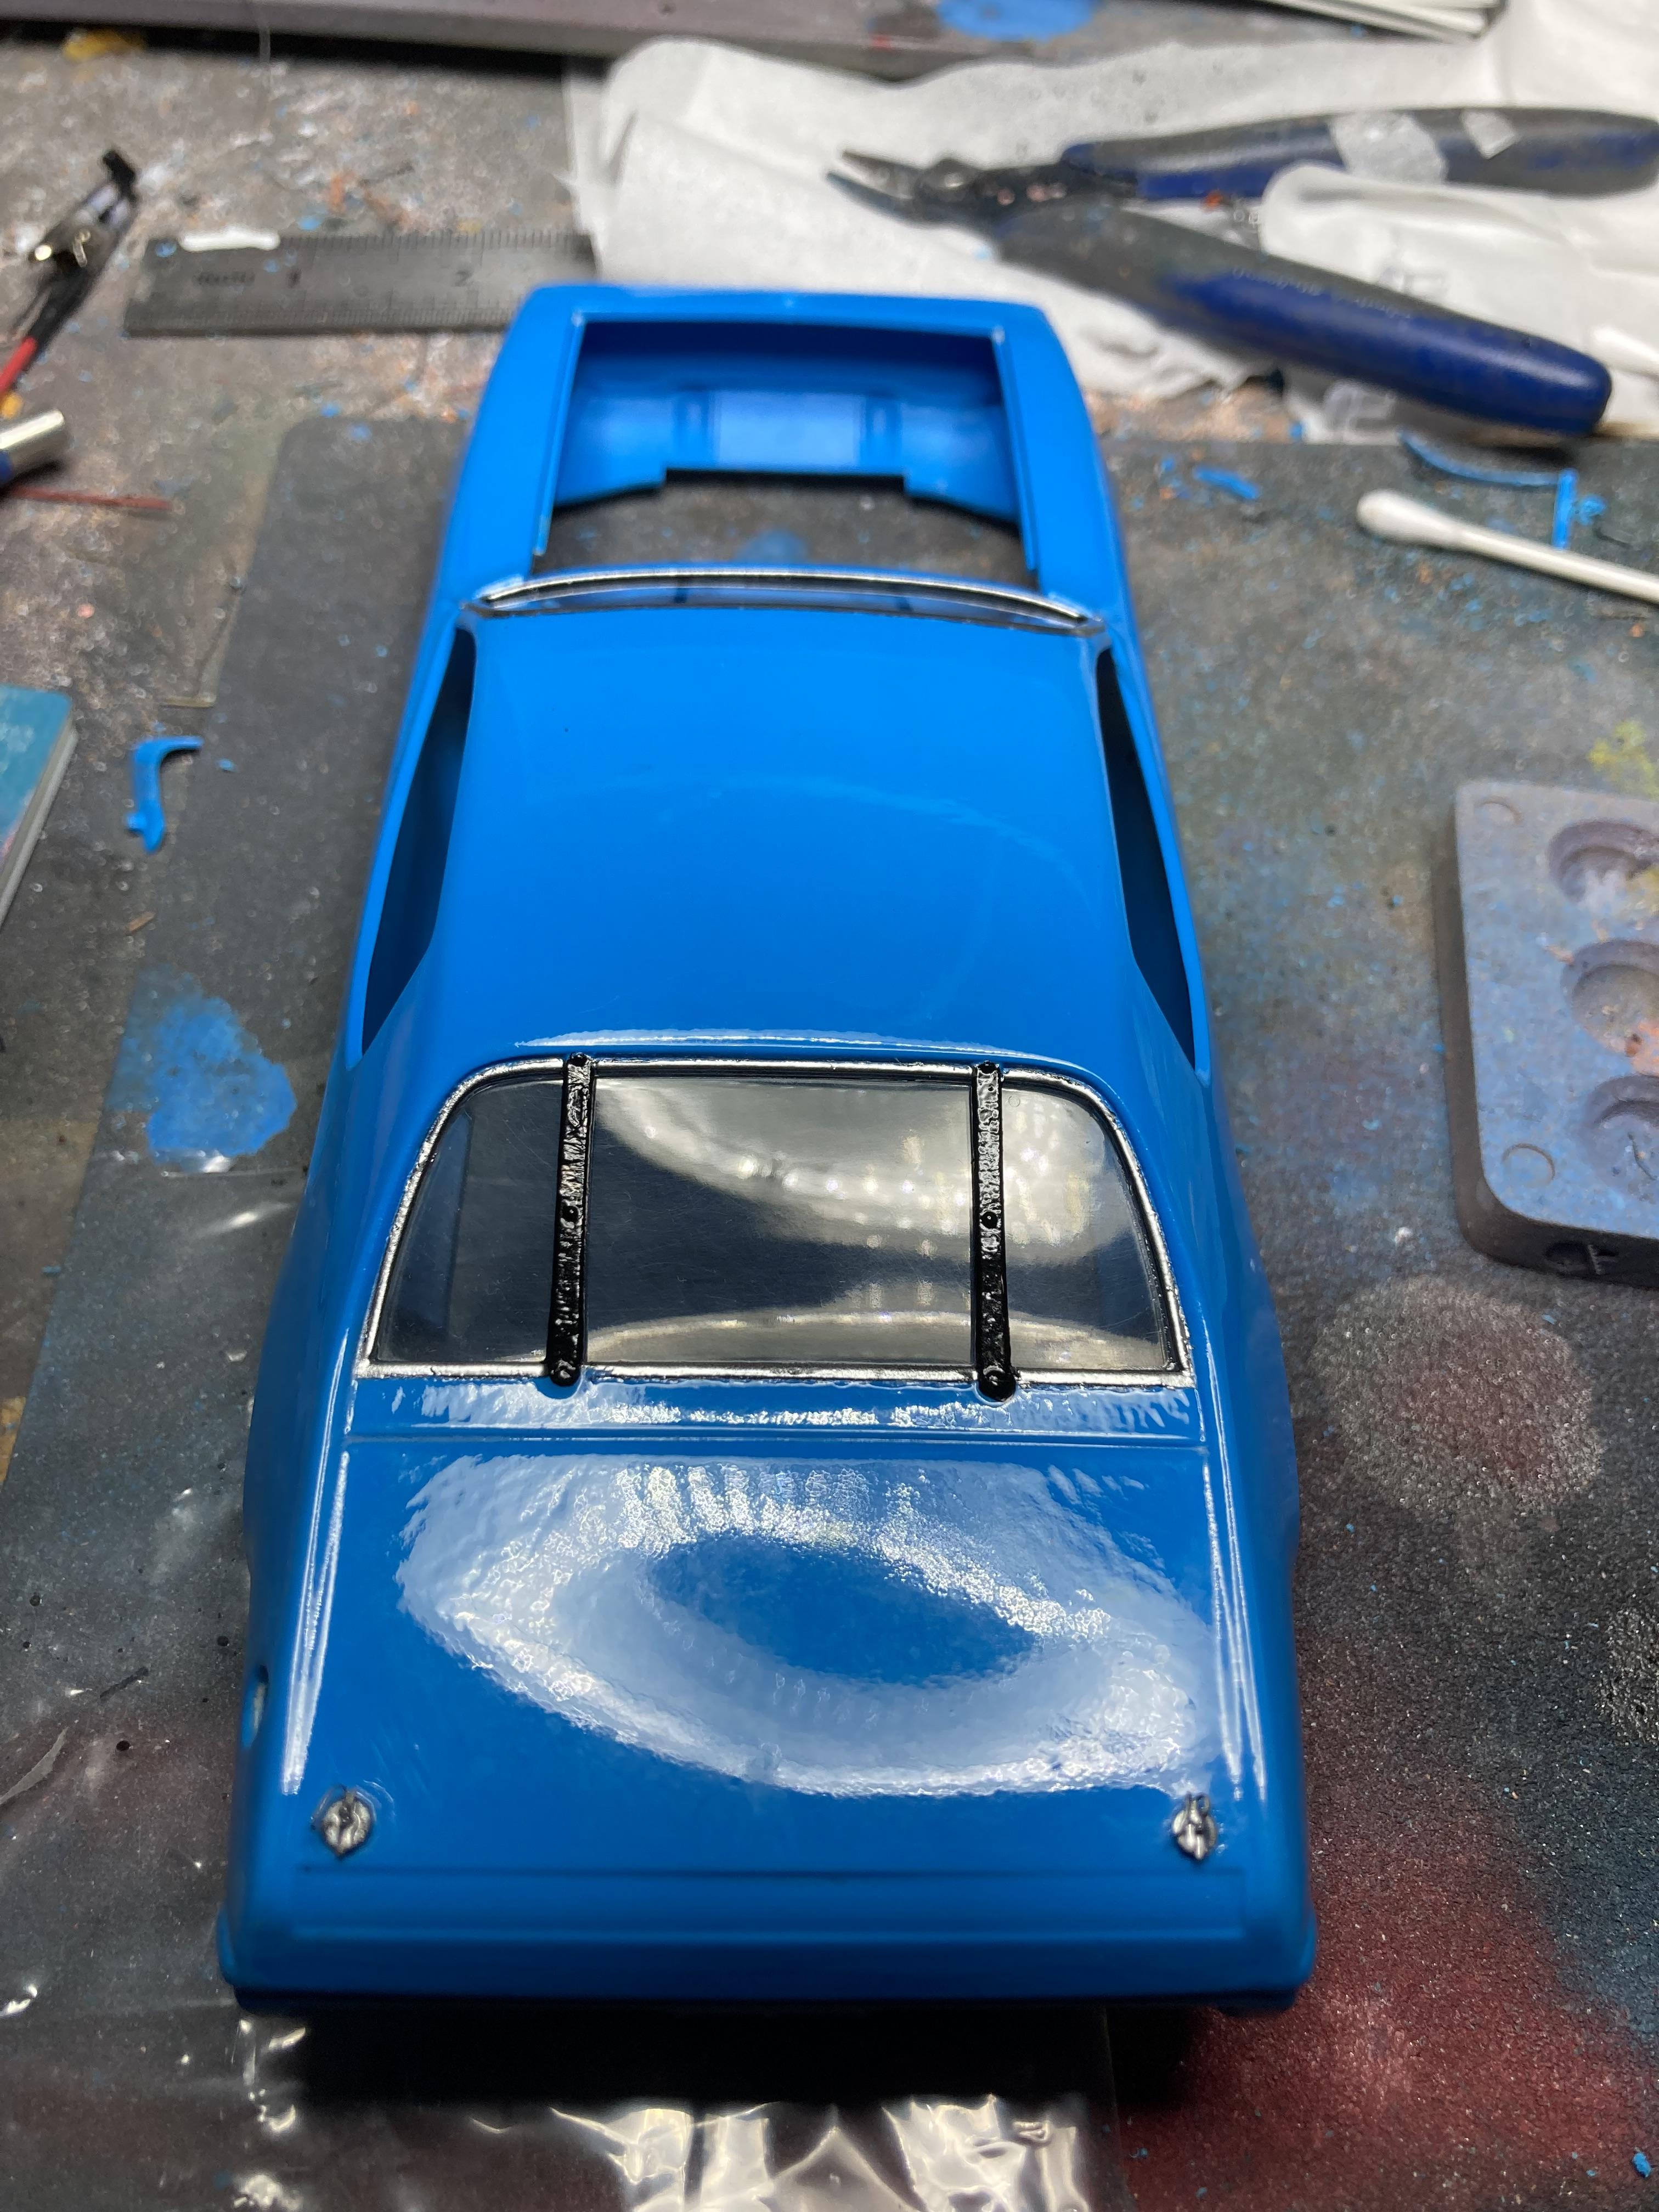
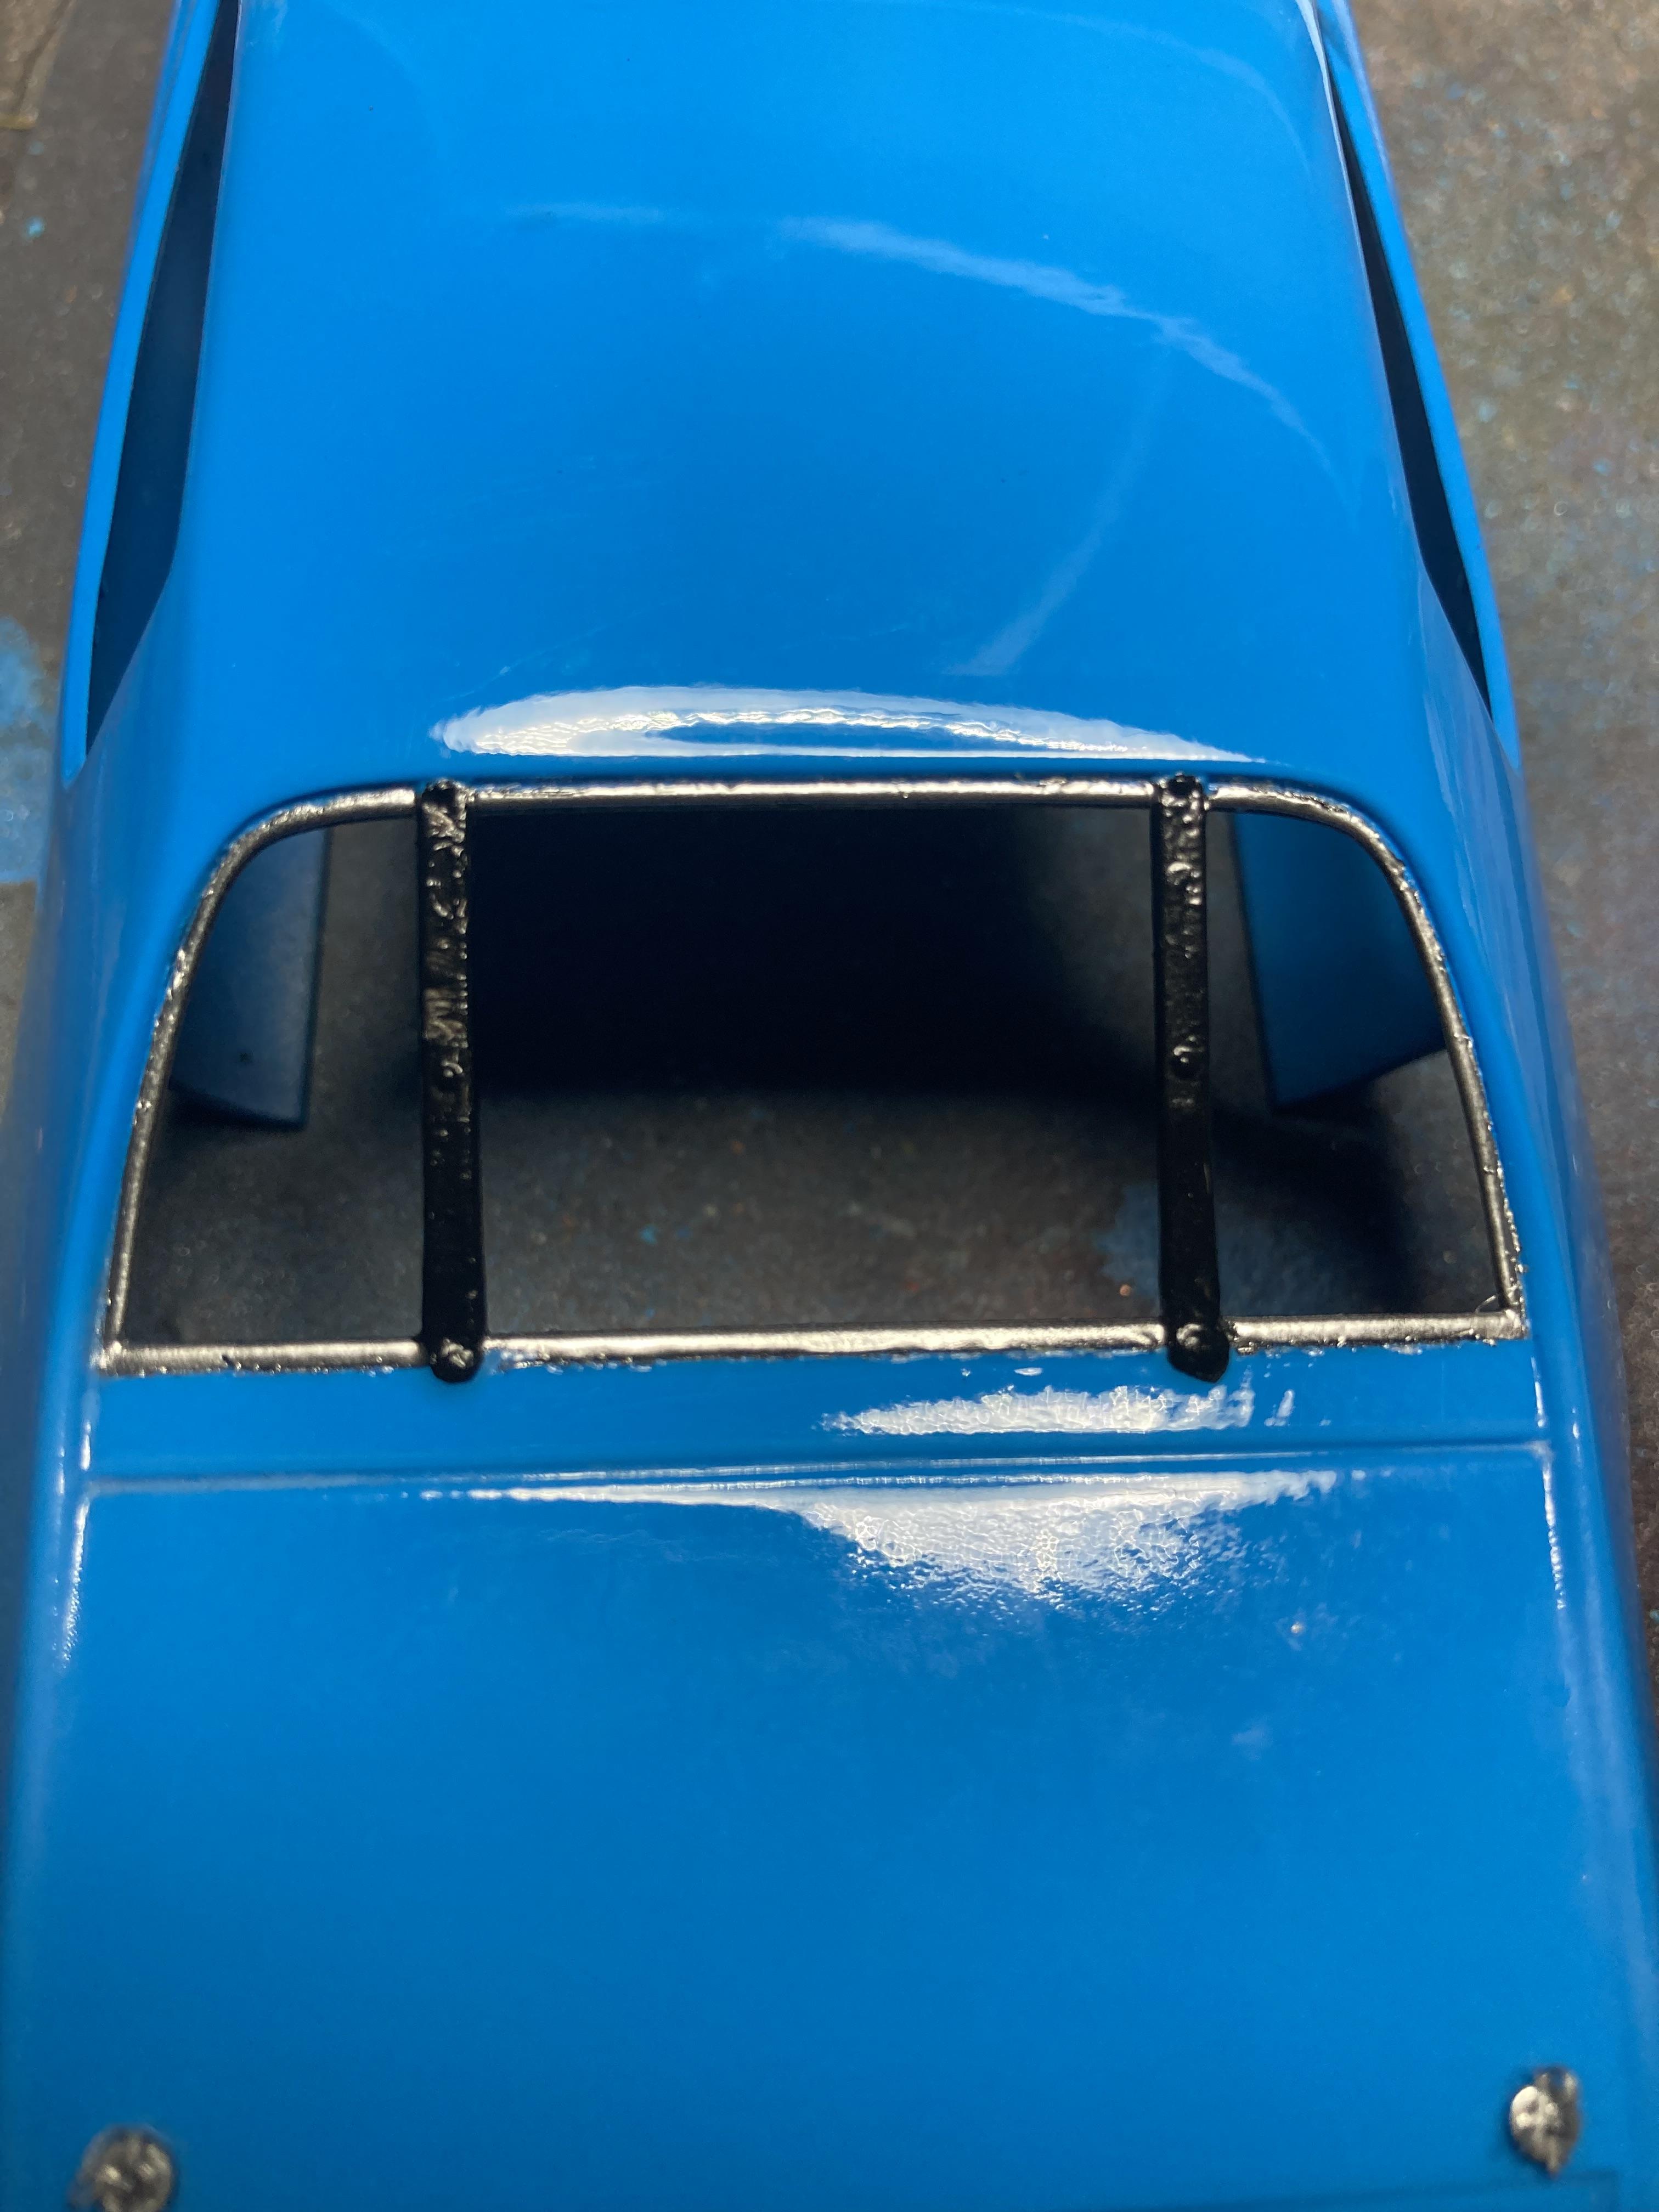
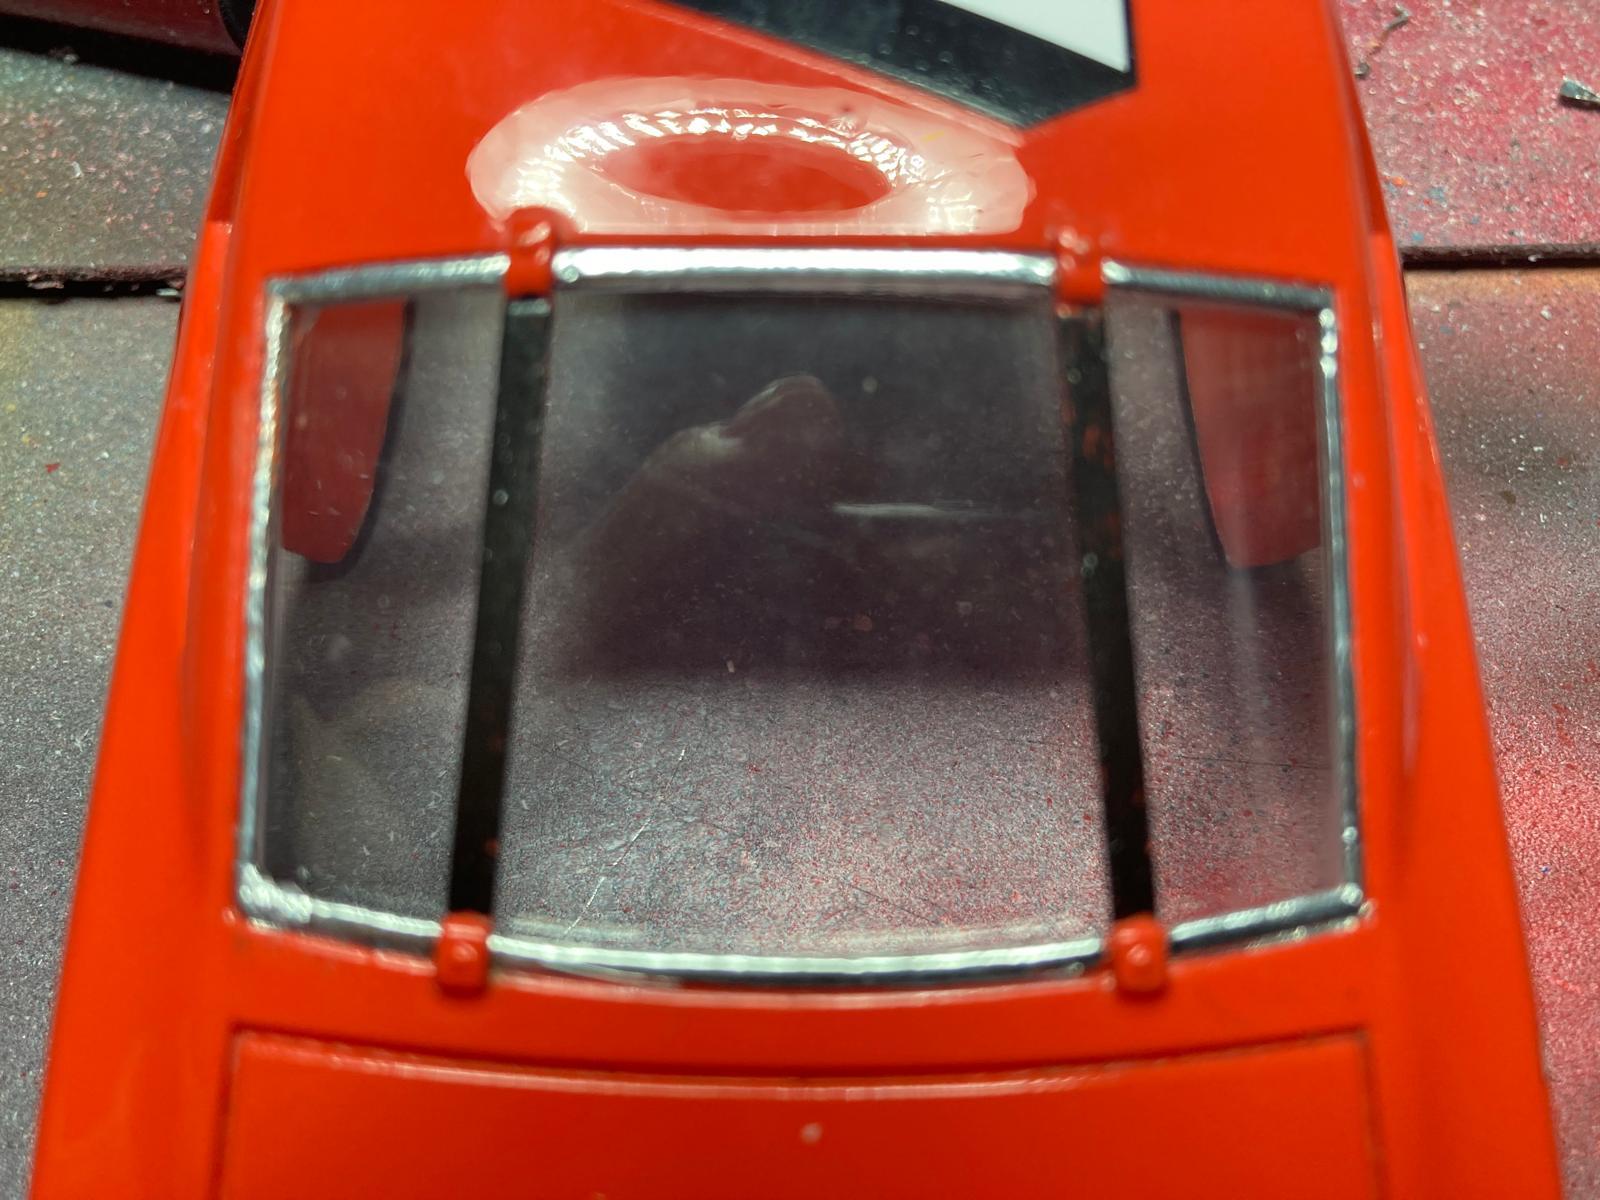
Using UV light-activated clear resin to fix the clear glassware has become my preferred method. By sitting the glass in place you can then run a bead of resin along the top edge of the glass and the underside of the body and the capillary action of the resin will let it flow into whatever groove or seat the glass panel is sitting in. It avoids unnecessary handling and the risk of panels sliding over surfaces that have already been prepped with some form of adhesive. You can see below where the resin has seeped into the grooves of the plastic body and the window and even managed to run up the back of one of the blow-out bars just for good measure and all without getting a drop or a smear on the clear panel itself.
-
Richard Petty's 71 Roadrunner
GMasterG replied to GMasterG's topic in WIP: Stock Cars (NASCAR, Super Stock, Late Model, etc.)
I’m not sure if I find this process as meditative; I’m certainly glad when it’s over and there are minimal casualties. Whilst it’s not perfect I try and make each successive model in some way the beneficiary of its predecessors and I’m a lot happier with my choice and application of chrome paint this time around.
-
Richard Petty's 71 Roadrunner
GMasterG replied to GMasterG's topic in WIP: Stock Cars (NASCAR, Super Stock, Late Model, etc.)
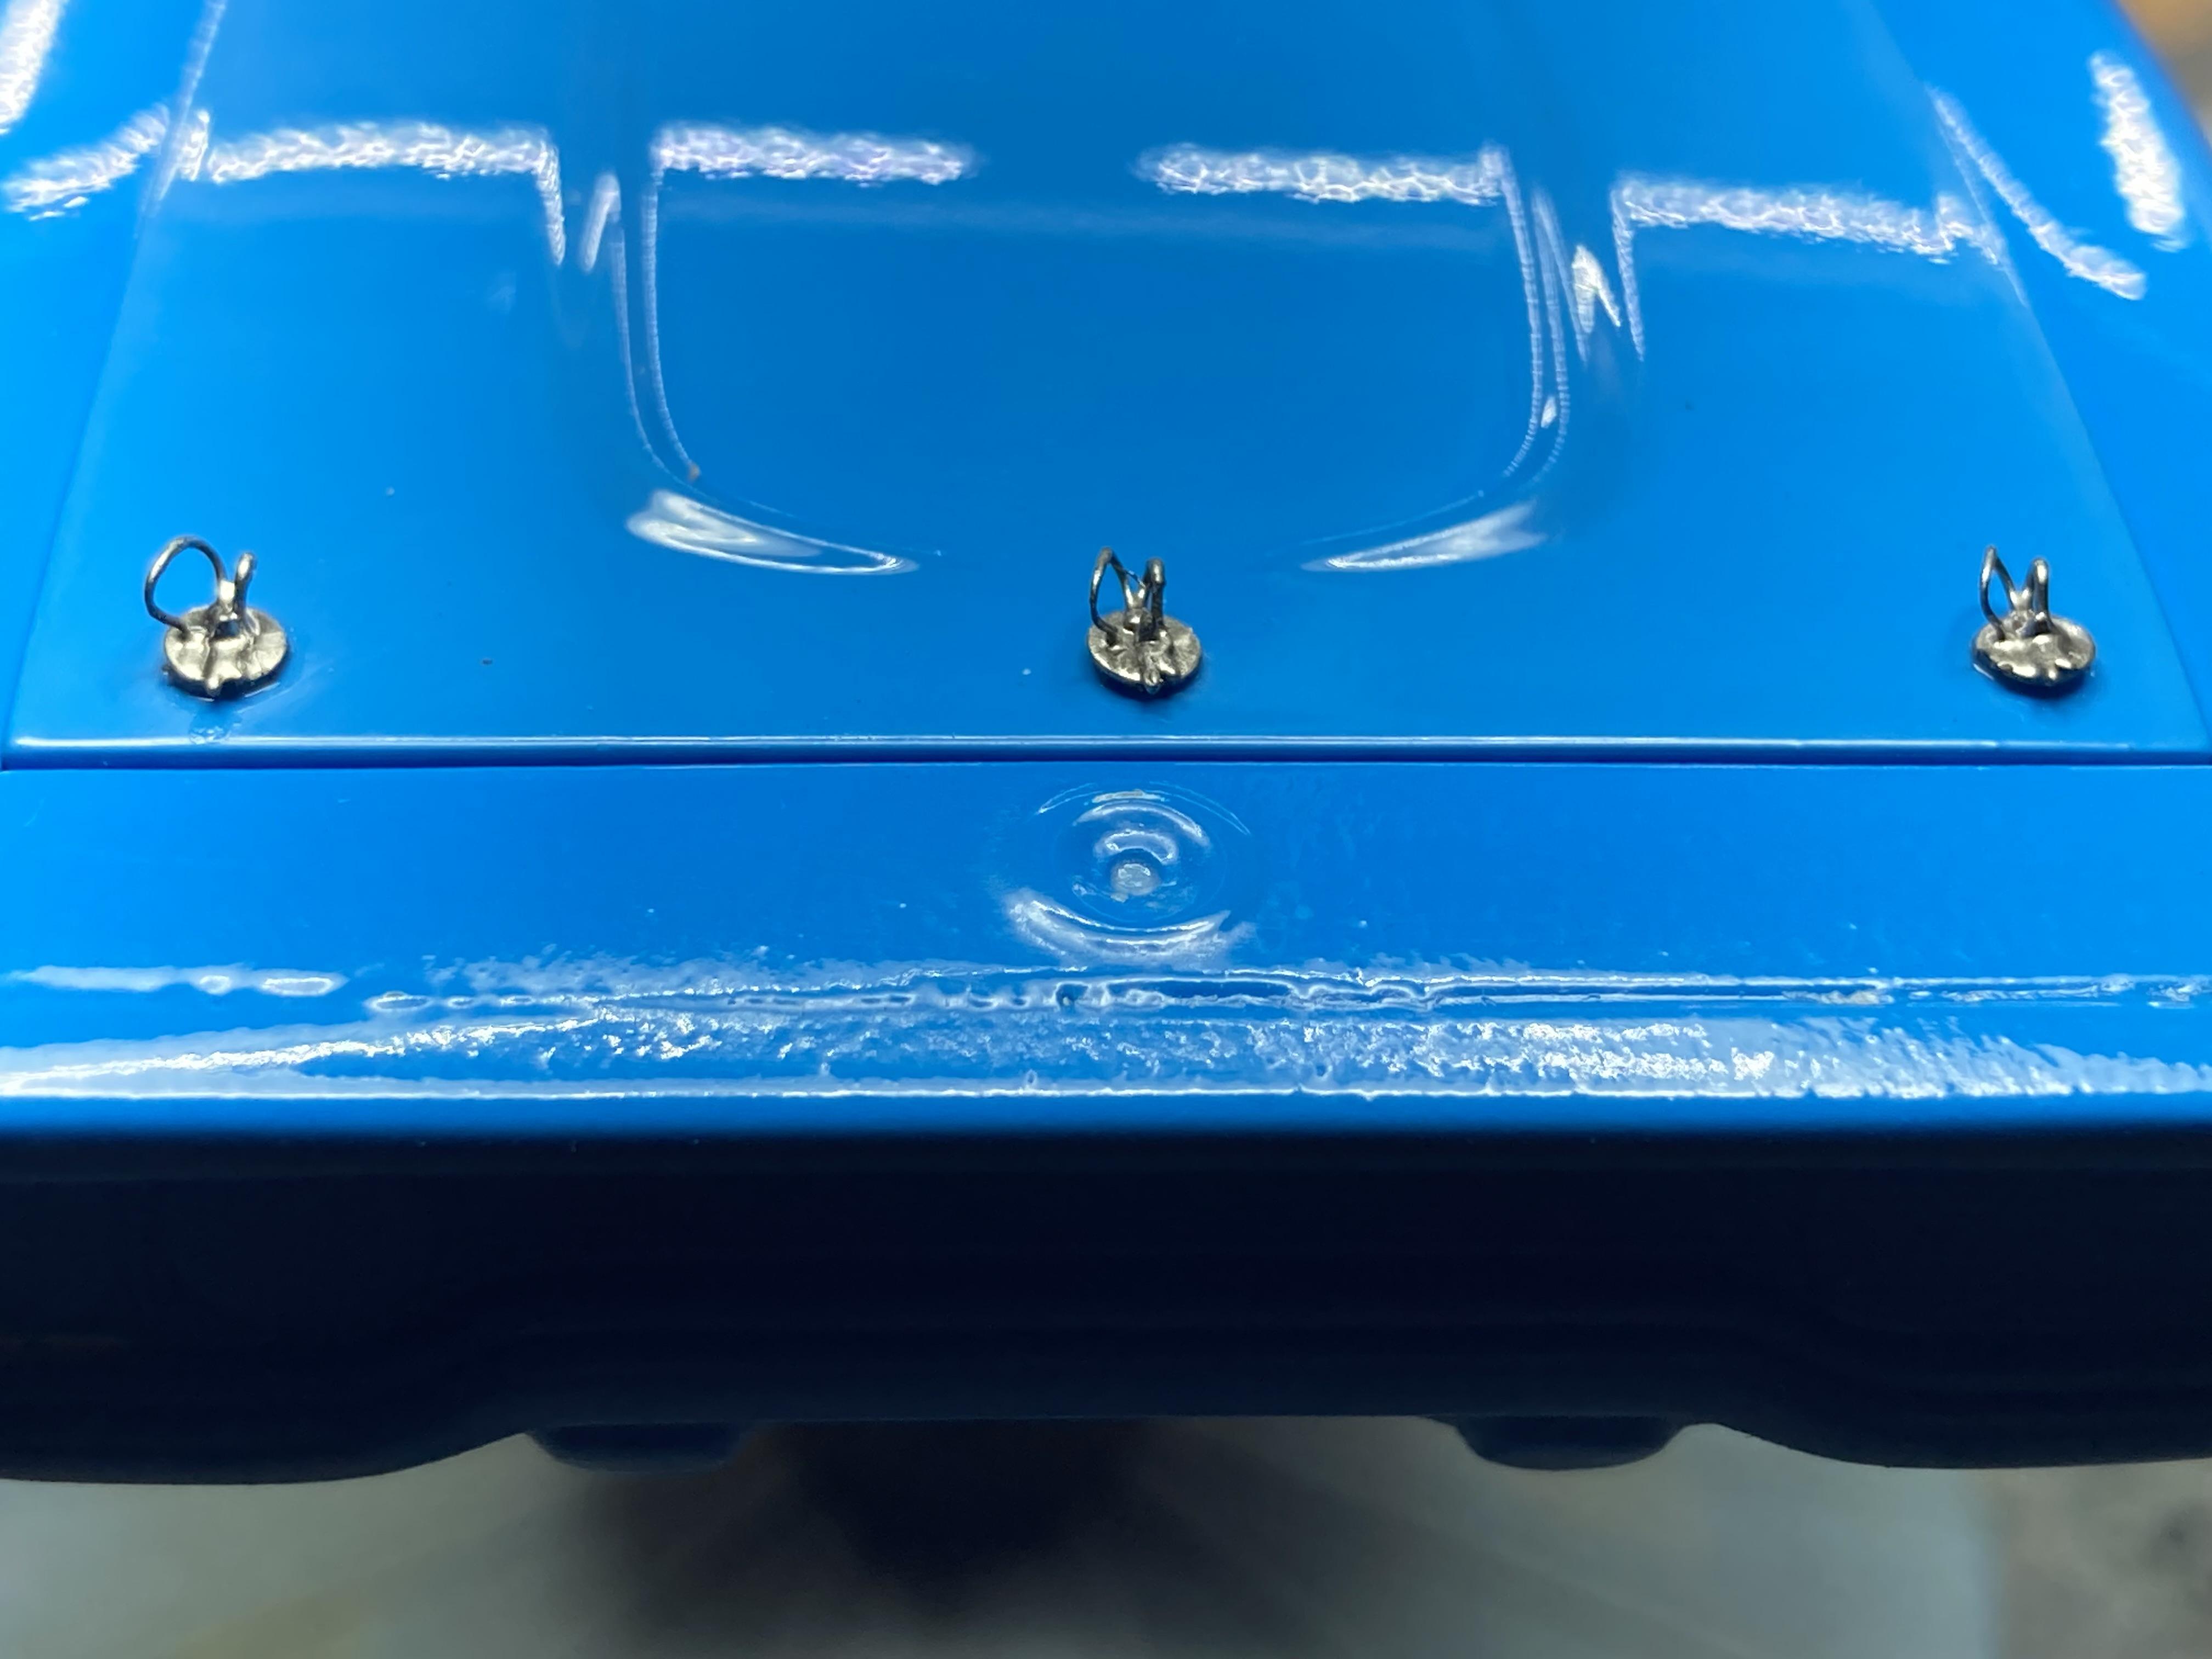
A little detail added to the hood. Some 3D-printed hood pins. I find this sort of fine detail work so incredibly rewarding. The focus is like a form of meditation:
-
Richard Petty's 71 Roadrunner
GMasterG replied to GMasterG's topic in WIP: Stock Cars (NASCAR, Super Stock, Late Model, etc.)
Thank you -
Richard Petty's 71 Roadrunner
GMasterG replied to GMasterG's topic in WIP: Stock Cars (NASCAR, Super Stock, Late Model, etc.)
Some extensive wet running with 8k sanding cloth, followed by a few more coats of clear (different brand) after which I applied some light liquid compound and then finally some liquid polish both from Meguiar’s and it’s come up quite well:
-
Donnie Allison's '74 Monte
GMasterG replied to Belugawrx's topic in WIP: Stock Cars (NASCAR, Super Stock, Late Model, etc.)
Use a hydrochloric acid bath in the same way you would a bath of bleach for chrome parts used in other kits; it will take 3-7 days -
Donnie Allison's '74 Monte
GMasterG replied to Belugawrx's topic in WIP: Stock Cars (NASCAR, Super Stock, Late Model, etc.)
It's not impossible to strip. Put it in a bath of hydrochloric acid and leave it there for anything from 3 days to a week and you will find it completely removed. This is not hearsay - I do it on every re-badged Monogram/Revell kit that Salvinos has re-boxed and in which are included these chrome parts. -
Richard Petty's 71 Roadrunner
GMasterG replied to GMasterG's topic in WIP: Stock Cars (NASCAR, Super Stock, Late Model, etc.)
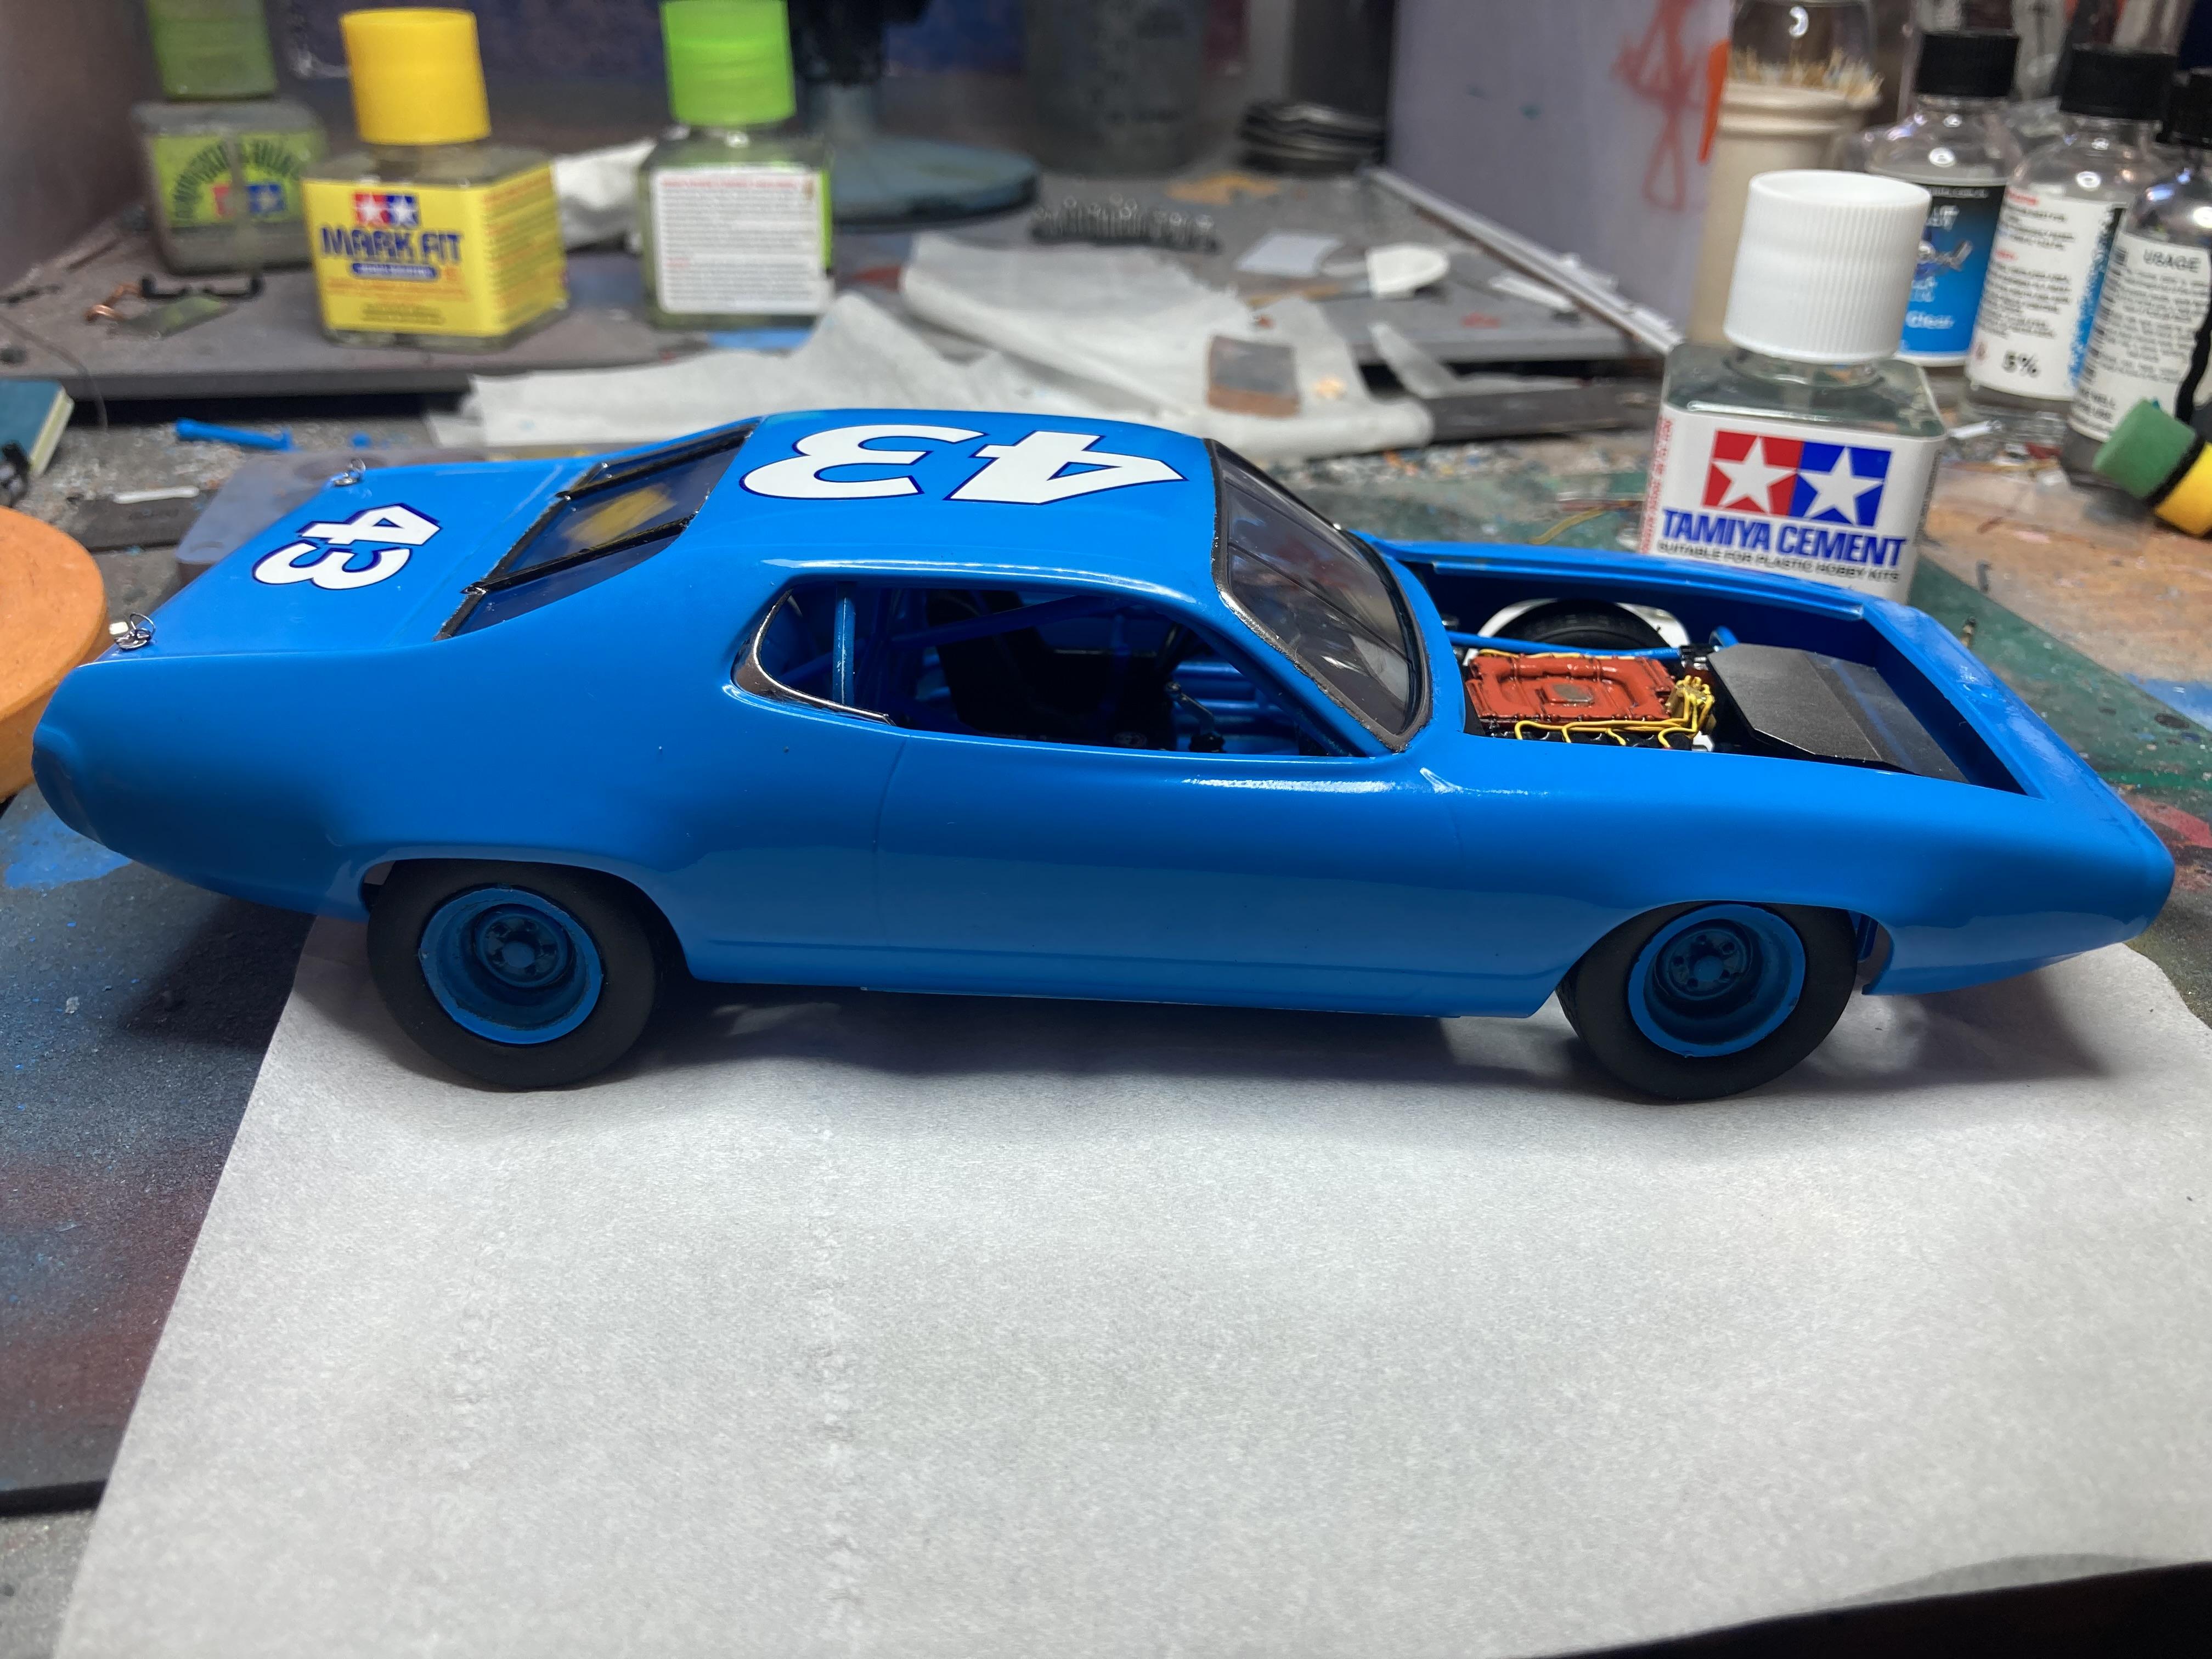
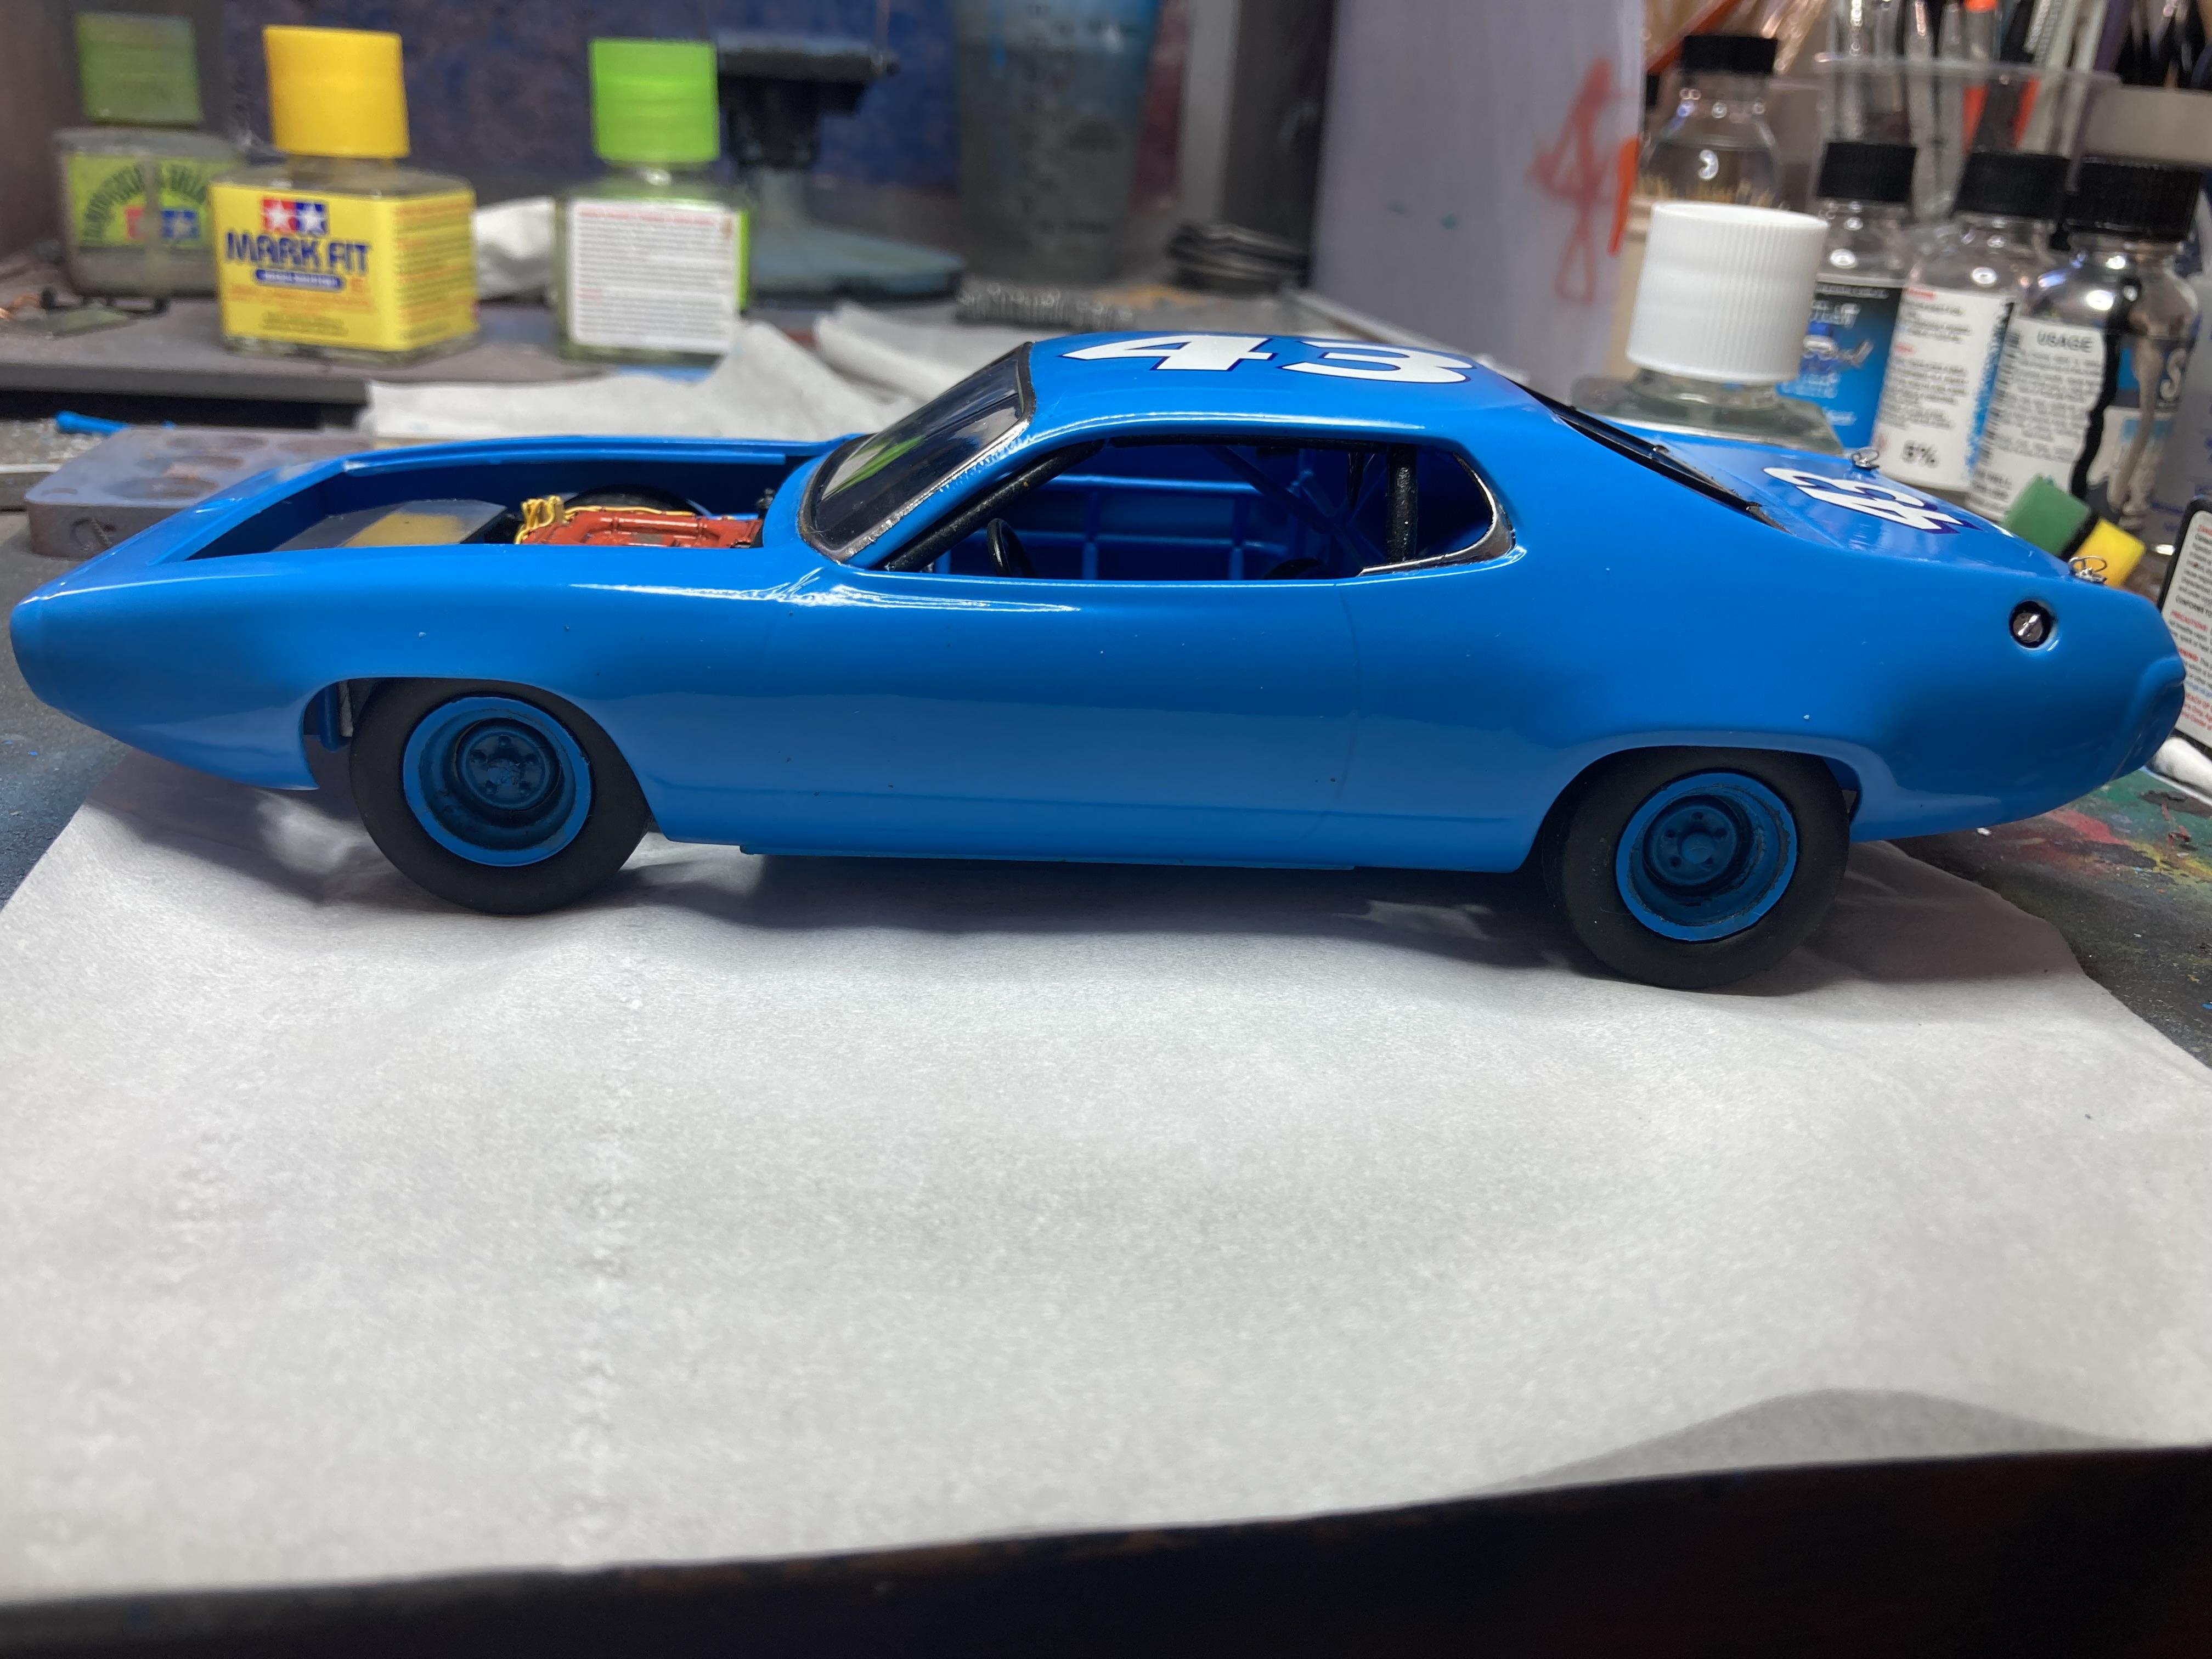
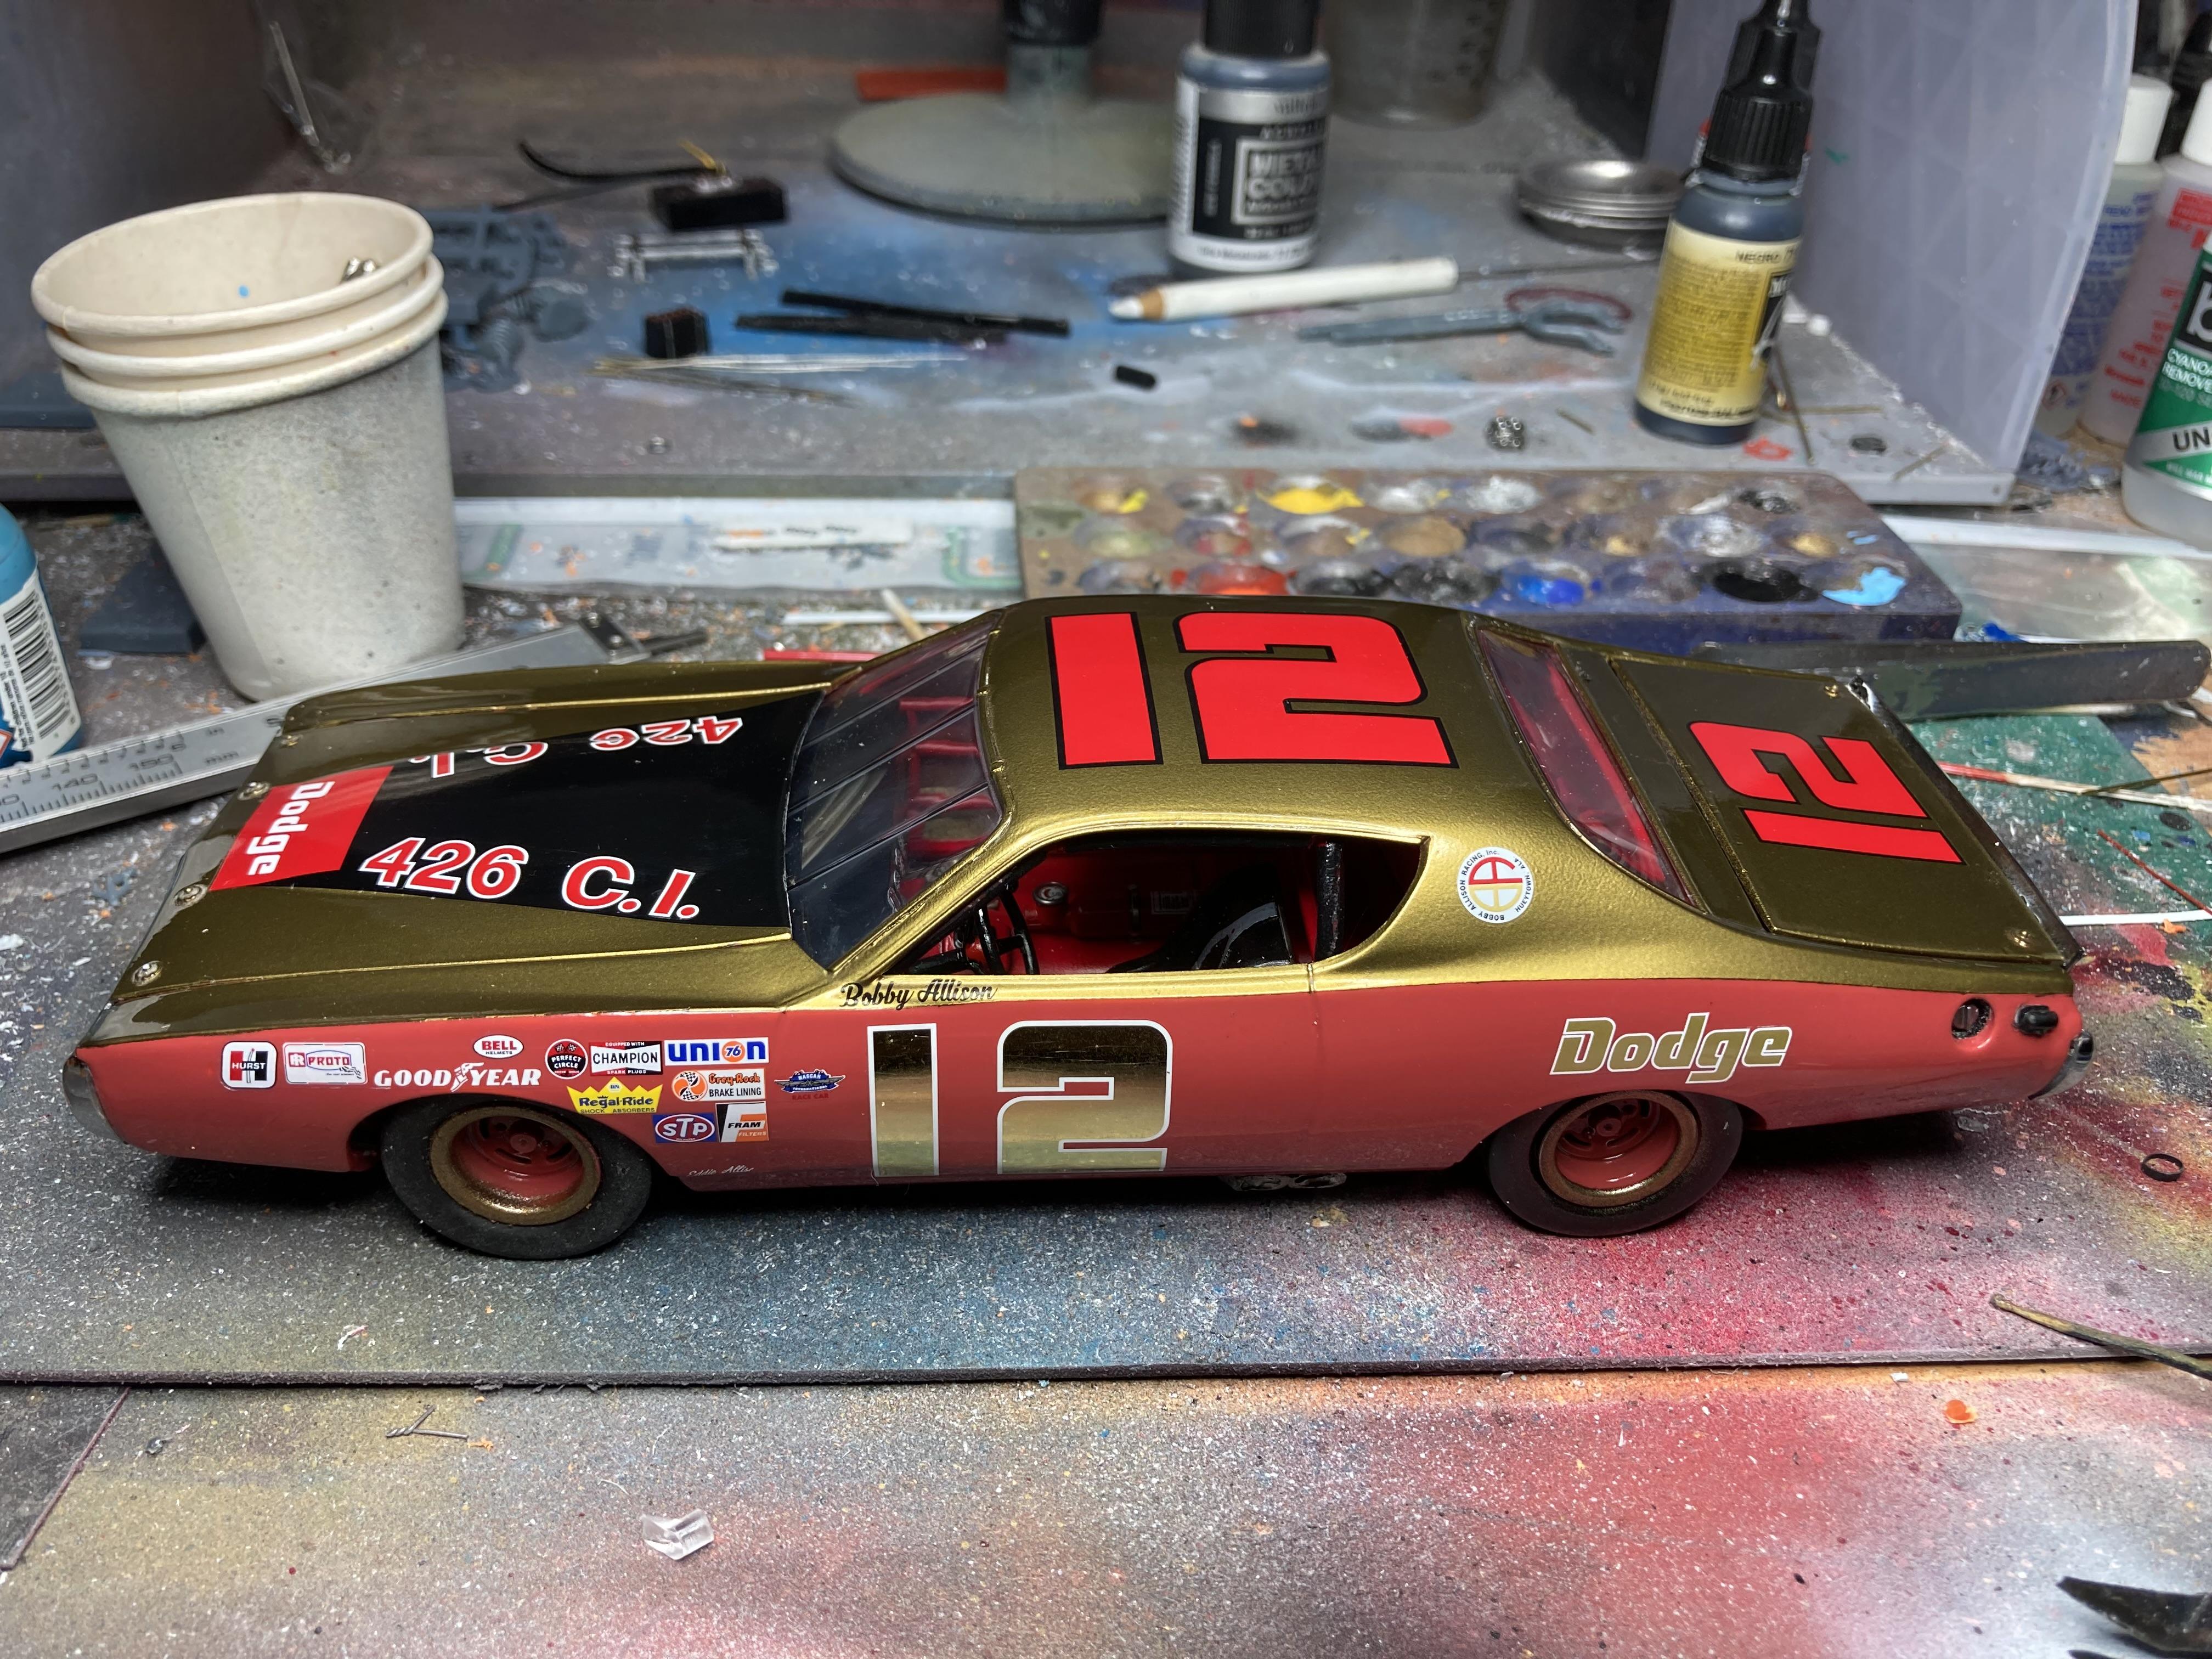
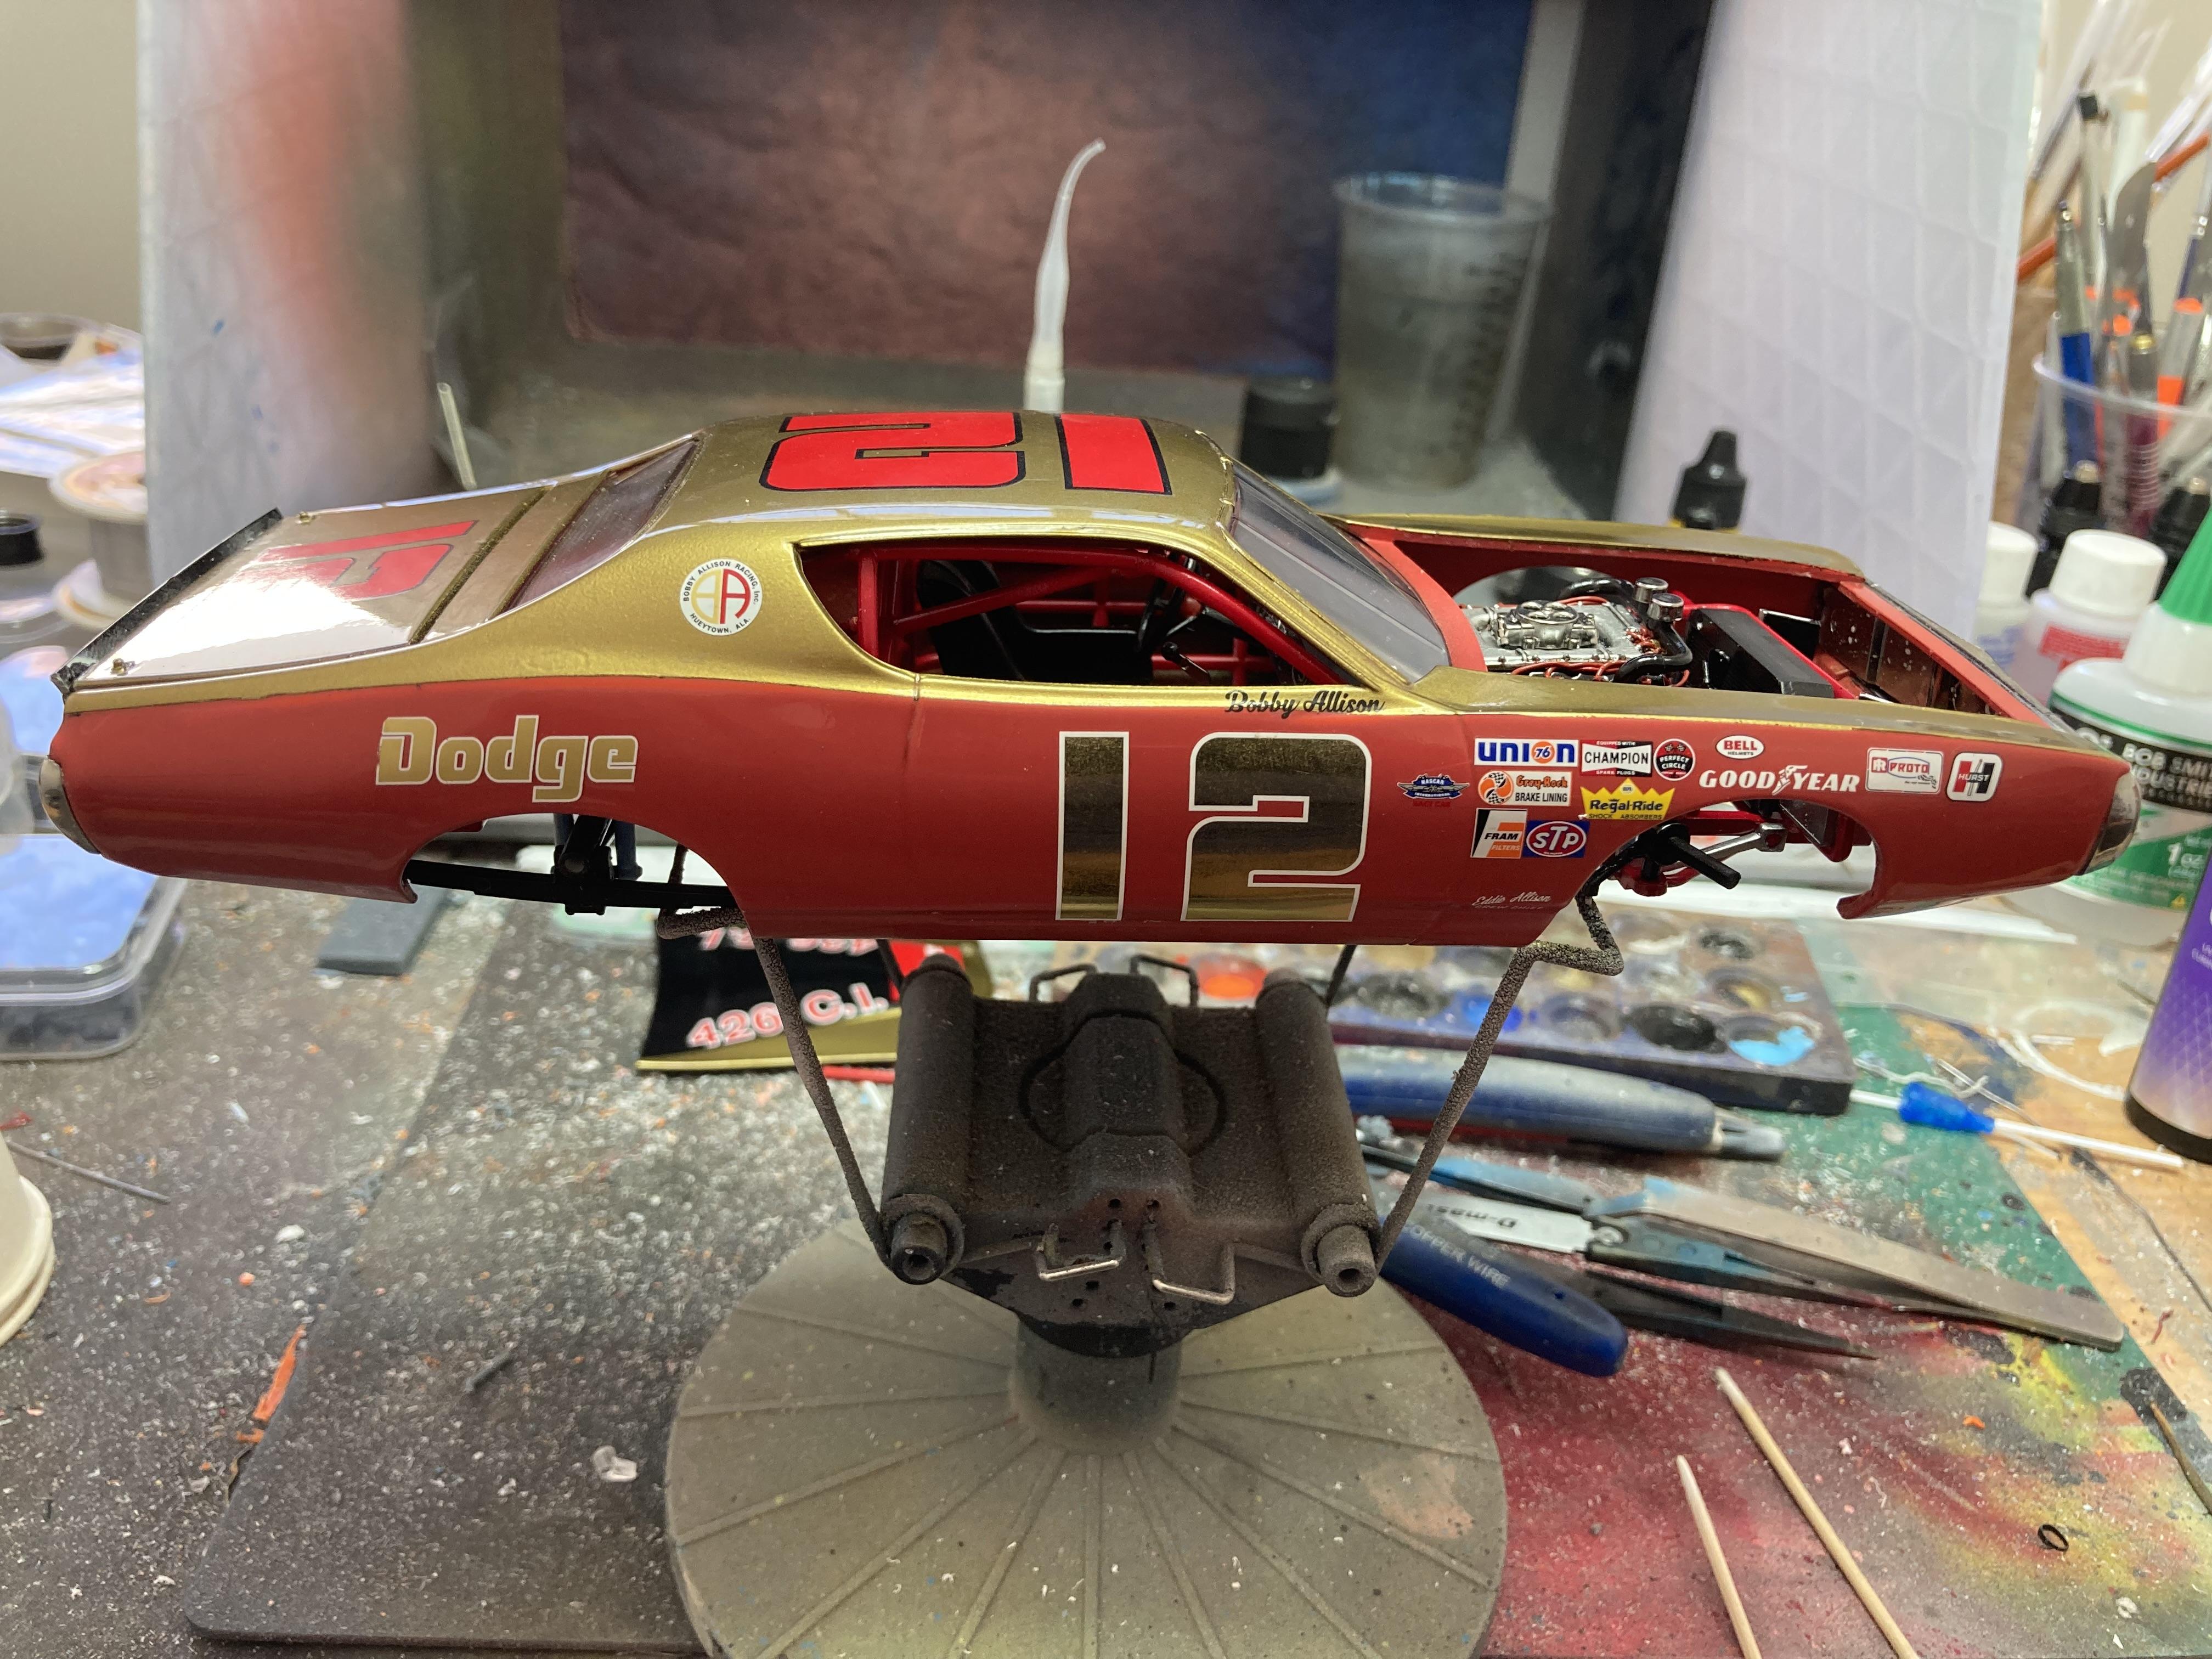
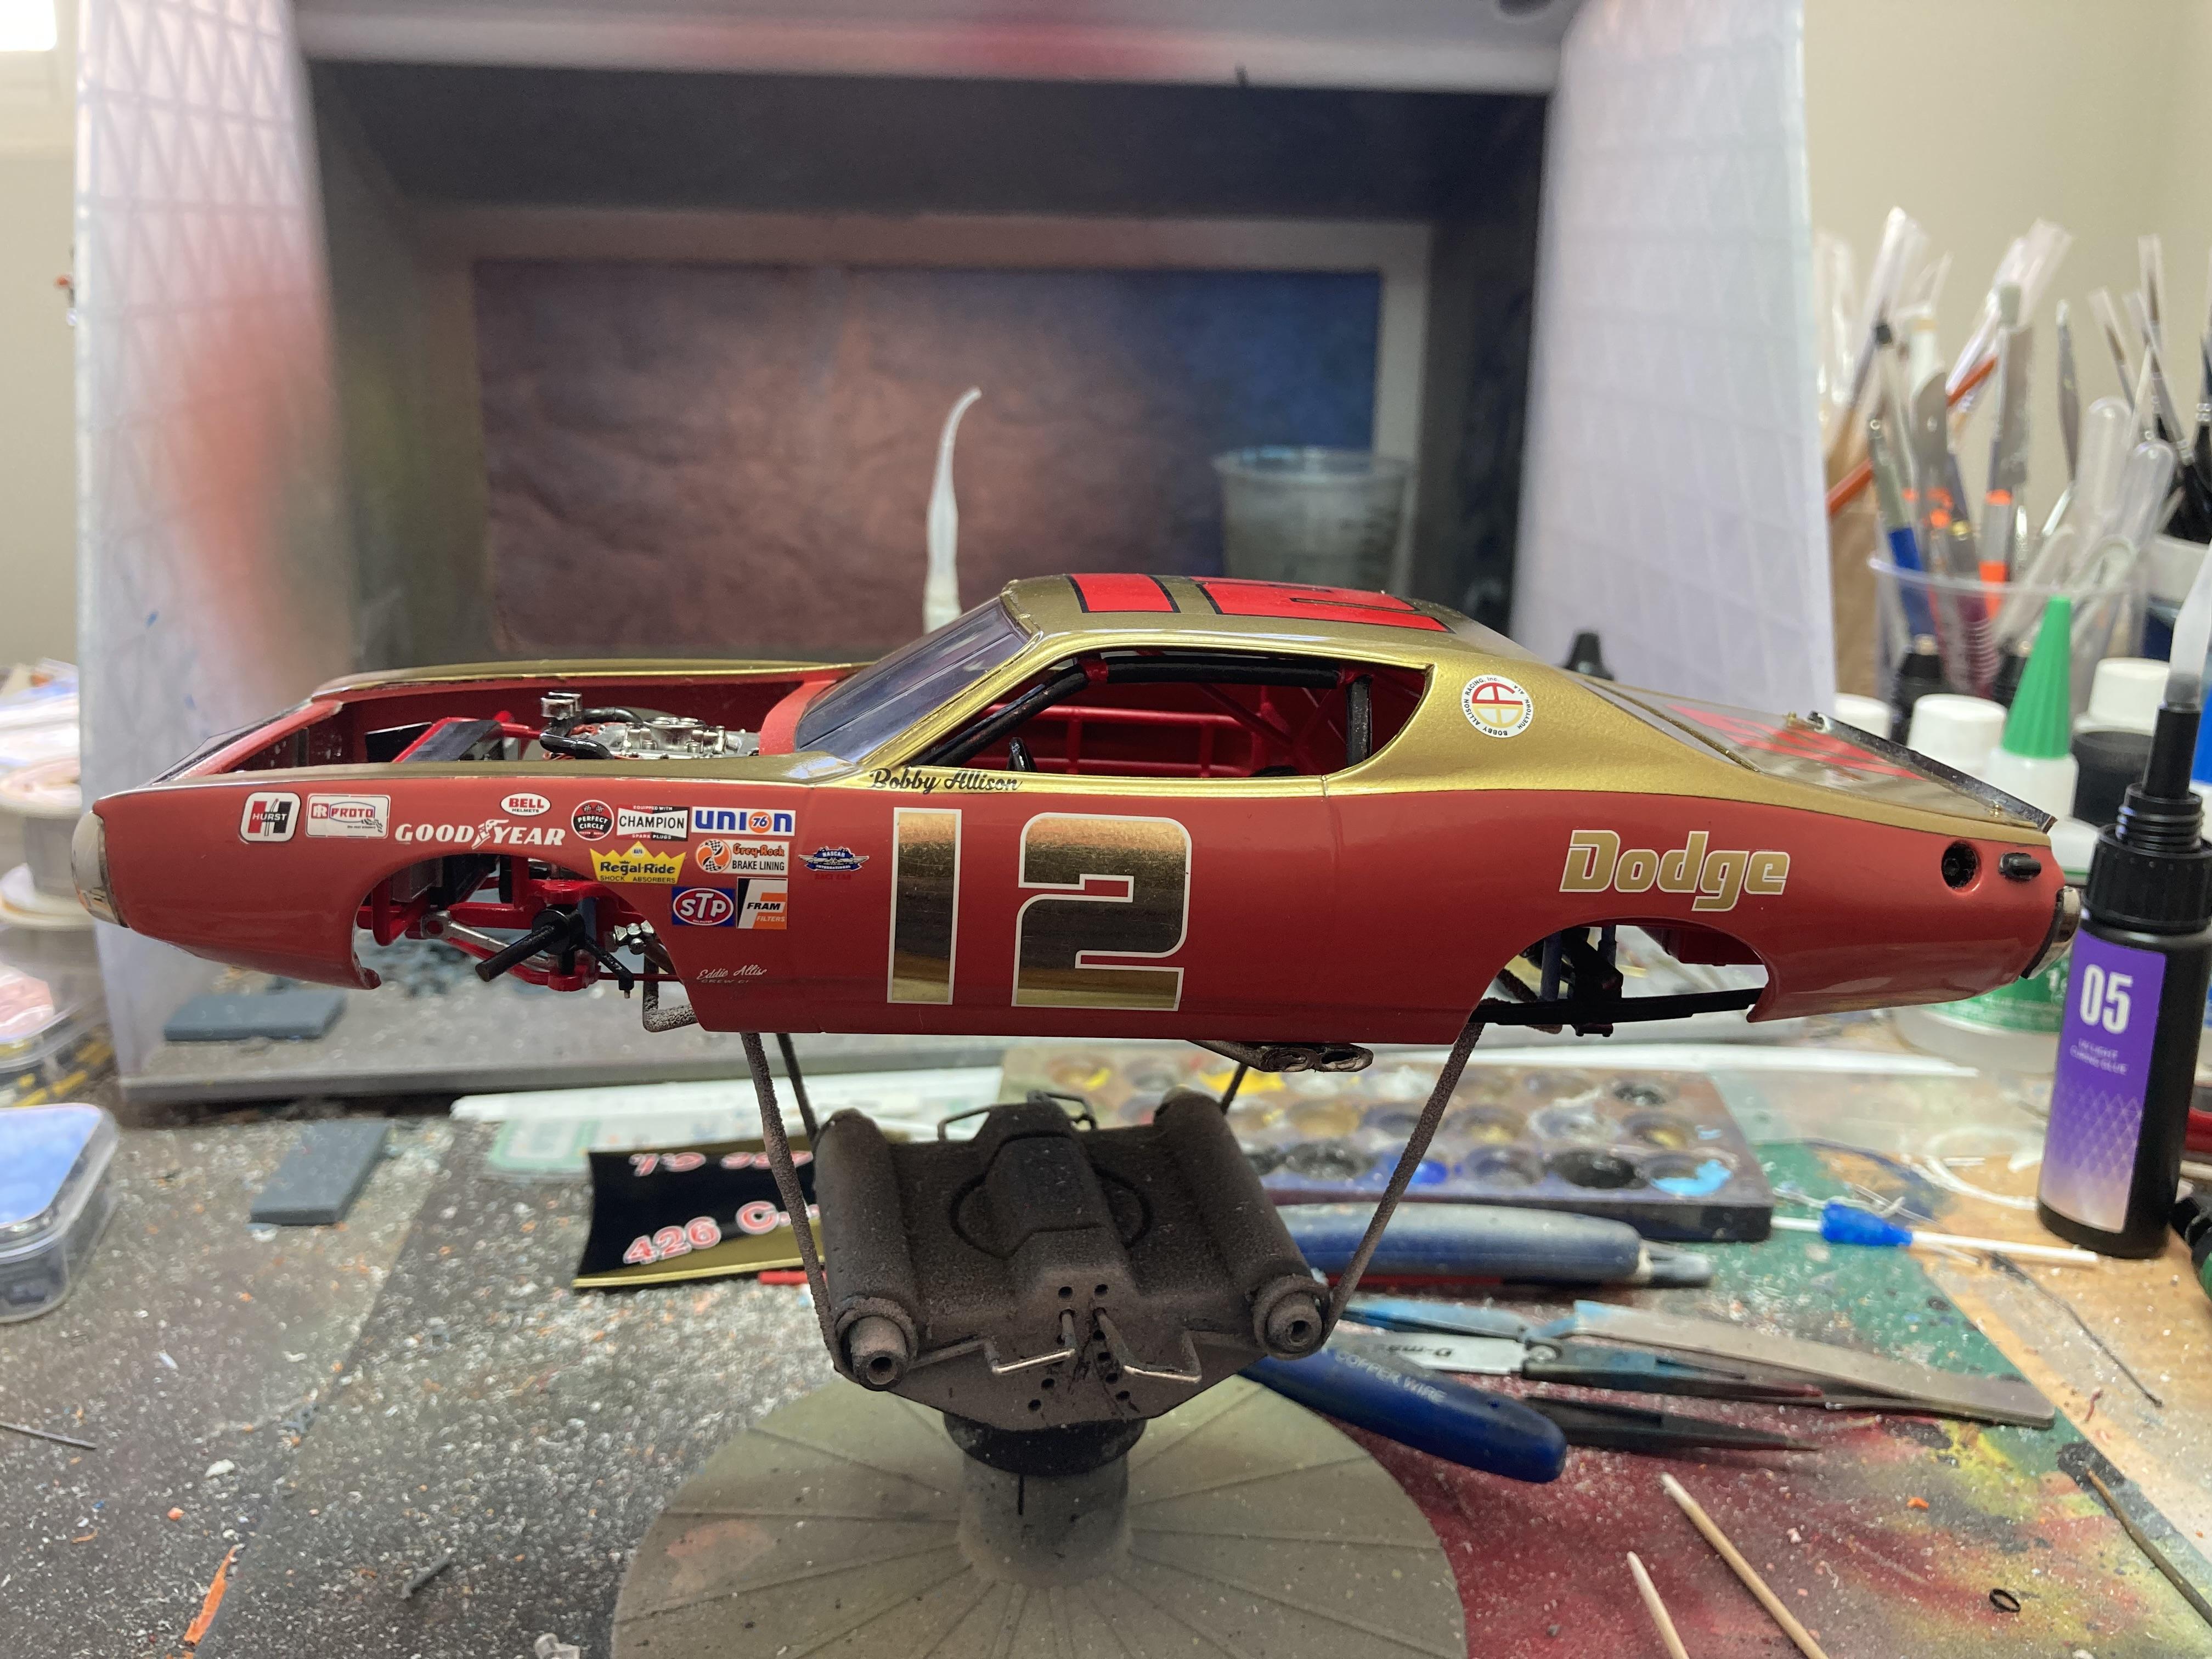
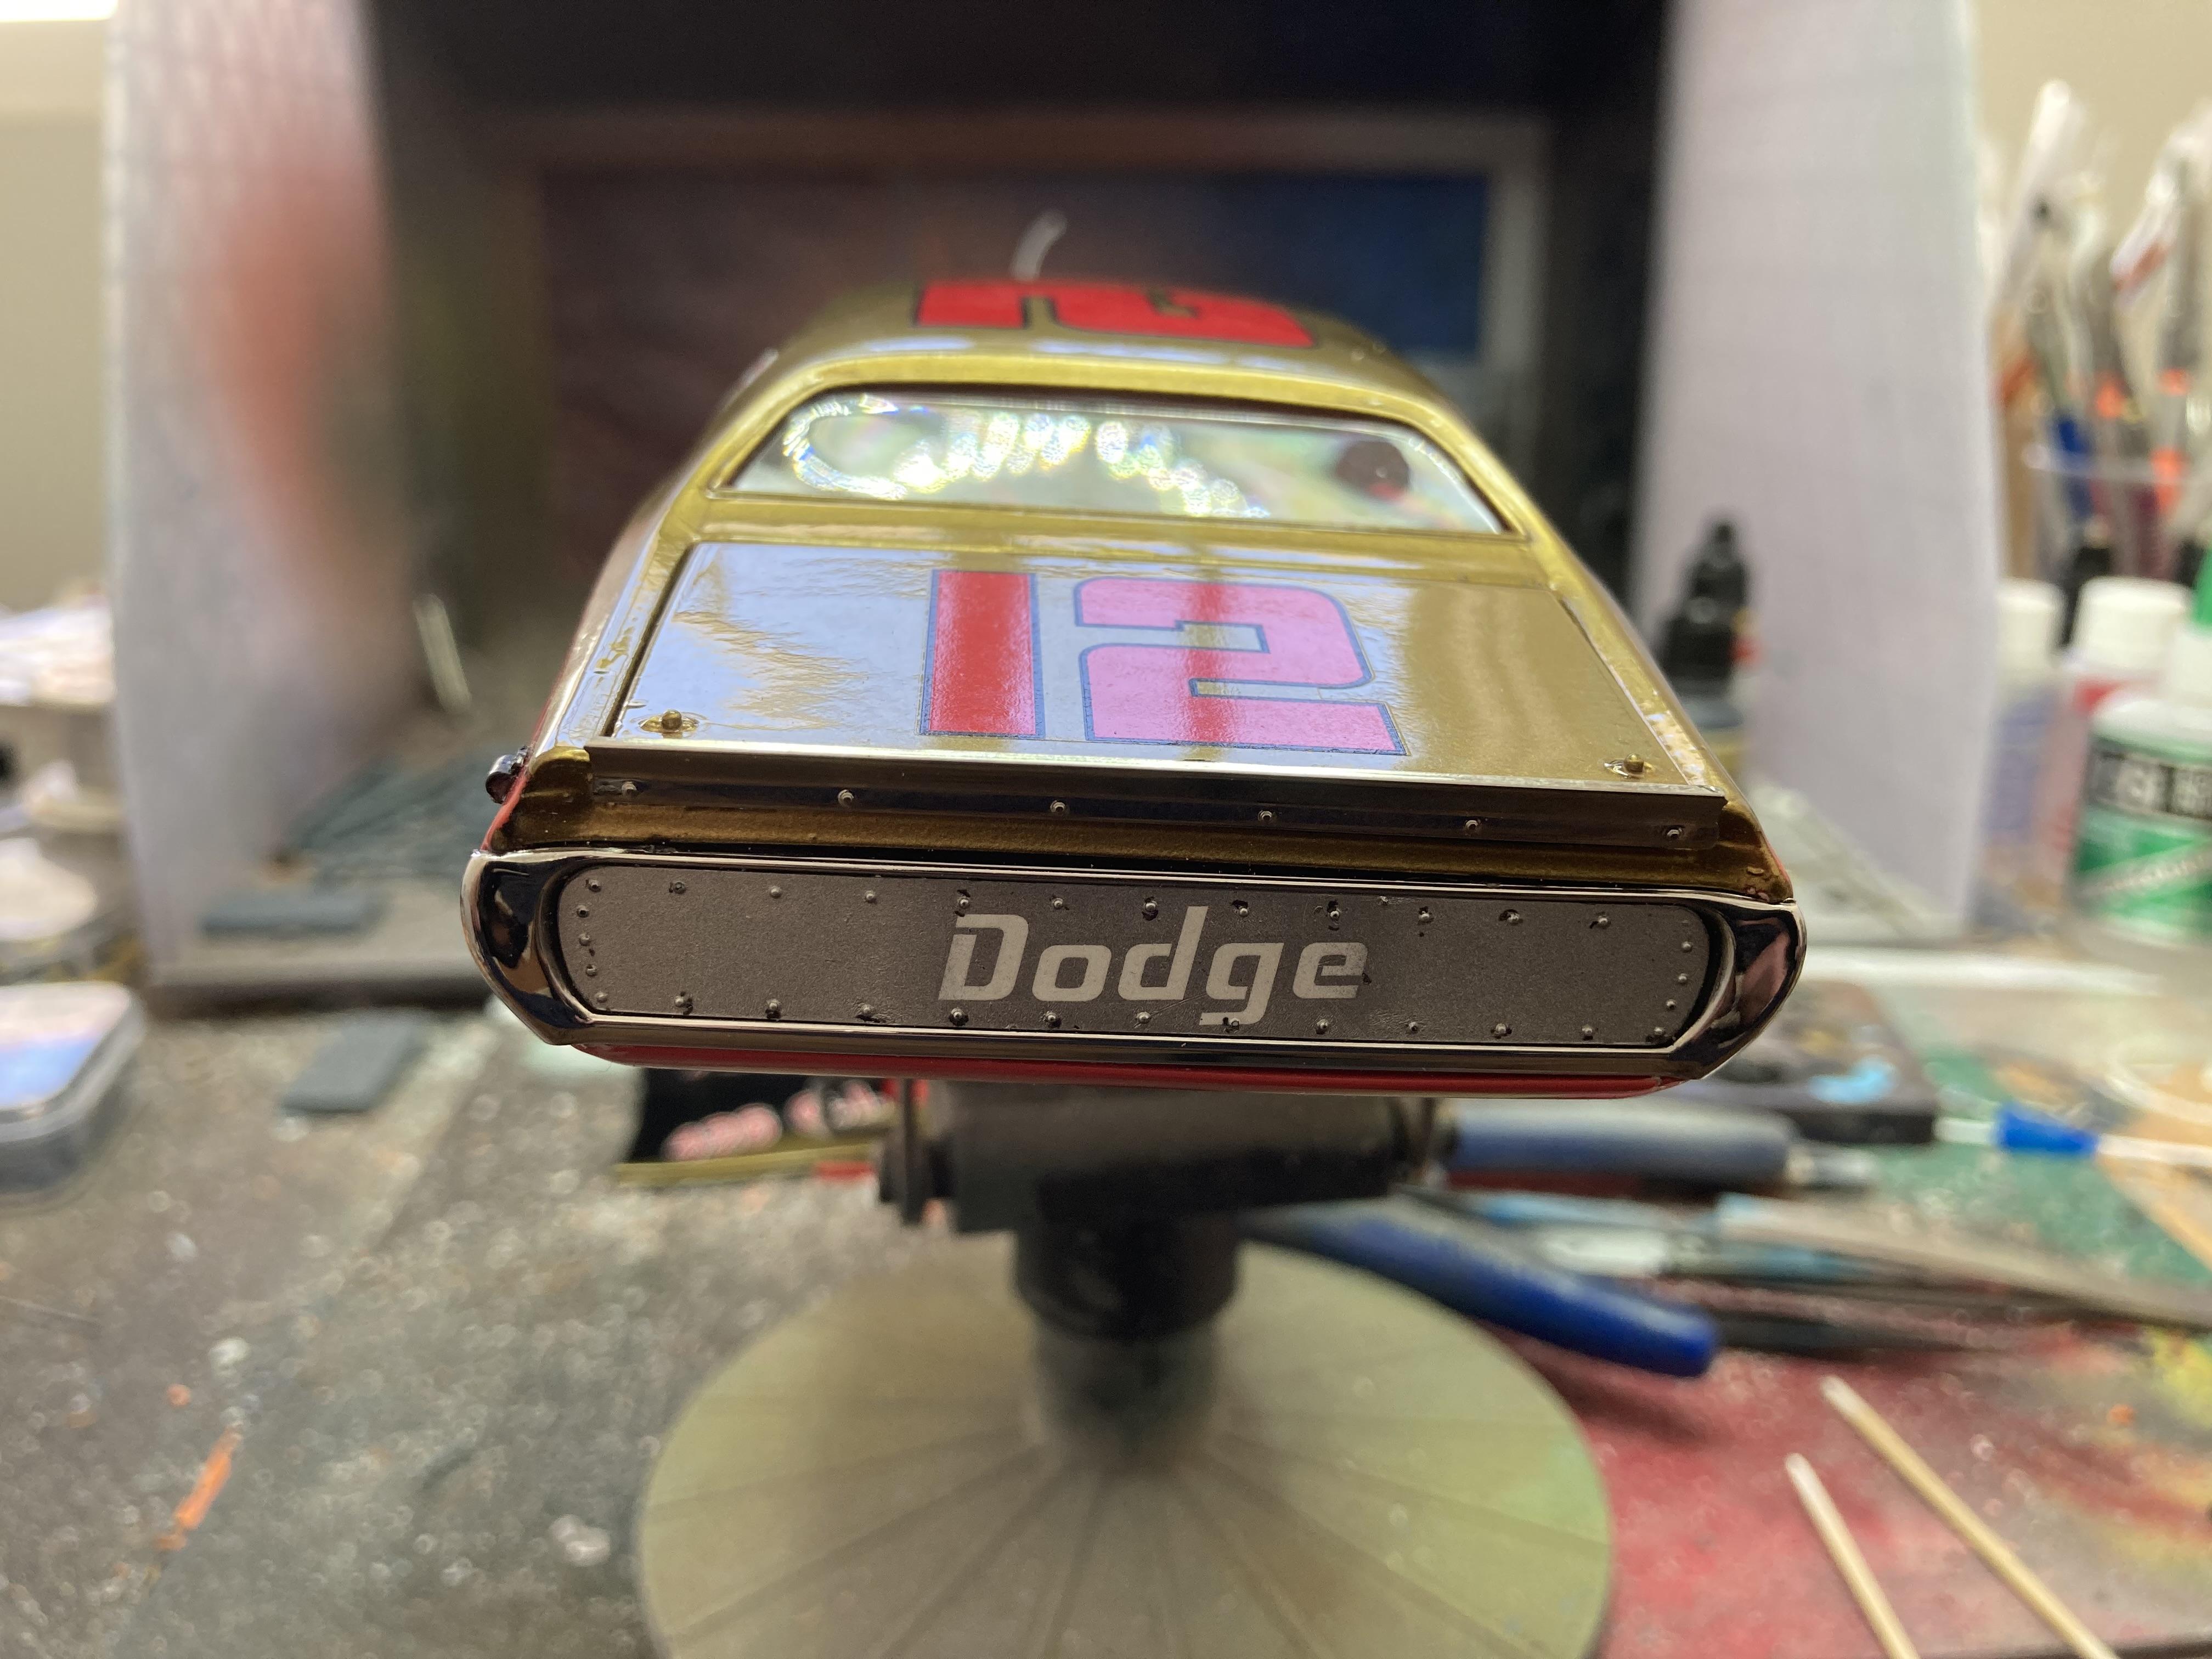
I've struggled with the finish on the body of this Roadrunner. The Zero Paints Petty Blue has not behaved in the same way to which I'm accustomed. I'm not blaming the paint - somewhere along the way I've done something that it didn't like. But I've embraced it as an opportunity to spend a little more time focusing on finishing techniques and paying a little more attention to surface preparation, sanding, polishing and removing orange peel. The picture below demonstrates why I've not paid much attention to such things in the past. On the left is a Charger body that will be Bobby Isaac's 71 K&K model. I sprayed this using SMS Rocket Red Mk 2 with a splash of Salamanca Red followed by a top-coat of Zero Paints 2k Diamond Clear. I can usually achieve a glass-like finish without having to sand/polish just by progressively adding more and more Mr Hobby Levelling Thinner to the paint until finally I just spray a finishing coat of 100% thinner which serves the dual purpose of acting as a saturation coat for base color as well as cleaning the air-brush. Such was the case on Richard Petty's 64 Belvedere which was the last time I used the Petty Blue. This time around I'm faced with a very fine orange peel on the surface of the clear coat to which I will have to apply some light sanding before floating a very diluted coat of 2k clear over the entire body.
-
Richard Petty's 71 Roadrunner
GMasterG replied to GMasterG's topic in WIP: Stock Cars (NASCAR, Super Stock, Late Model, etc.)
Thank you -
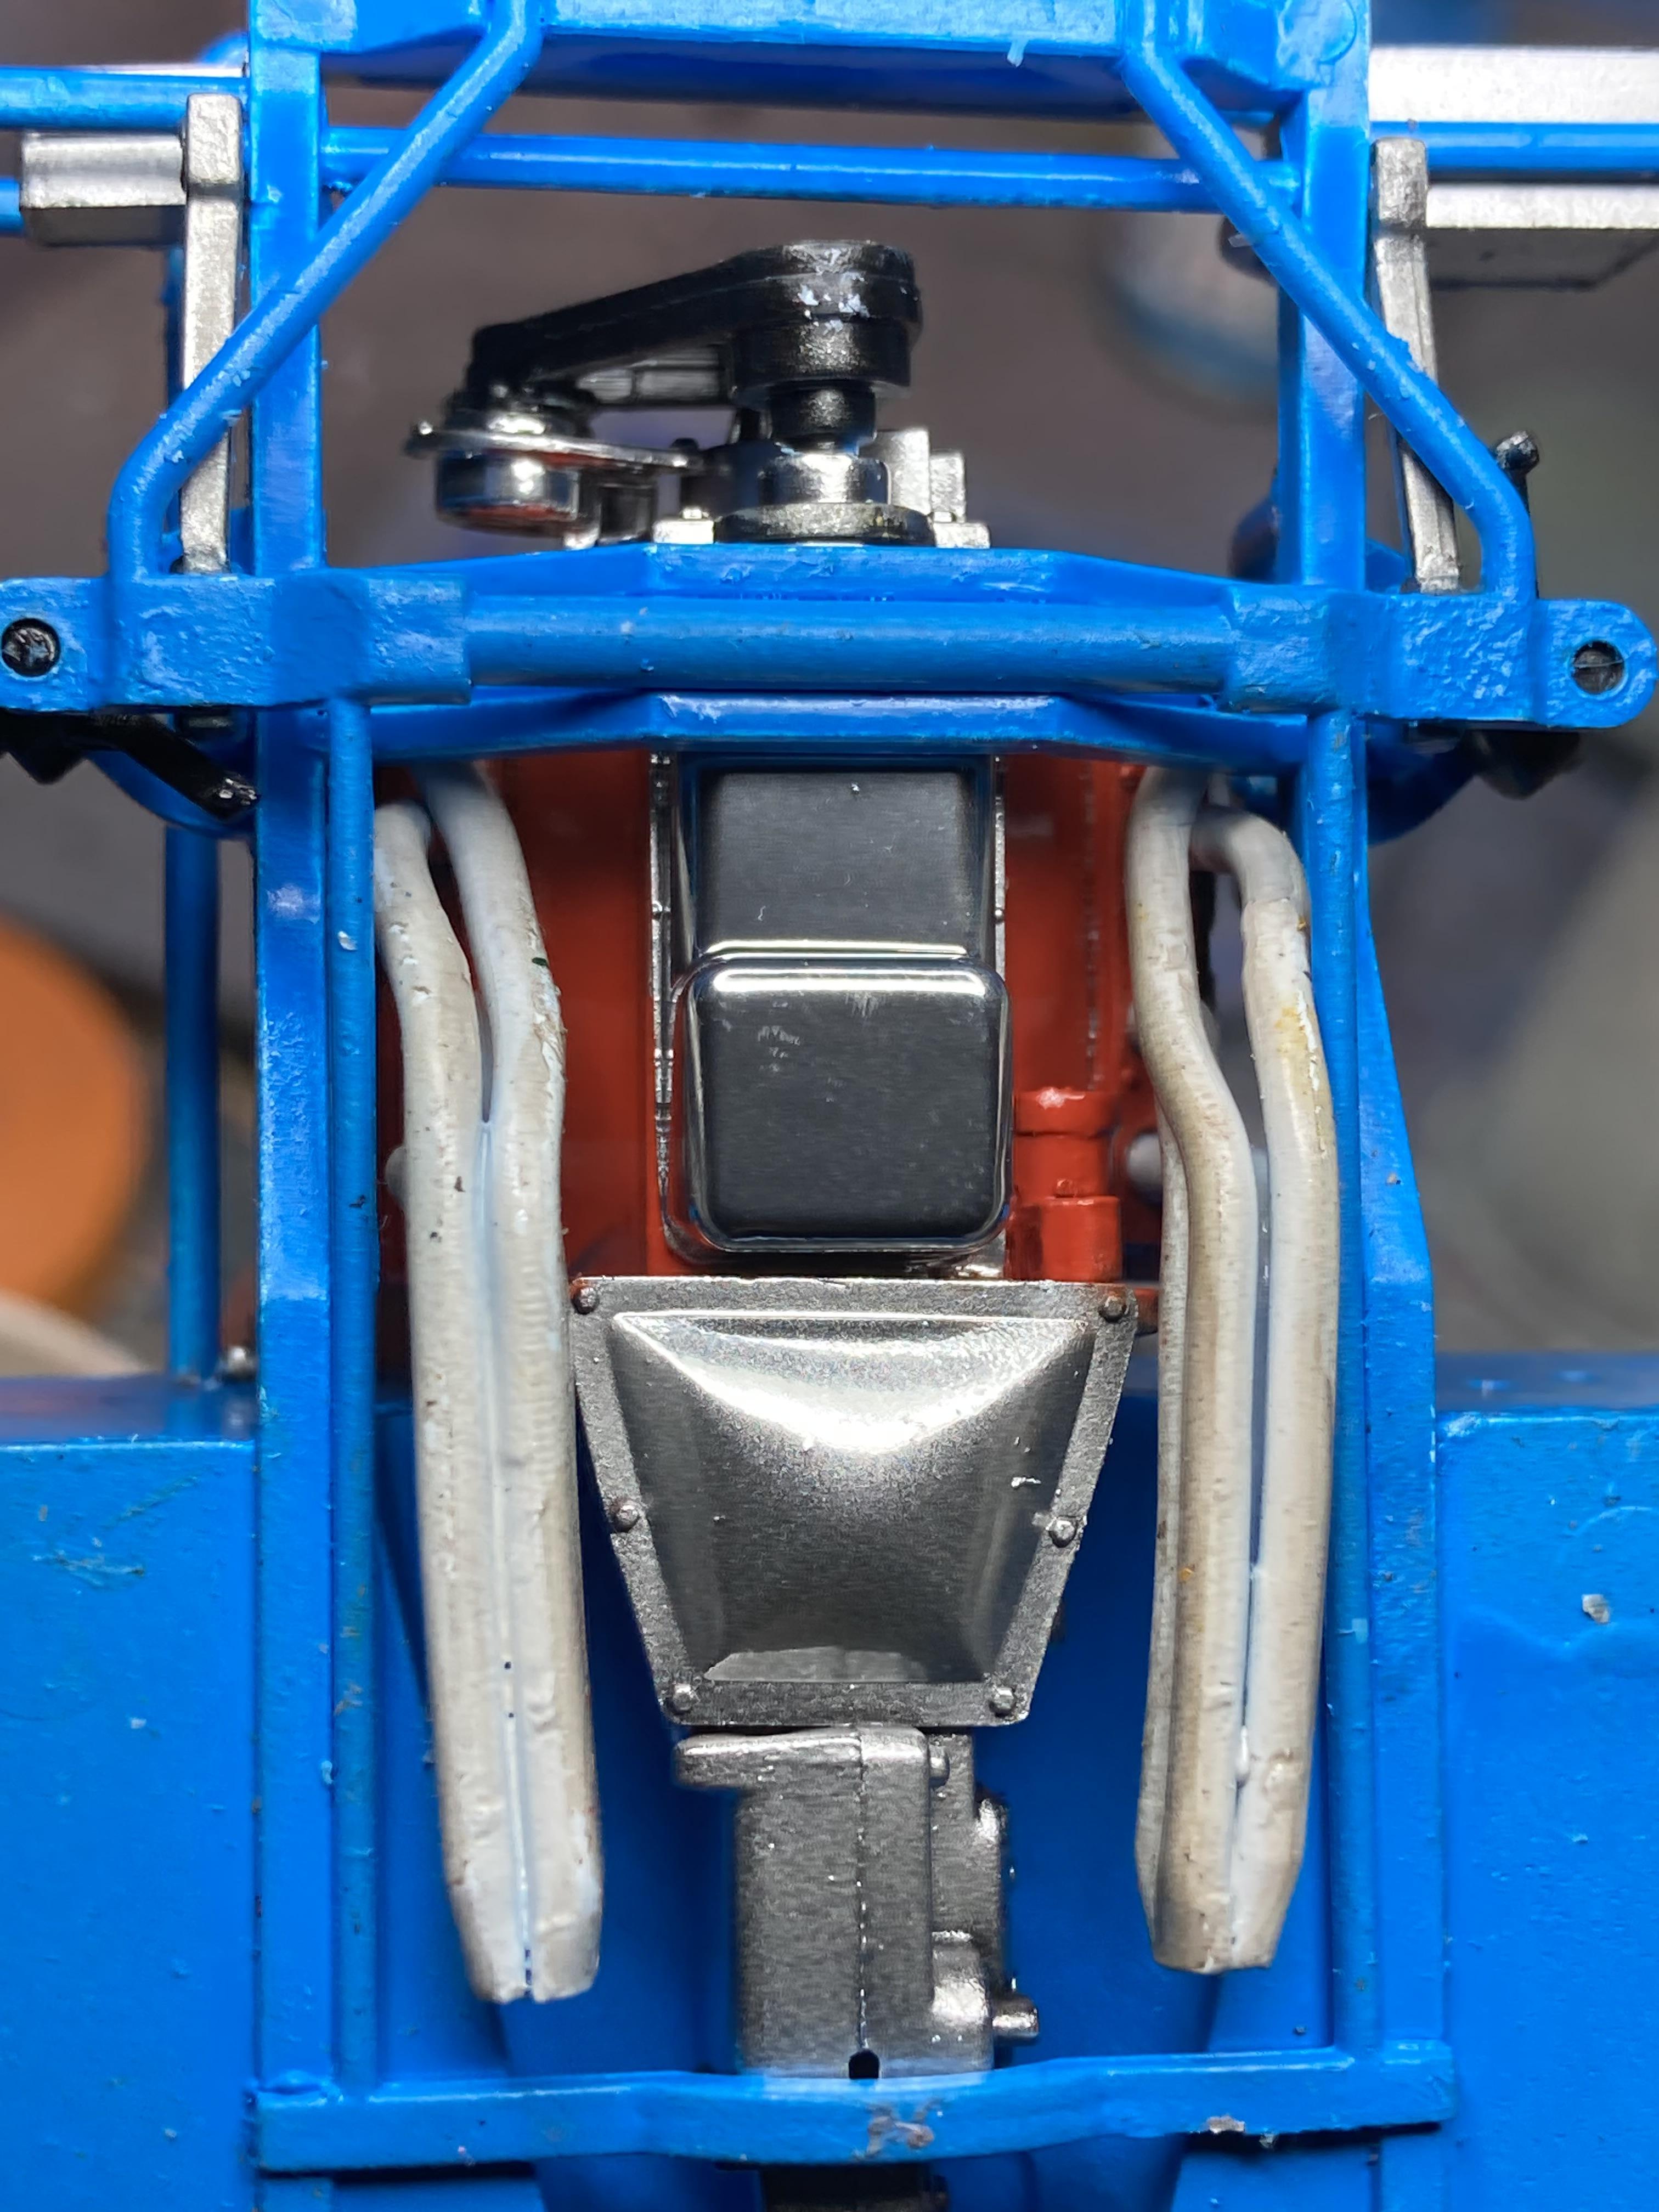
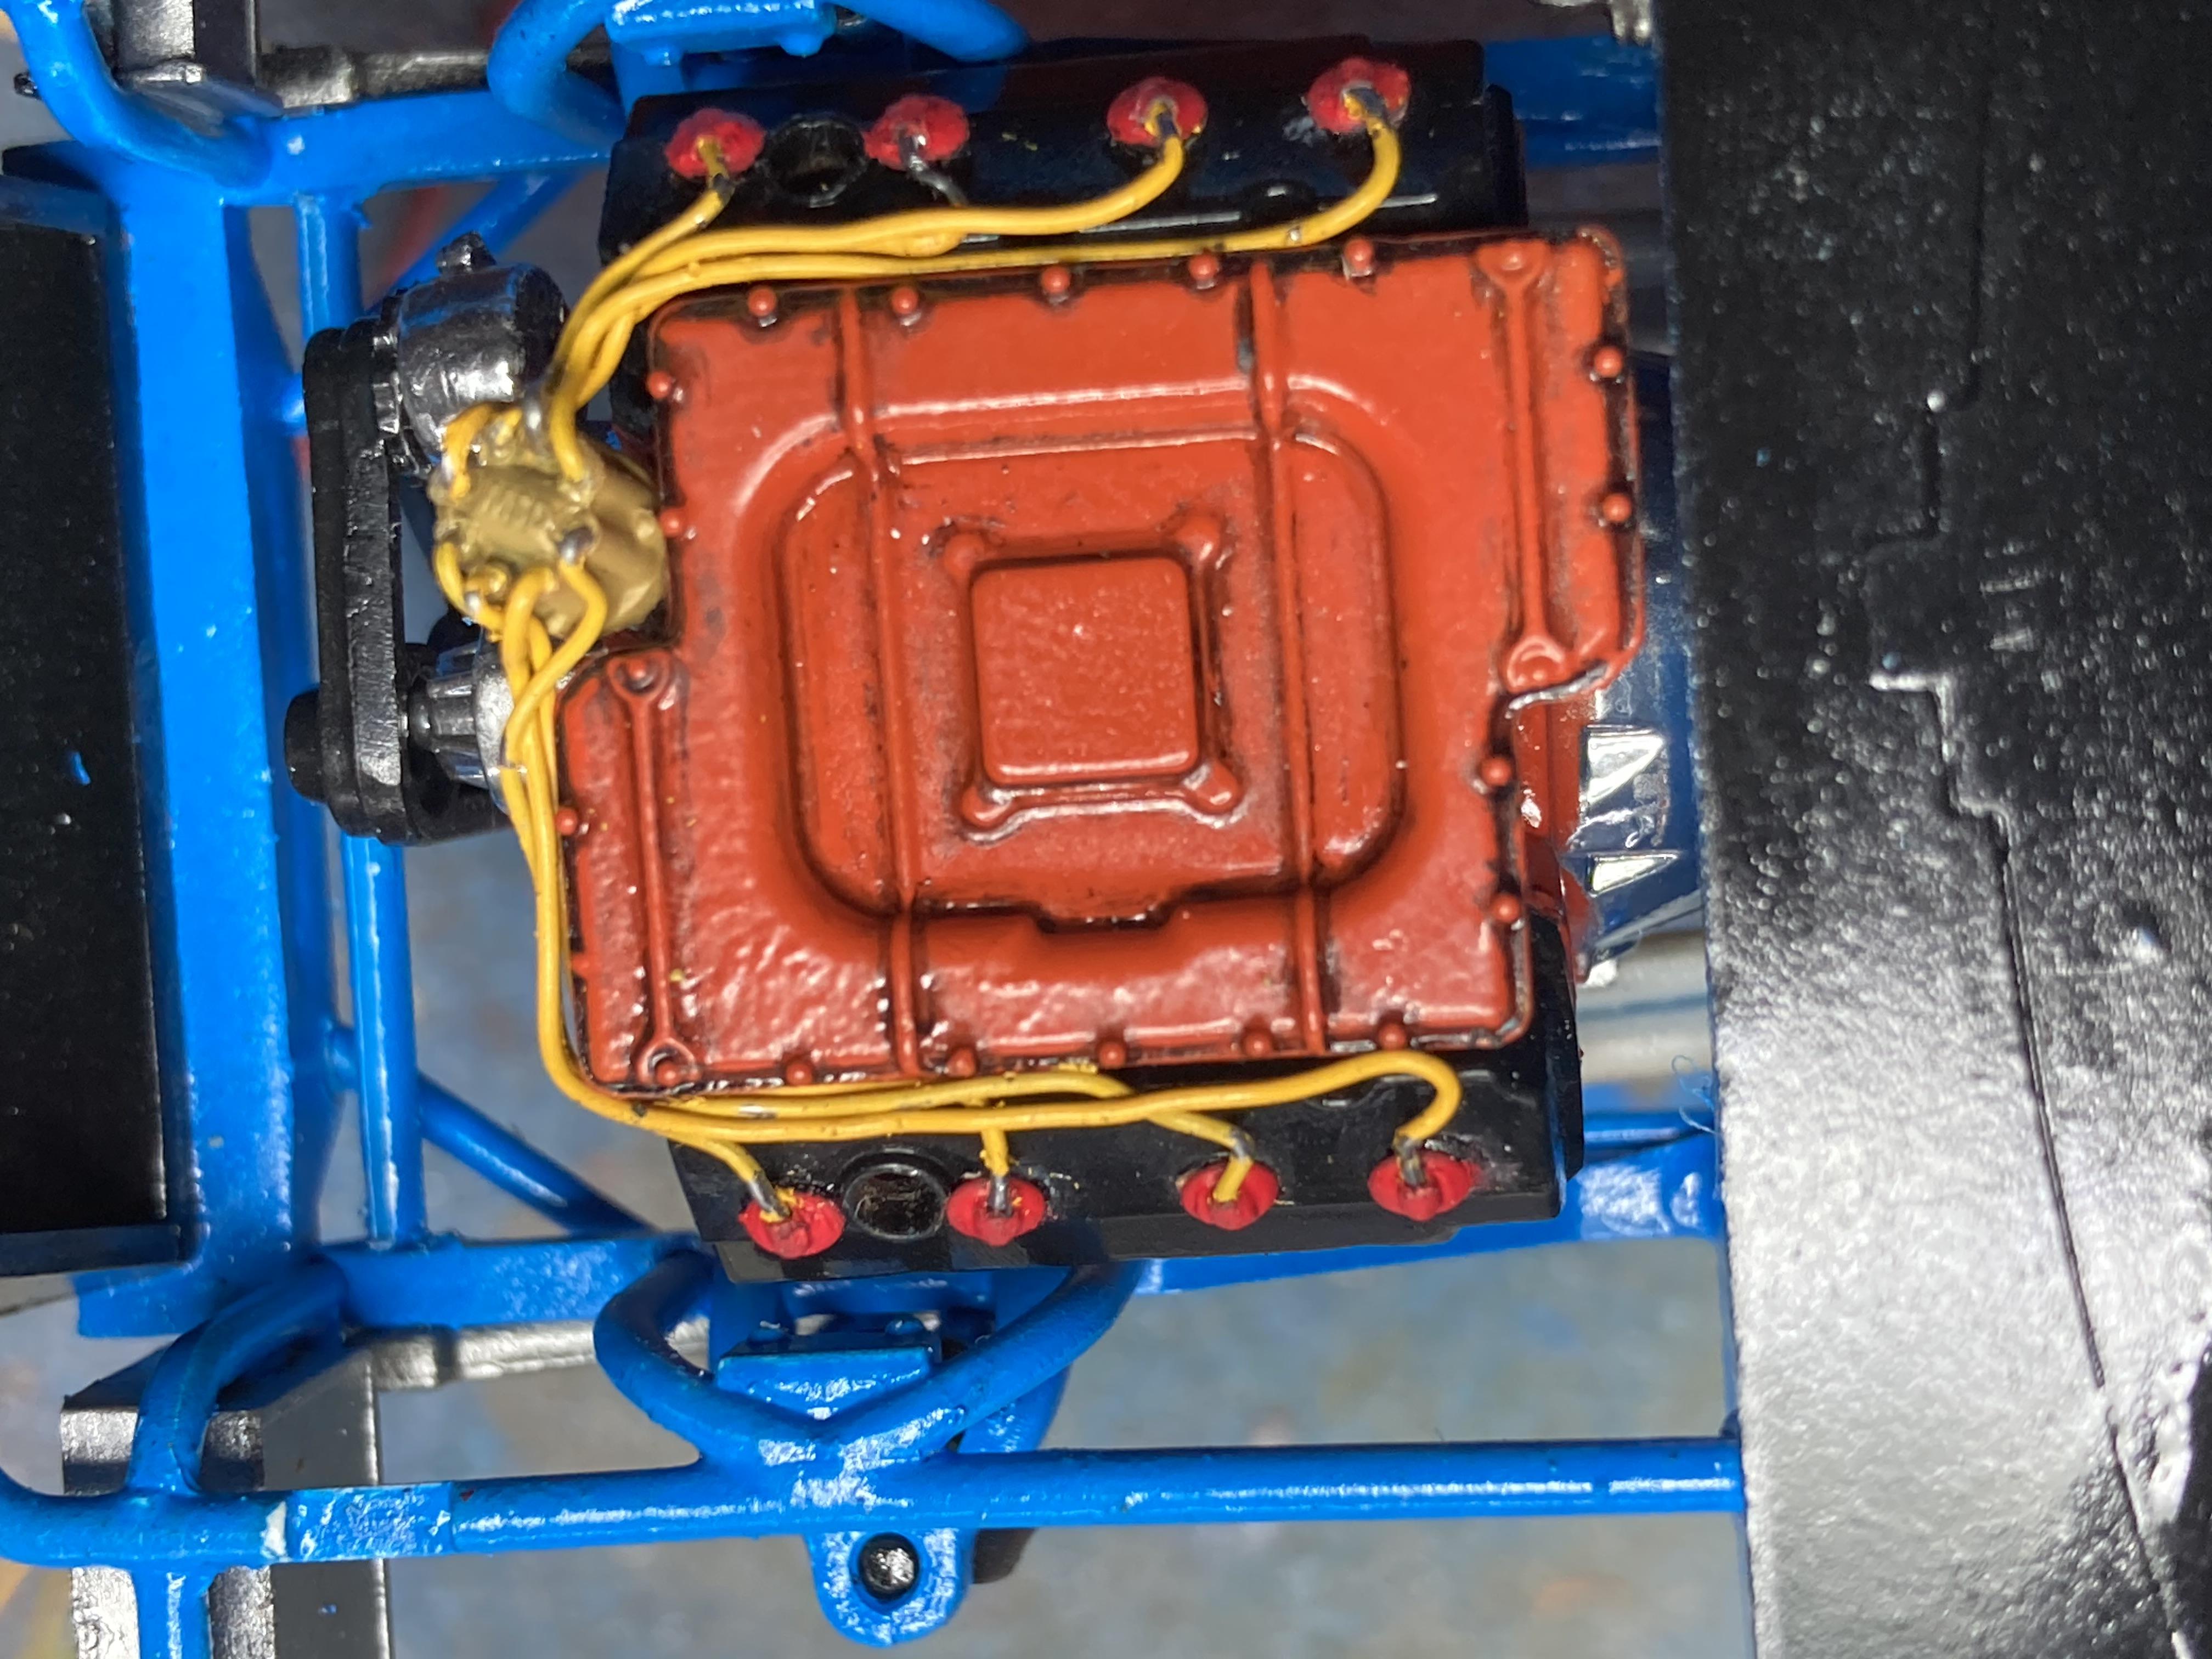
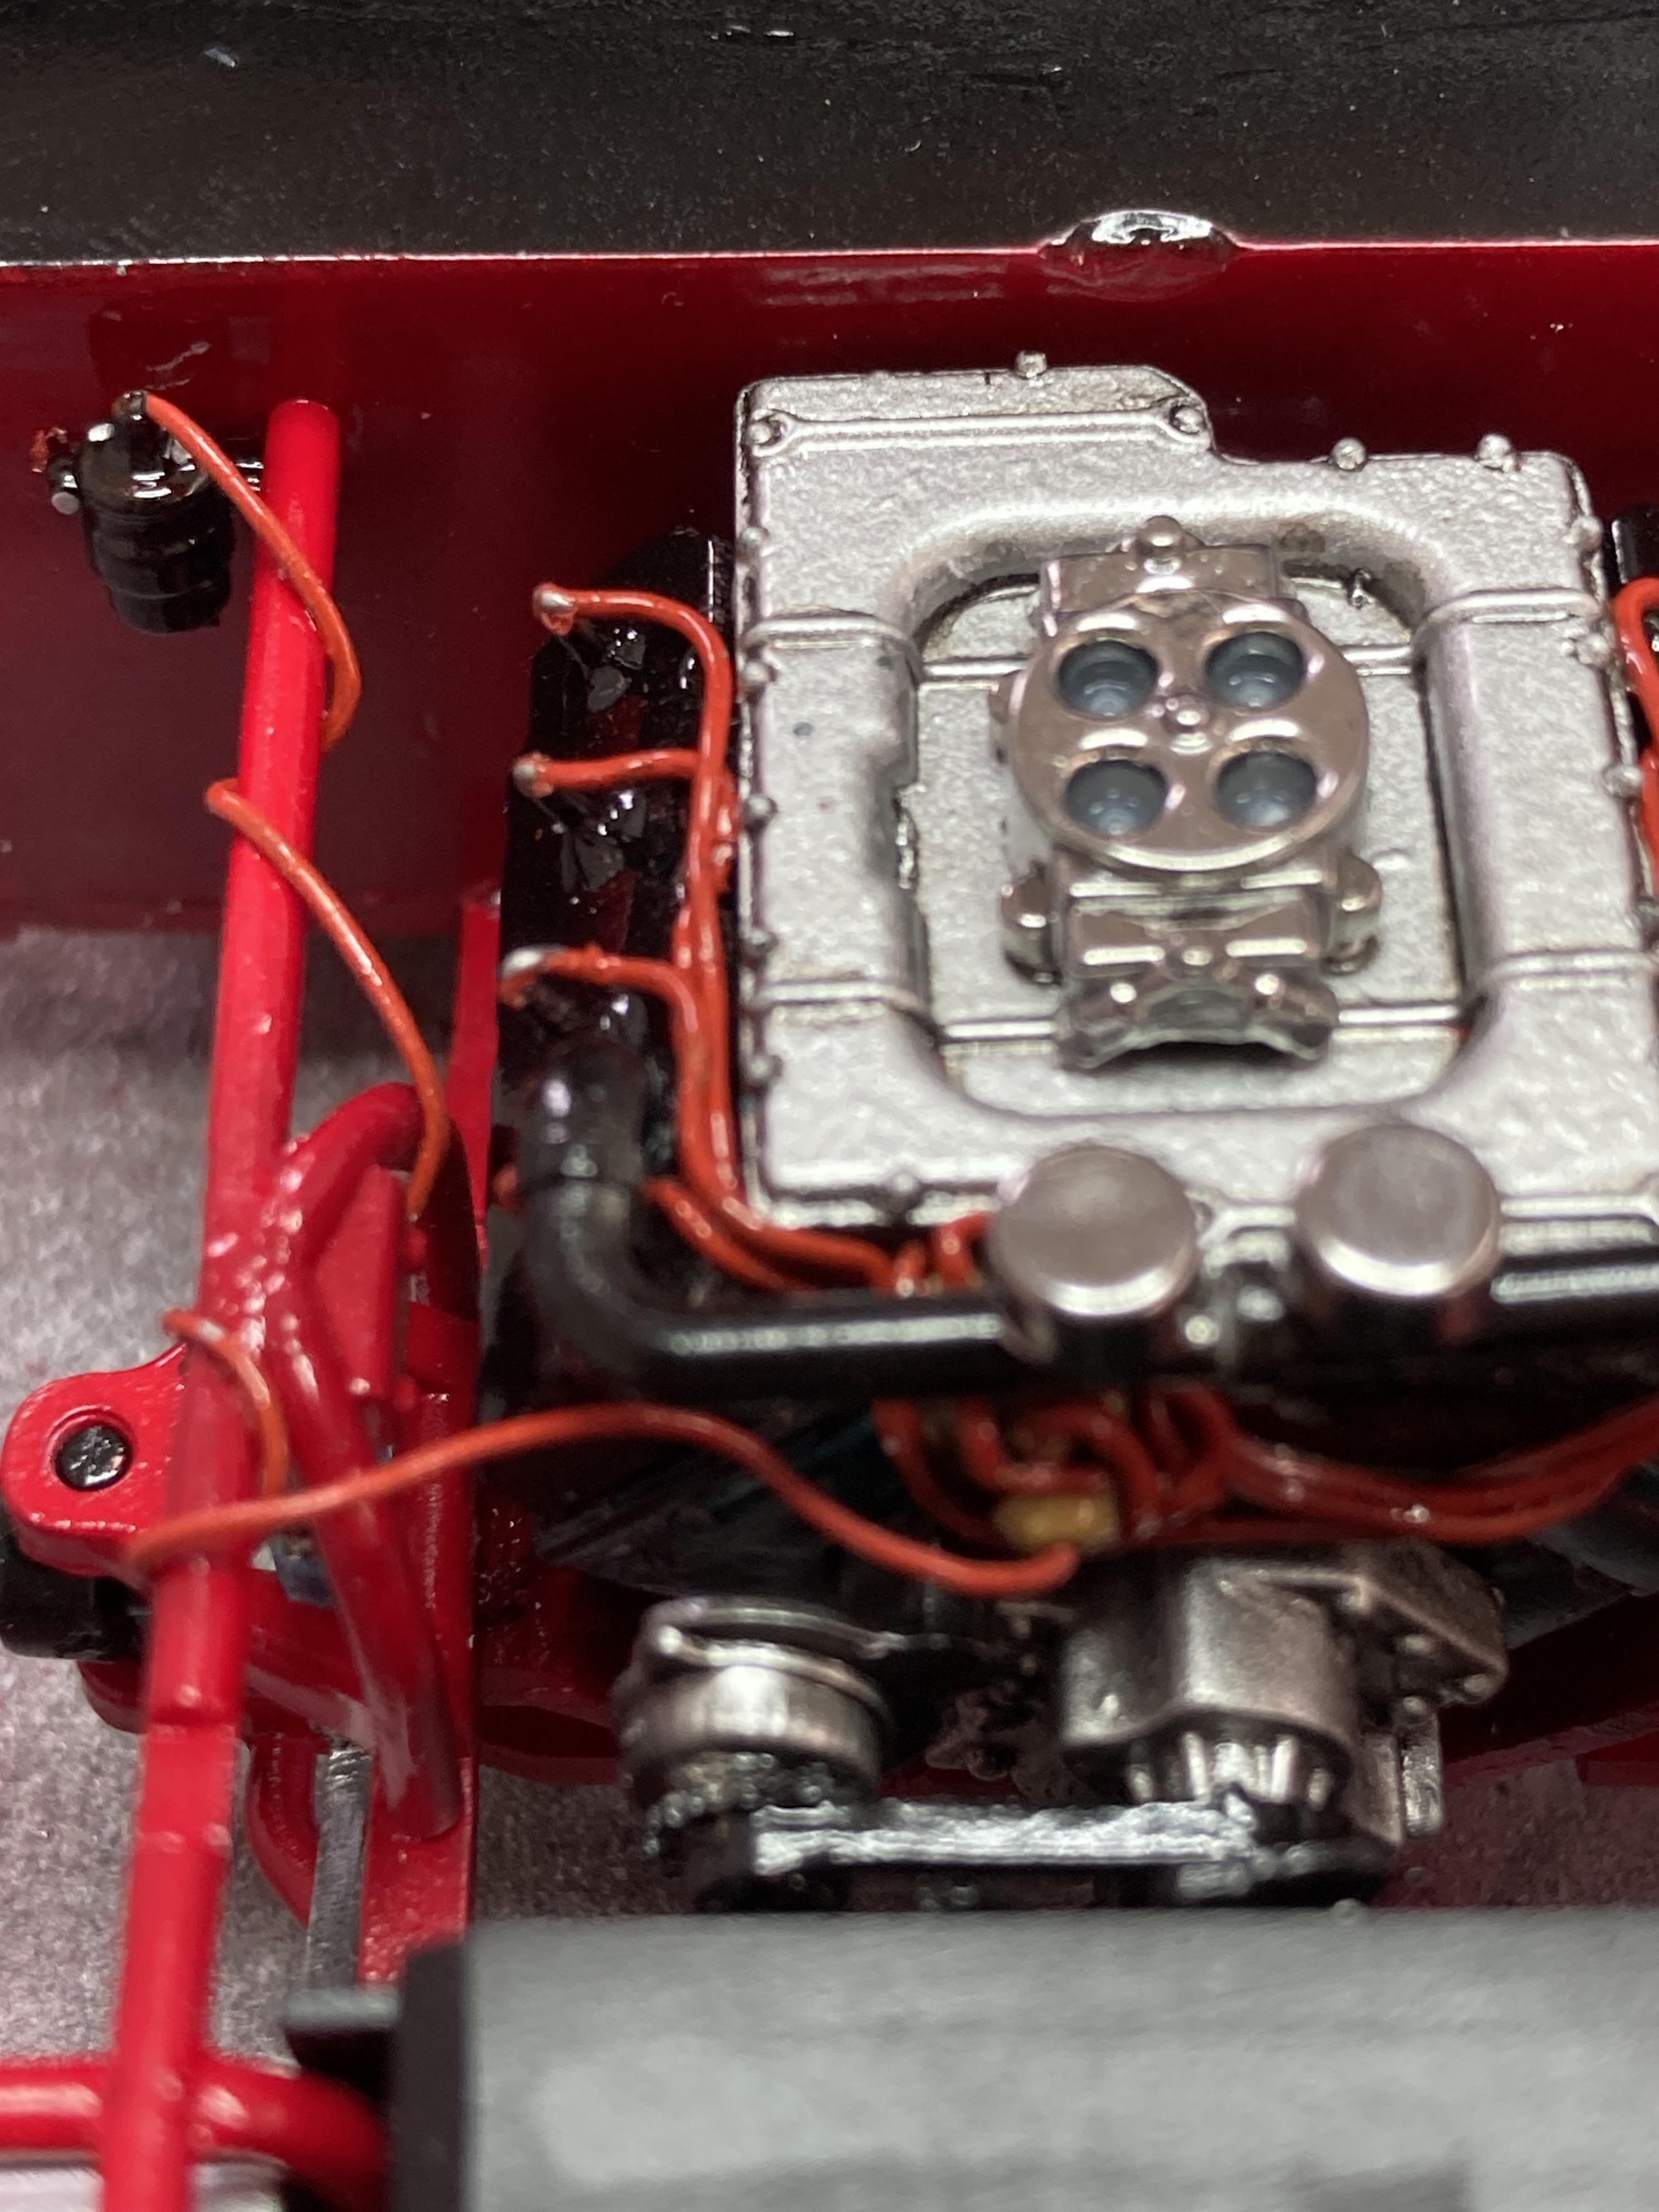
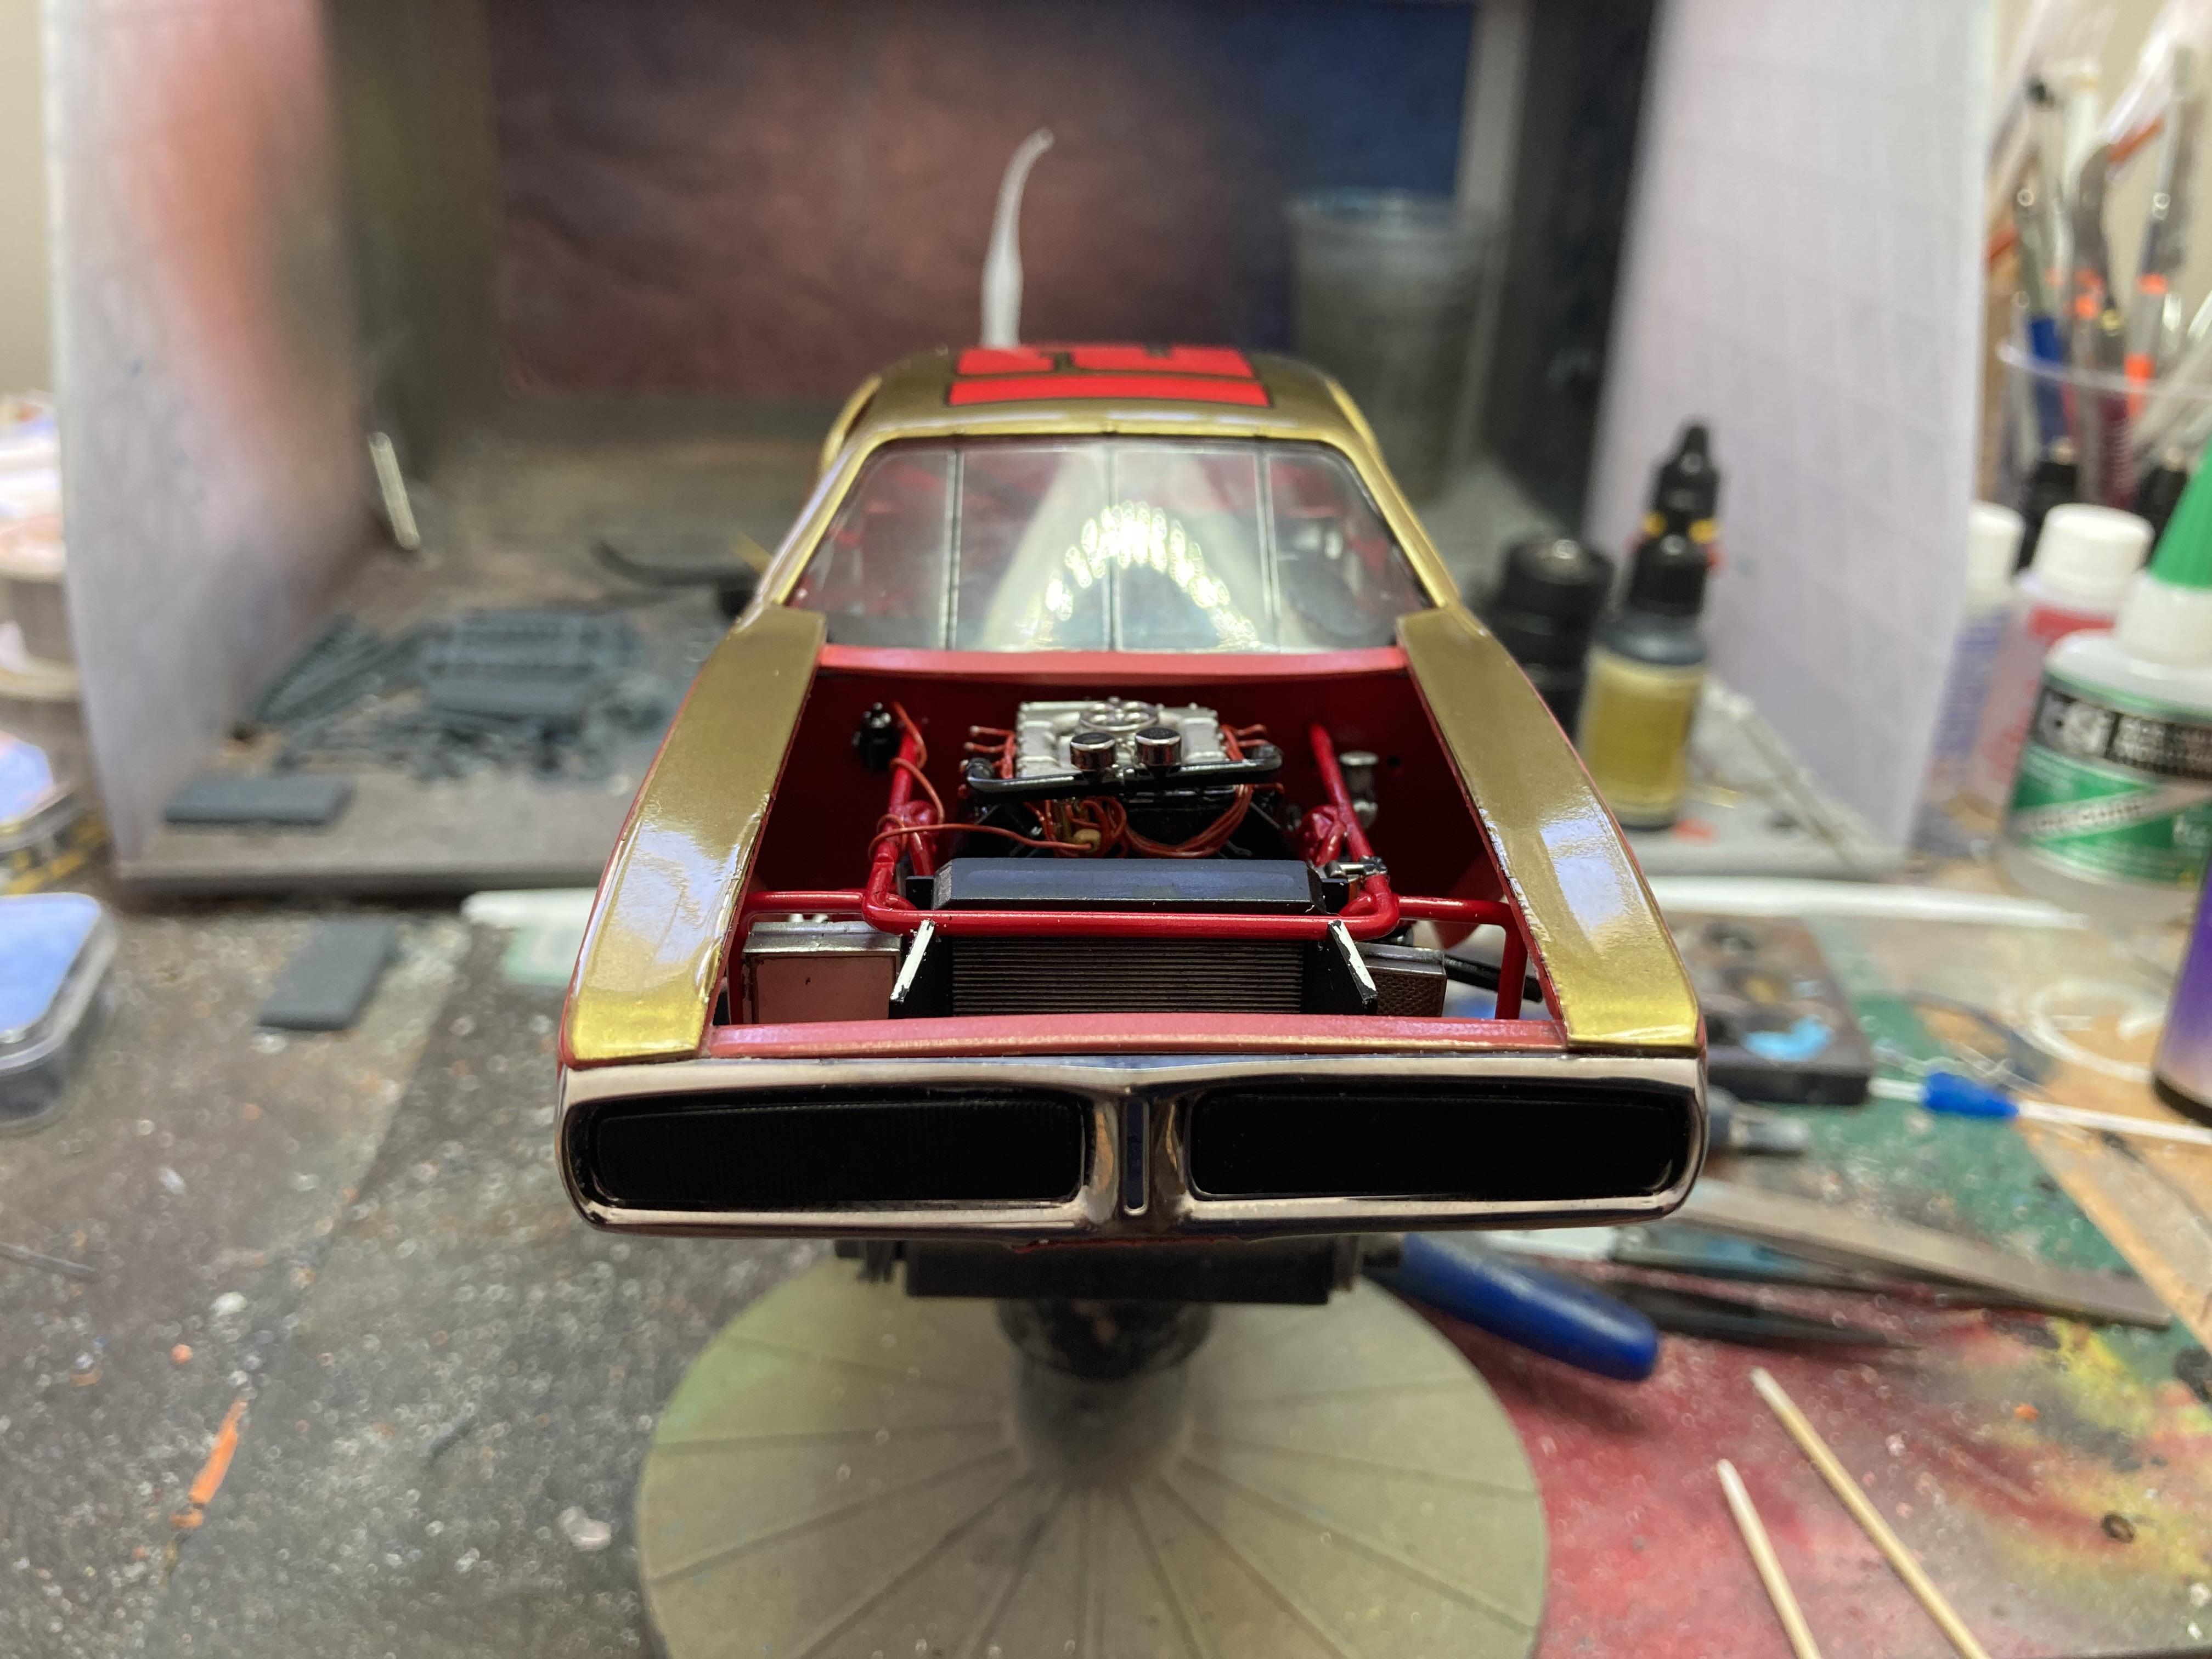
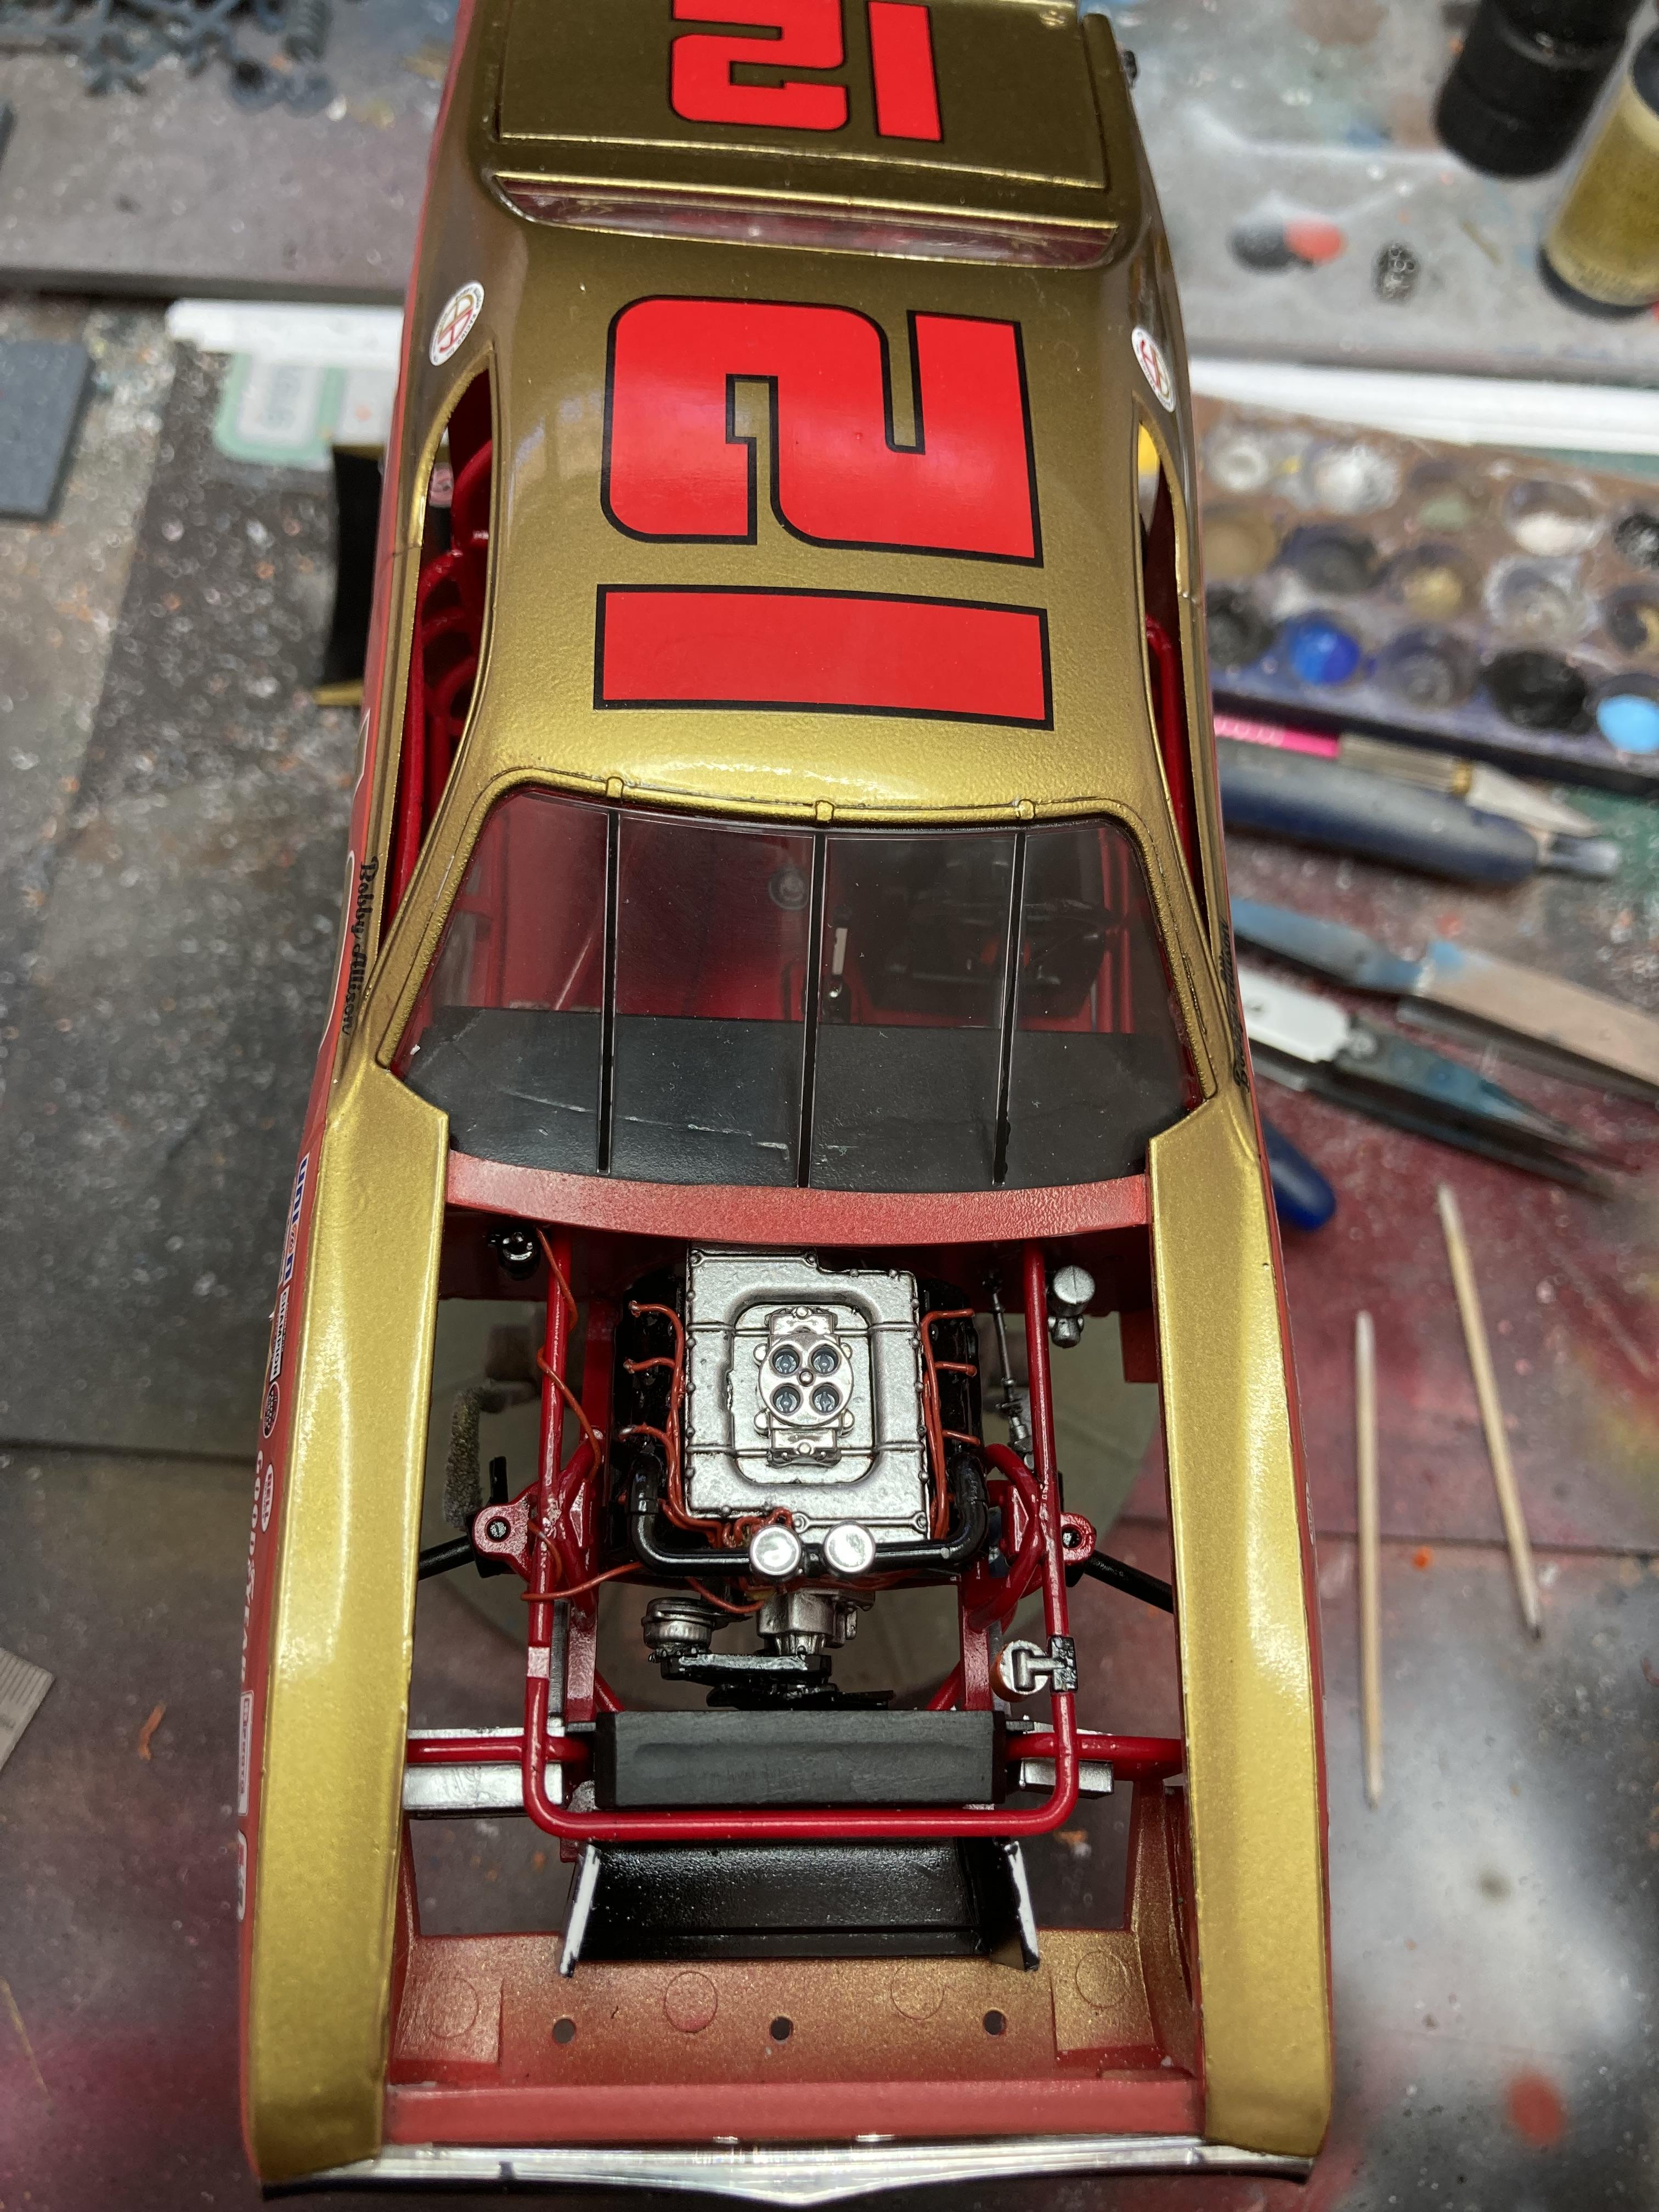
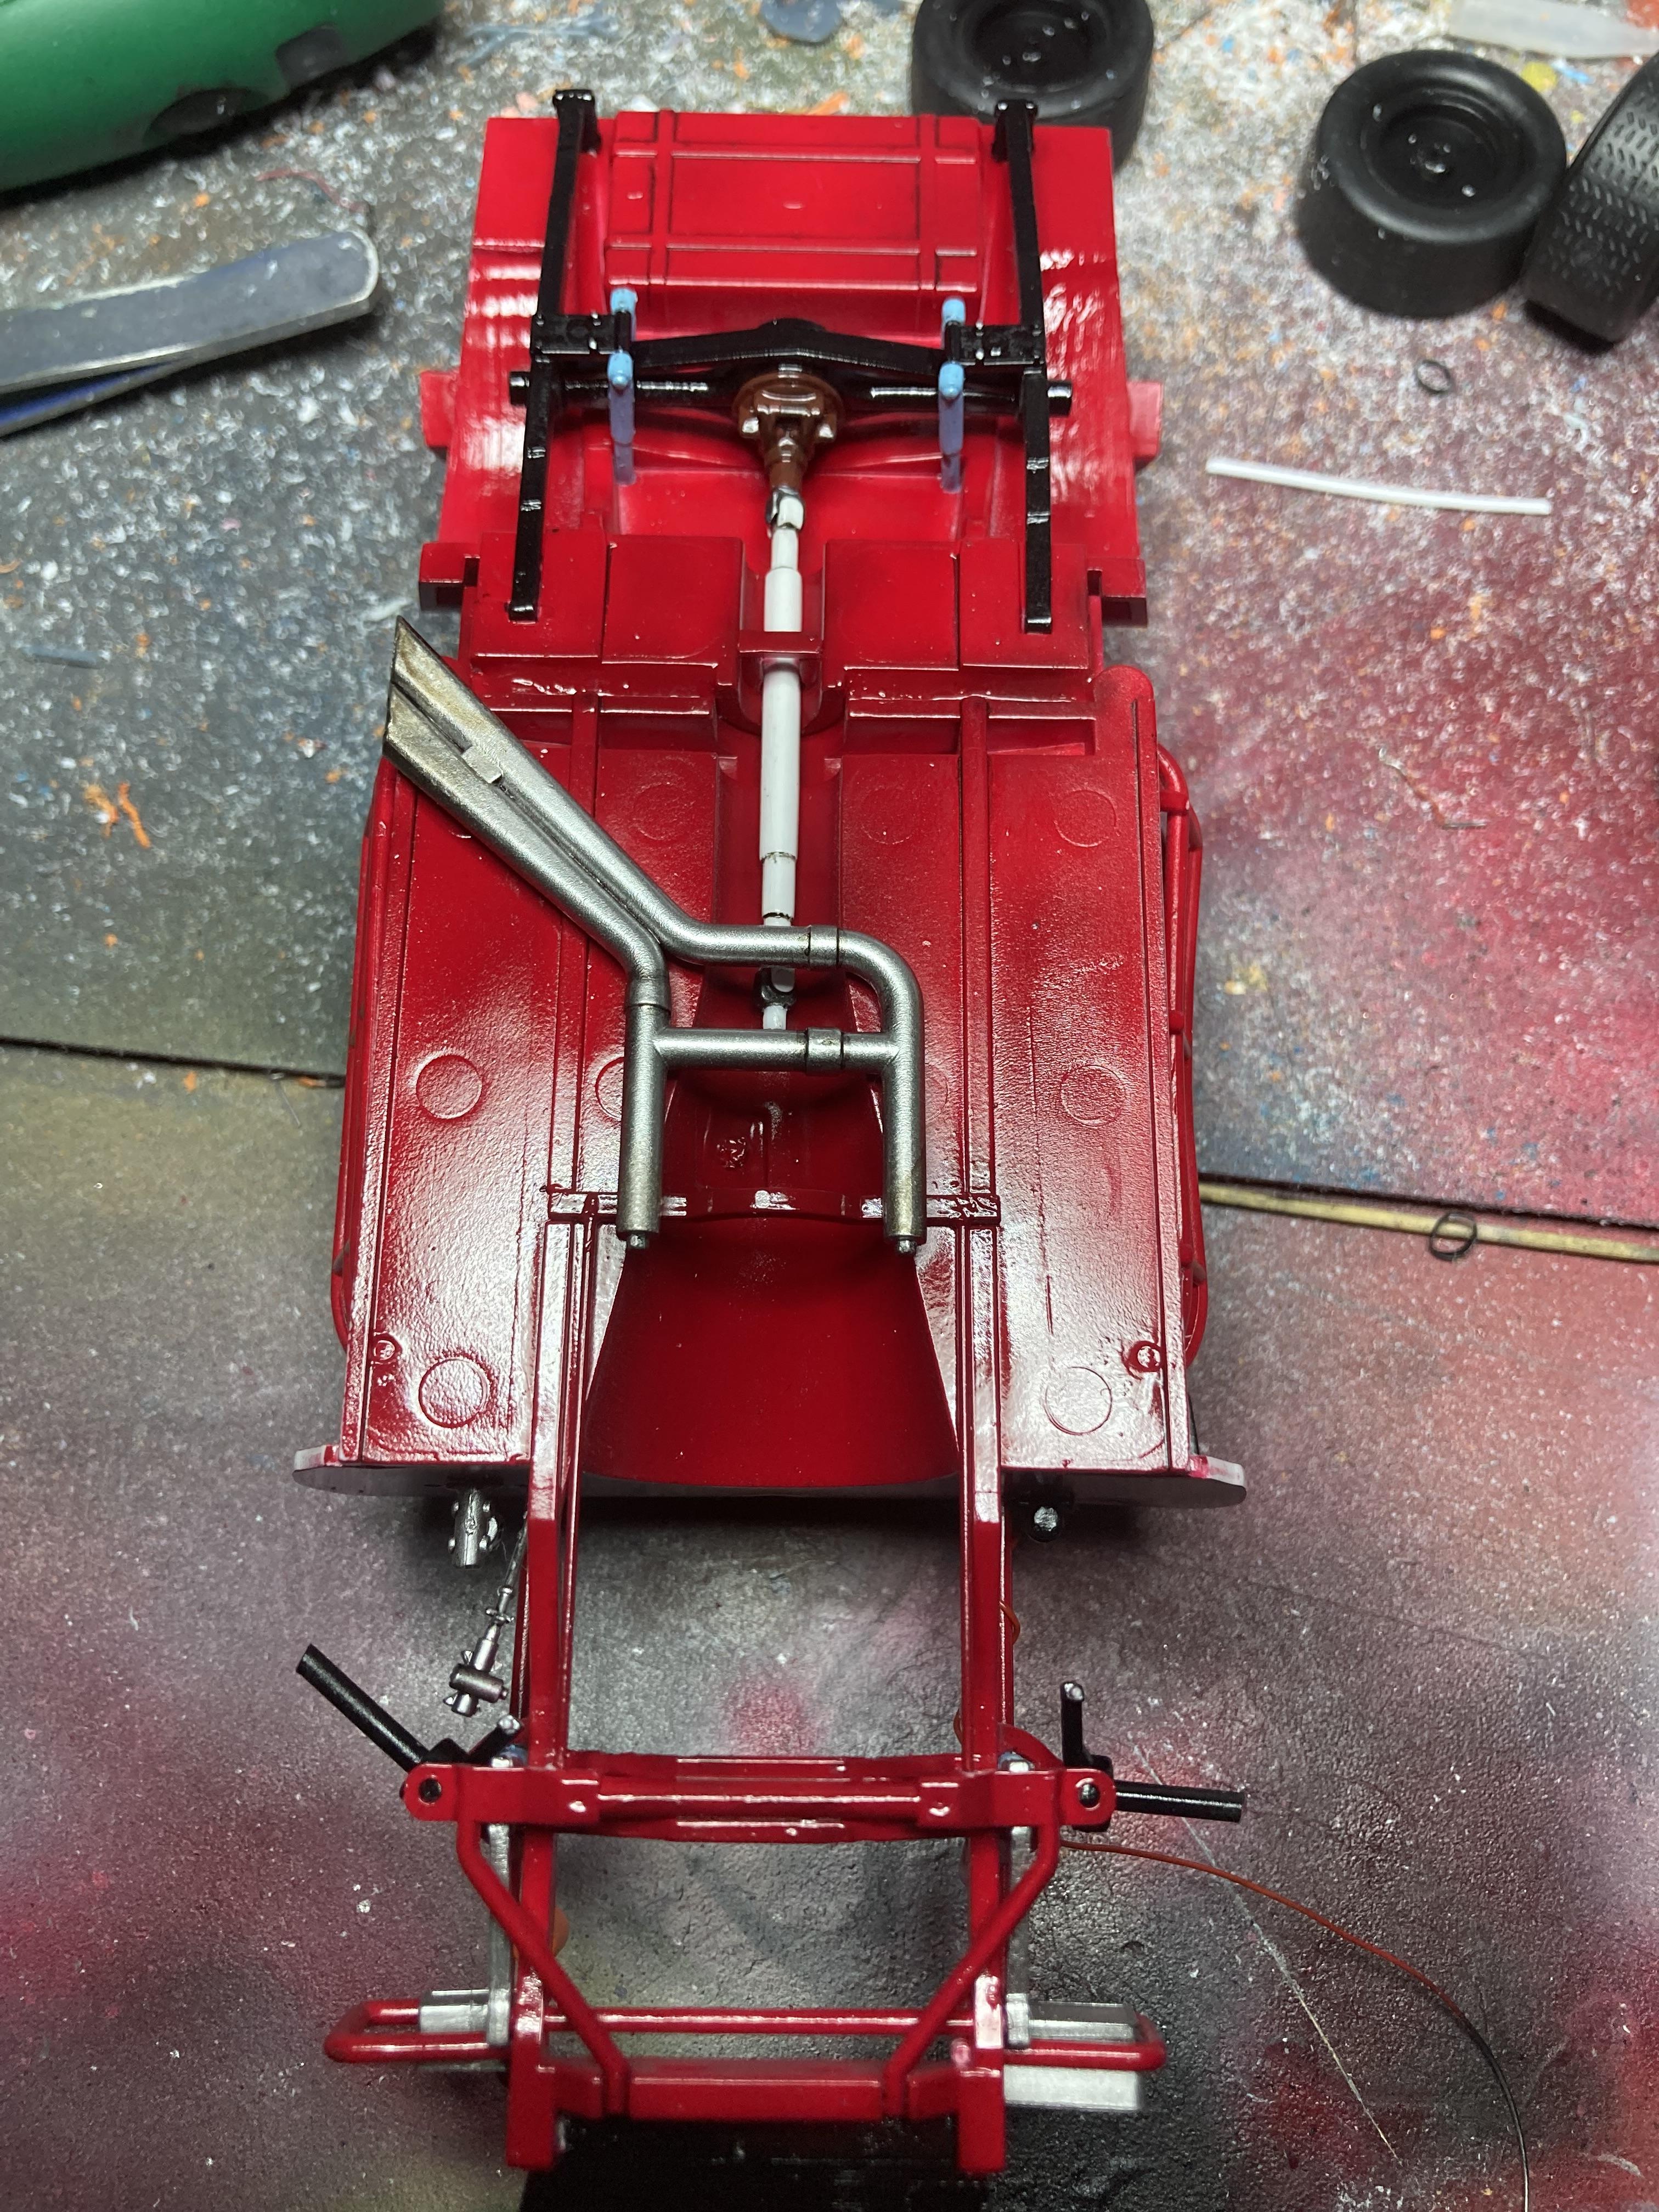
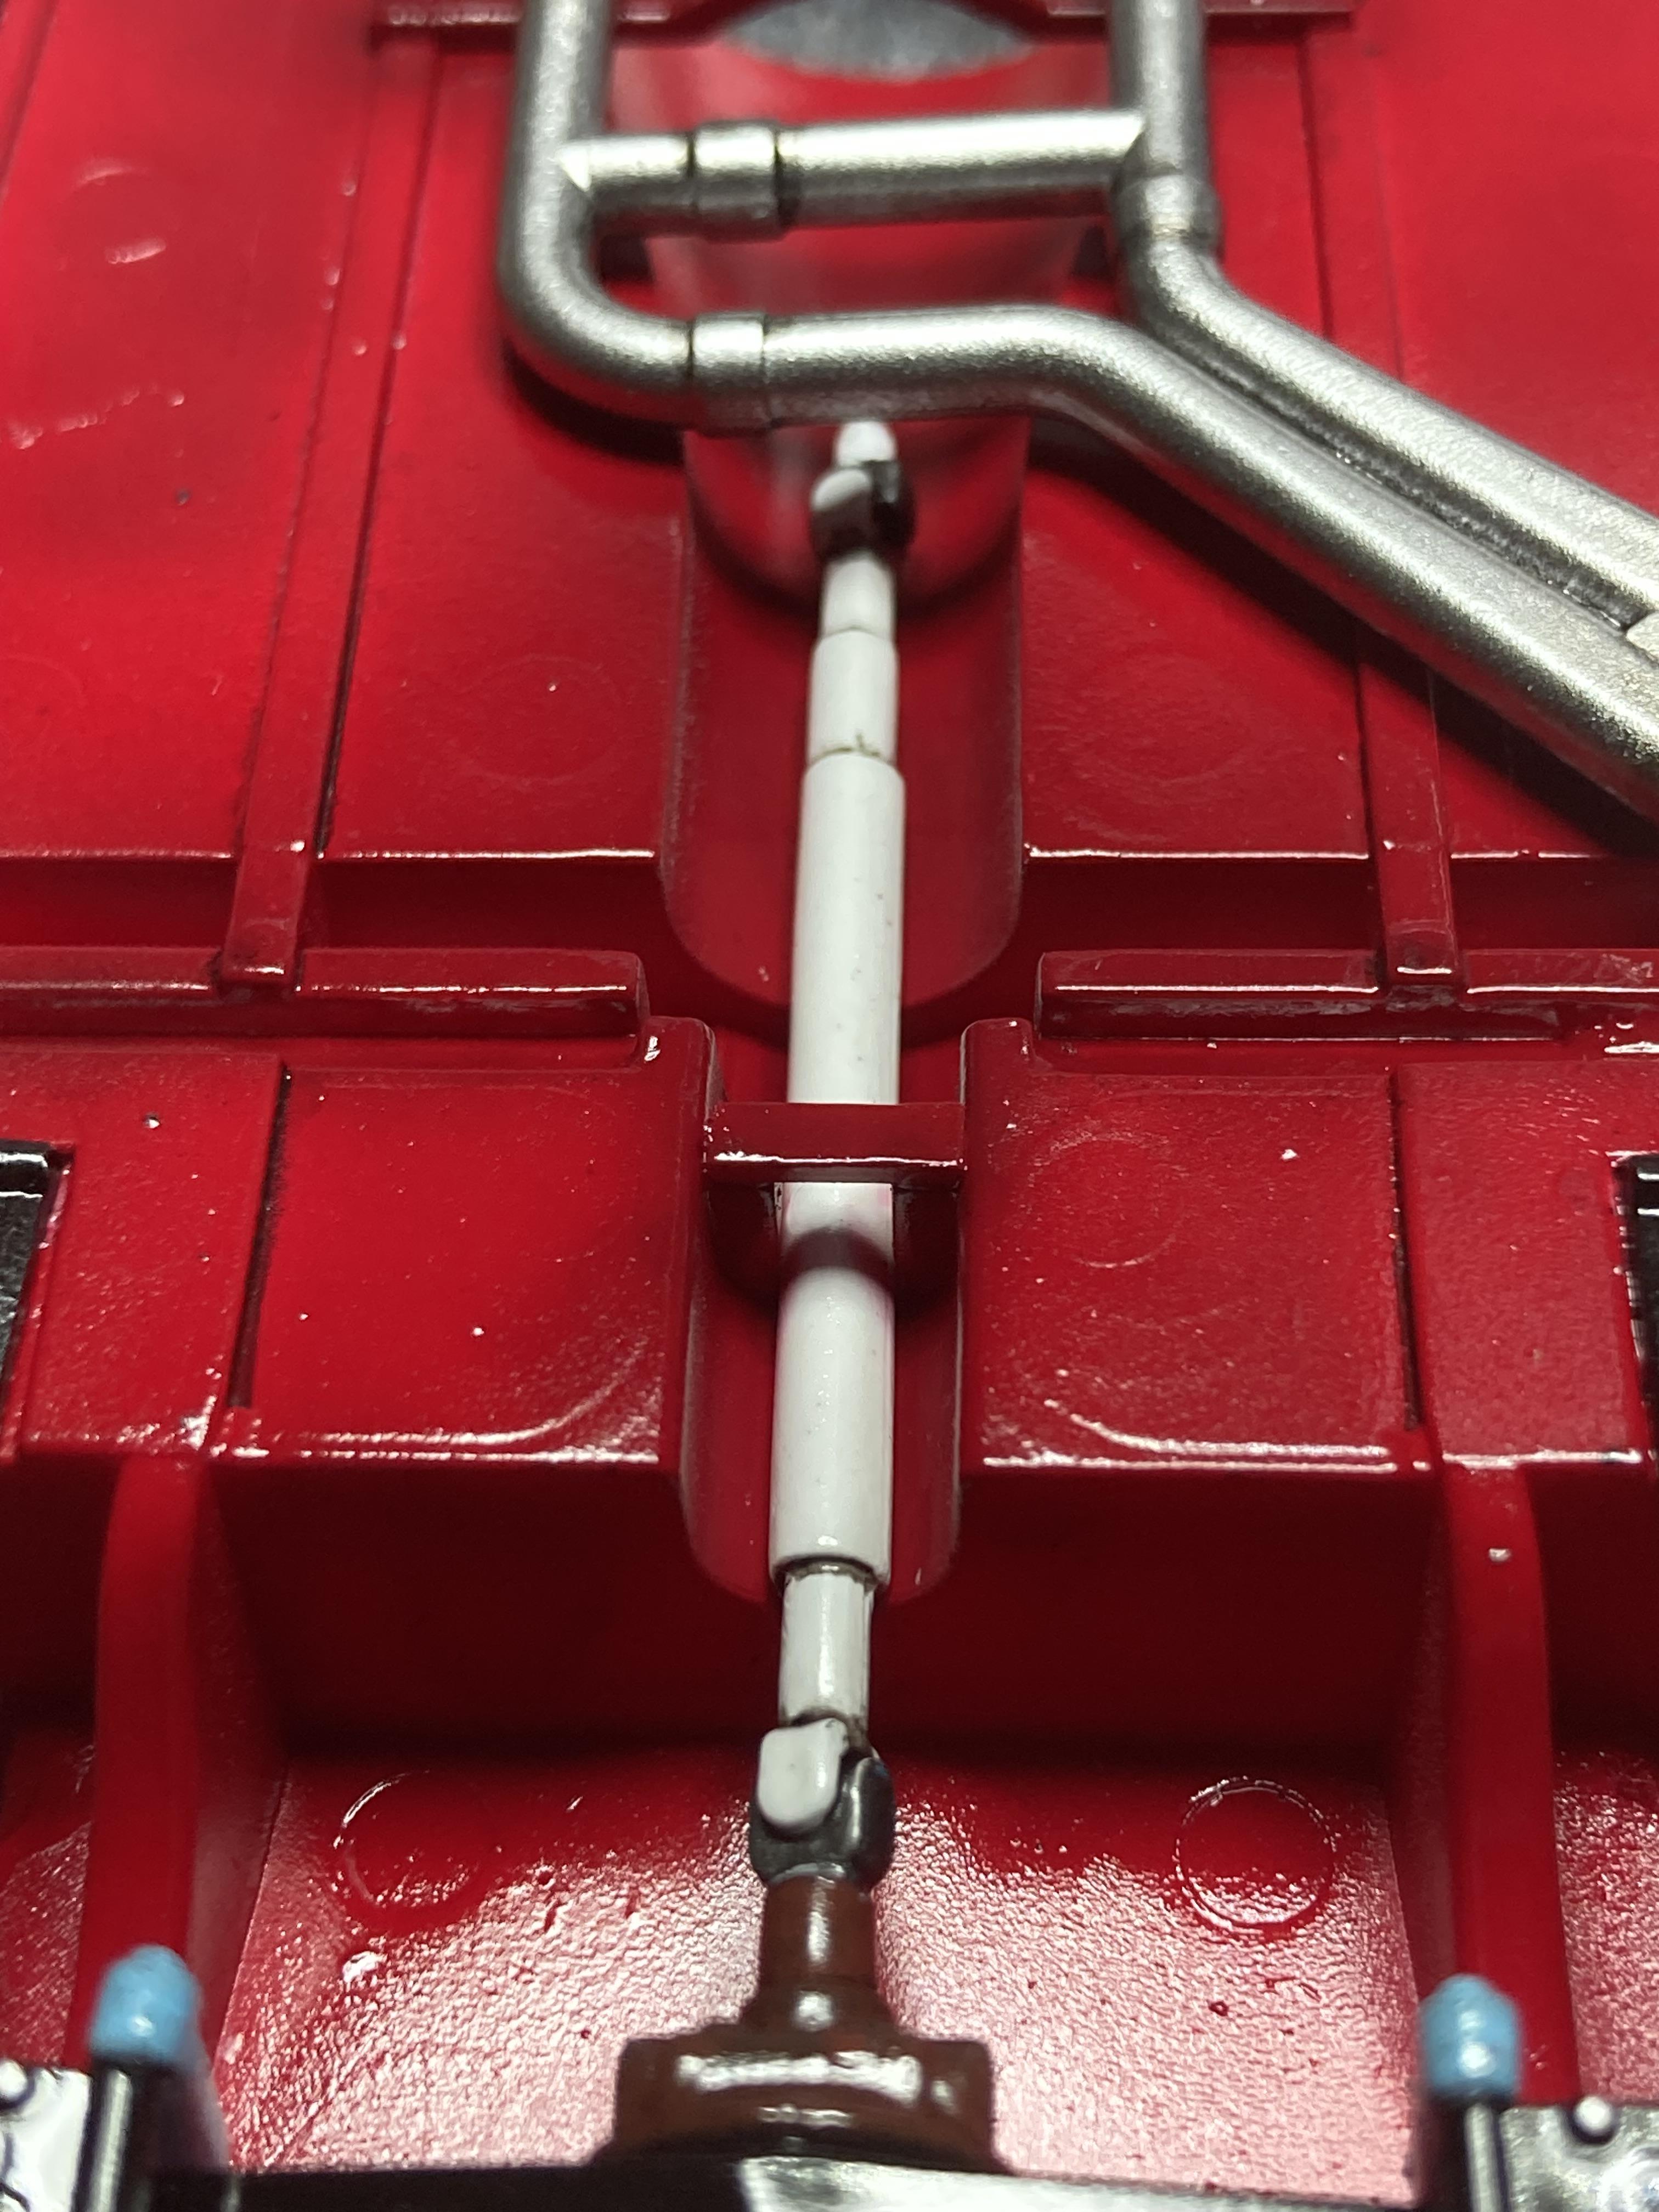
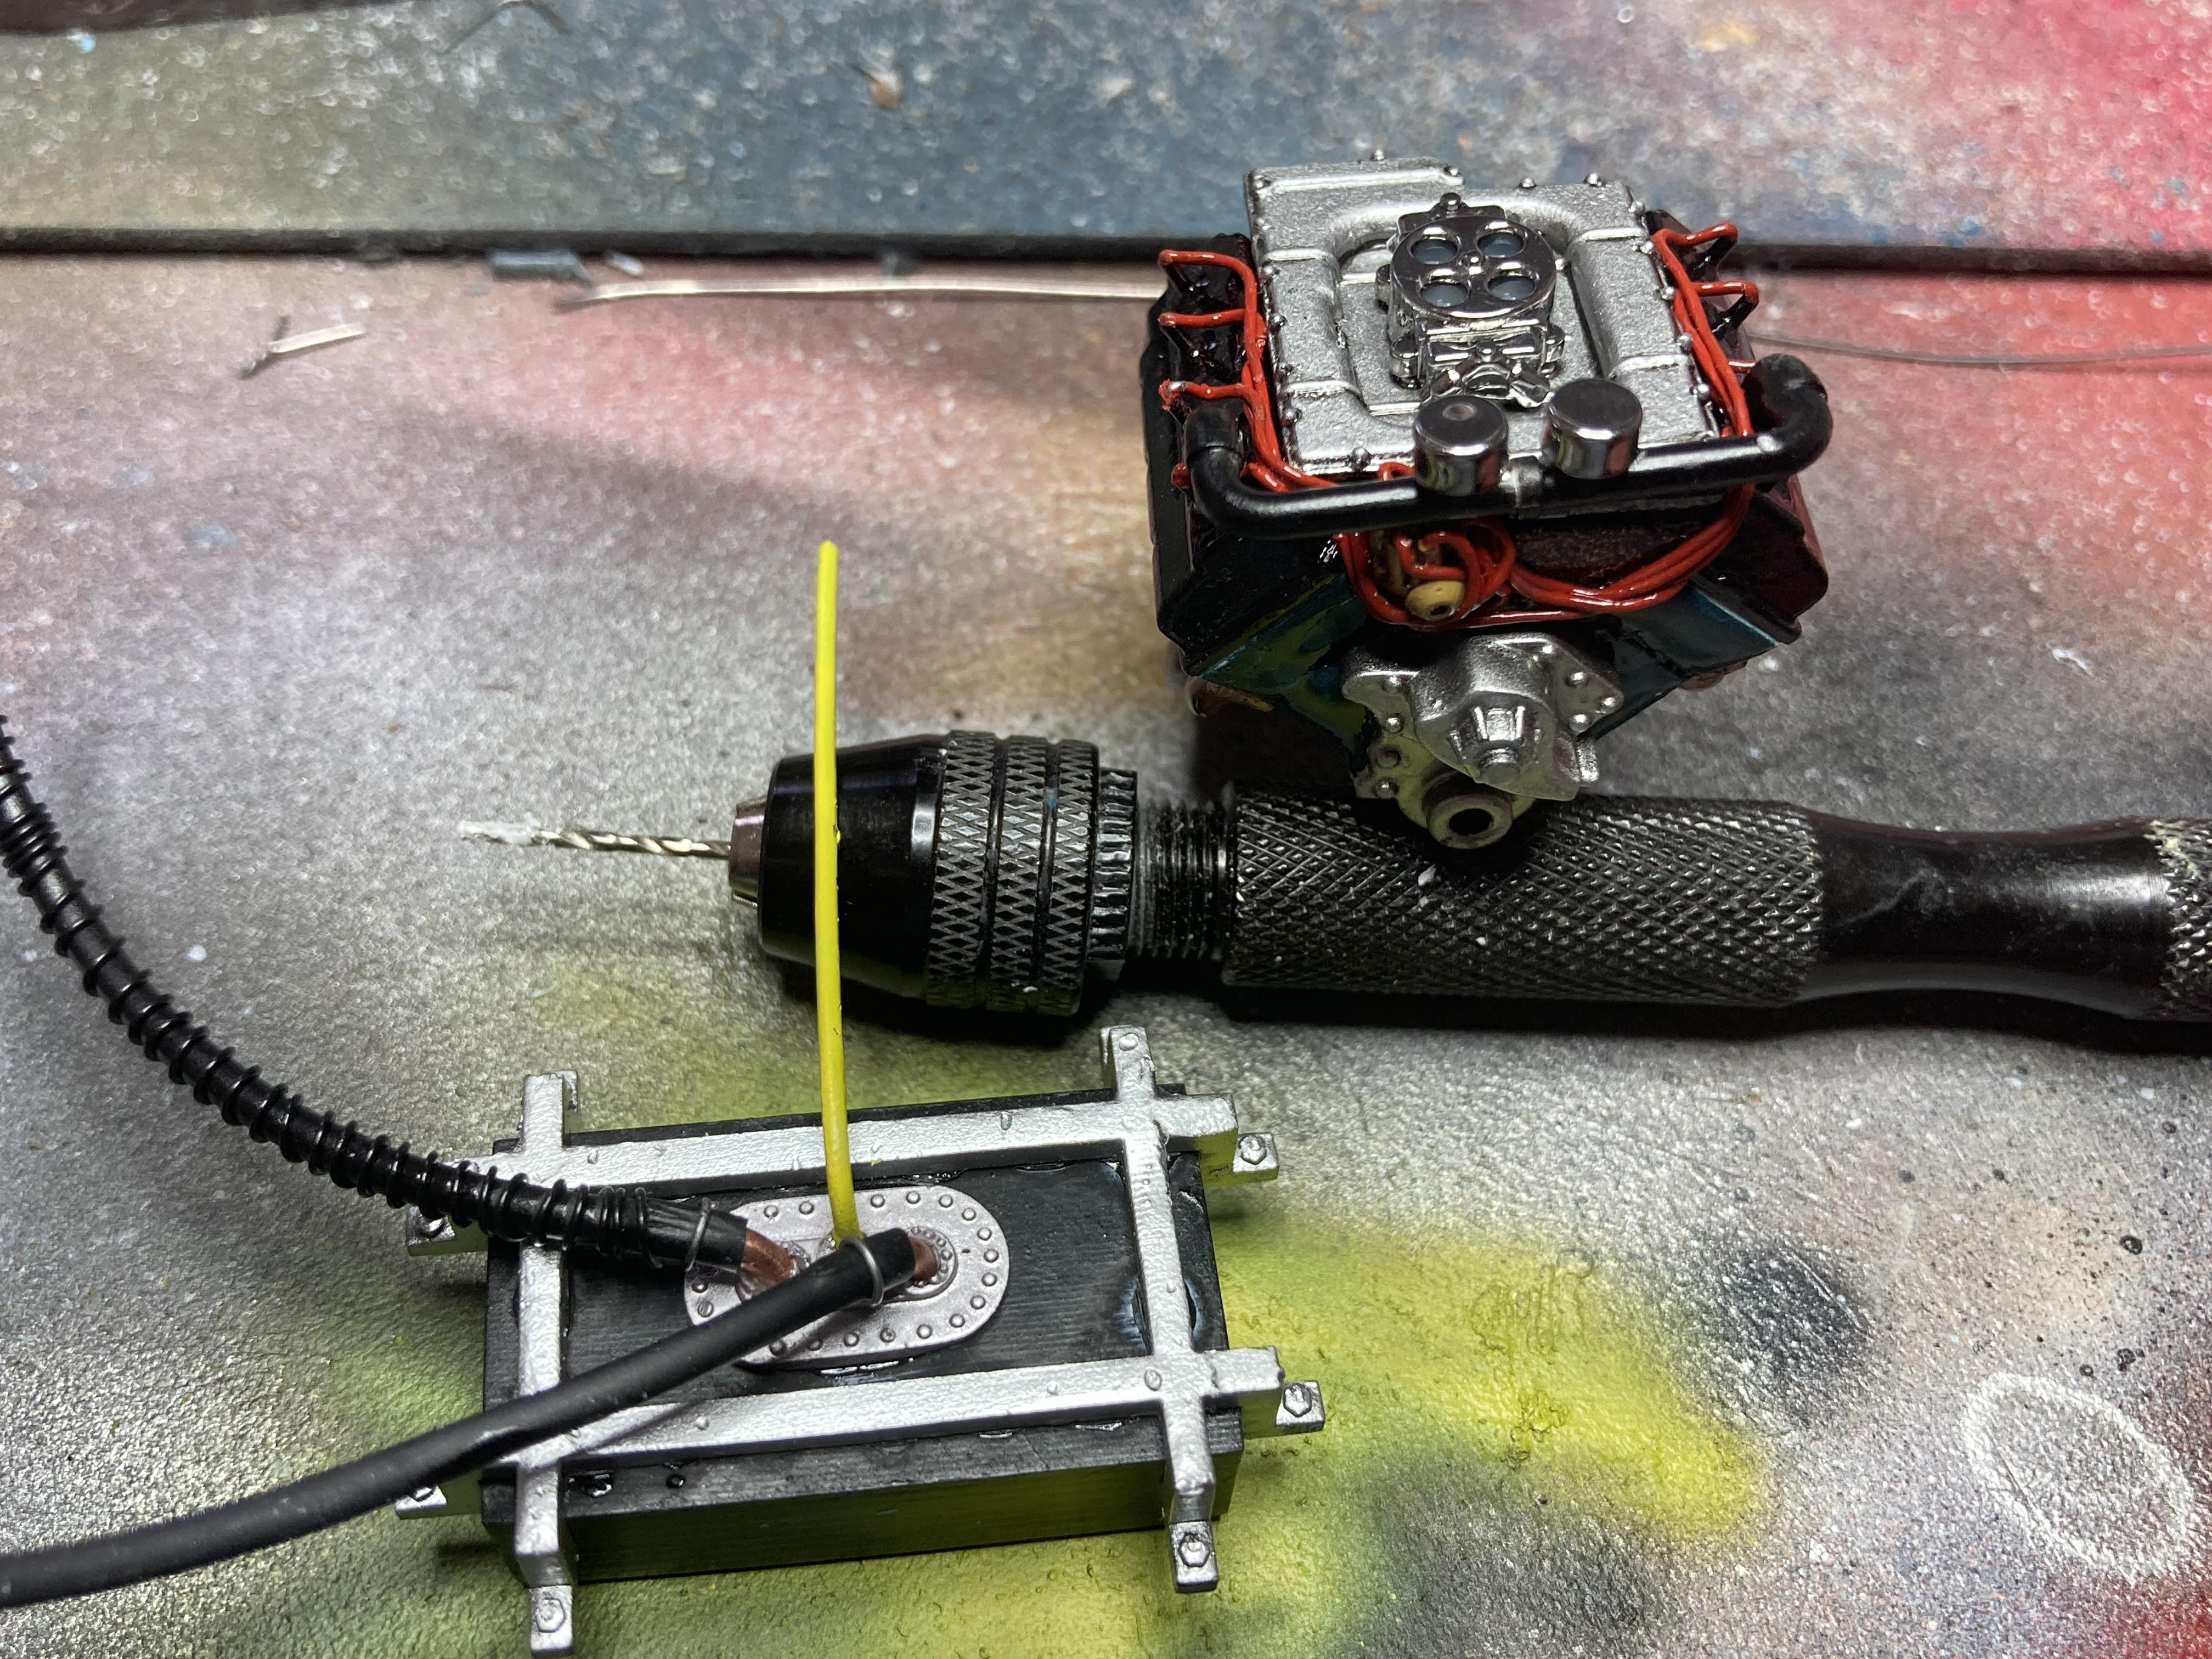
Many of these SalvinosJR kts contain the same parts so there is not much to be added by posting the same progress pictures over and over again save for the purposes of gauging one's own improvement. To that end, below is the engine fitted into the engine bay. This is without a doubt my best effort to date. It is symmetrical, the exhaust headers are placed/spaced perfectly to receive the exhaust dumps and a test-fit of the fan and radiator confirmed sufficient tolerance to make everything fit with no room to spare. I used silver chrome from DSPIAE and I'm delighted with the finish it's given me; having the engine drop in so effortlessly without spoiling the finish was quite a relief. The other aspect of the finish that I find very visually satisfying is the use of automotive 1k clear which has given a sense of depth and definition to the surfaces that I haven't previously obtained on other similar builds. I've found some opportunities to incorporate some more 3d-printed parts such as the red spark plug caps which add a nice bit of detail. The distributor is also 3d-printed. I forgot to trim the base to lower the overall height which I was reminded of when I tried to fit the breather cross-pipe which now doesn't sit so I've had to bend a new one out of 2mm brass pipe. I seem to have had success with it so I will paint it up and fit it during the week. I've not secured any of this yet because experience has taught me that some not-so-minor structural adjustments to the lower engine mount might be required once the air filter is fitted to allow clearance for the hood to sit flush. There is nothing that frustrates me more than a proudly-sitting hood. Not only is it visually distracting but also speaks volumes about one's own inability to plan ahead and foresee potential pit-falls.
-
Patto's Place has many options and variations of ETCC Group A racing livery for this model. I am currently building this kit as the '85 Hahne-Goss Bathurst 1000 winner.
-
Oldsmobile Quartet
GMasterG replied to GMasterG's topic in WIP: Stock Cars (NASCAR, Super Stock, Late Model, etc.)
Well it's certainly been more than a moment since I posted any progress in this build diary but since the end of January I've finished Richard Petty's 64 Plymouth Belvedere and Bobby Allison's Dodge Charger from 1971. And now returning to this group of four they will be the beneficiaries of the new standards that I've set myself having completed those two models. Firstly, I took delivery during the week of some Meguiar's Polishing creams and compounds so I set to and gave the Foytmobile a polish. The automotive 2k has really responded well to it. Secondly, I added bare-metal foil to the front and rear window surrounds; something I now regret not having done to Allison’s Charger. Thirdly, I added the rear window. In the process I smeared a little resin glue in the top left hand corner which the Meguiar's Plastix polish removed without fuss and it has left the clear plastic looking very good. Finally, I finished the underside and it is here that you can notice a few details that this car has inherited from the Charger build, namely; the detailed drive shaft, heat-shrink tube between the exhaust headers and pipes, and a little weathering with Hot Metal Sepia from Alclad. Tomorrow I can insert the front glass and unite the body with the chassis before adding the wheels and calling it done - what could be easier?!!
-
Thank you Todd. I consider myself a student of history so I appreciate the context and also the automotive anatomy lesson. I also appreciate your kind words regarding the build. I really like the NASCARS of the 50s through to the mid 70s and especially the Dodges and Plymouths. I have Bobby Isaac's K&K Charger slated as my next build to begin but for the next couple of months I'm going to focus on completing the four Oldsmobiles.
-
Done:
-
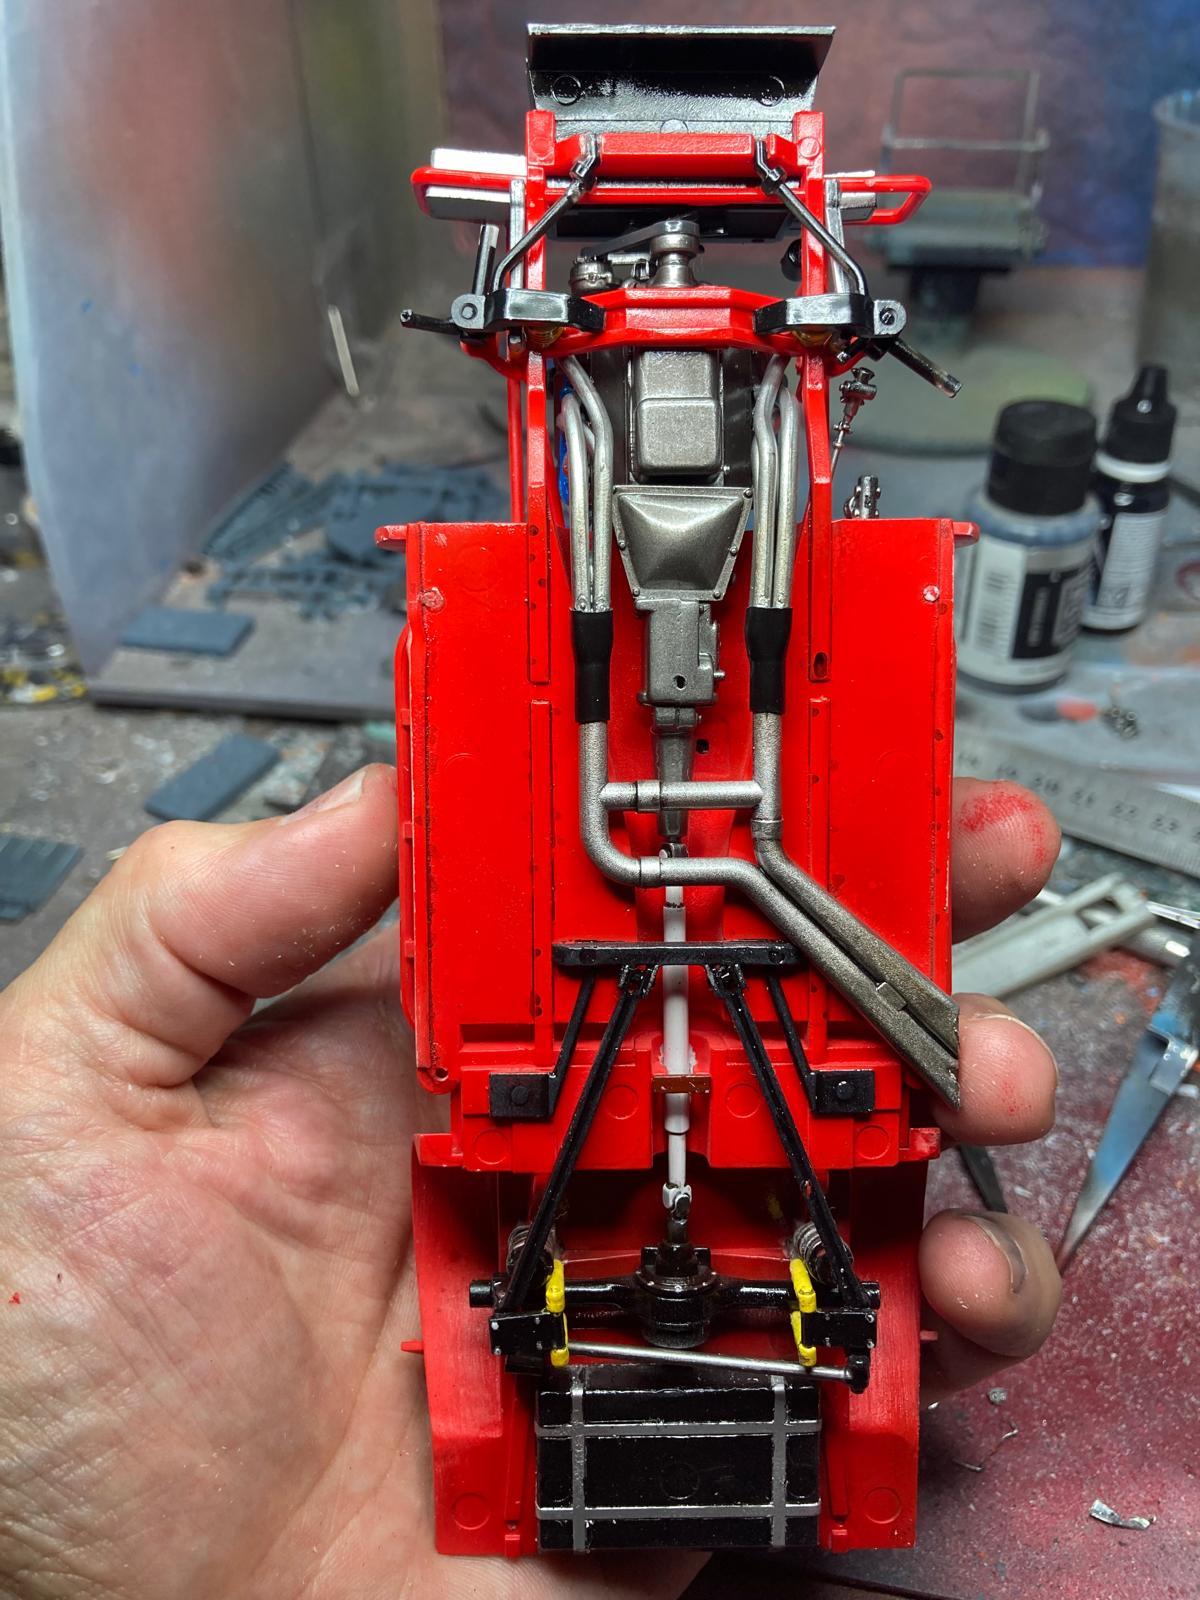
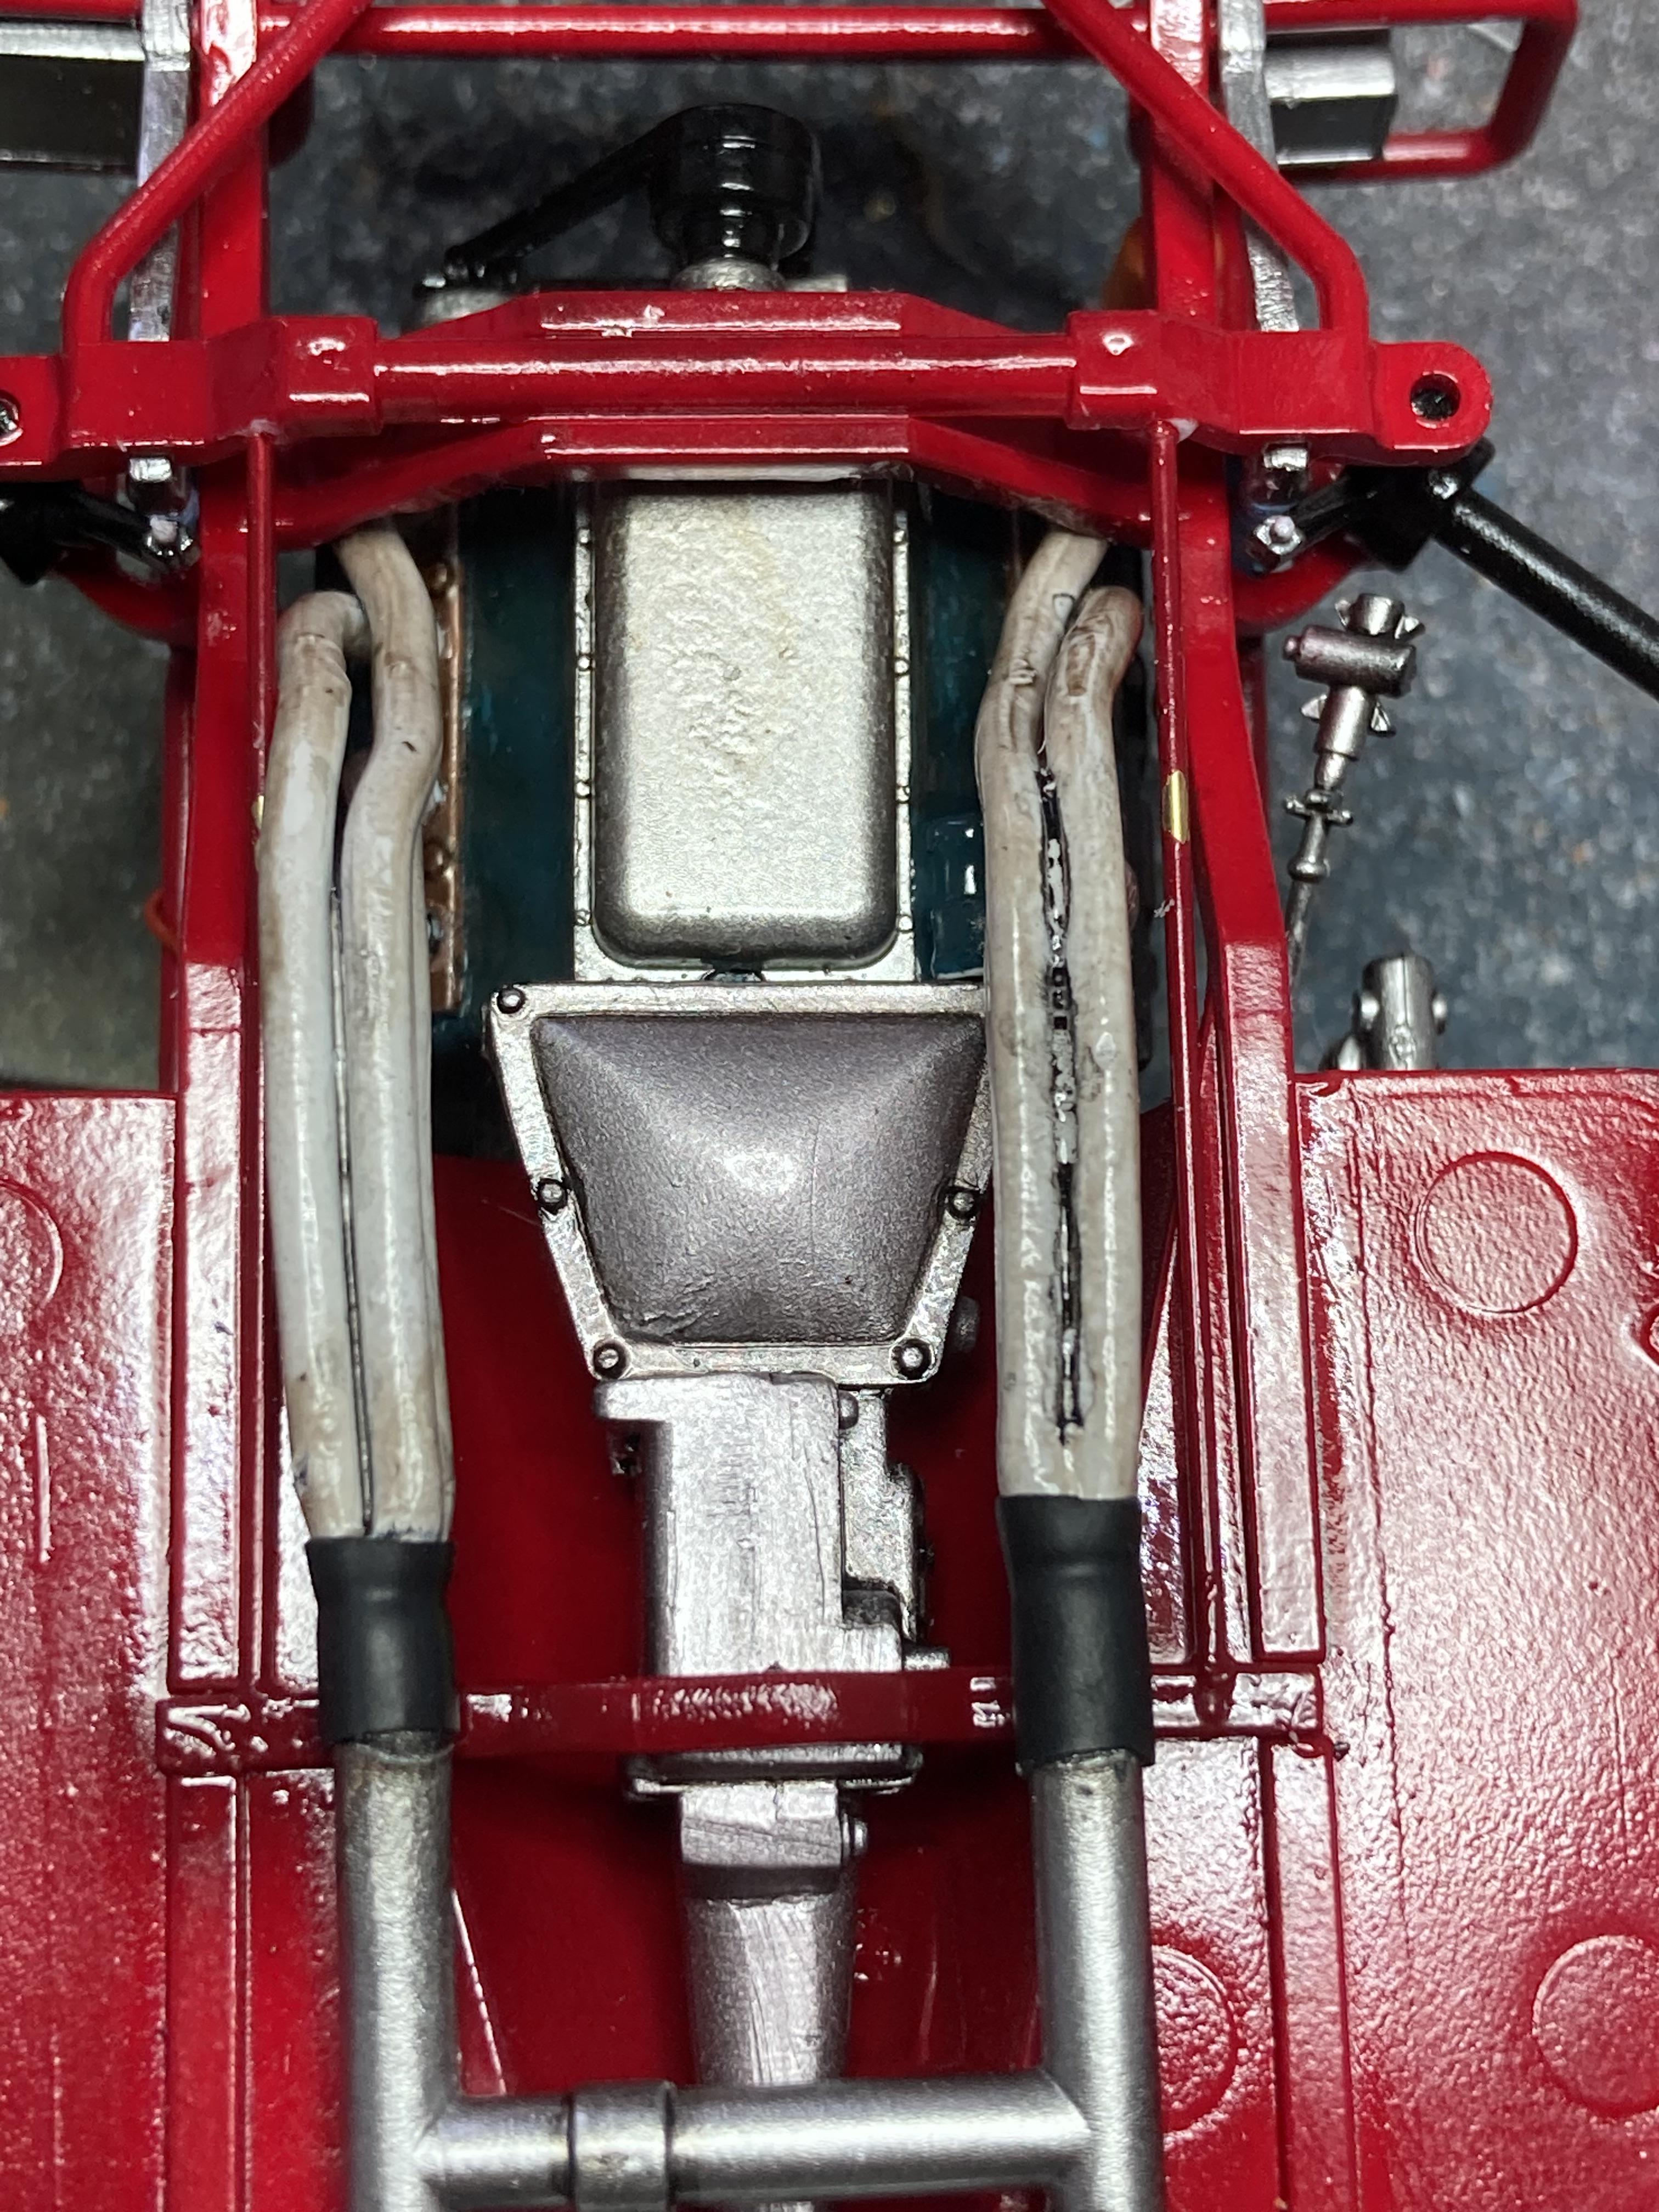
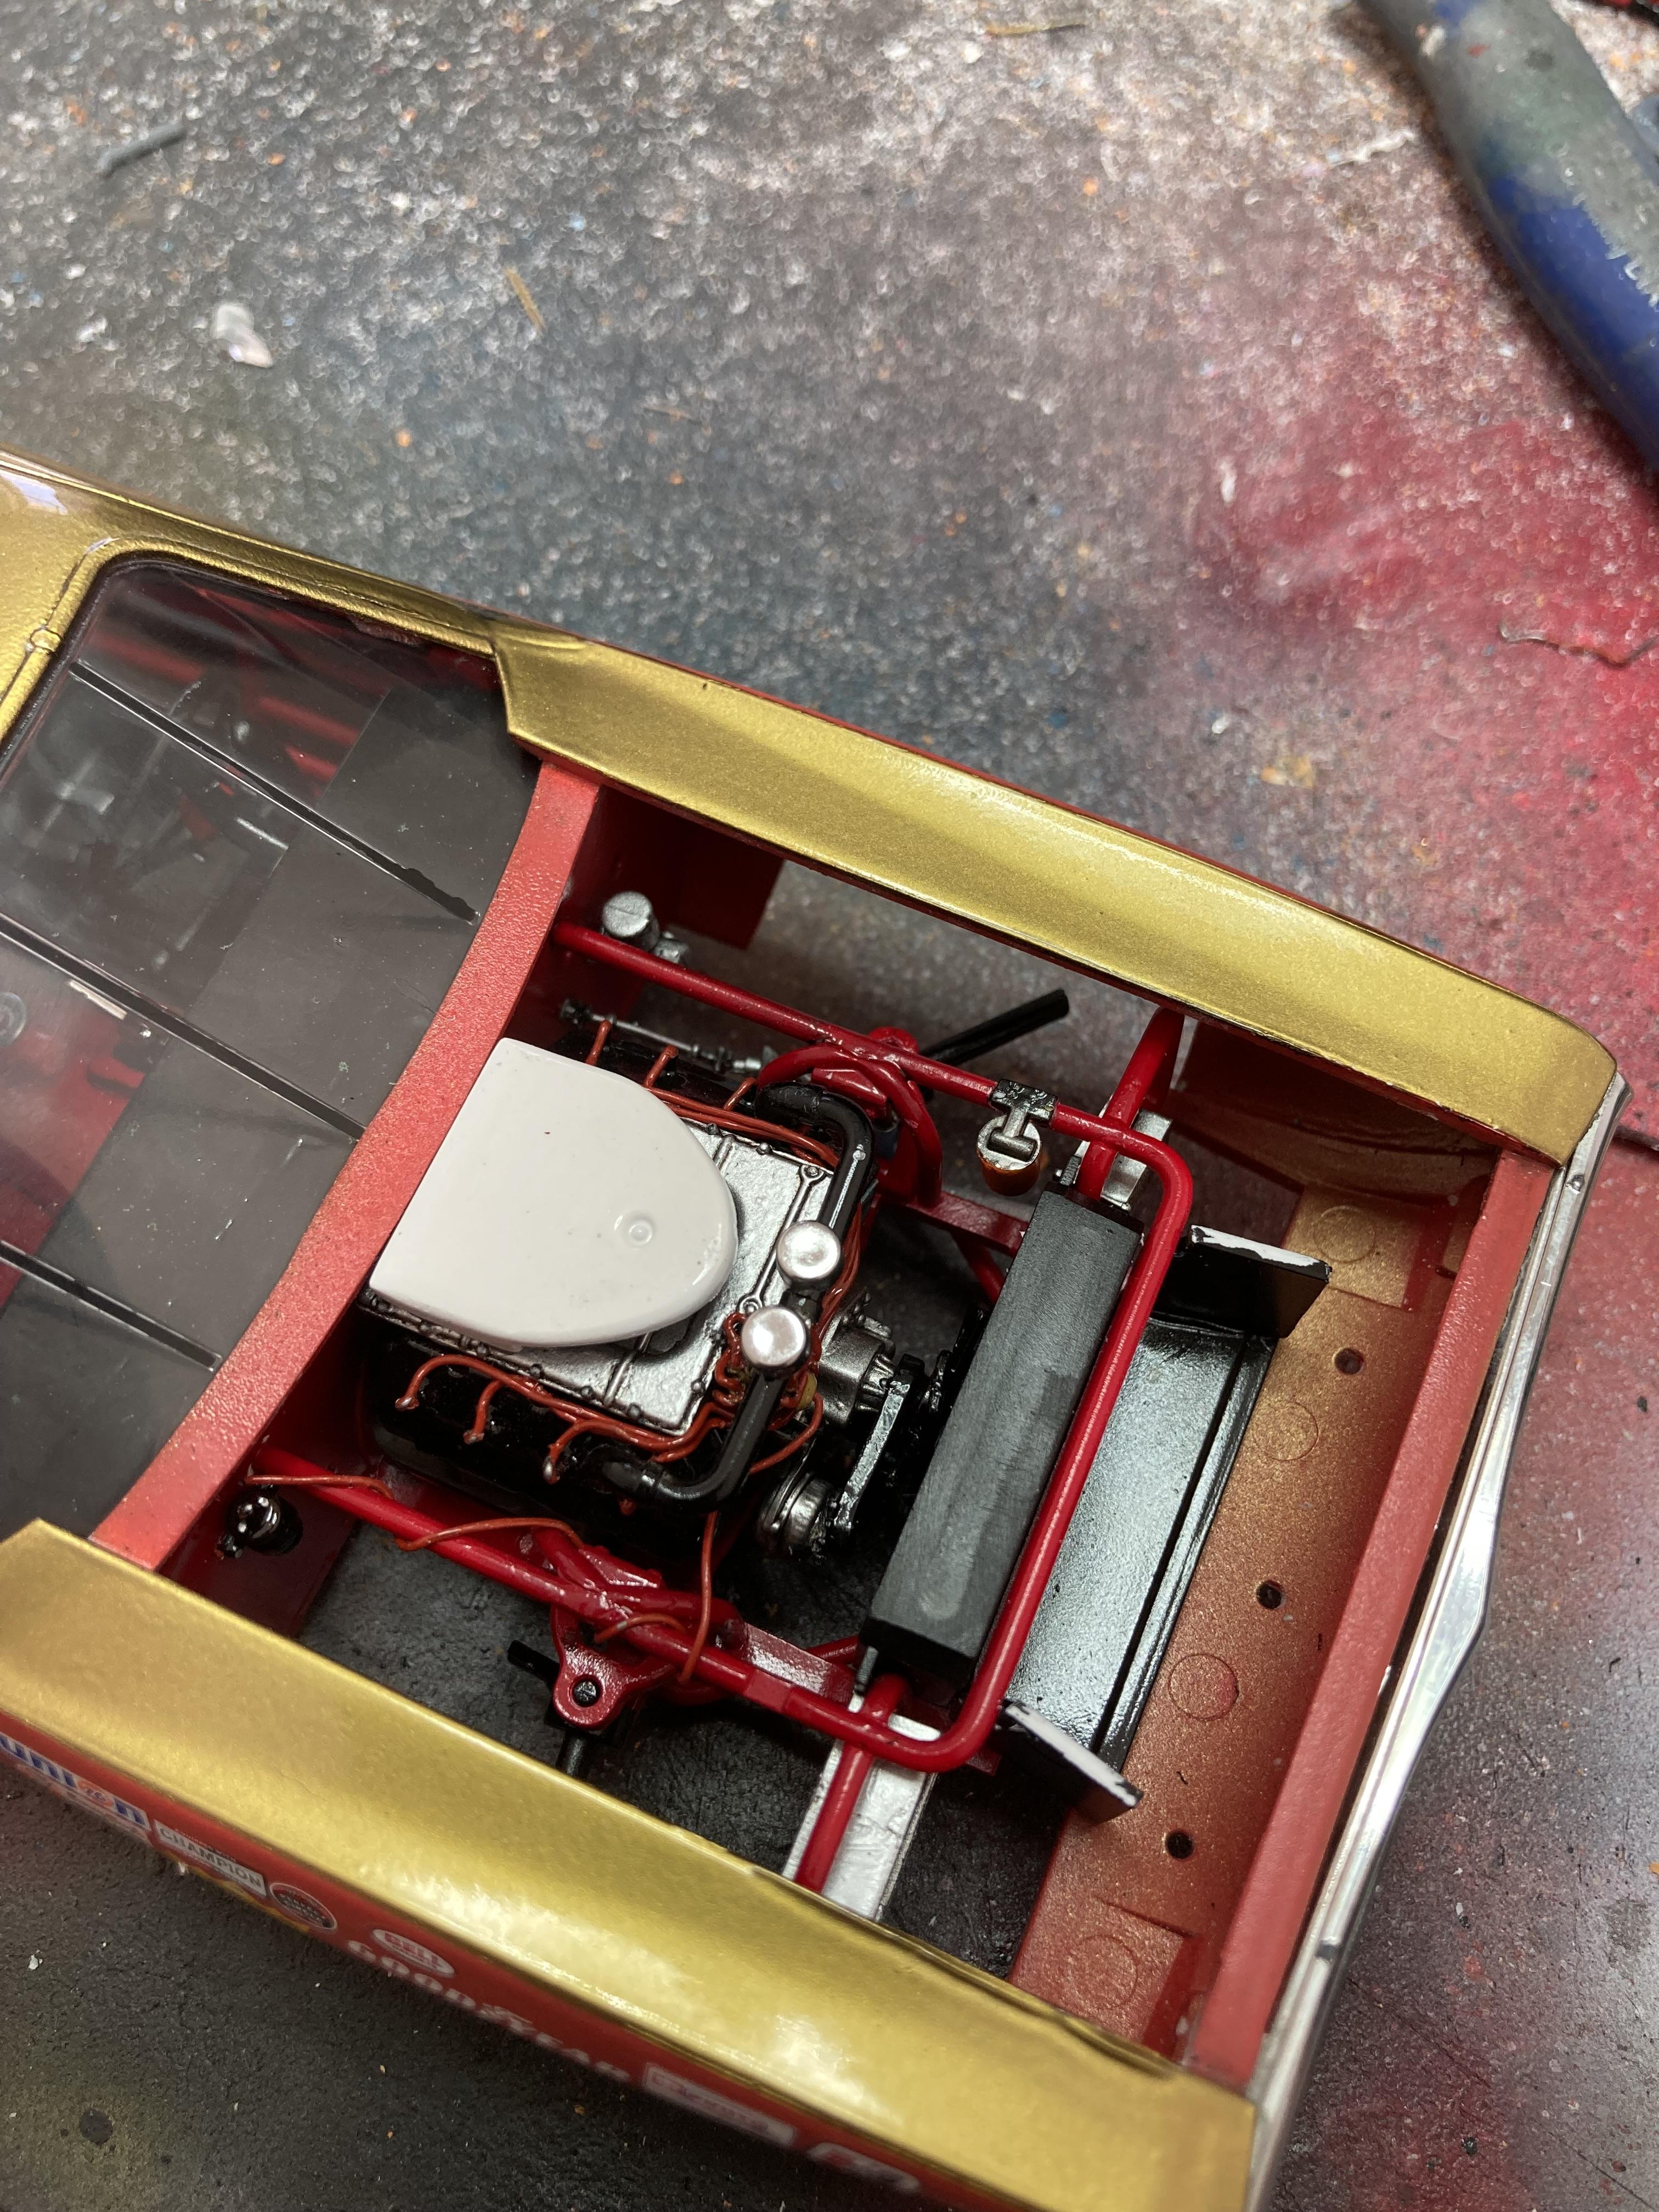
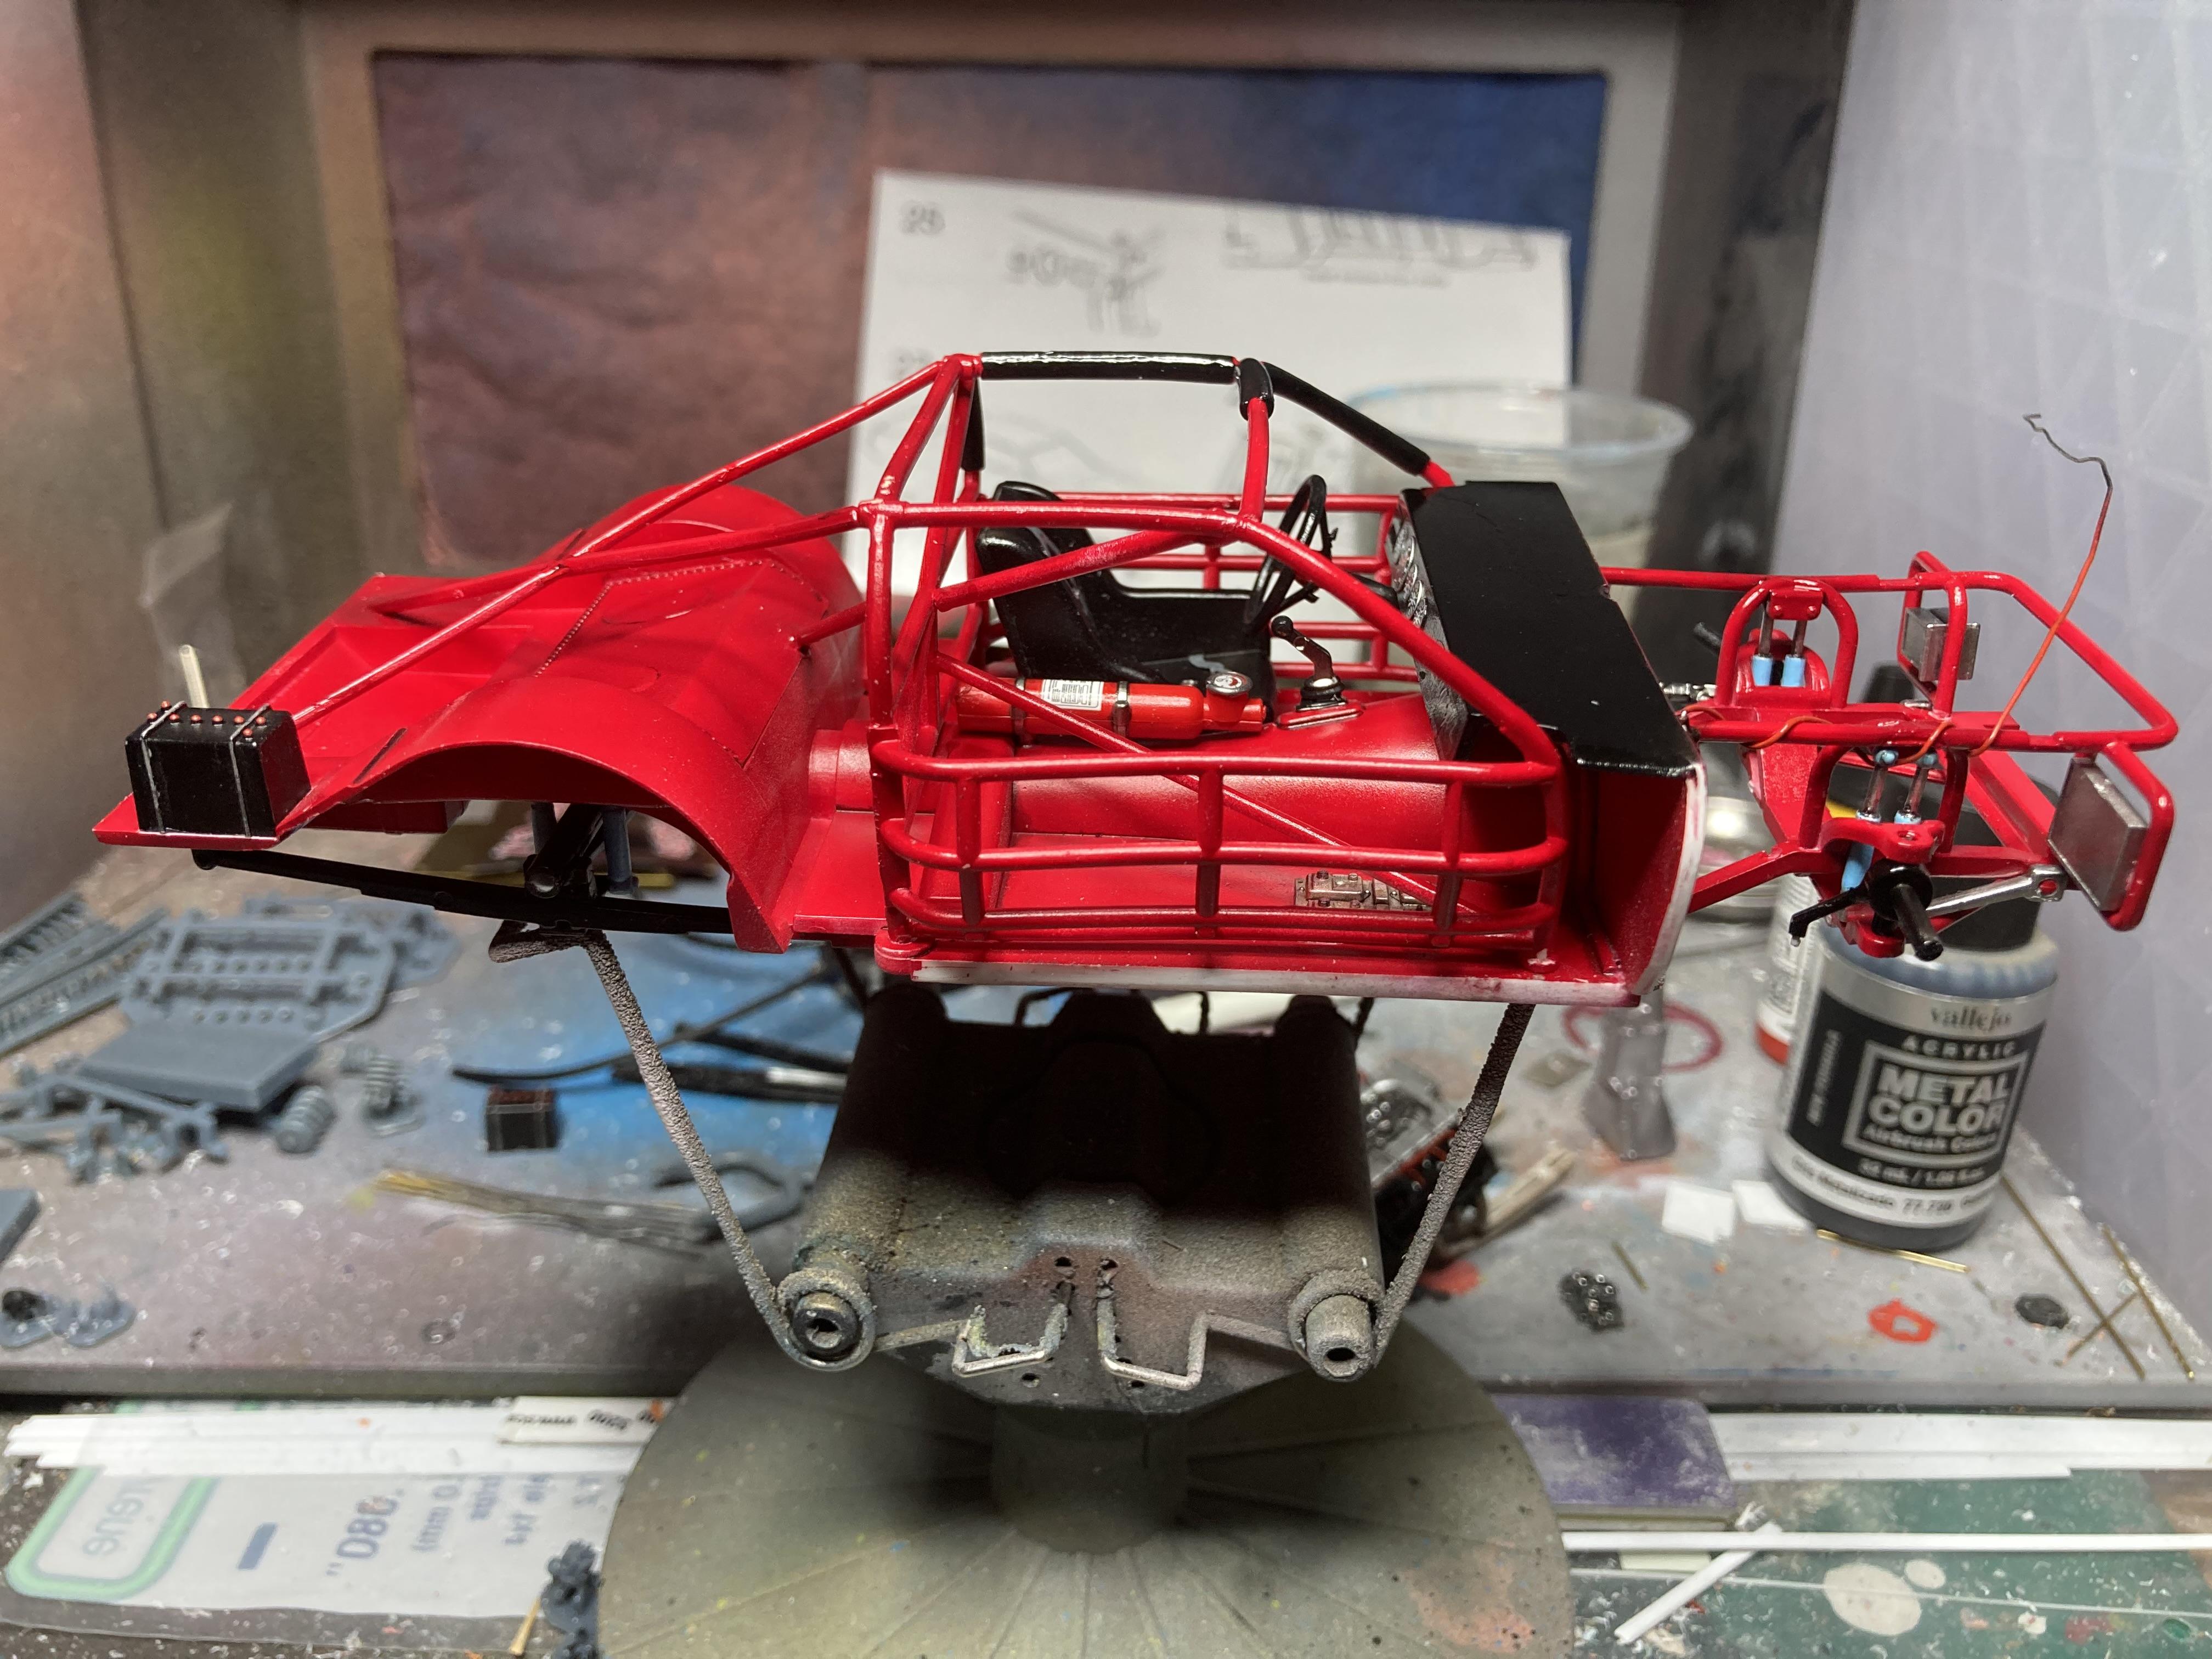
I’ve had a very productive morning fitting the engine into the bay and connecting the wire from the ignition coil to the distributor: The exhaust headers needed a little manipulating to get them to sit on the pipes and so for neatness and a finished look I added some heat-shrink tube which I think looks smart and I even got a little too willing with the cigarette lighter which has resulted in some nice weathering around the joins: At first I wasn’t sure what benefit there would be in separating the transmission from the engine save being able to paint the two separate parts easily. In the end it proved a master stroke allowing me to locate the engine correctly and then have the ability to simply drag the transmission into place and set it with a couple of beads of superglue. I then added the remainder of the cooling and radiator system: The engine, radiator and air intake all sit very plumb; it's the cross-over breather tube that sits a little crooked that gives the impression of a poor fit. Then it was time to add the clear windows, join the body to the chassis and add the chrome. I used UV light-activated glue to fix the clear parts and it worked very well: And it's worth mentioning for anyone wondering about how the Cartograf decals react to clear coats: there is an acrylic lacquer clear sprayed liberally over the top of the Dodge decal in the picture immediately above. I applied all the decals with Markfit and once set I burnished them into the plastic with Markfit Strong. This one had been sitting on the chrome piece for a number of weeks prior to spraying the clear which I did on Thursday morning (I think). The decal was unaffected by it. Notwithstanding all of the success, the morning’s labours were not without some minor incidents that proved a little frustrating, but which weren’t insurmountable. I managed to flick the air cleaner onto the windscreen and get a couple of smears of superglue on the clear plastic. Fortunately the larger of the two is obscured by the hood when it’s in place. However, the smaller of the two will be visible and I’m in two minds as to whether I should try polishing it out. I thought I’d cracked the interior cage trying to fit the body to the chassis but fortunately it was just two parts breaking at the joint which I was able to fix with some CA glue. Now it’s time for lunch and an episode of something on Netflix.
-
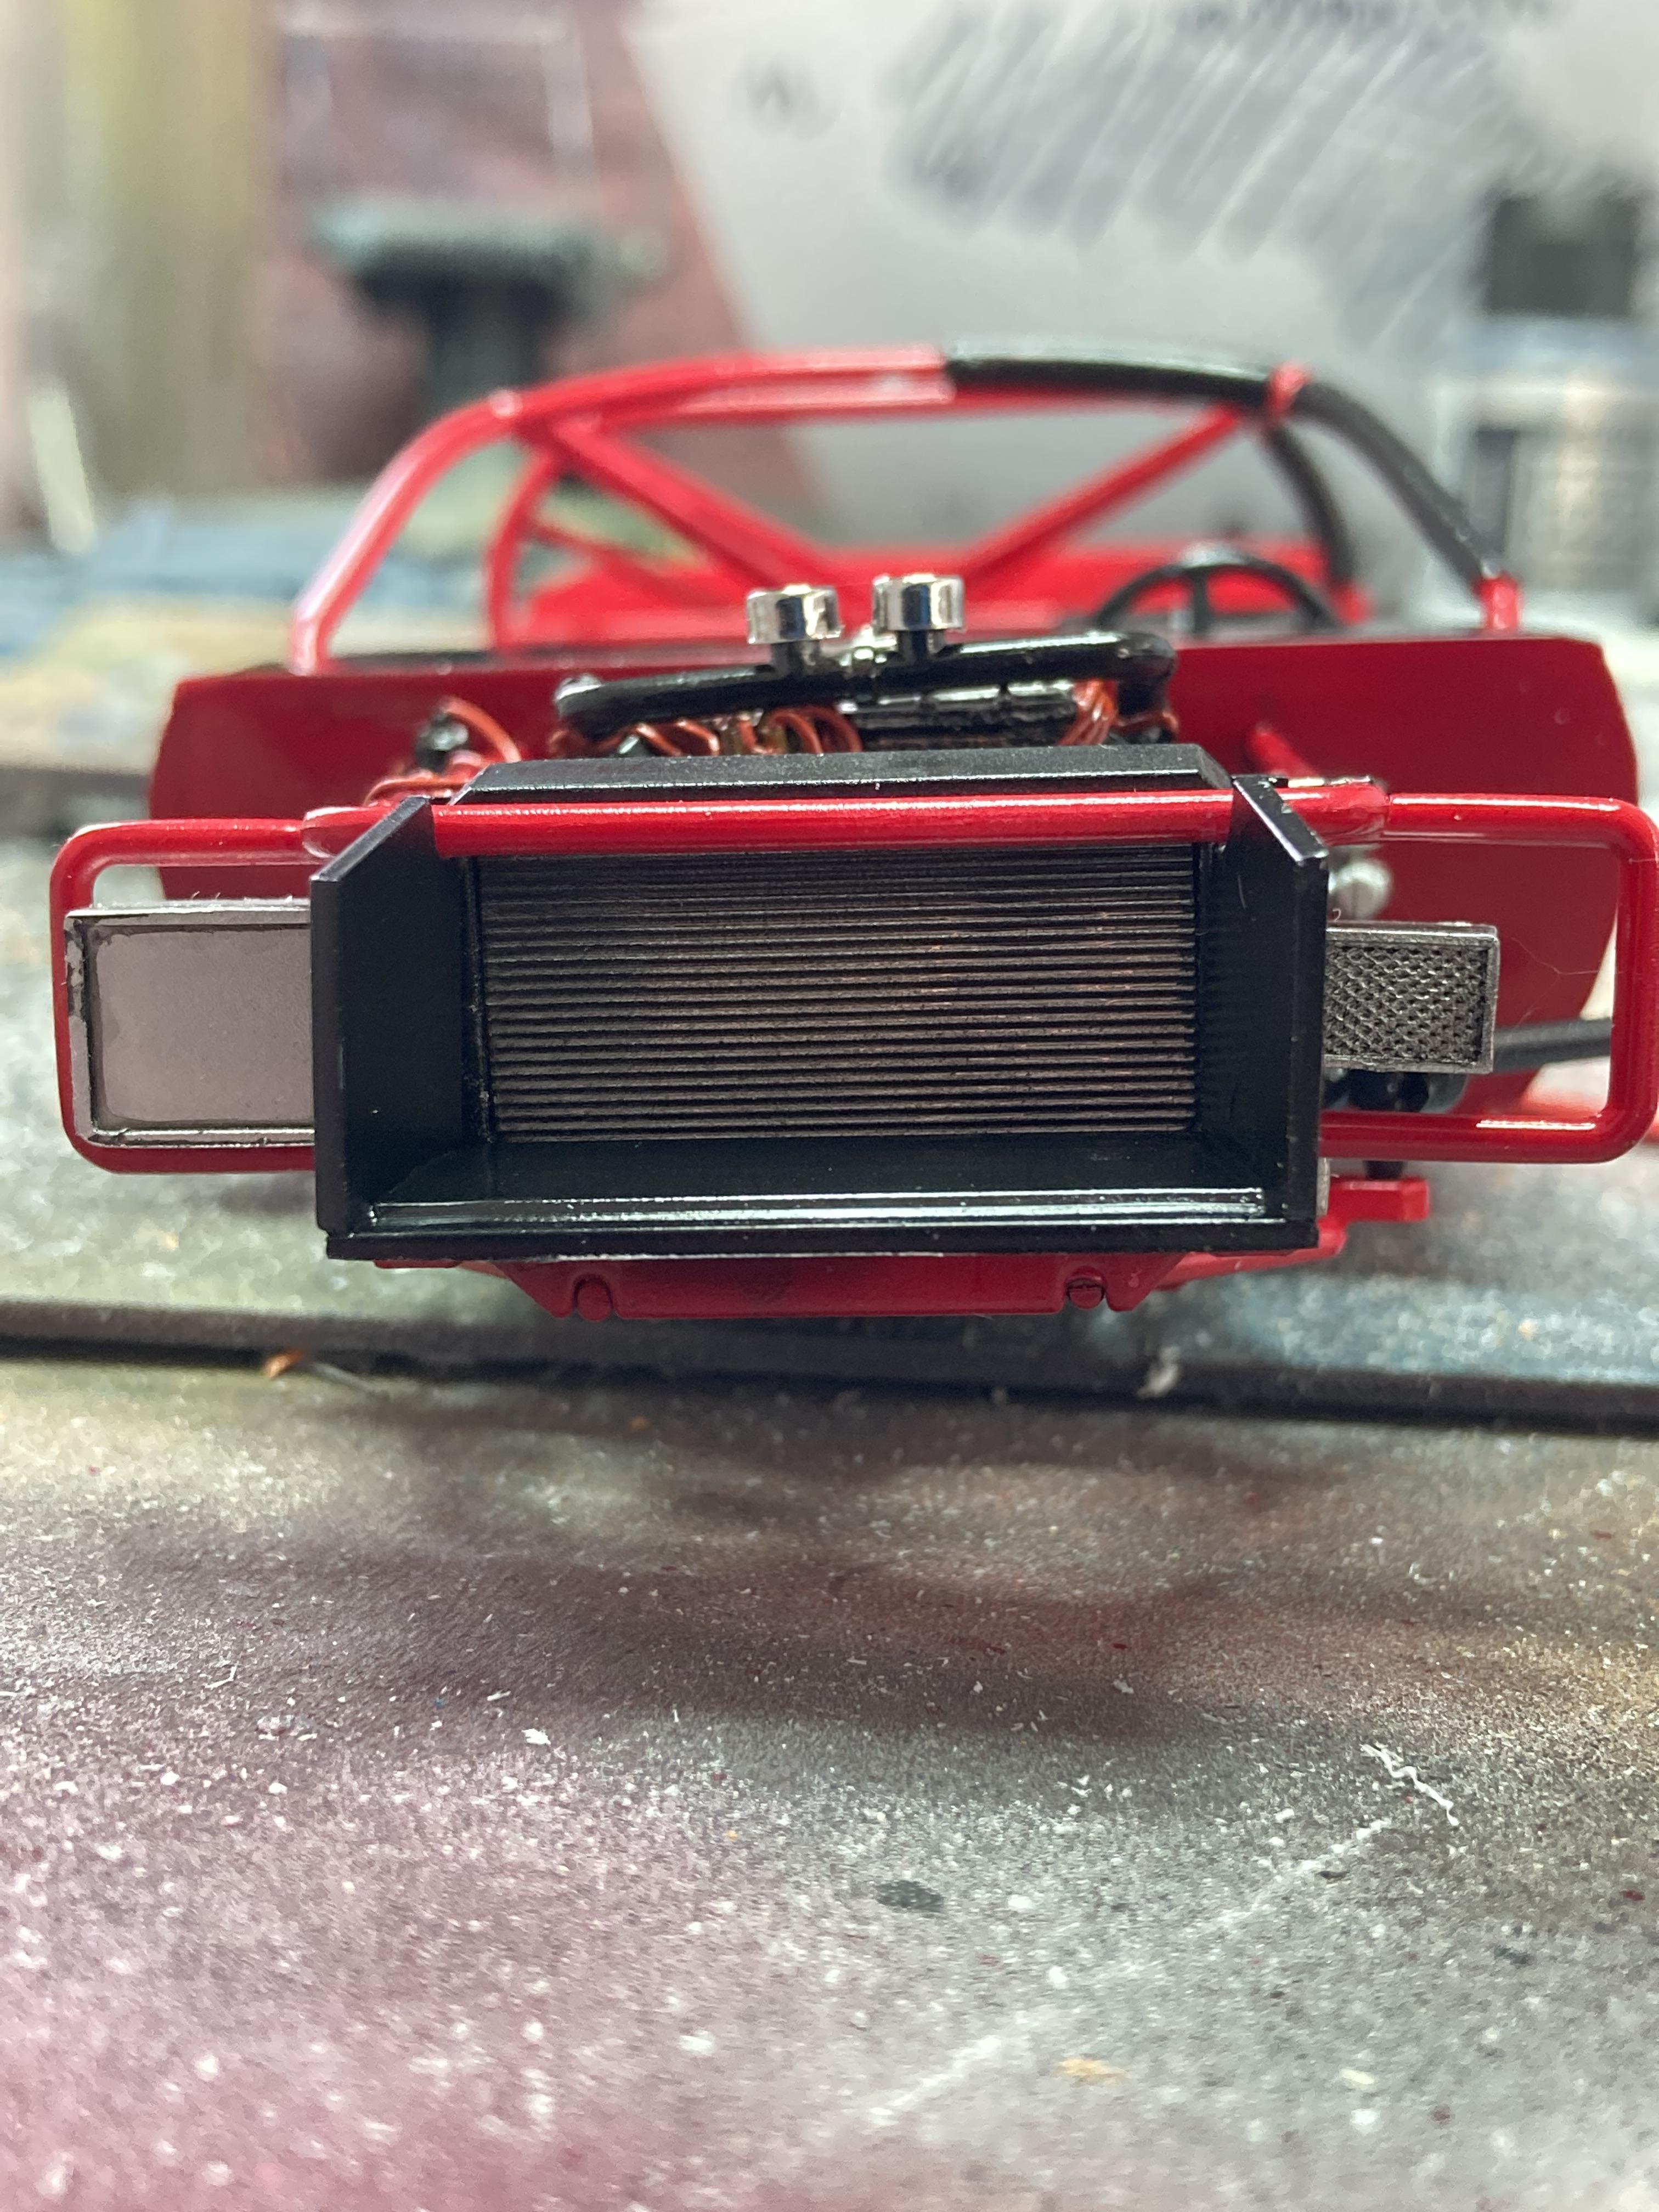
The progress is slow but it’s steady with a focus on doing whatever it takes to maintain quality control to the best of my current skill level. So far I’m happy with the results. Tonight a little work on the underside with the exhausts fitted and the front section that I broke two days ago successfully rebuilt with brass rod, installed, and paint patched. I used some Alclad hot metal sepia on the exhaust pipes as well as some Tamiya panel-liner and although you can't see it in this picture I drilled out the ends of the pipes and weathered them as well: I’ve painted, detailed and installed the driveshaft: as well as the front air intake: you can also see that I’ve ground down the cross-member onto which the engine mounts to allow myself some comfort that I won’t be stuck with a hood that won’t close.
-
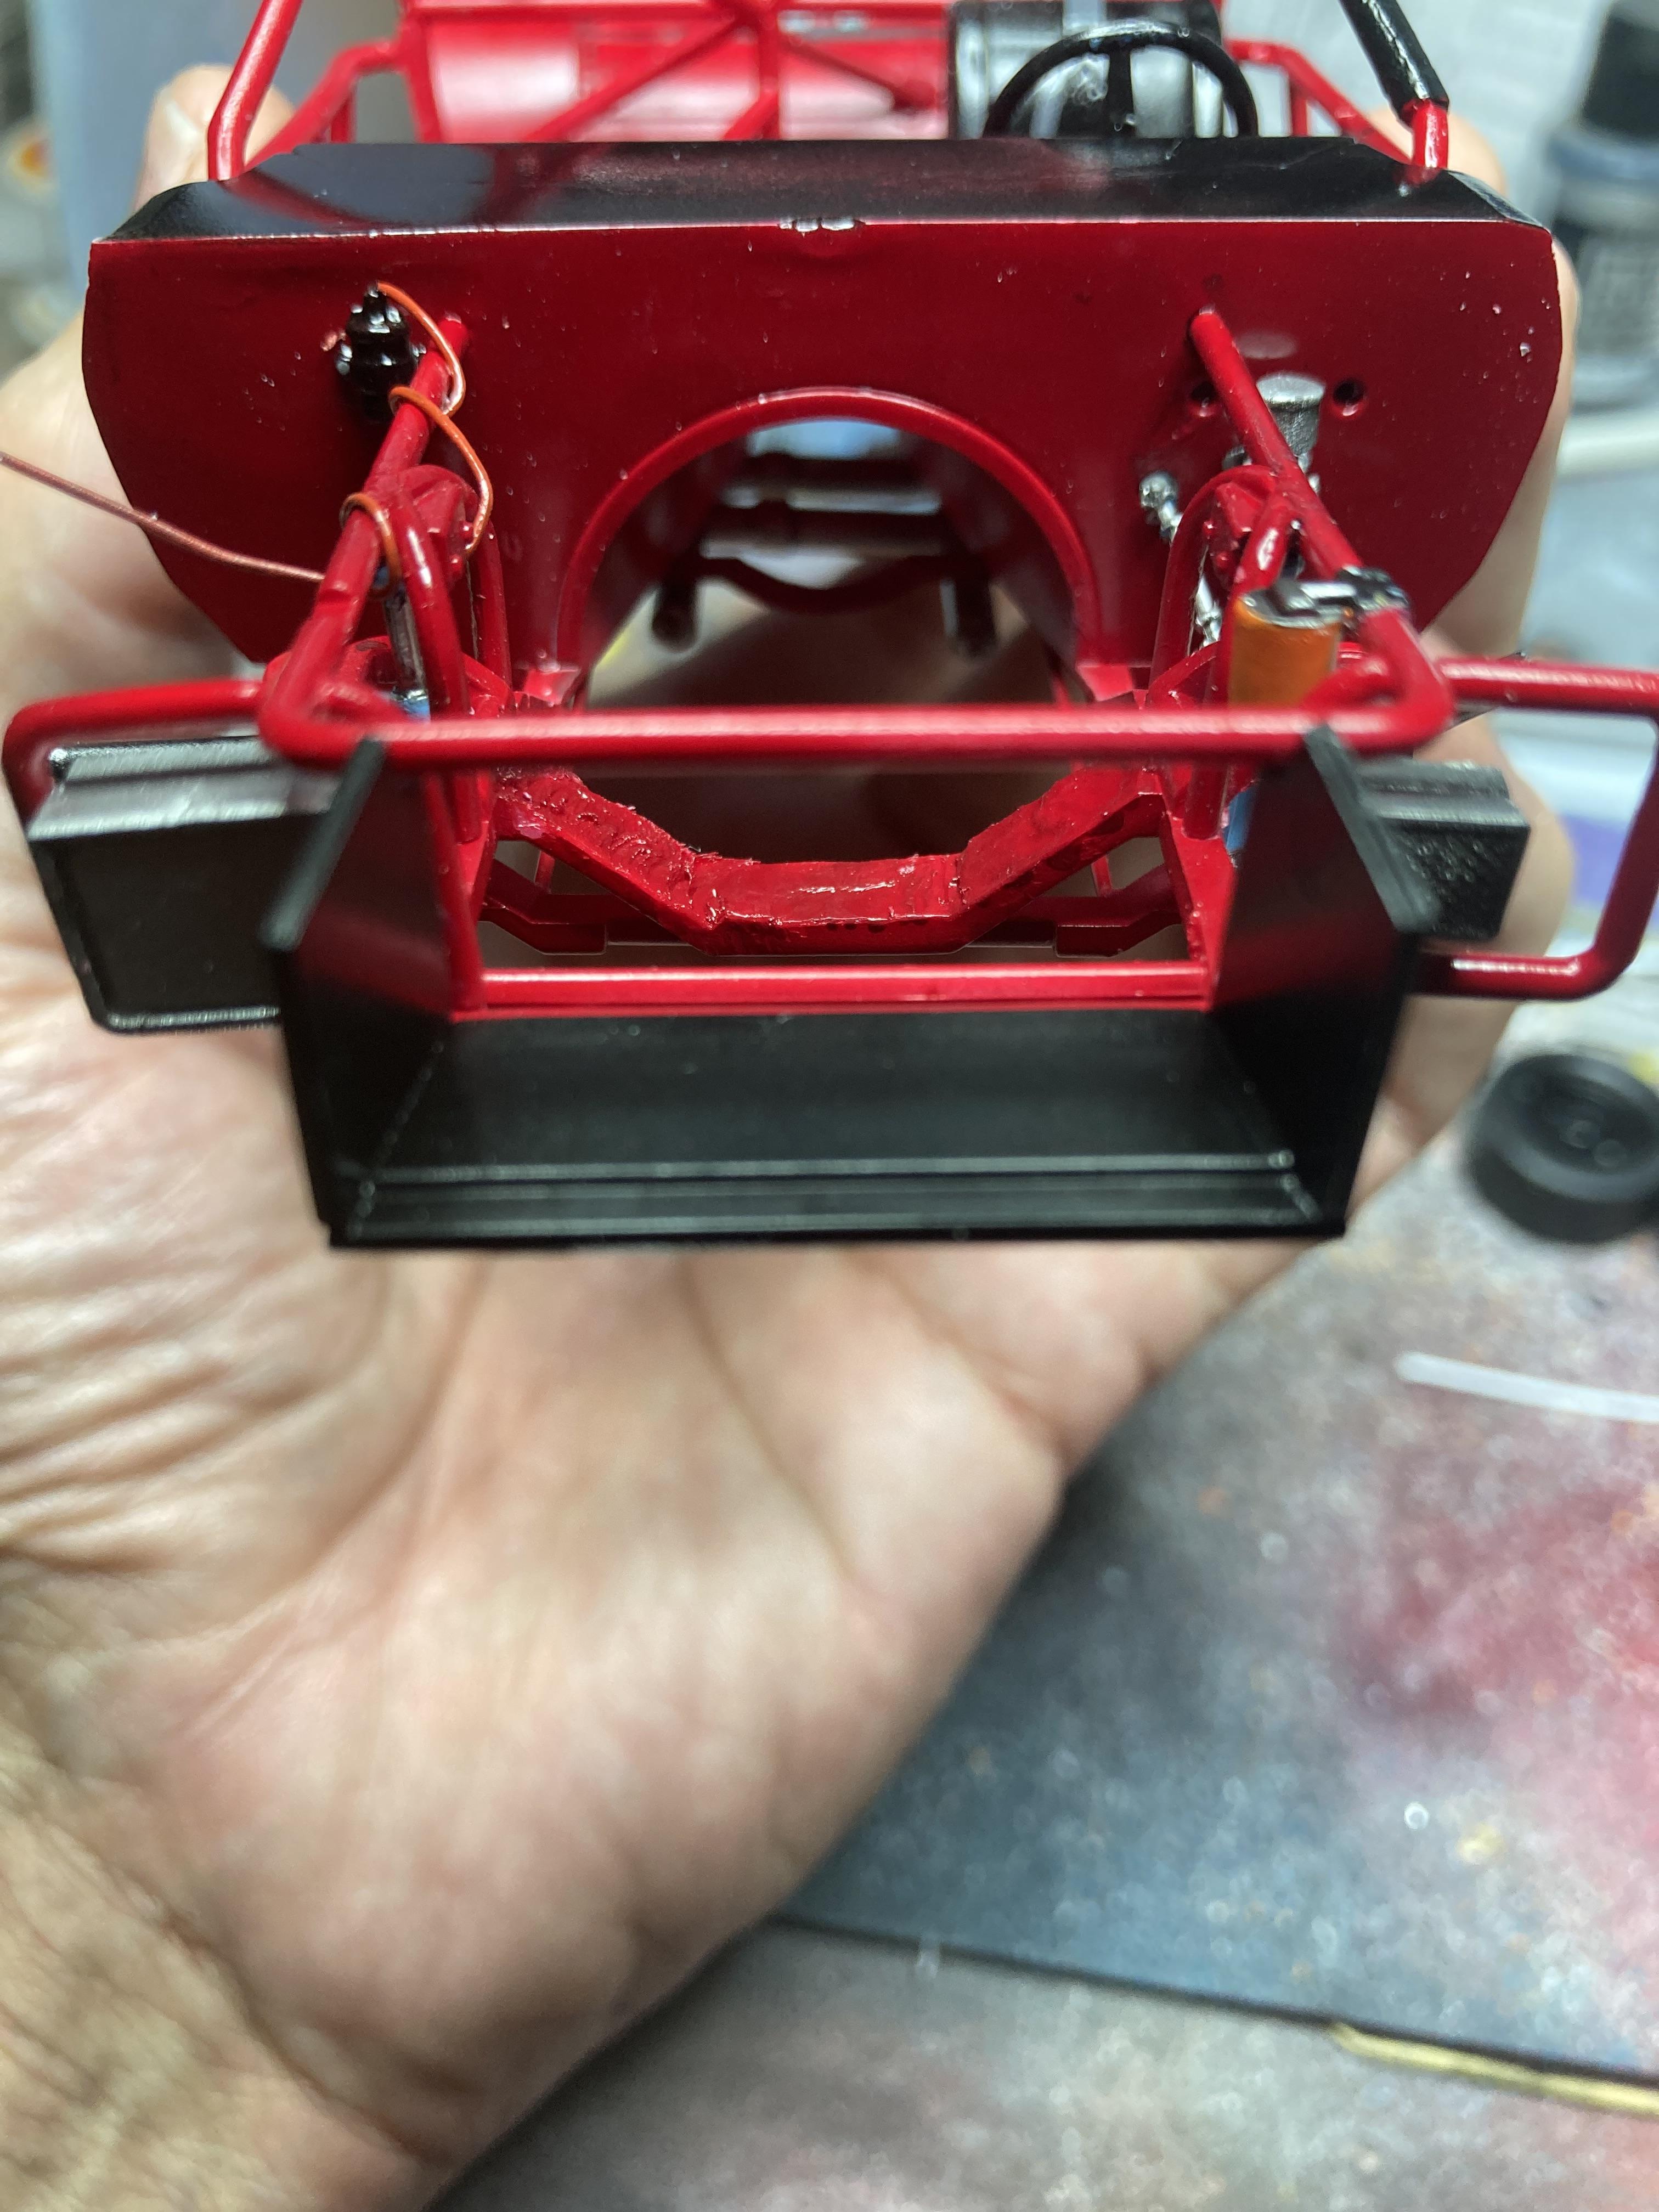
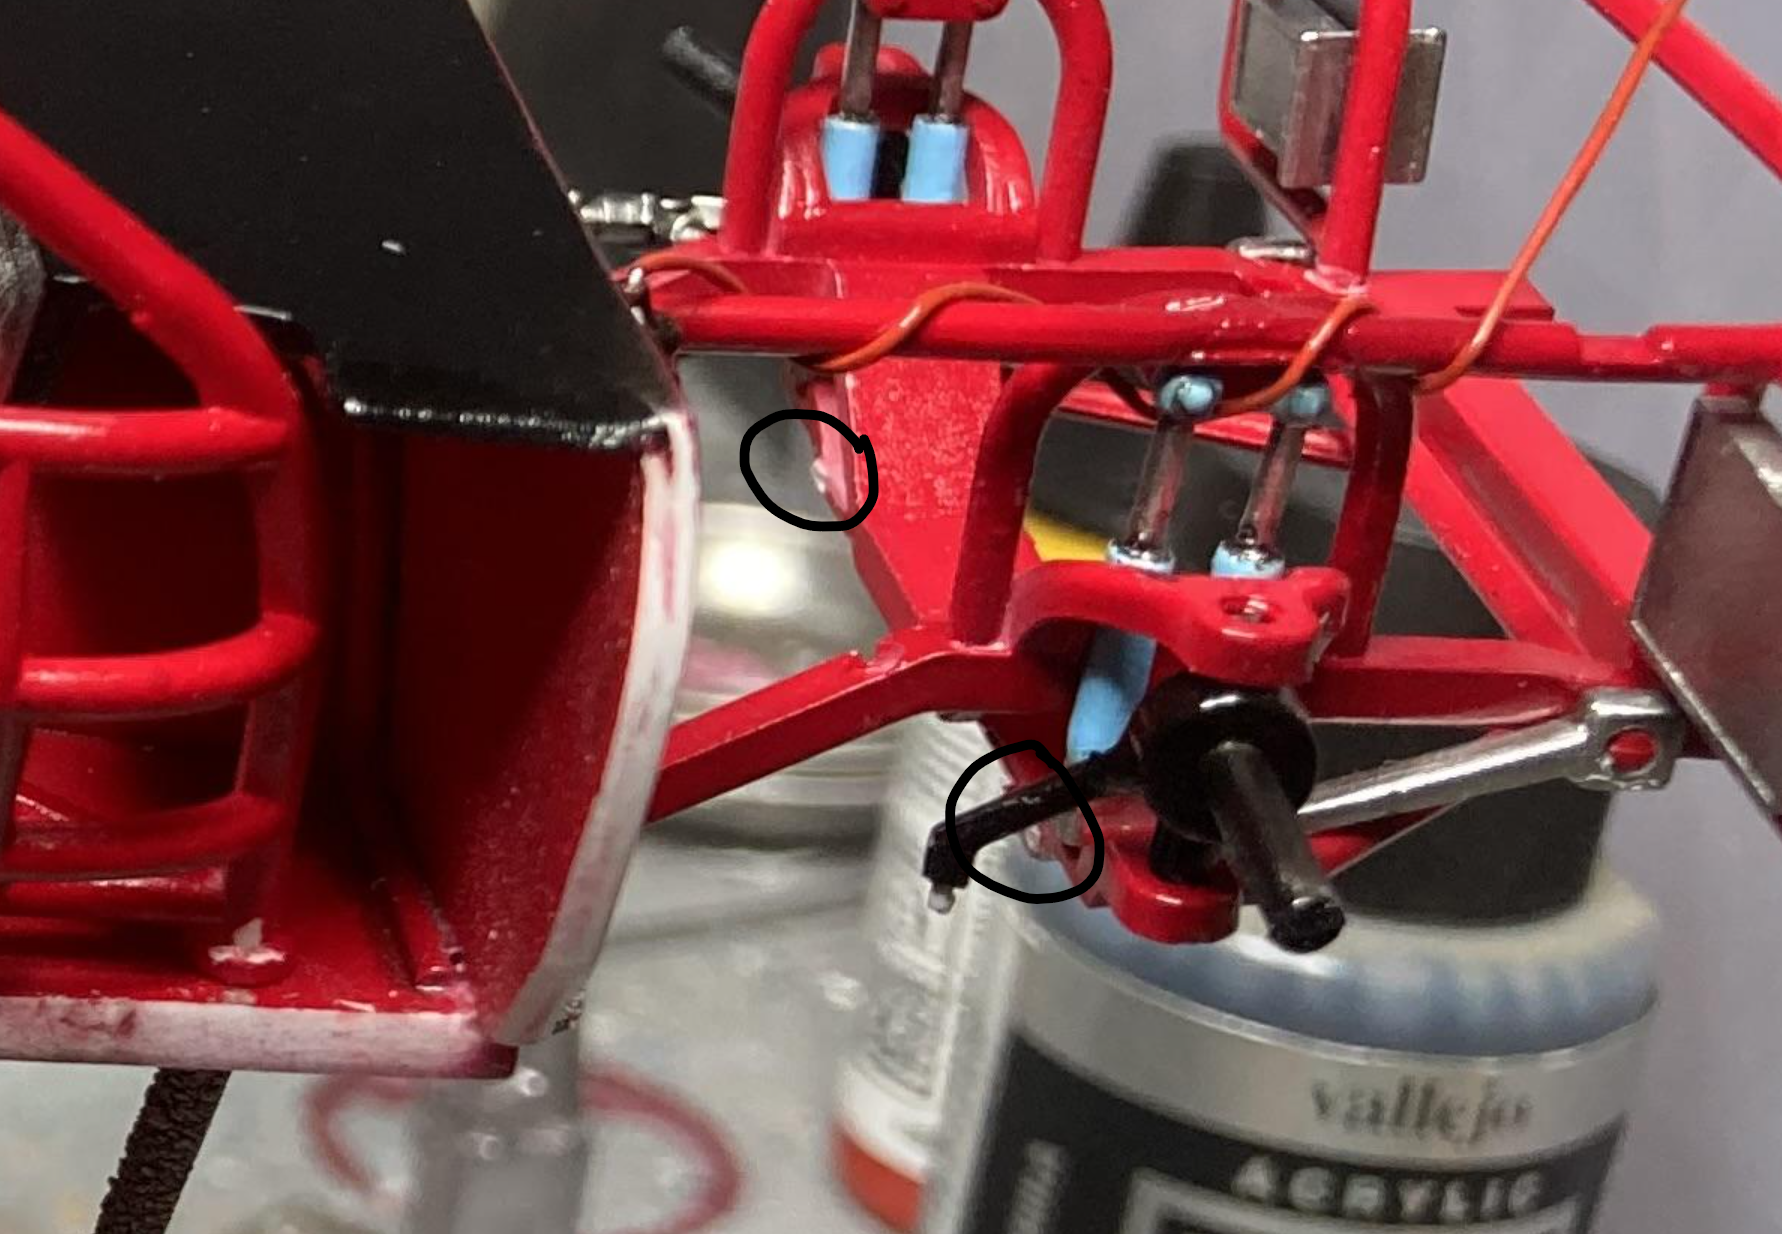
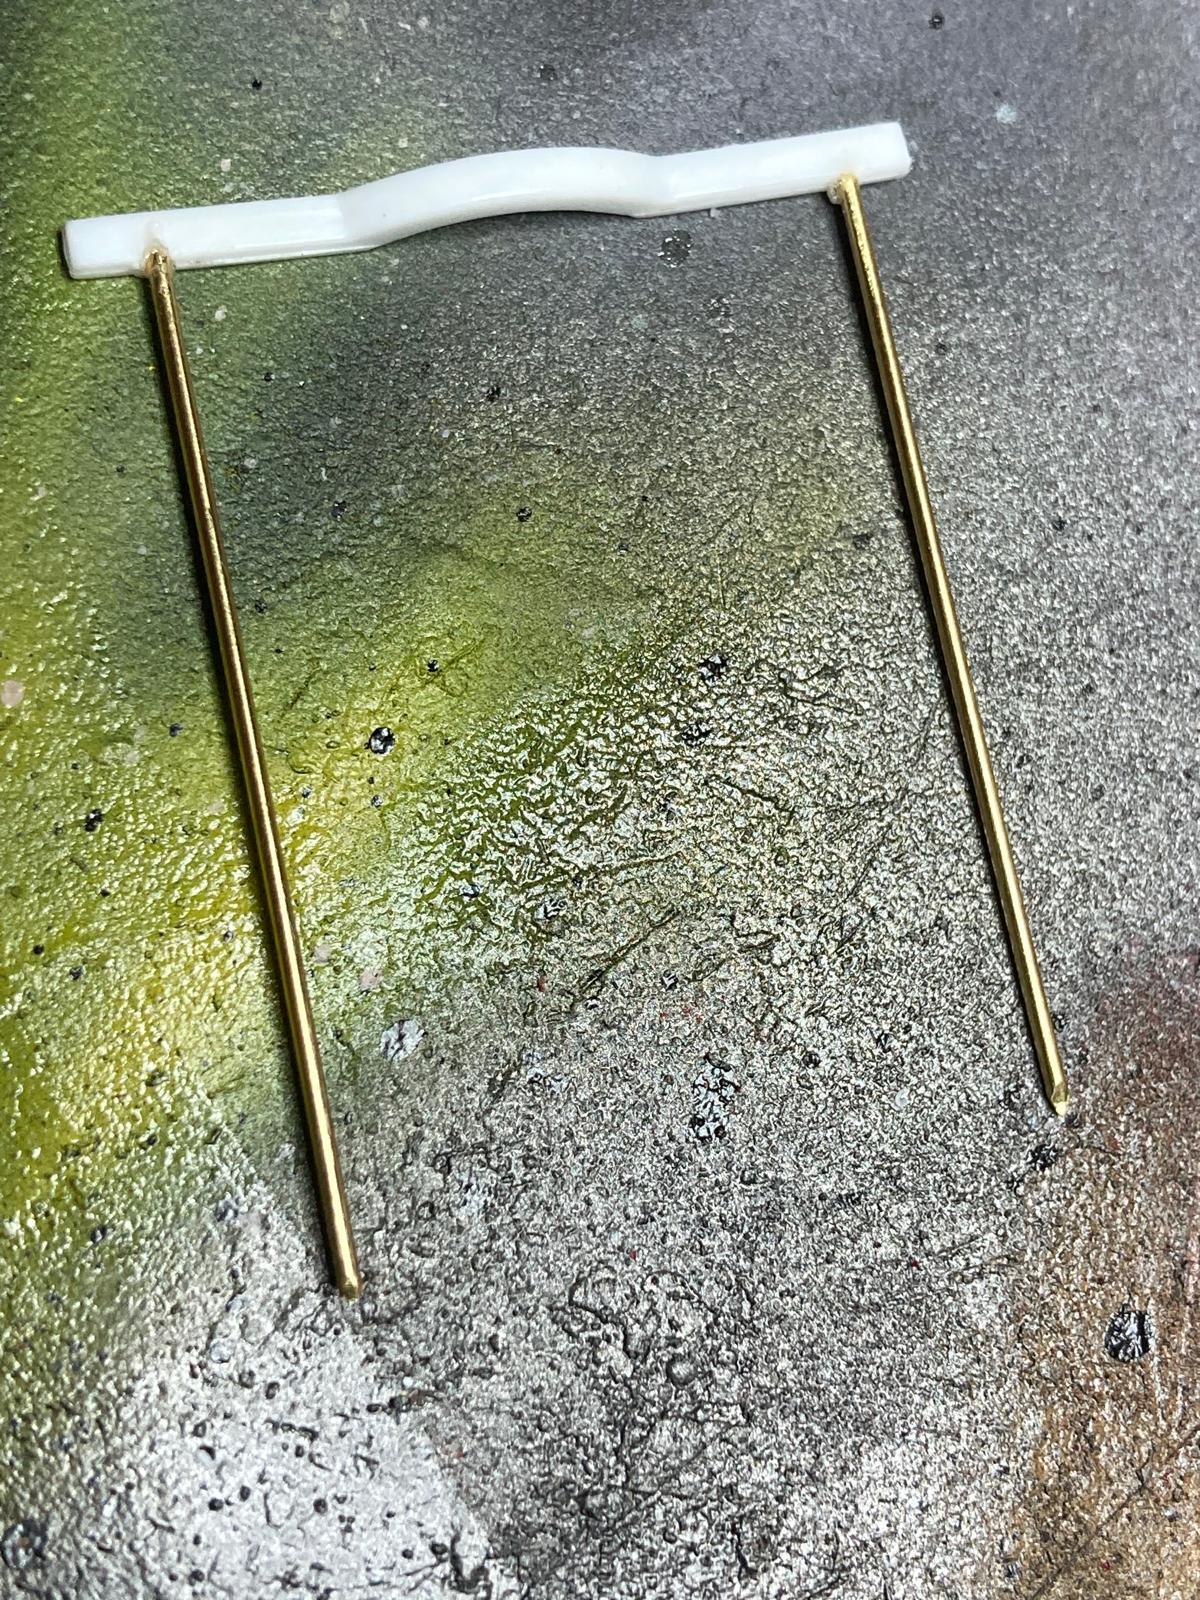
Anyone with a sharp eye will notice in the pictures above that there is a section of the under-carriage missing: Whilst test-fitting the chassis to the body I managed to snap one of the arms underscoring the adage that a build ain't over until it's over and it is these last stages of putting everything together that can prove to be the most fraught with peril. I recall something similar happening late last year when I built Allison's Hardee's car and I simply glued the broken piece of plastic back into place. It's a measure of how far my skills and my confidence in them have come that last night, in an attempt to look on the bright side, I saw this as an opportunity to build something better: Fortunately, the 4 Oldsmobile Cutlasses that I am in the midst of building, despite having a different front-end setup, still include this part (I have no idea what it's called) on the sprue and I only needed one of them. I drilled 0.2mm pilot holes into the cross-member and into the section of the part still attached to the chassis of the Charger. I then drilled 0.8mm holes for the brass members. The brass rod is 0.81mm so I tapered it at the ends to make it fit snugly. On the bright side, the test-fit seemed to indicate that the car's overall ride height and stance is good, and I think I will even manage to fit all of the engine into the bay including the airfilter (although I've had to grind out all of the profile underneath) with a bee's dick of clearance to the under-side of the hood.
-
Two become one:
-
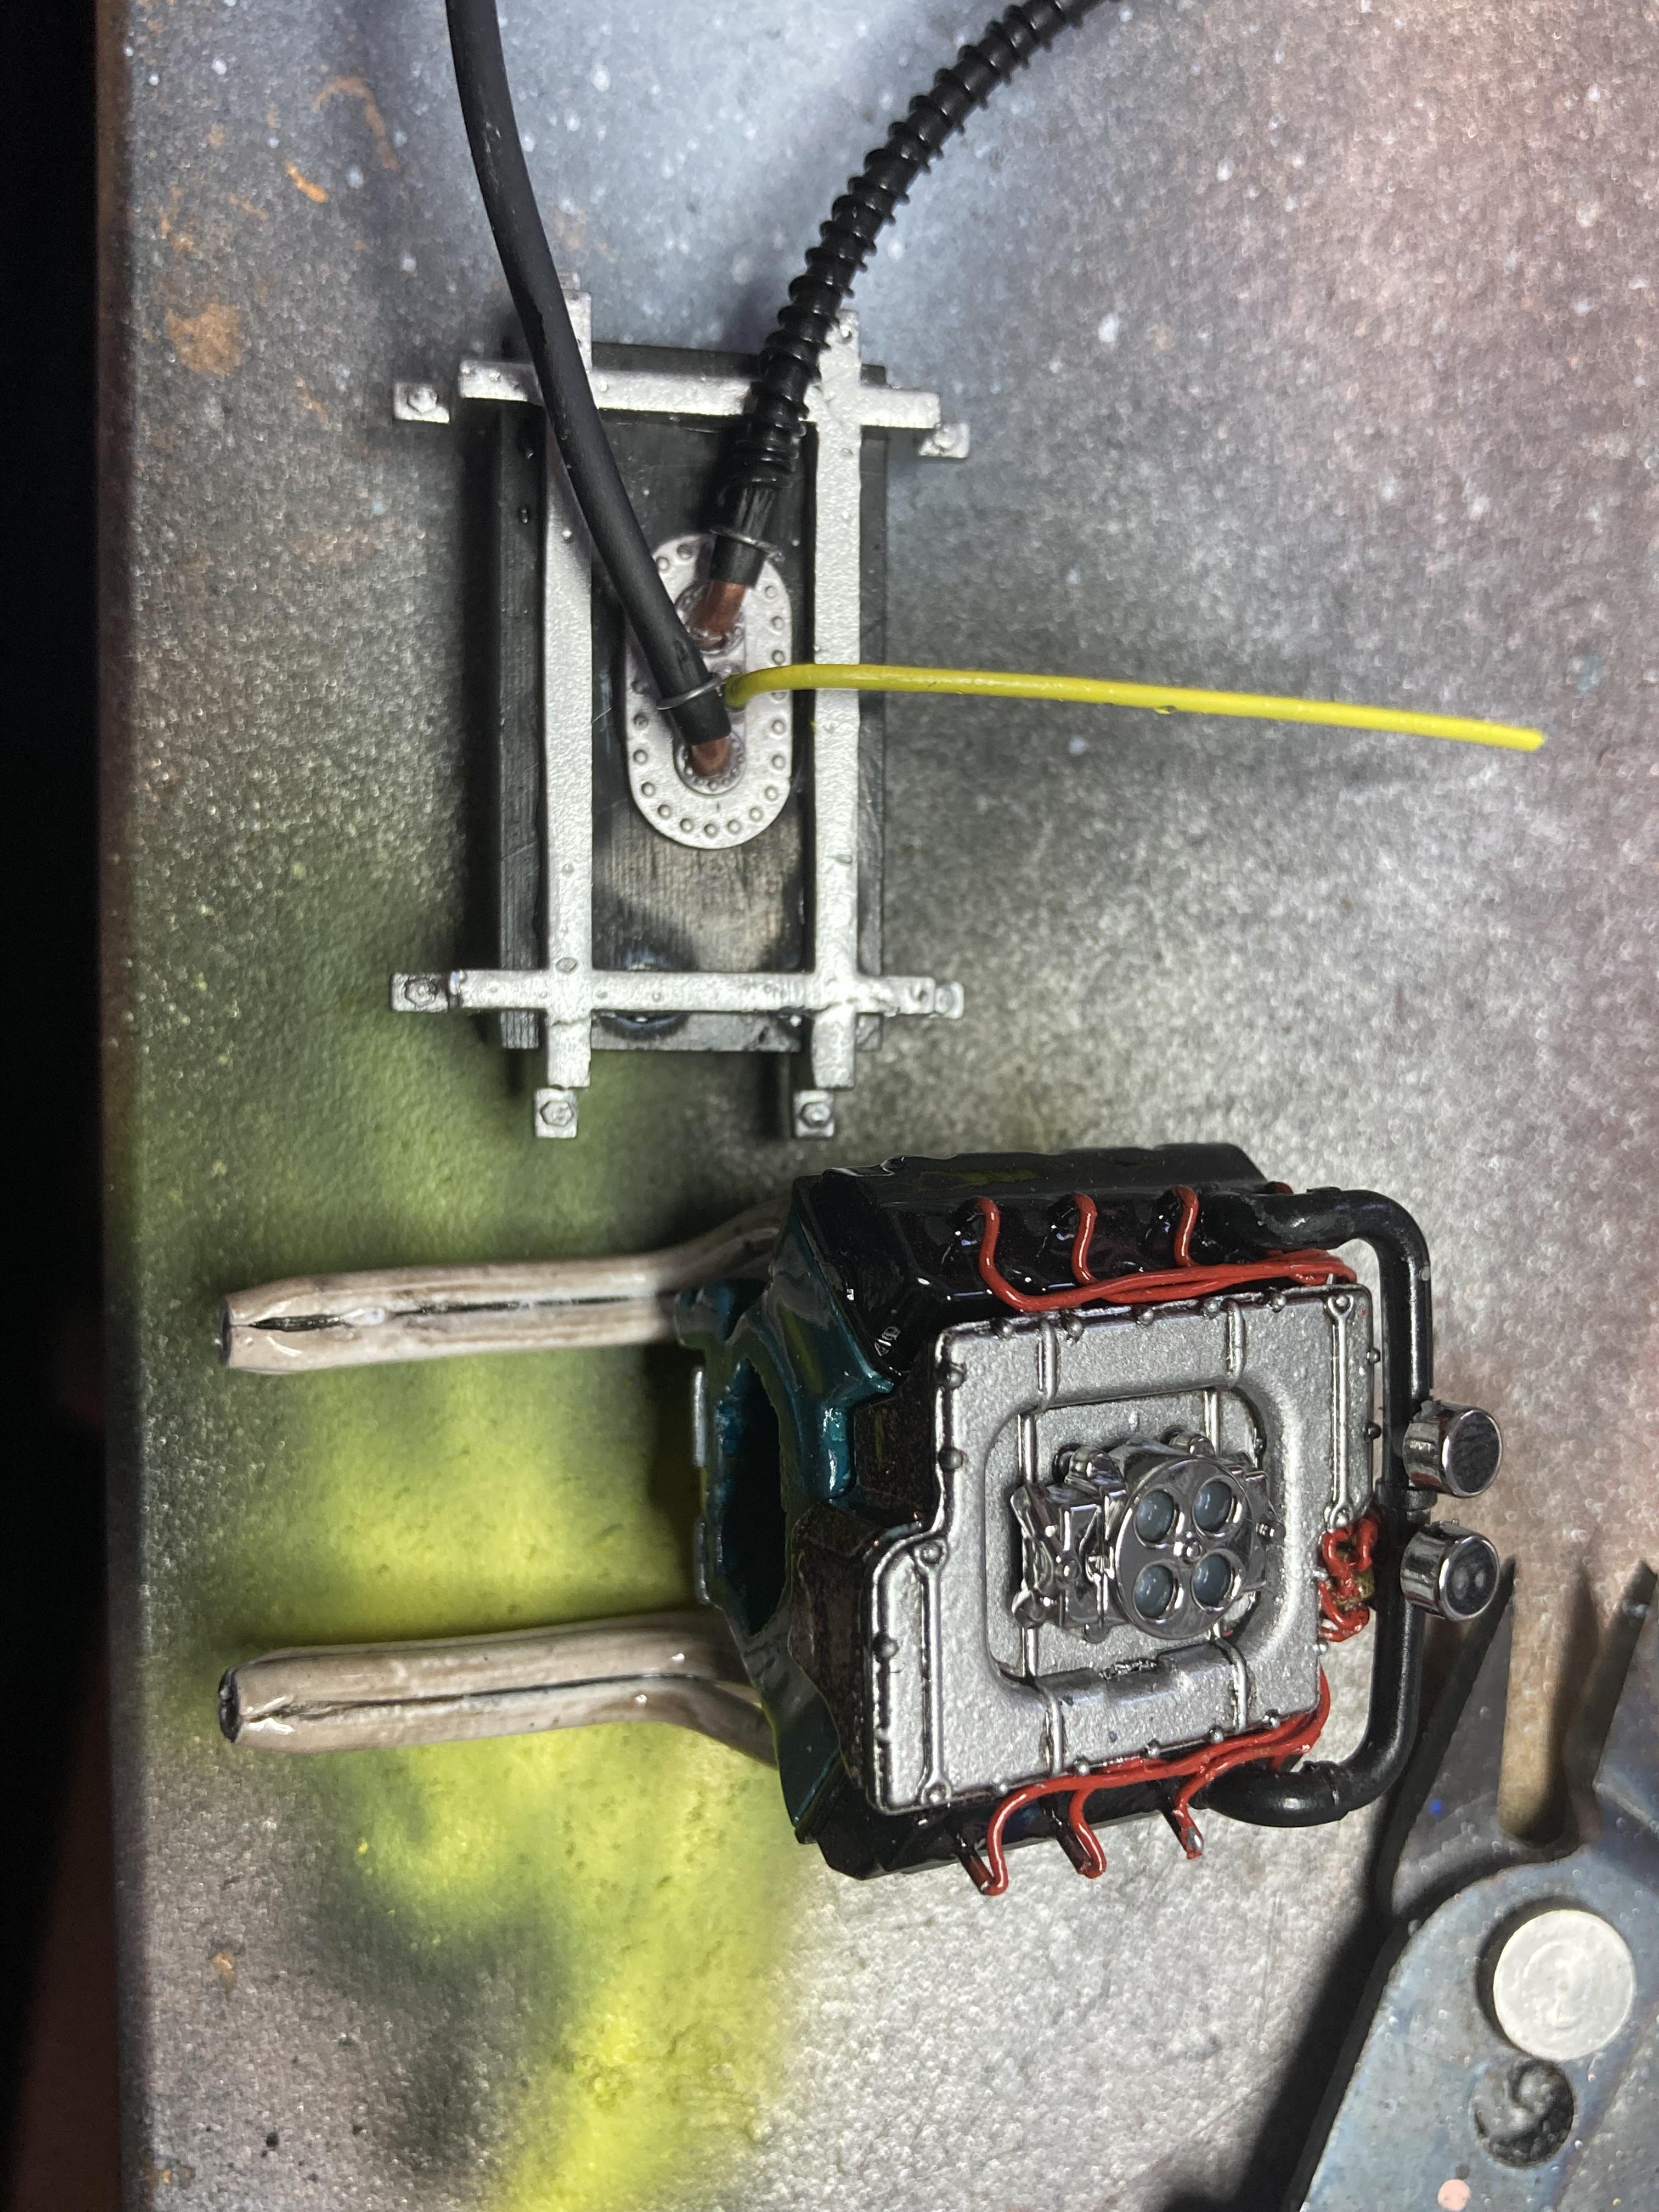
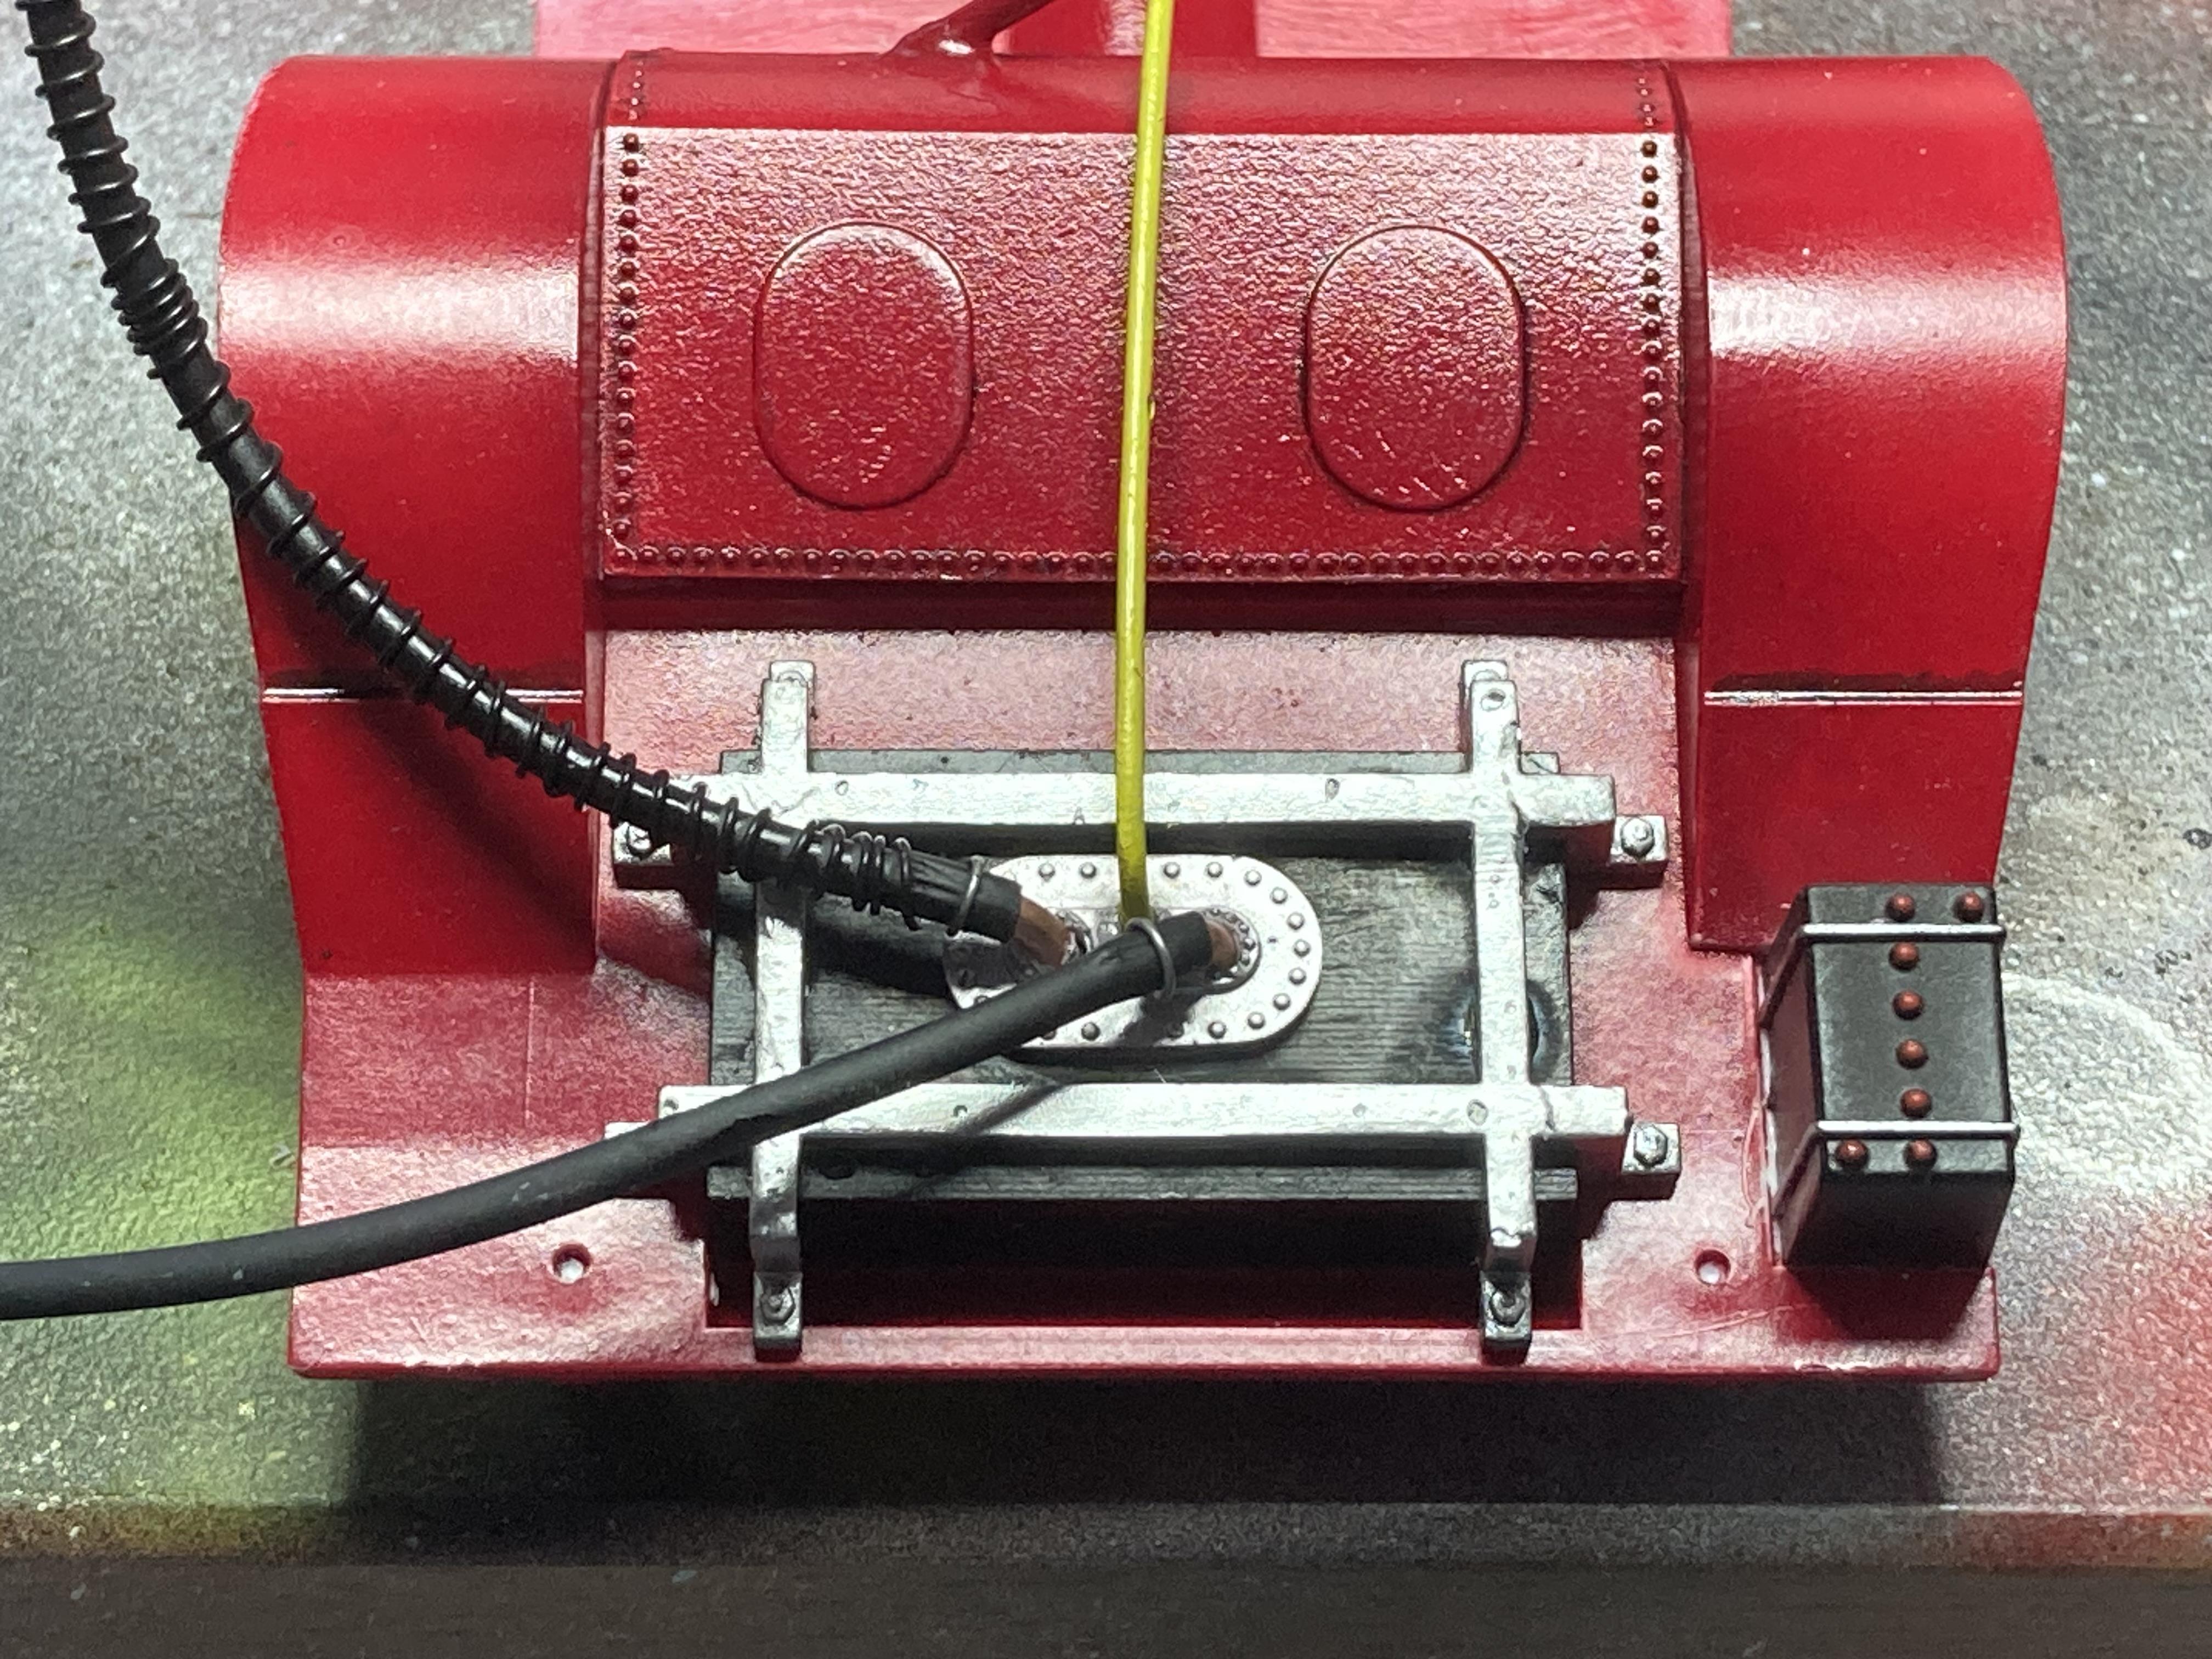
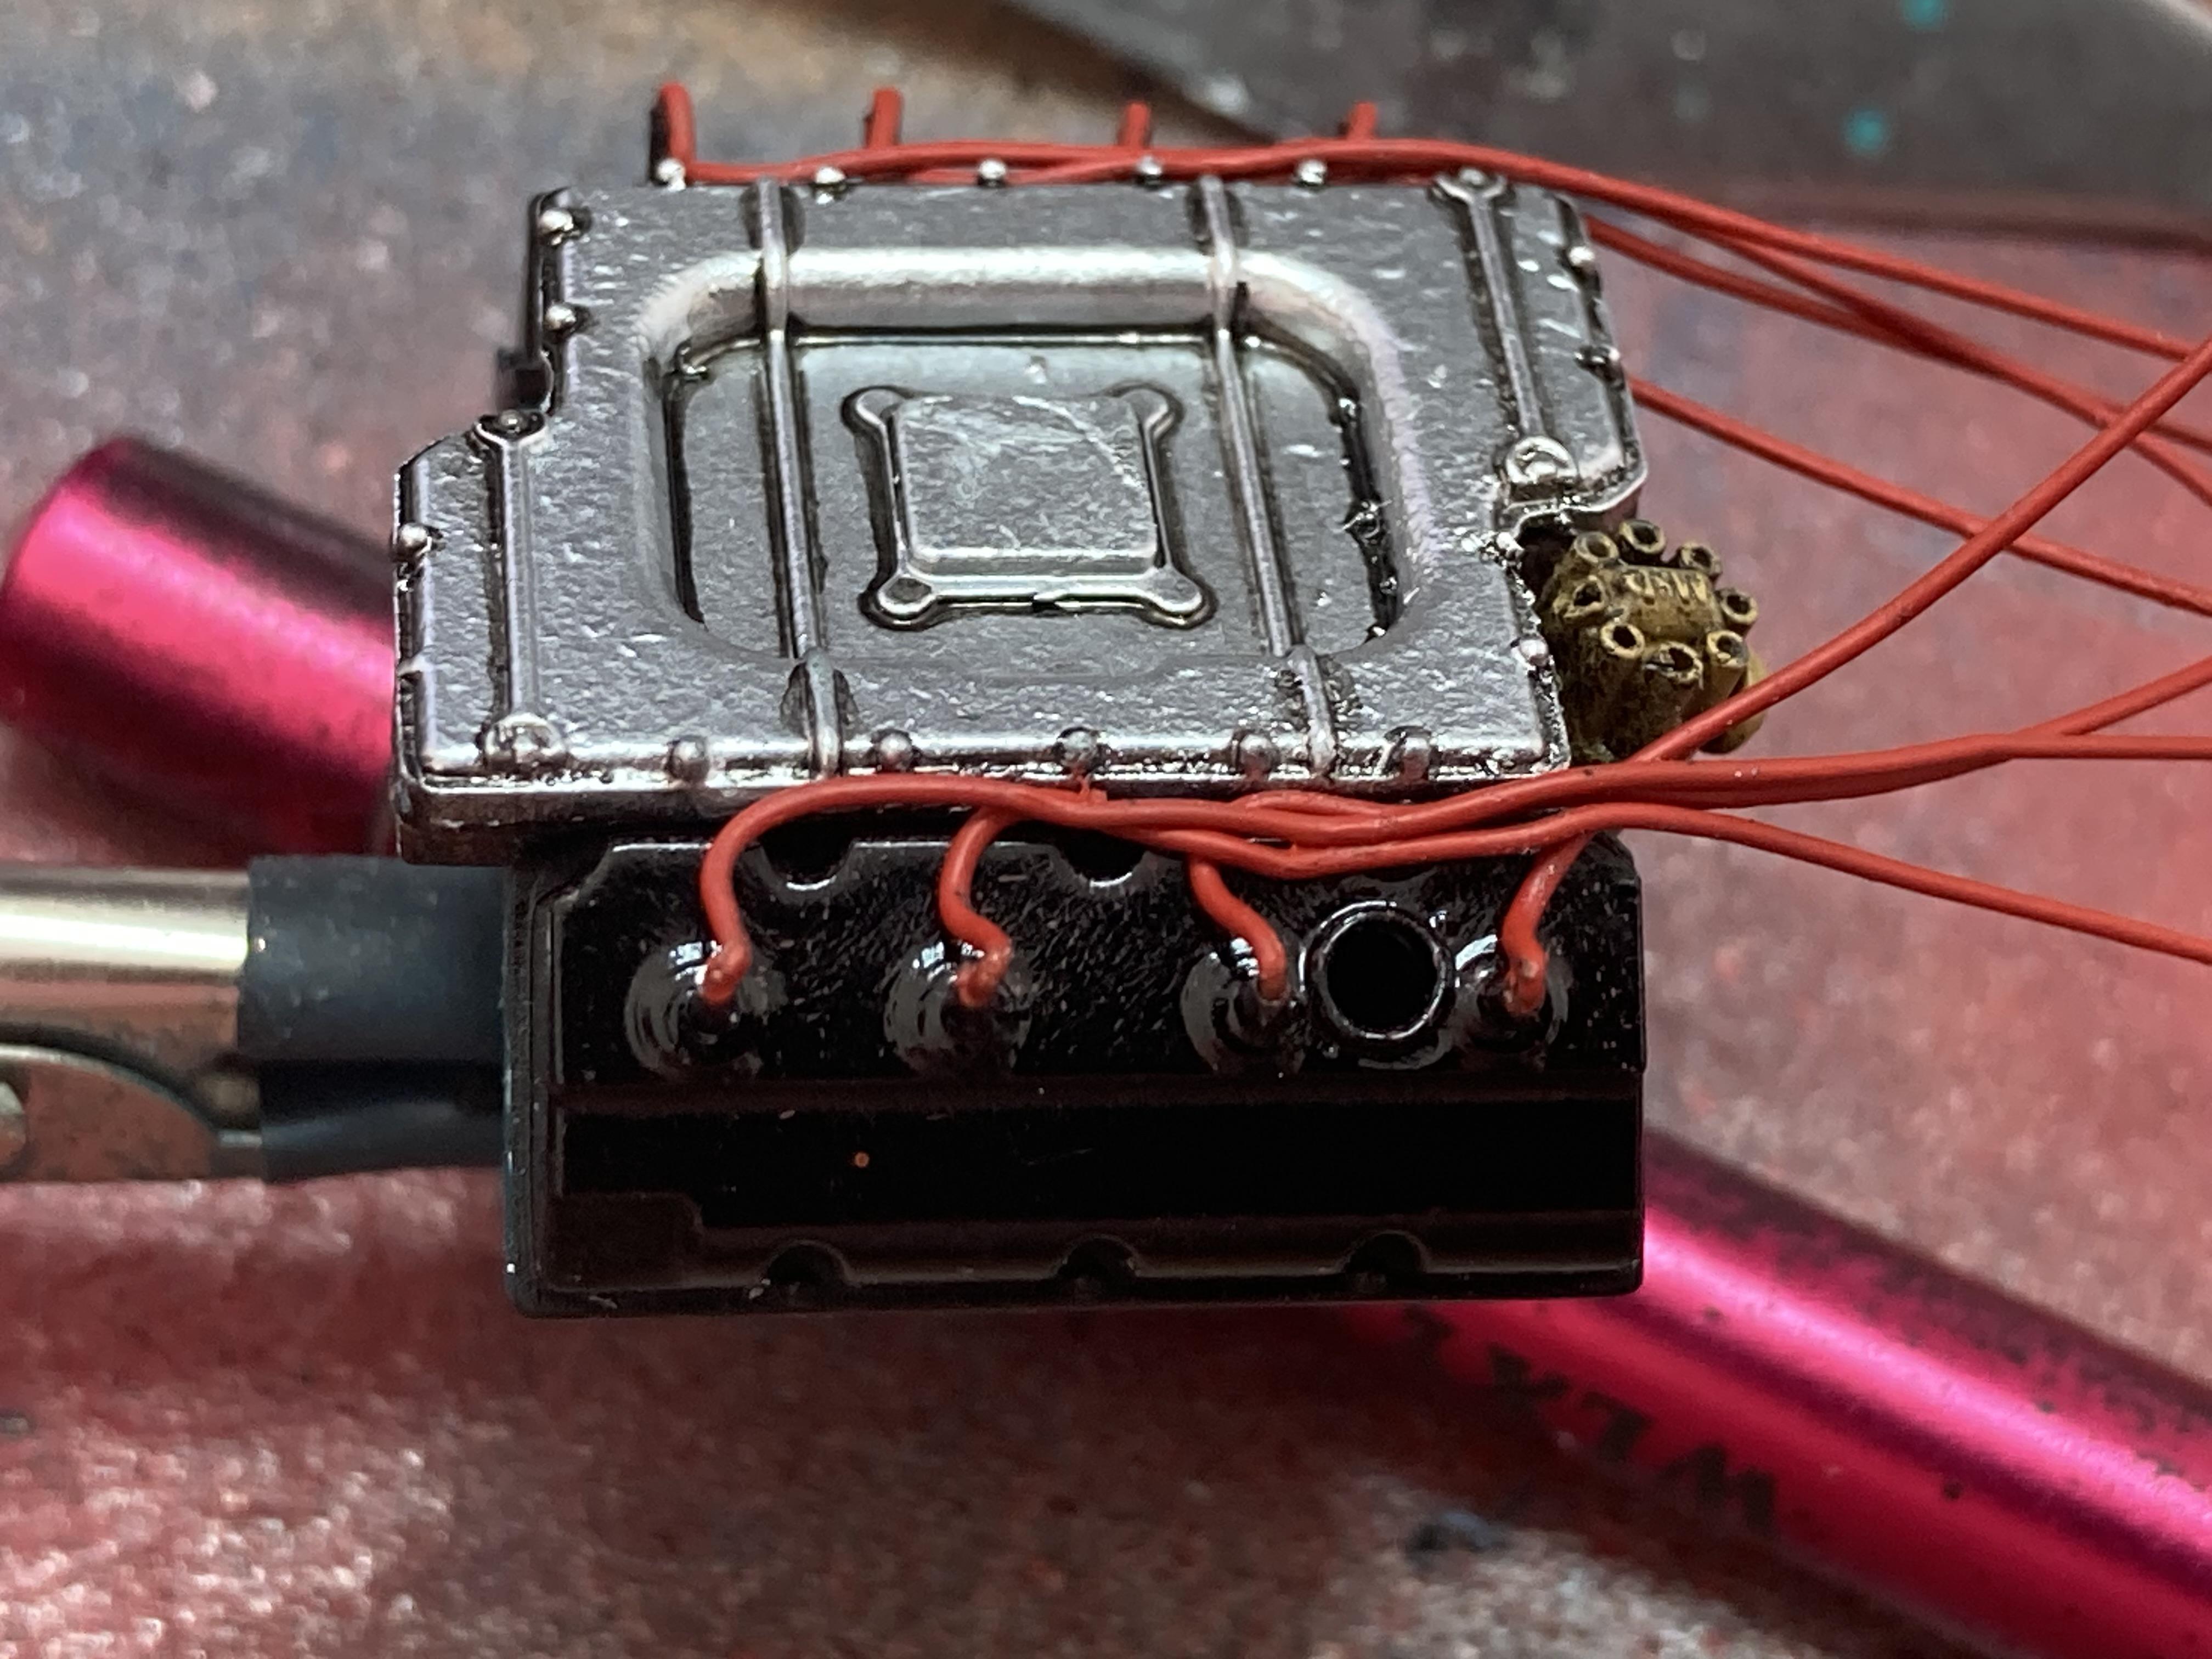
Finally I have the engine to a standard I’m happy with and I’ve progressed to doing a little detail on the trunk assembly. I found a picture of a 73 Dodge Charger that showed some very simple technology for the fuel cell: a fuel-in pipe that was ribbed; a breather pipe that wasn’t ribbed; and a much thinner fuel-out line that went through the rear firewall. The engine required so many touch-ups and so many breaks from frustration but it was well worth it. I was just determined that I would not accept anything less than what I know is work to the best of my current ability. Now that I’ve shown myself what that standard is I won’t accept anything less in future builds.
-
1/16 MPC 1973 Petty Charger
GMasterG replied to Dan Cooper's topic in WIP: Stock Cars (NASCAR, Super Stock, Late Model, etc.)
Dan I've just purchased this kit to build and I'd like to use this post as a build diary. Have you made any further progress since your last post? -
I wasn’t happy with this engine’s assembly so I pulled it apart and started again. By the end of the weekend I’d managed to add spark plug cables using 0.4mm solder. By refusing to accept poor workmanship and keeping clear focus we can all improve the final results.
-
Thank you.