Ajay
-
Posts
363 -
Joined
-
Last visited
Content Type
Profiles
Forums
Events
Gallery
Everything posted by Ajay
-
Progress over the weekend: The kit headlights are hinged so you can have them either open or closed - The taillights are nicely engineered and come as seperate red/orange/clear parts - the reversing lights just drop in without the need to glue them. Also completed the interior - I couldn't bring myself to paint it brown !. The engine is also finished - I haven't added agreat deal of detail over and above the kit except for the plug leads. So far it's been a nice kit to build - highly recommended. Cheers Andy
-
Just a quick pic of the partially completed engine : Thanks for looking Andy
-
Just a quick update on progress - I've polished out the clear and added the matt / semi-gloss black trim (bit of a masking nightmare !). There's a few small areas that will need touching up but overall it hasn't come out too bad. Thanks for looking Cheers Andy
-
Thanks for looking Andy
-
Thanks Greg Pics of the Aoshima version as requested Cheers Andy
-
Finished it off today : Thanks for looking Andy
-
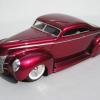
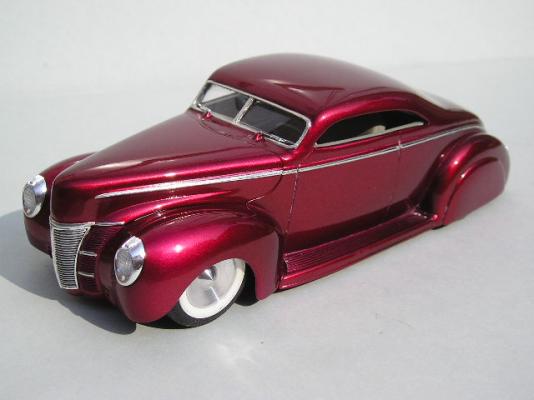
Made a start on this one which I'm planning on building stock :shock: I thought about spraying it white but was afraid the the red plastic would bleed through so I've gone with Ford Radiant red. Clear is Mr Hobby super clear which needs polishing out before I can start on the black trim (and there's lots of it !). Rims are Fujimi Watanabes as the rears are a bit deeper than the Aoshima ones, tyres are Aoshima stretchwalls. I'll post more progress as I make it. Thanks for looking Andy
-
A While back I brought the Tamiya R34 kit together with a Scale Auto Style Nismo transkit but at about the same time Aoshima brought out their version so this one got put to one side while I built the Aoshima one. I've now got round to making a start on it - colour is Honda Nighthawk Black and the rear wing is from the Tamiya Ings set. I'll swap the Aoshima rims shown for the Tamiya ones from their Nismo dress up set. & a couple of pics of the completed interior which is stock except for Aoshima steering wheel, Studio 27 harness with Tamiya p/e & Mr Model pedals. Thanks for looking Andy
-
Just some update pics of the completed interior: I had to cut down the Scale Auto Style Bride seats as they were too high - the seat belt material is from Studio 27 plus p/e details from Mr.Model as are the pedals & floor mats. As the decal sheet was missing from my kit I used the instrument cluster from the Aoshima SpoCom accessory set. & I've finally made a decision on the rims - Workmiester S1's with gold centres I'll probably have to take a few liberties with the suspension - at the moment the rims are just resting on the wheelarches. Thanks for looking
-
Finished this one off last night: Thanks for looking Andy
-
Hi Glen The kit came with the vinyl roof molded in - I just gave it a couple of light coats of automotive flat black through the airbrush. The kit I had was the one with the yellow car on the box art - I understand from a post on another forum that the roofline was too low and R/M corrected this and it was reissued with a blue car on the box. Thanks for the comments everybody - much appreciated - hopefully I'll have the 67 Coronet I'm working on finished over the weekend which is similar in style to the Charger. Cheers Andy
-
I appreciate this may not be to everybodies taste but here's where I am currently. The base kit is by Fujimi & I thought I'd have a go at replicating the Origin bodykit for the 1;1 car.The basic shapes were roughed out with plastic card and Tamiya epoxy putty : After some sanding: Coat of grey primer to show up the areas that needed more work: After a coat of Peugeot Seville & matt black (hadn't got any gloss black but clearcaot will make it gloss) I'll post more progress as I make it. Thanks for looking Andy
-
Got round to finishing this one over the weekend - I took a few liberties with the suspension to get it down in the weeds. Thanks for looking Andy
-
Thanks for the feedback - much appreciated. William - the Aoshima kit includes springs for the suspension - I was just a case of leaving them off to lower the ride height. Bobby - The Studio 27 decal is pretty thick and went down OK with micro sol/set and a bit of heat from the hairdrier !. After is dried a gave it a coat of clear lacquer and polished it out. Cheers Andy
-
Another one I've got on the workbench at the moment it's the Revell California Wheels kit sprayed Citroen Posidieon Blue Metallic. The wheels are the custom ones from the Revell Motor City Shelby GT-500 and EFI came from the from a AMT Chevelle kit. The interioe is Tamiya neutral grey with front seats from the Taniya 350Z. Thanks for looking
-
This is my latest completed model - it's the Aoshima HKS Hiper Silvia D1 car in street trim - basically OOB except for Aoshima CE28 rims, Studio 27 carbon fibre decal on the hood & drivers racing harness. The colour is Peugeot Seville. Thanks for looking.
-
Bobby Opened trunk comes with the kit - I forgot to mention in my original post that it all went together without any problems so kudos to Revell. BTW : Thanks for all the feedback - much appreciated. Andy
-
Finished this one off yesterday - it's the recent Revell kit painted Citroen Poseidon Blue metallic. Deep dish rims are from Pegasus with Model Car Garage p/e centres on the spinners. The license plates are from Lowrider Bicycle magazine and I added some Alclad chrome the engine/ engine bay Thats about it really - thanks for looking. Cheers Andy
-
A bit more progress -paints been polished out, majority of the BMF applied and I've made a start on the motor which is a hybrid of the 440 from the kit plus the induction system from the AMT Chrysler 300C. I've also decided to changed the rims to the custom ones from the California Wheels 67 Chevelle. Thanks for looking
-
Aoshima D1 Drift Samurai kit OOB except for Workmiester S2 rims & Pegasus tyres. Carbon fibre decal is from Studio 27, paint is Fiat Purple pearl. Thanks for looking. Andy
-
It was easier than I expected - used microsol/set - just had to patch it slightly on the inside of the hood scoop. Thanks Andy
-
Thanks Lee It's the AMT kit - I just built it kerbside in the end thinking that I might use the engine in something else. I had to take some liberties with the chassis to make the rims fit so you wouldn't want to see underneath (it's not pretty !). Cheers Andy
-
This the recent Aoshima D1 HPI RX7 kit in street guise - colour is Fiat Purple Pearl (still needs polishing out) and C/F is from Studio 27. Thanks for looking
-
An obsure one from me !. It's the Aoshima Hakosuka Skyline 2000 GT-R kit - pretty basic as I think it was originally a motorised kit but there's enough to work with and yes I think 4 doors can be sexy !. Colour is Vauxhall Platinum with Aoshima stretchwall tyres & Watanabe rims. Thanks for looking Andy
-
I don't know if everybody else works the same way but the 1st thing I have to do on a new project is to select the wheels that I'm going to use. This is the R-M Pro-Modeller kit - colour is Honda Nighthawk Black Pearlescent (still needs polishing) and rims are from the Revell Motor City 69 Shelby GT 500. Very early days yet - it's just a mockup to get the general idea of how the rims/ride height will look. I'll post more progress as I make it. Thanks for looking