
Mj-Styro
-
Posts
524 -
Joined
-
Last visited
Content Type
Profiles
Forums
Events
Gallery
Everything posted by Mj-Styro
-
Leaning tower of power Dare to be different project updated
Mj-Styro replied to Mj-Styro's topic in WIP: Model Cars
Here's acouple more view's! I built this car many years ago and started the restoration on it probly 4 years ago,(Built it Org. back when it came out and guessing 89 and only painted the body red..........) Well since then i have it going togather well!!!. Was stumped on the induction but after runnin thru the engine bin (Pail) i found a cool Injection set up from a ford pickup Monogram F350. Modifyed it alittle to get it to work.......... -
Started this one 4 years ago and decided it was time to get back on it this evening....... added Plug wires,fuel line.the rest i did back when LOL..... Oh and painted the blower and Tranny as well......... Starting to shape up now! Its going in a 1969 GTX Convertible that will look very stock on the outside with dual exhaust........
-
Looks great!!!!! Very nice so far!!!
-
I must be sick!!!Or is the new Project Sick........Huuuuuumm
Mj-Styro replied to Mj-Styro's topic in WIP: Model Cars
Thanks Jairus! I think maybe you are right, but i would like to add it to the bottom of the trailer (might be hard to see) but still a good idea.............. As far as the top side (isnt that supposed to be the shiny side :twisted: ) -
I must be sick!!!Or is the new Project Sick........Huuuuuumm
Mj-Styro replied to Mj-Styro's topic in WIP: Model Cars
Added a Bike for the trailer,also the taillites...(which were done by cutting Alum tubing,and diggin thru the parts bin for a set of round lights)......Also added Valve stems to the tires......(been hooked on doing them so why stop now) Also scratch built a trailer hitch for the pickup,Like what you would see on a farm truck, nothing fancy but did the trick back then........(for strenght i used straight pins to hold it on the truck, much better then using plain old super glue which will let go some time down the road.......) -
I must be sick!!!Or is the new Project Sick........Huuuuuumm
Mj-Styro replied to Mj-Styro's topic in WIP: Model Cars
My Brain is on over load with weird stuff like this............. So much to build from ideas just not enough time to do it.wanted to do that one years ago......... -
I must be sick!!!Or is the new Project Sick........Huuuuuumm
Mj-Styro replied to Mj-Styro's topic in WIP: Model Cars
Couple more pics, gettin some details on it....... -
Was bored this morning and had some free time........LOL!!! Ok heres the sick part!! i couldnt leave well enough alone! I HAD TO make it work too.............. :twisted:
-
1960 Ford Pick up
Mj-Styro replied to Irvin Arter Jr.'s topic in WIP: Model Trucks: Pickups, Vans, SUVs, Light Commercial
Thats an all plastic kit,the Bed was shortened to 6ft....... NICE TRUCKS HERE!!! they look better with paint on them -
After talking with Irvin Arter last night i came to this........... The BMF work Looked to bulky and looked like ###### so heres what we decided on........ Finish the BMF work thru out the whole rear taillight panel area,then i would go in with a silver sharpie and do the in-lays leaving the outter edges BMF,Then i would go in and out line the sharper edges with a black India ink......... Seeings how i couldnt find any talilites and instead of makin new ones i just used BMF over the taillite area and detail painted once that was done......... Now i am real happy with the out come of the taillite panel on this 68 cuda! Heres some pics for ya to judge yourself....... Just need to silver the emblem on the rear and maybe find some cool tags for it then i can call it done.......
-
Vega wagon Finished! Better Pictures 09-20-06
Mj-Styro replied to Mj-Styro's topic in WIP: Model Cars
Sorry but i dont think i can make it this sunday! just dont have the funds work has been very slow the last few months and i just bought a car last month that sorta hurt alittle but was well worth! -
Vega wagon Finished! Better Pictures 09-20-06
Mj-Styro replied to Mj-Styro's topic in WIP: Model Cars
Welp i just couldnt leave it alone i had to add yet more details! ACK!!!! I went ahead and did the decals,also added Valve stems and accented the slots better buy flat blacking the inside of each one........ Also pulled all the stops and tried to get better pics so here they are! -
Vega wagon Finished! Better Pictures 09-20-06
Mj-Styro replied to Mj-Styro's topic in WIP: Model Cars
Here's the tags i chose for it. I think they fit it...... they are from the chevy S-10 X-treme kit and thought about using the decals aswell they have the chevy logo and says X-treme after them. whats your thoughts? -
1960 Ford Pick up
Mj-Styro replied to Irvin Arter Jr.'s topic in WIP: Model Trucks: Pickups, Vans, SUVs, Light Commercial
That looks cooooooooooooool! Gotta see how you do your alclad............mine doesnt come out that shiny!!! and i have tried everything! -
Vega wagon Finished! Better Pictures 09-20-06
Mj-Styro replied to Mj-Styro's topic in WIP: Model Cars
Thanks Guys!! i am happy for the outcome.........sure was nasty tho! LOL its alittle better now -
-
1968 Ply Cuda Racing off the bench 09-16-06 update
Mj-Styro replied to Mj-Styro's topic in WIP: Model Cars
After Much details,Like makin Q/window glass for it,and BMF'ing and adding decals! she looks done!!!! still wanna do some minor things tho..........like paint the under side of the hood and scoop........... -
Vega wagon is gona get a small block........
Mj-Styro replied to Mj-Styro's topic in WIP: Model Cars
Thanks Izzy! Does look pretty smart.......... -
Still some details to go but its gettin there! Headers are from the 88 mustang gt kit, and i added a flange at the heads...I know not correct! But hey its a scale model! LOL
-
1968 Ply Cuda Racing off the bench 09-16-06 update
Mj-Styro replied to Mj-Styro's topic in WIP: Model Cars
68 Cuda gets color! Bittersweet Pearl House of Colors...........(rustolem clear) First coat with rattle can,sec,third and fourth with air brush then last coat with rattle can....... -
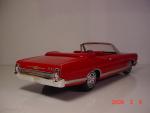
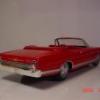
Nasty Build gets a restore! 1971/2 VegaWagon update 09-07-06
Mj-Styro replied to Mj-Styro's topic in WIP: Model Cars
EYE KANDY!!!!!!!!!!!! Carefull tho! it sure is red! LOL :roll: -
Nasty Build gets a restore! 1971/2 VegaWagon update 09-07-06
Mj-Styro replied to Mj-Styro's topic in WIP: Model Cars
Welp! shes polished out! and BMF work is done............ Lookin mighty smart now!!! -
Nasty Build gets a restore! 1971/2 VegaWagon update 09-07-06
Mj-Styro replied to Mj-Styro's topic in WIP: Model Cars
Have some color on it which i did tonight.........i must be doing something wrong tho i cant seem to spray lacquer with it blushing real bad lately. OWELL! I Have it polished out and will give it a bath tomorrow and polish alittle more,then it should be ready for BMF etc........ Its not 100% but looks 100 times better then it did before i started it..... -
Nasty Build gets a restore! 1971/2 VegaWagon update 09-07-06
Mj-Styro replied to Mj-Styro's topic in WIP: Model Cars
Ok heres a few updates and also details finally! sorry i havent been able to add any details,(because i have been real busy around here and wanted to get the pics out so everyone can see them,Unless you would rather i wait to send out pics of my progress??) Ok here we go first up is a top front shot, Heres a top shot of the front,The hood scoop is from a later model and that being a 1977 Vega and thought the hood scoop was neat, as you can tell i have it almost blended to the new hood......(if you remember i cut the hood out of the body as it was molded in) Here's a under shoot of the hood, if you look closely you can see the small strips (now after sanding and filling) on the outter edges of the hood and that back,also had to add small pieces of sheet stock to fill it in......Also not i havent cut out were the scoop is just yet, wanted to wait till i got the body work done on the scoop less chance of breaking something. Here is a rear shot of the progress so far, had to fill in with some putty so i could smooth out the back, also since i couldnt get the taillights out i will cover them with BMF till i have the body painted up then will peel it back off and then BMF again and detail paint it...........also i may have to put the lower seam back in after i get it all smoothed out.(this will be for the tailgate seam) -
Nasty Build gets a restore! 1971/2 VegaWagon update 09-07-06
Mj-Styro replied to Mj-Styro's topic in WIP: Model Cars
This evening was spent on fixing the bad chrome molding around the windows.....Also Have the hood alittle wider and longer by adding pieces of straight stock filed down and sanded smooth..........worked on the interior and had to shorten the chassis just a tad.......... Have it in primer now so i can see what else will need to be filled with body primer........... I also added small piece's of straight stock for the tops of the Q/panels so i can build that back up and is shaping up nicely! still will need some minor putty........... Here's some pics!