
JayVee
-
Posts
326 -
Joined
-
Last visited
Content Type
Profiles
Forums
Events
Gallery
Everything posted by JayVee
-
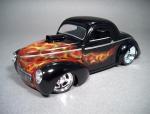
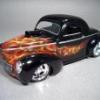
I've always liked this model kit (and the Thames panel truck, too) so I picked up one of each. I wanted to try building them in a modern street rod style. The paint is Tamiya racing white (slightly off-white). The flame mask pattern is from the Jimmy Flinstone Testor's masks, but I had to transfer the pattern to wide 3M blue tape to get the mask to conform to the tight curves: The ride height will be pretty low but not slammed. These rims and tires are from the parts box and they're narrow enough to not require large wheel tubs, just a little coaxing on the wheel wells with the Dremel.
-
Creative idea, I like it!
-
Good tips, thanks! I'll try Parafilm and the #11 black blade.
-
Here's the third attempt. The flame shapes are not really smooth, they're more psychotic and edgy, but I'm ok with that. (reflects my personality, maybe?) The first shading layer (purple) came out clean and even, but then I got too heavy-handed and lost control of the second (blue) layer. The flame tips are lavender, but they need to be dark blue or some other color. I'm going to change the approach to the blue layer to allow the purple to show through more. I think if I start the airbrush at the inner base of each claw and just pull the brush to the tips it will give more direction and "motion" to the flames:
-
All good points guys, thanks. Mirage, you're on the money with that hint. Next time, some of the flame tips will also be longer and have one more wave in them that ends up pointing the other direction.
-
Excellent job! This looks great. I agree that a little weathering on the wheels would put it over the top.
-
2nd attempt (on styrene sheet): For the next attempt the tips of the claws need to be extended and more slender, and I'm going to introduce a third color for the flame tips (darker blue). I can see that now I'll be able to practice making better flame shapes with pencil and paper, and then practice tracing the pencil lines with the airbrush until I can make smooth, even strokes. Once I get that under control I'll go back to masking and I'll seal the mask with clear to avoid the white bleed around the edges. Thanks for checking out the progress! -JV
-
You picked a good time to build a 928. Today is the Boston Shark Party which every year plays host to a large gathering of 928s. Check out the 928 section of Rennlist to see some amazing sharks ( supercharged, etc.) I love these things!
-
Thanks guys, I think you're right about it being a matter of practice. I'm prepared for a few more attempts before getting a keeper. This is different than true fire flames in that it's hard to visualize the final result without removing the mask, and then it's too late to change it.
-
I'm going to spend some time learning how to paint traditional "crab claw" flames in the style of the master, Brian Nehring. I studied his tutorial numerous times, and I have a lot of reference photos of his work that I'm using to try to get the right look. I don't have the technique under control yet, but I have to start somewhere so this prebuilt Riv will be the guinea pig. I'm using Ultra-Bright chrome foil for masking, and it seems to work well. I finally freehanded some flames that look acceptable: Here's how the painting went. I can get the control that's needed, but I painted it too "spotty". I need to paint smooth strokes in between each flame lick. I'm also going to reverse the blue and purple colors in the scheme. I need to make thinner connections on the flame patterns, and fatter bases on each crab claw. This will allow the white color to show up on each crab claw base. This is not a keeper, but at least it shows what I need to work on next. It's all about the journey, right? I expect this process to take a few weeks (months?) before I end up with my first keeper.
-
Fantastic project, congrats on the finished build!
-
Fantastic job! The 1:1 was killer and so is your version.
-
Add a little fire to that Smoothster kit on the shelf
JayVee replied to JayVee's topic in WIP: Model Cars
Both of these hoods have now been sent to new homes. -
Love it! The engine manifold looks absolutely killer.
-
Add a little fire to that Smoothster kit on the shelf
JayVee replied to JayVee's topic in WIP: Model Cars
Black one is spoken for. "That'd be wild to see a horde of Berserkers comin at ya behind shields like dat".....LOL -
I'm in the process of a major cleanup and I came across these two extra hoods from the Testor's Smoothster kit. The skull hood is Tamiya dark blue metallic, and the flame hood is Tamiya black. If you want one then send me a PM and I'll mail it to you. Maybe someone could use one to finish that unbuilt kit on the shelf:
-
nah, your version is very cool Mark! btw, regarding the hood fitment that you mentioned, I found that the front fenders droop down a bit on this kit so I had to lift them up against the front of the cab and glue them at the contact points. On my build this was a big issue because until I propped up the fenders the hood wouldn't shut. One of those final assembly surprises!
-
Thanks Tom, the rims are from the latest release of the kit. They were widened and fitted to Pegasus tires. I show some pics of them being made in the "in-progress thread" shown at the link at the bottom of the starting post of this thread.
-
Check out the finished project: finished project thread
-
The chassis and drivetrain for this truck are from the Willys coupe kit. When I saw the huge amount of space available in this engine bay and the last unbuilt Willys kit on my shelf I knew something had to be done, so I popped a fresh cutting wheel in the Dremel, sprayed a bunch of little plastic bits all over the floor, and glued together what was left over: Aftermarket air cleaners and coil were added. I was glad to find out that the hood cleared the top of the engine: The exhaust tips are from one of the old AMT '55 Chevy kits (Bel Air or Nomad): A monster truck rim and sheet styrene were used to make these wheel tubs: The soft styrene that's used in today's kits can be a drag, but on the bright side, it sure bends easily!: I like the way the sun reflected in the camera lens on these last two photos: Here's the link to the in-progess thread: in-progress thread Thanks for checking out the finished project!
-
Looks excellent, love the style!
-
To my eyes, it has a bit of Beetle, a bit of Boxter, and a lot of Benz! I'll hoist a Spaten in your honor.
-
I always look forward to seeing your projects, they're all...um...perfect, actually! How were these photos taken (lighting, etc.)? They're the best model car photos I've seen.
-
Here's the finished interior with simulated fabric inserts (to do this, just stand back and spray the paint spatter-style): The steering wheel/column is from the Deuce coupe kit with a column bracket made from sheet styrene, and the gauges are detailed with chrome foil with a flat black wash and clear window glue for lenses: The underside of the bed floor looked like this.... So I made a panel from thin sheet styrene (I love this stuff, it fixes everything!): I took some heat in the past for building slammed trucks with no inner front fenders, but not this time! These babies fit like they were meant to be used with this Willys frame (sometimes it's better to be lucky than good): I'll wrap this sucker up later today. I posted a lot more in-progress photos for this project than usual, but I thought that most builders care more about the raw details than the finished project anyway since we're here mostly to steal ideas for our own projects. C'mon, admit it, you know it's true!
-
I really like the concept, it's coming along great!