
JayVee
-
Posts
326 -
Joined
-
Last visited
Content Type
Profiles
Forums
Events
Gallery
Everything posted by JayVee
-
...and avoid the controversy over inner front fender wells.
-
here's how these were painted: pinstripe flame technique
-
I'm just starting out on this street truck project. The rims in the latest release of the kit have a pretty beefy look to them suitable for a truck but I wanted to widen the front wheels and widen the rear wheels even more, so I added Pegasus sleeves to the rear wheels and used wide Pegasus tires up front: The chassis and drivetrain will be from the '41 Willy's coupe kit. I think that hemi will fit nicely under this tall hood. I'll need to graft two chassis together to get the right length. The seats are from one of the Revell tuner kits. I'm thinking of using Testor's Evening Orchid paint with a clear pearl coat. If I add flames I'm thinking about painting true fire licks with clear purple, clear red, and maybe clear blue. The Evening Orchid is a light color so it would serve as the base color for the true fire, and the tinted clear licks would be painted using templates, as opposed to the standard true fire scheme of painting the solid base colors with templates and overcoating with tinted clears. This project is based on the same basic concept as this '57 Chevy street truck I did a while ago that has two WagonRod chassis grafted together: Here goes! -JV
-
I like your ideas on this project, it's coming along nicely!
-
The drop axle was from the '40 Ford street rod ragtop version of this kit. As I recall, the rims are from the AMT '57 Chevy kit, rear tires are from the '66 Buick Riviera kit, front tires and all four plastic whitewall inserts are from the '64 Chevy pickup kit, and the hubcaps are from the '50 Ford pickup kit. The ones in the Buick kit are larger than most other kits so they are really all that's needed to make a couple sets.
-
Hey thanks guys! Yes, this is the Revell Standard Coupe kit.
-
Yes, you're right! I'll go fix that now.
-
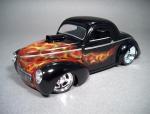
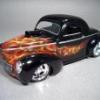
This retro-styled '40 Ford was painted in Testor's silver-blue followed by Tamiya pearl clear. The big 'n little steelies were sourced from a few different kits, and the Cobra engine is from the Buttera T kit. It was lowered quite a bit using the dropped front axle from the ragtop version of this kit, and the rear springs were shortened. The pinstripe flames were an idea I wanted to try since I thought they would fit the retro look of the car: The photo-etched trunk emblem is from the Model Car Garage: The square holes in the firewall for the hood hinges were sealed with thin sheet styrene: The floor pan was painted with Testor's fabric black paint: Ready for cruise night!
-
Hey thanks again all. This kit sat in the box on the shelf for a long time because I couldn't get past the "big square car" thing. Once the body was shaved of the handles, mirrors, and half the chrome doodads it started to have a retro-rocket ship look that made it more fun to work with.
-
Thanks all! I noticed that a lot of the bagged, rocker layin' 1:1 trucks are built without front inner wheel wells so I've been leaving them off as well. On this model they would be easy to fab using sheet styrene, but for now I'm moving on to finishing a '40 Ford Coupe that's in progress.
-
Here's a '60 Starliner that was just completed. It's painted Tamiya Mica Silver with a dark blue interior. I finally settled on a simple paint scheme since I think it works best with this car. The wheels are 19" Pegasus chrome T's, the disk brakes are from the Phantom Vickie kit, and the air cleaner is from the Revell '32 Deuce Coupe. The rest of the build is from the kit. The suspension was lowered quite a bit: This build had two other complete paint jobs earlier in it's life. This one ended up with a huge scratch that happened while applying the approximately 3 miles of chrome foil: This one ended up with bubbles in the clear in the panel lines: Even though the final paint job is the simplest, I think it fits the style the best. Thanks for checking out this project! -JV
-
Excellent work! I really like the custom hood w/ side scoops.
-
Looks great! Those rims update the look yet retain the retro vibe.
-
Super job! That engine is a perfect choice, too.
-
If you could only choose ONE photo of any of your builds, wich would it be?
JayVee replied to JAFFA's topic in Model Cars
A simple photochop trick: -
Well done! I really like the stance and the color scheme.
-
The deuce doctor delivers another winner! The styling ideas look great, I especially like the lime green and gray-green combo.
-
Well, I tried out that idea for making crab claw flames, and the problem is that the pattern is very hard to get precise enough to look good. If it were a die cut pattern then it would work great. I settled on this different paint scheme because I wanted long, flowing flame licks to complement the long chrome trim on the sides of the car. The flame colors are mica silver, aqua pearl, and purple pearl, with pearl clear. Here's a shot of the paint job before removing the tape to show the colors. For me, this moment in the painting process is always accompanied by a little trepidation: And here's the result. Click on the "Click to view full image" to get an accurate picture because the scaled down photo makes the flames look jagged and uneven: Now it's on to the other side of the car!
-
Yeah, but it's still one paint job shy of my all-time record. I always have a plastic tub of 90% alcohol ready and waiting.
-
Yes, that '37 is finished, and it's in the "under glass" section.
-
This Starliner was originally painted with ghost fire licks on the sides, and it looked cool until it ended up with a huge scratch that happened while applying the roughly 3 miles of chrome foil. I was kind of bored with it since I had done a few more paint jobs similar to it that came out better. I just repainted it in white/champagne gold and I'm trying out a new technique for flame masking. The photo shows a strip of tape that was cut on a piece of glass with a wavy line down the middle. The two halves were offset to make the string-of-hourglasses pattern. The end of one piece has been cut to make an insert to shape the flame lick. So basically all that's needed to build up the paint mask is a bunch of tape with these wavy line cuts. Pretty cool! I'm going to lay down three strips of flames on each side of the car, and they'll be white with blue/purple highlights:
-
Go for it! I was hoping someone would find that technique useful. For the crab claw style I'm going to make the wavy pattern larger, and then offset one side of the tape to create a string-of-hourglasses pattern. Then I'm going to use small pieces of tape to turn each hourglass bulb into a crab claw flame lick. I think it will be pretty easy.
-
That dropped axle really does get it down there, I remember being glad to find that out at the time. I'm going to use the kit grill for this one.
-
Thanks guys, this is the Revell kit that has a dropped front axle in the kit and the rear shocks were cut to lower the back end. One of the failed paint jobs this one had was dark metallic blue with these stripes covering the hood and front fenders. The stripes were white-yellow-lime green, and it looked really cool until the hood hit the ground with a wet clear coat on it. I prefer the silver-blue though.
-
Here are some progress pics on this '40 Ford I started a couple of years ago. The wheels are big 'n little wide whites that were assembled from various kits, and the chassis was lowered quite a bit: The first five (yes five...) paint jobs that I attempted were failures for various reasons, but I finally ended up with a paint scheme that I like. This is silver-blue metallic with white/yellow/turquoise/aqua/purple pinstripe flames finished with clear pearl. I think the pinstripe will look cool when the chrome strip is in place above it: The pinstripe flames were made by cutting a thin piece of tape down the middle on a piece of glass. I'm going to use this technique again to create a long string of crab claw flames for a Ford Starliner model that's being painted now. I'm glad to finally be making some progress on this model!