
JayVee
-
Posts
326 -
Joined
-
Last visited
Content Type
Profiles
Forums
Events
Gallery
Everything posted by JayVee
-
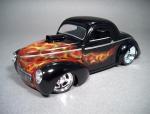
Here's some "blue fire". So many possibilities!
-
Updated----Sliding back door in '51 Chevy sedan delivery
JayVee replied to BIGTRUCK's topic in WIP: Model Cars
I like it! -
Lookin' great!
-
Great stuff!
-
Food Dehydrators & Paint Dryers
JayVee replied to JayVee's topic in Model Building Questions and Answers
Thanks for the info on these dehydrators. Seems like a good investment, since I sometimes want to get things done in a shorter span of time. -
Do I need one with variable temperature control? What brand(s) do you guys use?
-
Added a skull for tradition's sake :twisted: :
-
Lyle, you probably already know this, but BMF also makes a gold version of BMF that could be used for the insert.
-
'40 Ford project, updated 8-19 with new progress photo
JayVee replied to bluemoose's topic in WIP: Model Cars
Look great, thanks for the tip on that glue, I'll have to try it. -
Yes, I made one out of some sheet styrene. I just cut some different shaped curves along the edge. There are airbrush templates you can buy for this, but it was easy to make one.
-
Getting better...
-
'40 Ford project, updated 8-19 with new progress photo
JayVee replied to bluemoose's topic in WIP: Model Cars
Looks excellent bluemoose! How are you going to attach the rear fenders on this kit? Any special tricks? I always get nervous glueing those things in place. -
Thought I'd share a few pics of a '59 that was just painted. The flames are the traditional "crab claw" style painted gold with metallic green shading and yellow flame tips:
-
Looks great!
-
Stunning paint job, door panels look great, too.
-
Killer! The CF hood is perfect.
-
Outstanding detail work! The steering wheel horn ring is a really slick idea, and the spokes came out great, too.
-
Thanks for the feedback guys. I'm shooting at 15 PSI, and I'm using a Badger 100-LG gravity feed internal mix airbrush with the fine tip. I'll keep at it and the shape and size of the licks should improve. I think this would be easier on a larger scale so I'm going to work on some larger flames until I get the hang of it. The walls of my office could use a brush-up...
-
Here's an early attempt at "true fire" (my first attempts looked more like "spew fire"). The hood in the top part of this pic has a decal I made for reference, and the hood on the bottom is painted. I need to make a smaller template and denser flames on my next try, but at least it looks like it will work:
-
Really nice! Super clean build.
-
Great period styling. Makes me want a cheeseburger and A&W root beer!
-
Here's the final result before clear coat (since I ran out of clear). I used the Badger 100-LG with the fine tip for this shading:
-
Looks great Len, I'll check out the bay for some masks.
-
Great looking project! I like the weathering on the inside of trailer.
-
Here's a '57 that's pearl white/pearl green. The flame template was made by sticking the Scotch Blue painter's tape to a transparency film and printing the pattern onto the tape using an inkjet printer. The pattern was sprayed with clear to seal the ink, and the tape was stuck onto a piece of glass to be cut out. Here's a pic of the the template: The flames were painted on this piece of styrene with pearl green fading to orange and then purple, with a light pearl white overcoat. Here it is in position on the hood: To finish the pattern, the template will be cut down the middle and the two halves will be swapped and painted onto the top of the front fenders. After about ten test runs I think I'm brave enough to actually paint the car body. Here goes...