Chuck Most
-
Posts
12,888 -
Joined
-
Last visited
Content Type
Profiles
Forums
Events
Gallery
Everything posted by Chuck Most
-
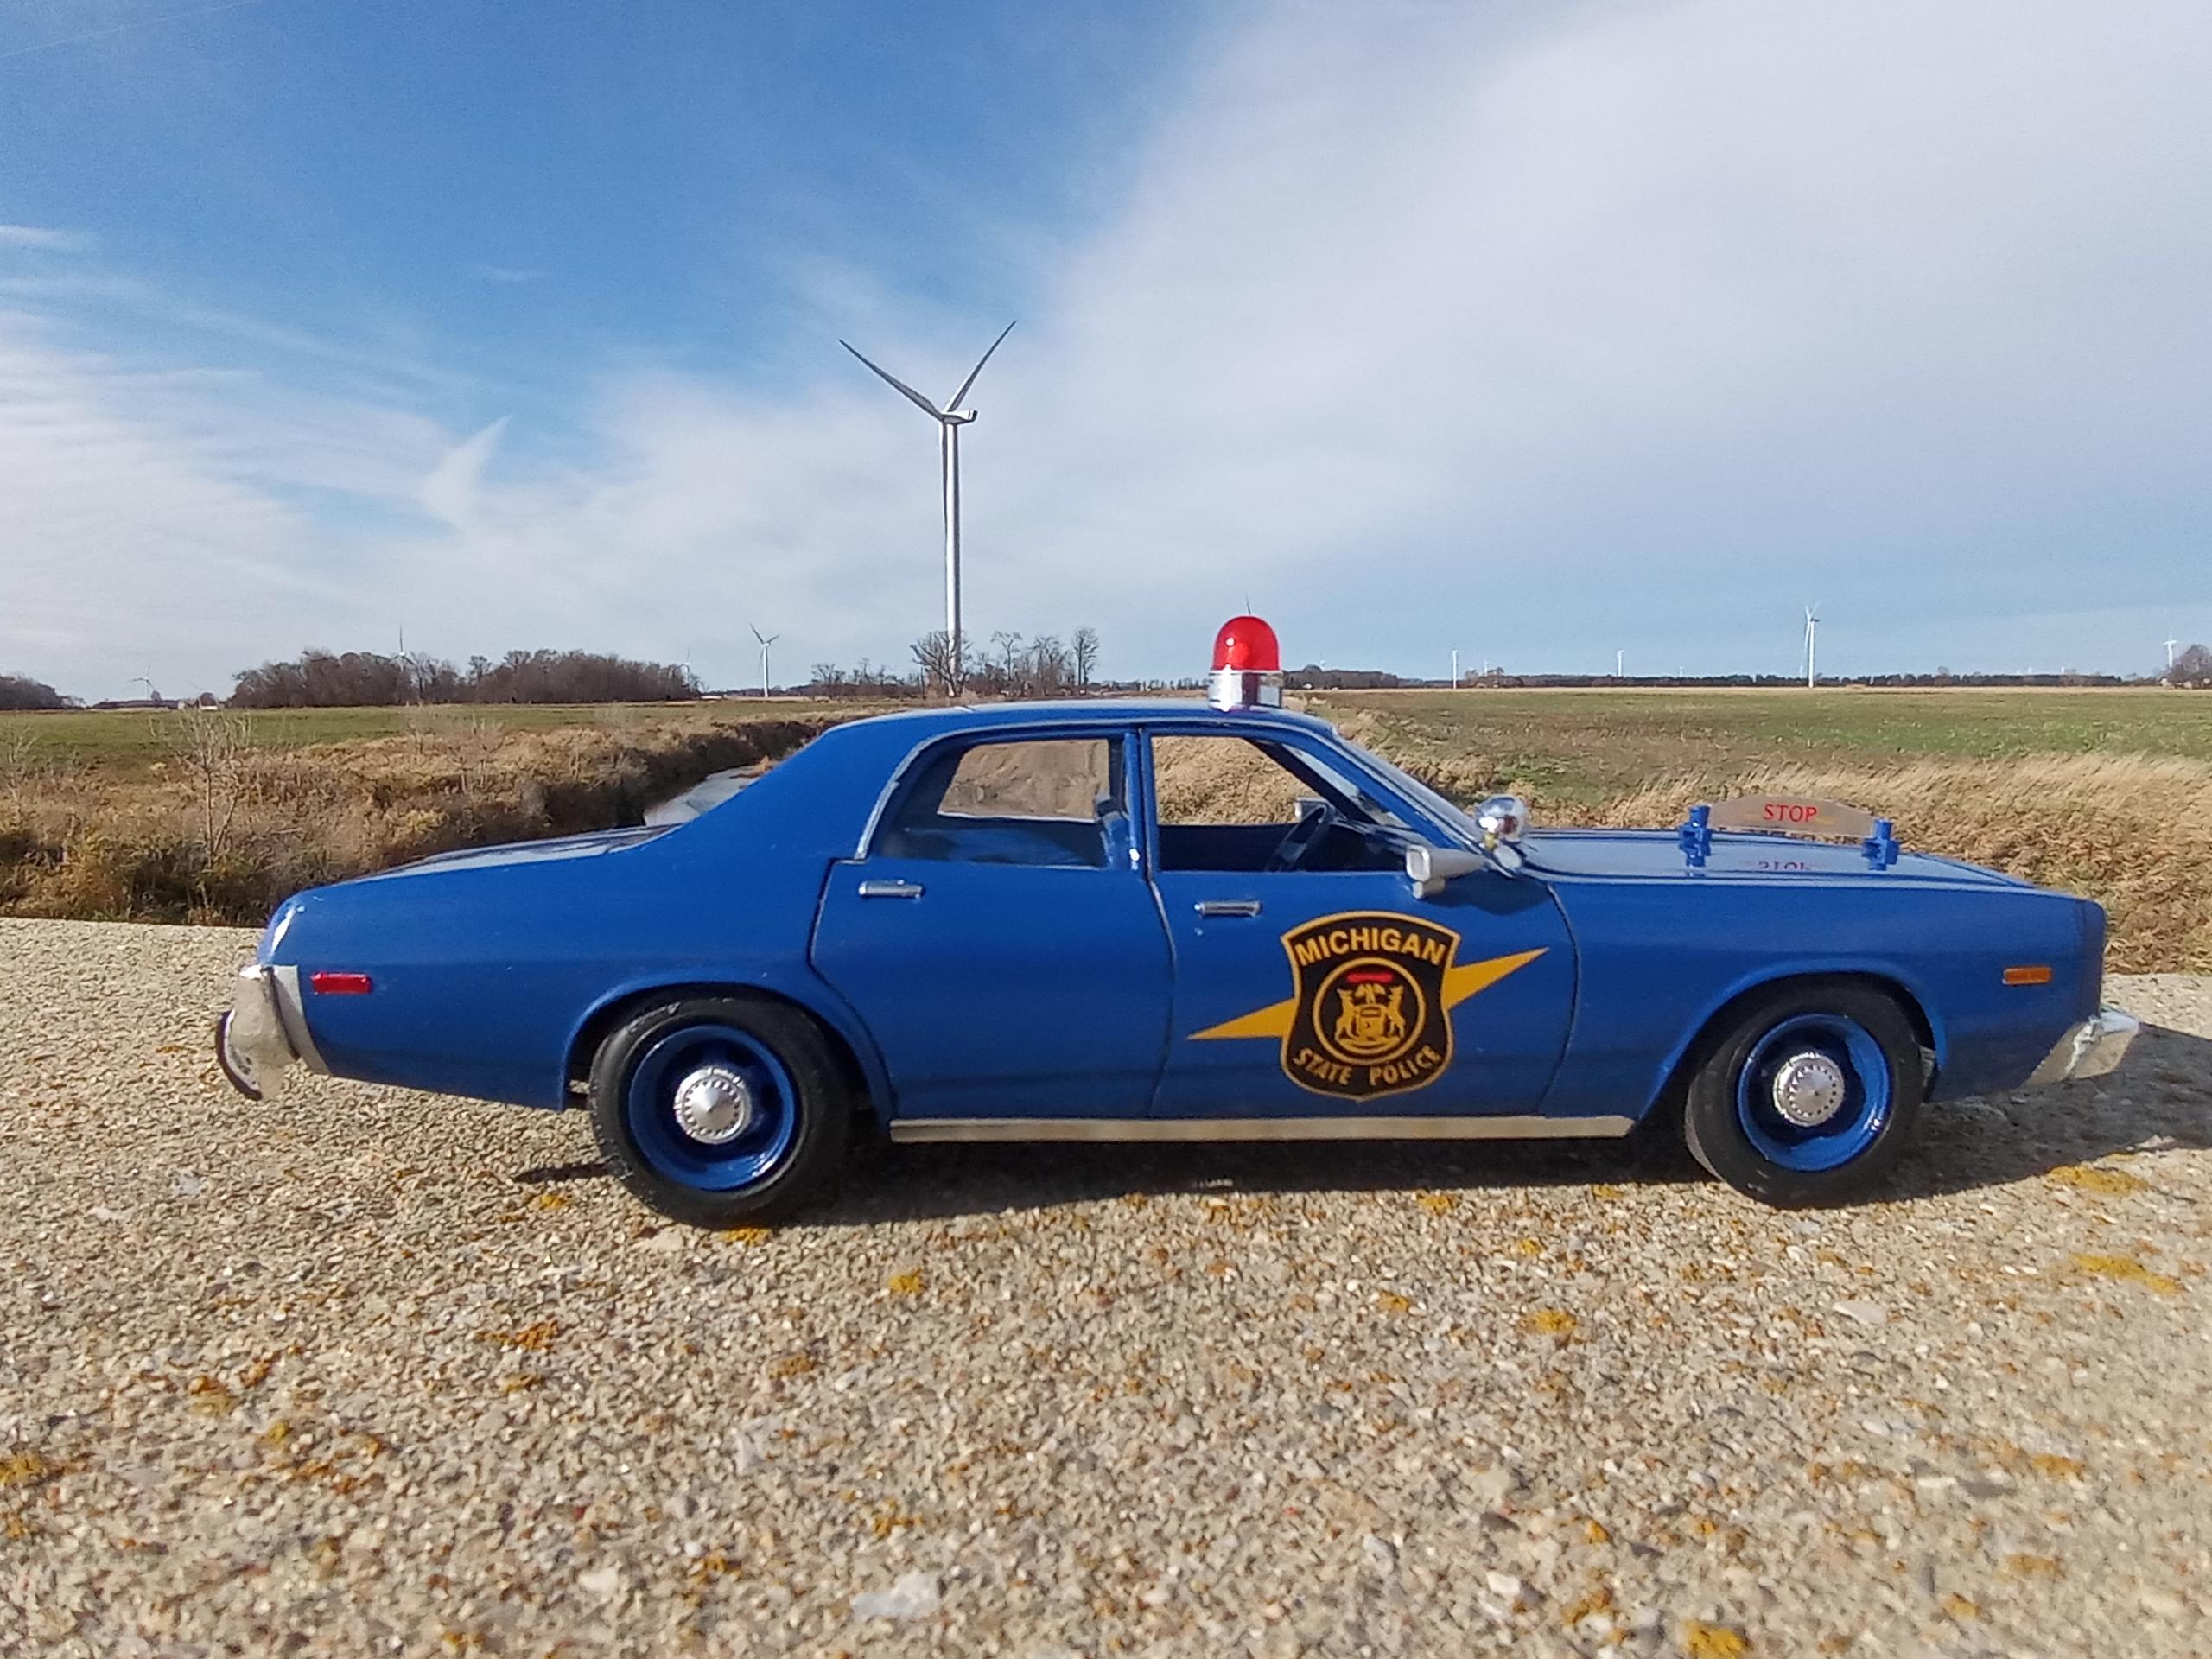
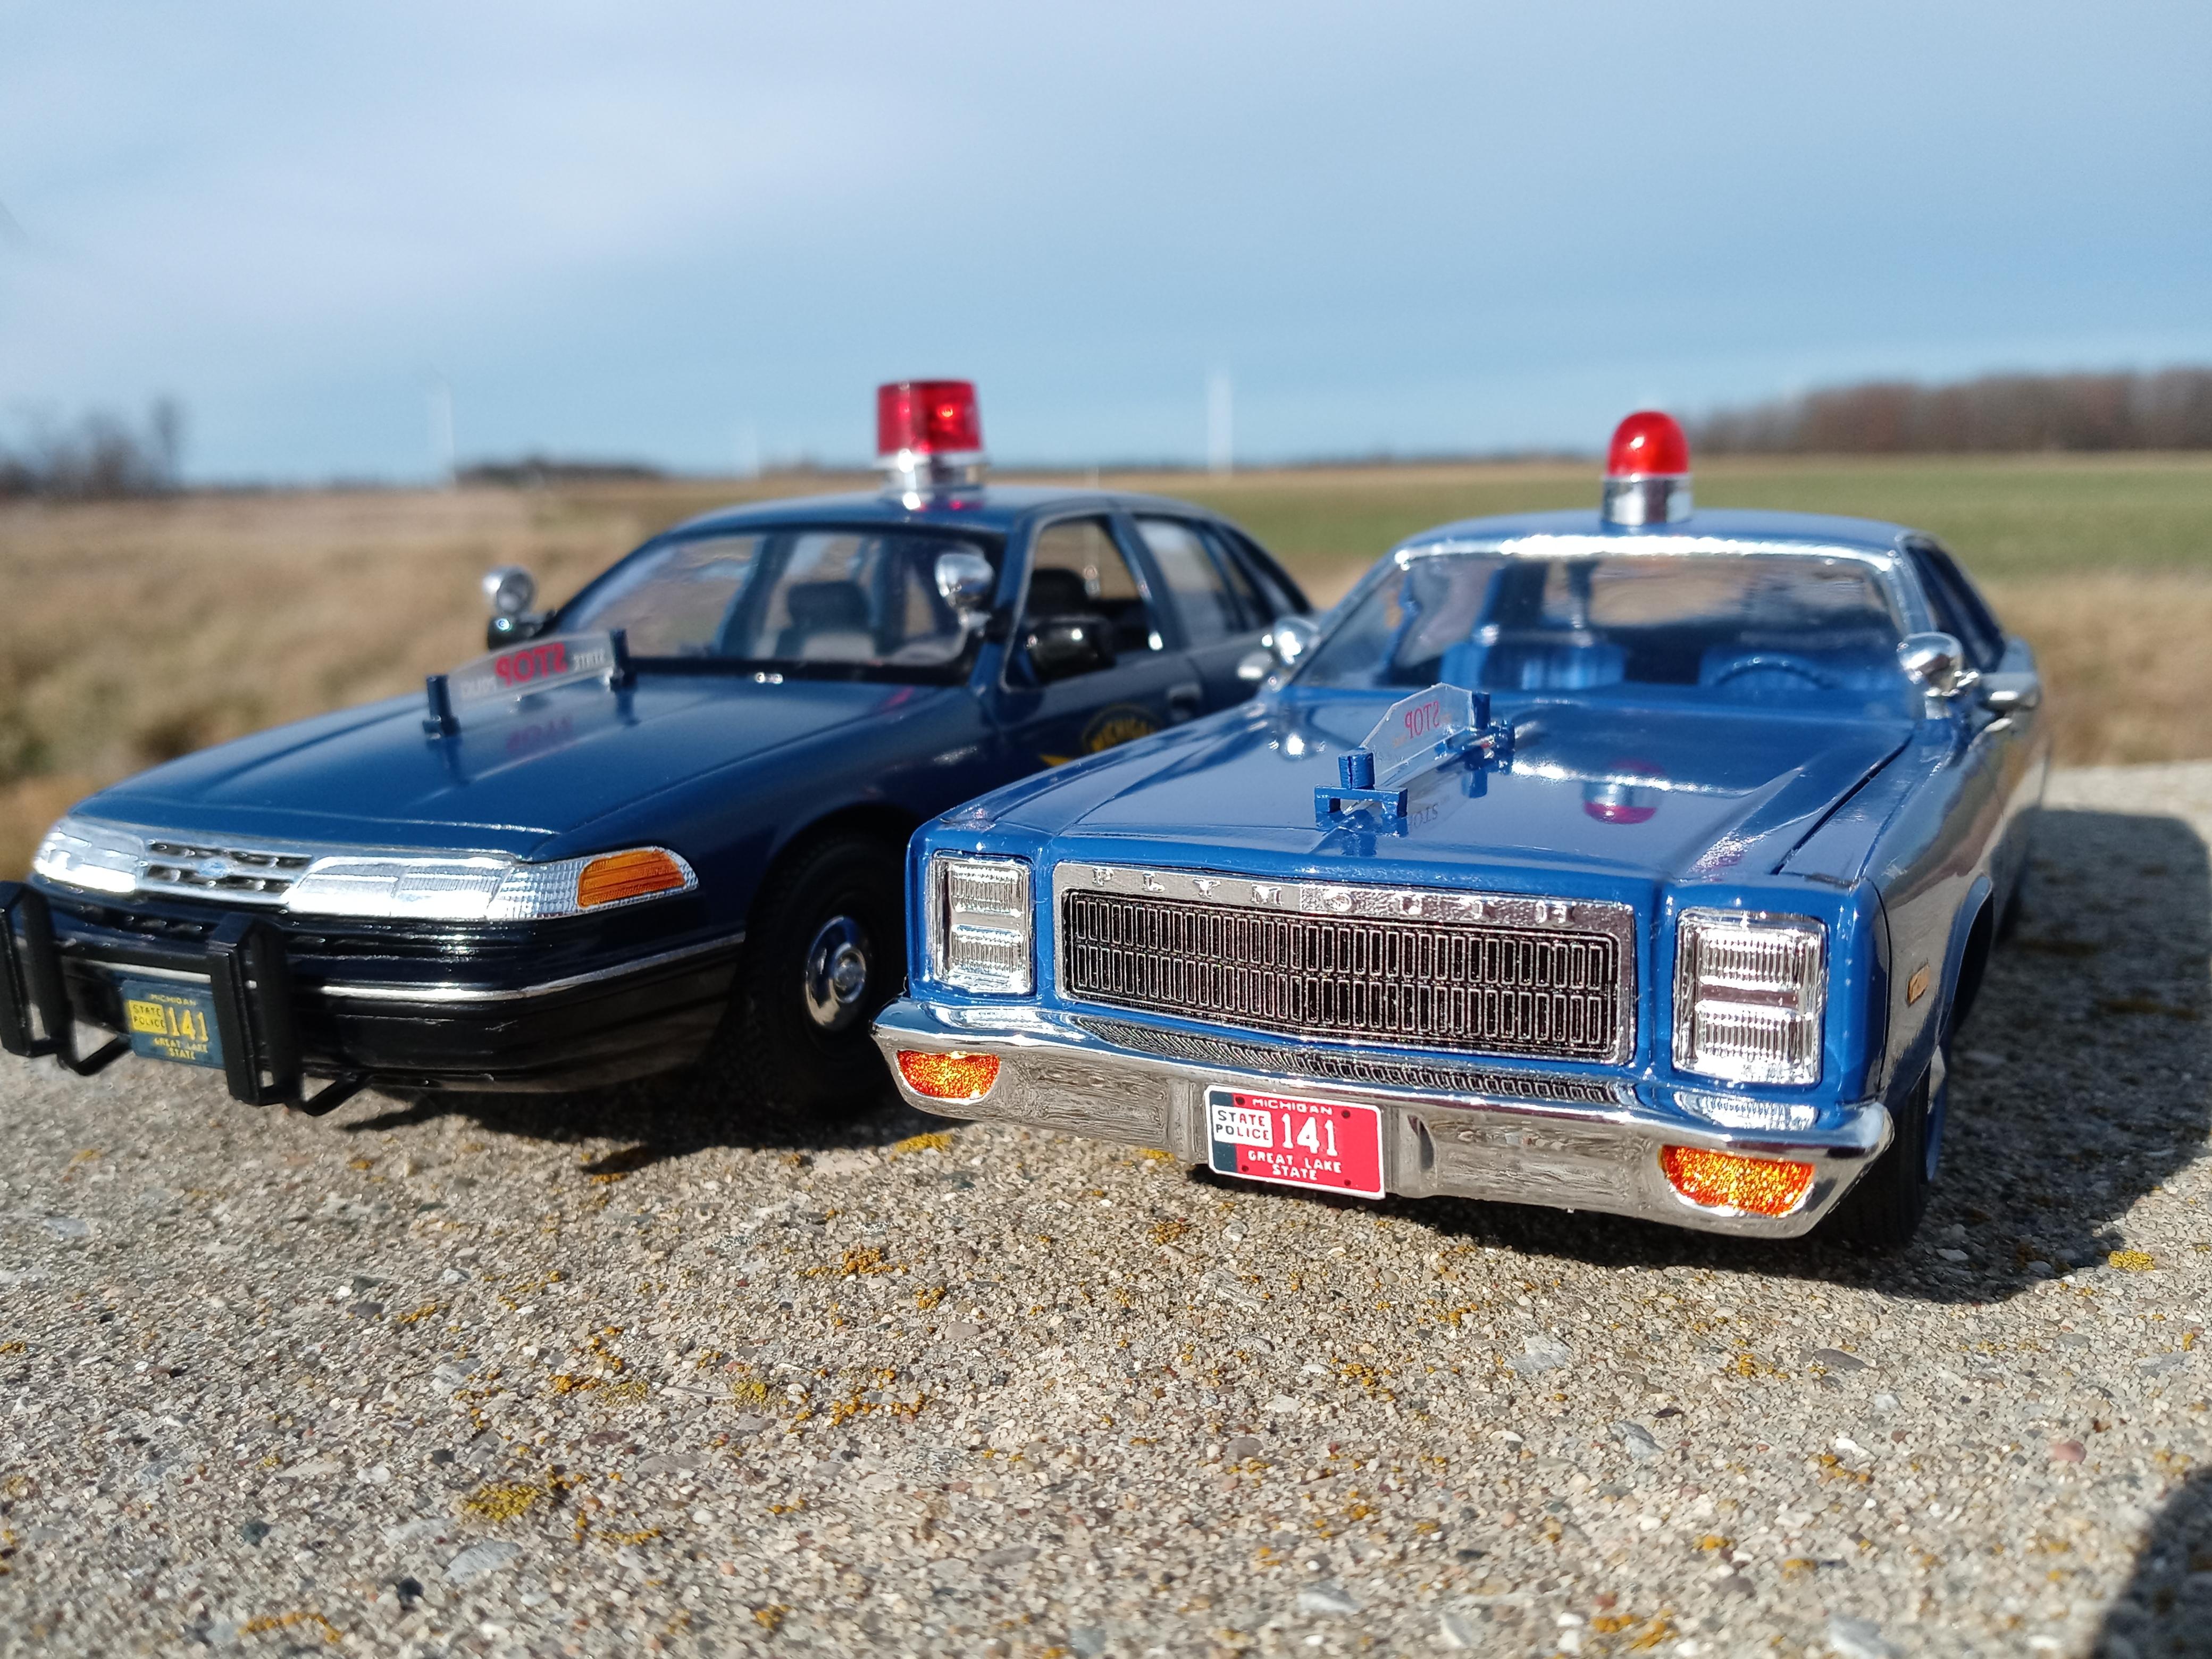
This was an MPC Dukes of Hazzard Dodge Monaco. It was treated to a Plymouth grille and 6 hole police wheels from Ra-Sti on Shapeways, a Campesino Plastics rear bumper and taillights, Chimneyville decals, 1940 Ford sedan delivery spotlights, a scratch built hood light, and a modified Johan Rambler beacon. Kit is curbside with only lower engine detail because this kit is a raging dumpster fire. ? Eventually it's getting an antenna and front bumper guards. Maybe. It's numbered 141, meaning it is based out of Post 14 (now defunct Ithaca post) car number 1, just like the 1997 Ford I built 6 or 7 years ago. So they're the same unit two decades removed.

-
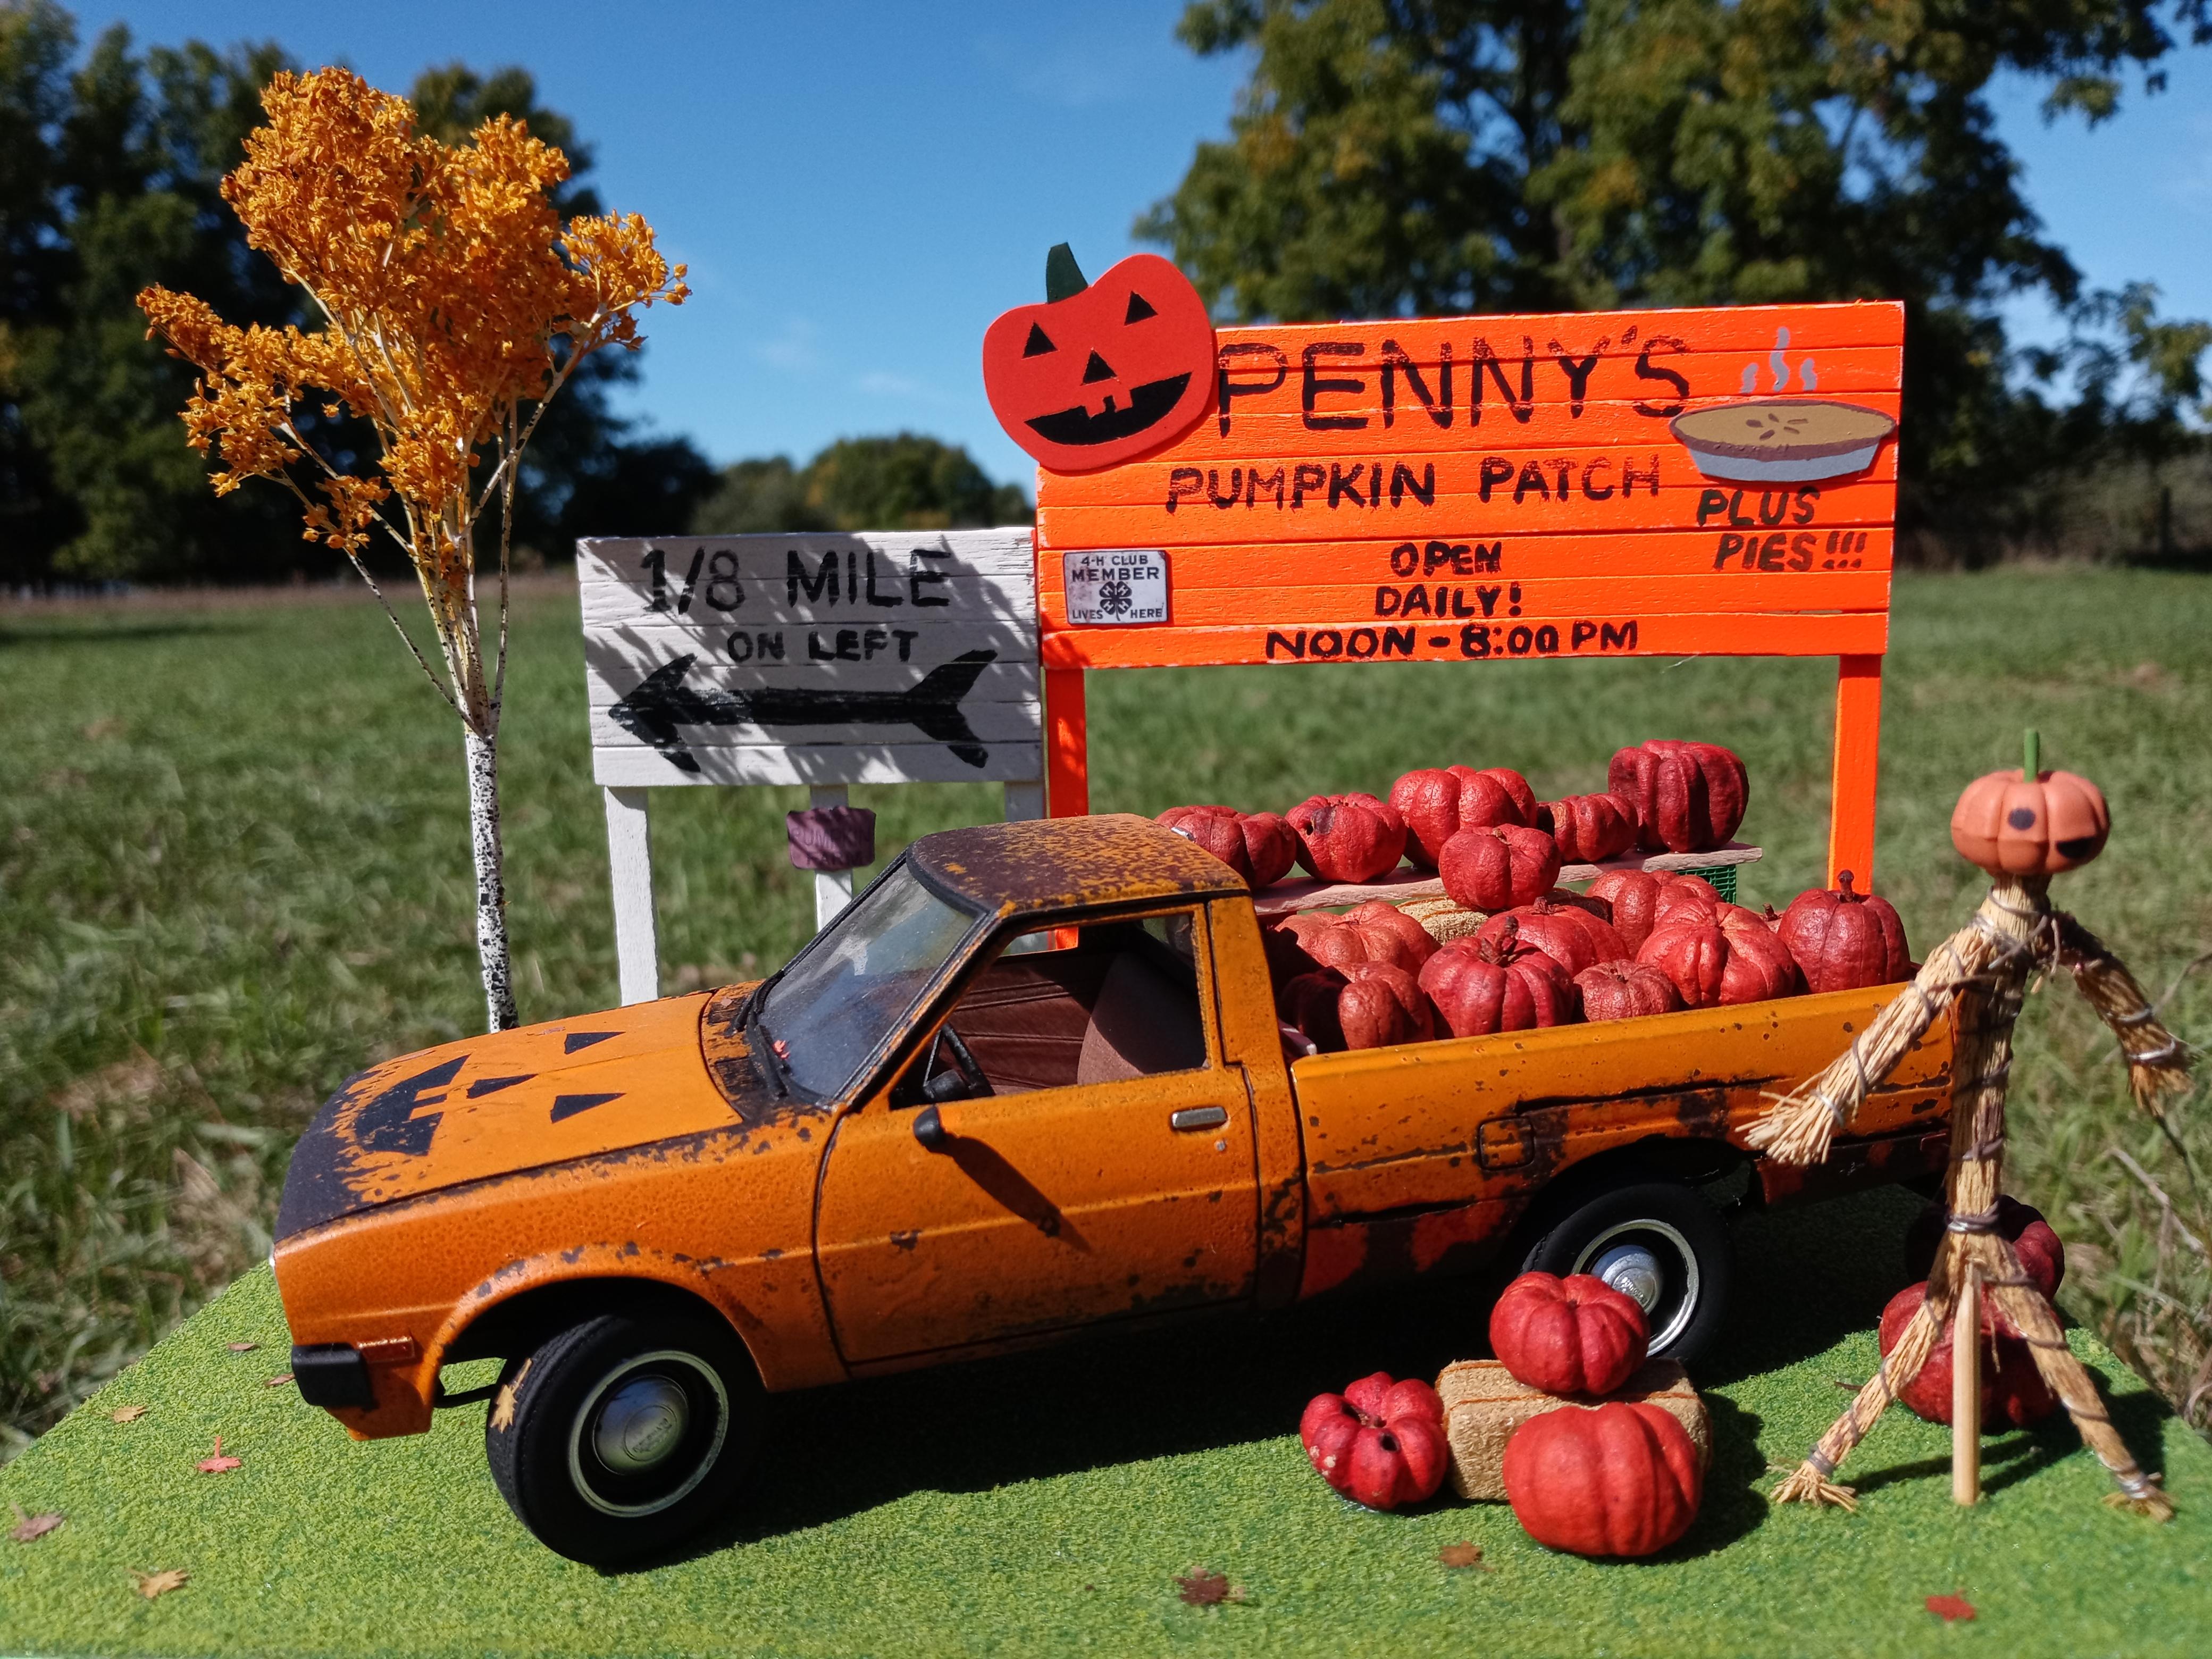
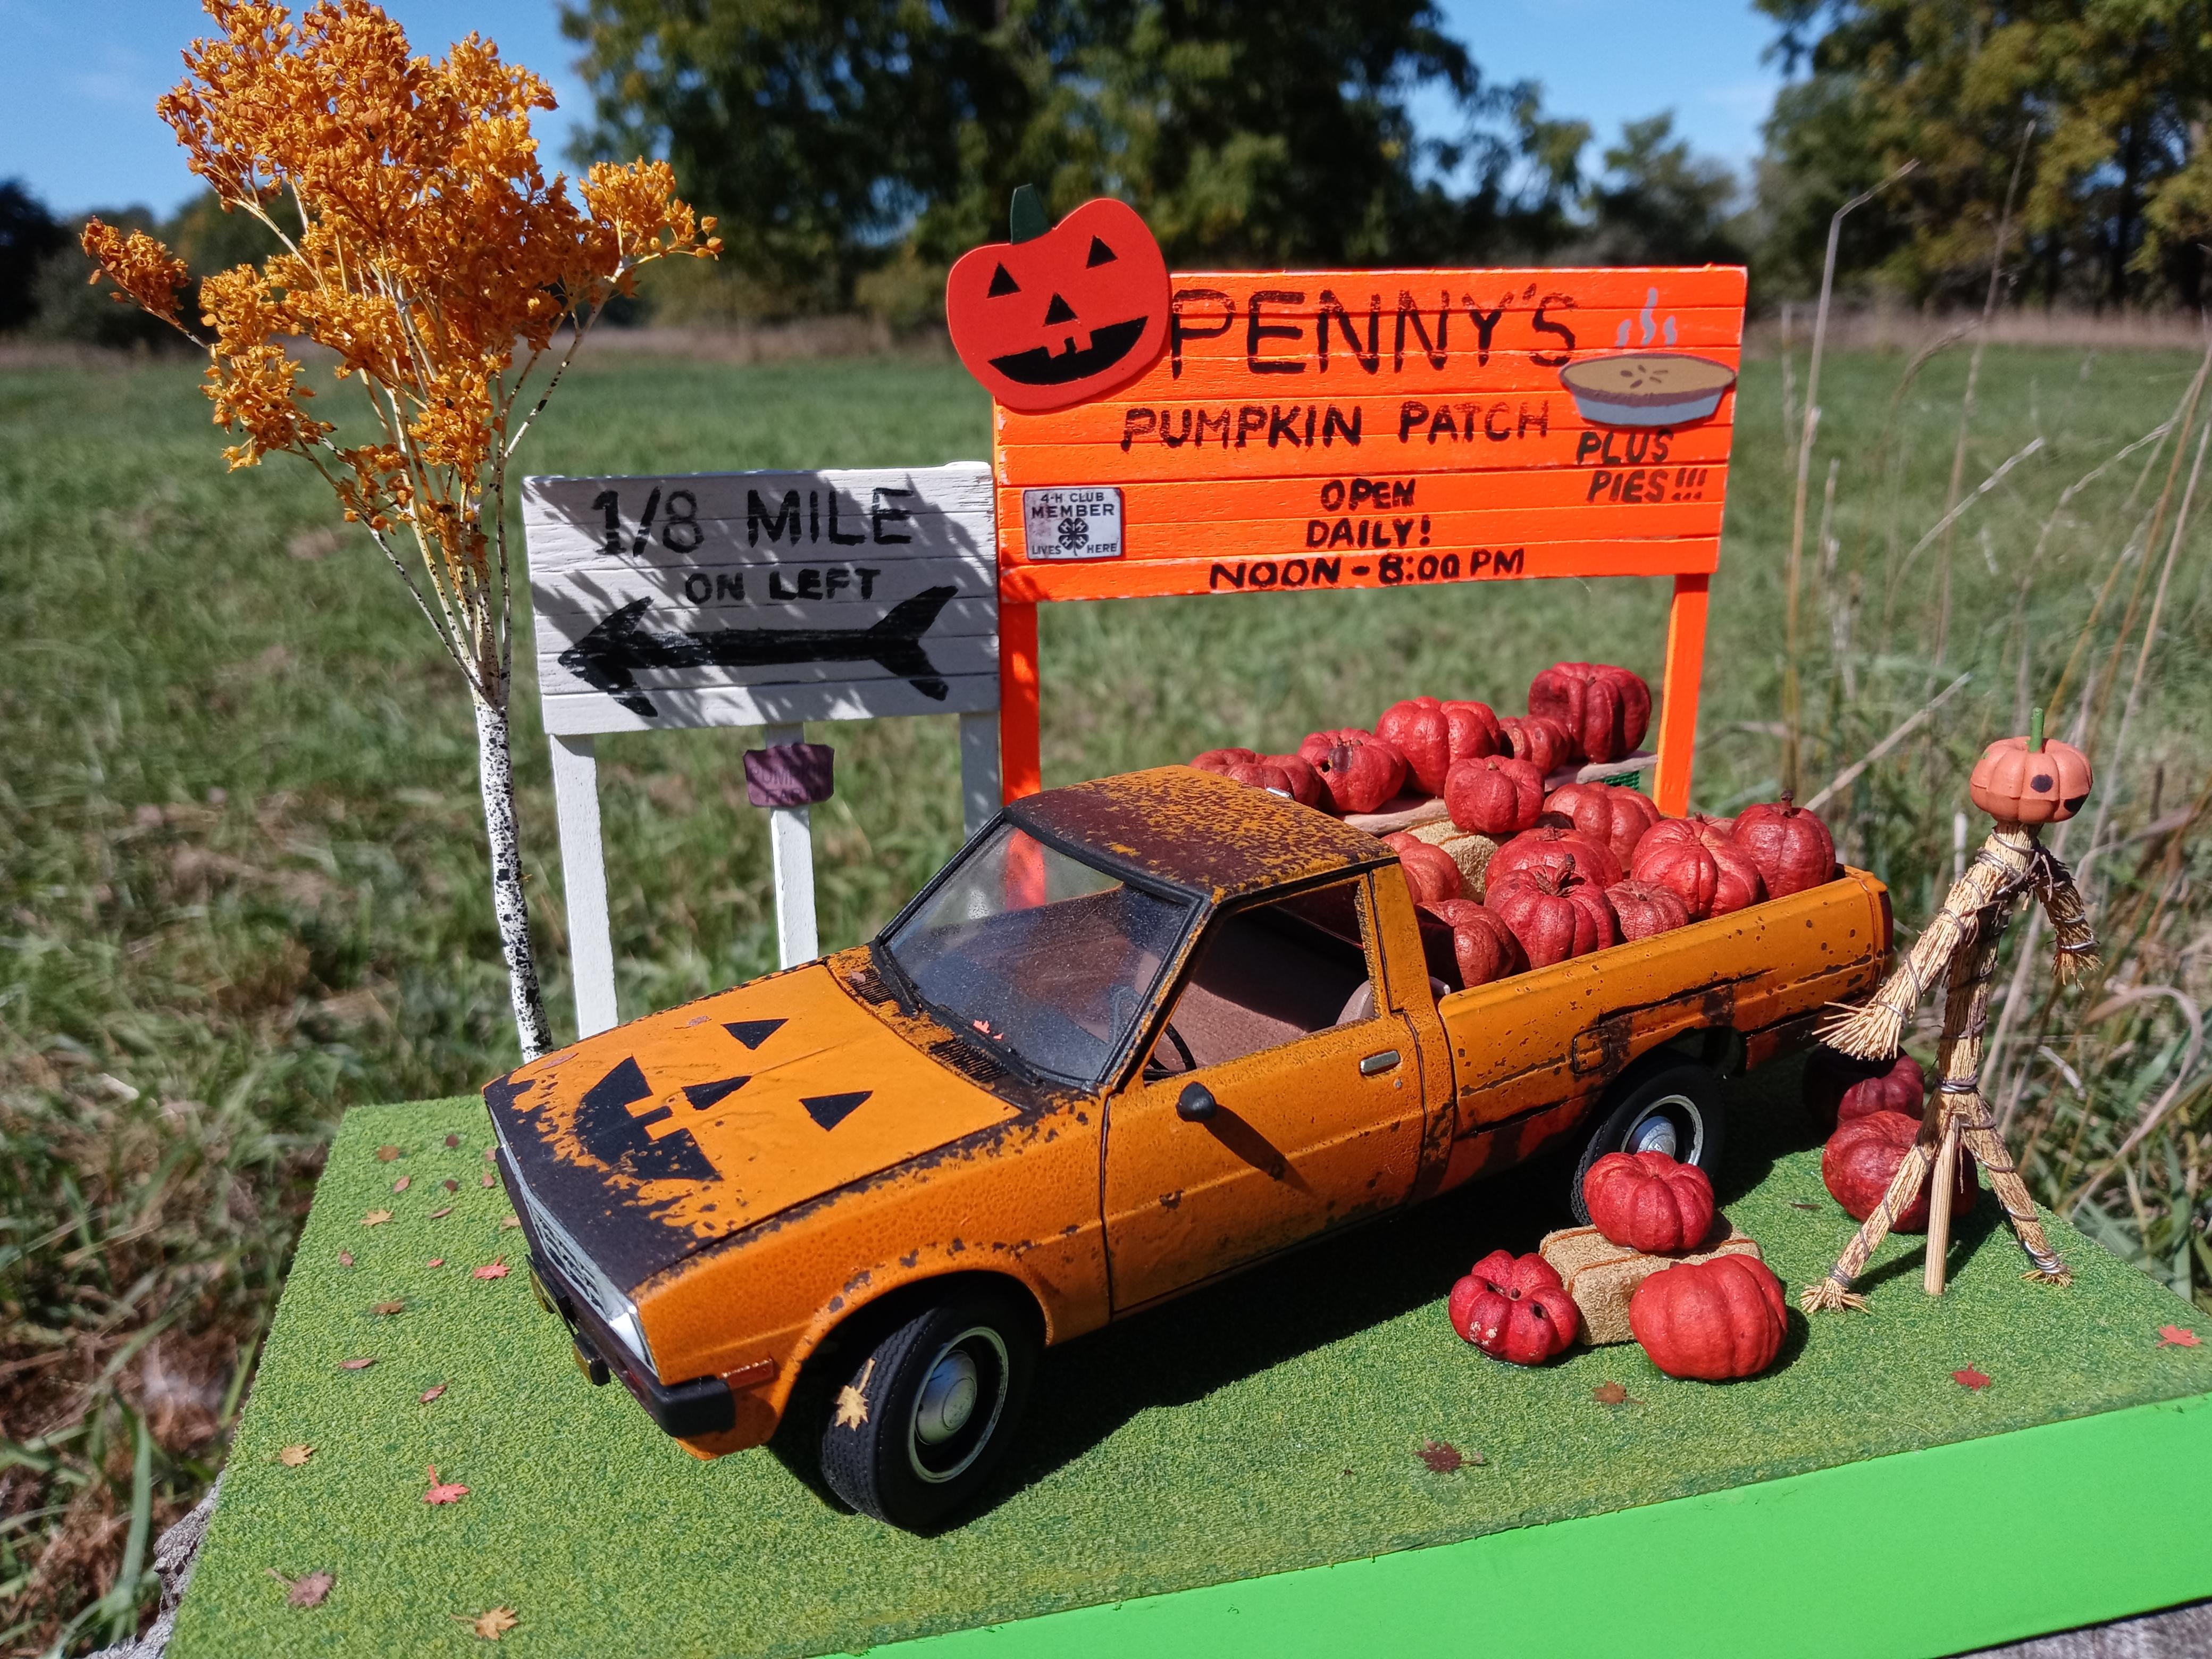
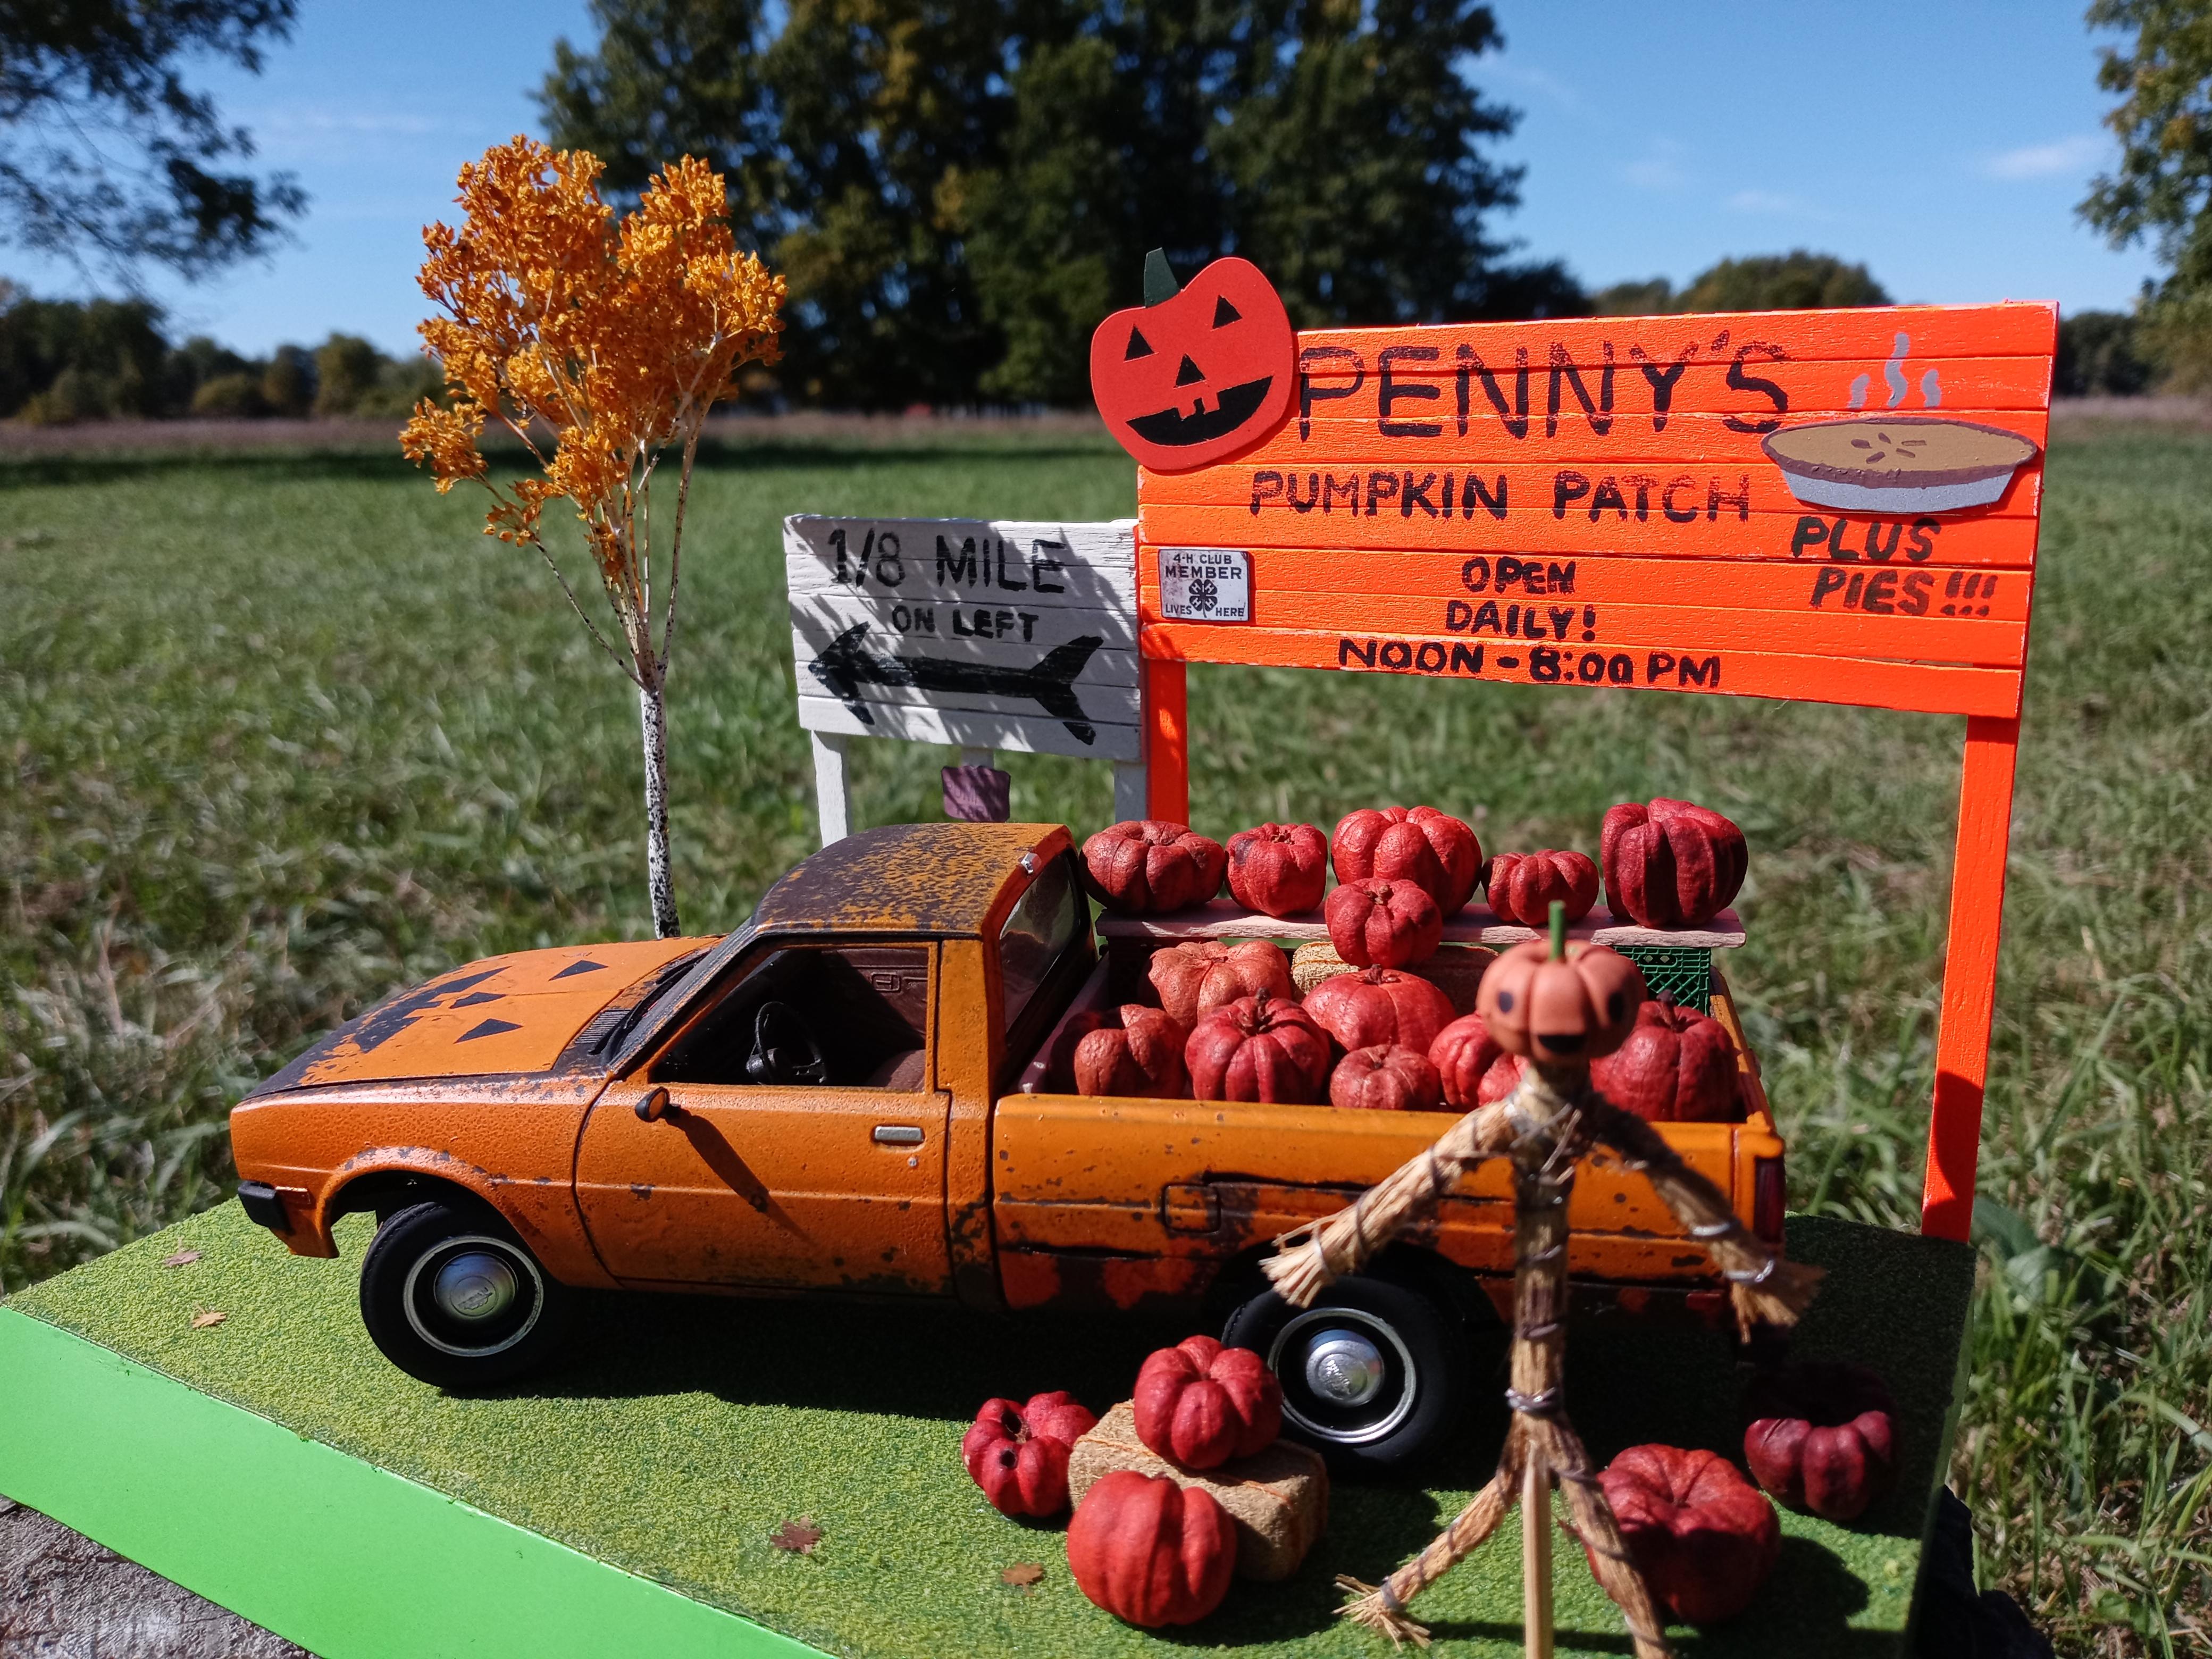
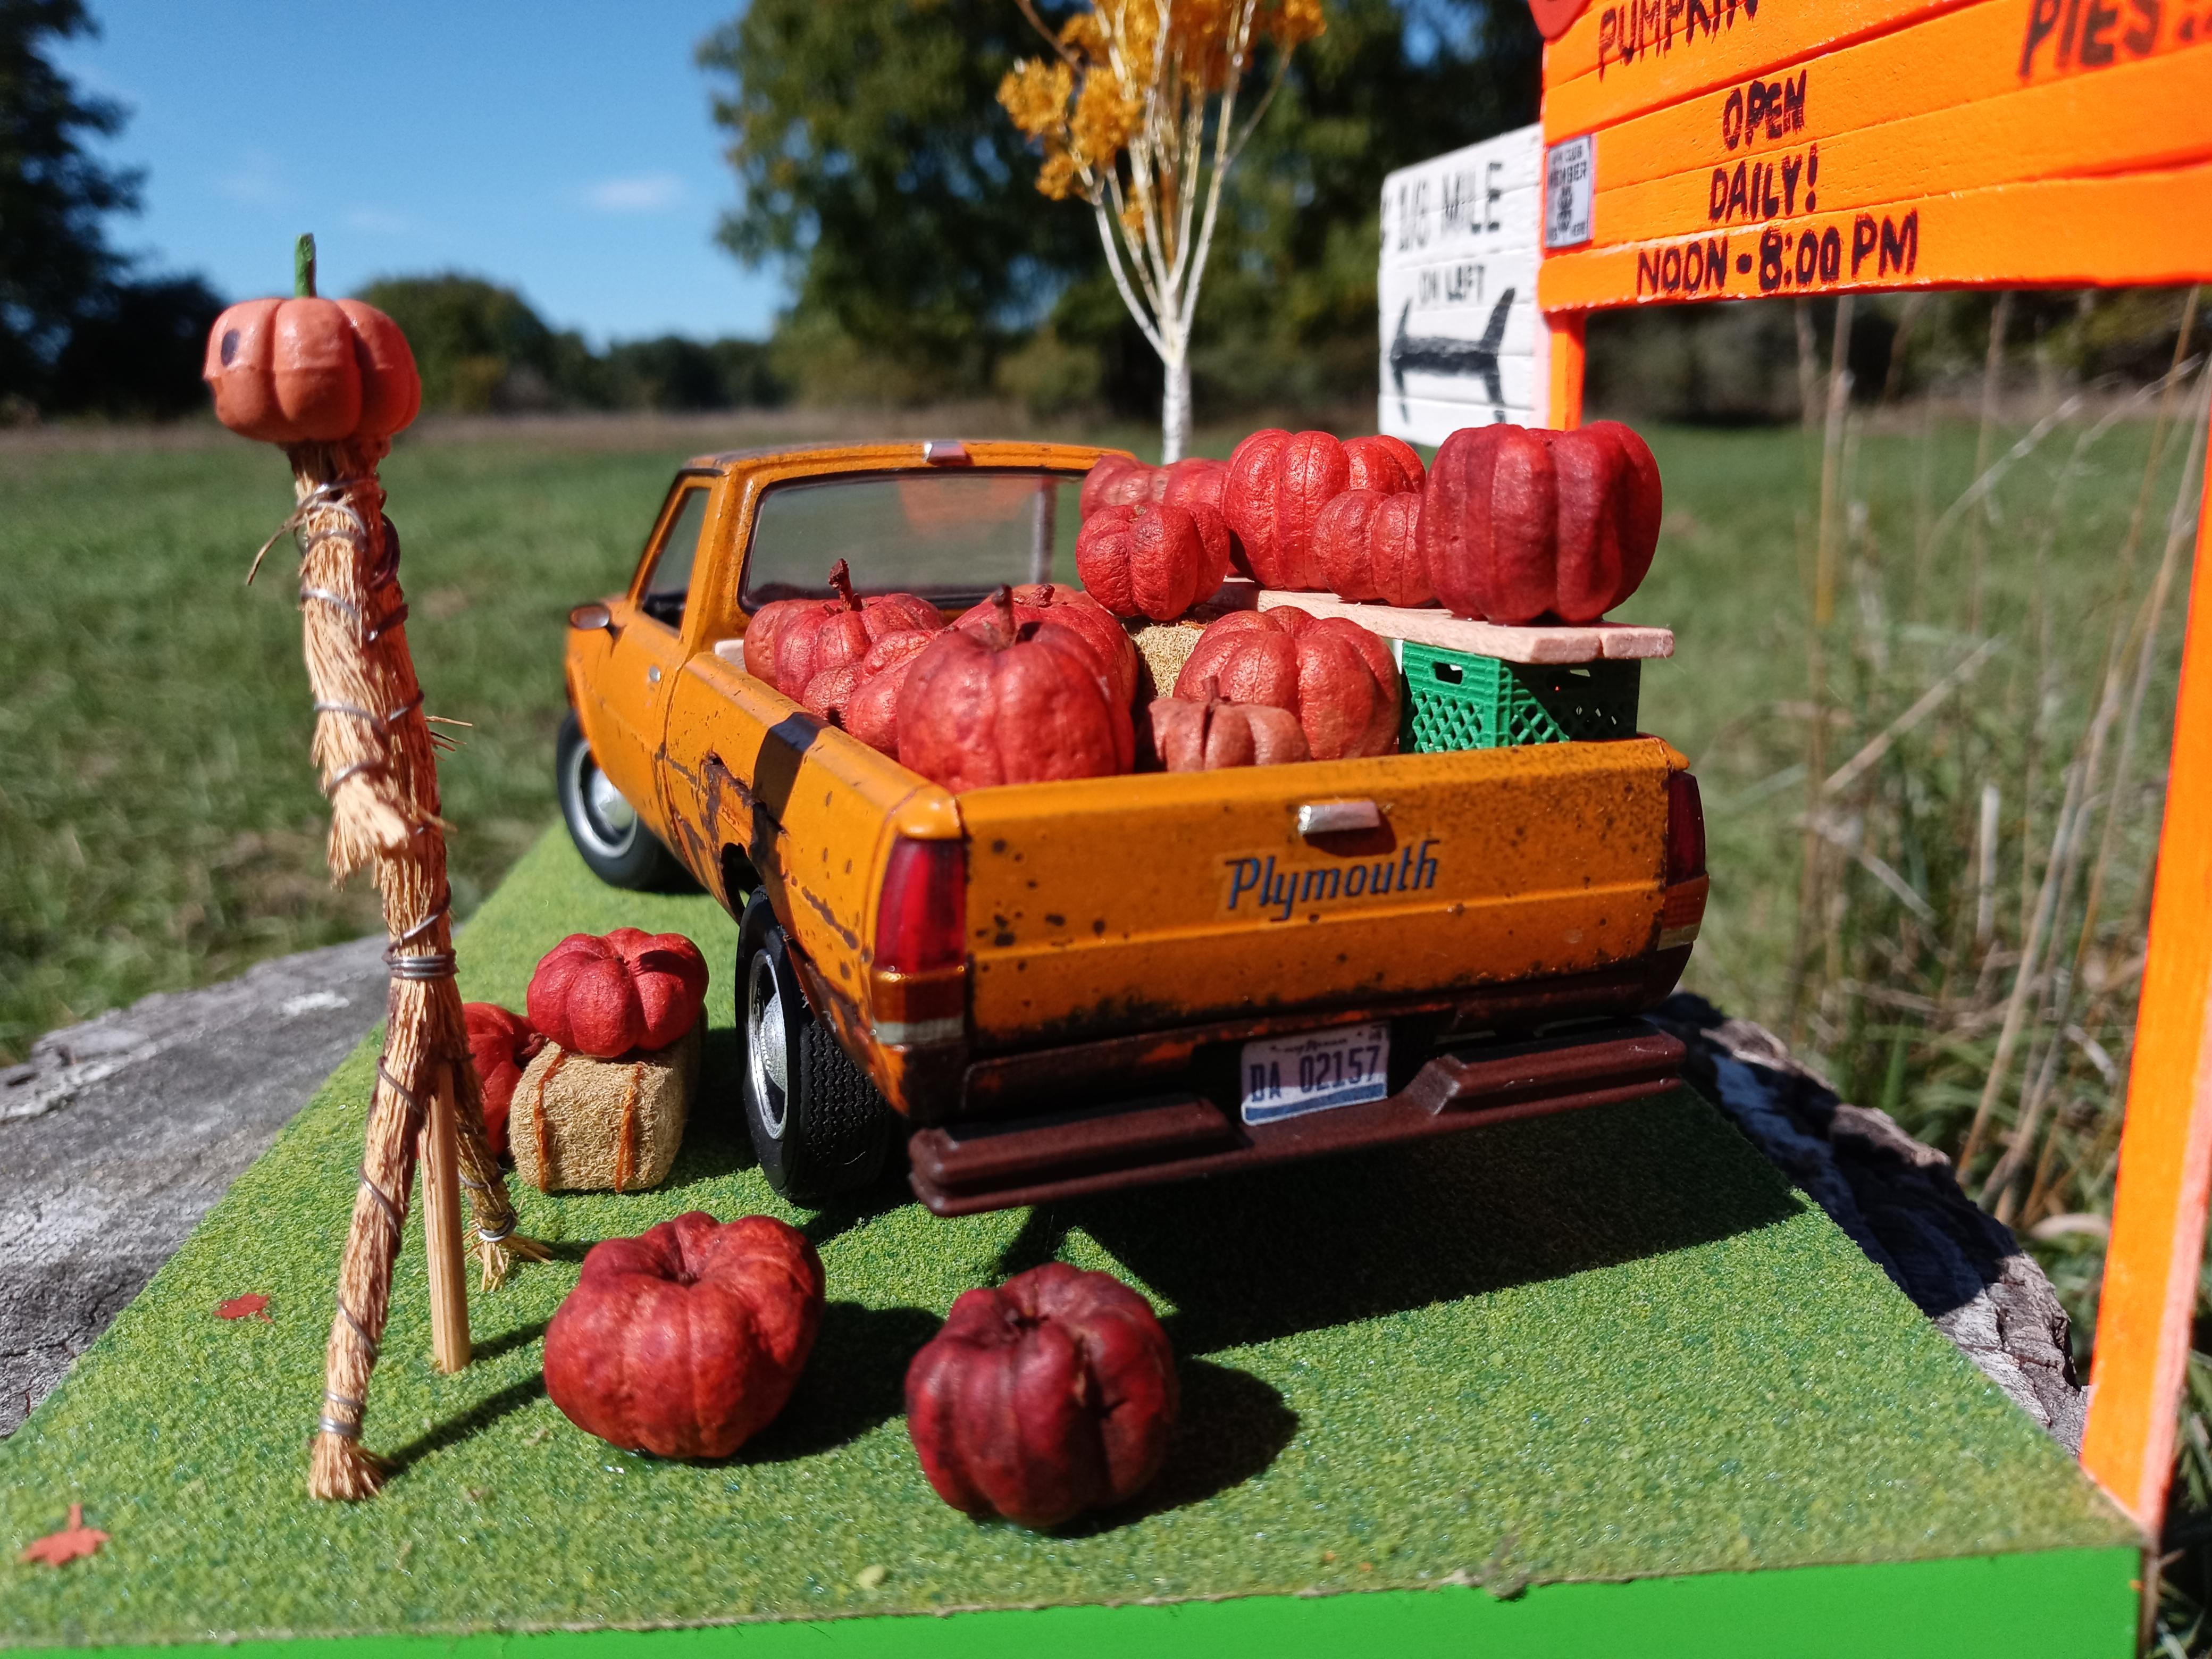
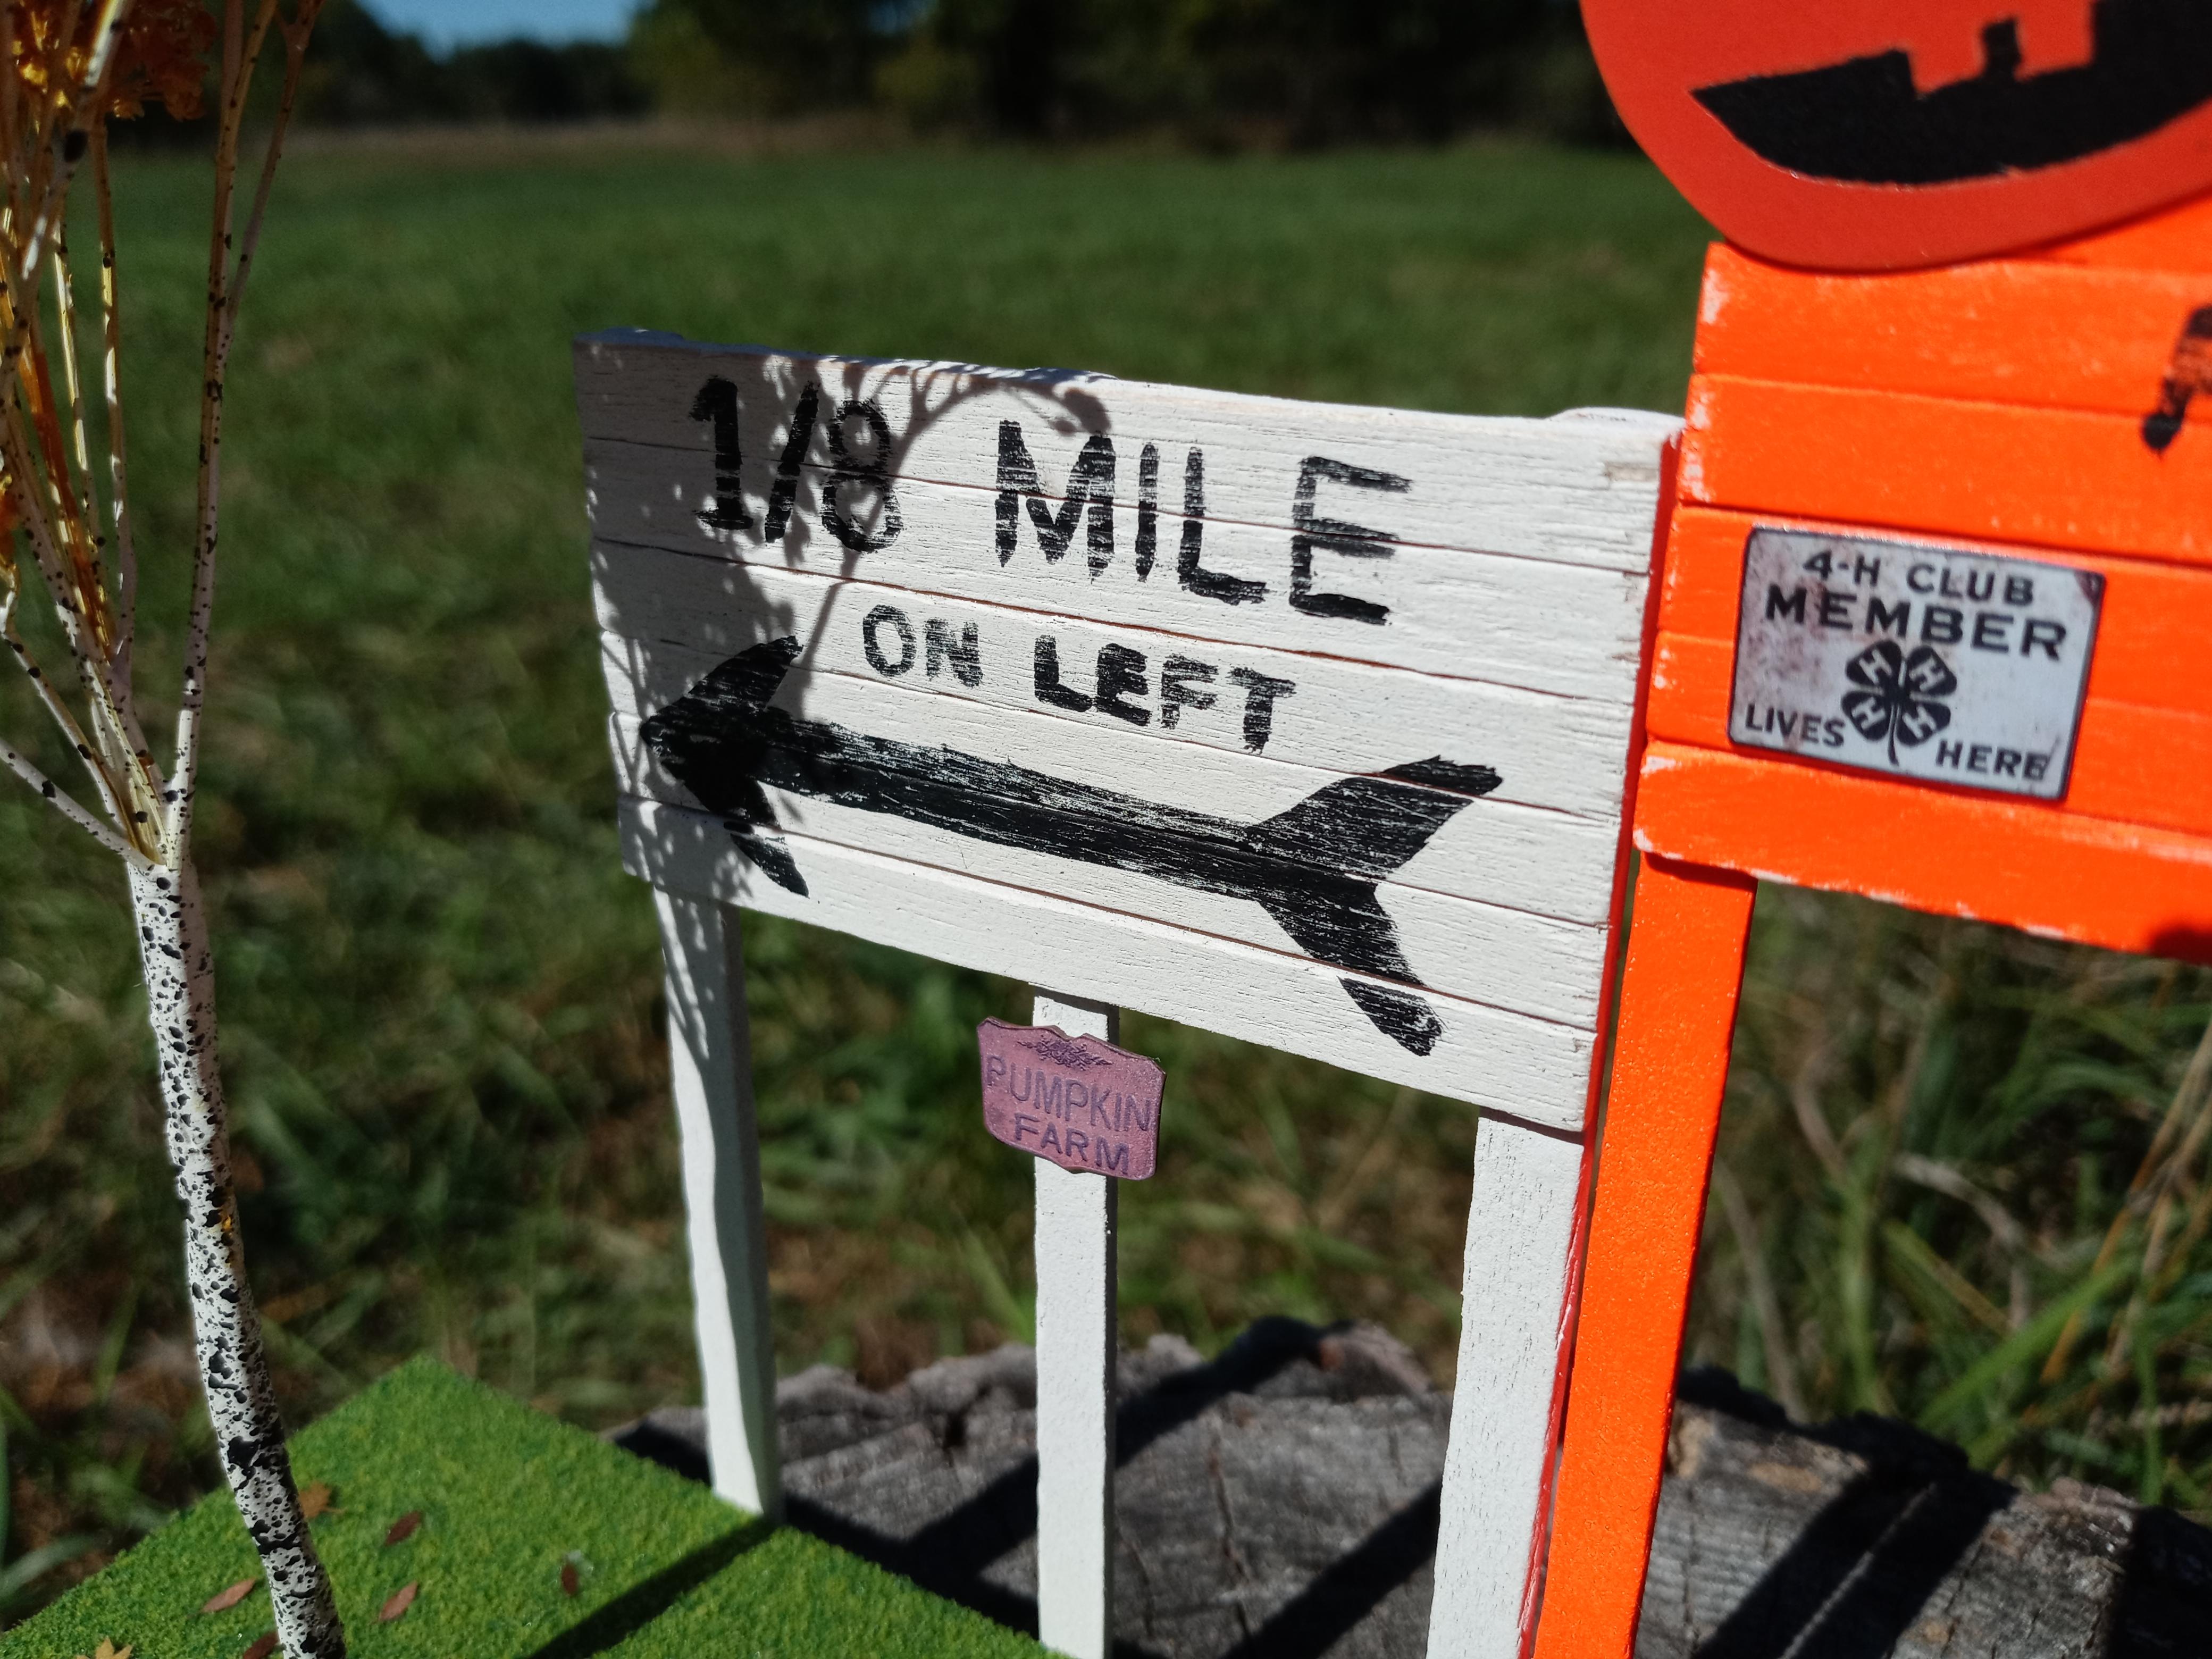
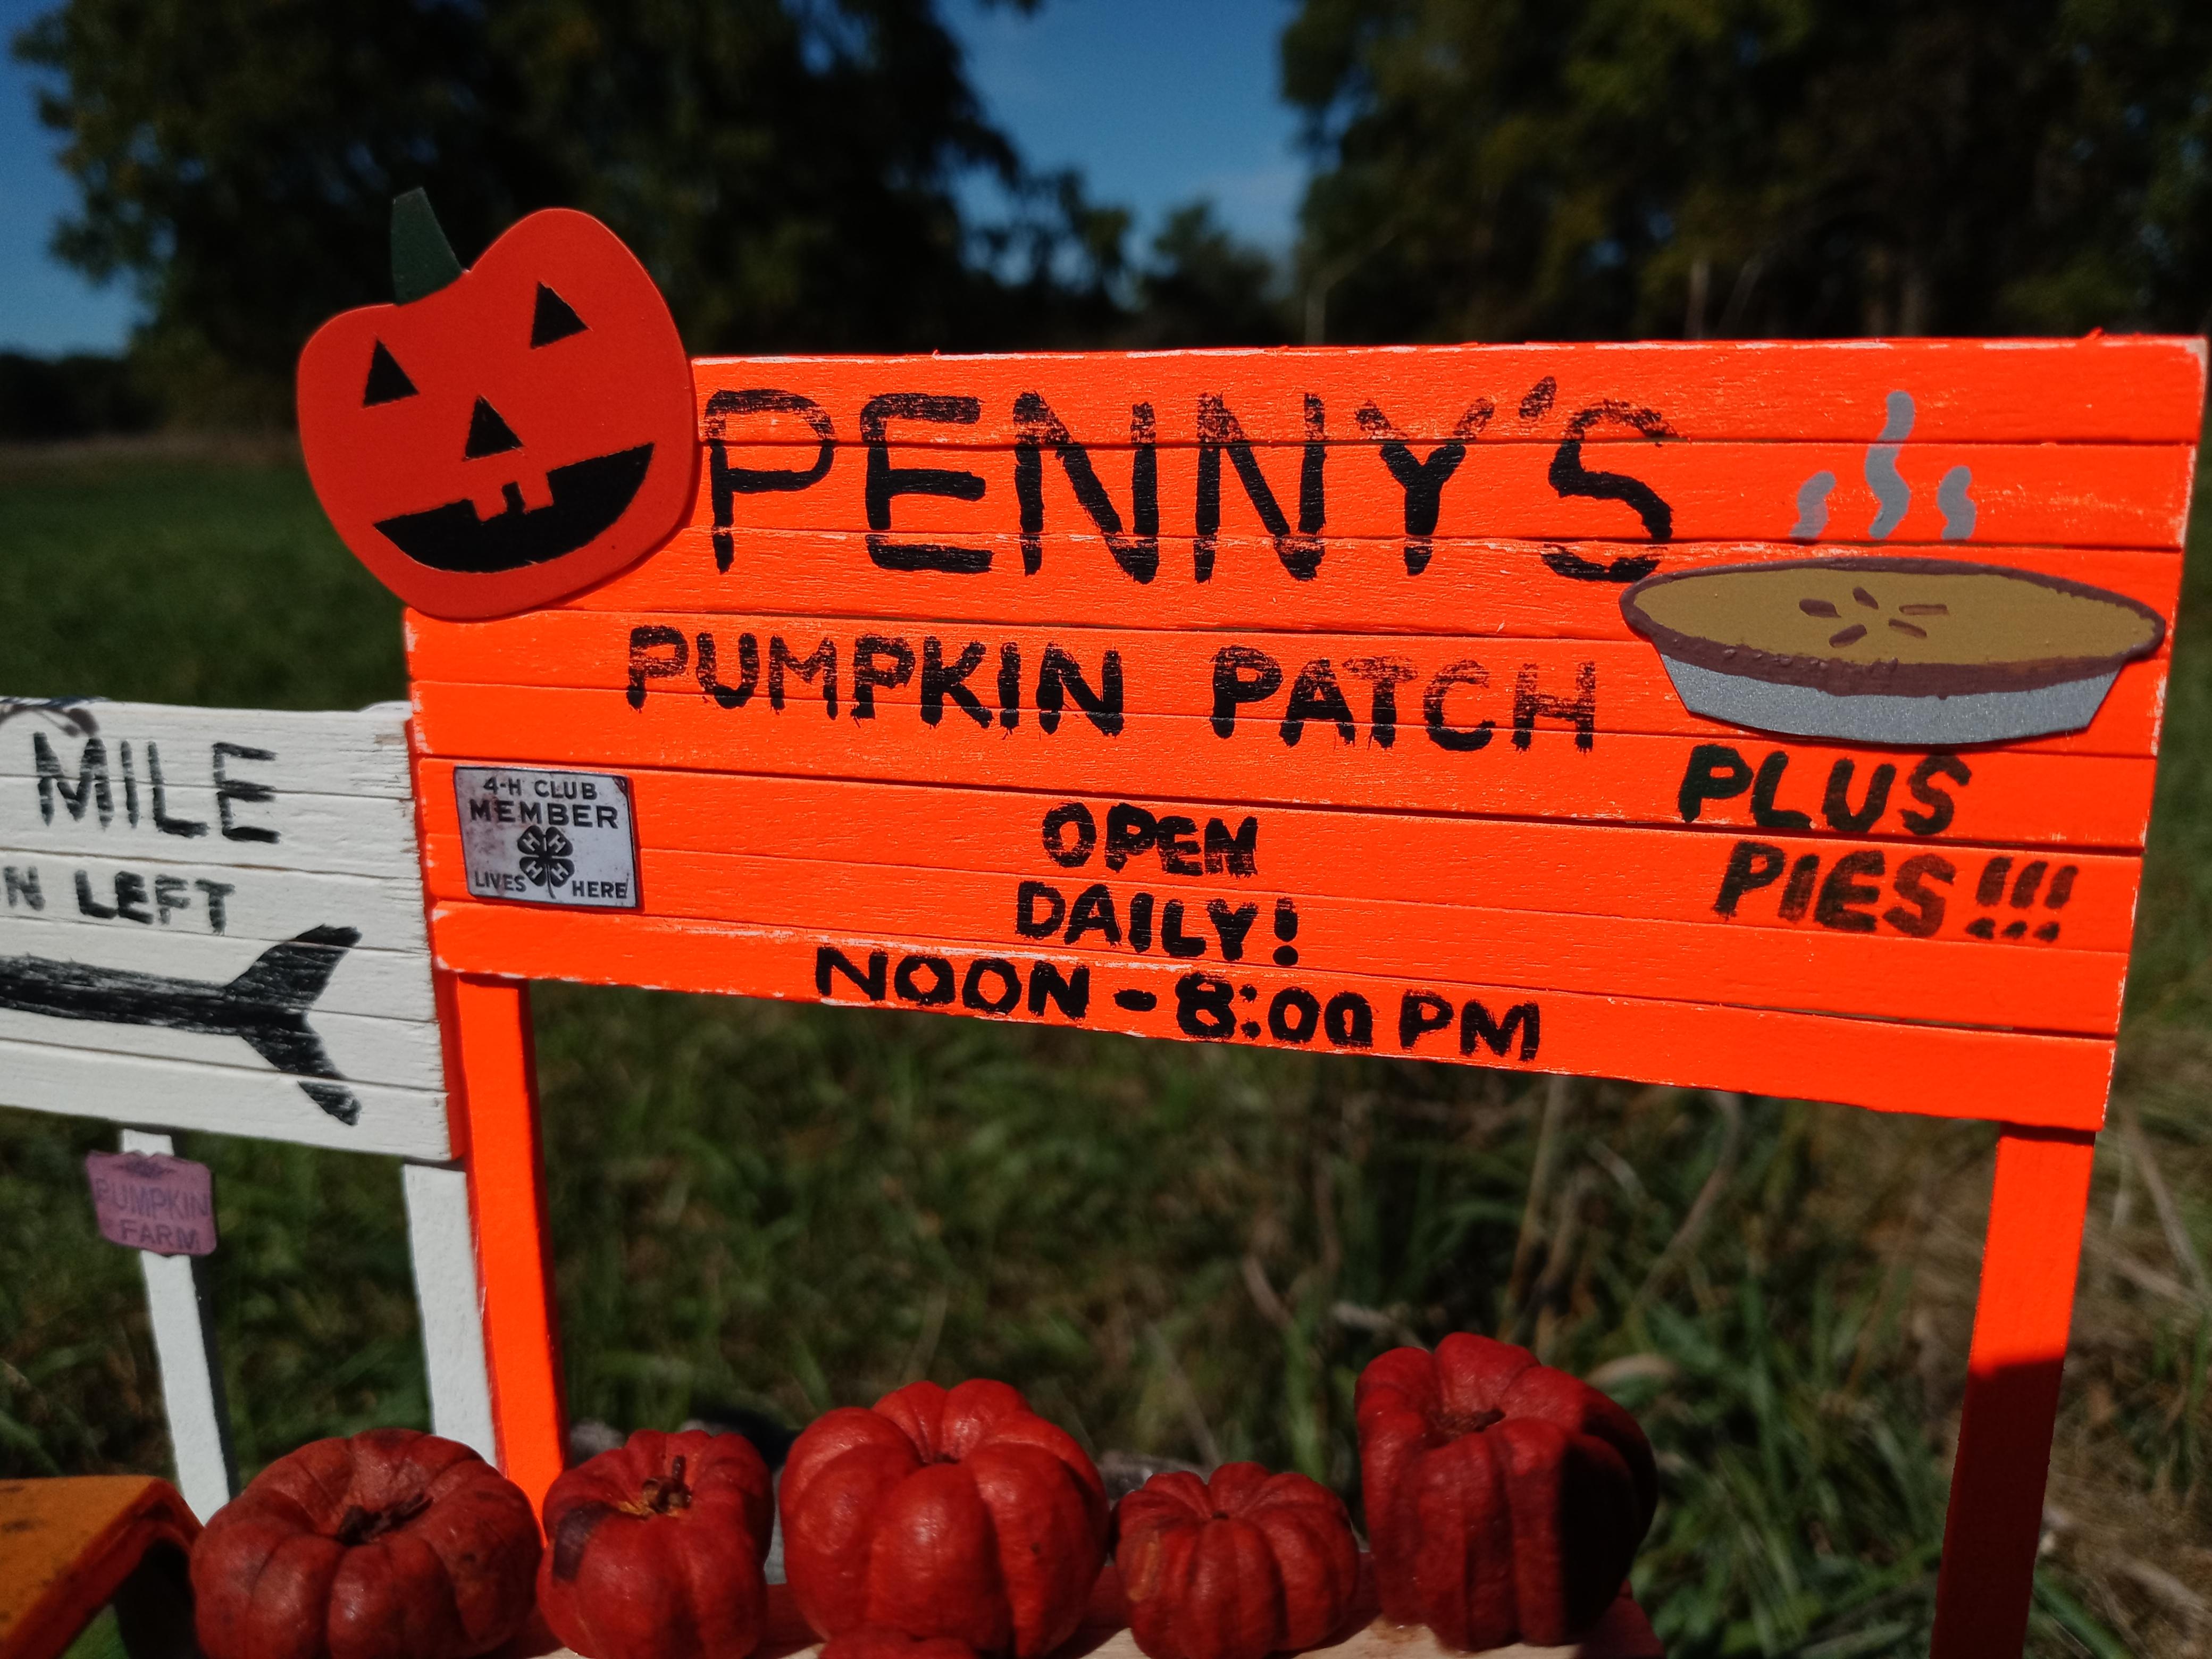
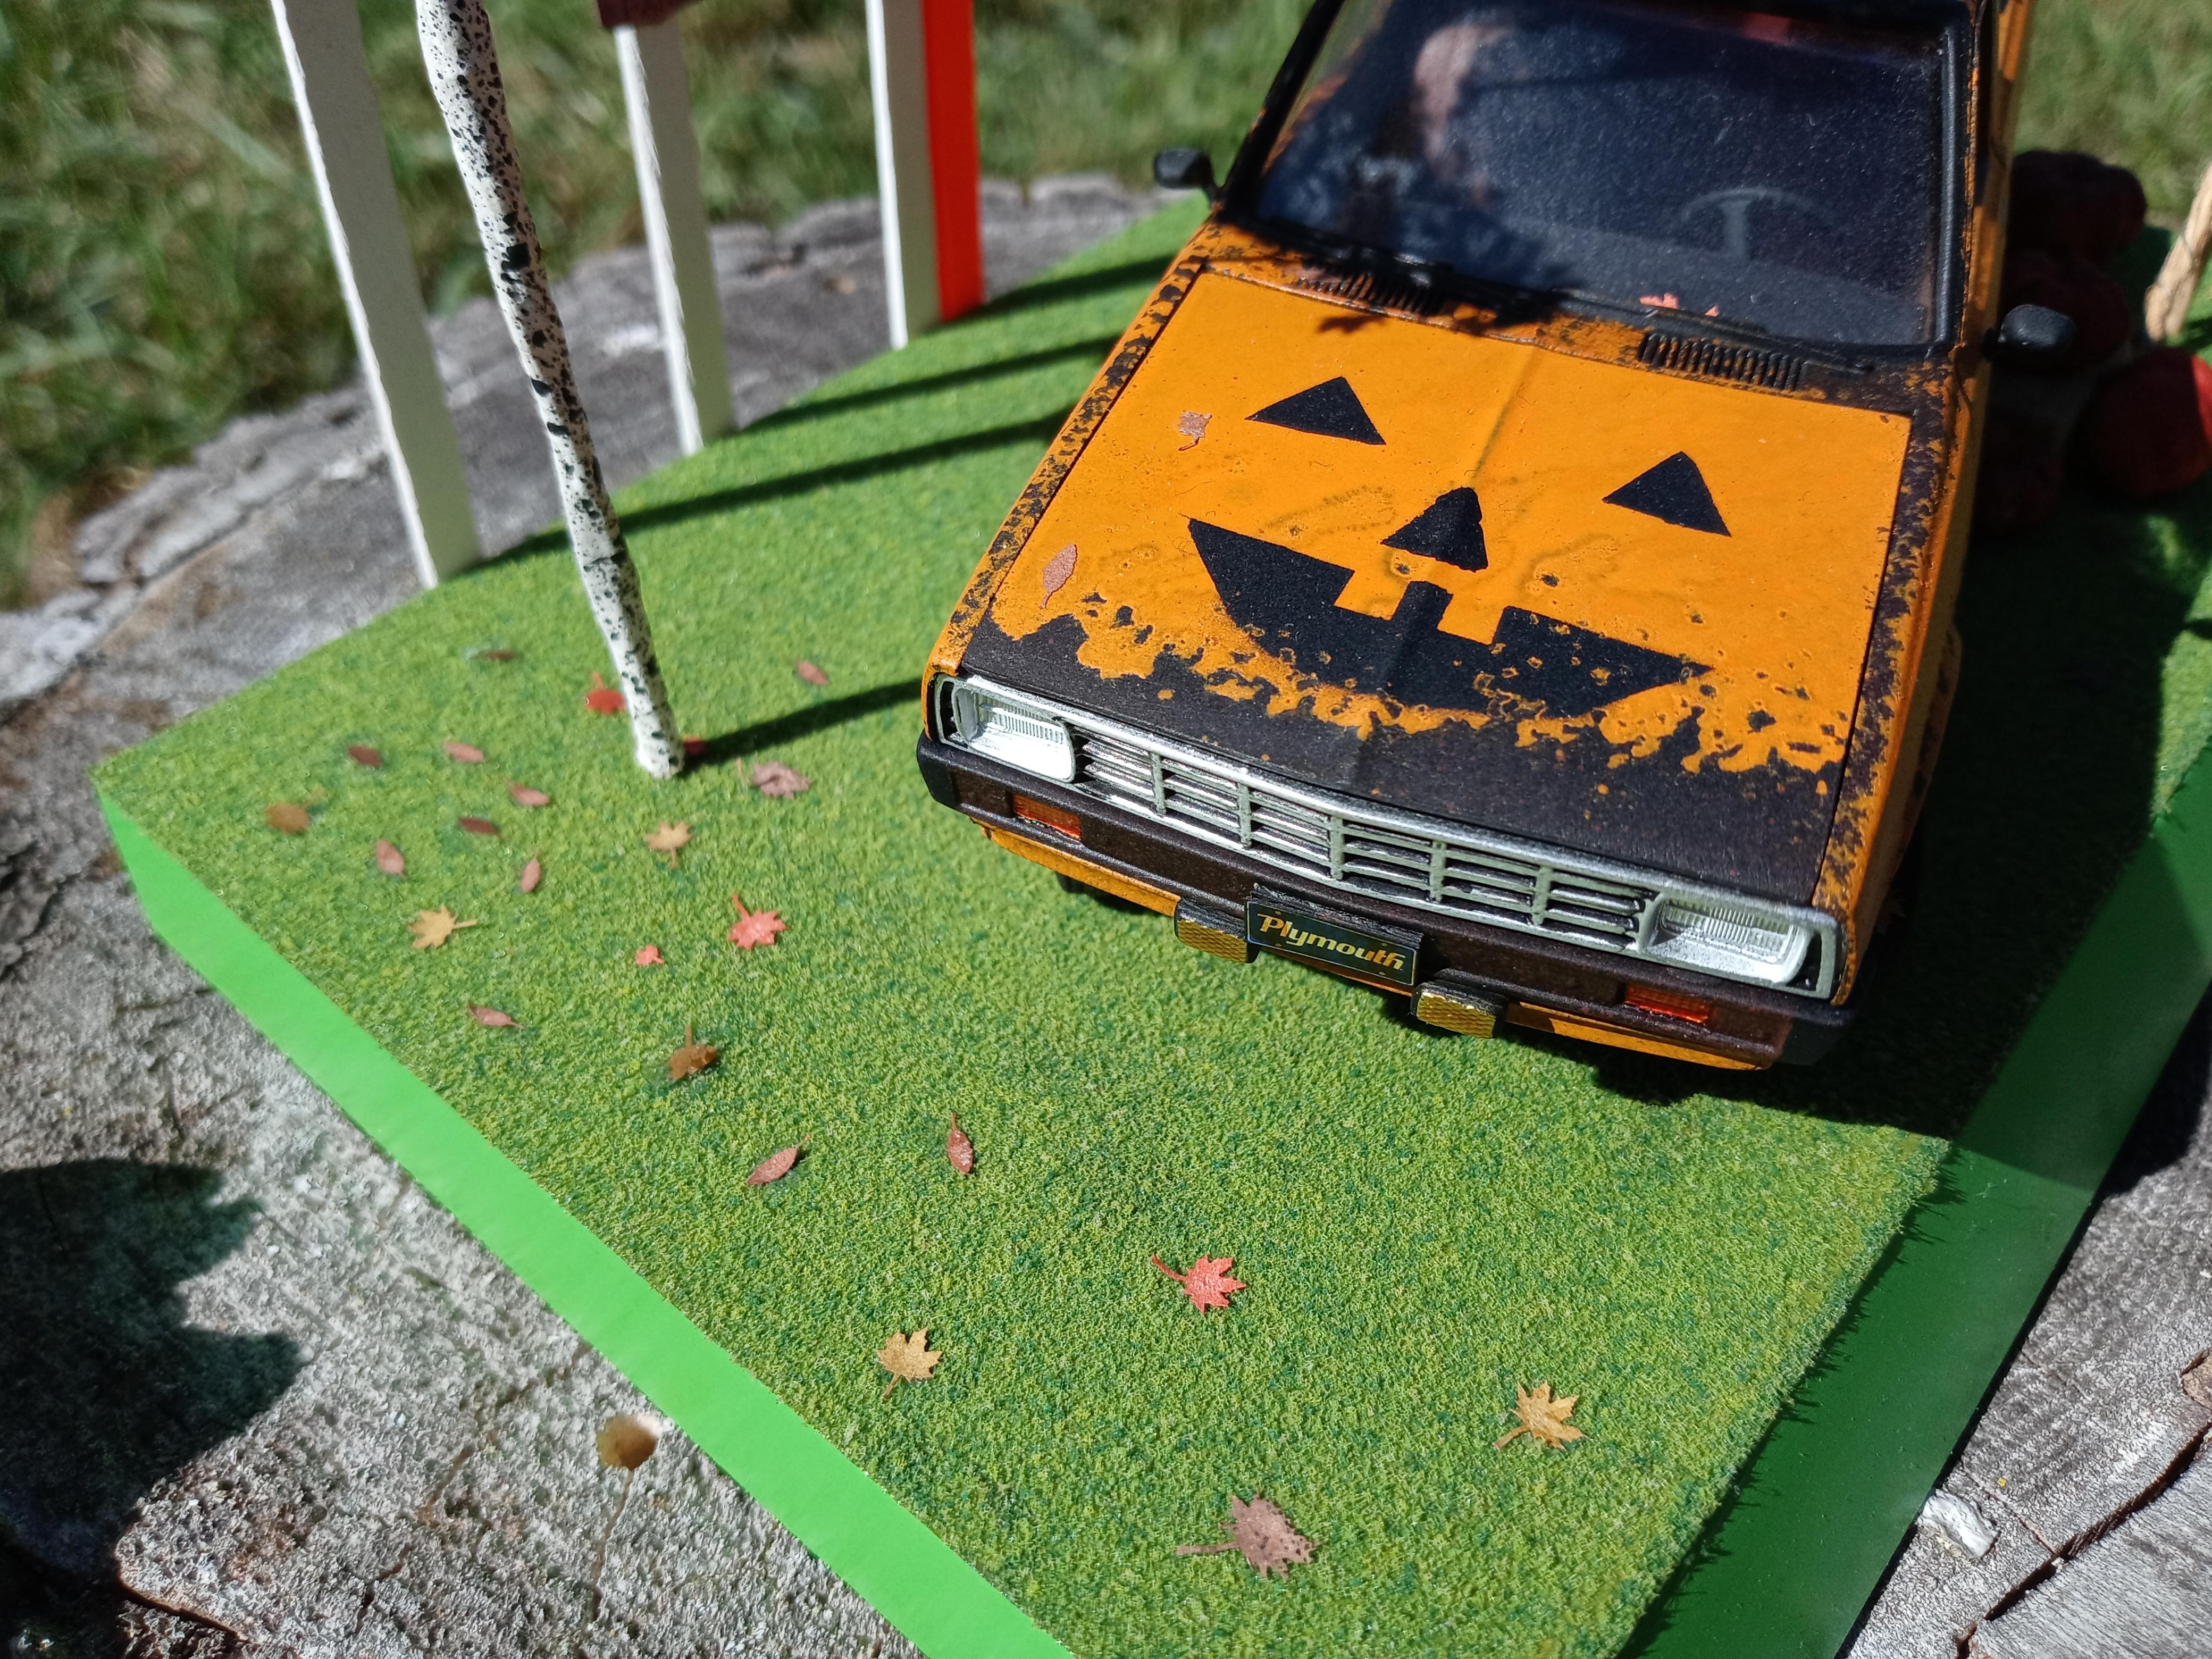
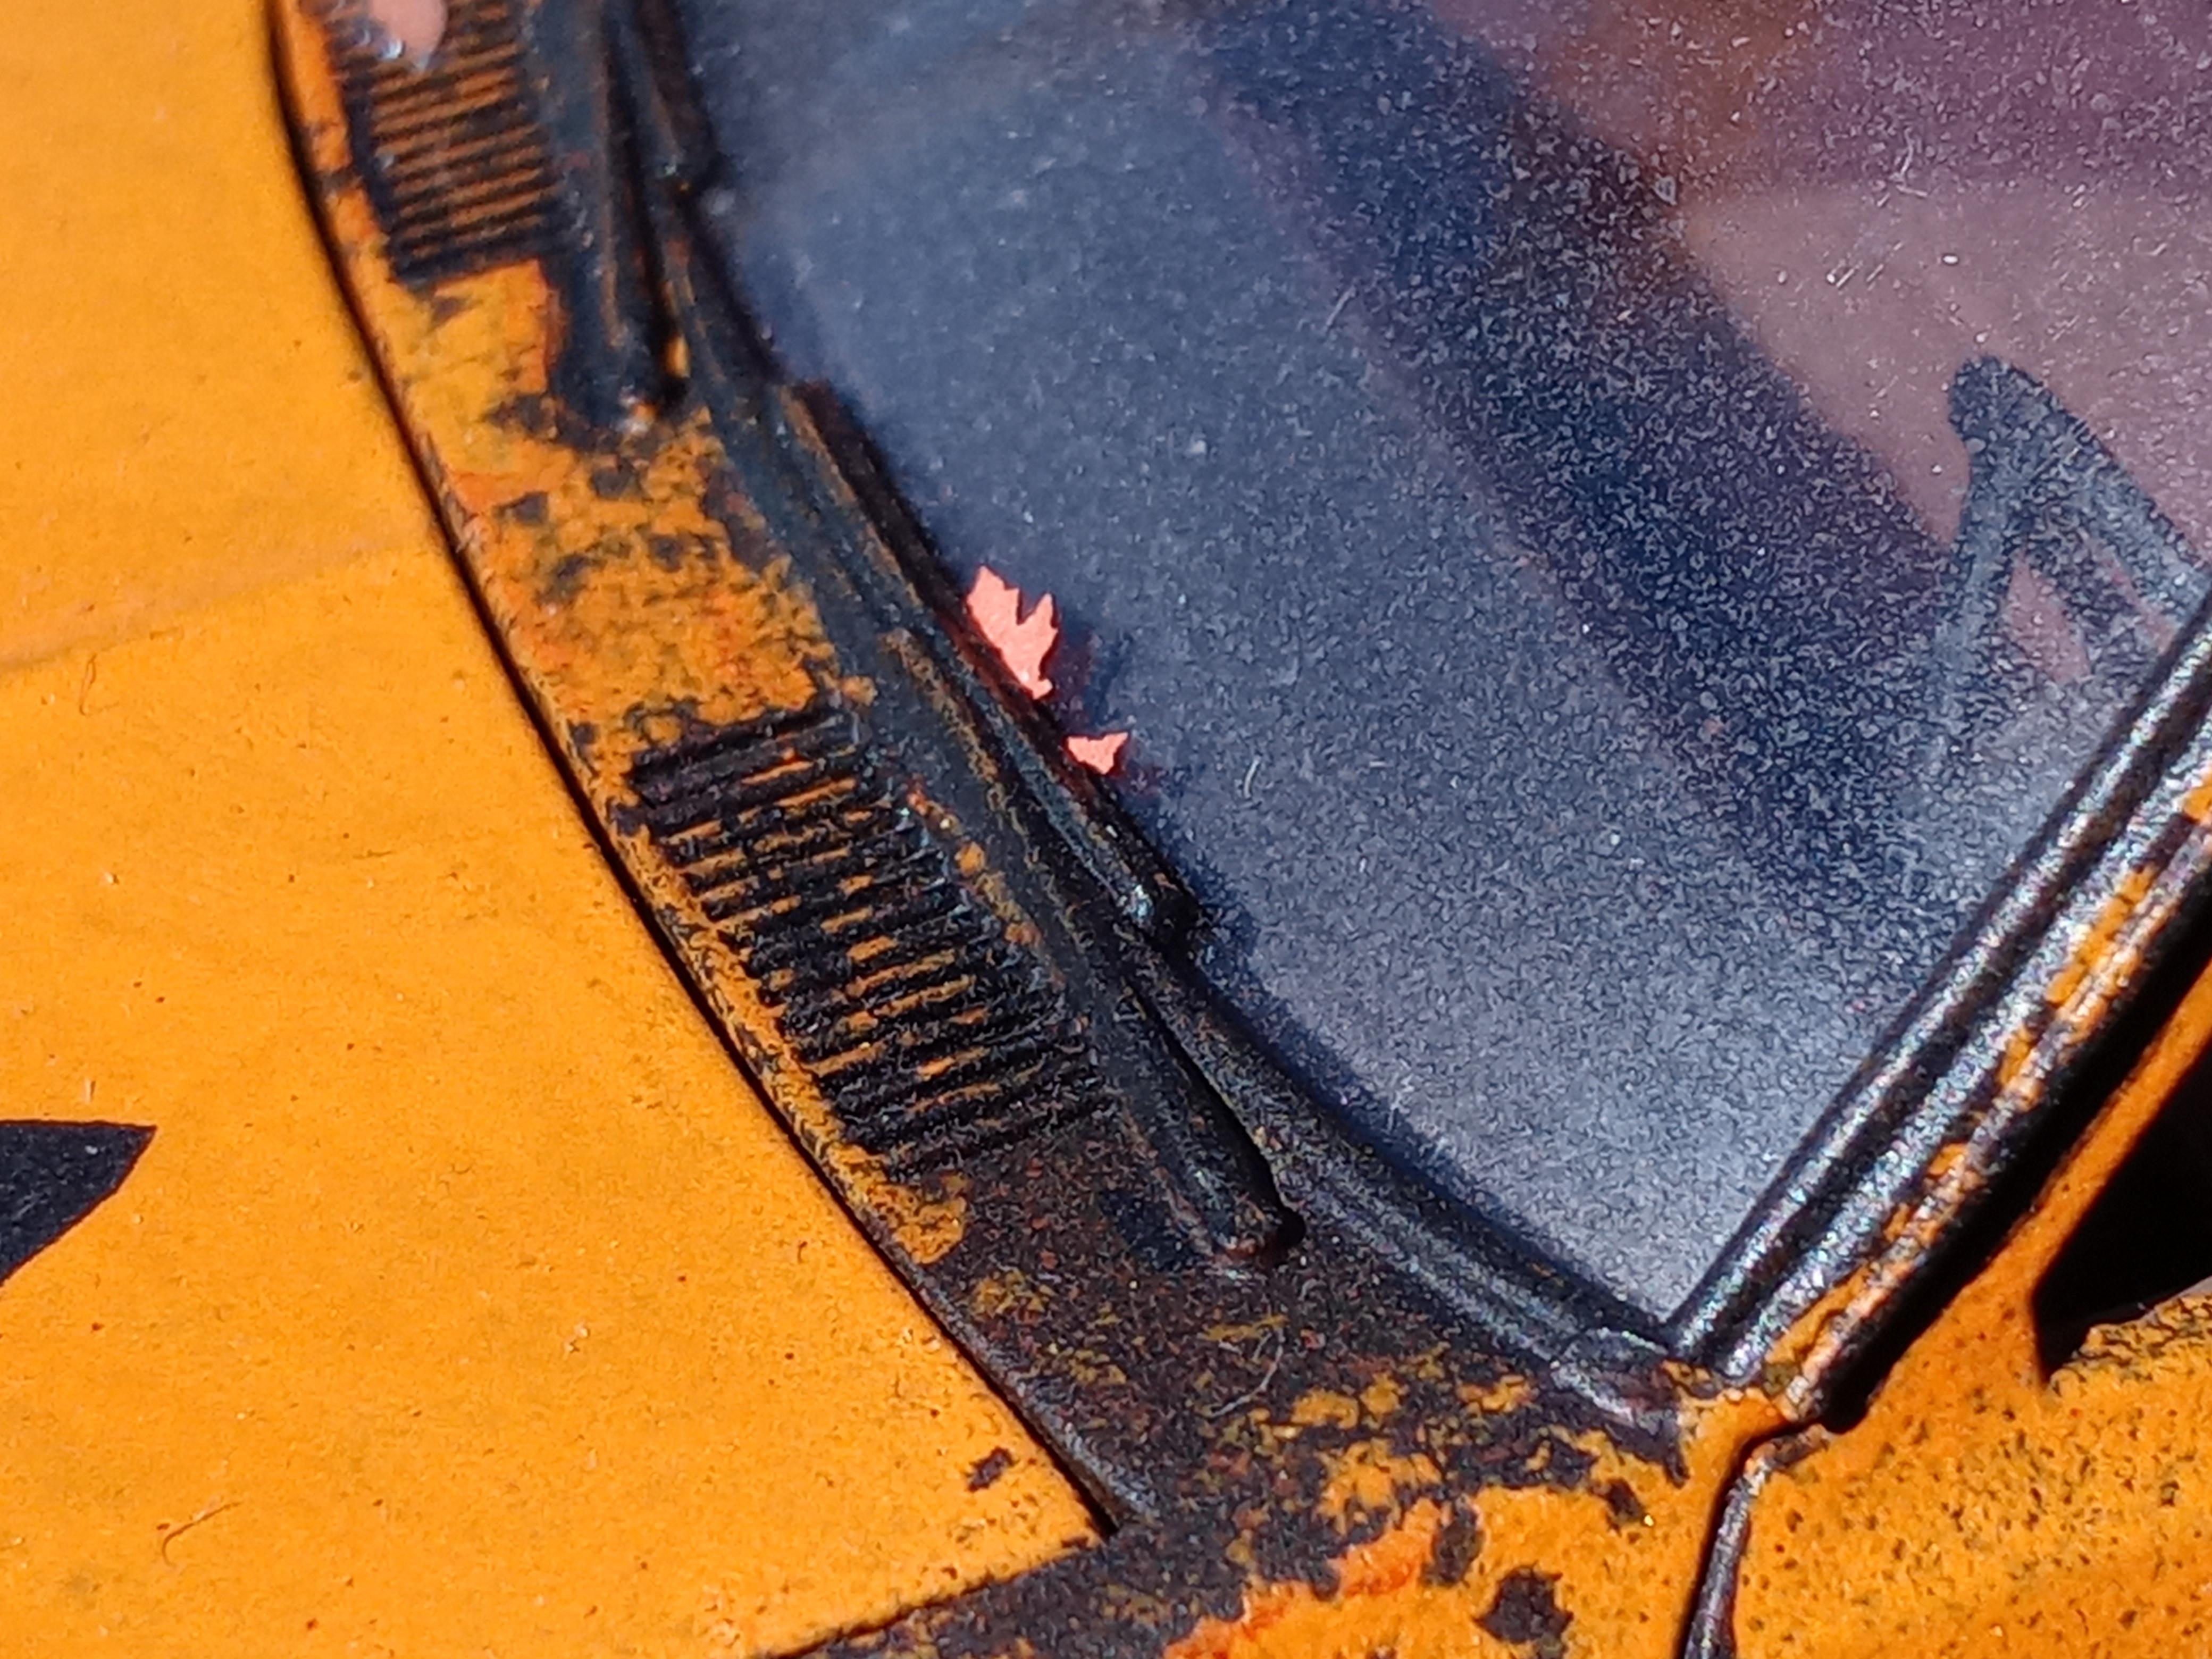
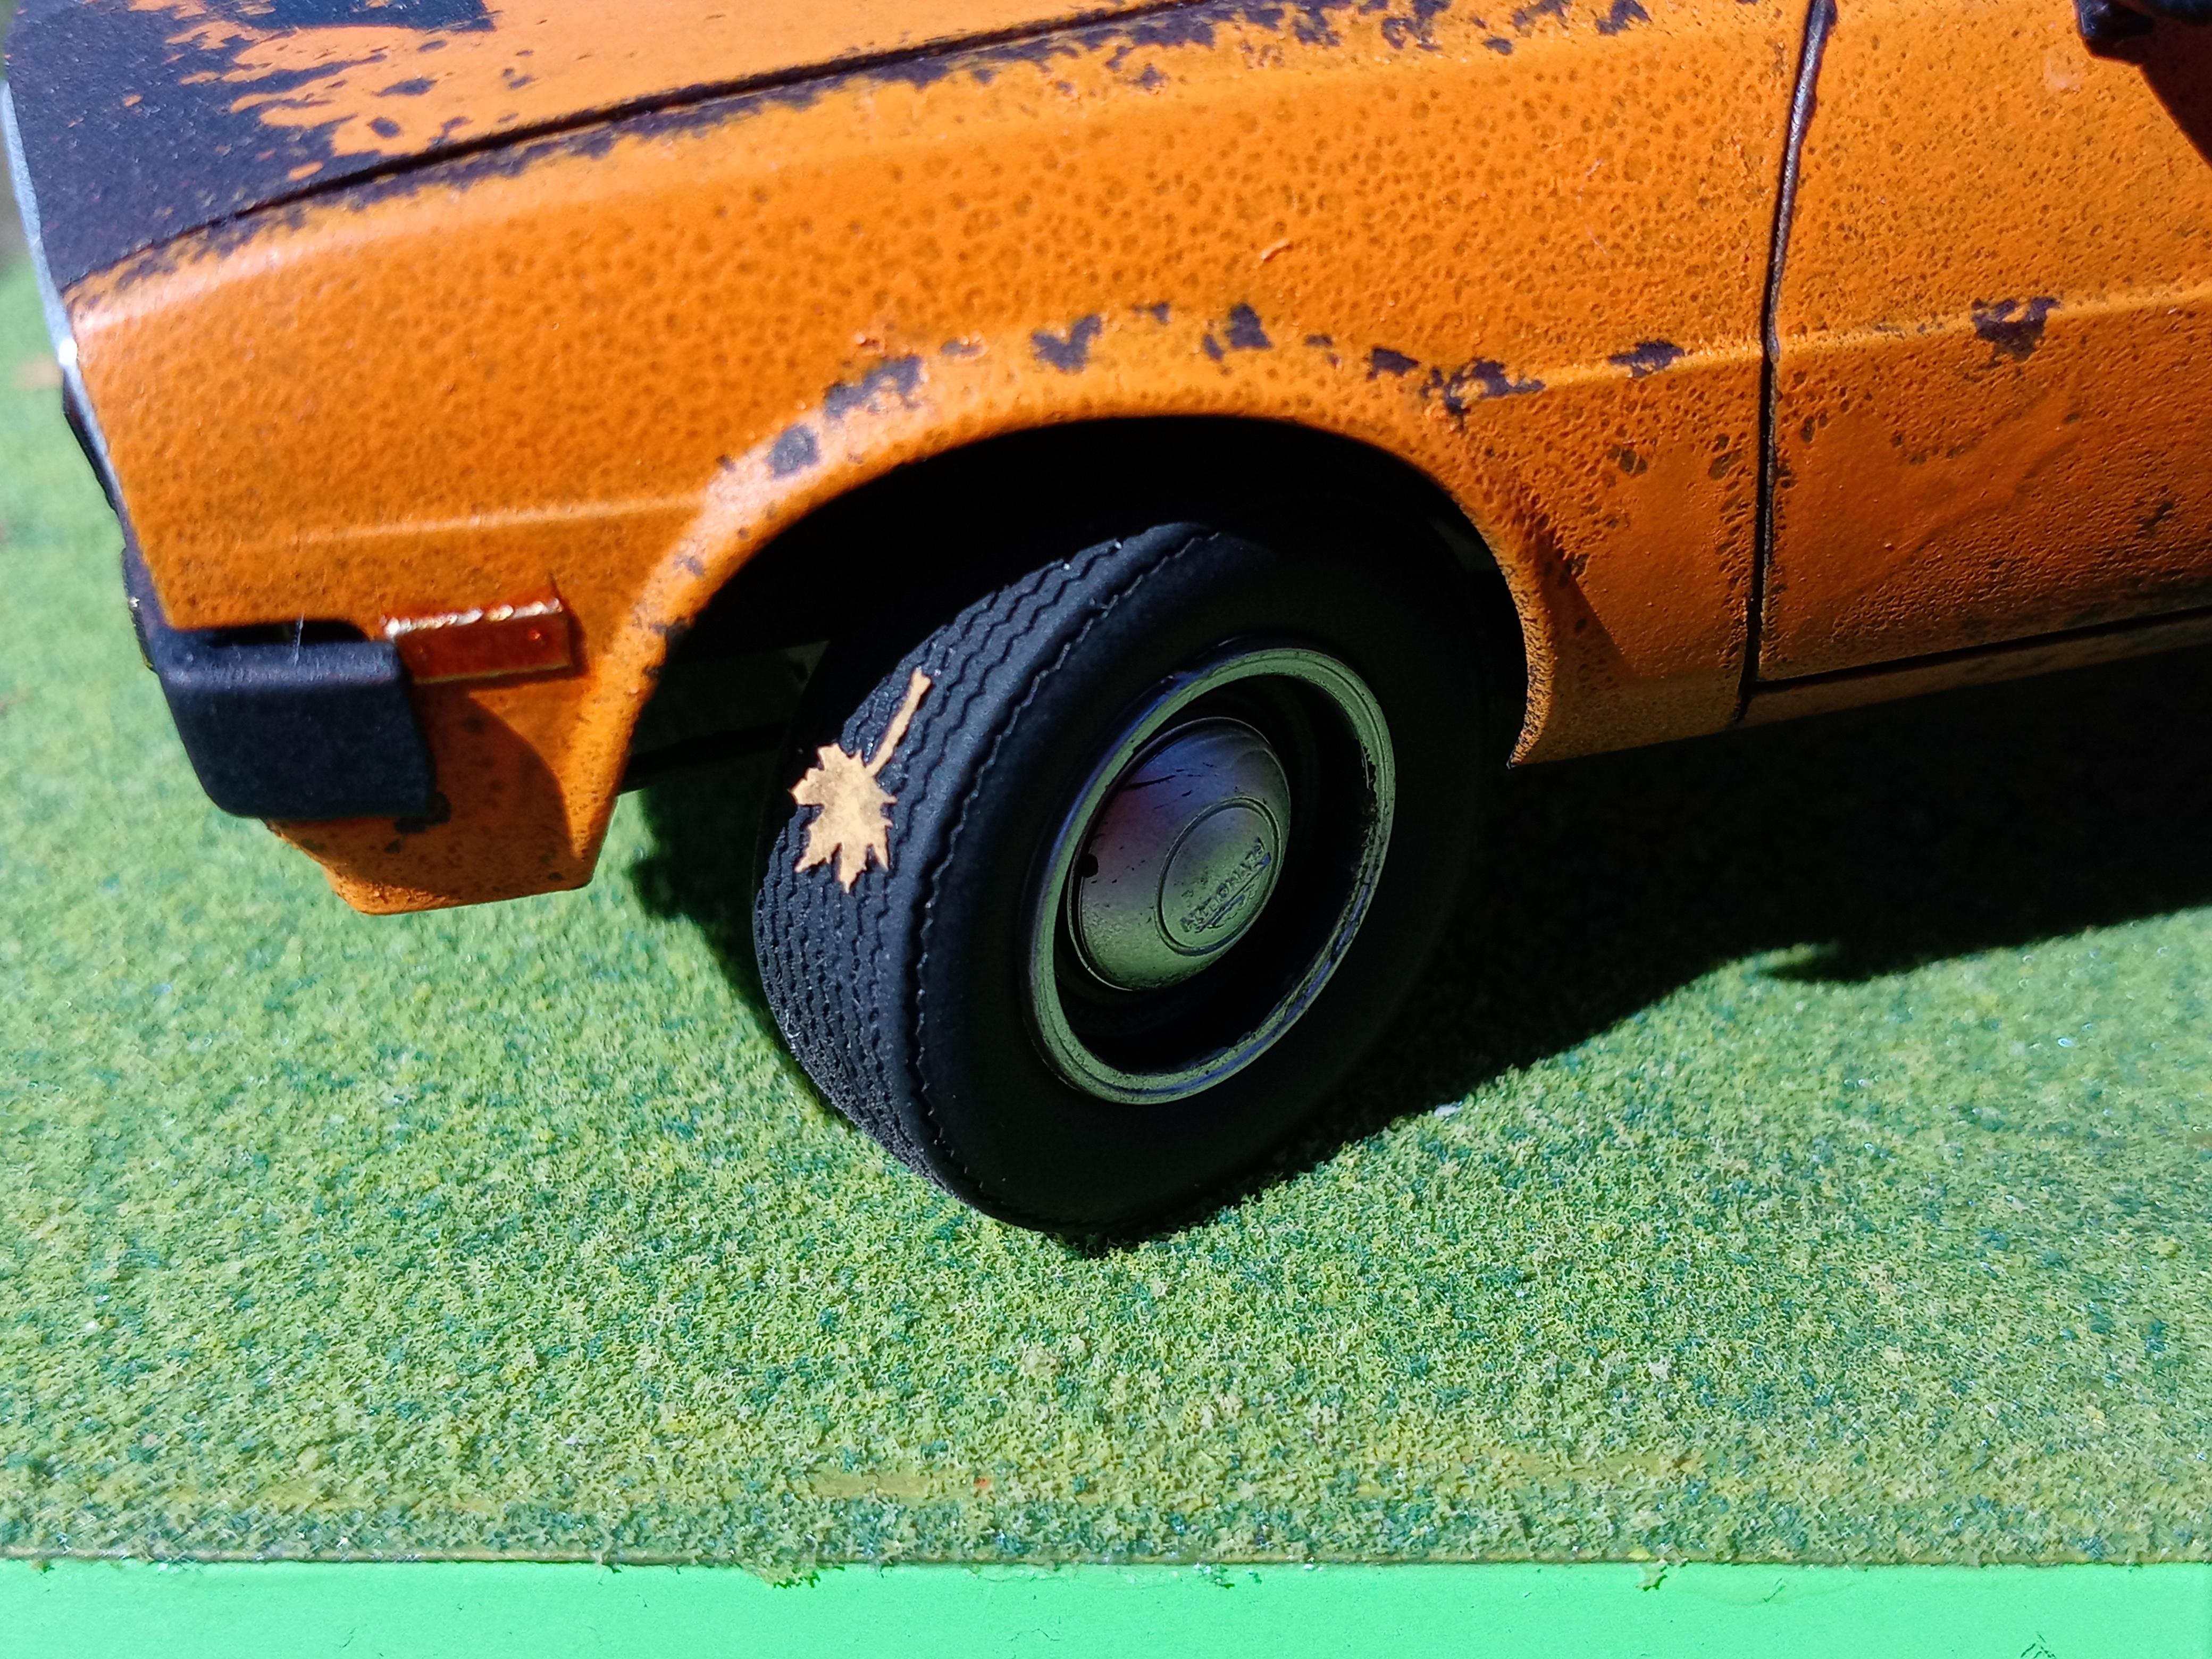
Built the Plymouth Arrow (MPC Dodge D50) some time ago. Just finished up a base for it. Base itself is an old AMT Prestige base, the rest is mostly ols scale railroad stuff. The pumpkins are some dehydrated things I found at a local craft shop. The signs are all made from craft sticks. The leaves are from AK Interactive. They're 35 scale but since as far as I know leaves aren't a standard size they look fine in 25 too.
-
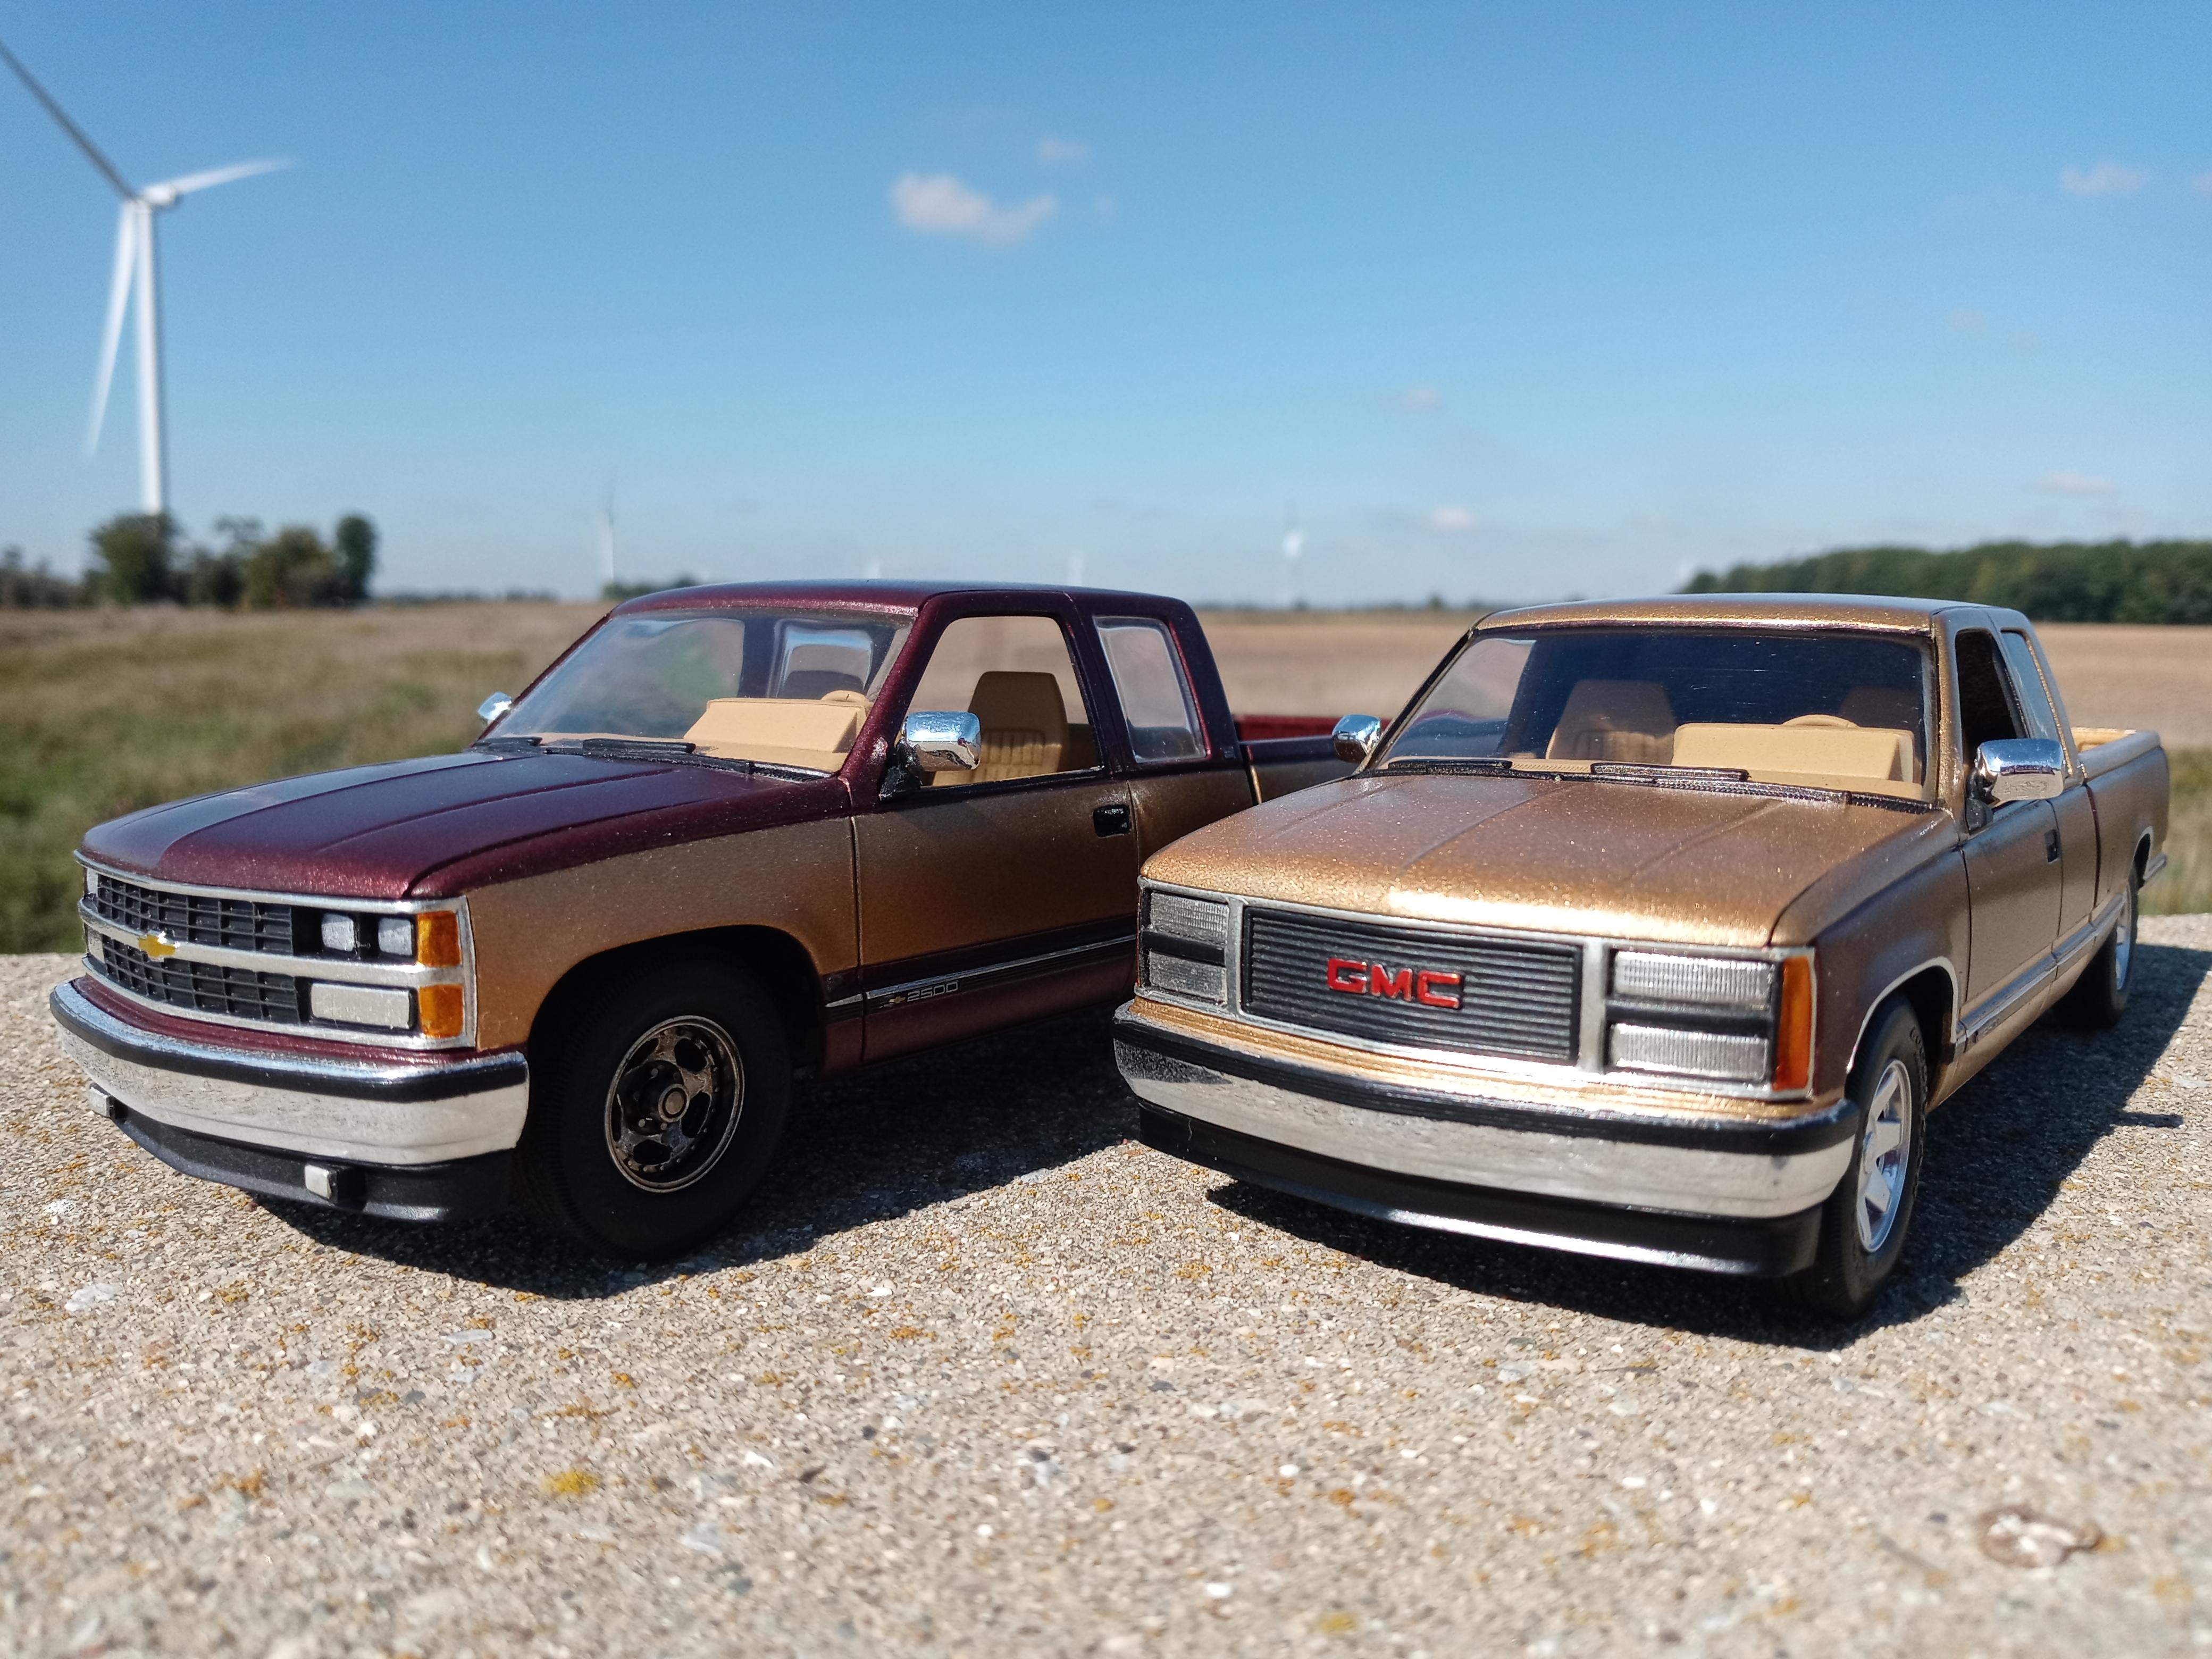
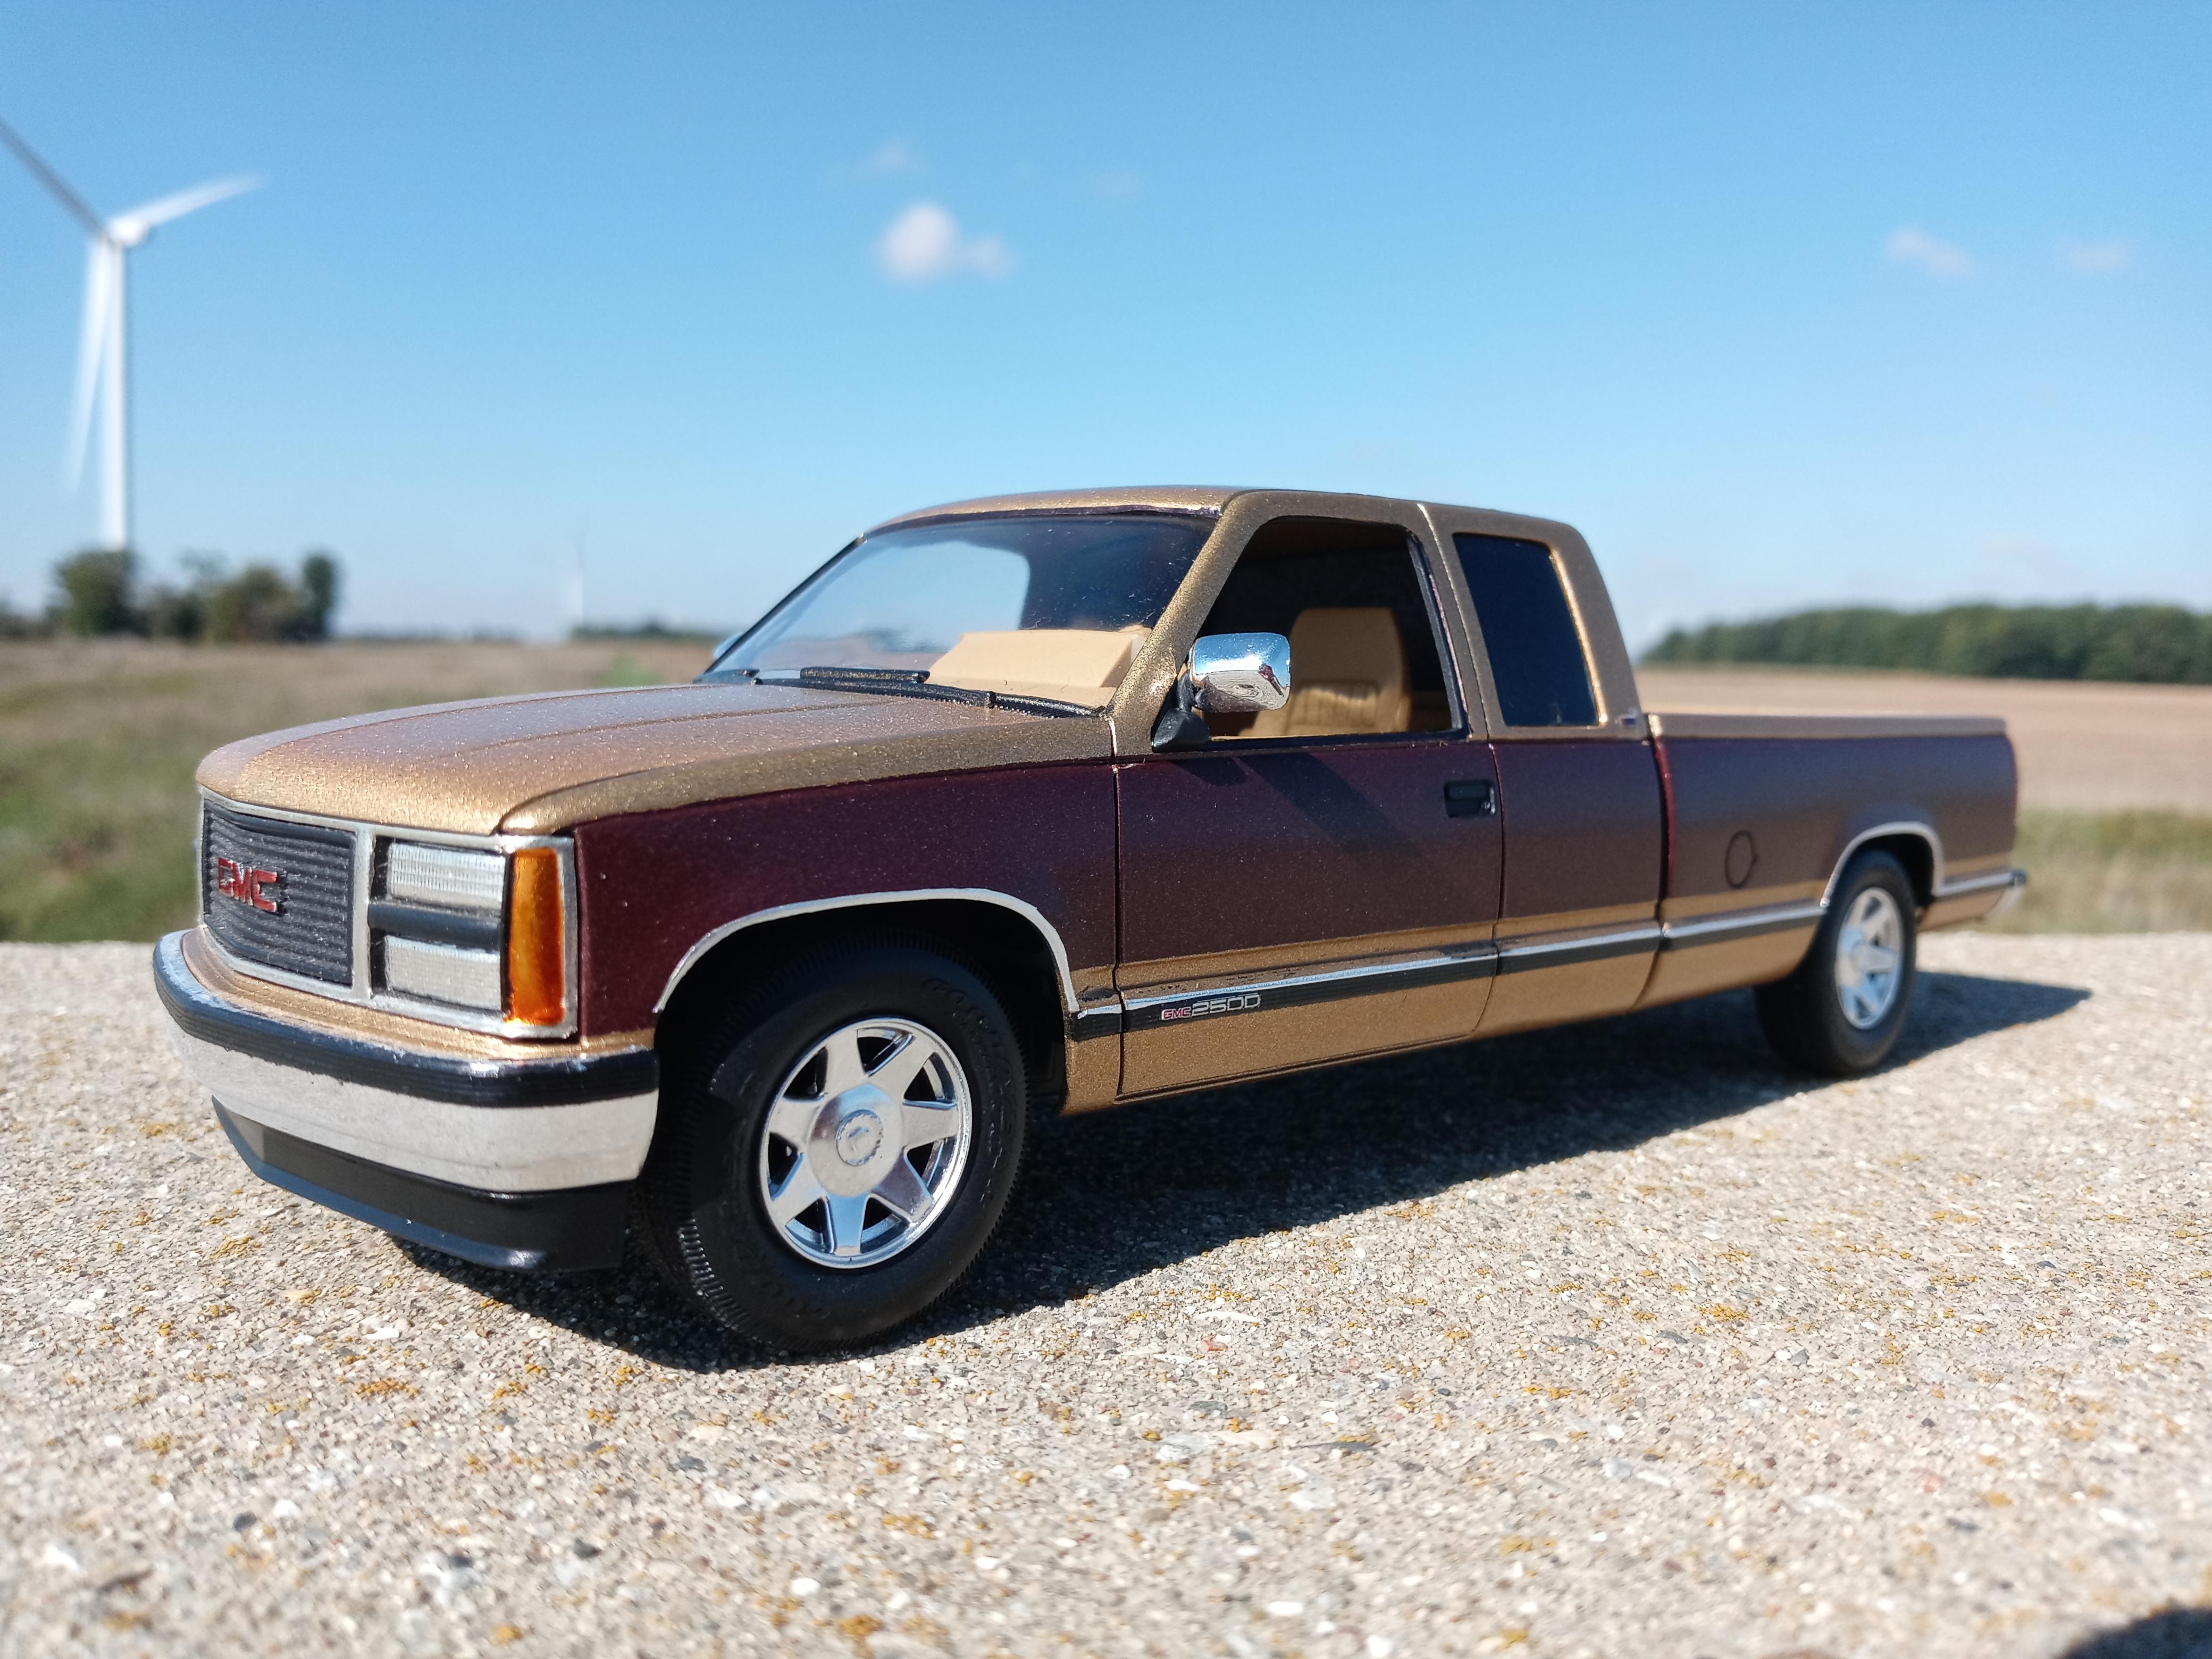
A while back I did a brown over gold 1989 Chevrolet C2500 extended cab, starting with the AMT 1993 snap kit. I had the GMC grille (phantom dually piece with the GMC logo from a Sonoma) done some time ago, and I had another perfectly good extended cab (or Club Coupe as GMC called it) kit so I decided to do a slightly newer GMC version with the color scheme flipped. Wheels and tires came from an AMT Escalade EXT, and the 2500 emblems and Sierra tailgate badge came from @echoxrayniner, aka Ray's Kits Decals. The gmcers.org sticker was printed off the internet. Needs a little foil touch up but it's a decent shelf model and a nice companion to the 1989 Chev.
-
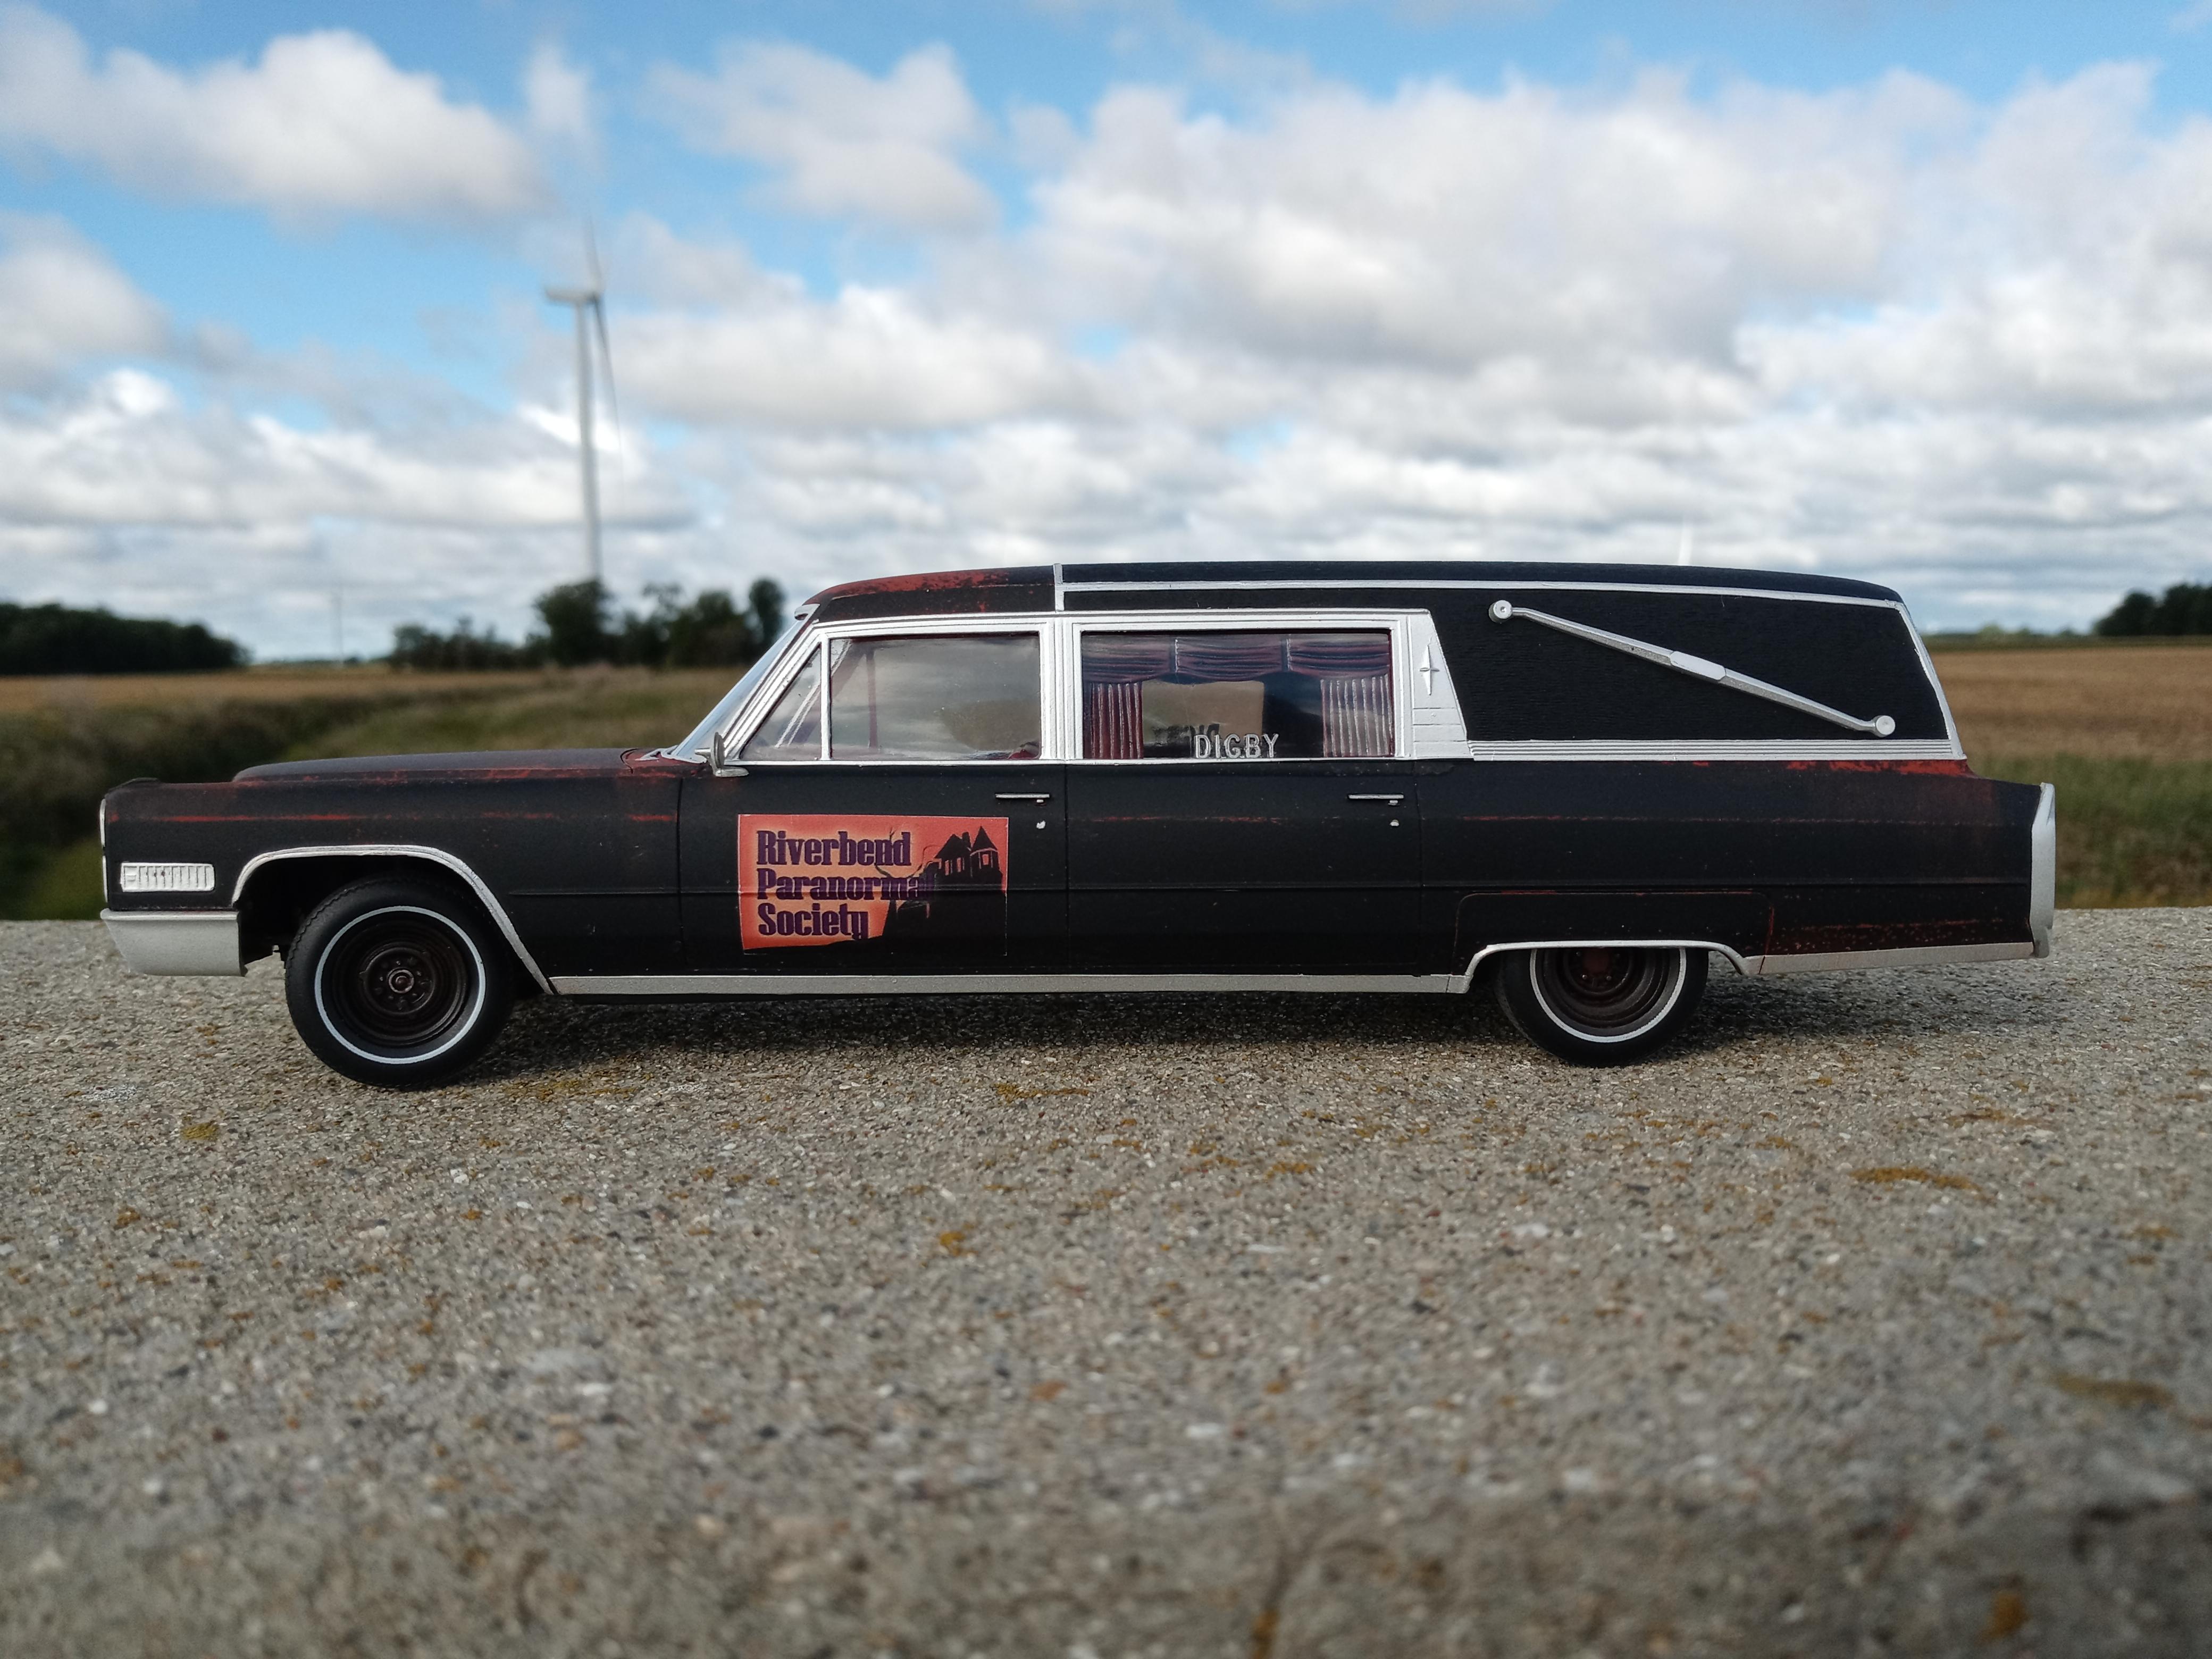
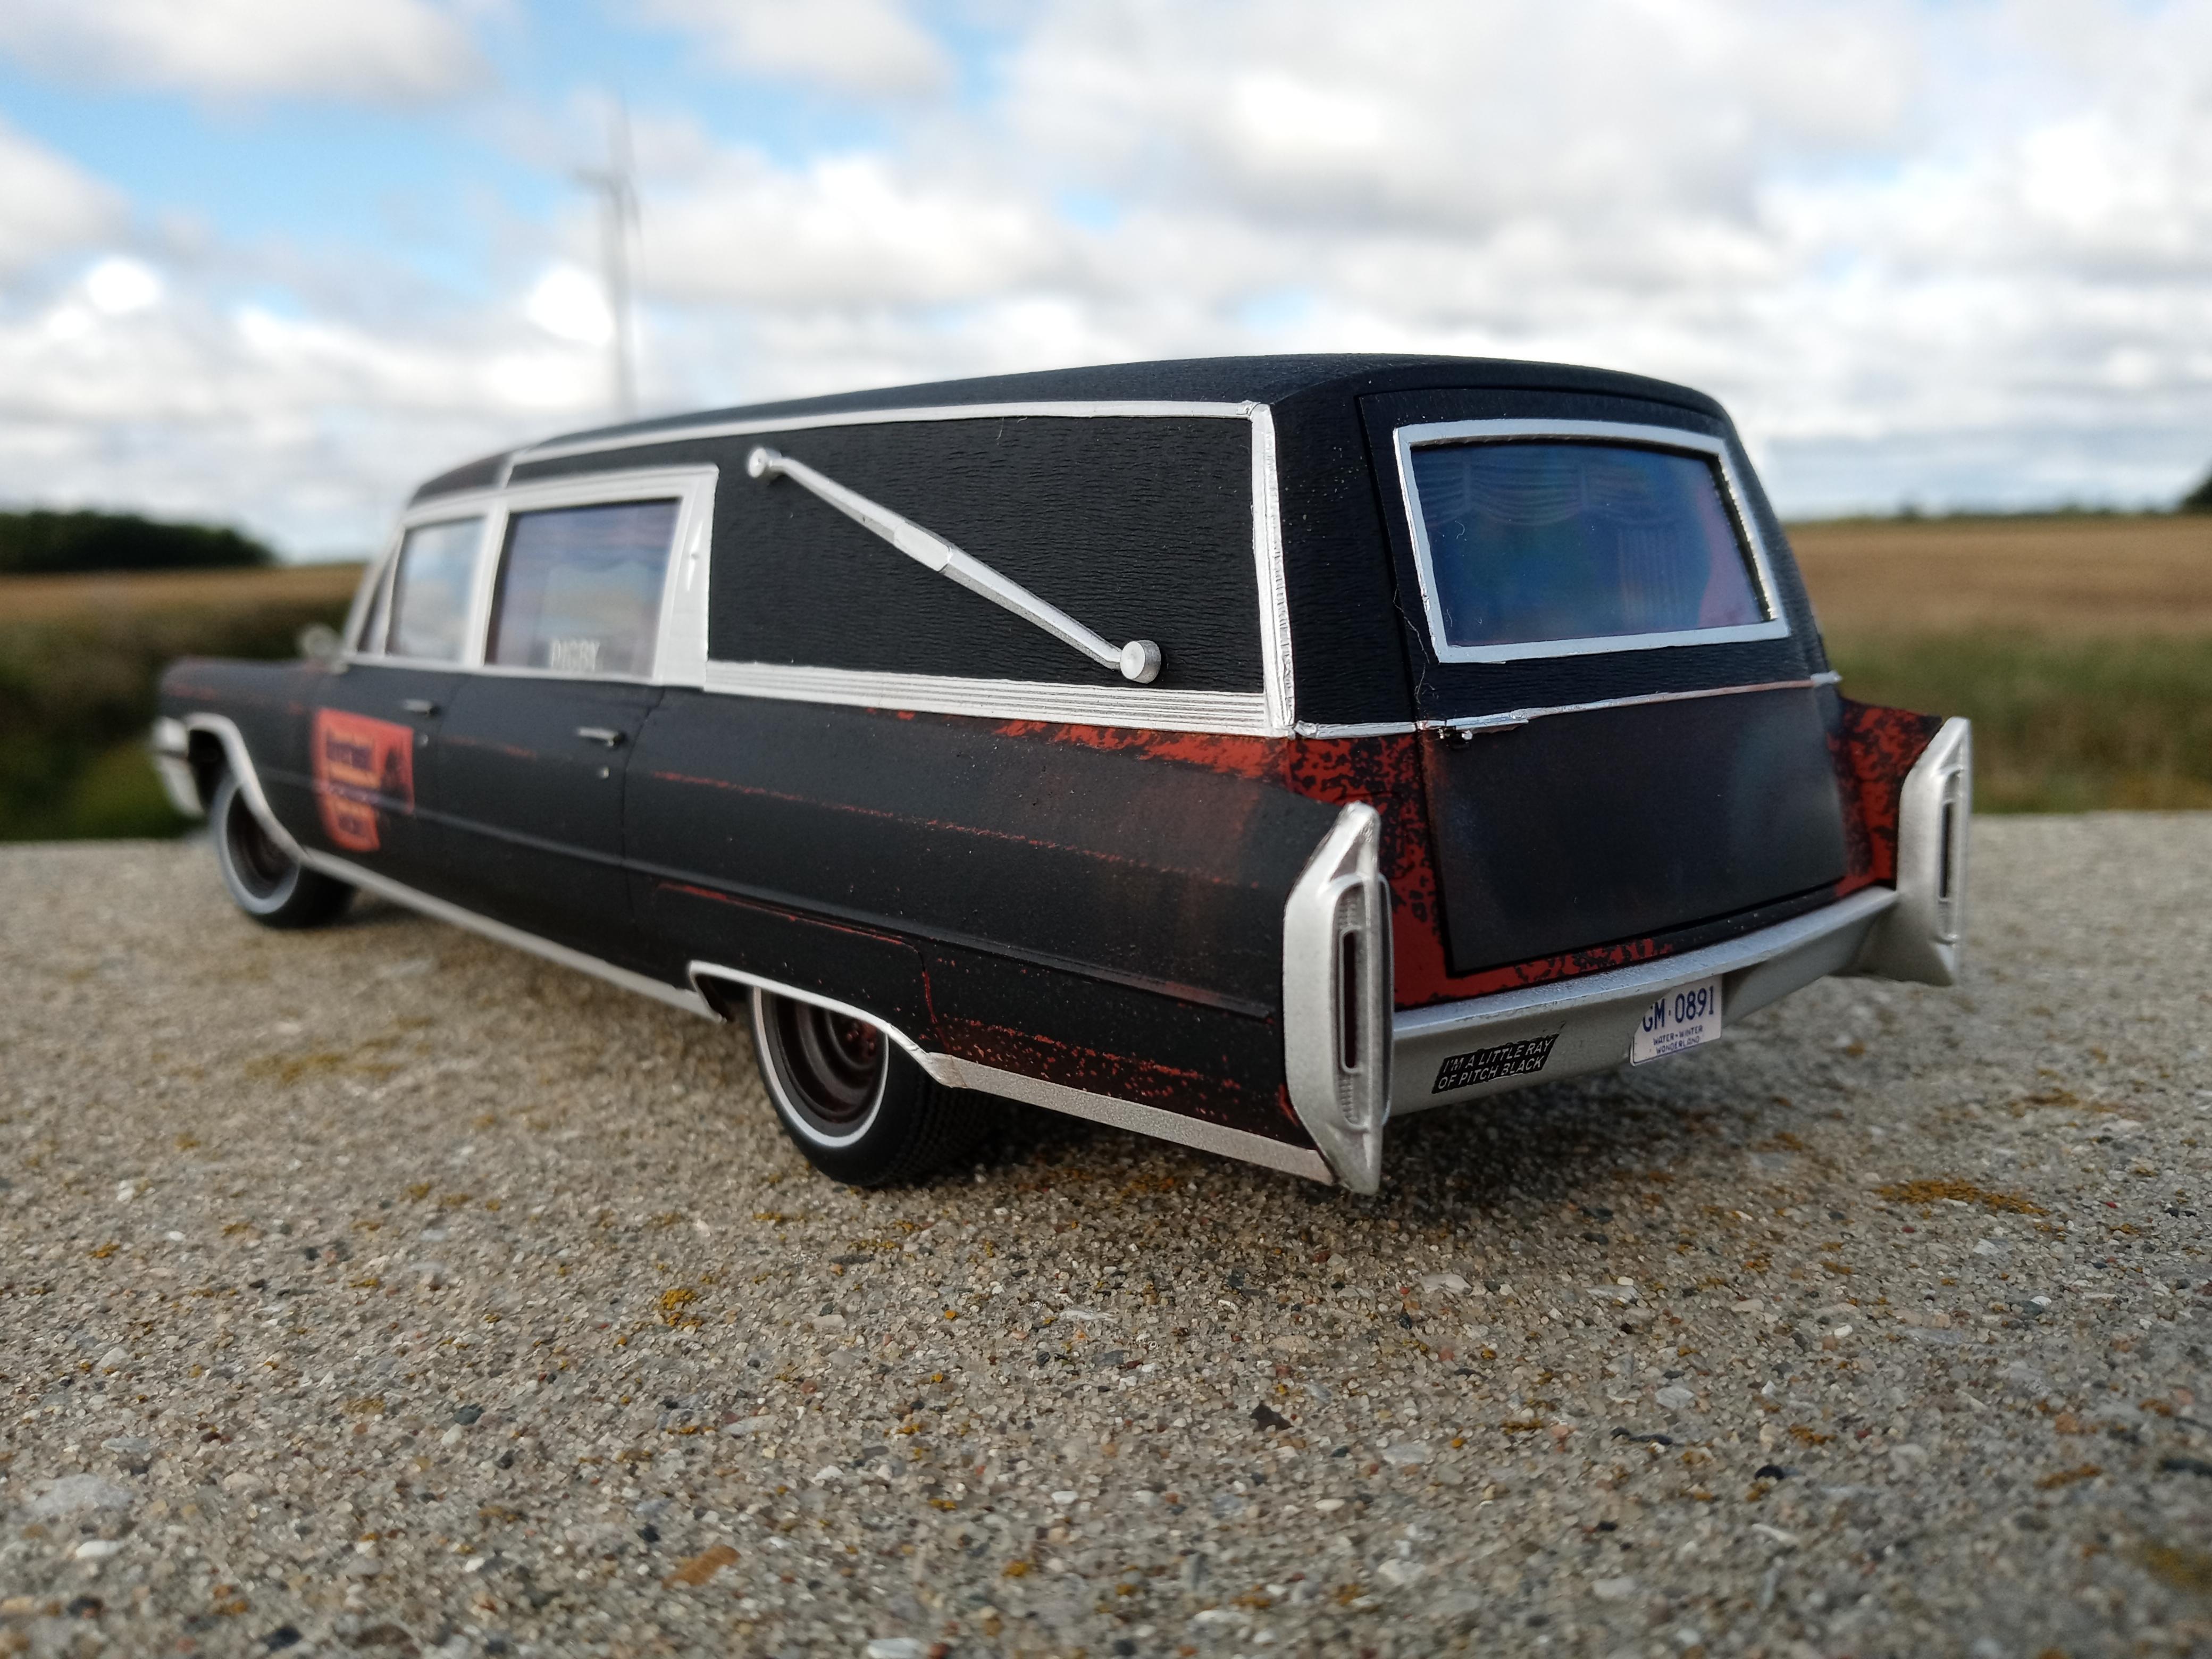
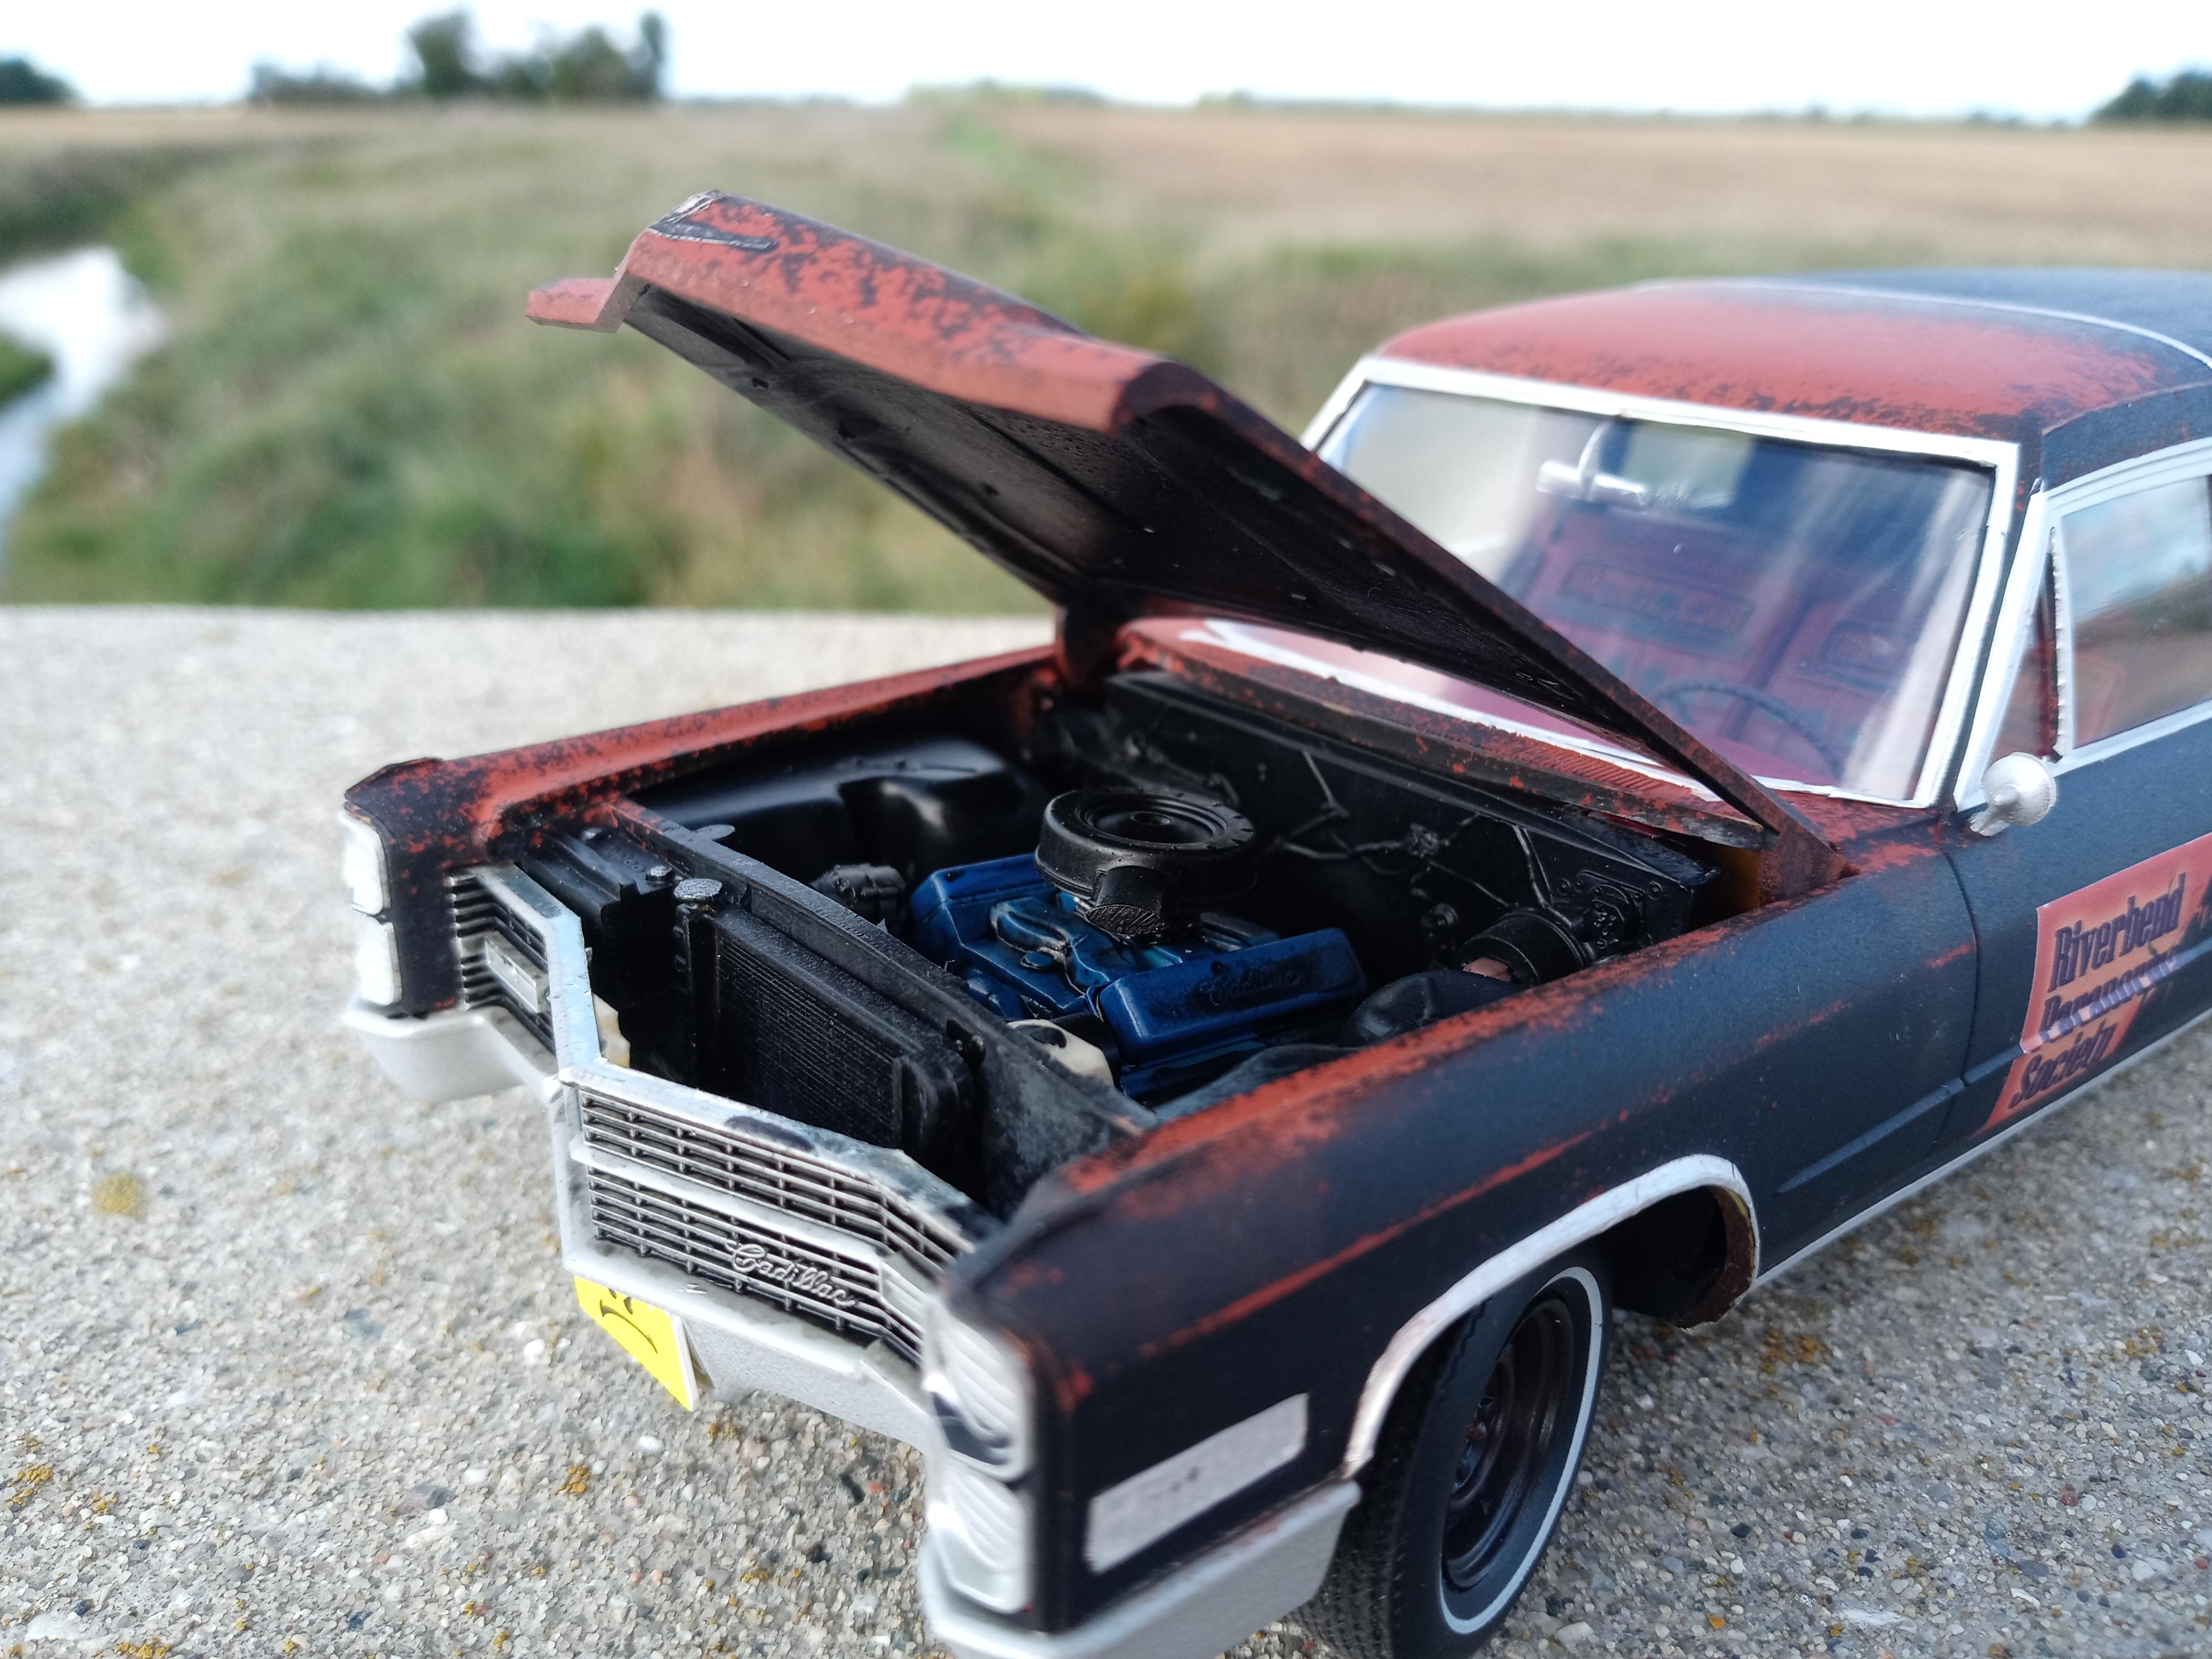
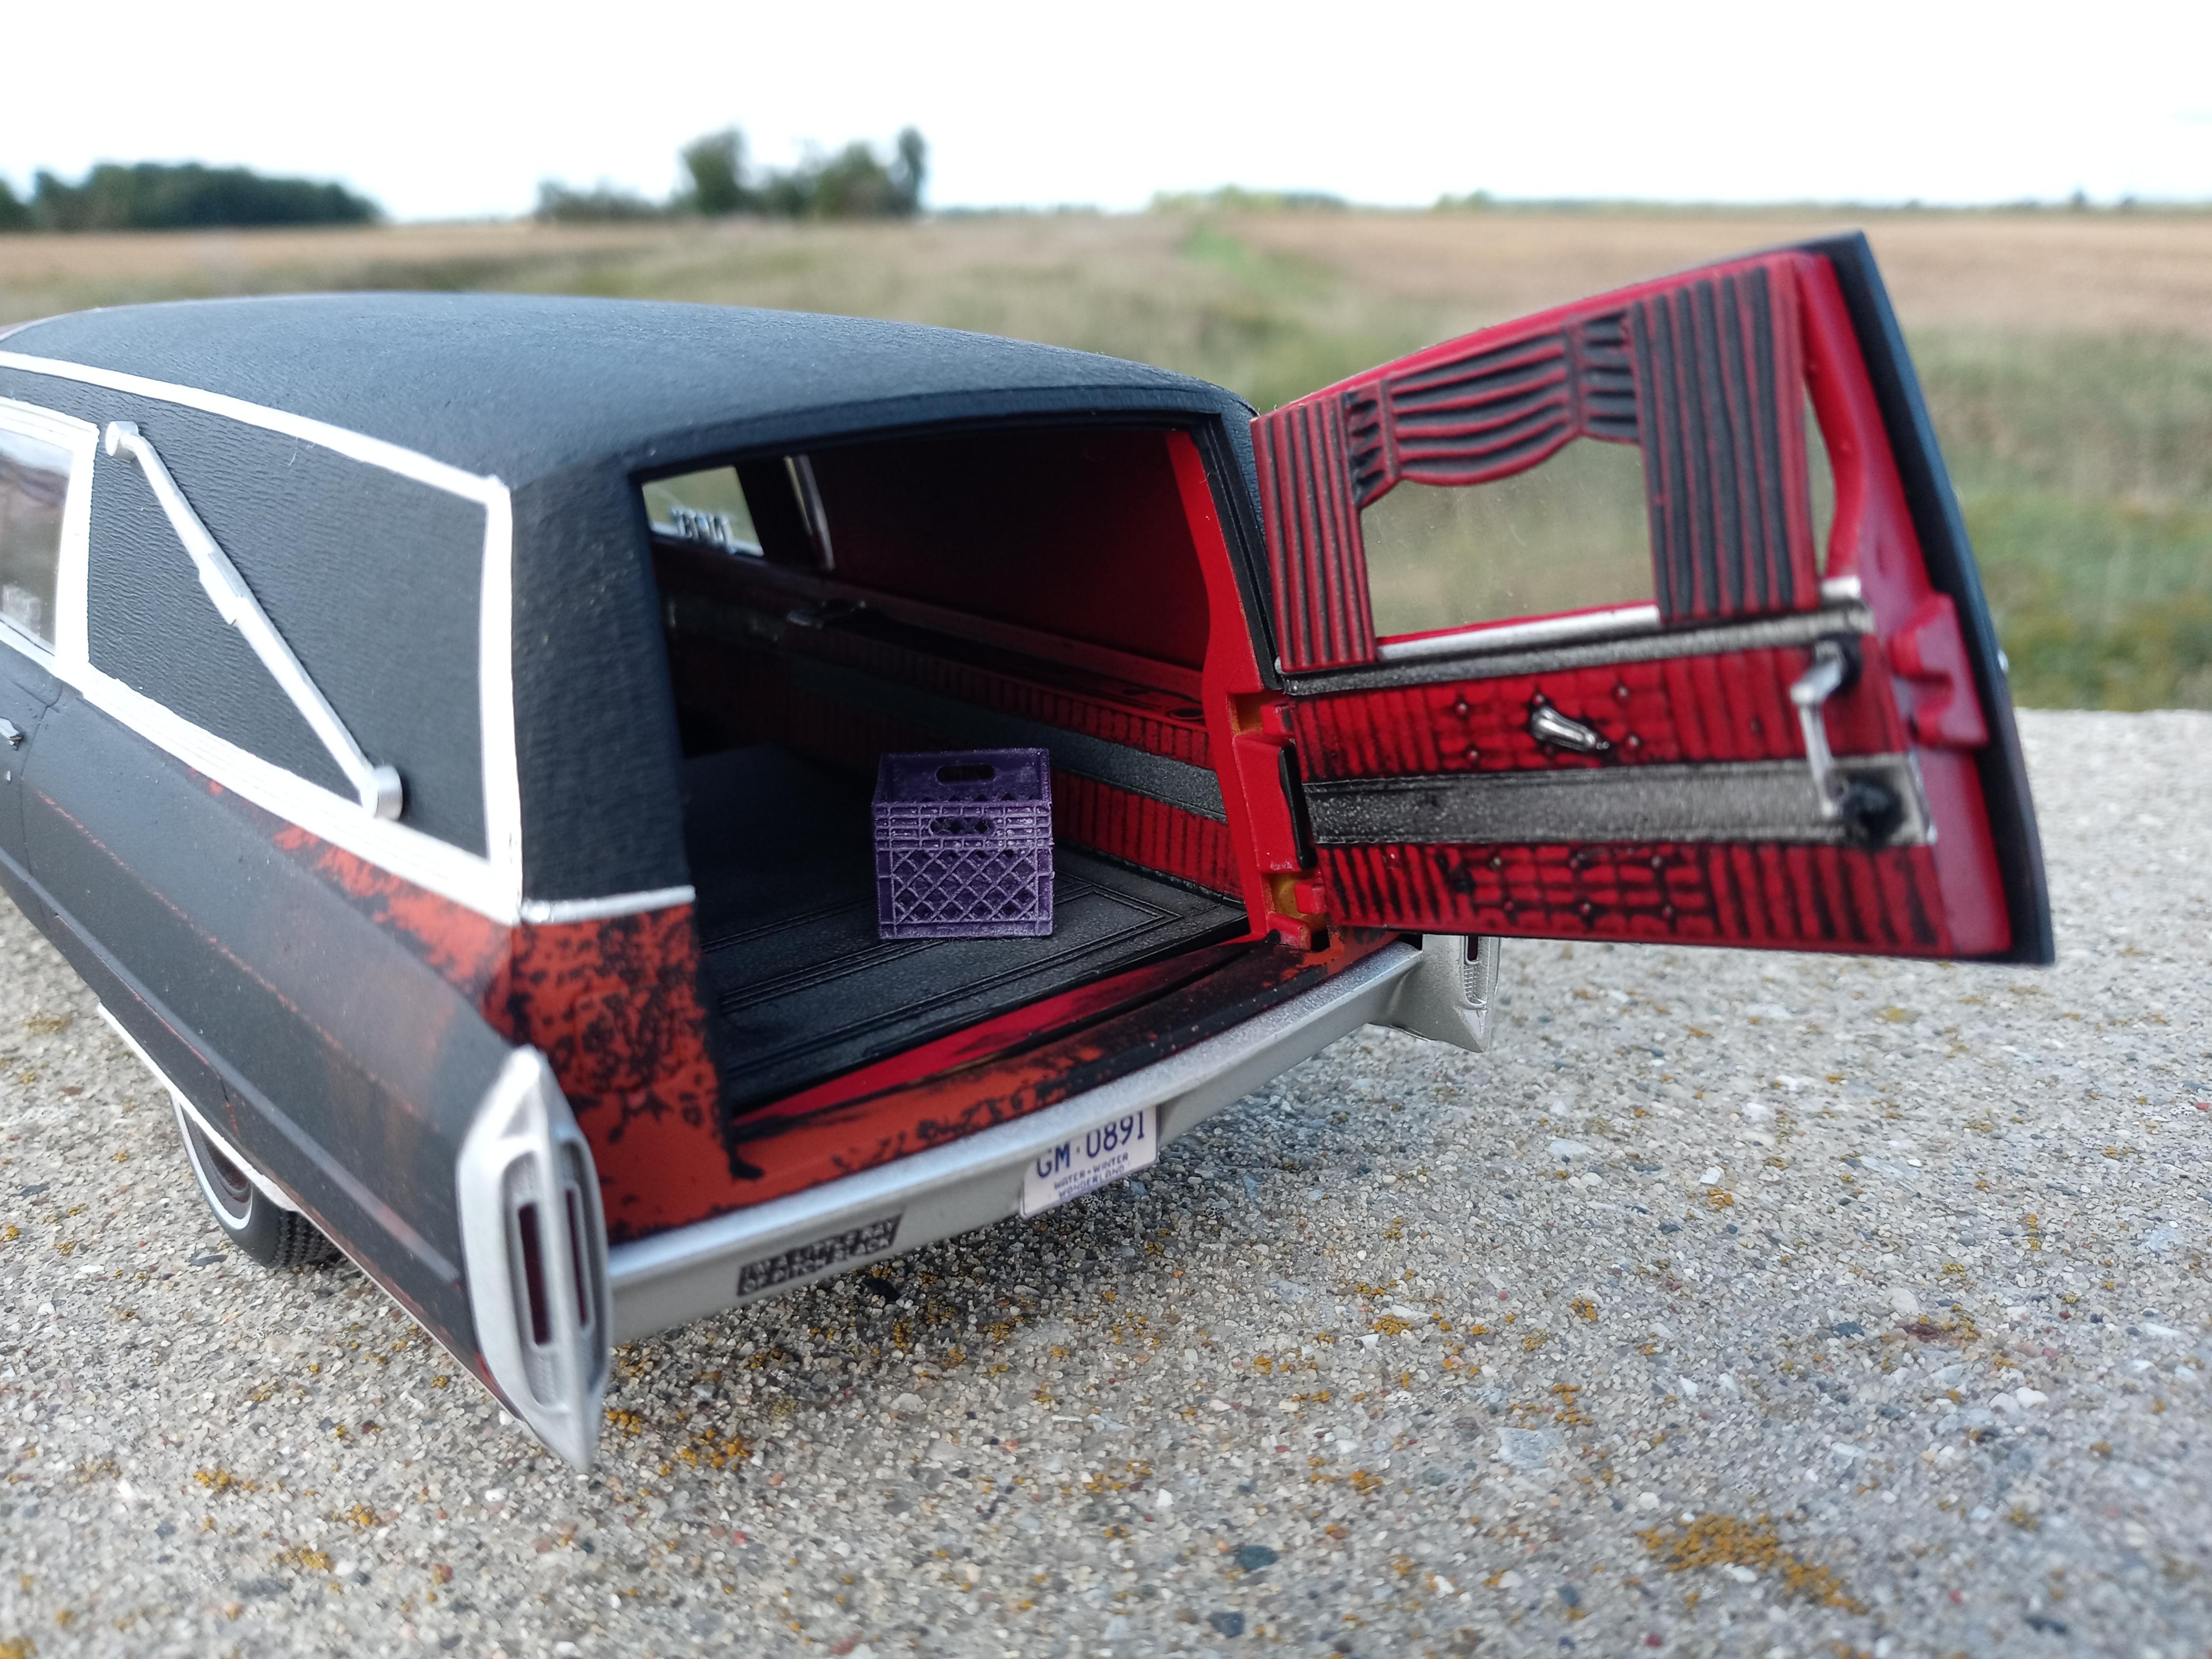
This was a Heavenly Hearse kit I've had laying around for years. The idea was to make it part of a Halloween display. The overall rundown appearance was inspired by a 1:1 70s Oldsmobile hearse used by a local haunted attraction. Other than some AMT wheels and tires and a crate in back it is box stock. The graphics were done by my buddy Erik. Eventually the rear will be full of ghost hunting equipment (hence the crate) and set on a base.
-
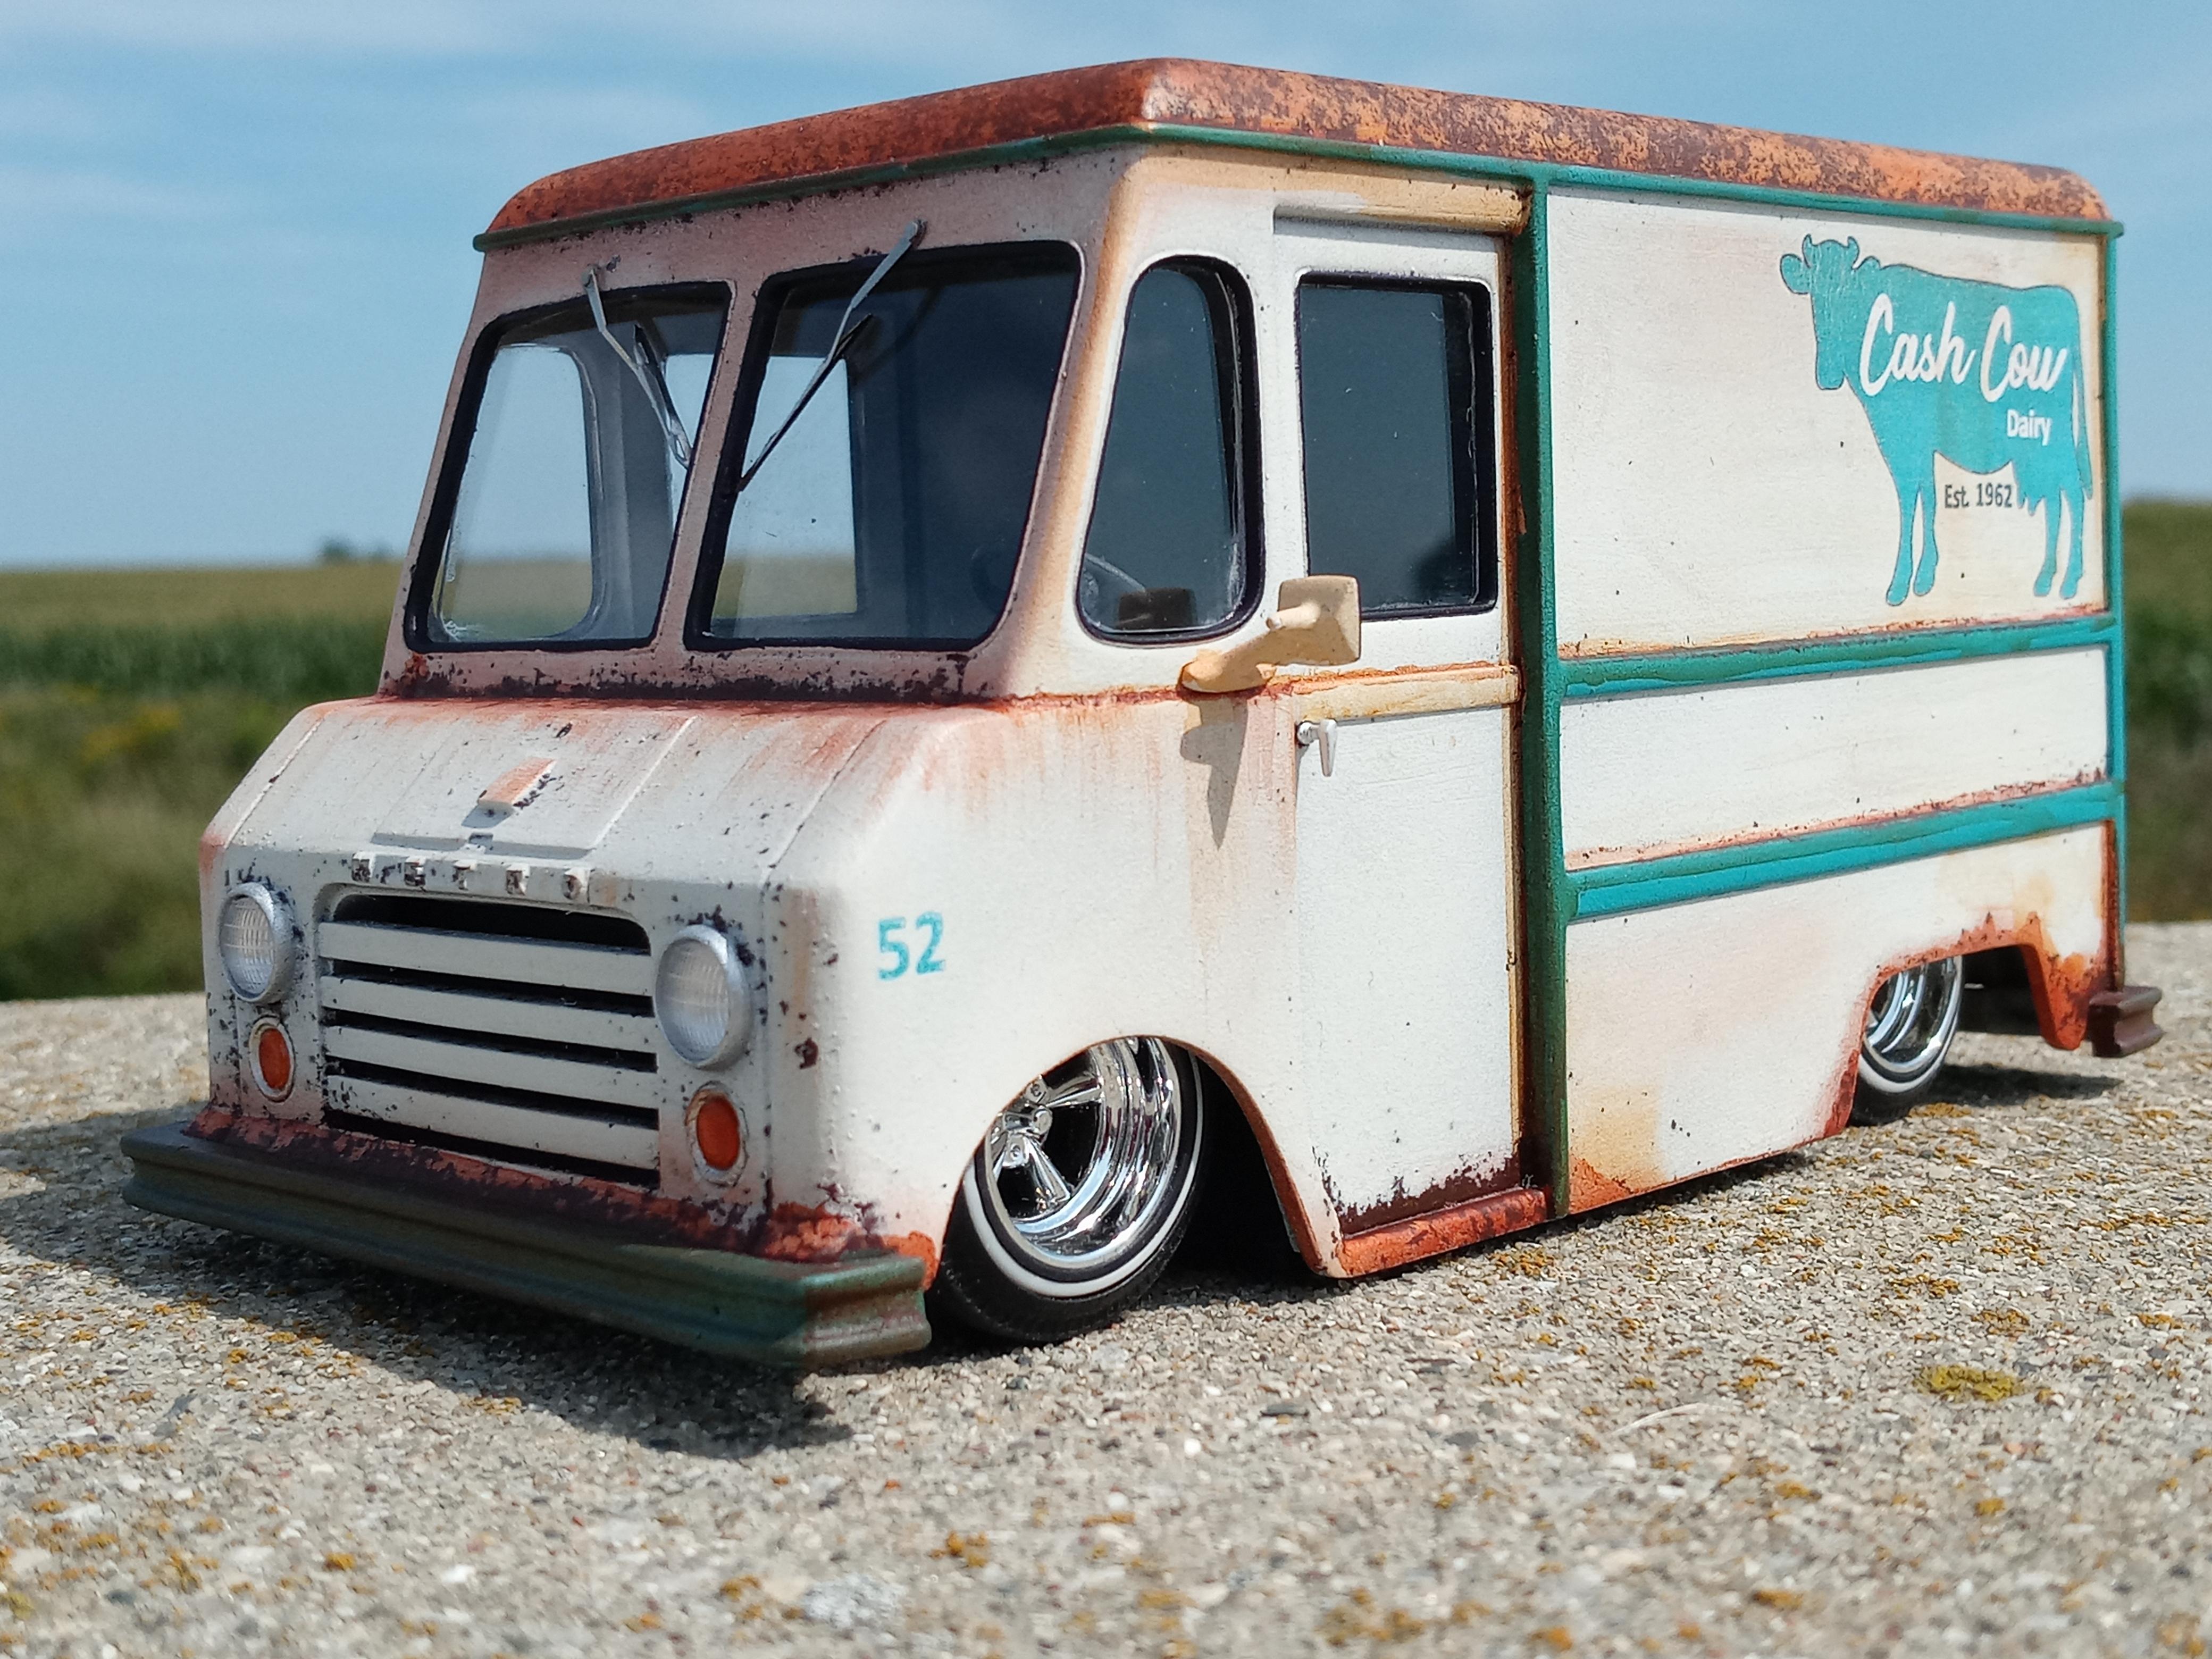
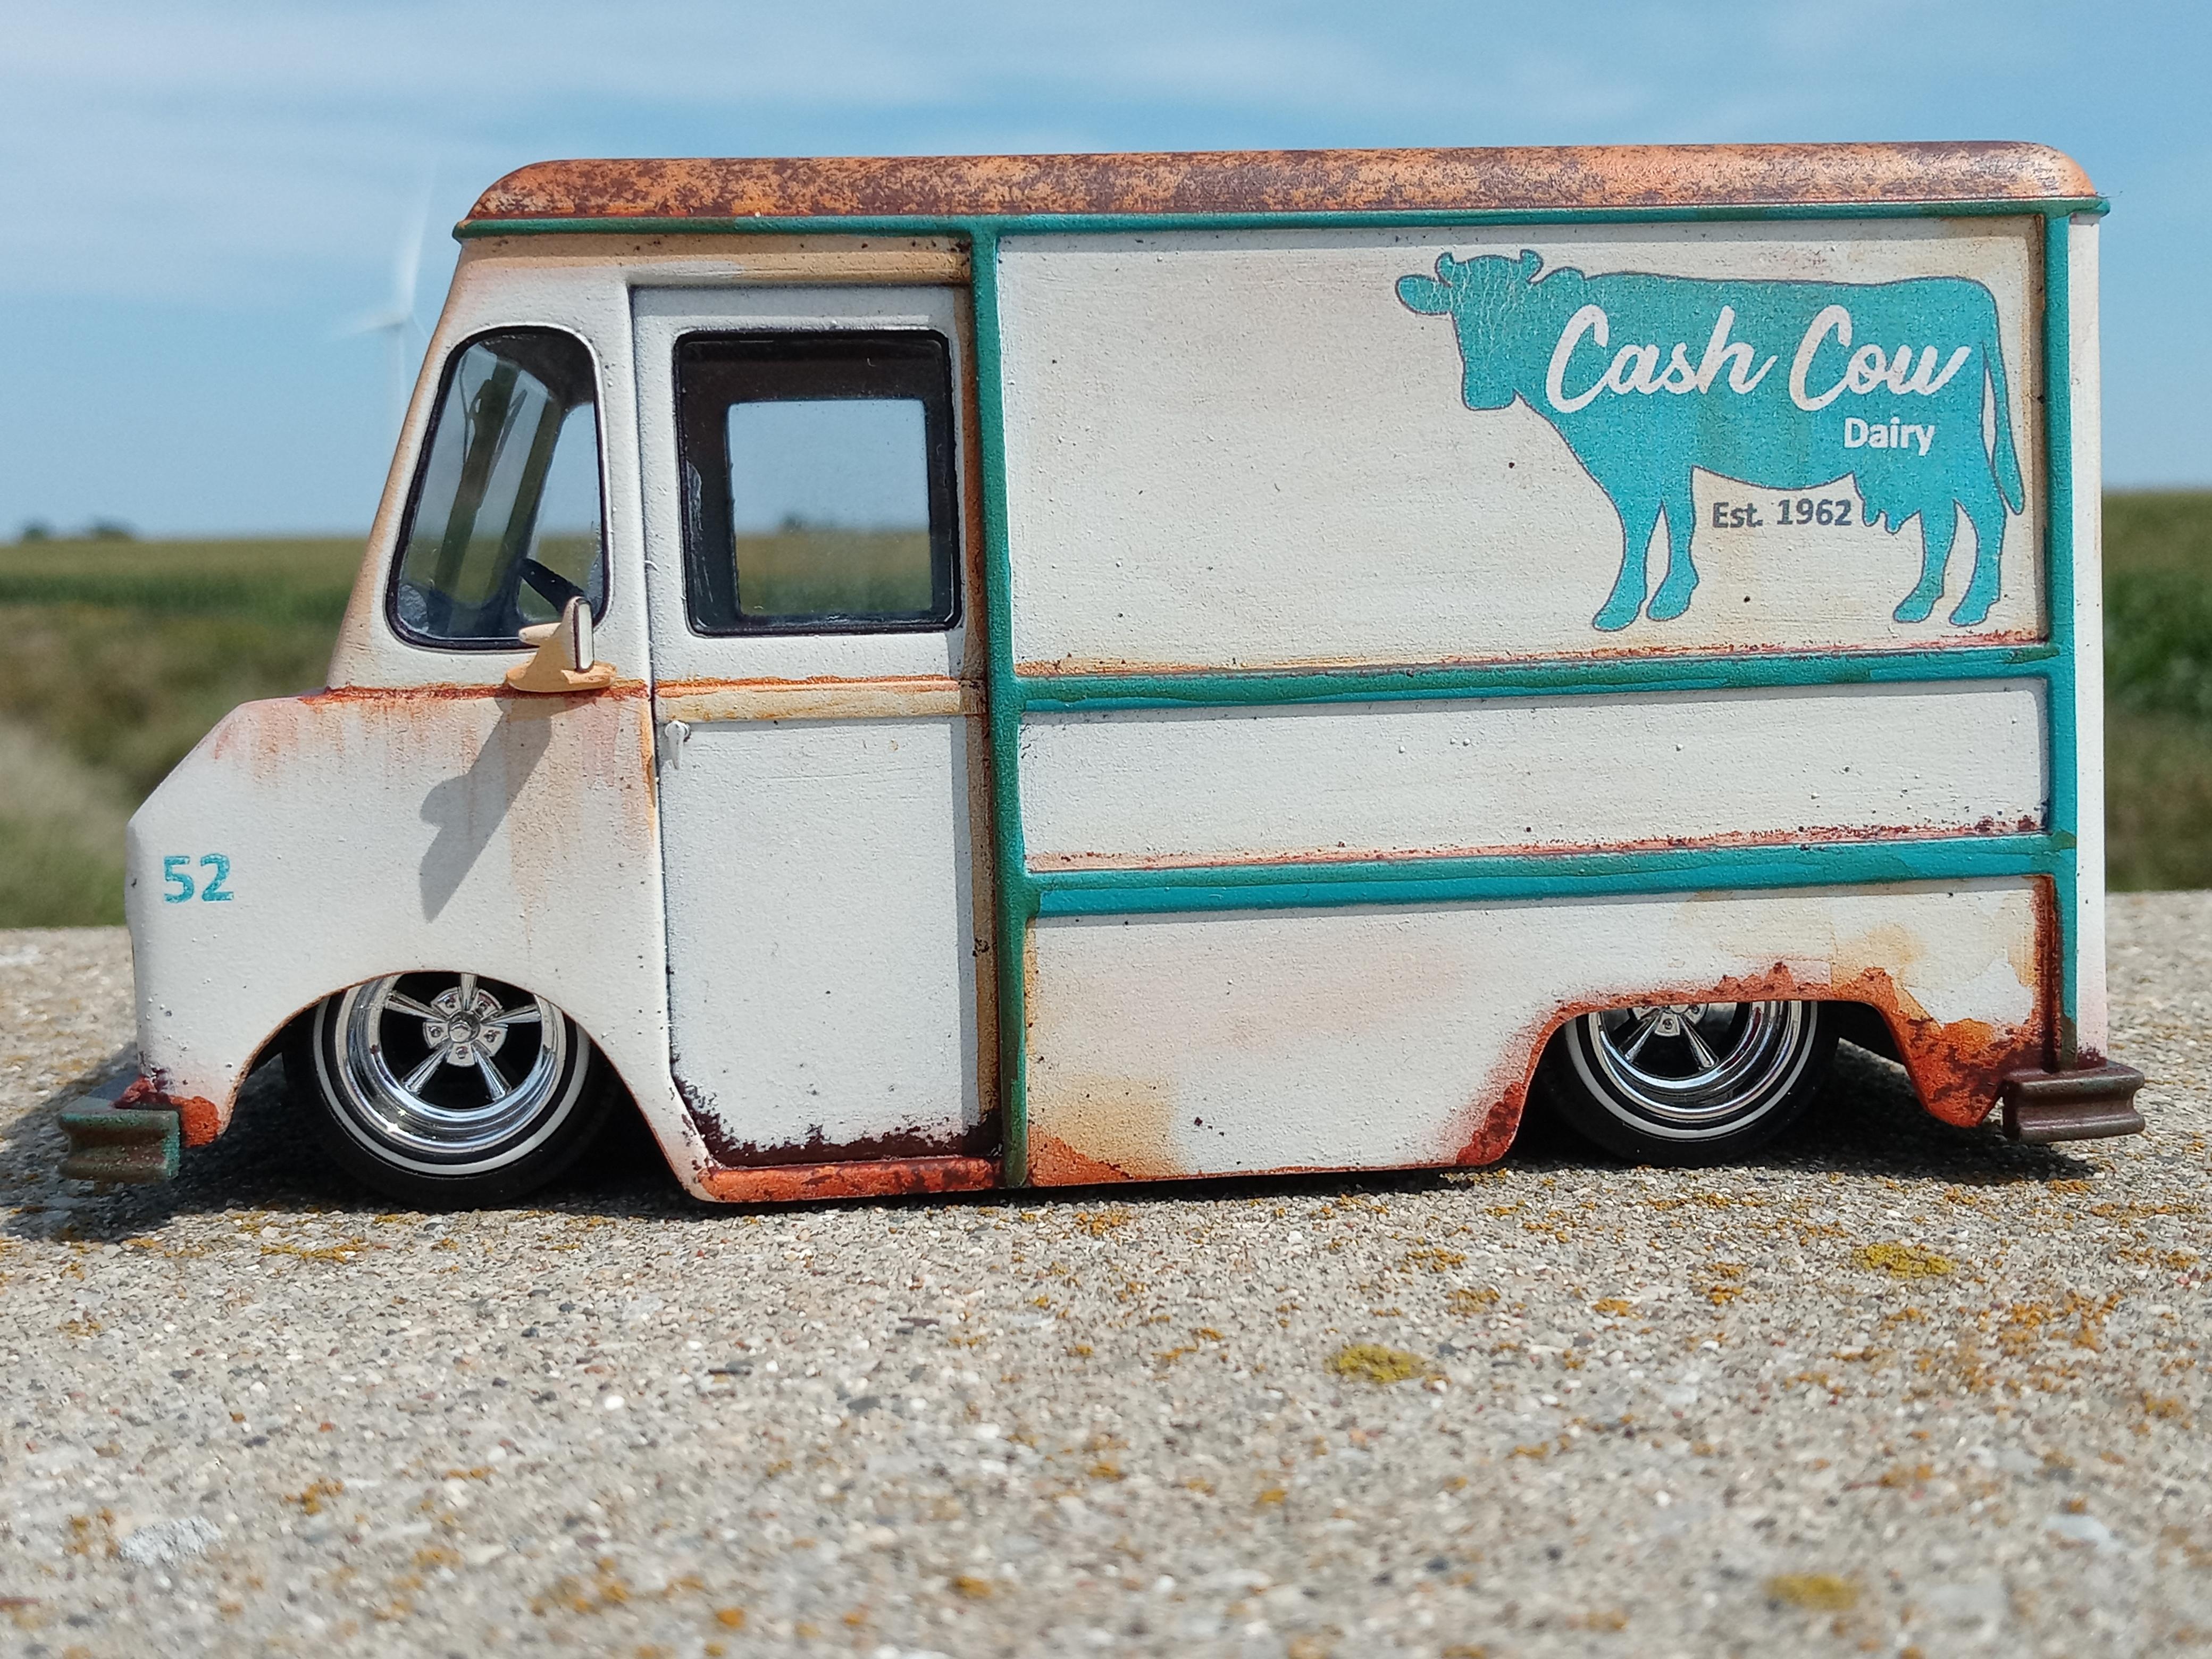
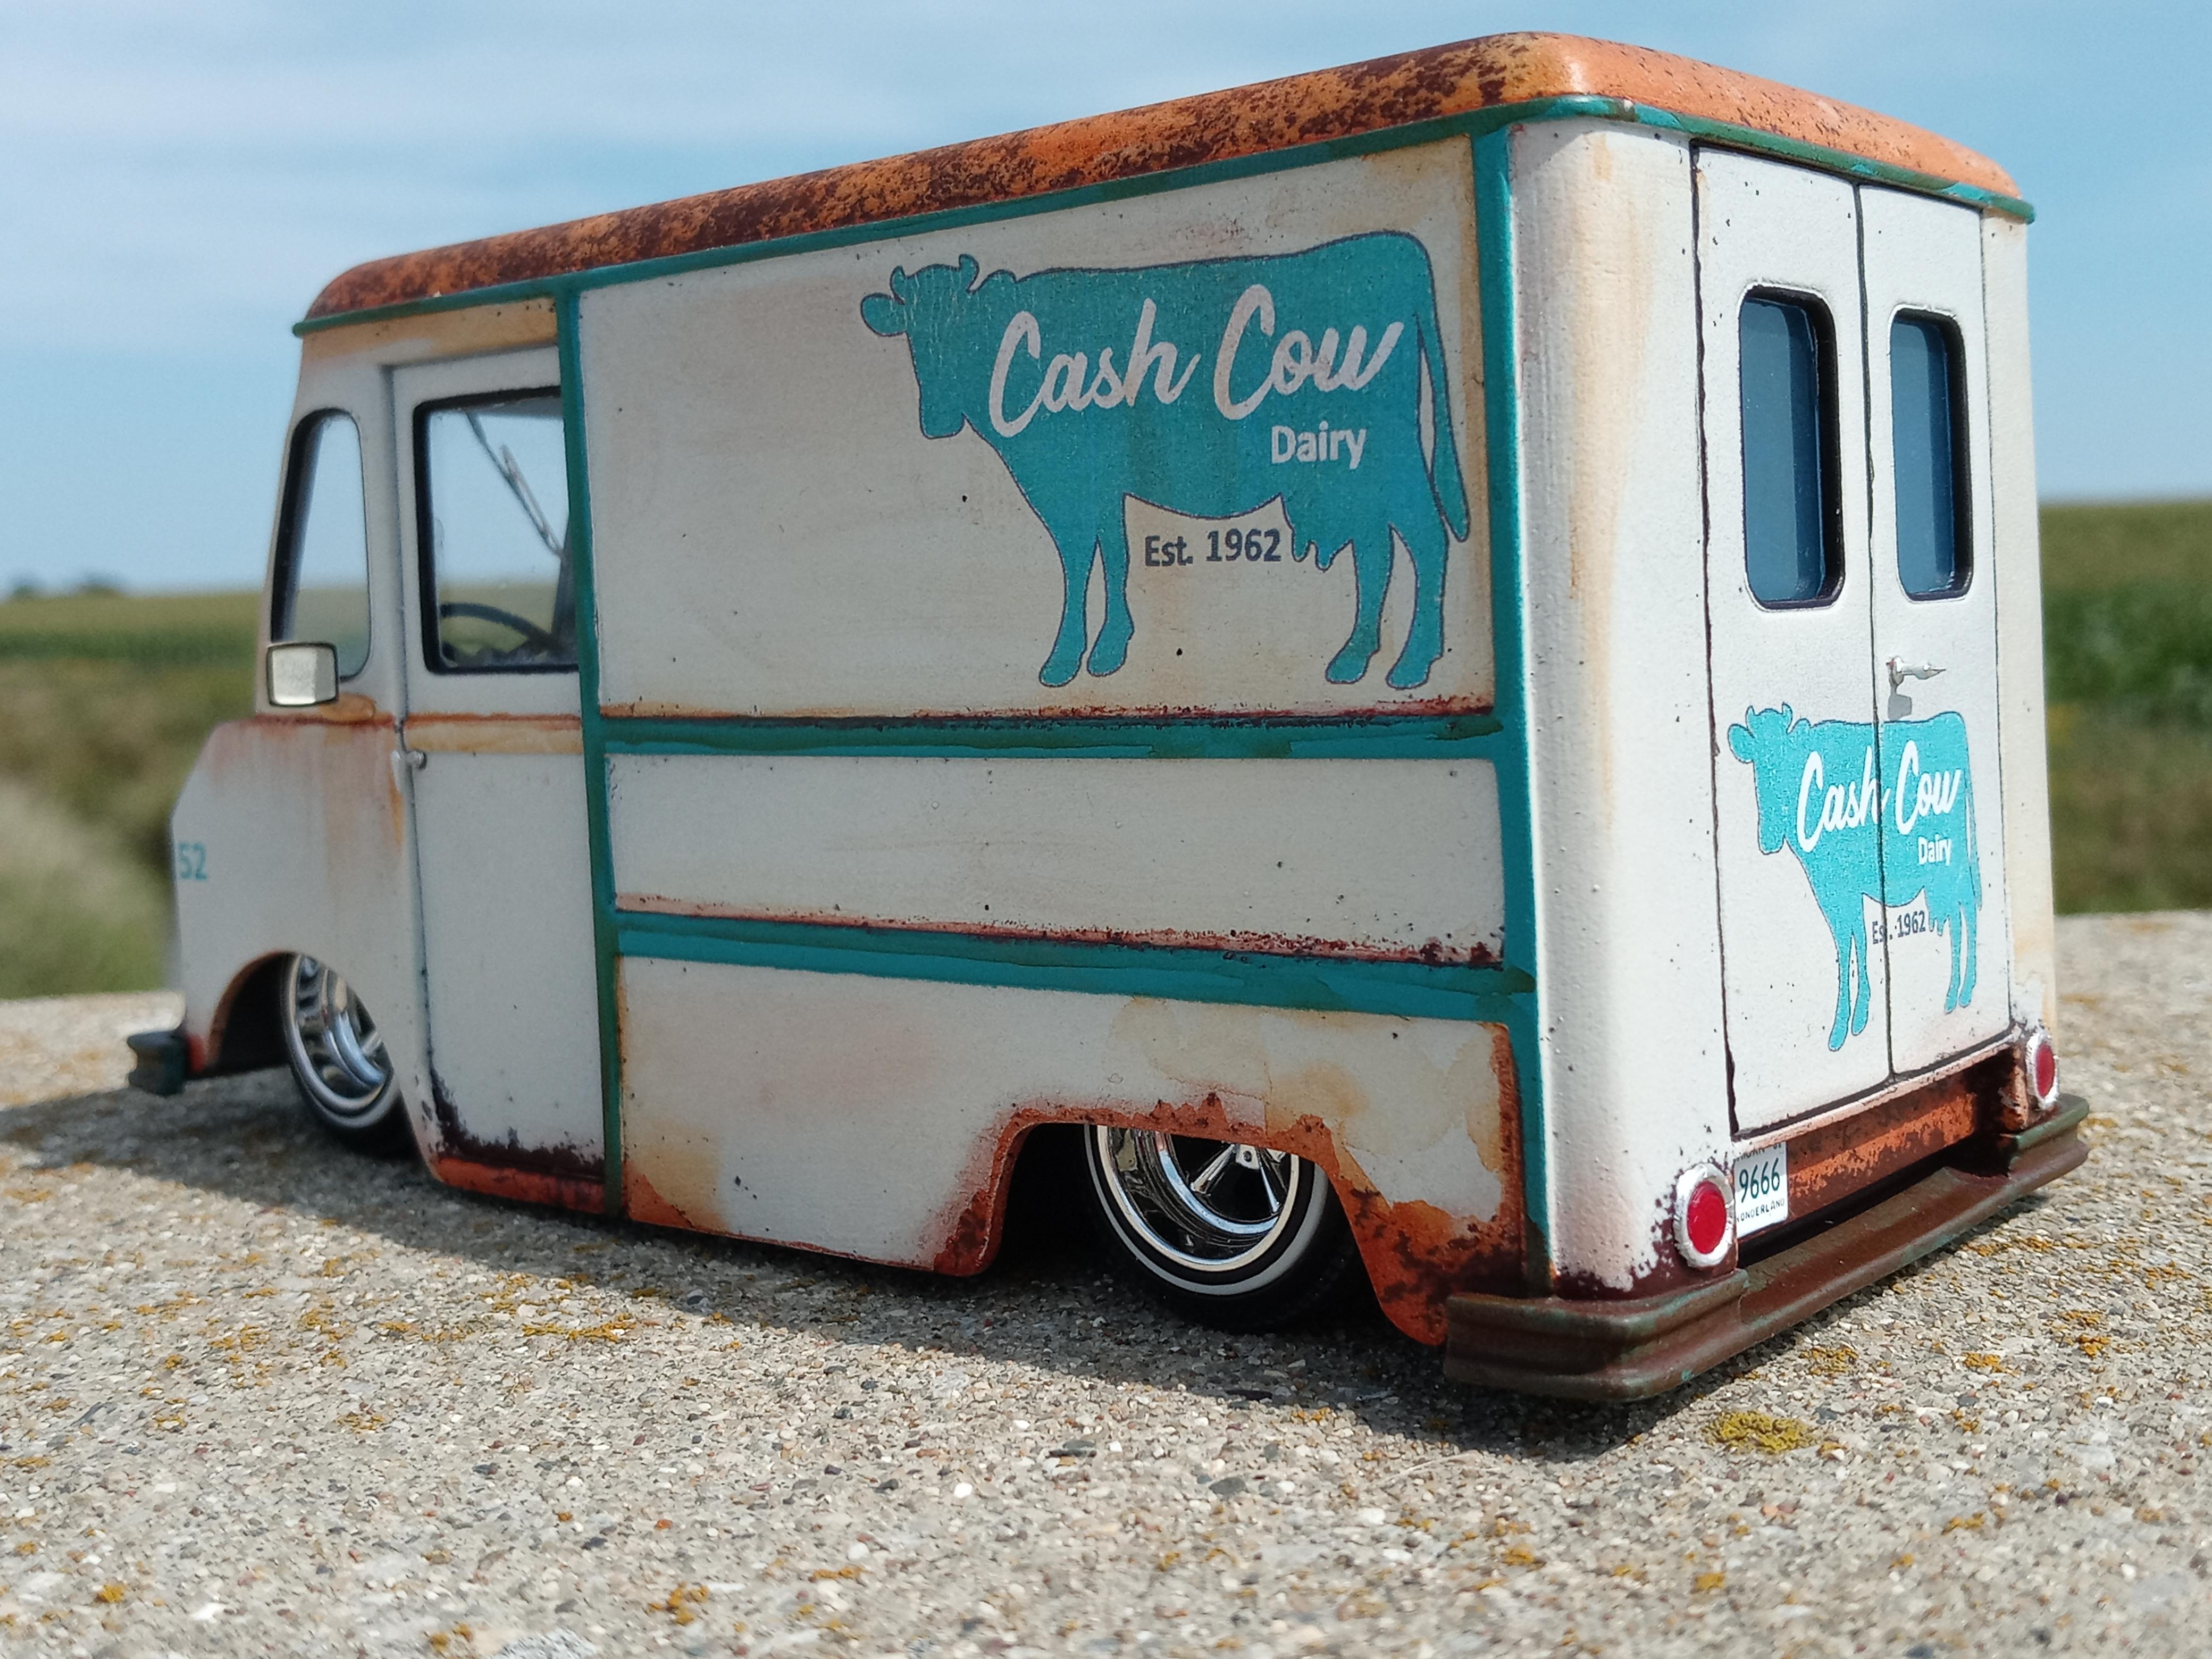
This is the @IceMan Collections printed resin kit. It was a limited run and I managed to nab one of the last of the milk truck version. After debating on a paint scheme I thought "why not just use the supplied graphics?" It's tubbed at both ends to represent an "aired out" suspension with Pegasus wheels and tires. Paint is good old Krylon chalky rattle can paint, distressed with salt, Vallejo rust washes, AK Interactive weathering pencils, and Monroe powders. Inside is a GM tilt column, a ridiculous stereo system, the air suspension components... And a crate containing a quartet of milk bottles.
-
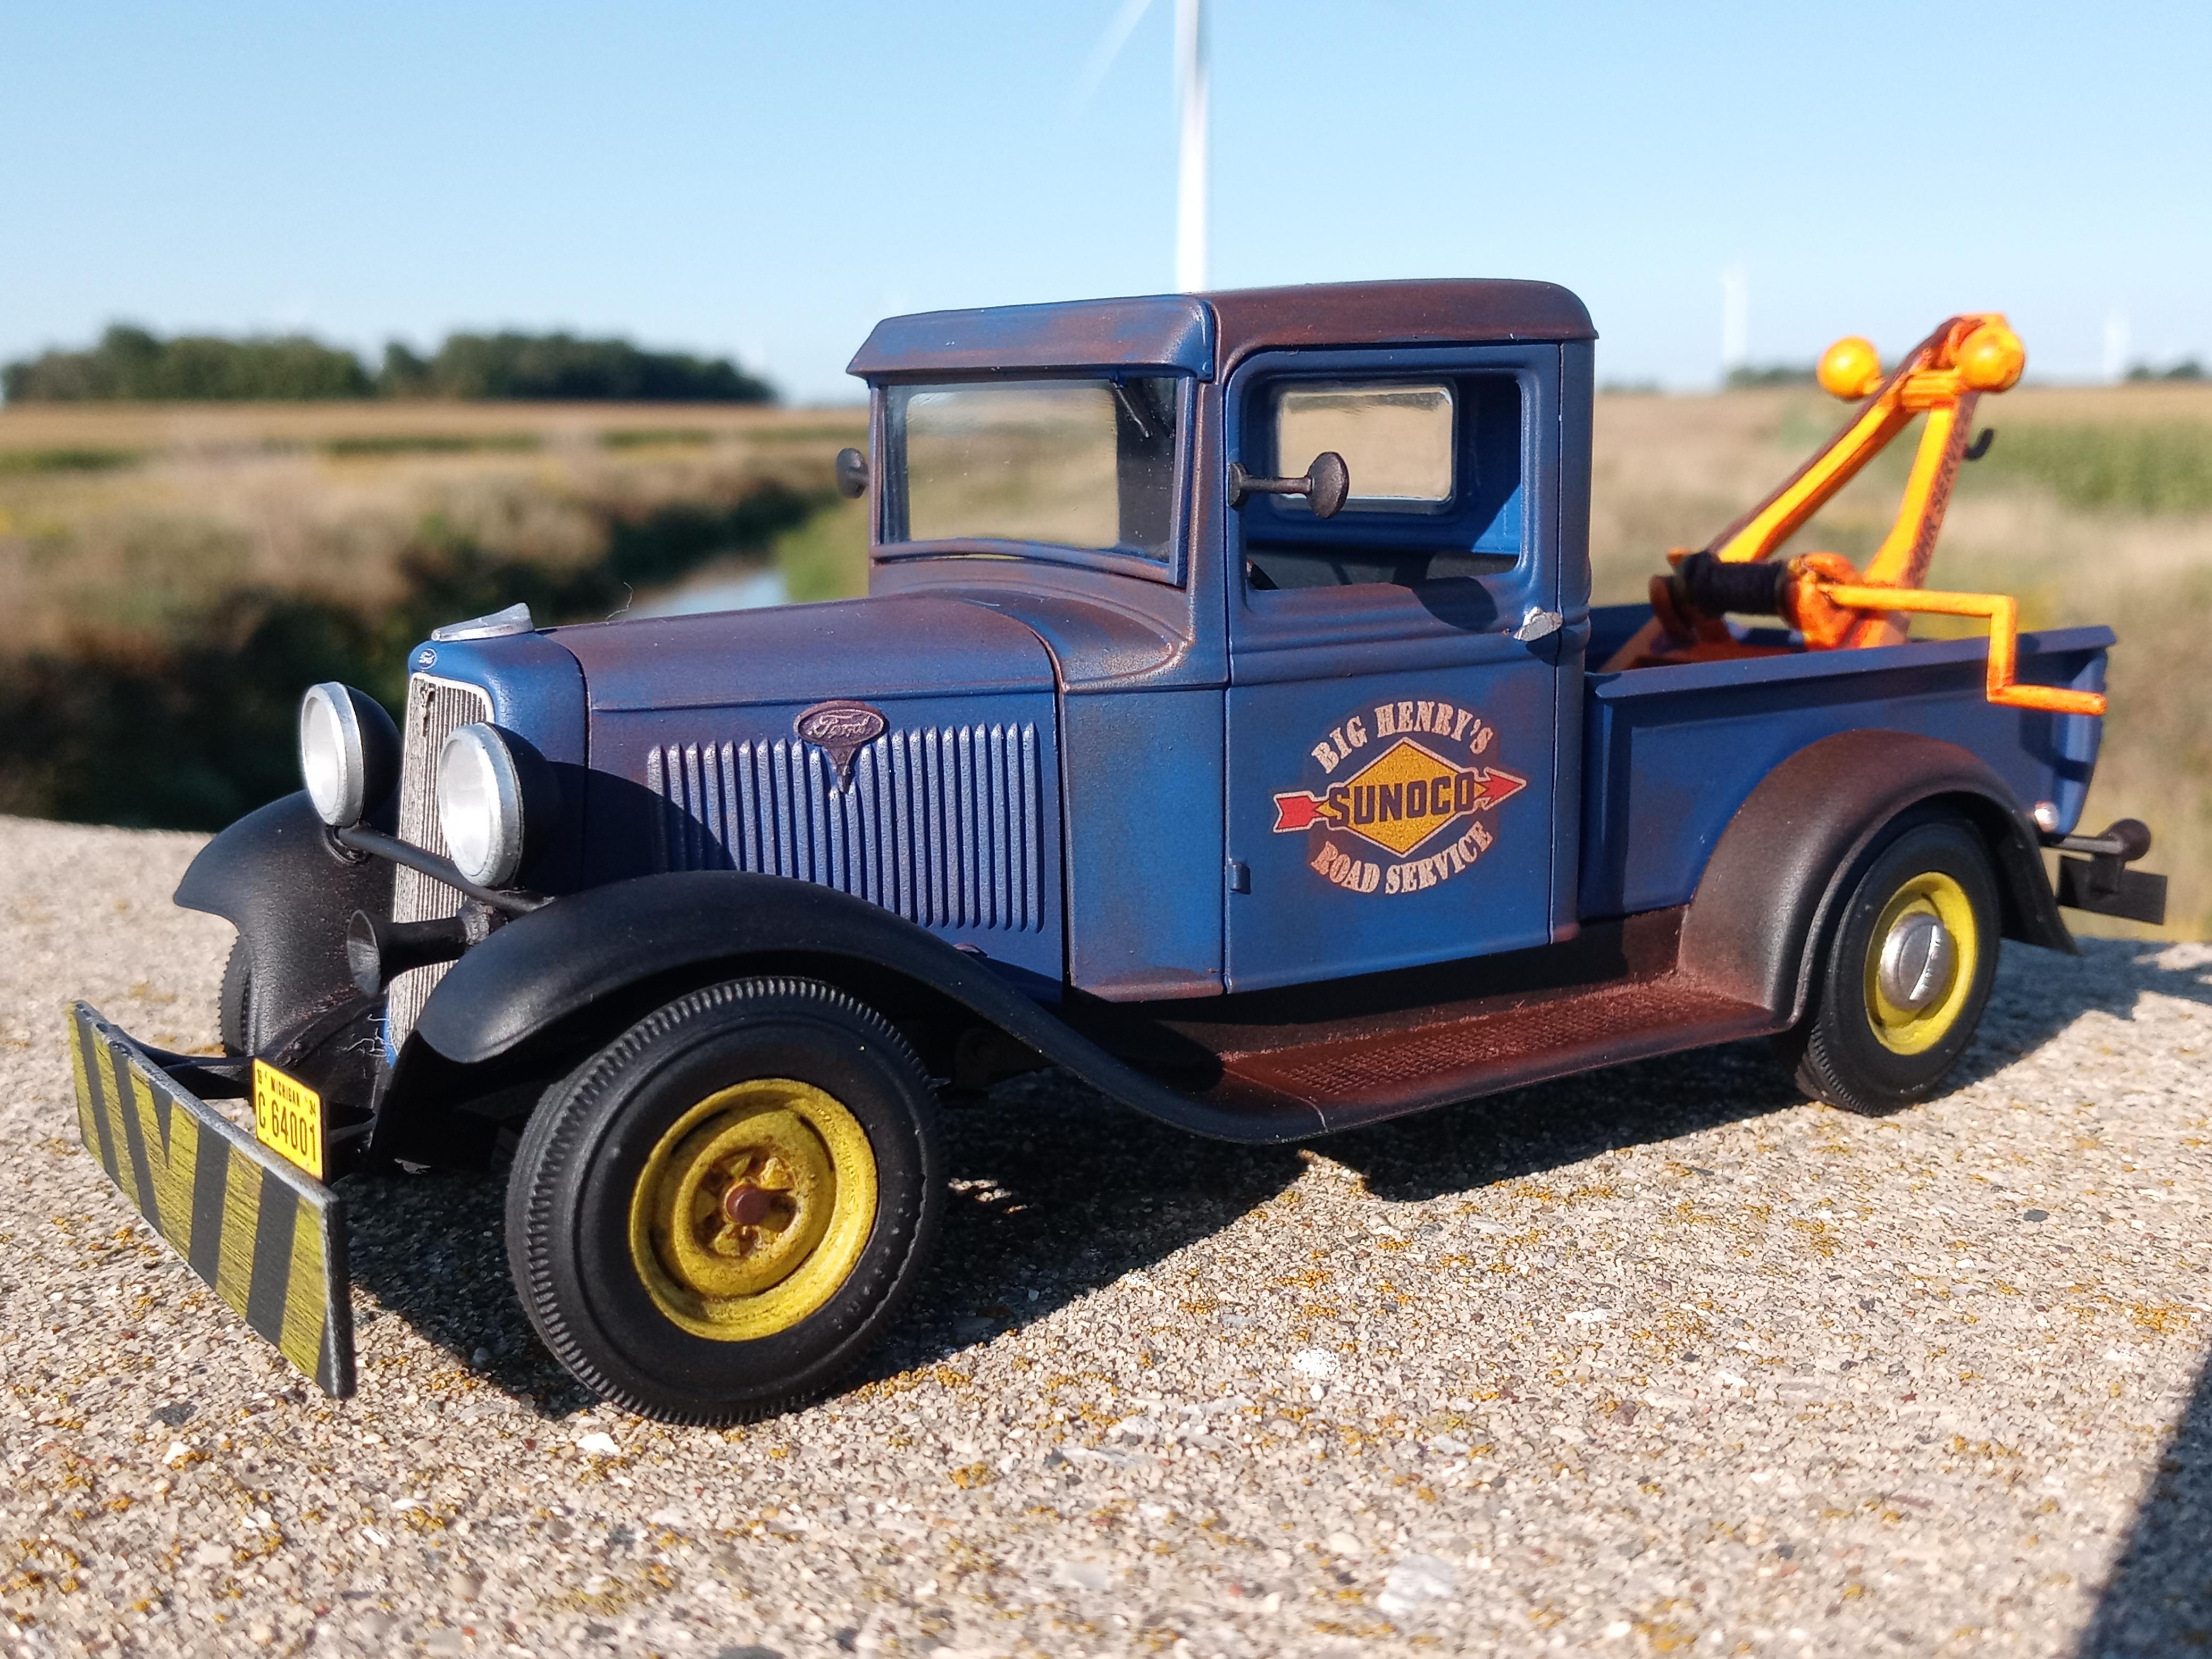
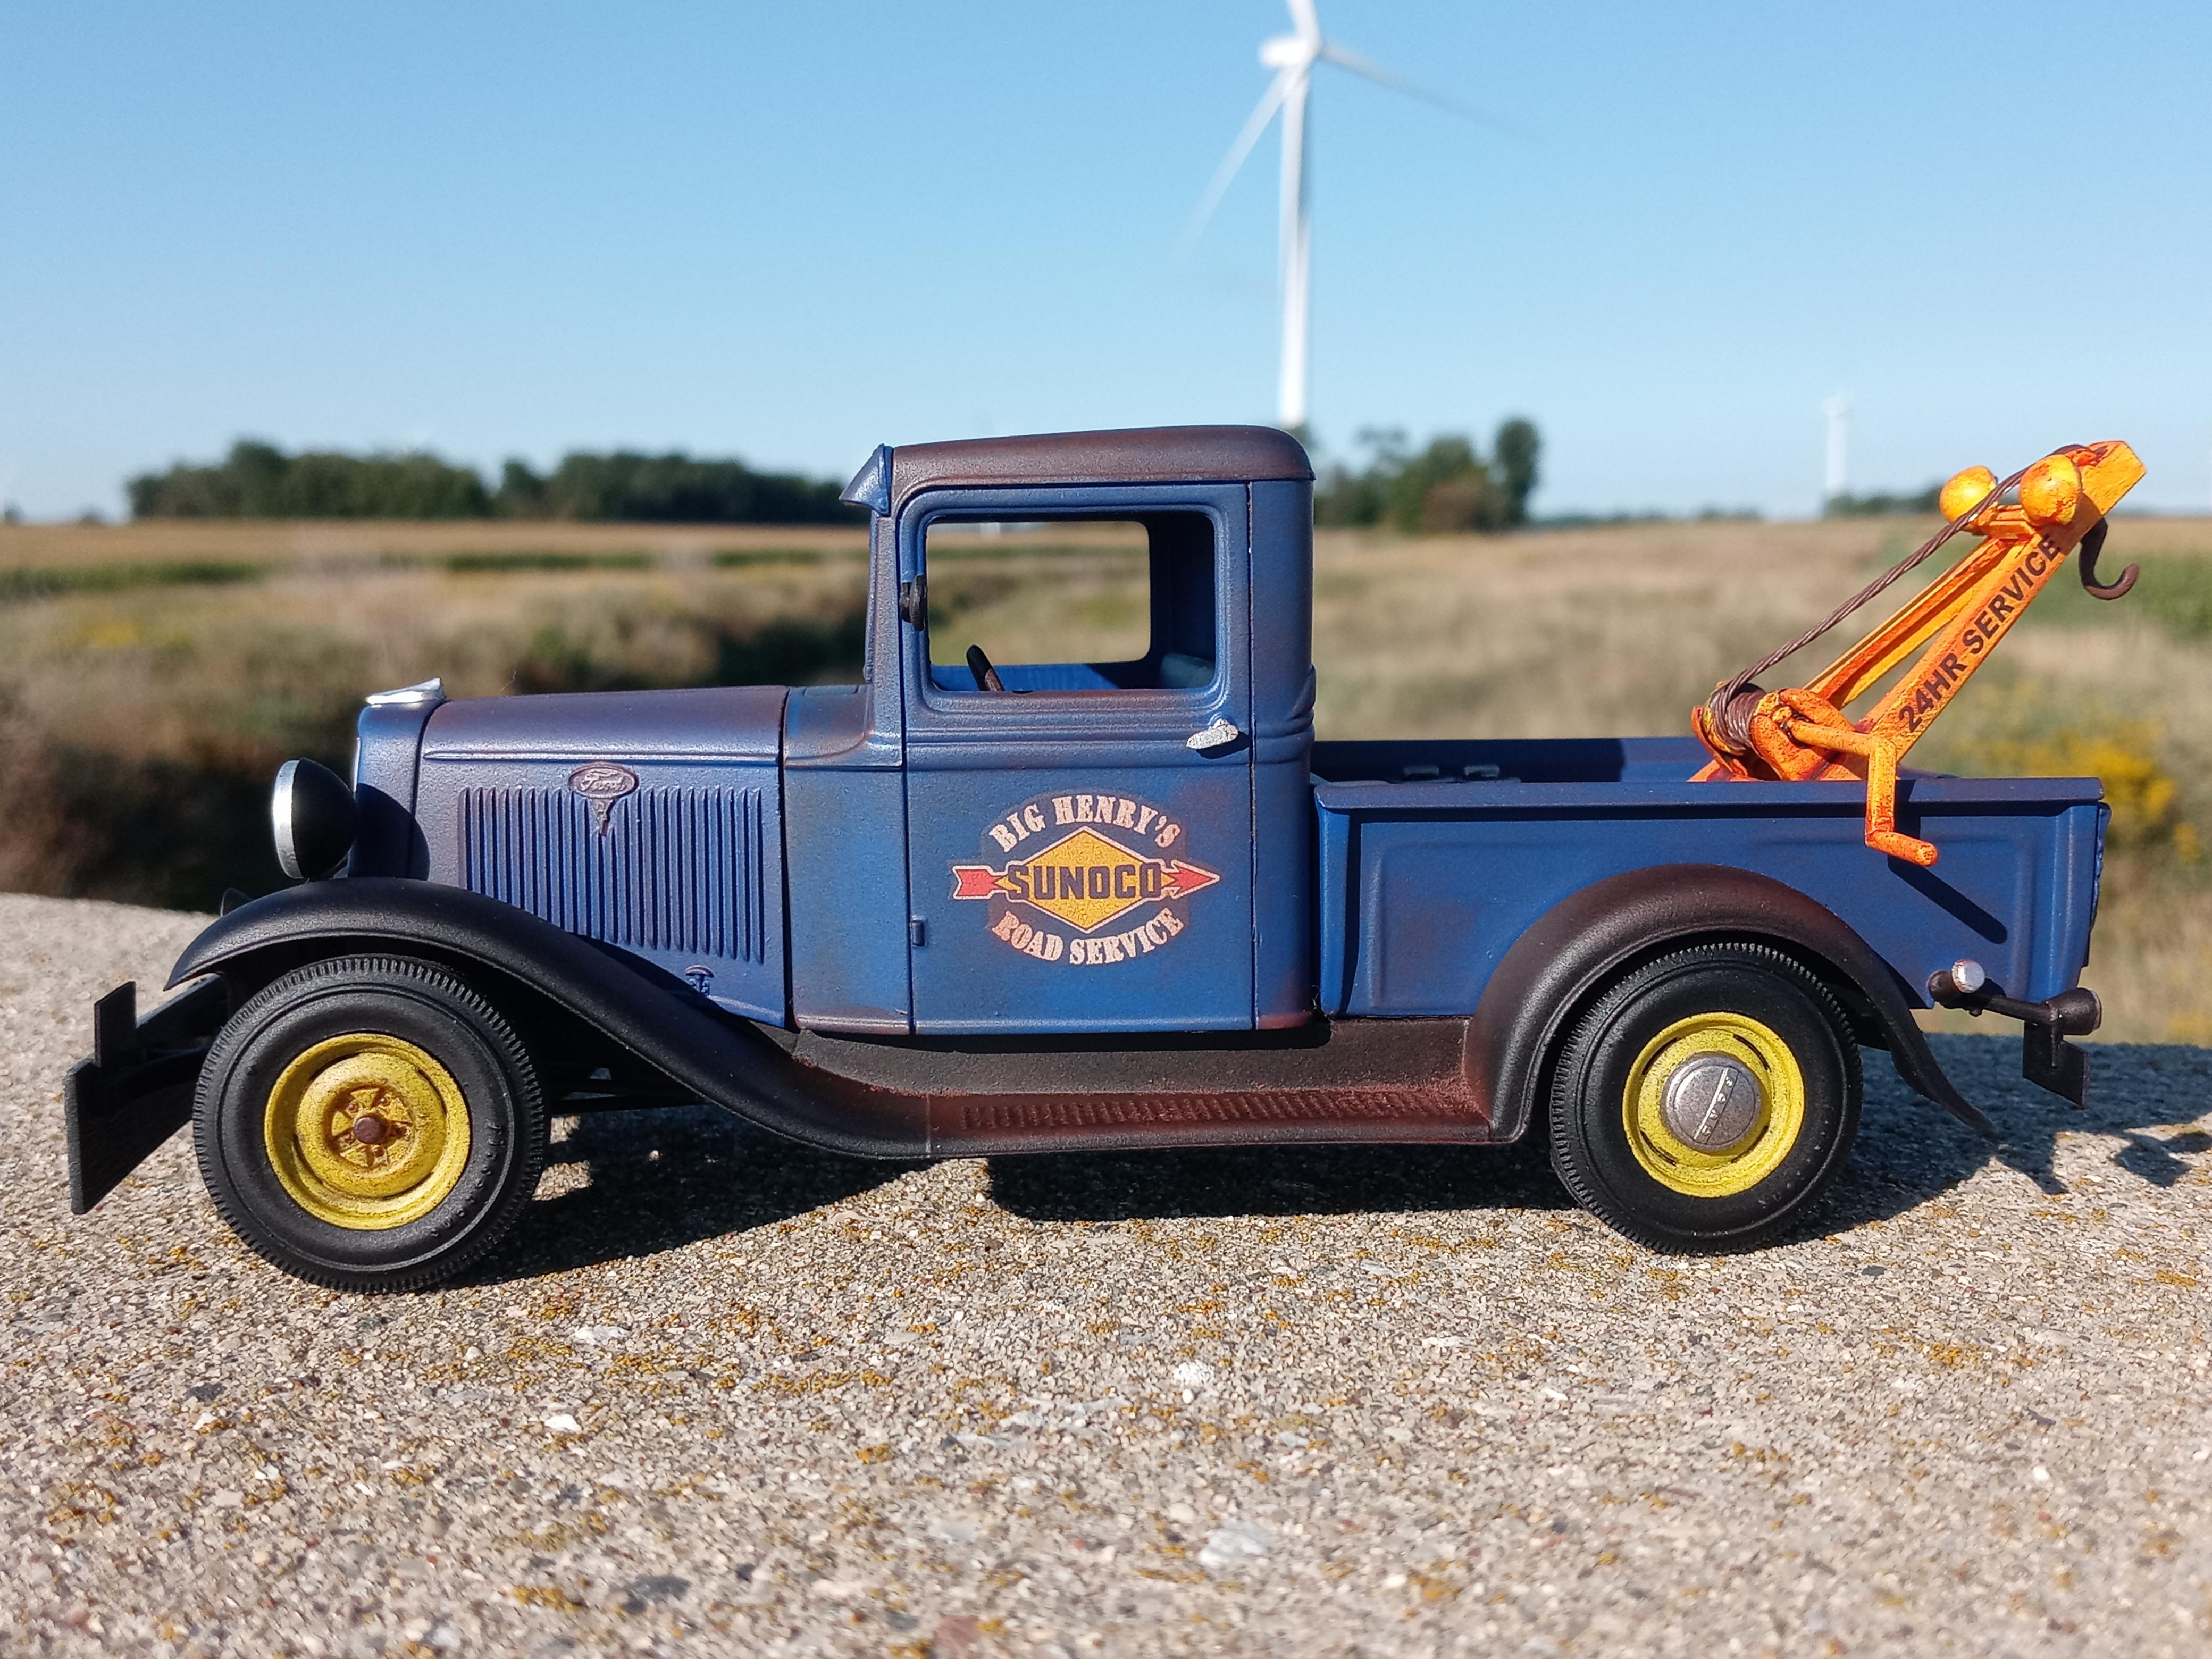
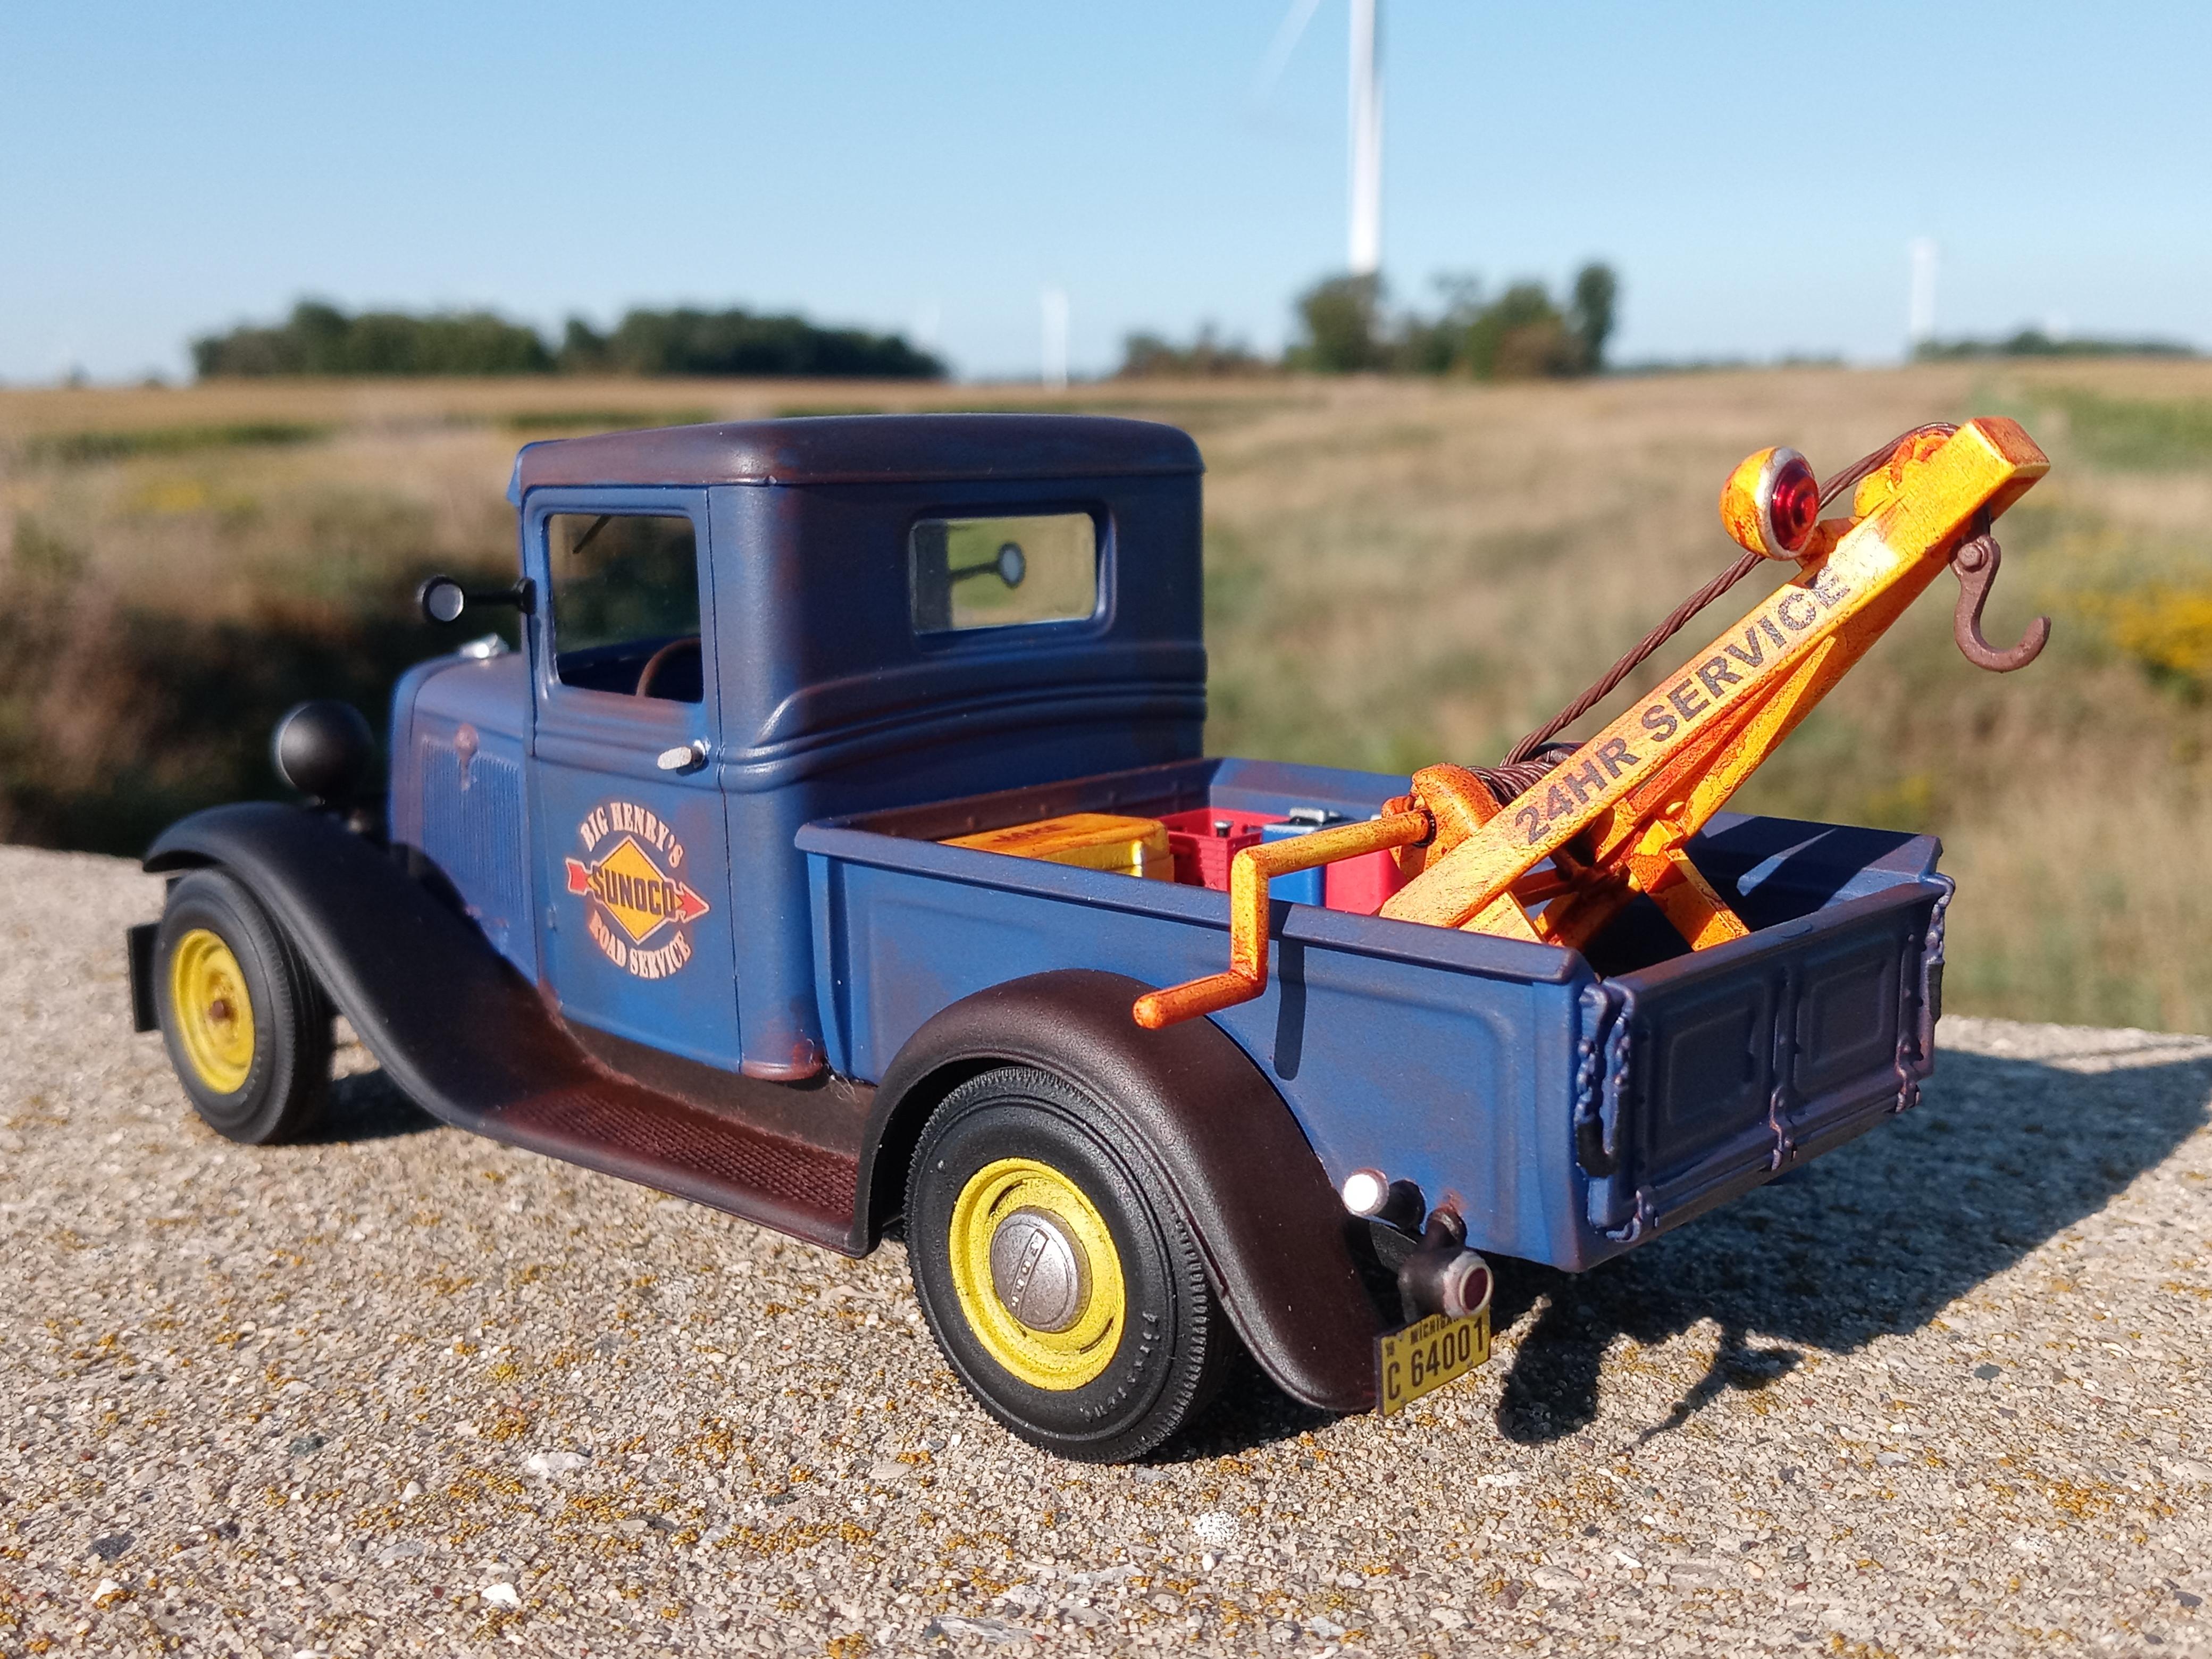
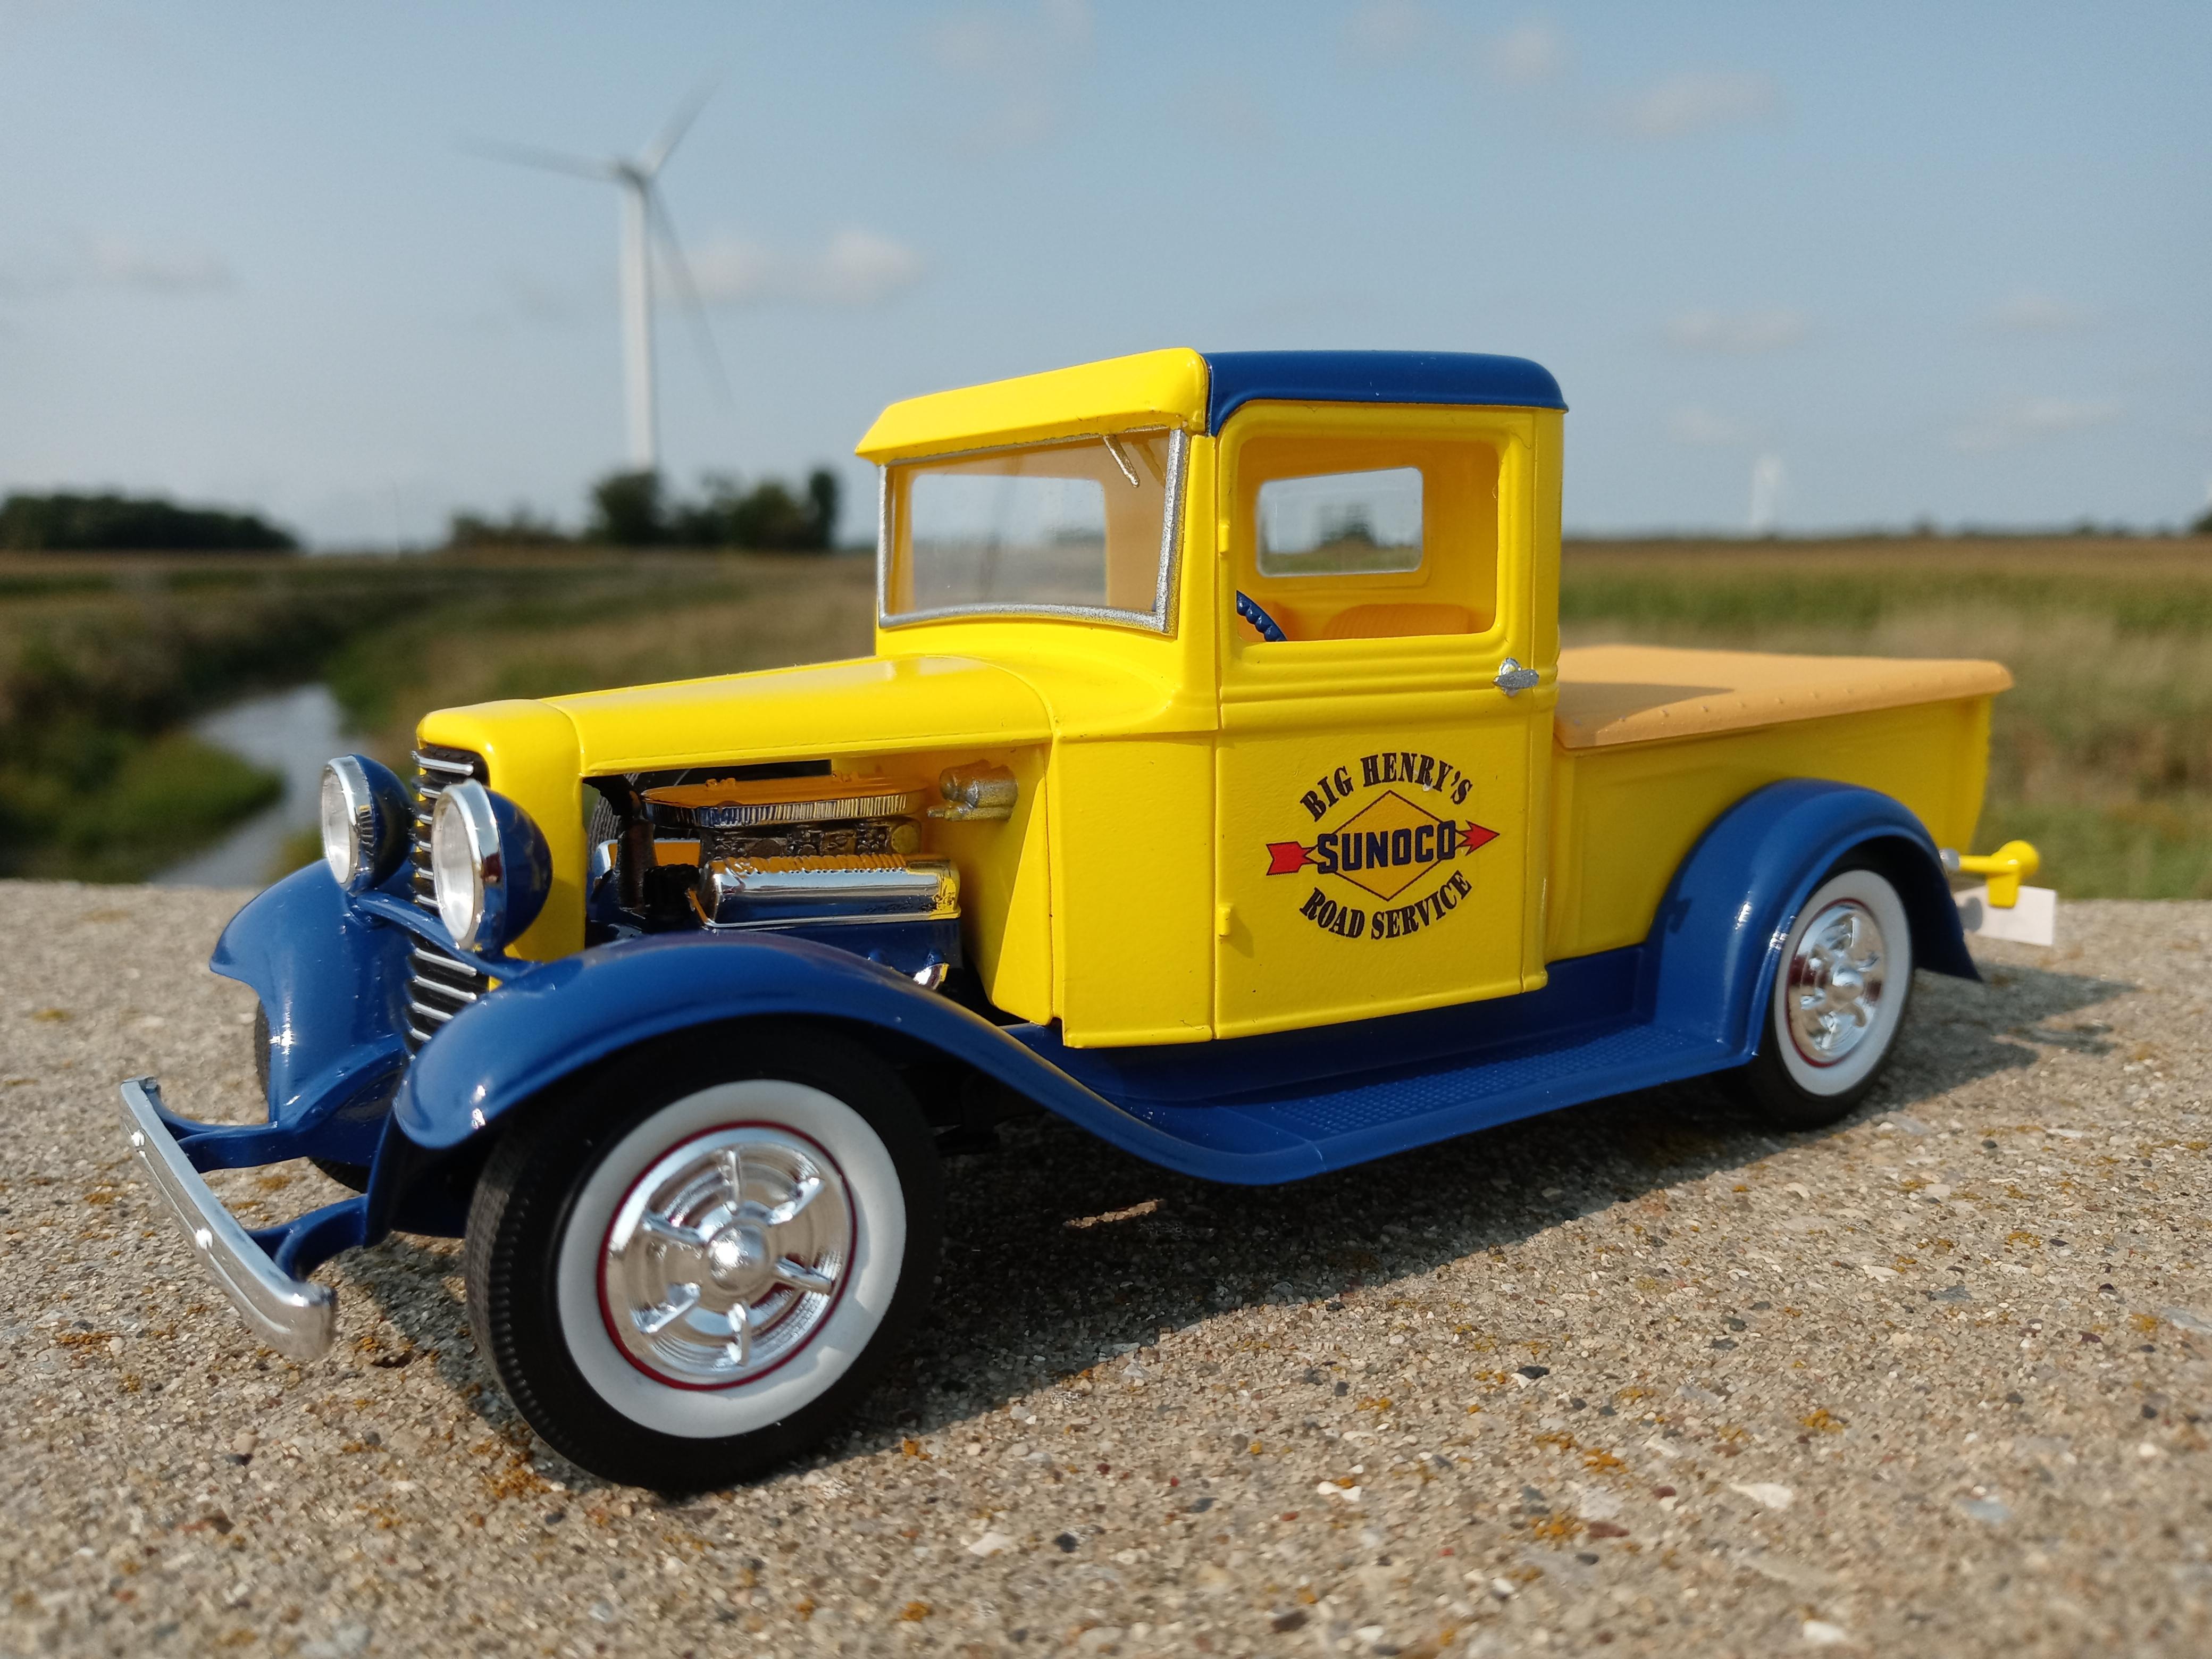
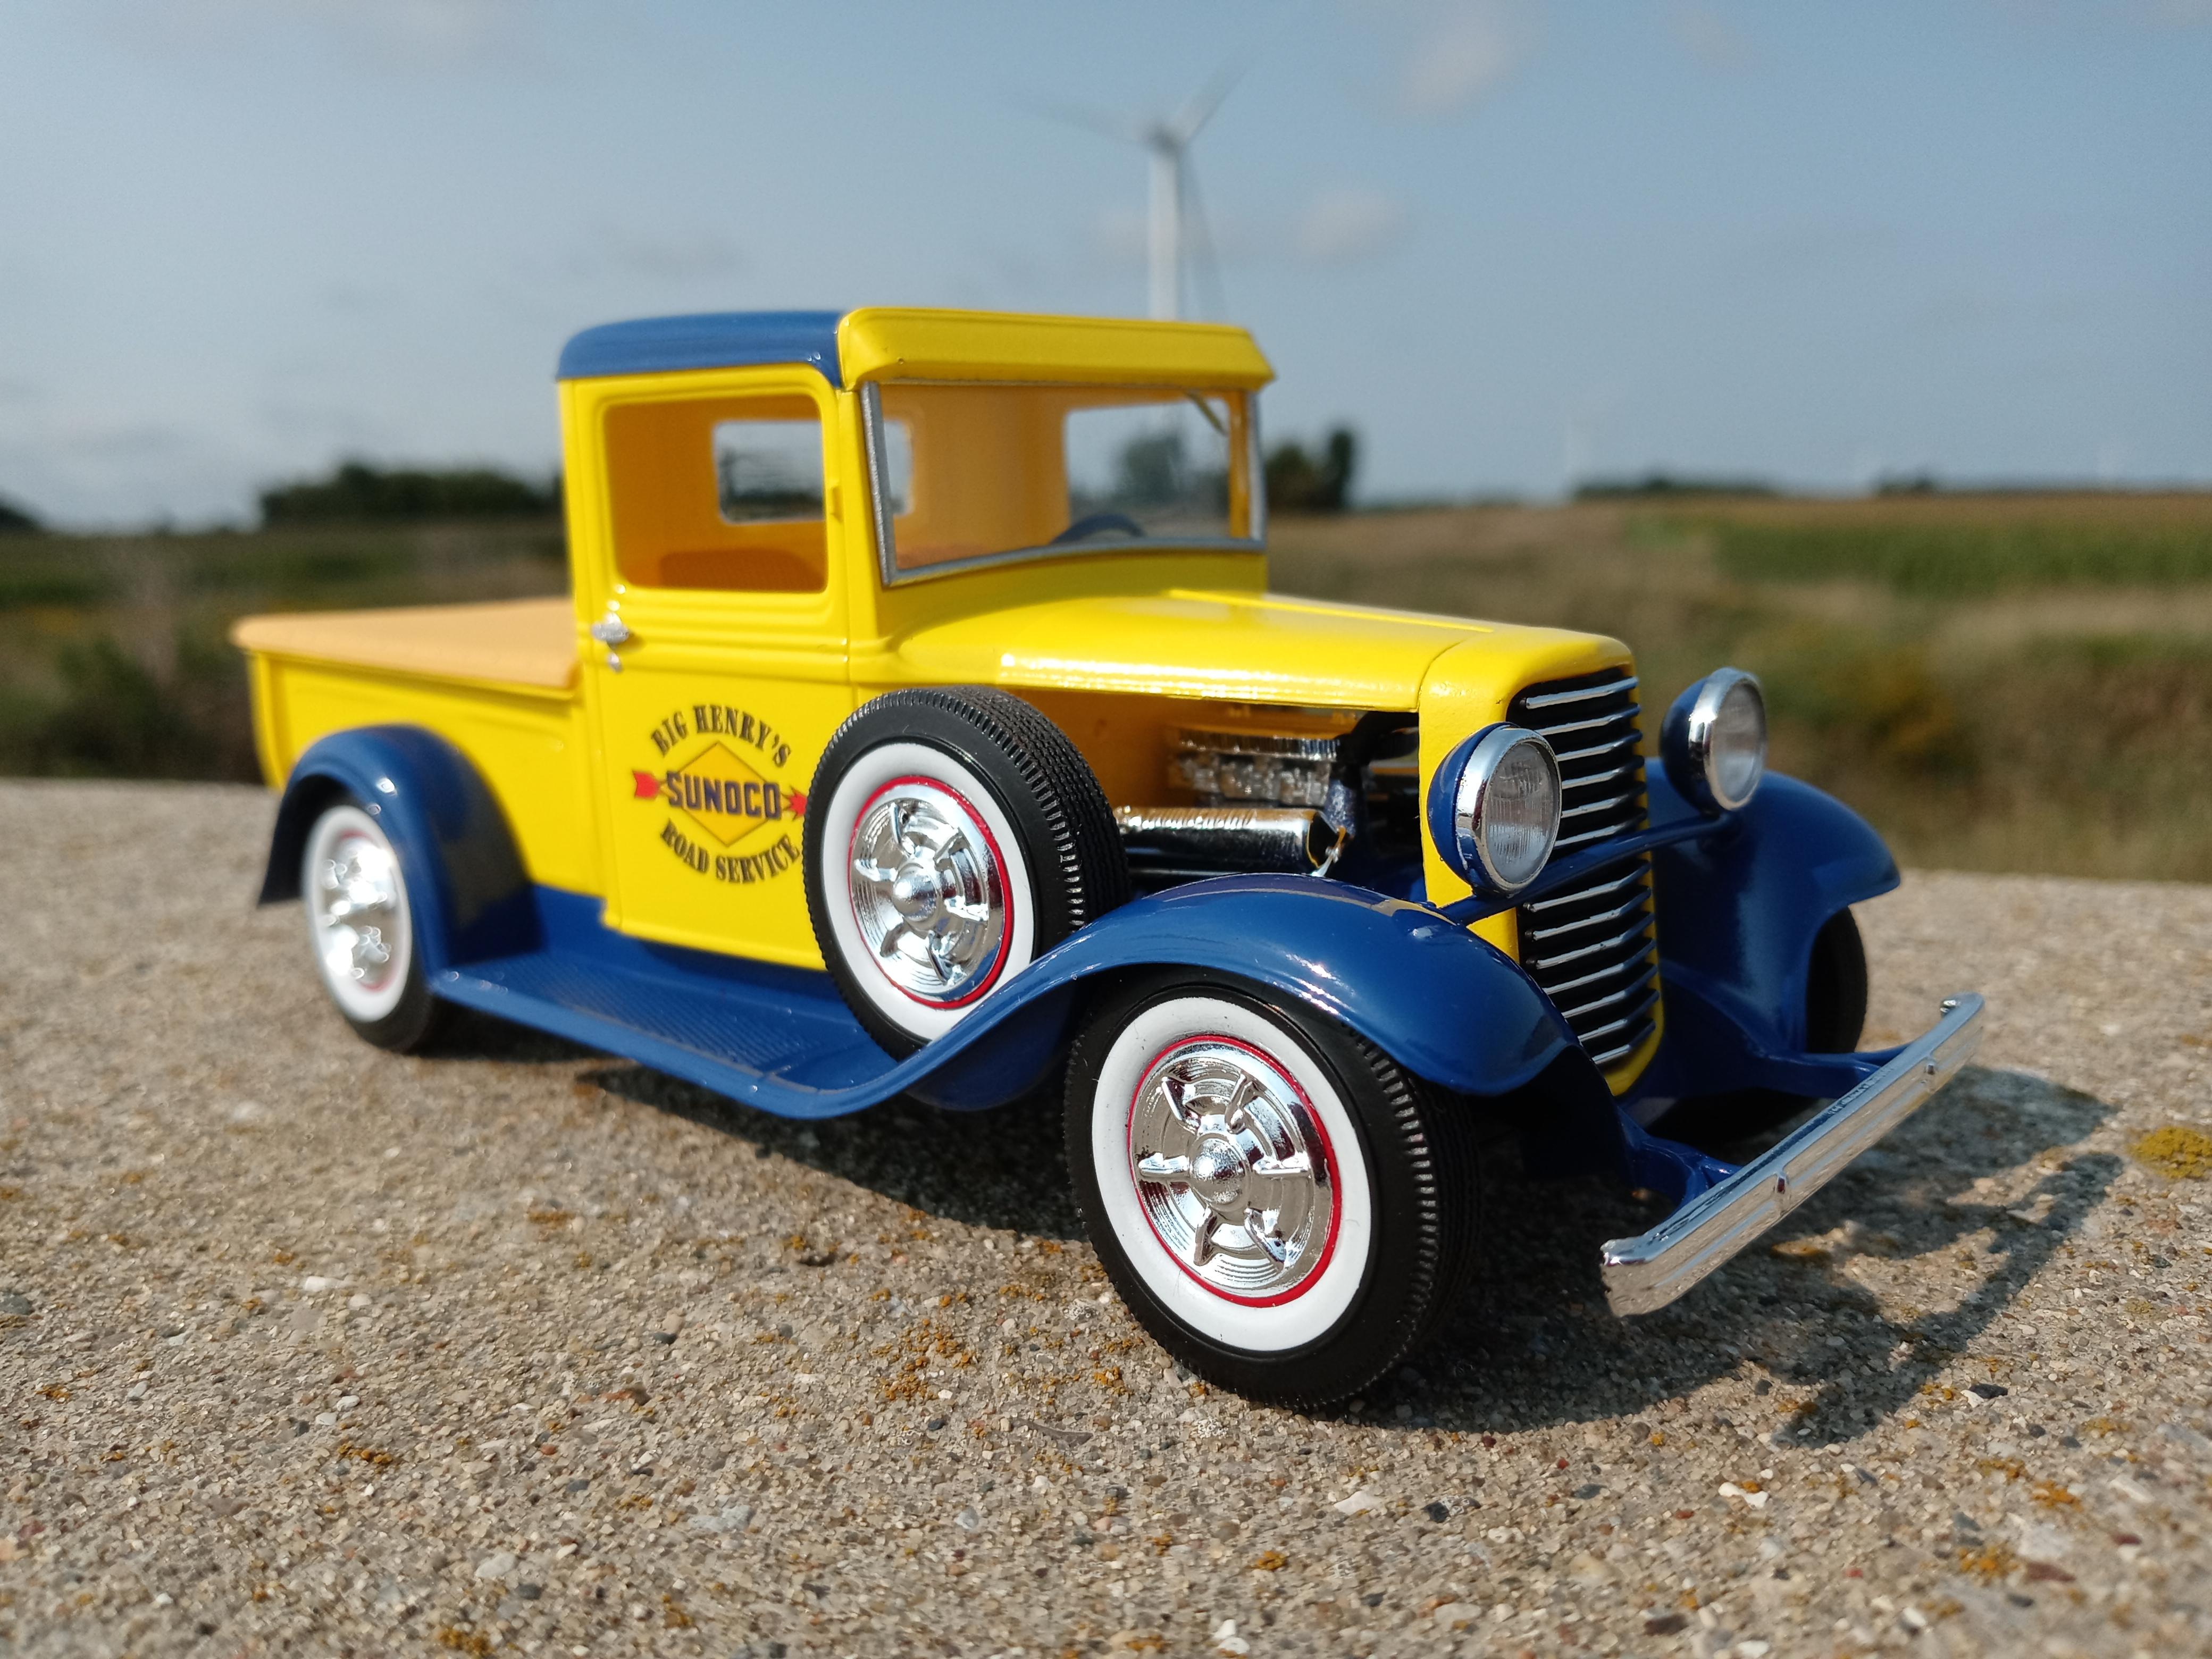
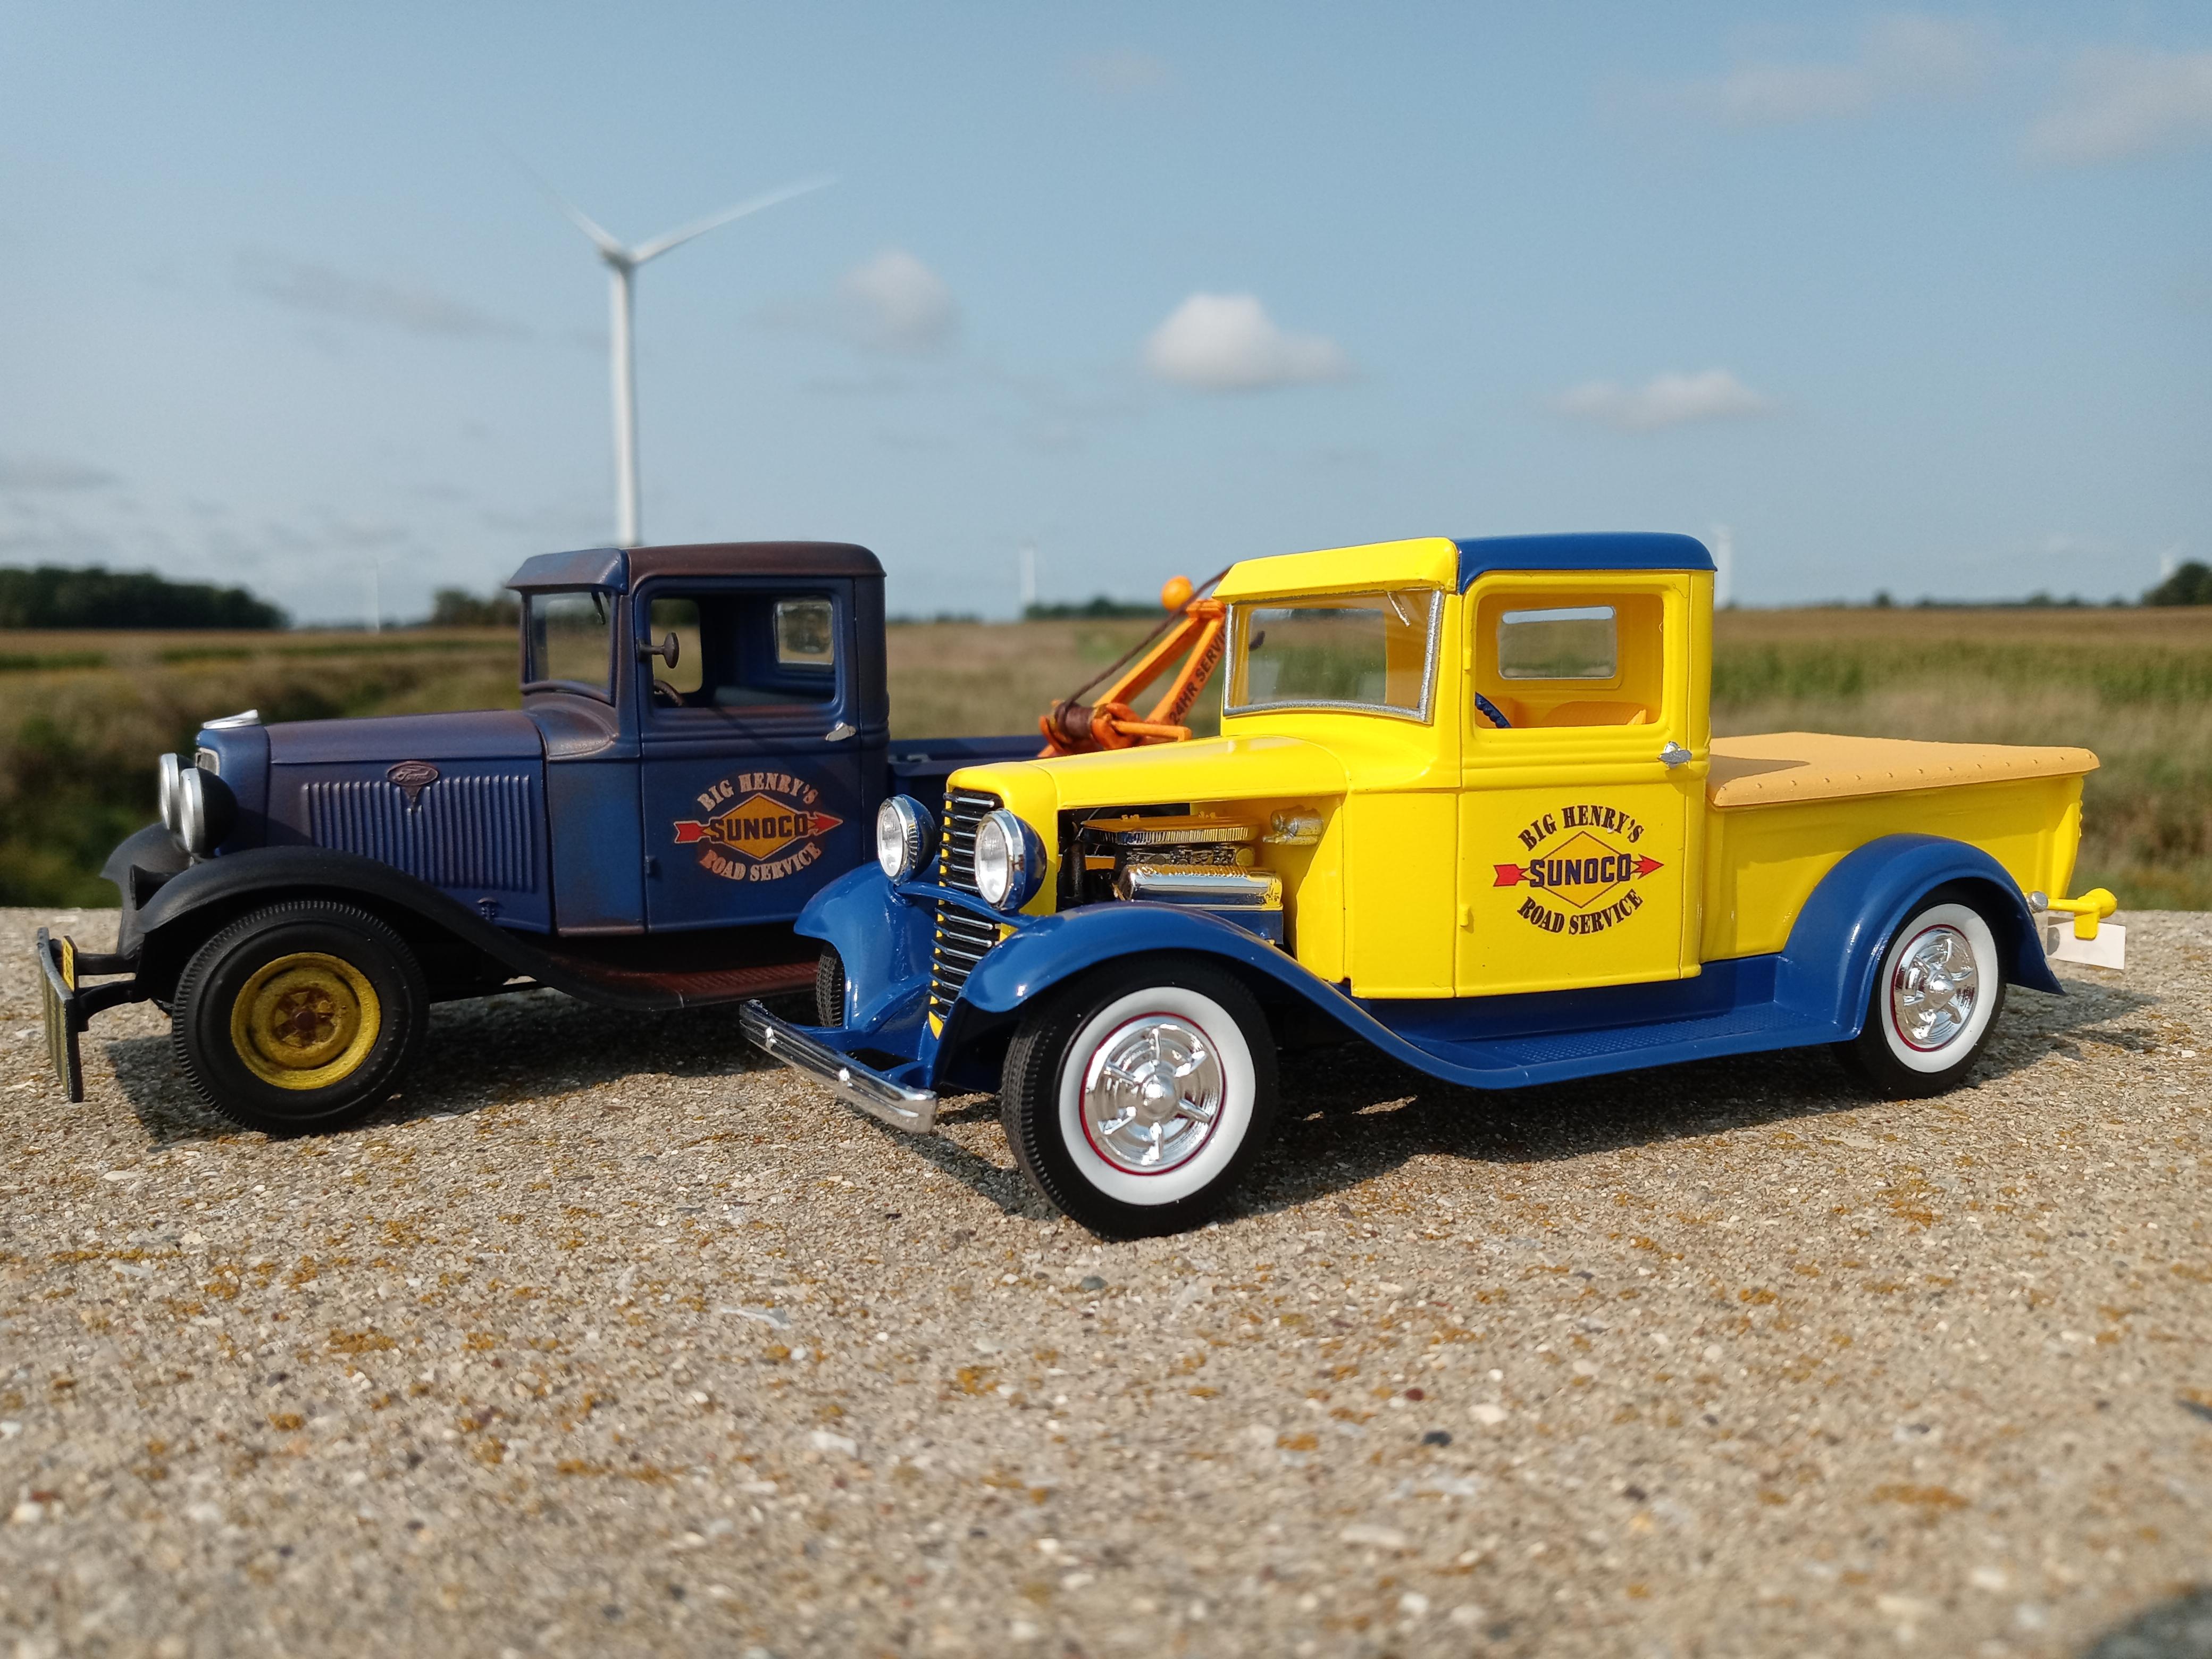
The wrecker is the new Sunoco reissue. I kept it mostly box stock aside from some 53 F100 wheels and some extra junk in the bed. I used the kit supplied 390 but I wanted something a bit more utilitarian than the three two setup, so that was replaced with a 4 barrel intake and heads from a Moebius F100. The street rod is a 2000s Lindberg reissue but was inspired by the AMT Sunoco box side panel. Again it has F100 wheels and covers this time. The pleated tonneau cover came from a 1992 Lindberg reissue. Decals, of course, are left over from the Wrecker. About those decals. They adhere right now and don't like to budge once off the backer. Wetting them and the doors with soapy water was a must to position the things. Not really a problem... If you're expecting it. ?
-
Been a long time since I built a hot rod. So here we are. The cab and bed are from the AMT/Ertl reissue of the old MPC '29 Ford Woody/Pickup. The cab was modified to fit the firewall and interior from the Revell '29 Model A Roadster, and the bed was cut down. Speaking of the Revell Roadster, that's where pretty much everything under that cab and bed came from. The entire chassis from that kit was used, along with the radiator, grille shell, and headlights. The wheels and tires were donated by a Revell Rat Roaster. The kit's Chevrolet engine was swapped out for the 5.0/AOD combo from a Revell 1932 Ford street rod. It was capped off with the staggered dual quad intake and twin McCullough superchargers from the AMT Barris Surf Woody. The conical air filters are from Iceman Collections, and the hitch is from Scenes Unlimited. The blanks were filled in with minor scratchbuilding and kit parts.
-
Well it’s finally announced.?
Chuck Most replied to NYLIBUD's topic in General Automotive Talk (Trucks and Cars)
But that would mean we would need to change the way we do things, which would be hard. So why not wait until the consequences come around to bite us? Then we would need to change the way we do things, which would be hard... but we don't have to worry about it right now. We can do it later! (Note: For the people seated in the back, my remark is what we call "sarcasm". Tom has a salient point here.) -
That's just typical Sony. They really need to stick to consumer electronics.
-
Fun fact... the vehicles and gadgets in these movies were designed to be "toyetic", a term Schumaker had said he'd never heard before helming these Batman flicks. Basically the producers worked with the prop designers to make the movie props easily marketable as toys. Probably explains quite a bit for how this version of the Batmobile looks. I know this because I watched the special features on the Batman and Robin DVD... the movie makes a lot more sense then. Pretty bad when the behind the scenes featurette is more interesting than the actual movie.
-
I didn't so much build this kit, as put it out of it's misery. Sheesh. This thing had more warp than five seasons of Star Trek. Which series? Pick one. The best parts on it are the Missing Link hood and wheel covers. Said hood fit perfectly, better than the kit hood, even... until the chassis was inserted. Now it's a little high at the driver's rear corner. It was worse but with a little trimming to the underside and a bit of gentle bending I got it somewhere near presentable. Other than those and the tires (robbed from an MPC 1978 Dodge D150) it's box stock and coated in Testors Root Beer. Well... the plates aren't fromt he kit. The front one is from Best Model Car Parts and the rear one is from Three Inches Under. I managed to find a small strip of unused BMF from before it was "improved" so at least I wouldn't have that headache on this one. Kind of a junker but I'm guessing the actual 1973 Satellites weren't any kind of master class in craftsmanship either, so I guess it fits. At least that's what I'll tell myself. I've heard blowing up models with firecrackers is fun, but it's a decent enough looking shelf model for what it is so I suppose it doesn't deserve that kind of fate.
- 26 replies
-
- 10
-

-

-
It hit me as I was working on this that, despite 30+ years of building models, I had never tackled a monster truck. Originally I bought the Coke-branded reissue of the USA 1 as a parts donor, and for the decal sheet (which includes some new badge decals as well as two sets of gauge faces) with the mind to cut down the suspension and build it as a mud truck. The first thing I did was test out the Testors Root Beer/Pure Gold combo and the Ray's Kits Decals (2500, Silverado emblems, 4x4 markings and tailgate banner). I figured worst case I would have a painted body to use on a stock '88-90 annual. Yes, the 4x4 markings are oversized. Neal at Ray's knows about this and is working on addressing that problem. I used them anyway because in this case I thought they went well with the oversized tires. Despite my original intentions I kept an awful lot of the box-stock parts. The exceptions to that are... '88/89 grille, stock hood, bed rails and roll bar from an '88-90 annual kit. The monster truck kit has a roll bar but I liked the one in the 2wd kits better, so I went ahead and used it. The lights themselves are the same in both kits. I used a 454SS interior tub because it has no hole for the shifter and omits the molded clutch pedal. Each differential has a parts box rotor/caliper casting. And finally the engine, which is an old Ross Gibson "Alley Rat" 502 backed up by a 350 transmission robbed from a Lindberg street rod. The USA 1 plates came from a '57 Chevy Sportside decal sheet, as a nod to the monster truck kit's origin. It may eventually get some door graphics, and maybe I'll hang a hook off the winch fairlead, but otherwise it's done for now.
-
It's from the phantom dually kit. Fit isn't great but it looks good once everything is fitted and blended.
-
Anybody know the link for the Rays kits ebay store?
Chuck Most replied to Mike C.'s topic in Links to Aftermarket Suppliers
I didn't say it was. Somebody asked if that Facebook page was related to the distributor for Ray's on ebay, which it is. -
This will probably be my last GMT400 for a bit. It's the fifth in a row I've finished and while I'm not feeling too burned out by the subject matter, there's other stuff I want to build. This began as a 1989 promo. It's lowered about as far as you can get with the stock chassis, and sits on wheels and tires from the phantom dually. That same kit also couged up a bed and roll pan. The topper shell came from the 1993 extended cab kit, and the mirrors came from a 454SS. I also made an attempt at a billet grille with foiled V-groove Evergreen sheet. The paint is Testors Mythical Maroon, which is an uncannily good match for the factory promo plastic. I left the interior in the orginal raw metallic maroon plastic aside from some detail painting (bezels, inner door handles, etc..)
-
Yes... this is the fourth GMT400 in a row I've finished. And I'll possibly have a fifth finished sometime this evening or tomorrow. Then I'm taking a break from these things. This began as the 1993 1500 snap kit. The grille was swapped out for an '88/89 version. The air dam was cut away (it's molded to the chassis plate on the snap kits and promos) and replaced with one from a glue kit. The glue kits also barfed up the fog lights and side mirrors. Though you can't see in the photos, it also has a glue kit shifter and a clutch/brake pedal from the spares box. The six bolt wheels (yes, light duty GM 3/4 ton two-wheelers had six lugs at this time) came from an Aoshima Nissan Pathfinder, while the tires are the Goodyears from AMT's Escalade EXT. Paint is, again, Testors Extreme/One Coat, with Pure Gold and Root Beer. I didn't clear the finish and gave it a few scrapes and scratches to resemble a truck that's far from new but still somewhat well cared for. The Michigan plate is from Six Inches Under, while all the other graphics (emblems and tailgate banner) are from the Ray's Kits GM truck detail sheet. Oddly these snap kits have (in my opinion) slightly nicer dashboard and grille detail than the glue kits! Too bad Ertl dropped the ball on the outside door handles again. The handles on these actually look worse than the earlier kits. And the next x-cab version I build will have tinted glass, or have the inside of the glass unit painted interior color... look at that reflection from the glass unit in the rear 3/4 view.
-
Anybody know the link for the Rays kits ebay store?
Chuck Most replied to Mike C.'s topic in Links to Aftermarket Suppliers
That it is. -
I got this kit in a trade many, many, many years back with Nick Winter. The idea was to do a 90's style sport truck, so the trim, emblems, and handles were removed/filled, an old Accu-pro ZR1 roll pan was installed, and some Hiro three spoke wheels with Pirelli tires were set aside. There the project sat for a very long time, boxed up with the red Sportside I finished not too long ago, but here it is finally finished. Aside from the roll pan and rolling stock mentioned before, the model is pretty close to box stock. Alterations include a cowl induction hood from the Phantom dually kit, a new radiator and electric fan, cowl induction air cleaner housing, steering wheel and seats from an AMT Resto Rods kit, Iceman Collections side mirrors, a tinted glass unit from a Brickyard 400 promo, and a tonneau cover made from .020" plastic sheet. The 1992/3 style 454 SS graphics are from a Ray's Kits decal sheet. The suspension has been modified to lower the truck, slightly de-arched springs out back and new spindles up front. Paint is Testors Purpleicious. All it needs to complete the 90s aura is a flannel shirt on the passenger seat and a copy of Stone Temple Pilots' "Core" album in the cassette deck.
-
1990 GMC Diablo
Chuck Most replied to Chuck Most's topic in Model Trucks: Pickups, Vans, SUVs, Light Commercial
Yes indeed. Almost used the cowl induction hood too, but set that aside for another project. Somewhere I have the GMC grille with the lettering from a Sonoma added. -
Chevrolet had the 454SS, and GMC had the Syclone. So here's the full size GMC muscle truck that never was but could have been. It started as a 454SS and was fitted with an LT5 and 6 speed manual from a Corvette ZR1. The 1500 decals are from Ray's Kits, the hood and Diablo graphics are from the old MPC Caballero, and the rear window graphic is from an old Slixx sheet. The wheels are color matched Center Line modulars taken from two kits (so I'd have the same width on both ends of the truck). The interior is more or less stock, but with a floor shifter, and it also has the steering wheel and seats from an AMT Dodge Viper.
-
In Britain you need plates and registration to operate a tractor on public roads, but I don't know of any place in the US where that is mandated. Many years ago locally there was a guy who got his license revoked after several DUI arrests and ended up driving around on his Farmall until he was arrested again for operating that drunk, because that's still illegal, registered vehicle or not.
-
These and those '89-97 Thunderbirds with '49-'51 shoebox Ford front and rear ends seem to be making a comeback.
-
I think I started this in or before 2012. I know that because I got the wheels and steering wheel from Chris Olsen (of Olsen Bros.) in a trade, and we met up at Hulings Hobby House to complete the trade, and I think he closed in 2012 so it's been at least that long. No particular reason it sat in a box for the majority of a decade, sometimes things just work that way. Basic idea was a 90's style "sport truck", with a 4" front 6" rear static drop, shaved moldings and badging, color-keyed handles, and 17" Budnik wheels. And a smattering of polished billet trim. I didn't go with a billet grille and opted to just color key the factory grille, even though at one time I had a photetched Machined Alulminum Specialties billet grille for this kit. Despite not using that, I was able to use another long-gone aftermarket part- the MPB Detail Products vacuum formed cowl induction hood. Aside from the hood and roll pan (from the phantom dually kit), and 454SS mirrors, I kept the body mostly stock but applied BMF to the bed steps to duplicate the billet replacement pads sometimes used on 90s custom trucks. The phantom dually's tail light covers were also used. It was painted with my last can of Testors Revving Red, and the interior is mostly Revell Ochre Brown. Inside, the '67 Impala custom steering wheel and a Warhammer skull shift knob are the only deviations from stock, though there's quite a bit of Bare Metal Foil to simulate polished billet trim. I also used a gauge panel decal from the Coke monster truck. Say what you will about Round 2's thing with Coke decals but at least that sheet includes two gauge panels along with 1500 and Silverado badging.
-
This is kind of a companion to the Sonoma I put up a few days back... a "lab rat" type project made from an incomplete kit and used for mocking up components for other projects and ended up being built as a curbside. Base kit is the AMT '95 Ranger XLT. The core support and front edges of the fenders from a 1996 Explorer were grafted on, and the bumper, hood, and grille were used. The Explorer also coughed up the leather bucket seats. Paint is Testors Lime Ice, and the bed and cab were painted years apart so there's a slight mis match in the colors. I'm just gonna use the excuse that the bed was damaged dragging after the rear air suspension failed and had to be repaired and that's why it's a slightly different shade. One thing I can't excuse are the tail lights... I flopped the position of the turn signal and backup lens portion. Since the orange needs touched up anyway I'll probably redo those if they really bother me. Wheels are 19" Aoshima Kranze LXZs from their VIP wheel set line. I think the mirrors and steering wheel are also Aoshima parts packs items but it's been a few years since the cab was more or less finished. This body was the test bed for two custom Ranger chassis, one mild and one wild, that hopefully will end up under projects at some point shortly.
-
I've been on a rampage lately taking butchered and incomplete kits and disposing of the spare parts the fun way. Case in point- this thing. I had robbed the chassis for a custom project, but that left me with a mostly intact Sonoma, or at least the visible upper parts. So now it's a curbside built to represent a bagged mini truck "aired out" and sitting on the rockers. I used Testors One Coat paints to duplicate the purple/charcoal paint scheme an awful lot of these trucks seemed to be painted back in the day. The kit has molded S10 rub strips, which I left in place because I liked the look better than the stripes the GMC had. And I had my doubts about the 27 year old Ertl decals being viable anyway. That and I'm lazy and didn't want to shave and sand the rockers. Wheels and tires came from an S10 Xtreme and were color matched to the truck. I opened the grille by removing material from the back, even though AMT really screwed up the look of the grilles on these trucks... my what big eyes it has! I foiled the lenses from behind to hide the BMW-like look the kit reflectors have going. Other than the rolling stock the only other non stock part is the tonneau cover, taken from a '93 Ranger. It was a fun, quick curbside project and It allowed me to use the rest of this parts donor kit for something constructive. And having the modified body gave the the opportunity to mock up a couple of frames for future full detail projects, so all in all it was also kind of a purposeful project in the end.