

am73grand
-
Posts
1,486 -
Joined
-
Last visited
Content Type
Profiles
Forums
Events
Gallery
Everything posted by am73grand
-
 Thanks for the link. Looks like I need to save up some money!
 -
I have not seen that conversion. I love the refit NX-01. I may have to track it down. My next build will be a TOS 1/350 Enterprise.
-
This build is probably the most challenging I have ever worked on. I've used tools and techniques on this I've never used before. Including a hot glue gun and soldering iron. Here's a look inside the shuttle bay. I have since added a couple of work bees and 2 shuttles. I plan on adding one more shuttle to hide a light that went out on the floor. Neck installed and starting to clean up wiring so it all fits inside. Secondary hull sealed up. Just need to glue the back down. Next up will be building/painting the officers lounge. Once that is done I can seal up the saucer. Once the saucer is sealed I can then start working on the engines. I'm making progress slowly but surely. As always thanks for looking!
-
Thanks! I'll be building NCC-1701. Taking a few liberties such as Star Trek V era shuttles in the bay. I'll be adding an update in a few days.
-
I mounted my flasher board under the floor of the shuttle bay. I had to finish the botanical gardens before I could mount the shuttlebay floor for good: And here is my almost complete shuttle bay. I will only have two shuttles a few work bees and one transport pod. I don't want the deck to look too cluttered. Other modelers have put people in their builds but I will not be adding them. Next step is building the ships for the shuttlebay and then I can seal it up and install it for good. When that's done I can seal up the secondary hull and start on body work. Thanks for looking!
-
I bought this kit years ago and then bought the lighting kit from Trekmodeler to go with it. I let it sit for a while and am finally getting back to it. I bought the Paragraphix photo etch set and a few other extras. I started lining the inside of the hull with aluminum foil tape to block the light. Then I started running the wiring harness for the lights. Here's where I am at so far. Here's the upper saucer with the lights installed: I wanted sequentially flashing lights on the floor of the shuttle bay. I found this flasher unit online that runs the lights around in a circle: I'll run some fiber optics from the LEDs to holes drilled in the floor. I'm using a cheap fiber optic light I got at 5 below for the strands:
-
I like him a lot. Really came out cool.
-
That is AWESOME!!!!! Nice job!!!!
-
That is GORGEOUS!!!!!! Nice job man!
-
Thanks!! She did come with a base that looks like cobble stones. I really thought it was plain so I didn't use it. I will be putting her on a different base. what you see in the pics is my mantle with a runner on it
-
Thanks guys. She was a lot of fun to build. The kit is made by: http://www.nocturnaproductions.com/elvira.htm
-
Thanks everyone she was a really fun project! Cato, I started by priming the leg with Testors White Lacquer primer. Then masked off the top of the leg and sprayed the unmasked portion at around 15 psi with my airbrush. Paint was brown Badger opaque airbrush paint mixed about 50/50 with black. The leg was sprayed from about 12 inches away. Unmasked the leg, added the spider web craft tape and then a strip of lace cut off a bigger piece. PM me if you have more questions
-
Well, she's all done and on display. I'm pretty happy with how she came out. Especially since this is my first figure kit build. Thanks for looking!!!
-
1974 Beck Pavement Sprinter
am73grand replied to Old Sprinter's topic in WIP: Other Racing: Road Racing, Land Speed Racers
Amazing build. What a beautiful racer! -
That looks wicked. I love the flat black!!!
-
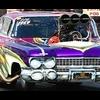
I am a huge Batman fan and I like his cars even more. When I first saw this car I thought Batmobile right away. Then when the kit was released I knew I had to have it. So here's what I'm starting with: The car is just crazy looking so I won't need to do much to transform it into the Dark Knights ride. First order of business was to add some bat fins off the "Batman and Robin" Batmobile. They look right at home on this body. I've still got a long way to go but this is a for fun project and I'm not going to go crazy detailing it. I've got quite a ways to go but I thought you guys might like seeing this. Thanks for looking!!!
-
That is really awesome!! Nice job!
-
After three attempts I finally got her legs painted and installed. I also glued her upper and lower halves together. I also got her arms rough painted so I need to clean them up and detail them before I can glue them on. Thanks for looking!!!!
-
63 chevy 2 nova outlaw prostreet updates 10/31/14
am73grand replied to tyrone's topic in WIP: Drag Racing Models
OH YEAH!!!! That rocks man. Love the color combo and stance! -
That really looks awesome. Nice job!
-
Those look great!!!
-
Gorgeous! Love this style of race car
-
That looks awesome. Really nice build
-
Love it!!!!
-
That looks so mean! NICE build!