
Wagoneer81
-
Posts
1,003 -
Joined
-
Last visited
Content Type
Profiles
Forums
Events
Gallery
Everything posted by Wagoneer81
-
 Don't you wish they would offer some of those cool, overseas options here in the states? Patrick2005, I think it was an episode of Trucks!... That episode drove the prices of Gladiator grilles up from about $50.00 to around $200.00... Prices are finally getting affordable again. I need to get one before they run the episode again and make the prices go silly one more time.
 -
Titan90 W.I.P.
Wagoneer81 replied to Wagoneer81's topic in WIP: Model Trucks: Big Rigs and Heavy Equipment
Small update; The trailer is finished except for lights and weathering, still a ways to go on the tractor. Here are the two of them mocked up together... Kostas, thank you! It is kind of an odd non-factory paintjob. I tried for a 'homegrown' paintjob that looked like it had been cooked up in some farmers equipment barn. You know the kind, the trucks owner gets ahold of a couple of gallons of blue paint, looks at his plain white truck and grabs the roll of masking tape... -
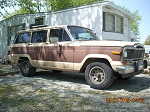
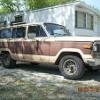
And to go along with this nice looking Gladiator, I give you a Cherokee Panel Truck... I found this in Daleville, IN and it was sold a few months after I took these pictures. Very few of these were made, I believe that this is a 1964 model. This is a factory vehicle. It's a Cherokee without window openings punched in the side panels and when I opened the back doors, the doorjamb was the same as on my '81 Wagoneer. This is my daily driver, the '81 Wagoneer. Point of interest; When Willys, later AMC, changed the grilles in this family of vehicles, all they did was design a grill and headlight buckets that set out in front of the original gladiator style sheetmetal. That original sheetmetal became the core support, so to speak and still exists behind my '81's plastic DOT approved grill. This would make backdating a newer Wagoneer or Cherokee pretty simple. A set of CJ-7 headlight buckets and trimrings, a Gladiator center grill, problem solved... I'm seriously considering it...
-
This is the beautiful thing about modeling... you can do things in plastic that one wouldn't dare try in the real world. A custom/streetrod Cord? Go for it! Makes me want to dig out my Lindy '48 Lincoln and give it a whirl...
-
AWESOME!!! The '60 model Ford is one of my favorite trucks! You have done a spectacular job ressurecting this one. Have you decided on an engine yet? I'll be watching this one!
-
L-700 Stakebed
Wagoneer81 replied to Wagoneer81's topic in WIP: Model Trucks: Big Rigs and Heavy Equipment
Hah... That's funny! Actually, this one is going to be a 'survivor', a truck that has been fairly well cared for, used but not abused over the years. It will get a cargo of sorts. It is going to represent a delivery truck owned by a plant nursery named "Stone Leaf Farm". I built this model for my sister who is really into gardening, flowers and such... I'm taking Tamiya 1/35 scale sandbags and turning them into palletized fertilizer, mulch and topsoil bags and I will use G-scale details to provide clay pots, planters, handtools and other nursery related items. So, stay tuned, the truck is finished but it still has to be loaded. -
Bending Plastic Tubing
Wagoneer81 replied to Mooneyzs's topic in General Automotive Talk (Trucks and Cars)
Yeah, I didn't even know they made solid rod that diameter. I'll have something to talk to my LHS about... "Hey, Brandon, can you get..." Solid rod would have been nice but...I had to use what was on hand. Clint said it best in 'Heartbreak Ridge', "Improvise, overcome, adapt." No worries is right, we're all here to learn in one form or another, that's one of the many reasons that I love this forum! -
I find that I do some of my best work between midnight and 4am. Must be the quiet of the night, I can concentrate better without daytime interuptions. I hope you find that as well!
-
Bending Plastic Tubing
Wagoneer81 replied to Mooneyzs's topic in General Automotive Talk (Trucks and Cars)
I used the salt technique on 1/4" dia. thinwall styrene tubing because I was getting some pretty bad deformity at the bends when I was heating and bending. These were pretty tight bends as I was trying to route the pipe up between the frame rail and the fuel tank between two of the tank mounts on a 1/25 scale Titan90. I wasn't having any luck doing it any other way and using the salt just made it sooo much easier... I've used these other methods as well with smaller tube and I'm not disputing that they all work quite well. The method of using the brass insert wire in the tubing is the most painless way to bend small diameter tubing that I've ever used. Now that you mention it, I can see salt or sand not being necessary on smaller stuff. I should have specified what diameter tube I was using, I guess. -
Fallen Hero coming home
Wagoneer81 replied to crazyjim's topic in General Automotive Talk (Trucks and Cars)
I'm not a violent man, been in several fights, never have been to jail... But, as respectful as I am to our military personnel, as emotional as I get hearing of another death in the name of Freedom and protecting the downtrodden , it wouldn't do for me to cross paths with these protestors. I would go to jail afterward... for a long time, I'm afraid and I would go with my head held high! Some things simply are worth fighting for. The memories of our fallen heroes and the piece of mind that their families require are two of those things. They fought for us, now, who's gonna fight for them?!? I believe in free speech, I am a patriot who believes in protecting peoples rights but crapping on the memories of our fallen because of some imaginary connection that a whack-job preacher conjured up between homosexuality and service-men killed in action is completely uncalled for... Ok, I've vented, I feel a little better. My eyes developed leaks while reading this thread and the screen got a bit blurry... I'm not an overly religious man but, I feel that this is appropriate--- Heavenly Father, Grant a courageous heart, a quick mind, and a serene spirit to those now in our armed forces, ready to offer their talents, and if necessary their lives, for the cause of truth, justice, and liberty. Keep them close to You in every way. Make them always, even in these difficult circumstances, true witnesses to Your goodness, love, and compassion. And finally, bring them safely back to their homes and families. Amen Godspeed, Cpl. Jonathan Turner. When you get to heaven, tell them as they have since before Guadalcanal, "Another Marine reporting, I've served my time in Hell". Semper-Fi! Carry on! -
Any interest in a 8lug truck steel wheel?
Wagoneer81 replied to RyanSilva's topic in Truck Aftermarket / Resin / 3D Printed
You had me at "8-lug"! I just added you to my eBay Favorite sellers list! I was looking through my Feedback and I've bought from you before but it was before I discovered this site... you will definitely be hearing from me again! -
Ok, I say ALL OF THE ABOVE!!! Ohh, ohh, ohh... my wallet's going to hate me... This is one of my favorite vehicles... Look at my avatar, my 'Forum Persona'... Anything Willy's Overland or Old-Jeep related and you have my undivided attention!!!
-
You're in luck on a couple of these. Hasegawa makes a Willys MB Jeep, kit# MV1:2500 / 24501 AND a Pkw.K1 Kubelwagen, kit# MV3:2500 /24503 both in 1/24 scale. The MB comes with a nicely molded pedestal mounted M1919 .30cal Browning and the Type 82 comes with two M98k Mausers, two MG34's with drum mags, two MP40 sub machineguns and two Type 60 Panzershreks. They both include driver figures and for you Band of Brothers fans, the Jeep decals include markings for the 506th PIR, 101st Airborne Division, 1944. Also, if you want a Mid-1950's to early '70's military Jeep, a good place to start for a conversion would be the Dukes of Hazzard 'Daisy's Jeep'. It's a CJ-5 with the original 4-cylinder engine. The wheels and tires for it could be pirated from a Willys MB kit... I agree with your list, especially the half-tracks and would like to add; (Preferably in styrene) a Vietnam era M151 Ford MUTT and ANY make of a WWII/Korea era Deuce-and-a-half... Stude, Dodge, GMC, anything, just gimme a 2 1/2 ton truck! I found a GMC, in resin, from an overseas manufacturer but I'm not man enough pay the $250.00+ pricetag!
-
Hmm... I've never seen this kit before... definitely not your typical AFV, I like it! You've given us another well executed armored jewel! Question: What caliber were the guns on this beast? 20mm? 30?
-
That is pretty ironic... That'd be kinda like showing one of the old 'Airport' series disaster movies on a trans-Atlantic flight, dontcha think?
-
I'm not sure about the deck chairs, though I have heard that... it would be an interesting point to research though. I looked hard the other night but couldnb't find it; I had a picture of Titanic in port with a man, visible from the waist up, standing in the top of #4 funnel on the port side. It was an engine room crewman who climbed up an access ladder from below, to "have a look about". I did know about the bunker fire. It was in the forward bunker of boiler room #5 which put it directly amidship. It was reported after they departed Southampton, before they even arrived at Cherbourg. Reports were that they did slowly flood the bunker with water after it was reported and thought they had it out but it rekindled less than 24 hours later and they worked on putting it out with hoses through one of the upper access hatches. According to inquery reports, they (the surviving 'black-gang' boiler room crew) were pretty sure that they had it extinguished before she met the 'berg. Another bit of trivia, speaking of coal; Due to a strike by Welsh coal miners, while at Southhampton, White Star Line had to appropriate coal from the bunkers of their liners Mystic and Oceanic to have enough coal for Titanic's Trans-Atlantic voyage.
-
Yeah, I get a chuckle when I see CGI images of Titanic and there's smoke rolling from all four funnels... The fourth funnel really did even out the look of the ship. That and rival Cunard liner Lusitania had four funnels, so... While the fourth funnel wasn't a 'boiler uptake casing' like the first three, it did house several engine room vents AND ladders because of its position directly over the engine room. Here's a unique view, from Olympics #4 funnel.
-
Coating for Homemade Decals
Wagoneer81 replied to Danno's topic in General Automotive Talk (Trucks and Cars)
I've used the Testors bonding spray and the One-Coat Wet Look clear, both with good results on my inkjet decals. Funny, the bonding spray smells just like regular clearcoat... Coincidence? Can't say about the others because I've not used them. -
Bending Plastic Tubing
Wagoneer81 replied to Mooneyzs's topic in General Automotive Talk (Trucks and Cars)
I found a great way to bend plastic tubing without using up a brass or aluminum tube in the process. (Some of us are cheap like that... ) I think I actually learned this technique here... I don't remember... Cap one end of the tube with a piece of plastic and a bit of superglue, fill the tube with regular table salt and cap the other end so the salt doesn't run out. (cut a longer piece than you need, you'll cut it to length when finished bending.) The salt will help the tubing hold its shape when you bend it. I slowly heat the area to be bent over a candle flame (this is a personal preference, others may use a different method.) and shape accordingly. after the tubing has cooled, cut one cap off, pour the salt out, trim the tubing to shape and there you have it. I've done truck exhaust with this method and it looks just like miniature, mandrel bent pipe. Hope this helps! -
I'm in Anderson, IN, about 25 miles northeast of Indy. Seems we're scattered all over the state!
-
YES!!! The blue frame rails really make this design pop. That's gonna be on good looking tractor!
-
L-700 Stakebed
Wagoneer81 replied to Wagoneer81's topic in WIP: Model Trucks: Big Rigs and Heavy Equipment
The color, my friend, is Testors flat (military) medium green from a rattlecan with three coats of Testors Wet-Look clear for that used, not abused look. -
G, thanks for the compliments! 'White Star Buff' is the color on the funnels and it was custom mixed according to the instructions provided in the deluxe kit. Using Testors 1/4oz. paints, it's mixed as follows: 7 drops 1145 white 3 drops 1170 light tan 1 drop 1167 tan 1 drop 1114 yellow 3 drops 1166 brown. Minicraft worked with maritime artist Ken Marschall and gave us builders a pretty extensive and accurate painting guide for this kit. Even if someone is building one of the older versions, I highly recommend obtaining a set of instructions from the Deluxe Reissue. On the rest of the ship, I used Floquil engine black for the hull and funnel caps, the red anti-fouling paint is Floquil Boxcar Red. That or Tuscan Red make for the best anti-fouling paints, IMHO. Floquil also makes a retarder that you mix into the paint to slow its curing time, this allows it to flow out nicely and no brushmarks show. (That's another little secret about this build, I don't have an airbrush. This model was entirely handpainted.) I started using Humbrol white and finished using Testors flat white because the Humbrol didn't cover worth a darn. I originally painted the deck with Testors 'Wood' but as that turned out to be a VERY close match to the buff on the funnels (yeah, after all that mixing, go figure... ) I mixed a thin light wash of pale yellow, white and tan and quickly went over the decks to lighten them. Much to my suprise, it worked and simulated the natural pine deck quite well.
-
Challenger 1 Mk.3
Wagoneer81 replied to TheCat's topic in WIP: All The Rest: Motorcycles, Aviation, Military, Sci-Fi, Figures
Yes, who??? That would make an AWESOME dropdeck load for someone who builds Semi's (someone like me...lol). This is a very nice build, perfect colors, well executed assembly, what more can I say? -
Back around the first of December, I was asked by my girlfriends cousin ( A fellow Titanic and passenger liner enthusiest) if I knew of any ship builders that would and could build a 1/350 Titanic model for him. The very night before, I had been thinking hard about digging my Minicraft Deluxe kit out of storage and starting on it so I said, "Sure, I'll build it forya!" I finished it on 2-20 and delivered it to him the following day. This was a very fun, very challenging build considering the molds are 35+ years old and do show their age... These are the old Entex molds from around 1975, Minicraft bought them, I believe, in the '80's and then updated them in the 1990's after expeditions to the wreck site showed them that there were several detail related errors in the kit. Well, I jokingly told Dylan that I would make all the mistakes on his, that way my future build would be perfect... It was a learning experience... Especially considering that I want to build three more of these kits for my own collection; I want all three Olympic class ships... HMS Titanic, an HMS Olympic in her 1916 Dazzle Camo/Troopship fit and the last of the three sisters, the hospital ship HMHS Britannic as lost in the Kea Channel in 1916. This is the Deluxe kit built box stock, everything seen, PE and such, is in the kit. The most difficult part of the build was giving it up to its new owner but he appreciates what went in to her just as much as I do. Isn't that a pretty face? I took close to a hundred pictures before giving her up. If anybody wants to see more, just ask.