
KJ790
-
Posts
811 -
Joined
-
Last visited
Content Type
Profiles
Forums
Events
Gallery
Everything posted by KJ790
-
Mark Martin Folgers Thunderbird
KJ790 replied to randman's topic in Stock Cars (NASCAR, Super Stock, Late Model, etc.)
This is a beautiful build! You mentioned that you changed the wheels. May I ask what wheels you used? -
Texas 3d Customs W series
KJ790 replied to DRIPTROIT 71's topic in Truck Aftermarket / Resin / 3D Printed
I agree, I am very impressed with the one that I have. -
Any interest in an International 9800 Eagle cab?
KJ790 replied to Oldmopars's topic in Truck Aftermarket / Resin / 3D Printed
I would buy a couple 9800 cabs if possible. I have been planning on scratch building them, but if I could buy one that would save me a ton of time. I would vote for 1/25 scale, as the 1/25 scale Moebius chassis and suspension would be the most accurate for a 9800 cab in my opinion. -
I was finally able to get some outdoor shots of my scratch built Peterbilt 372.
-
Detachable Lowboy Trailer
KJ790 replied to Mopar - D's topic in WIP: Model Trucks: Big Rigs and Heavy Equipment
This is going to be cool! -
Almost complete. Just a few more details and then I need to wait for nice weather for some outdoor shots.
-
Back to working on the cab. The front of the cab was finished off with all of the small details and emblems. I made a mold for the turn signals and then vacuum formed clear plastic over the mold. I then painted them with Tamiya clear orange. The headlights are from CTM. The interior tub is mounted inside the cab. I made some grab rails and mirrors out of bits of scrap that I had kicking around.
-
I had to cheat a little for the dash. Rather than scratch building one, I decided to draw this one in CAD and 3D print it. Since these trucks had a "break-away" intake system, the air cleaner is open when the cab is raised. I decided to make an air filter using some photo-etched mesh that I had left over from a previous build. The chassis is getting closer to finished. I used resin 2-hole wheels that I had cast for the drive wheels, and some Keystone aluminum rims for the steer wheels. The tires are rubber pieces that I cast. Fuel tanks are now mounted and the exhaust is almost finished.
-
It has been a while since I gave an update, so time for a photo dump. I used a Cat 3406 engine from a Revell snap kit, but made some modifications to make it an air-to-air charge cooled engine. Next up was the chassis. I used frame rails and rear suspension from an RoG Peterbilt. The frame had to be shortened and the front portion of the frame was scratch built. Basic plumbing was created using various sized styrene round stock. I modified the radiator from a Revell snap kit to be narrower, then scratch built a charge cooler to mount in front of the radiator. The air filter canister, battery box, fuel filter, and exhaust mount were scratch built. Fuel tank brackets (and eventually fuel tanks) were from Kootenay 3D model parts.
-
Thanks everyone! I was able to get some paint on the cab. And a little pin striping.
-
The cab is now in primer and the chassis has been started. I am using an RoG Peterbilt 359 frame and rear suspension that I have modified to work with the cabover.
-
I roughed out a front nose for the cab. My initial attempt has the wheel arches too far forward in my opinion, so I shifted them backwards .060" after this photo was taken. Next was to finish off the grille, headlight buckets, and bumper. Finally, some rear cab fairings and roof top spoiler were roughed out. Lots of sanding ahead to get all of the seams smooth. Everything is just set in place for the photo mock-up.
-
Thanks! That seems to be the common opinion of these. We always called this one "The Egg". The cab gets pieced together with a back wall, a roof, and then a front firewall. I made some sketches based on pictures that I found on the internet to try to scale the shape of the cab out.
-
This is a project that I have always wanted to embark on, but never had the guts to try. I decided to finally take the plunge and attempt to build a Peterbilt 372. This seems to be a model of truck that people either love or hate (with more leaning towards the hate side of things). Personally, I have always thought it was a really cool design. My family owned this one back in the day, and I always liked the look of it. This project started in an unlikely manner. About a year ago, I was attempting to draw pinstripes in Microsoft Word, but with an inkjet printer I can only print things that will show up on light colors. Since this 372 was white, I gave it a shot. I was pretty happy with how they came out, and knowing that this file existed in my computer has been bugging me until I can put it to use. So I started by cutting out the basic sides of the cab. I use .020" thick styrene and layer it to get the features I want. I can make the bottom layer relatively solid, and make separate features such as doors that all glue onto the base layer.
-
90's GMC TopKick C7500
KJ790 replied to Sergey's topic in Model Trucks: Big Rigs and Heavy Equipment
That is incredible! Awesome work! -
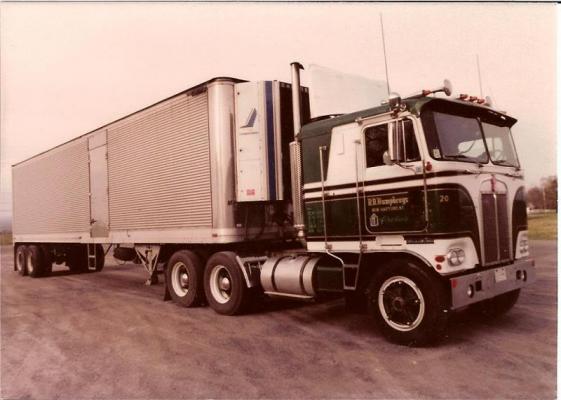
1964 Kenworth K100 with 1956 Great Dane trailer
KJ790 replied to KJ790's topic in Model Trucks: Big Rigs and Heavy Equipment
Thanks! You gave me an idea to make these look like old photographs that have been scanned into a computer. -
I have finally finished this combo. The truck is an AMT K123 kit that has been heavily modified to be backdated to a 1964 model. The trailer is almost entirely scratch built.
-
1956 Great Dane Reefer
KJ790 replied to KJ790's topic in WIP: Model Trucks: Big Rigs and Heavy Equipment
Almost done, I made some batteries for the reefer unit, along with a thermometer for the front of the trailer. The rear of the trailer was completed with CMT lights and reflectors. The offset door cams that Great Dane used during the 50's always drove me nuts (I like symmetry), but I went with it for authenticity. I painted on some chips on the steel parts, then added some rust colors and a black wash. For wheels I used Dayton wheels from an AMT Diamond Reo kit with some oil resin hubs added. Tires are from an AMT Tyrone Malone Papa truck kit. -
1956 Great Dane Reefer
KJ790 replied to KJ790's topic in WIP: Model Trucks: Big Rigs and Heavy Equipment
Time to add some character to the sides. I masked off the front and rear 4ft and hand cut letters to mask along each side of the trailer. After this I sprayed a light filter of Tamiya "smoke". This gives the appearance of ghost letters from days past as well as newer panels where the trailer had been extended in the front and rear. -
1956 Great Dane Reefer
KJ790 replied to KJ790's topic in WIP: Model Trucks: Big Rigs and Heavy Equipment
Thanks everyone! I used a spare tandem from a "Big Rigs" trailer that I had kicking around. I changed out the brake chambers to some more realistic ones that I had made. I was able to get some grey paint on the trailer. I also added some wood to the inside of the vent doors. I used balsa wood that I painted with layers of thinned down Tamiya brown and black paints. -
1964 Kenworth K100
KJ790 replied to KJ790's topic in WIP: Model Trucks: Big Rigs and Heavy Equipment
Thanks! I think bingo plates came around in the early 70's, but I could be wrong. I just copied the plates from this 1965 photo. -
1956 Great Dane Reefer
KJ790 replied to KJ790's topic in WIP: Model Trucks: Big Rigs and Heavy Equipment
The box is assembled and it is standing on its own. I scratch built some landing gear to try to capture the vintage Great Dane look. -
1956 Great Dane Reefer
KJ790 replied to KJ790's topic in WIP: Model Trucks: Big Rigs and Heavy Equipment
The real trailer had a model C Thermo King reefer unit, the first commercial reefer unit sold. I had purchased a resin version of the unit to use, but I was not completely happy with it. I decided to use it as a guide to create my own. After some weathering, here is the end result. -
1956 Great Dane Reefer
KJ790 replied to KJ790's topic in WIP: Model Trucks: Big Rigs and Heavy Equipment
PVC pipe cut into quarters will work as the 24" radius front corners. A vent door was cut into the driver's side top corner. A riveted on patch was added to the passenger's side where something (perhaps a low hanging branch) had previously damaged the trailer. -
With my latest Kenworth complete, it is time to build a trailer for it. For this I will be scratch building a 1956 Great Dane reefer. After looking at the available kits, none of them had the right riven detail or panel lines of this vintage of trailer, so I decided it would be just as much work to scratch build one than to modify a kit. I started with sheets of .020" thick styrene, laying down strips of MicroScale rivets. I then cut the sheets into strips and used .040" round rod to great the ribs of the sides of the trailer. The real trailer that I am using as inspiration was originally purchased new by Alterman Transport Lines of Miami, FL. It was originally a 30ft trailer, but Alterman had it extended to 34ft at some point by adding 4ft to the front of the trailer. My Grandfather bout it in the spring of 1964 and extended it further by adding an additional 4ft to the rear of the trailer. Early Great Danes had a seam running along the length of the trailer midway up the side.
