

SpreadAxle
-
Posts
2,198 -
Joined
-
Last visited
Content Type
Profiles
Forums
Events
Gallery
Everything posted by SpreadAxle
-
Going Green and Aero
SpreadAxle replied to mackinac359's topic in WIP: Model Trucks: Big Rigs and Heavy Equipment
The paint looks great Tim. -
Going Green and Aero
SpreadAxle replied to mackinac359's topic in WIP: Model Trucks: Big Rigs and Heavy Equipment
I wonder if those are in western states. Some of the Wal Mart store buildings in the western states are colored differently than the usual blue and white. Some are green and white, and some are tan and dark red. Not sure why though. Living 1/2 hour from their corporate offices myself, I've seen the 386's but they're the usual white and blue. I see they're buying T660s also. That's a nice look though with the green. -
Going Green and Aero
SpreadAxle replied to mackinac359's topic in WIP: Model Trucks: Big Rigs and Heavy Equipment
Having spent about 1/2 my career in T600s, I can tell you from experiance it's true. Same with the T2000 I drove for a short time. The windsheild required much more attention as far as keeping it clean. The DAYLITE door, which have the bigger side windows found on later KWs, also collected more dirt in the area of additional glass in the rain/snow. As to Tim's comment about a 379 with vs without a visor, it does make a difference. The center brackets separate from the cab over time, so I removed it on my old Pete until I could get a new visor. I did notice more crud on my glass in that short time. I never thought it would make a difference, but it did. As to the 386, very cool. Nice start you have there so far Tim. -
Peterbilt 378 Heavy Transport Inc.
SpreadAxle replied to Twist67's topic in WIP: Model Trucks: Big Rigs and Heavy Equipment
You did a really good job with the details on the engine, and the air lines on the frame. The air valves you made are very realistic. -
Current W.I.P.
SpreadAxle replied to monkeyclaw's topic in WIP: Model Trucks: Big Rigs and Heavy Equipment
Cool! -
here is some of my fire apparatus
SpreadAxle replied to johnrescue's topic in WIP: Model Trucks: Big Rigs and Heavy Equipment
That's a very nice collection. -
all scrath built
SpreadAxle replied to johnrescue's topic in WIP: Model Trucks: Big Rigs and Heavy Equipment
Xcellent!!!!!! -
VERY NICE WORK KURT!!!!
-
1975 Hayes Clipper COE
SpreadAxle replied to mackinac359's topic in WIP: Model Trucks: Big Rigs and Heavy Equipment
Thanks Tim. -
1975 Hayes Clipper COE
SpreadAxle replied to mackinac359's topic in WIP: Model Trucks: Big Rigs and Heavy Equipment
Well done Tim. Nice paintjob as well. As to the fairings on the front corners of the cab, did you make those by cutting a piece of tubing, or bending a flat sheet of plastic? Anyway, nice job. -
This is a build to be very proud of! Nice work.
-
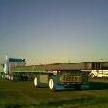
Over the last few days I've been working with the paintjob. Tonight is the first time I unmasked the white to see how it came out. I think it turned out well. I have some touch up 2 do, but I am pleased with the results. The masking was done with Parafilm M. This is my first time using it. I like it. Pretty crisp with not too much bleeding if you lay it down right. I didn't cut as straight as I thought on the hood. Here you see the first shot with the trailer. It's just the tank itself propped up. The color is Model Master Aluminum Plate buffing laquer. I need to buff it some more, but I thought I would show the eventual direction I'm going with this mock up. Note:Since these pix were taken, I'm doing one more coat of blue on the hood, thanks to a screw up I made . Hopefully I can have it finished as far as painting it tomorrow. Thanks 4 looking.
-
Ford CLT9000
SpreadAxle replied to phoneguy's topic in WIP: Model Trucks: Big Rigs and Heavy Equipment
Lookin' good Jerry -
Ford CLT9000
SpreadAxle replied to phoneguy's topic in WIP: Model Trucks: Big Rigs and Heavy Equipment
Good luck Jerry. I like the wheels on this truck. -
Thanks, Chris
-
refueller help
SpreadAxle replied to ns4ever's topic in WIP: Model Trucks: Big Rigs and Heavy Equipment
This would be a cool build. -
Thanks everyone.
-
:)Further progress has been made on this truck. I spent the weekend working on the chassis and engine. Most of the assembly is done. I still have to finish painting the cab and hood. I will probably shoot the blue areas b4 the end of the week. We'll start with the shortened driveshaft. It's the kit shaft cut with the ends stuffed into a snug fitting piece of K and S brass tube. I figured it might add a little strength rather than just cutting it and gluing the remaining ends. Just a neat idea I thought I would try. and the finished product.. Here's a shot from last night showing progress to that point. The tank support bar for these square tanks was broken on both ends. So I drilled the front of the tanks where the forward support mount goes. That seems to have helped. A mock up shot from the rear. You may notice 2 weathering attempts here, involving the tires. First, the mismatched brands of tires. The Firestones on the forward drive axle are shaved down and weathered for a well-worn look, including the left outer tire being cupped, while the rear axle tires are brand new GoodYears. I've often seen the rear drives wear down first, and many fleets will just replace the 4 on the rear axle first. Another mock up shot. The green on the radiator was from the original build. It was my attempt to replicate spliied antifreeze. I'll fix that. Thanks 4 looking. I hope to have this one done soon so I can take it home. I'll be starting the trailer soon, I just wanted to get the tractor further along first.
-
Man F2000
SpreadAxle replied to eburg_Dub's topic in WIP: Model Trucks: Big Rigs and Heavy Equipment
First one, huh? Looks good. -
AWESOME!!!!!!!!!!!!!!!!
-
While cruising Tim Ahlborn's website, I noticed he took the time to add further to the reference material he already offers those who visit. If you are interested in paint schemes for the Peterbilt 352 cabover, click on the link below, then scroll to the very bottom of the page. There are 5 pages from the Peterbilt paintbook. All for the 352. Tim, thank you for all the reference photos you have provided on your website. They are a real help to those who visit. http://timstrucks.web.aplus.net/PBCOEolder.htm
-
You're welcome Dave. I knew these would be of use to someone. I got them from all over the place. As I find more, I will link or post the pix.
-
Dave, I was stuck on that name for awhile. I read of many modelers using it on the forums, calling it the "purple bath", but never knew what it was for a long time. The "purple bath" is Castrol Super Clean, although another name for it that I've seen is Purple Power. It's an automotive parts cleaning agent(there's probably a better description 4 it) that a lot of modelers here use to strip paint from a model. It also softens glue bonds. It's pretty safe to use. I'm not sure what the equivalent would be where you live. It comes in a big plastic jug and the chemical is actually purple in color. It's one of those things you should wear gloves to use.
-
Dave, the chemical we often refer to as the "Purple Bath" will usually weaken the bond between glued parts. If it soaks long enough, you can work them loose with minimal or no damage. Then again, that depends on the glue used, and whether or not the joined surfaces were kept free of paint. If painted surfaces were not scraped prior to gluing, the parts separate easier. If you(or the pervious modeler if restoring someone else's built-up model) cleaned the areas to be glued pror to cementing, there is a stronger bond. Often times, they will separate, but sometimes, they won't. Careful cutting near joints often helps to start, and then you can separate by hand. The bumper on this Mack and a few other parts gave me that very problem. The bumper wouldn't separate from the frame, so I got the idea to go with the shortened bumper since it was being painted anyway. Often times, this is more of a headache than removing the paint, as it will try your patience. Good luck on your restoration.
-
duel peterbilt
SpreadAxle replied to ns4ever's topic in WIP: Model Trucks: Big Rigs and Heavy Equipment
Very nice.