

dougp
-
Posts
202 -
Joined
-
Last visited
Content Type
Profiles
Forums
Events
Gallery
Everything posted by dougp
-
Very nice, love the color combo...
-
Cris Craft Runabout
dougp replied to nts's topic in WIP: All The Rest: Motorcycles, Aviation, Military, Sci-Fi, Figures
Great start, I've got to get back to working on mine... -
Very nice, looking forward to the next step.
-
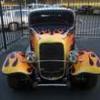
Thanks for the comments everyone. For those asking about the wheels they are Pegasus Hellas 19" front with 23" in the rear. I hand painted the centers using decanted Tamiya gun metal, the color used for the stripe, wing and lip spoiler. It took several coats to cover the chrome and get the color right. Yes, Harry I tried the door handles and the wheel well lip trim, but it just didn't look right. I was trying to give it a contemporary look while retaining the classic feel to the theme. I wasn't going to do the window trim either, but I needed to break up the line just a bit because it has such a long look to it. You got it IHSS, the site was a major inspiration for my theme, especially model year and the coil over suspension.
-
This is my second wip and it's finally completed. See the wip here: http://www.modelcarsmag.com/forums/index.php?showtopic=65287&st=0&p=798334. This was my first for many new ideas, techniques and methods. I replaced the oem suspension with a coil over suspension with rack and pinion steering. The kit engine/transmission/exhaust was modified with updated components and scratch built headers. The brake/fuel lines were detailed and subframe connectors added. The interior was left basically stock with the bench seat being replace with buckets and the gauges updated with home made decals. Body trim was completed with bmf aluminum and the panel lines washed with a dark red and the wing was shortened . The paint was wet sanded, polished and waxed (pictures don't do it justice). The build was a challenge and turned out better than I expected. Thanks for looking and enjoy...
-
She's finally complete and moved to Under Glass. Never thought I would see this day, she's been my Eleanor, always something going wrong or not working right no matter how much I planned, test fitted, etc. Thanks for everyone's support and enjoy...
-
Thanks Mike, but yours looks great too. I thought about doing a two-tone like yours, but I chickened out at the last minute.
-
Well its been a while. The body is painted, wet sanded and polished. I'm detailing the engine bay and headliner preparing the body for the interior and chassis. Here are a couple of teaser pics of the body before the wet sanding and polish. Hope to have this one done within the week. Thanks for looking...
-
Jake, here is the link to the wip. http://www.modelcarsmag.com/forums/index.php?showtopic=65287&hl= Finally got the body painted, just waiting for it to set up before doing the bmf and other detailing. I'll post an update soon.
-
Thanks for the support everyone. I will continue the wip for the speed boat here, but right now it's taken a back seat to a WWII Mosquito build for our club's show next weekend, a 56 Chevy build for Goodguys in August and my other wip a 71 Daytona. I promise not to let it die and will post updates as soon as there available.
-
Thanks for all the great comments. It was a challenge combining the kits and I'm amazed everything stayed aligned during the build. Erik, I will have it at our show next Saturday, hope to see your LX 5.0 there!
-
Well she's finally done. She started out as a AMT promotional Silverado dually for the cab, interior and bed with AMT Ford Louisville Short Hauler for the running gear, a DG Productions toy bank for the front clip and a BB chevy from the AMT 57 Corvette gasser. The parts box and scratch building provided many of the under hood details and other miscellaneous parts. For details of the build see the wip here: http://www.modelcarsmag.com/forums/index.php?showtopic=65283&st=0&p=798272 Thanks for looking...
-
Update 05/28/13 I'm calling it finished. The steps were made from the lower steps of the Louisville's fuel tanks. I cut the ears off the steps and drilled holes to add a length of styrene rod for the mounting braces. For the mirrors I modified a set from a diecast 06 mustang and scratch built the filler/mounting plates. I added the air horns from the Louisville to the driver's side radiator support like my 1:1 inspiration. And to finish off the rear frame rail I added stick-on jewels for running lights above the license plate holder. And now after almost 9 months she's complete. Thanks for all the great comments and support. It was a real challenge using new techniques and scratch building learned from this great site. I will continue the wip progress of the speed boat here unless the mods decide to move it to a more appropriate topic area. Thanks for looking...
-
Looking good Erik, can't wait to see it in person at one of our meetings.
-
Thanks guys, I just finished detailing the engine compartment. Worked out my issue with the headlights. I reshaped a couple of round fluted headlight lenses and used Krystal Klear to attach them to the back side of the original headlight lens, followed up by a coat of chrome paint then matt black to match the inside of the hood. The pics don't do them justice. Stripped the original yellow coating from the side marker/turn indicators and re-painted with Tamiya clear orange. Working on the design of some kind of steps for climbing into the cab.
-
Source for throttle return springs
dougp replied to Bonekrosha's topic in Tips, Tricks, and Tutorials
The spring loaded jewelry clasps sold at Michaels and others for making necklaces works great too and come in a variety of sizes. You just have to pry open the clasp and pull out the spring. -
Update 5/11/13 Just a little update. I had a coat of clear run on me, so I had to rework the driver’s side. Thank the Lord I was able to sand it out and reshoot. Otherwise it would have gone in the purple pond which would have meant redoing all the body work. If that had happened it probably would have ended up in the trash can after all the useable parts had been removed. The glass and interior tub are installed. The rear glass was tinted with Tamiya smoke and front cowling and wipers were painted in matt and semi-gloss black. The grille is painted and installed. The GMC logo was painted with Tamiya chrome with a coat of clear red over it. I’m in the process of reworking the headlights and turn signals. They were originally used with led lighting and are just clear lenses with no fluting detail. I think I have a solution which I show in the next update. Thanks for looking.
-
Eggtastic aerodynamics and it must be eggstremely fuel eggfficient. Ok that was bad, but great build.
-
It's still a unique looker and I like what you did with the headlights.
-
I use Duplicolor' clear over Tamiya, Testor's and Model Master's laquers all the time with out any issues.
-
Very nice, good luck with it at the Milwaukee NNL.
-
Love the yellow, great color choice.
-
Update 04/08/13 Well the interior is finally done. I replaced the kit bench seat with the buckets from a 71 Plymouth GTX. I added seat belts front and rear, and the shifter is a Calnaga Castings piece: http://www.calnaga.com/index.html . I used embossing powder for the carpet painted with Tamiya matt black. The rest of the interior was painted in a combination of Tamiya mat black, semi gloss black, black and gloss aluminum. The seat/door inserts were brushed with a flat black wash. The gauges, SRT and Super Bee decals are homemade. Door handles and window cranks were bmf . Finally solved my issues on the front nose cone and the body is in paint. Thanks for looking...
-
Thanks for the great comments. My original paint scheme just didn't work out. The original was going to white above the belt line with diamond dust smoked with burnt styrene and a clear orange cover coat below the belt line. Colors didn't turn out as expected, so it was back to the drawing board. I needed something that would pop and also look great on the speed boat.
-
Well its been slow going. Finally got the color on the cab and bed. The hood and tailgate are in the spray booth now. Next a coat of clear before trying to wash the panel lines before the final coats of clear and polishing. I used Testors One Coat Laquers with the base color being Diamond Dust with Icy Blue followed by DeJa Blue. Thanks for looking...