

dougp
-
Posts
202 -
Joined
-
Last visited
Content Type
Profiles
Forums
Events
Gallery
Everything posted by dougp
-
Brett, I like what you did with yours, wish I had thought of using a modified tounneu cover. I sectioned in the rear deck of a Mustang Mach III for mine. I know its a lot of work, but it's looking great. Can't wait to see it in paint. I like the Boyds too, you don't see them on Willys builds, it will be different.
-
Looking great, can't wait to see it finished. I built one for clubs contest at the Goodguys show two years ago...
-
Nose cone from a Superbird or Daytona, modified to fit the front of a AMT Fireball 500 with the fins modified from a 57 Chevy.
-
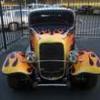 Update 02/07/13 Not much to report, but the interior is complete and the body is ready for paint. Here is the completed interior. I used a seat belt p/e kit from scale dreams with channel styrene for the seatbelt seat hangers. I notched the B pillar panel for the front seat belt retractor slots and cut slots in the rear bulkhead for the back seat belt reatractor slots. The interior is Tamiya matt black with a flat black and semi gloss black wash. The rubber floor covering was sprayed with Tamiya semi gloss black and the gauge panel was a homemade decal. Thanks for looking.
 -
Thanks for the comments and support guys. I think I've finally got it together on the nose cone. The passenger side cone has been given me fits along with one side of the trunk lid where I used styrene rod to fill the original deck spoiler holes, but I think I finally got it beat. Got the final wet sand on the primer done last night and I'm just waiting to make sure it's completely dry before laying the silver base coat. The interior is almost done and I will post pics soon.
-
Update 02/07/13 Just a quick update to let everyone know I’m still working on this build. Both my wip’s have had set backs. While waiting on parts that went into the purple pond, some work was done on the Topkick and the fabbing on the ski boat started. I spent a couple of hours with a dremel abrasive wheel and file to open up the grille. A little wet sanding and it will be ready for paint. About the only thing that has gone right with the interior is the dash. A web photo of a Silverado gauge cluster was used to make a decal for the dash. Once in place it was coated in Micro Krystal Klear. Tamiya gloss aluminum was used on the knobs and buttons to duplicate the use of aftermarket knob/button covers. A green wash was used on the around the radio buttons and display. After researching custom speed/ski boats on the web I decided to do something a little different. With some parts left over from a couple Revell Concept Camaro kits I decided to put them to use. I’m using the dash and taillight surrounds to add a unique look to my speed boat. I raised the front deck with sheet styrene and left a groove at the leading edge of the dash so a modified windshield can be slipped into place after the hull is painted. The rear transom has to be raised to fit the resin jet drive, so the taillight surrounds are being used as fillers. The stern of the boat will be shaped around the taillights. The seats are resin Recarro’s that were cut down to just above the side bolsters and super glued together. The sides are filled in with sheet styrene and putty. The engine is from Revell’s Corvette C5-R kit with engine mounts made from sheet and rod styrene.
-
Update 03/12/13 Just a quick update to let everyone know I haven’t given up on my build. Both my wip’s have had set backs with different parts ending up in the purple pond. Just wish the purple stuff didn’t clean off the body filler and putty as well as the paint. I got the engine mounted on the chassis and the a new exhaust system built. I used exhaust parts from the Daytona and Superbird kits to build this one. I added a cross over pipe and dumped the exhaust in front of the rear axle. I finished the exhaust in Tamiya bare metal steel and weathered the entire system with a thinned Testors rust enamel wash. Exhaust system set temporarily in place. I will glue into place after the body is in place. Thanks for looking.
-
Thanks for the comments. It's been a learning experience getting it to this point. As Kataranga said I've only seen a couple F600 resin conversions on ebay and they aren't easy to get. Also while doing 1:1 research with google on the topkick I found a couple of modeler's who've converted die-cast F600s. Again very few at that.
-
Update 02/12/13 I finally got the chassis done. I was trying to copy the Alerkation K frame upgrade and rear suspension components. I ended up with a hybrid of their different versions. It was tedious going with the use of ten big thumbs to build with, but I’m happy with the results. Here is the bare chassis detailed with the fuel/brake lines and rear sway bar. Rear suspension components in place. Front suspension components in place. Still working on the body. Had a set back on the body work. I dropped it and the seam between the nose cone and the right front fender cracked. Now I can seem to get it as smooth as the first time but I guess patience will prevail. The interior is started and should be done by the next update. Thanks for looking and enjoy.
-
Update 02/07/13 Thanks for all the great comments guys. It's coming along but not as quickly as I would like. I have a little progress to report. My paint order finally arrived so I’ve been working completing the chassis. First up was the exhaust. I thought about using the stock Louisville exhaust and running up through the bed, but it didn’t go with theme I’m after. So I used tube styrene and the mufflers/tips from a Big Foot monster truck kit and fabbed my own exhaust. Here is the comparison of the stock vs. custom and the final installation on the chassis. I used Model Masters iron rust to lightly weather the exhaust around the mufflers and bends from the exhaust manifolds and BMF the exhaust tips. On the Louisville short hauler kit the flaps were attached to the underside of the box and had to be shortened to fit their new location. The mud flaps where shortened, painted and weathered and attached with styrene tube run through the frame. And now the radiator/shroud, engine/trans, drive shaft and exhaust is all in place. I’m still prepping the body for paint and have started painting and detailing the interior. While waiting for my paint order I’ve started on what the Topkick will tow during the summer months…here is a teaser that started with great resin parts from Calnaga Castings, http://www.calnaga.com/index.html. Enjoy!!! Enjoy and thanks for looking...
-
For the warbird guys: DH Mosquito 10 minuite video-wonderful !
dougp replied to Ace-Garageguy's topic in The Off-Topic Lounge
Thanks Bill for the video. Great video. I fell in love with the Mosquito as a kid after seeing the movie Mosquito Squadron and the 633 Squadron. I built a night fighter version of the Mosquito many years ago and have plans on doing another this spring for a build off. Brings back a lot of fond memories of my aircraft building days. -
Update 01/18/13 I have to commend those you who do thorough wip’s with lots of pictures. I found myself making progress and forgetting to take pictures of the work done. It gets to be a lot of work trying to build and document what is done. So great job to those who do it so well… The chassis is painted and assembled. While doing research on the Topkick suspension and test fitting I discovered the Ford chassis didn’t include front shocks. The lower and upper shock mounts were made out of sheet and channel styrene and shaped to replicate the Topkick mounts. Tube styrene was shaved to create the shock bushings. The shocks were fabbed from tube and rod styrene. As I stated earlier this rig was going to include a hitch. The hitch from the Revell 65 Chevy pickup/Hemi Hydro (HINT) boat kit was flipped, trimmed and extended using sheet styrene. Finally the hood, cab and bed are in primer and the first complete test fit. I think I finally have a paint scheme in mind. Just for a teaser the colors I’m thinking about using will be Tamiya pure white, Tamiya Clear Orange, Duplicolor GM silver metallic and styrene smoke. I’ll let your imagination run wild with the possibilities. Thanks for looking...
-
Another great build Erik, looking forward to the next one.
-
BMC tutorials
dougp replied to The Creative Explorer's topic in General Automotive Talk (Trucks and Cars)
I'm getting everyones request and will send it out as soon as possible. I tried to send it to Danno, but the forum has a 24mb max on file attachments and the tutorial zip is 57mb. When making your request please send me your email address so I can use Sky Drive to give access and the ability to download the file. Caution, if you have a slow internet connection it may take awhile. Thanks -
BMC tutorials
dougp replied to The Creative Explorer's topic in General Automotive Talk (Trucks and Cars)
Got your email Erik, but I see you got the file. Anyone that wants a copy of the zip file send me a pm and I'll get it off to you. If one of the mods has a way of posting here for members to download I'll forward it on them... -
From a DG Productions promotional bank like this one: http://www.ebay.com/itm/Ameritech-bucket-truck-Top-kick-new-in-the-box-/170965621463?pt=Action_Figures_Diecast_US&hash=item27ce585ad7 Again I lucked out, a seller on ebay was selling the cab only for $4. I just cut the front clip off the Silverado and the hood off the Topkick and mated them together.
-
Cool Aftermarket semi parts
dougp replied to nboldman's topic in General Automotive Talk (Trucks and Cars)
Here are a couple to start with: http://www.aitruckmodels.com/ http://www.kitformservices.com/metal.html http://sourkrautsmodeltrucks.com/ -
A Chevy Silverado promo kit was used as a donor for the cab, bed and interior. I got lucky and found one cheap on ebay.
-
Update 12/29/12 Just a quick update. Got the rear sway bar built and installed. It’s the only rear suspension component that’s stationary, otherwise the rear suspension is fully functional. With the sway bar being stationary I was able to set the rear ride height. Sorry I forgot to take pics during the mock up. The scratch built Alerkation K frame coil over replacement front suspension went smoother than expected. I used front end components from an AMT 32 Phantom Vicki, parts box pieces and scratch built support frame. The kit frame shock towers where cut out of the frame and the phantom shock tower/control arm supports where weld into the stock frame. Rod and square styrene were used to build the new cross member and frame supports. Here the front end is assembled using white glue. The coil overs, tie rod ends and sway bar end links still need to be built. The spindles still need a little more work for attaching the tie rod ends. I’m really happy with how it turned out. The ride height worked out perfectly, sorry forgot to take pics while I had it mocked up. I’ve started on the interior now that most of the suspension work is complete. The kit dash and engine came equipped with A/C. My build doesn’t have A/C so I have to fill in the A/C vents on the dashboard. I’ve also drilled out the instrument bezels for placement of homemade speedo, tach and gauges. I’m not happy with the pedal placement and will rework those too. Thanks for looking...
-
Update 12/29/12 Just a quick update, not much getting done during the holidays. Anyway I’ve completed the exhaust manifolds, master cylinder and starter. I used parts box pieces to make the power distribution box, windshield washer fluid reservoir and air cleaner. The coolant reservoir and windshield wiper motor were scratch built from rod and sheet styrene. The radiator frame and supports were made from channel styrene. The engine is almost complete. The power steering reservoir and alternator were attached with scratch built brackets and push pins. The drive belts and fan attached. The TBI was made by removing the float bowls from a Holley dominator carb and using rod styrene to add details. An oil filler tube was made with rod and tube styrene. The HEI distributor was provided by MAD. Test fit of engine with distributor installed. Fuel tank cut from promo Silverado undercarriage and filled with strip styrene. Tank will be shaped and fitted to the underside of the bed above the frame rails. Cab with it’s first primer coat. The finish looks great with only a couple on imperfections to fix. Planning to continue preparing the cab, hood, bed and frame for paint. I need to decide on a paint scheme so I can start work on the interior. Thanks for looking...
-
Finally bought paint booth (Update 12/21/12)
dougp replied to dougp's topic in Model Building Questions and Answers
Thanks for everyones input and suggestions. Thanks Scalenut for the comments and pics about your Pace, they were the deciding factor. We need open space around our projects because we still primarily use rattle cans. We bought the Artograph booth (same as MicroLux) from Amazon. Saved over $100 between the free shipping and lower price on Amazon. Thanks Chief Joseph for the suggestion and supplied link about the secondary filter. We went out to collect the parts and while at Lowes we found these Dryer Lint Trap kits. They included 8' of ducting and two snap rings. Since we're limited on space I felt these would make great secondary filter containers and they solved my problem of having to fabricate a 'Y' connector to the 5 gallon drum (booth has two exhaust ports). I picked up two 4" aluminum collars and a 30X20 generic HVAC filter. Total for all the parts was about $35. I pressed fit and hot glued the aluminum collars to the inside of the lint traps. I then measured and cut 4 circular pieces of filter material and placed them in the traps. The filter material presses and seals against the collars in the traps. The tops snap into place and the two traps are connected together by gluing their wall brackets together. Here is how they look assembled together and in use. Booth and filters got their first work out tonight. We couldn't be happier with the results. The booth has plenty air flow, work space and is well lit with the clear top. I found I will be able to use polyester batting material for filter replacements in the future. My wife makes quilts and has a ton of the material laying around. I used it before as filter material in my old homemade paint booth. Now we don't have to wait until spring to paint again. Thanks again to everyone. -
Which clear coat for Tamiya spray paints?
dougp replied to Raypa's topic in Model Building Questions and Answers
I've used Duplicolor and Modelmaster clears without any problems. -
Flareside "At least I have phat rims"
dougp replied to Affod's topic in Model Trucks: Pickups, Vans, SUVs, Light Commercial
By the pics it appears the weathering to have turned out great. At least you made the effort at weathering which is more than I can say for myself. Keep building, its the skills on this site that keep pushing me to build and try something new each time. -
Tim, I think I have just what you're looking for: I picked it up off ebay for a build a couple of years ago. Build went a different direction, so if you want it im me.
-
Update 12/10/12 Well it has been a while since I’ve updated the Daytona. I’ve been busy on the Topkick WIP, but decided to give it a rest to work on the Daytona. I like doing modern upgrades to older cars and wanted to do something different on the Daytona. I built a modern 440 for it so it needed a modern suspension. After a couple hours of research on the web I found the Alterkation suspension upgrades for Mopars. It was a challenge working with such small pieces but after several attempts I think I finally got something close. The 1:1 The kit differential appeared wimpy so I swapped it out for one in the parts box. Haven’t decided whether to fin the cover or try and reinforce like the one in the 1:1. The Daytona's new rear suspension. I used styrene channel and strip to make the trailing arms, axle, coilover and panhard bar mounts. Rod and tube styrene was used for the coilover shocks, different bolt attachments (to be shortened later) and panhard bar. The shocks will be painted silver and red clear then wrapped with red wire. Still need to add the stabilizer bar, add a reinforcement cross member for the coilovers and clean up and shape/shorten the parts. Next I am going to attempt replicating Alterkation’s K frame coil over replacement for the front suspension. I've been a little hesitant about cutting out the K frame but I’ll never get it done unless I try. Anyone got an AMT 71 Charger in case I screw it up Thanks for looking...