Doctordarryl
-
Posts
160 -
Joined
-
Last visited
Content Type
Profiles
Forums
Events
Gallery
Everything posted by Doctordarryl
-
Third Monogram Slingster Build: A 60s Style A Modified Roadster
Doctordarryl replied to Doctordarryl's topic in Model Cars
My Fotki site has been updated with a new price list, the magneto decals and the Hilborn fuel pumps. http://public.fotki.com/doctordarryl/scaleautodetails -
Third Monogram Slingster Build: A 60s Style A Modified Roadster
Doctordarryl replied to Doctordarryl's topic in Model Cars
I have to update the Fotki site. Hopefully I can do that this week. -
Third Monogram Slingster Build: A 60s Style A Modified Roadster
Doctordarryl replied to Doctordarryl's topic in Model Cars
I made interior "tin" from 0.005 inch thick Styrene sheet that I painted with Tamiya AS-12 Bare Metal. The MAS and Arrowhead items were recent purchases. Arrowhead is back in business. MAS moved from SC to PA and may have been down for a short time. A well known resin caster is bringing out an upgrade kit for the slingster. I am toying with offering some additional parts depending on what they offer in their upgrade kit. I am collaborating with this resin caster and provided a master for a Hilborn fuel pump. -
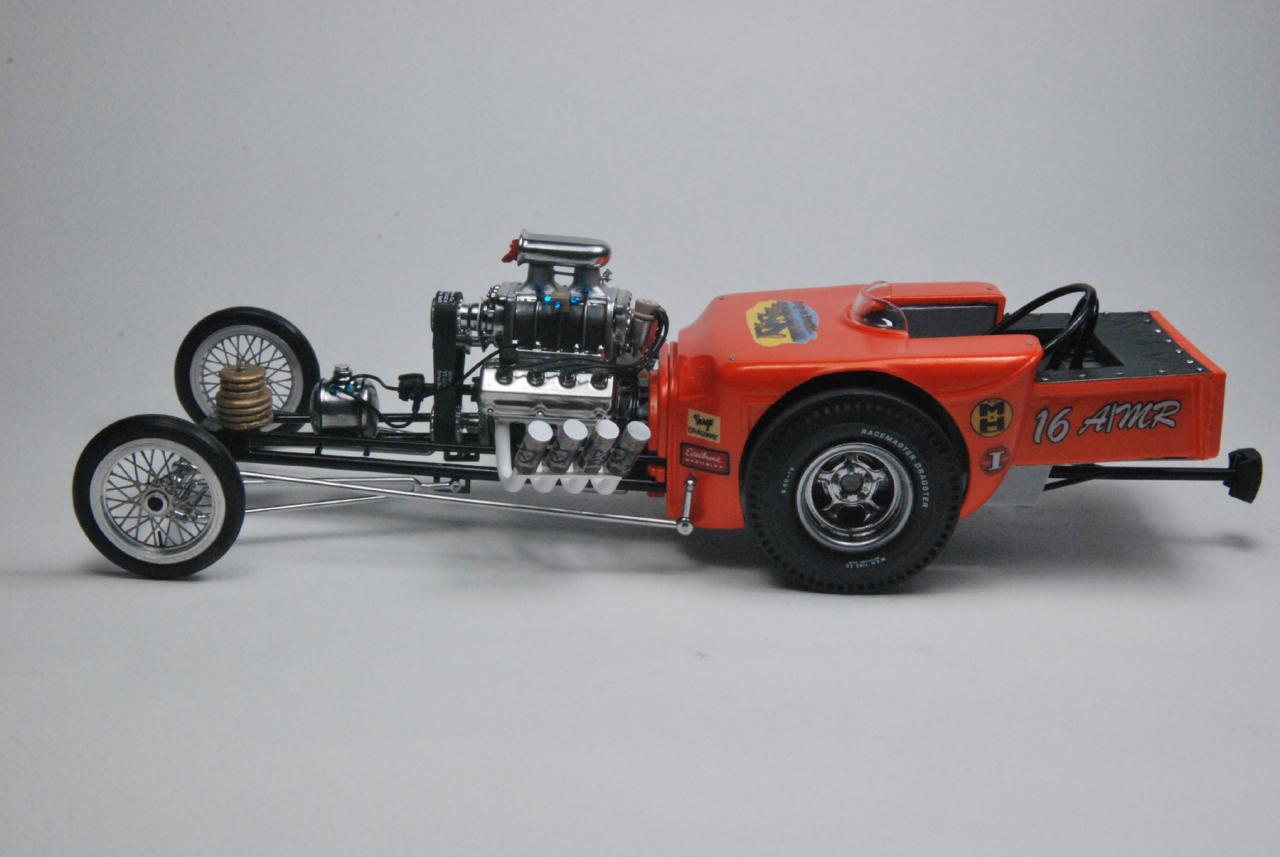
Here are some pics of my third Monogram Slingster build - the Keep on Truckin 60s style A/MR. The resin body was from Altered States and modified slightly. I used HOK Tangelo Pearl for the body. The engine block and frame were airbrushed with Tamiya TS-14 Gloss Black. Decals were custom made by Scale Auto Details (namely me). I lived in southern California in the 70s and liked Robert Crumb's artwork, especially Keep on Truckin' art so I decided to use that for this build since the body had a pick up bed. I used AMT parts pack slicks and rear wheels. The rear wheels were detailed and each wheel consists of 14 pieces. They were redone with Alclad II Chrome over Testor's Gloss Black. The front wheels were PE items from Machined Aluminum Specialties (MAS) with parts box tires. The kit Hemi engine was used. The blower pulleys were items from Arrowhead Accessories and the belt was from MAS. The magneto was from Morgan Automotive Details with a top cap decal from Scale Auto Details as were the front bar bell weights and the blower belt part number decals. I used the kit zoomie headers and modified them to be more protypical. I made Coors beer cans from Evergreen Styrene tube and sheet with decals from Scale Auto Details to cover the header ends. The red shop rag stuffed in the injector scoop was made from a 1 cm square from a cotton tee shirt and painted Tamiya Flad Red. The engine is wired and plumbed. All kit chrome was removed by soaking in Purple Power cleaner and then redone with Alclad II Chrome over Testor's Gloss Black. The body was cleared with HOK clear after the decals were applied. I love this kit and have a few more ideas for additional builds.

-
Second Slingster Build: Lo$t Wage$ 60s-style dragster
Doctordarryl replied to Doctordarryl's topic in Model Cars
Just received a package from Susan and Duane (Arrowhead Accessories) and they filled my old order from eBay, 6 years after the fact. I will remain a strong supporter of Susan and Duane since they have products that no one else has and I will remain a customer. I read about there troubles and I feel sorry for them but like the old saying, what does not kill you makes you stronger. They should be VERY strong. I would not wish their trials on anyone. Thank you Susan and Duane. Keep making excellent products. -
Second Slingster Build: Lo$t Wage$ 60s-style dragster
Doctordarryl replied to Doctordarryl's topic in Model Cars
I tried the e-mail address and it bounced. The Contact Us tab on the web site does not give you an e-mail address, it puts you into an eendless loop. -
Second Slingster Build: Lo$t Wage$ 60s-style dragster
Doctordarryl replied to Doctordarryl's topic in Model Cars
I did contact them through eBay using the "Ask a Question" on one of their auctions. I do not expect to hear from them unfortunately. It is experiences like that (and I was not the only one stiffed by Duane and Susan) that turn people off to the cottage industry. I am really put off by the gaul of them stating on their web site that they would not sell on eBay until all back orders were fullfilled. I highly doubt that my eBay purchase was the only one they never fullfilled. If I do not hear from them in a week, I will bring it up to eBay even though it has been nearly 6 years. eBay may be able to exert pressure on them with the new seller rating system being implemented next month. I will also contact them through the new e-mail address as well by forwarding them the PayPal invoice for the items they never shipped. -
Second Slingster Build: Lo$t Wage$ 60s-style dragster
Doctordarryl replied to Doctordarryl's topic in Model Cars
It literally slipped right in. Some minor tweaking with location of the front motor mounts was all that was needed. -
So does Machined Aluminum Specialties.
-
Second Slingster Build: Lo$t Wage$ 60s-style dragster
Doctordarryl replied to Doctordarryl's topic in Model Cars
I got stiffed for about $50 on eBay in June of 2008. I must have sent a dozen e-mails over the past 6 years. I went to their website and it is still up. I forwarded the PayPal invoice to the parts I won on eBay in 2008 to the only Arrowhead e-mail address I had. I noticed that you were put into an unending loop if you click the Contact Us tab on their web site. Does anyone have a current e0-mail address for Arrowhead Aluminum? They know me well since I bought a ton of stuff from them and always used to stop and chat with them at shows so I was very disappointing when I got stiffed. -
Second Slingster Build: Lo$t Wage$ 60s-style dragster
Doctordarryl replied to Doctordarryl's topic in Model Cars
Greg, Both kits are nice but it is hard to objectively compare a kit engineered more than 50 years ago with one engineered a year ago. On that basis. the Monogram Slingster wins hands down - a much better engineered kit but it is like comparing a 19641/2 Mustang with a 2015 Mustang and asking which is better. The collector might prefer the 19641/2 Mustang and the car nut (like me) might prefer the 2015 Mustang. Again in terms of engineering. the 2015 is not comprised of cast off Falcon parts. -
Second Slingster Build: Lo$t Wage$ 60s-style dragster
Doctordarryl replied to Doctordarryl's topic in Model Cars
Greg, No they went out of business 6-8 years ago. They stiffed a lot of people who bought on eBay and I was one of them. I had a good supply of some of their better parts. -
All - please look me up at NNL East. I will have a vendor table and will be well stocked with decals and resin parts. I am an authorized show dealer for Pro-Tech for the northeast this year and am excited about how Charlie's products complement those from Scale Auto Details. I will be well stocked with Pro-Tech parts. I'll also have some models (new and old) to sell. Don't forget to check out my Fotki site: http://public.fotki.com/doctordarryl/scaleautodetails to see items I offer and make a list to give me at the show. I'll be well stocked with the latest drag decals that are selling extraordinarily well on an unnamed auction site. I was hoping to have my web site up before NNL East but it is unlikely that will happen as the day job keeps interfering. Funny how that works. One day soon I will be able to spend the day on my passion and not my profession. See you at the show.
-
Very nice job Steve on a very difficult kit to build!!!! I have an unbuilt original release with TV Tommy's autograph on the top of the box - that's a keeper but I must pick one up to build. I have the 1/18th scale GMP diecast to help me with the build/plumbing/etc. I still see this kit on the shelves in hobby stores and at shows so it was out not too long ago and may still be in the Revell catelog. Since the chassis was from Chassis Research I was thinking of using the chassis from the new Monogram Slingster kit to build the twin-engined version that came before he added the second pair of engines and front wheel drive. I also have that 1/18th scale GMP diecast and it sits right above my build table along with the showboat.
-
Here is a little item to add to your next drag model - a decal for the top of the magneto cap. I got some magnetos from Morgan Automotive Details and they are very nice with separate caps. MAD offers magnetos with different color caps (and wires). I prefer the tan cap and will offer decals in various colors to match MAD products. Keep Building!!!!
-
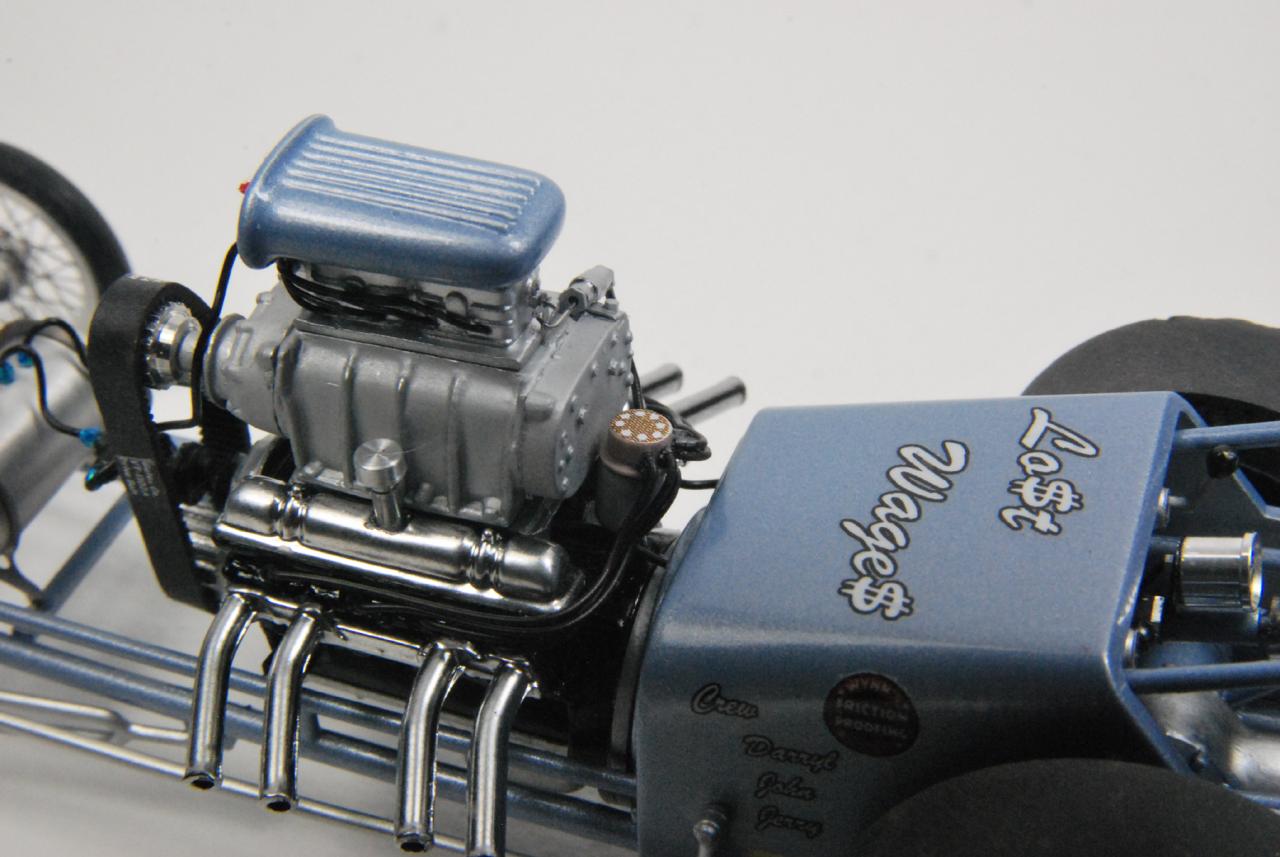
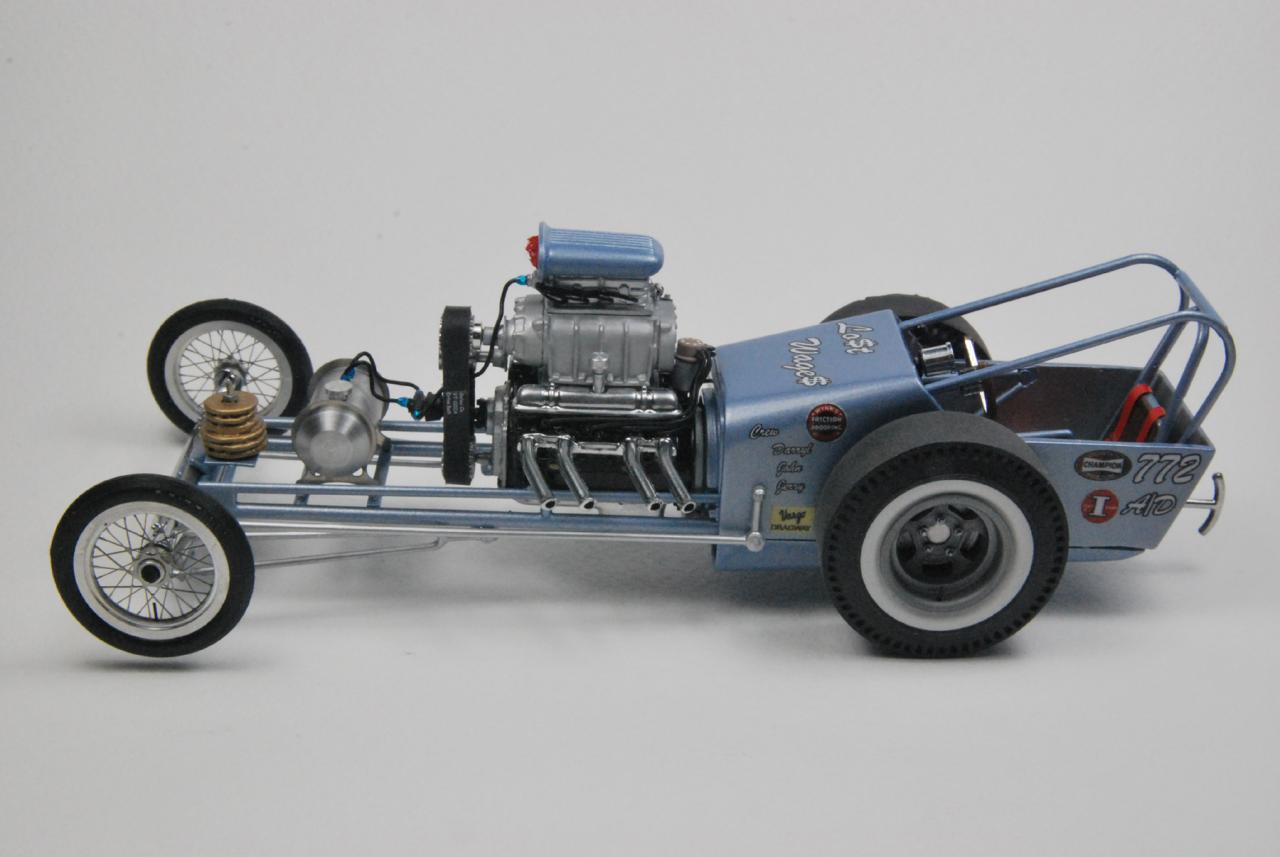
Mark up another build I wanted to do for quite some time; a low buck 60s style dragster. I used the Buick engine from the Revell Tony Nancy 22Jr roadster kit along with the in-out box. The injector scoop is from a BluePrinter parts pack. I used a MAD magneto with a Scale Auto Details decal for the top of the cap. The front wire wheels were PE items from Machined Aluminum Specialties as was the Moon tank and blower drive belt. The rear slicks were from a recent AMT parts pack as were the rear wheels. However, the rear wheels were modified and consist of 14 pieces for each wheel. The bar bell weight stack (ballast) was a modified item from Scale Auto Details. I modified the front engine cover and cast a fuel pump extension to go with the Tony Nancy kit's Enderle fuel pump. The body and frame were airbrushed with Tamiya Light Pearl Blue. After applying the decals, I airbrushed Testors Clear on the body. The engine block was airbrushed with Tamiya Gloss Black. I added an oil filter on the right side and freeze plugs on both sides. I used Arrowhead Aluminum turned aluminum blower pulleys and Detail Master oil breather caps on K&S aluminum tubing extensions. Folks from the Lehigh Valley might like the Vargo Dragway sticker on the body (seen in the side view just behind the steering arm). I saw dragsters like this at Vargo in the early 60s when I hung out there. The Lo$t Wage$ name reminds me of the old adage - "if you want to make $1,000,000 racing, start with $10,000,000". I have plans for a few more builds from this great kit from Monogram. I will be offering more decal sets through Scale Auto Details as well. Keep Building!!!!
-
Show us your Engines - Post Dedicated to the Engine
Doctordarryl replied to TheCat's topic in Model Cars
They did not use real beer cans to cover the headers. They were specially made to look like empty Coors beer cans with the label right side up so you could read it. You are correct that if they used real beer cans then the label would be upside down. -
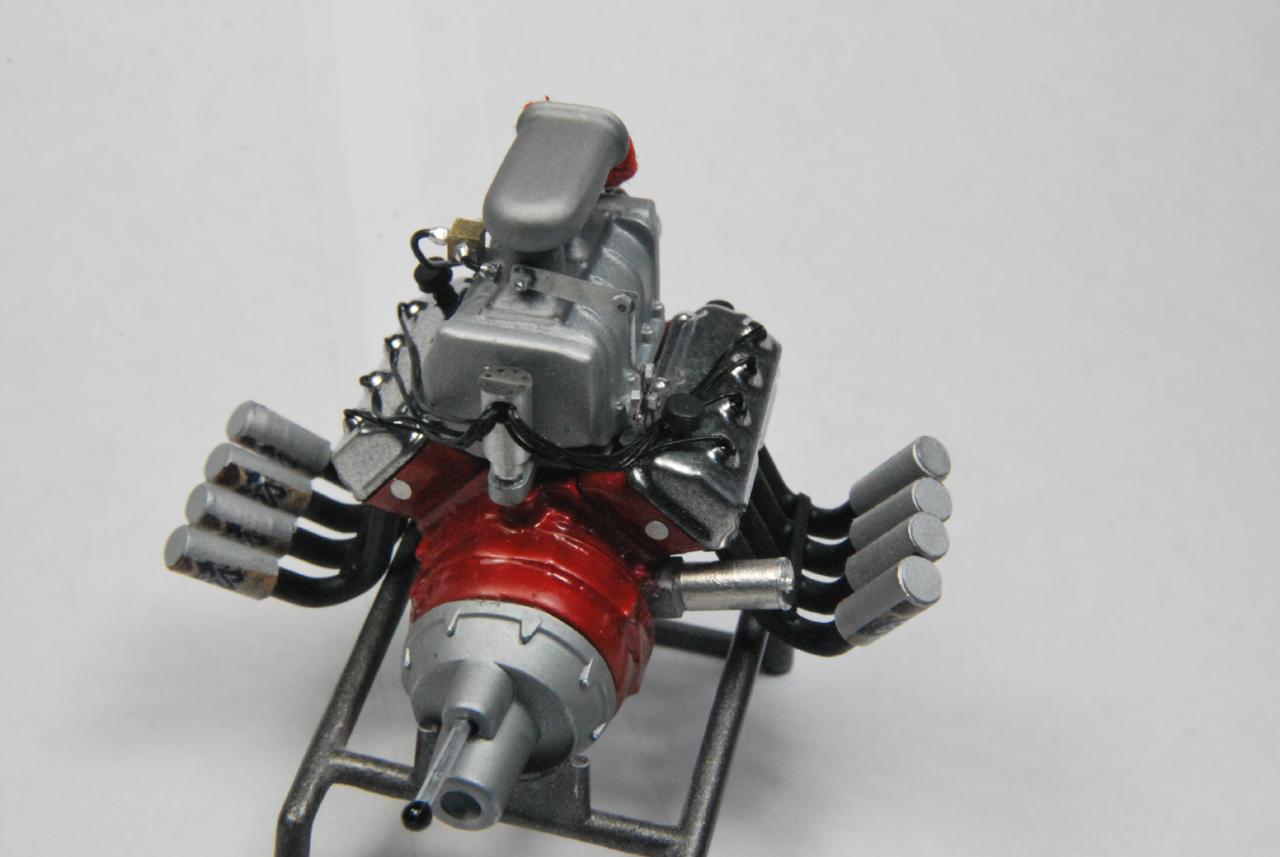
I thought it might be the injected 426 Hemi from the "Little Red Wagon" by IMC and later re-released by Lindberg but there does not appear to be a transmission attached to the block.
-
Show us your Engines - Post Dedicated to the Engine
Doctordarryl replied to TheCat's topic in Model Cars
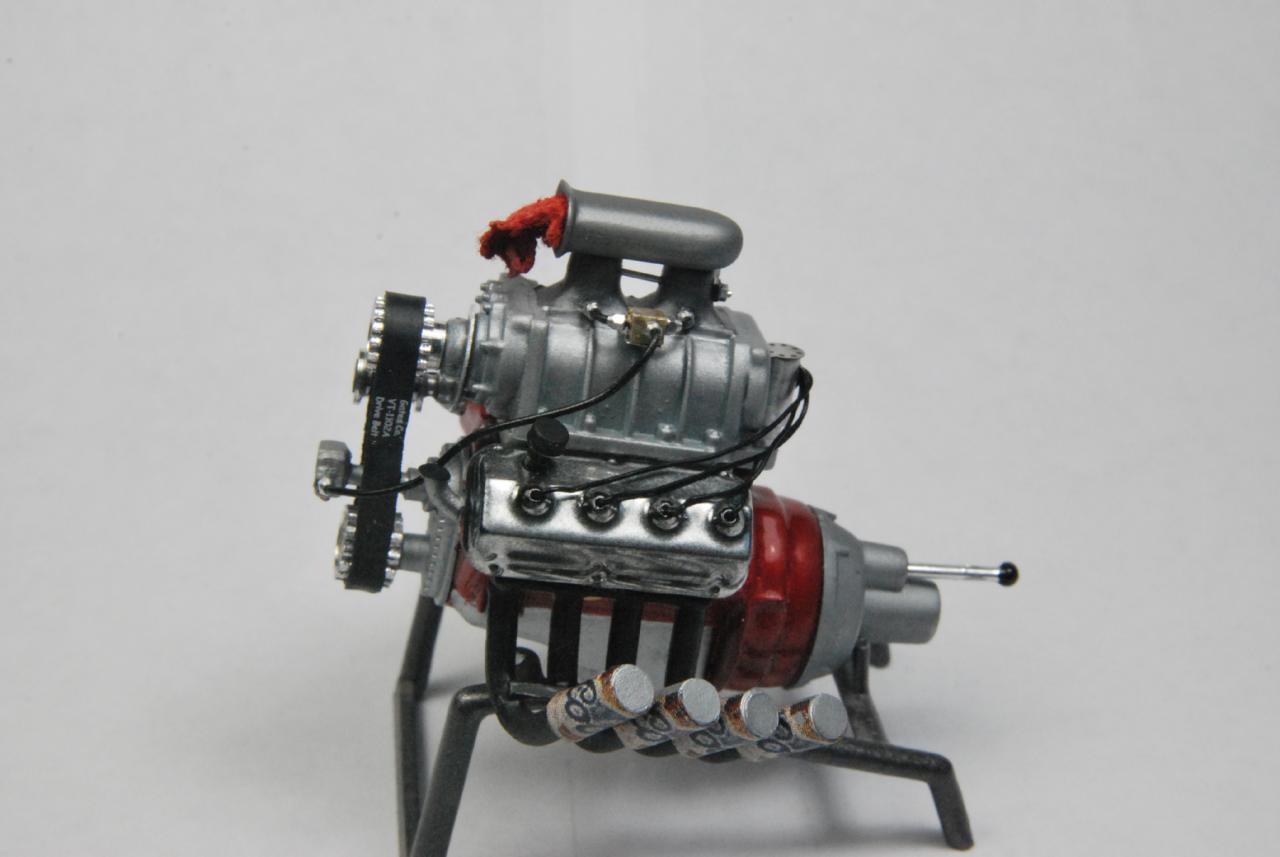
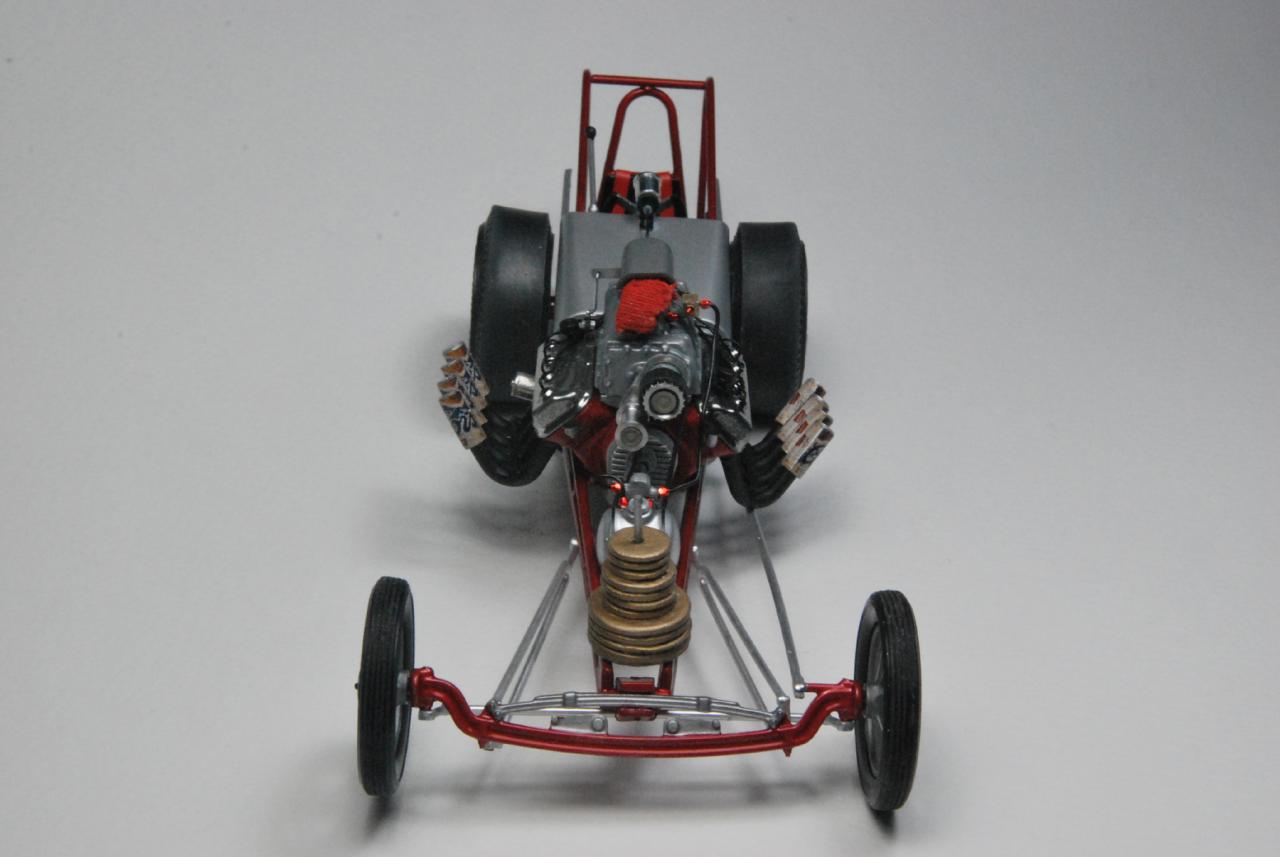
Here are some pics of the Hemi for my build of the Al Bergler "Aggravation" A Competition (A/C) coupe from the new Monogram Slingster dragster kit. I may offer the Coors cans or just the decals through Scale Auto Details http://public.fotki.com/doctordarryl/scaleautodetails I used the kit engine which I intially thought I would replace. Once I assembled the block and eads, I decided to keep it. I added a resin Hilborn fuel pump (may offer it through Scale Auto Details), scratch built magneto, Arrowhead (no longer in production) turned aluminum blower pulleys and cogged blower belt, added Detail Master breathers to the kit valve covers, scratch built an oil filter housing, modified the headers so I could place Coors beer cans over the ends of the zoomie headers, the shop rag stuffed into the injector scoop was made from a piece of cotton tee shirt painted with Tamiya Flat Red acrylic, freeze plugs made from gold Mylar film, water necks for the heads made from stretched sprue, steel plugs for the water jacket openings in the rear of the heads, injector linkage made from printer's aluminum sheet, wire, and brackest from Model Car Garage. This was a fun kit. You can see the build in the Drag Race models forum (search for dostordarryl or Aggravation) and the finished model in right here in Under Glass. Enjoy
-
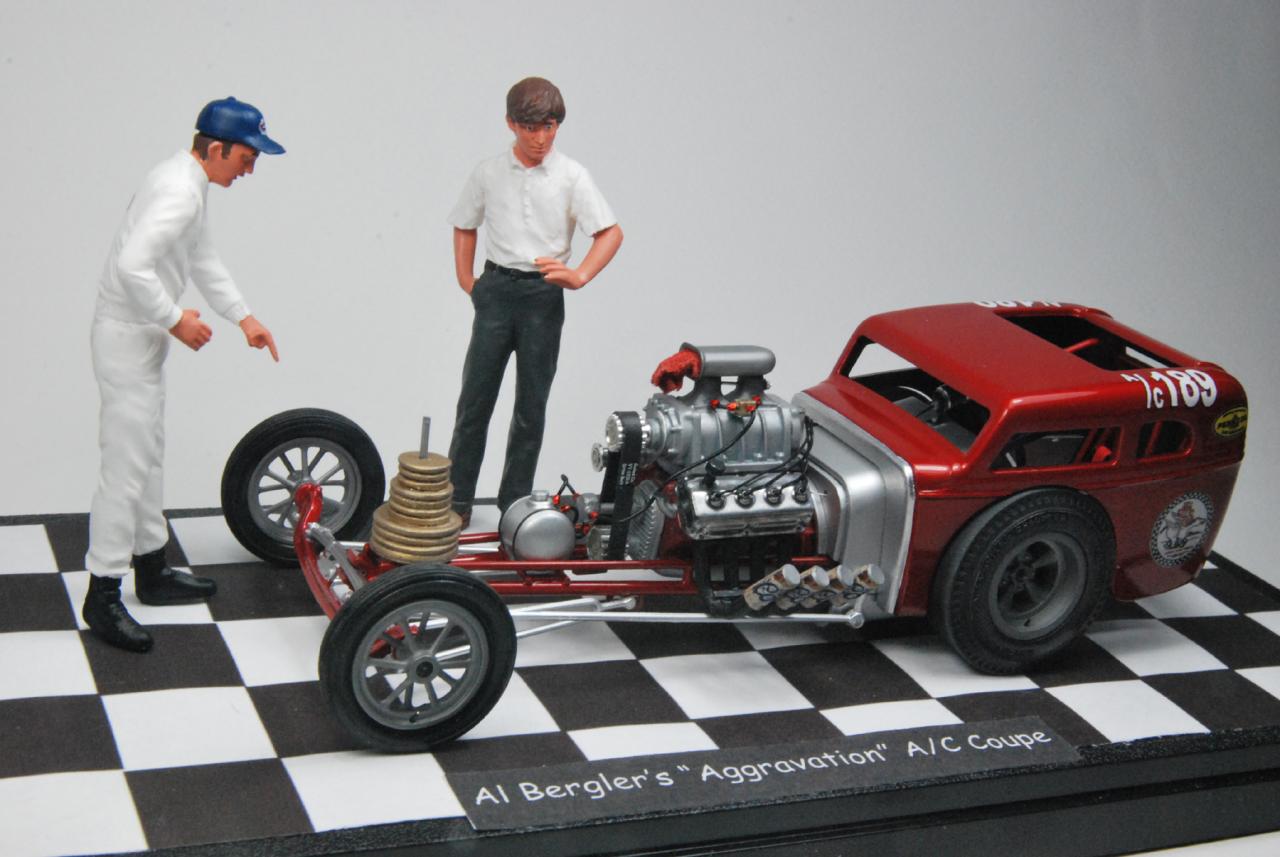
The NHRA tech guy is from the Tamiya Rally Mechanic set.
-
Very nice job Tom. The black frame contrasts very nicely with the HOK Solar Gold. Just out of curiosity - what thinner did you use for the HOK paint? I use Mar-Hyde acrylic lacquer thinner but since 3M bought Mar-Hyde they discontinued that product and I am running low. I agree that this is a fun kit to build. Monogram must be commended for bring out this kit. I expect to do a few more and am looking for pictures of Chassis research dragsters that I might make decals for. If anyone has decent pictures of some old dragsters which used the original style short wheel base Chassis Research chassis (that sounds redundant - LOL) feel free to message me. I typically give a few sets of free decals to those who supply images adequate for me to create artwork for decals. Of course, they must have a wider appeal than just you and me since while this is an offshoot from one of my hobbies, Scale Auto Details is a business.
-
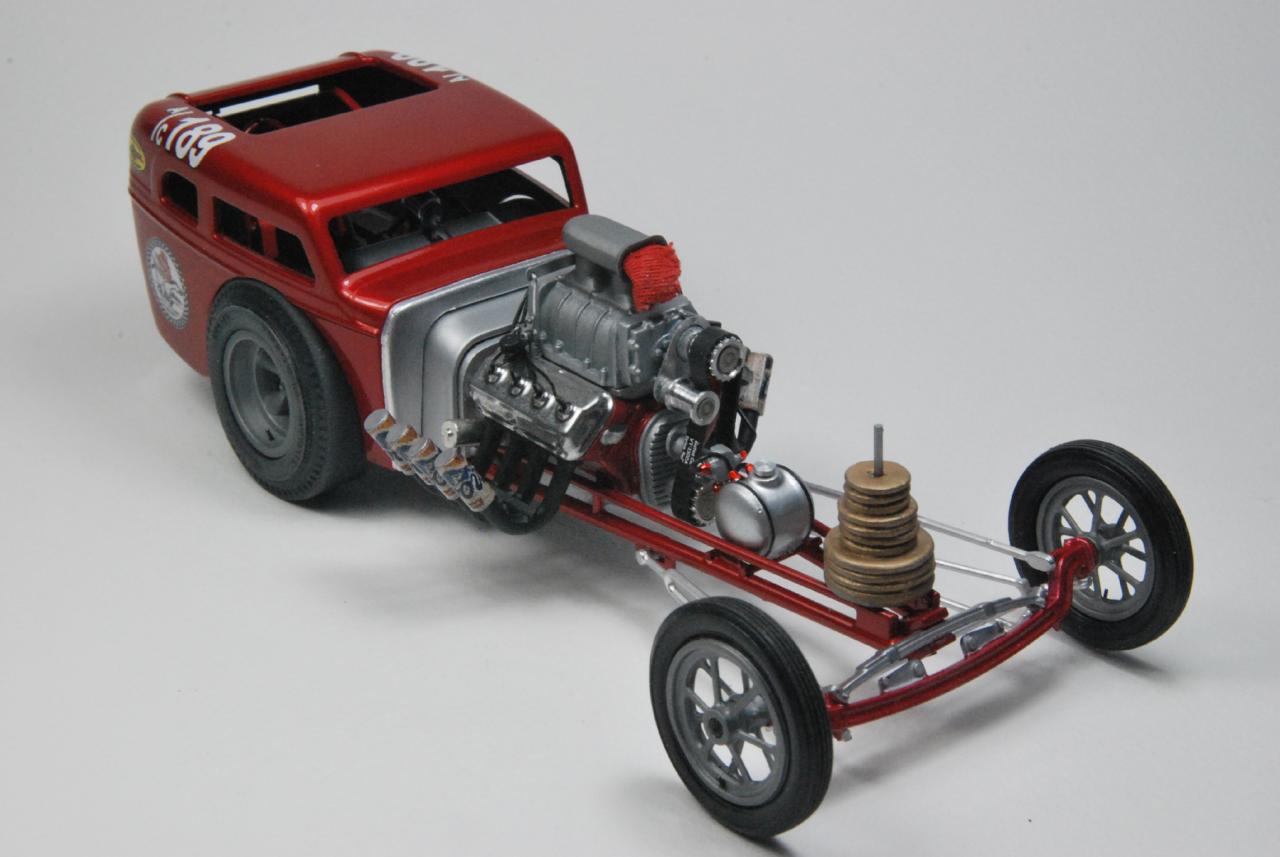
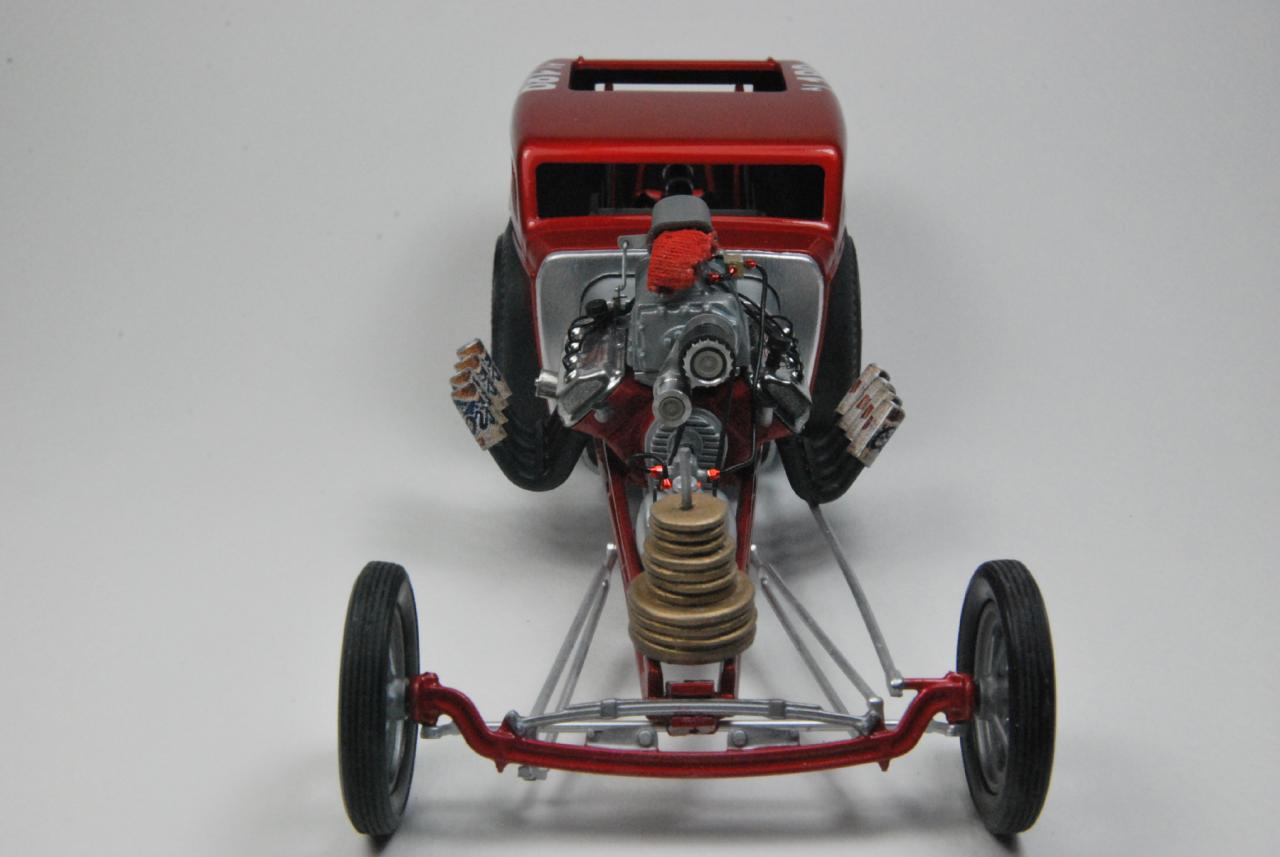
Here are pictures of my finished Aggravation A/C coupe dragster built from the new Monogram Slingster. I can't say enough good things about this kit. If this kit truely was scaled down from the old Monogram Sizzler kit, it is amazing how well the Sizzler was engineered over 40 years ago!!! WOW. I had no problems with assembly. I like the scale feel of the chassis parts, much like the Revell Kurtis Kraft midgets they strived to keep as much in scale as they could and did a fantastic job. Both the decals and the resin stack of bar bell weights are available from Scale Auto Details http://public.fotki.com/doctordarryl/scaleautodetails I did change a few things. I did use the kit engine but added a resin cast Hilborn fuel pump. I made the Coors beer cans to cover the zoomie header ends and the shop rag stuffed in the injector scoop was made from a piece of cotton tee shirt painted with Tamiya Flat Red acrylic. I cast the stack of bar bell weights in resin. I used Ma's Resin wheels and slicks since they were a little bit larger than the kit items which appeared slightly too small to me. Because I used different wheels, I had to widen the rear axle by 1/4 inch (1/8th on each side) to properly space out the new slicks/wheels. Since the slicks were a little larger than the kit items I had to slightly increase the openings in the body for the slicks. I removed the body seam going across the roof and also removed the drip rails and filled in original rear wheel openings. I added the lower character line to the rear of the body using strected sprue and shortened the vertical body seams and scribed a horizontal body seam where the vertical seams end. I drilled a large hole in the rear of the body to mount the new scratch built push bar and added black styrene tube to look like a "gasket" between the body and the push bar (as seen on the real car). The paint on the frame, engine, and Bantam body was Tamiya Transparent Red over Tamiya Silver Leaf - airbrushed with an Aztek A470 airbrush. The paint was cut 1:1 with Dupli-Color lacquer thinner. Dupli-Color clear was airbrushed over the decals and on the frame and engine. The dragster "under body" was airbrushed with Tamiya Silver Leaf to represent dull. oxidized aluminum sheet. The original car did not have those panels painted. Al Bergler was a top notch fabricator and he made the dragster body panels out of sheet aluminum. Freeze plugs were added to the engine and water necks were added to the front of the heads and steel plugs in the rear of the heads. Injector linkage was scratchbuilt from printer's aluminum sheet, thin wire, and brackets from Model car Garage. I used Arrowhead (no longer in business) machined aluminum blower pulleys and their cogged blower belt with decals I made for the belt markings. I stripped the kit chrome off of the Moon tank and glued it together with IPS Weldon #4. Before it dried I squeezed the top and bottom together to create a small bead on the seam. When that dried I sanded it down with 600-grit wet and dry sandpaper and finihed it with 2000-grit paper. I sprayed it with Tamiya White Fine Surface Primer (as I did the body and frame) followed by Tamiya Silver Leaf. The cap in the Moon tank was from Detail Master. The hold down straps were Line-o-tape 1/64th inch wide black tape. The blach tape and machined aluminum cap were brushed with Floquil flat to knock down the sheen. The fire wall of the Bantam body was covered with Bare Metal Foil Dull Aluminum to match the dragster body panels. This is a fun kit to build and I wanted to build a model of this car for many years. I love the old drag cars. I always like to display my models with a base and figure(s). I can just imagine the NHRA tech inspector saying he did not like the stack of bar bell weights and Al is telling him if he does not have them there he will just pop a wheelie. Enjoy.
-
Here are some pictures of the finished chassis with the dragster body but not the Bantam body. The engine has been wired and plumbed. The tach and gauges were wired as well. There is also a picture of the scratch built push bar made from Evergreen styrene rod, tube, and sheet and finished with Alclad 2 Chrome over Testor's gloss black. I have pictures of the finished assembled model in the Under Glass forum (where I was told to put finished models regardless of what they are - I won't be surprised if it is moved back here to Drag Race models but so be it). Go to the Under Glass Forum for the finished photos of my Al Bergler's Aggravation A/C coupe dragster model.
-
Here is a picture of the Coors cans. I made them using a MicroMark Chopper, Evergreen styrene tube, and a MicroMark punch set with 0.01 inch thick Evergreen styrene sheet. They were assembled with IPS Weld-On #4 and sprayed with Tamiya Silver Leaf. The beer can labels are decals I made using Coors literature to generate the art work. If there is enough interest I may offer the Coors can decals (9 per sheet) for sale.
-
Finally finished the engine. It is now plumbed and I finished the injector linkage as well. I made a shop rag to stuff into the injector scoop (as I saw in a B&W picture of the front of the dragster). I will post some images of the dragster without the coupe body when I finish it later this week. The decals are selling very well on eBay. Enjoy.