Doctordarryl
-
Posts
160 -
Joined
-
Last visited
Content Type
Profiles
Forums
Events
Gallery
Everything posted by Doctordarryl
-
All, I have finally purchased a domain name and scaleautodetails.com is now mine. Now I need to develop a web page, hopefully that will be up and running before NNL East. I also have a Squidoo Lens (a one page website) that has my tips for achieving award winning automotive model finishes. You can see it at the following hyperlink: http://www.squidoo.com/scaleautodetails-finishes Feel free to Tweet it to friends and like it on FaceBook. More updates when I get my website up and running.
-
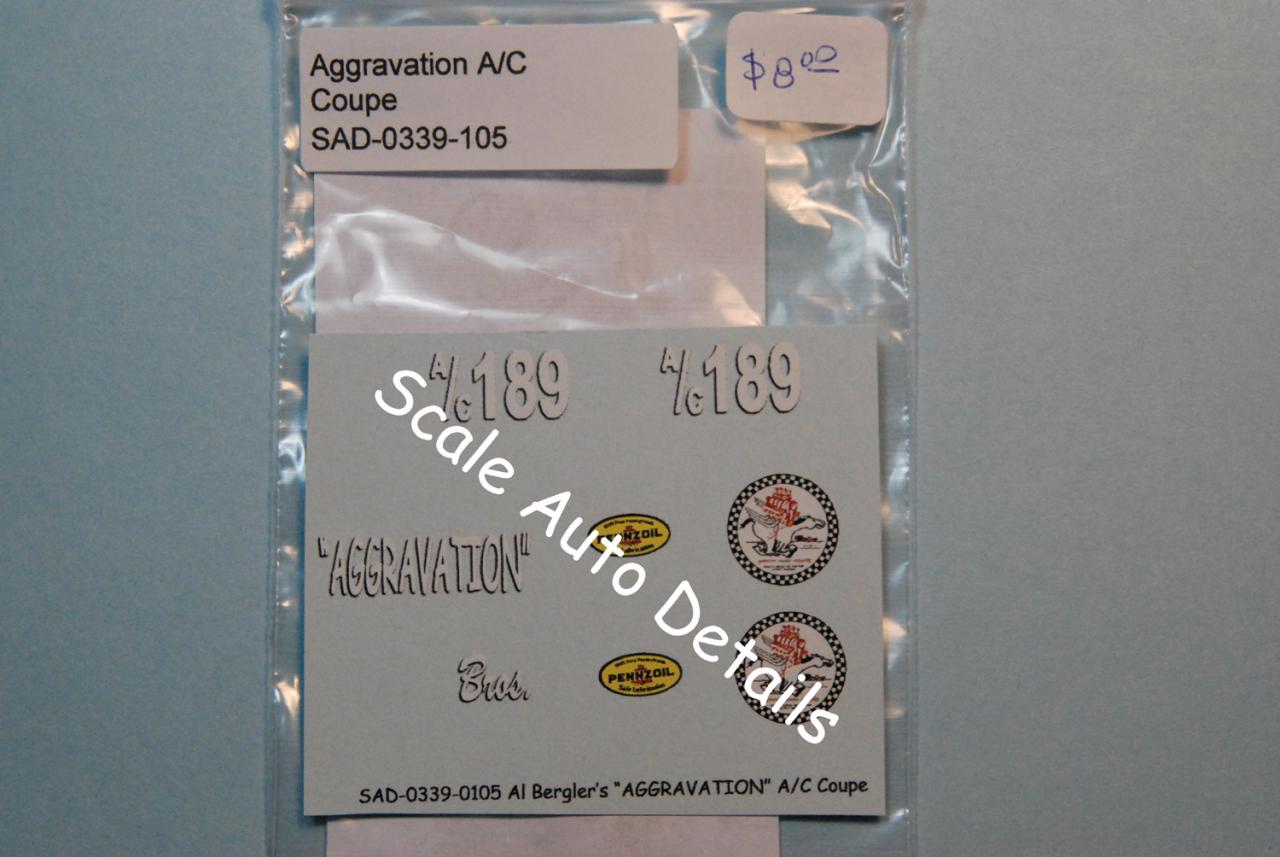
All, Please be advised that I also offer the Al Bergler's Aggravation A/C coupe decals scaled up to 1/20th scale for the old Monogram Sizzler dragster (and the RMCM resin offering). Please PM me for pricing if interested. This is not a stock item at Scale Auto Details but is run on an as needed basis.

-
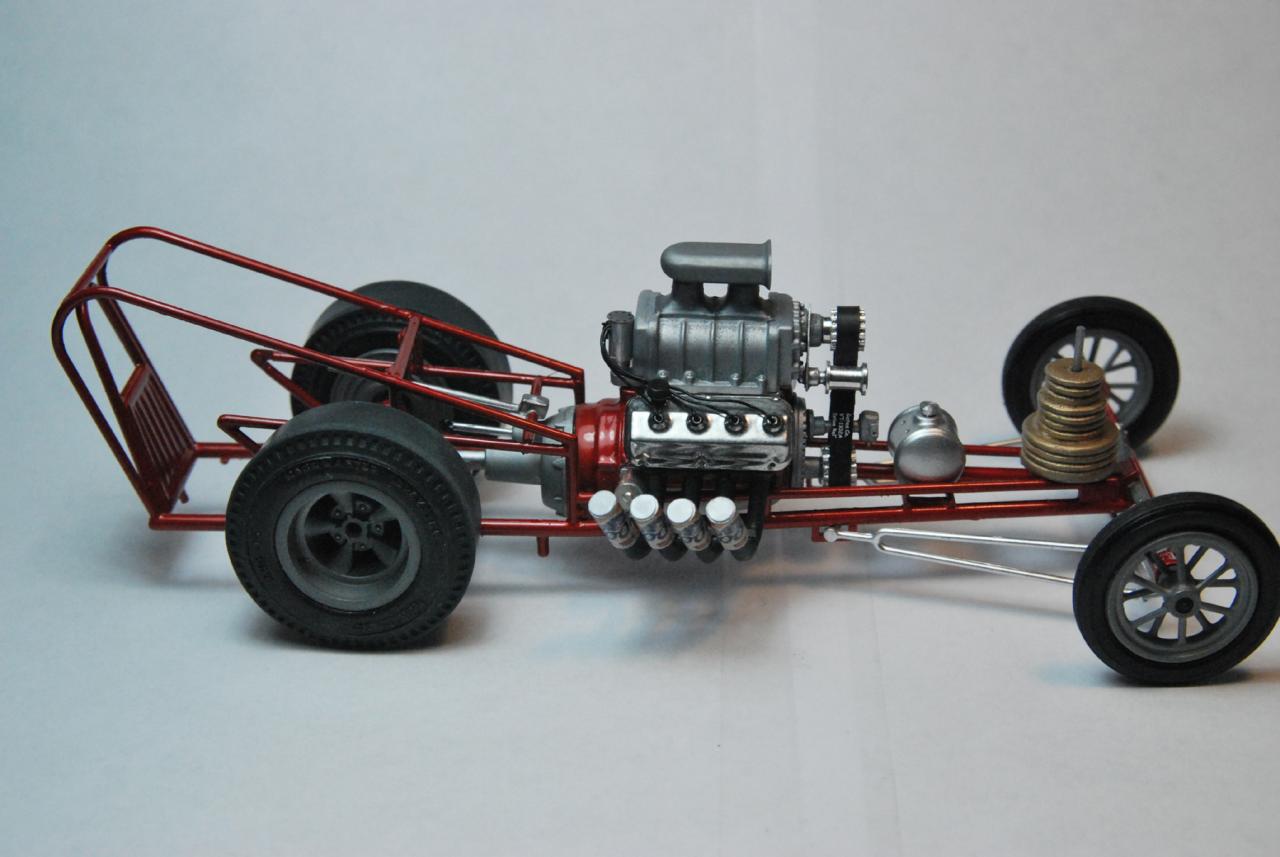
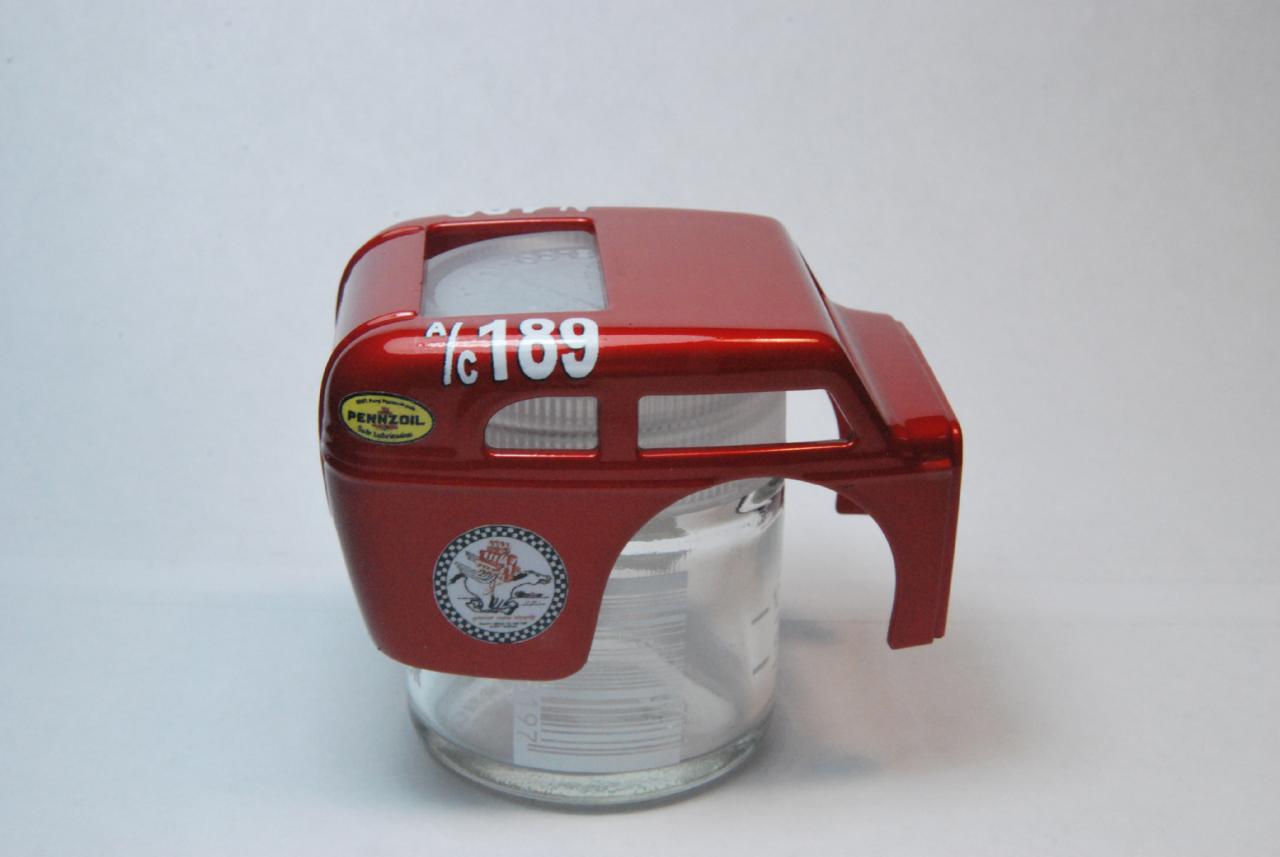
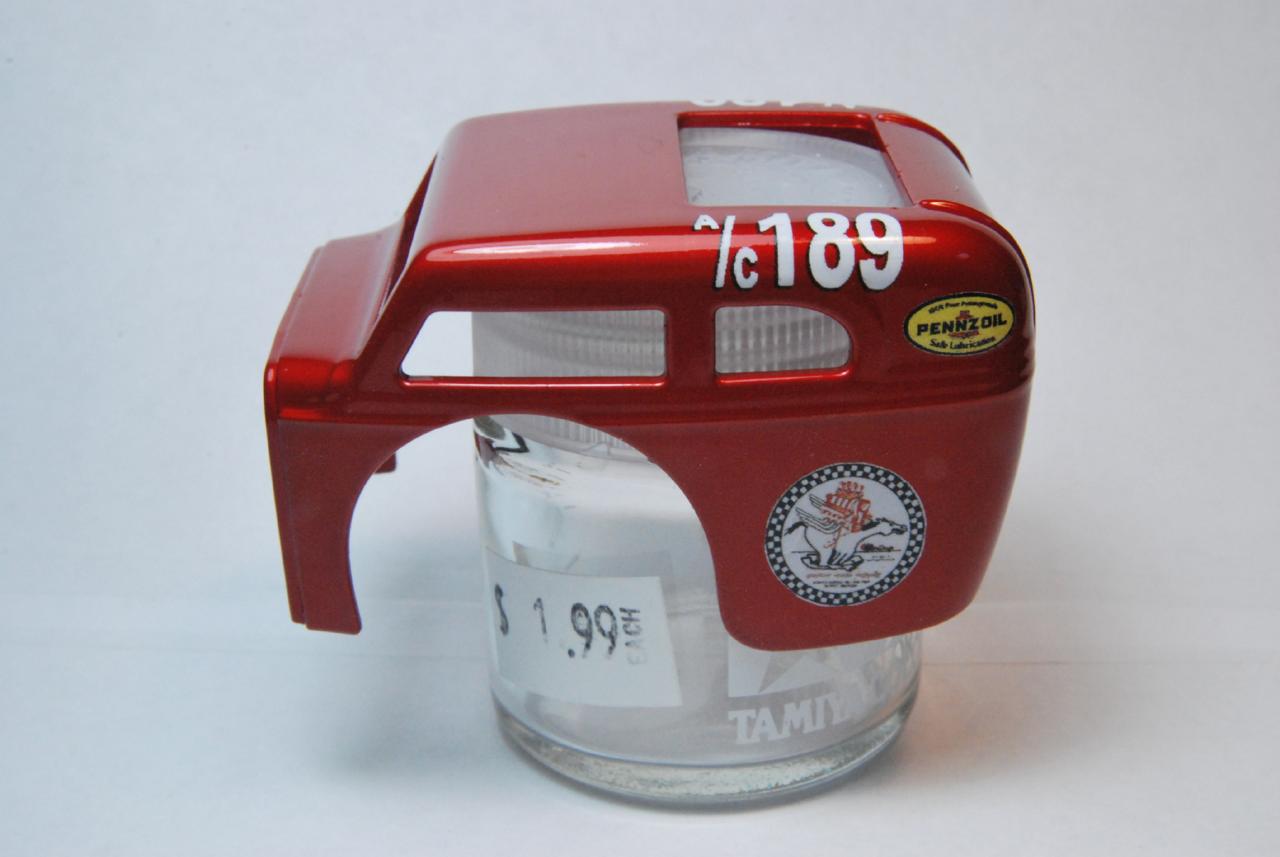
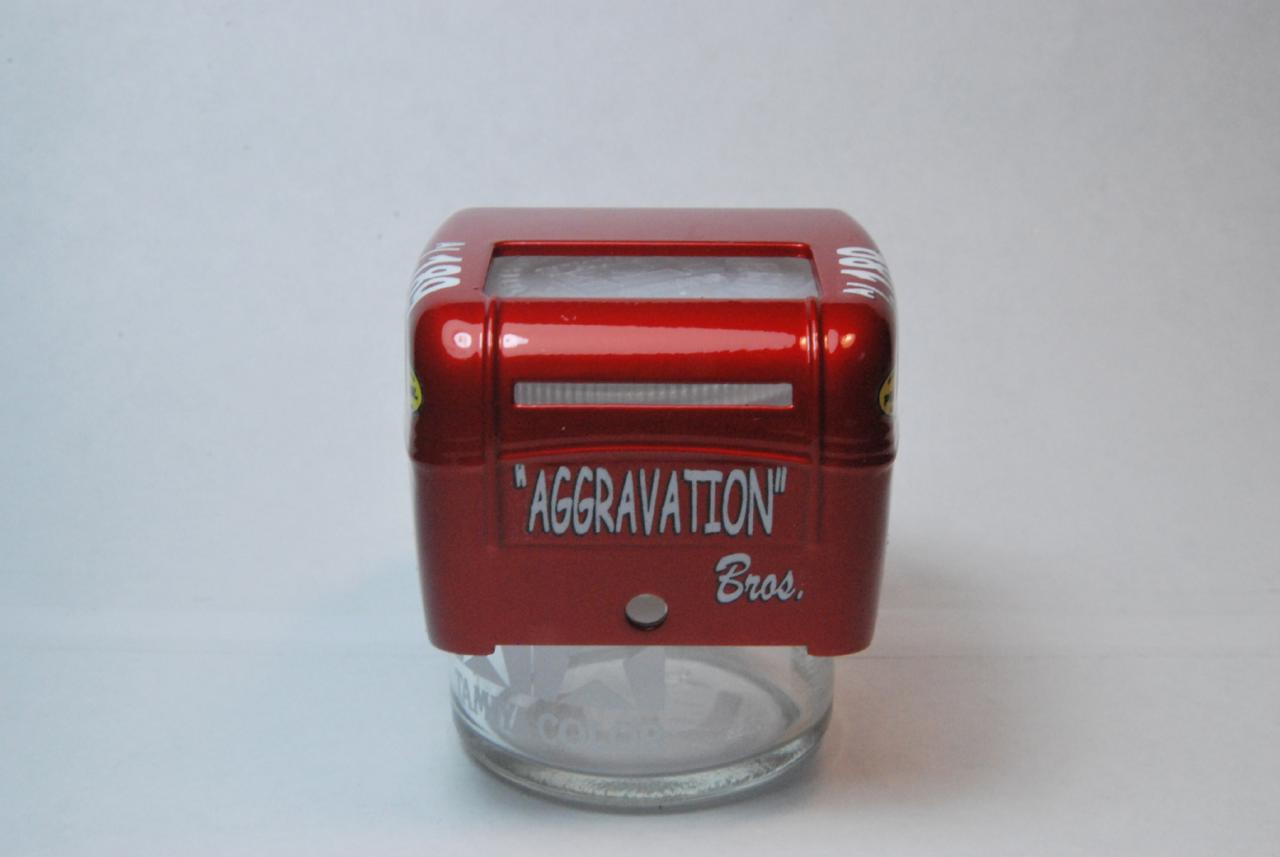
Was able to get some work done on the model while watching Denver get spanked. Watching paint dry is boring. Here is the painted but not completed chassis up on wheels and tires to check stance, levelness, etc. The bar bell weight stack is a resin item from Scale Auto Details. Here are shots of the body. I forgot to mention that the lower "seam" on the rear of the body was missing from the kit body so I added stretched sprue to make the lower rear body reveal (see the pictures of the modified and kit bodies at the beginning of this post). Painted with two wet coats of Tamniya White Fine Surface Primer, two wet airbrushed coats of Tamiya Silver Leaf, and two wet coats of Tamiya Transparent Red. I dried the body in a food dehydrator for 24 hours, applied the decals from Scale Auto Details, and placed it back into the dehydrator for 12 hours before applying two wet coats of Dupli-Color clear (with a touch of 5 Star Acrylic Enamel hardner) and back into the dehydrator for 12 hours. A minor rub out will be required in a day or two. here is a hyper link to the Fotki site for Scale Auto Details. http://public.fotki.com/doctordarryl/scaleautodetails More later when I get the sub-body finished and finish the chassis.
-
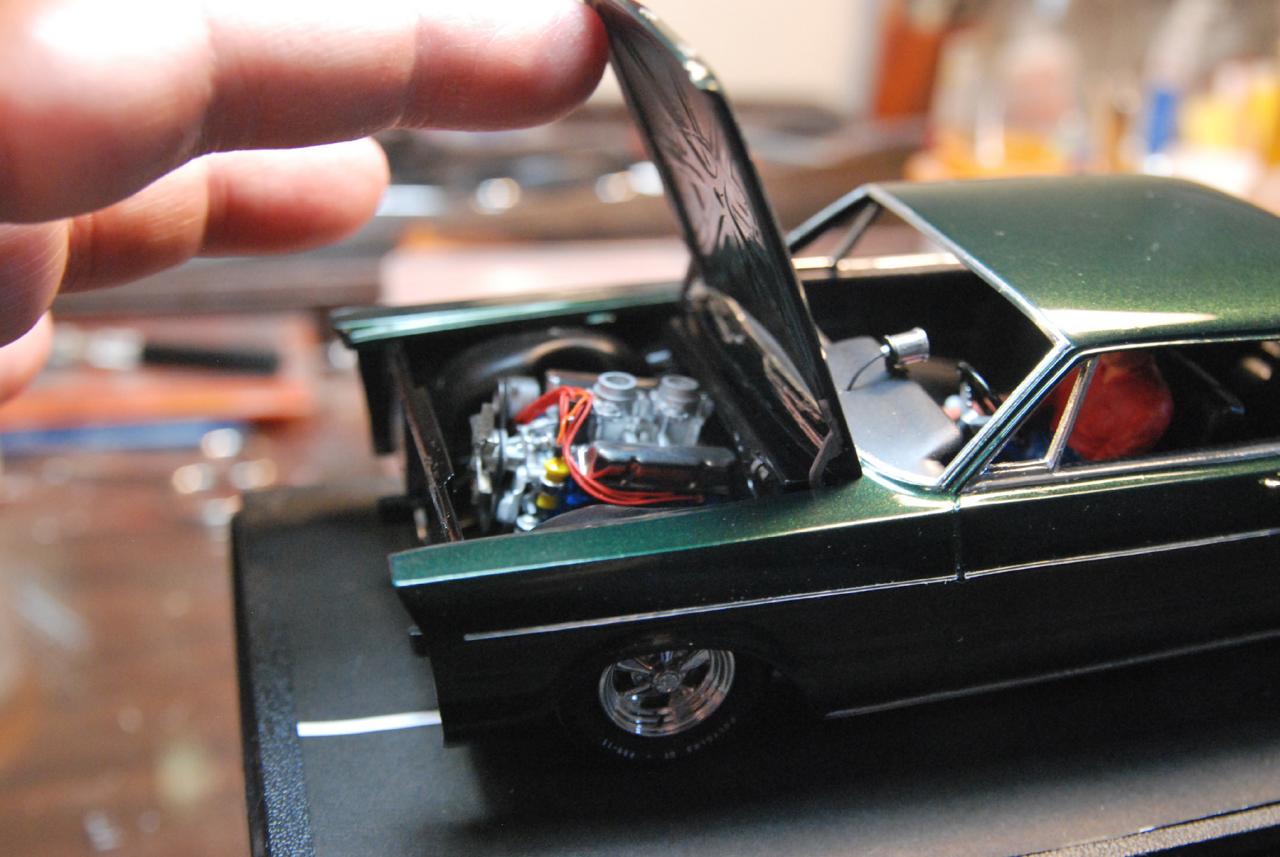
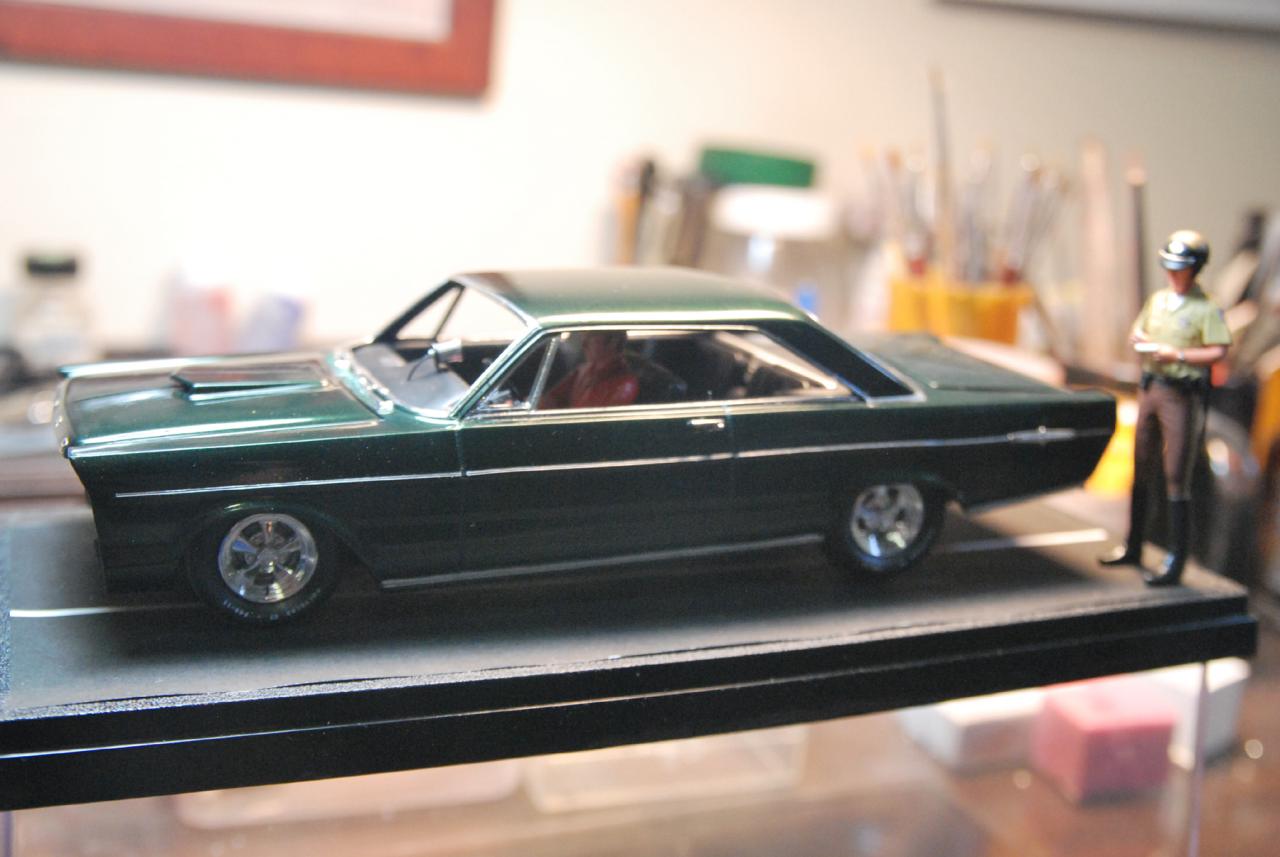
I also have a '65 Galaxie 500 on the work bench. I had been collecting parts for this build for 4-5 years. When AMT brought out the GoodYear polyglass tires (F-15 and L-15) those were the last parts I needed to build a replica of a real R code '65 Galaxie I had back in 1968 (my Green Monster). It was a side oiler 427 with 2-fours and a four speed. I used the engine out of the AMT 427 Comet. I put a hood scoop from a '68 Mustang on my real Galaxie and the Trumpter Falcon kits have a scoop similar to that which I used on the model. I also had Cragar mags on my Galaxie and I found some at the Toledo NNL a few years ago from an unknown kit. The real car was Ivy Green Metallic and I used Testor's British Racing Green Metallic. I just finished foiling the model and I used hood and trunk lettering from the Model Car Garage detail PE set for the 60 Ford. I hope to have this finished for the upcoming NNLEast. I street raced the real car and did not lose to too many challengers. I made more money street racing than at my day job at a chemical company. Those were interesteing days!!!
-
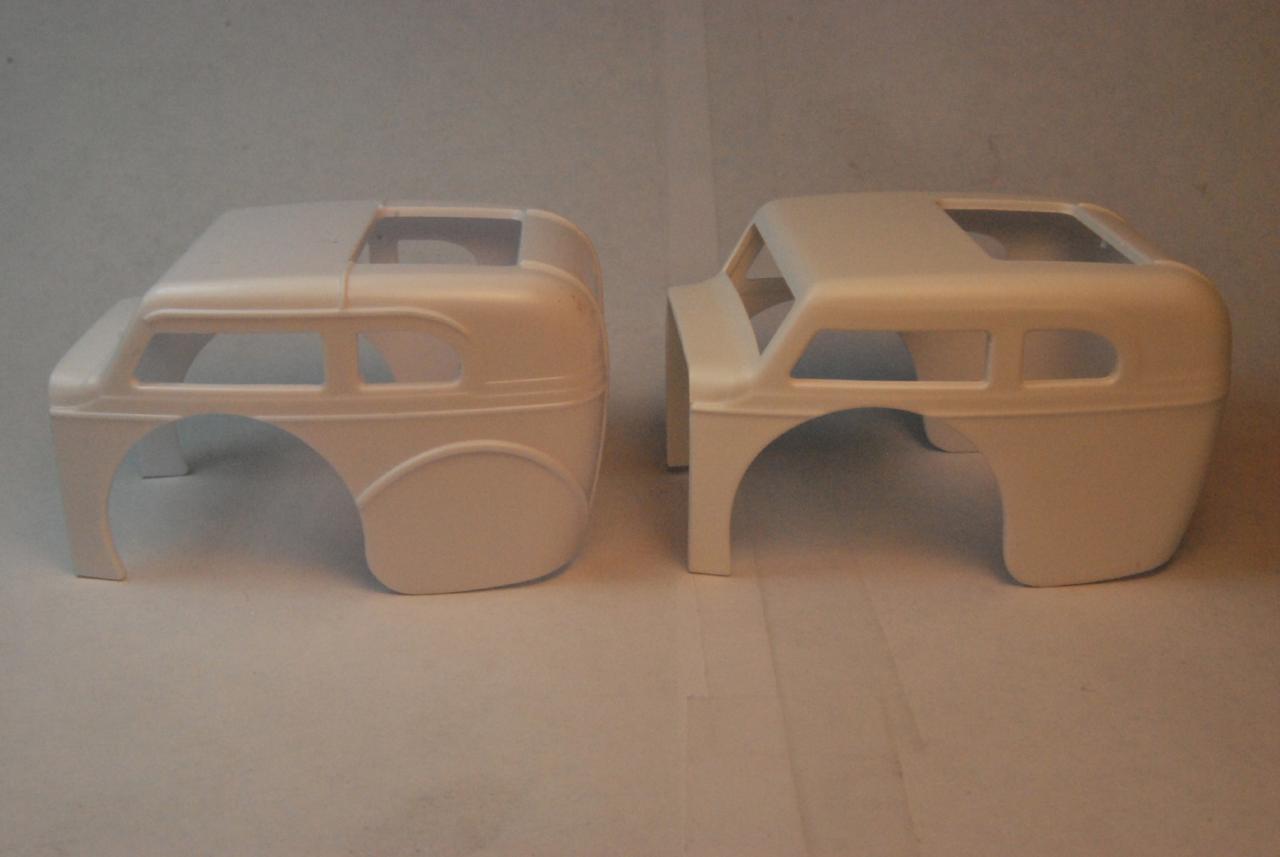
My build of the Bantam-bodied Aggravation A/C coupe is underway. I modified the kit body to appear a little more like the real car. I removed the drip rails, the filled in stock wheel arches, shortened the rear vertical body seams, scribed a rear horizontal seam, and drilled a hole for the push bar. The frame was modified to have a cross member up front to hold an upright for the bar bell weights. I detailed the kit engine. I am using Tamiya Clear Red over Tamiya Silver Leaf to represent Candy Red. I modified the kit headers to remove the web near the pipe exit and made Coors Beer cans to place over the open end of the exhaust headers (a common practice in the 60s and 70s while drag cars were in the pits). I added freeze plugs made from gold Mylar film, breathers to the valve covers, Arrowhead machined aluminum blower pulleys, Arrowhead cogged blower belt, and scratch build the oil filter housing on the right side and covered it with Bare Metal Foil chrome. I added a fuel pump to the front engine cover. I made the magneto from telescoping sections of K&S aluminum tubing and wired the spark plugs. I am using Ma's Resin slicks and wheels since they are a little larger than the kit items. The kit items just look a little too small to me. I am using the kit front wheels and tires. More pictures as I progress.
-
Hey Steve - these images are from the Kenz & Leslie archives. They are selling well despite your nit picks. I did not slam the errors in your midget sheets (of which there are many). I live and let live. I can claim to have the world's best selling midget decals. Sales volume proves that. The bar in the grille for the '68 is so simple it hurts. Ever hear of Evergreen Styrene strip? I saw that web site you noted and the mountain peaks are easily seen on 4-5 shots of the '69 Cougar. So much for your nit picks!
-
Great news. I will certainly look for them at NNLEast.
-
You can see some of my products at the following Fotki link: http://public.fotki.com/doctordattyl/scaleautodetails
-
quality custom decal supplier?
Doctordarryl replied to phil55's topic in Car Aftermarket / Resin / 3D Printed
I have done custom decal work for some top model builders. Feel free to PM me with requests. My line is Scale Auto Details and I am proud to say I am responsible for designing the world's best selling Kurtis Kraft midget decals. You can see some of my products at http://public.fotki.com/doctordarryl/scaleautodetails -
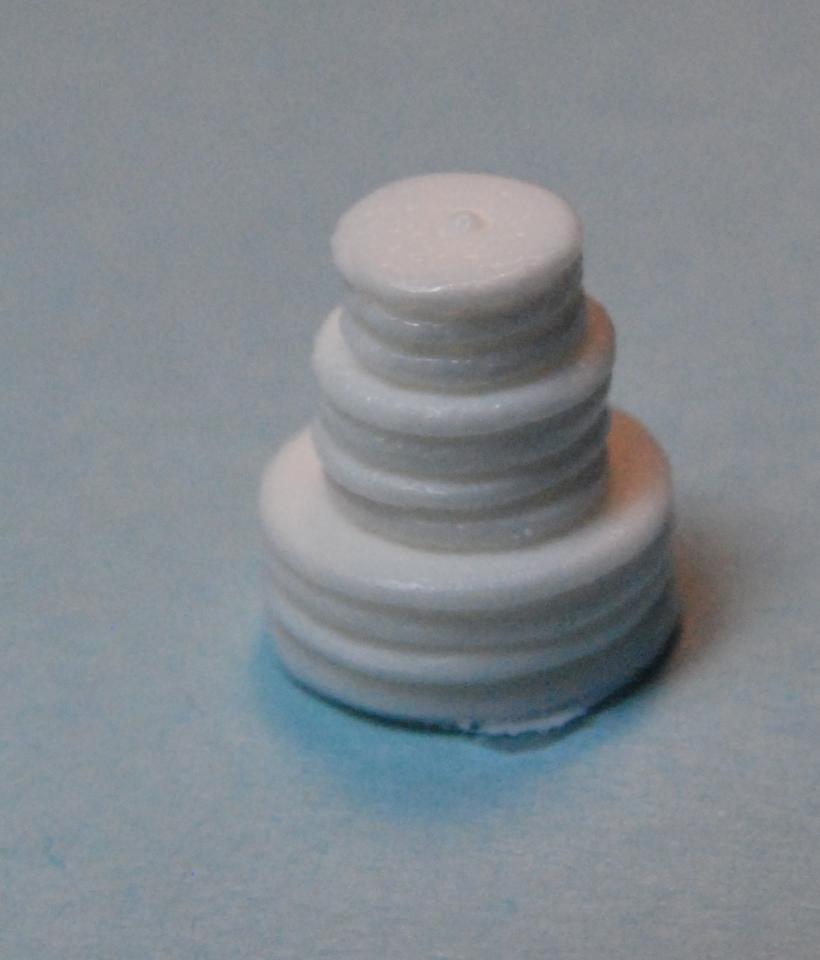
Here they are. This is a 1/25th scale stack of bar bell weights for the front of the Aggravation A/C coupe (see first picture in this thread) for use with the decals and the new Monogram Slingster dragster kit. See more info at http://public.fotki.com/doctordarryl/scaleautodetails A picture would have been nice!!!!
-
ET 10 spoke wheels?
Doctordarryl replied to Mike Chernecki's topic in Car Aftermarket / Resin / 3D Printed
There is a nice optional set of 12 spoke spindle mounts in the new Monogram Slingster dragster kit. -
FYI. I will also be resin casting the stack of bar bell weights and offering them for sale shortly.
-
ET 10 spoke wheels?
Doctordarryl replied to Mike Chernecki's topic in Car Aftermarket / Resin / 3D Printed
Many kits had them and Competition Resins has them as well. The old AMT 57 Ford had a set. The AMT Piranha had a set, Those are the ones I can readily remember and I am sure there were many other kits that had them. They were very popular back in the 60s. -
I just released two new sets of decals; 1) Kenz & Leslie High Country Cougar '68 Cougar F/C and 2) Kenz & Leslie High Country Cougar II '69 Cougar F/C. The first set is for the MPC/AMT '68 Cougar F/C kits that have been released over the years. The second set is for the hard to find AMT '69 Cougar F/C. These decals are the only accurate sets that correct errors on the kit decals
-
Carl, I have color pictures of the car and it was bright red - maybe candy red but it is hard to tell. I was going to use Tamiya Bright red which I think looks close. By the way, the color picture I have was when the car won the first Riddler award. Not bad for a drag car. The markings were a little different so I am doing the one in the B&W picture which my decals represent. The frame was also red. The inner body and front firewall were polished aliminum (as shown in the attached color picture). This is a fantastic kit and I for one will build at least 6 models from this kit. Mooneyes dragster may be next with some kit-bashing (recall the old AMT parts pack with a CSB with a front mounted blower?). I also have adecal sheet for the moon eyes dragster. Try this picture.
-
The Slingster Dragster. Updated 1-20-14 Finished !
Doctordarryl replied to cobraman's topic in WIP: Drag Racing Models
Just released a new decal set for Al Bergler's Aggravation A competition (A/C) coupe (which I believe the old Monogram Sizzler dragster kit was modeled after). I have a build on the work table that will have the bar bell weights stacked on the front axel for ballast!!!
-
Here is a picture of my decals for the La Bergler Aggravation along with a picture of the real car. That's Al Bergler. I wish this posting site had a spell checker!!!!!
-
I just released decals to make Al Bergler's Aggravation A/C coupe from the Slingster kit. Available from Scale Auto Details. http://public.fotki.com/doctordarryl/scaleautodetails Got a build under way with the bar bell weights stacked on the front end for ballast. This is a great kit. Well done Revell/Monogram. Here we go with a picture of the decals for Al Bergler's A/C coupe for the Monogram Slingster dragster kit. Decals from Scale Auto Details.
-
Nice build. What paint did you use? I just released decals for Al Bergler's Aggravation for this kit. I believe that the original Monogram Sizzler kit was heavily influenced by Bergler's dragster. The Slingster is a down-sized version of the old Sizzler kit and now has parts to allow building the Aggravation A/C coupe - except for the decals which Scale Auto Details now has in stock. I will have them listed today on eBay and also my Fotki site. http://public.fotki.com/doctordarryl/scaleautodetails
-
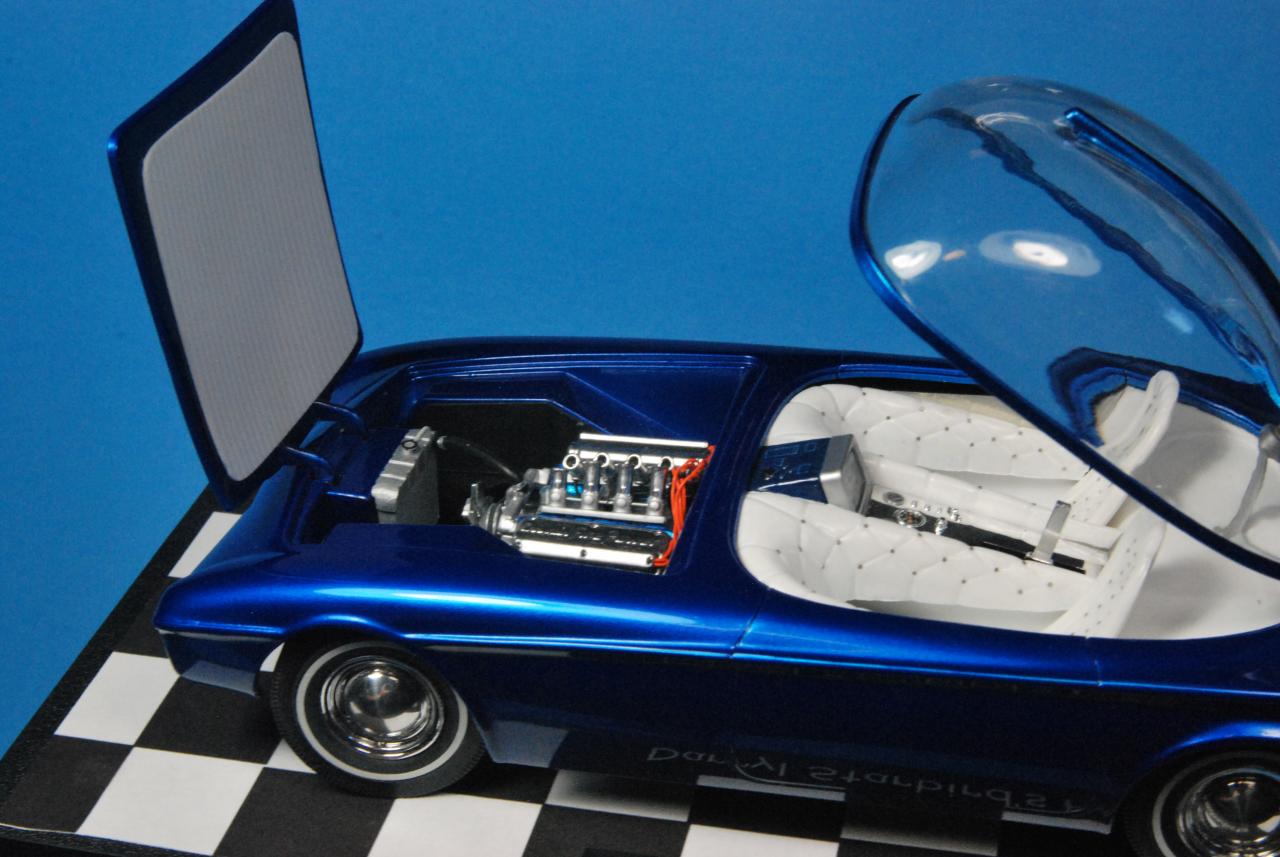
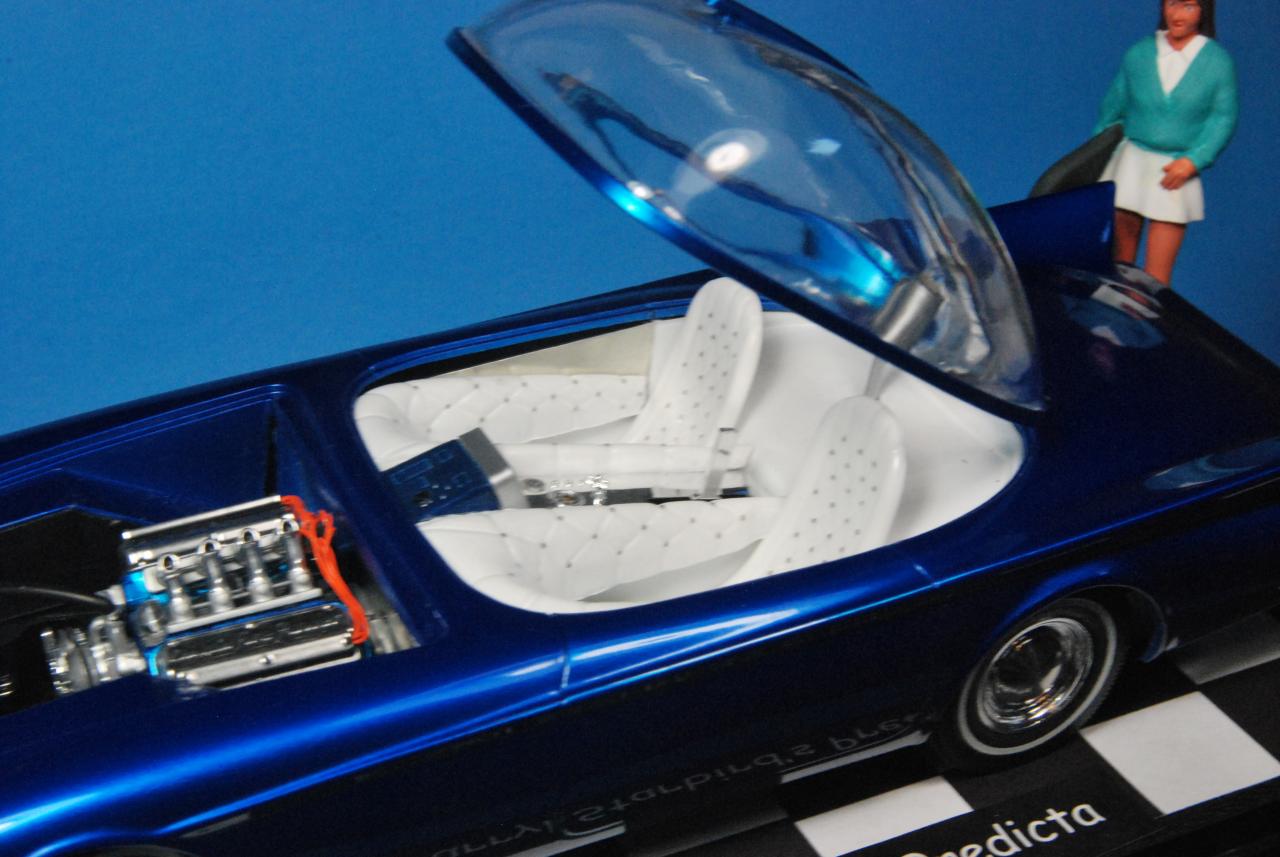
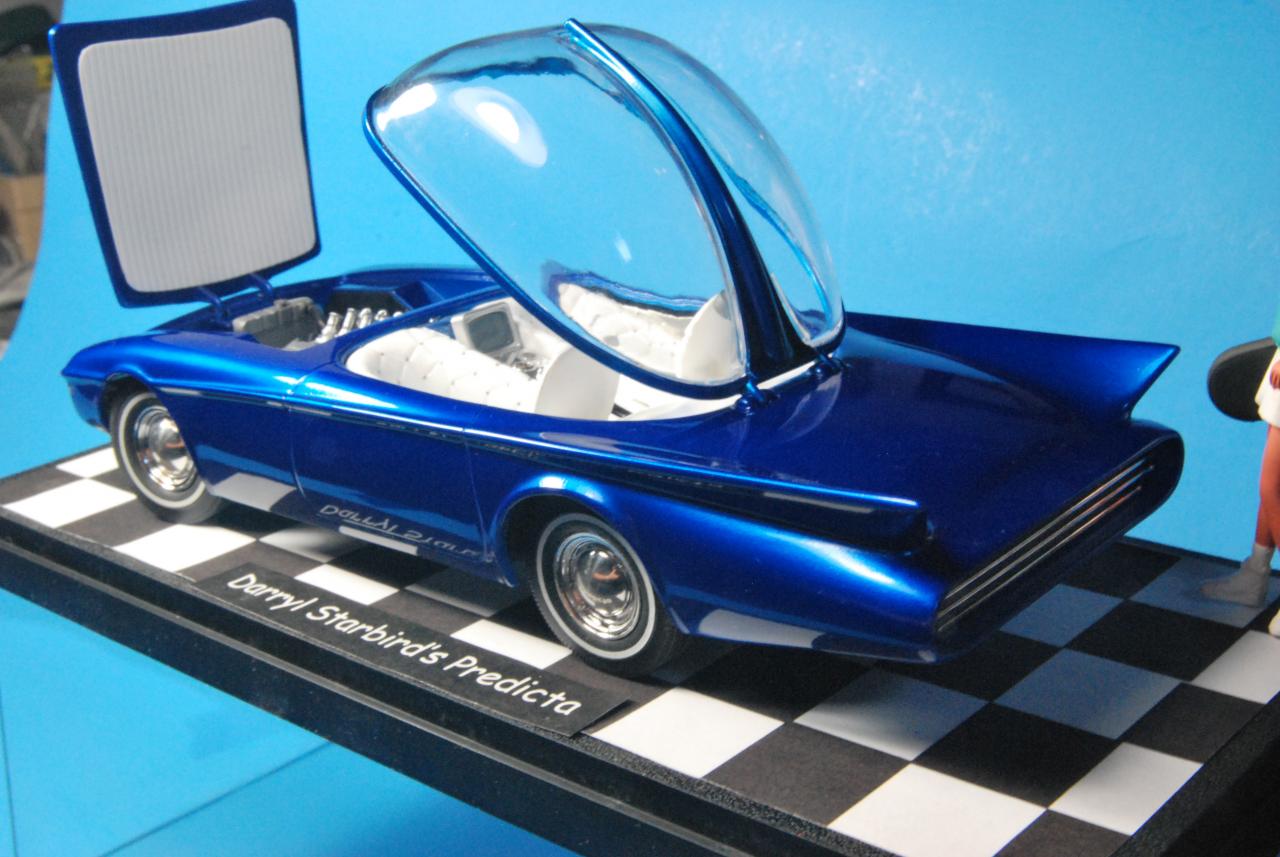
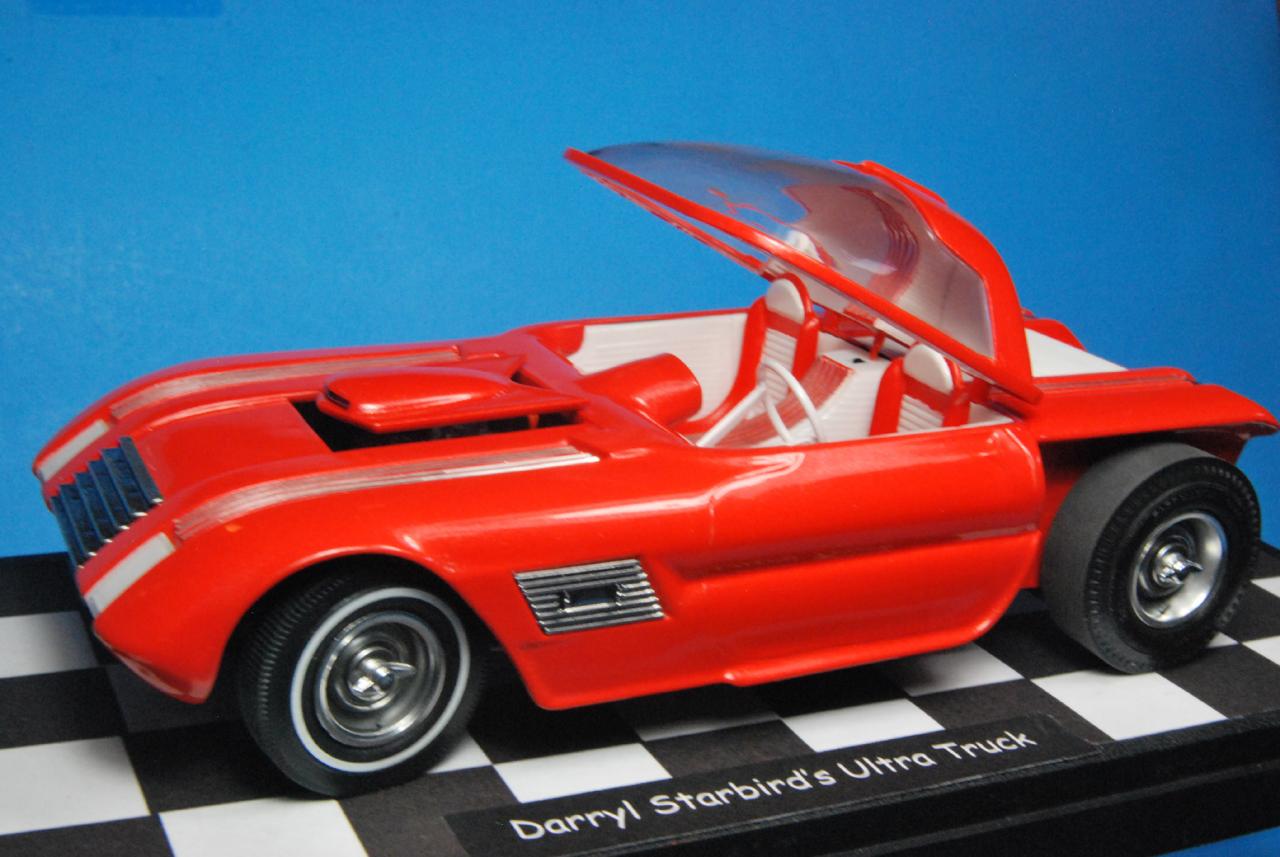
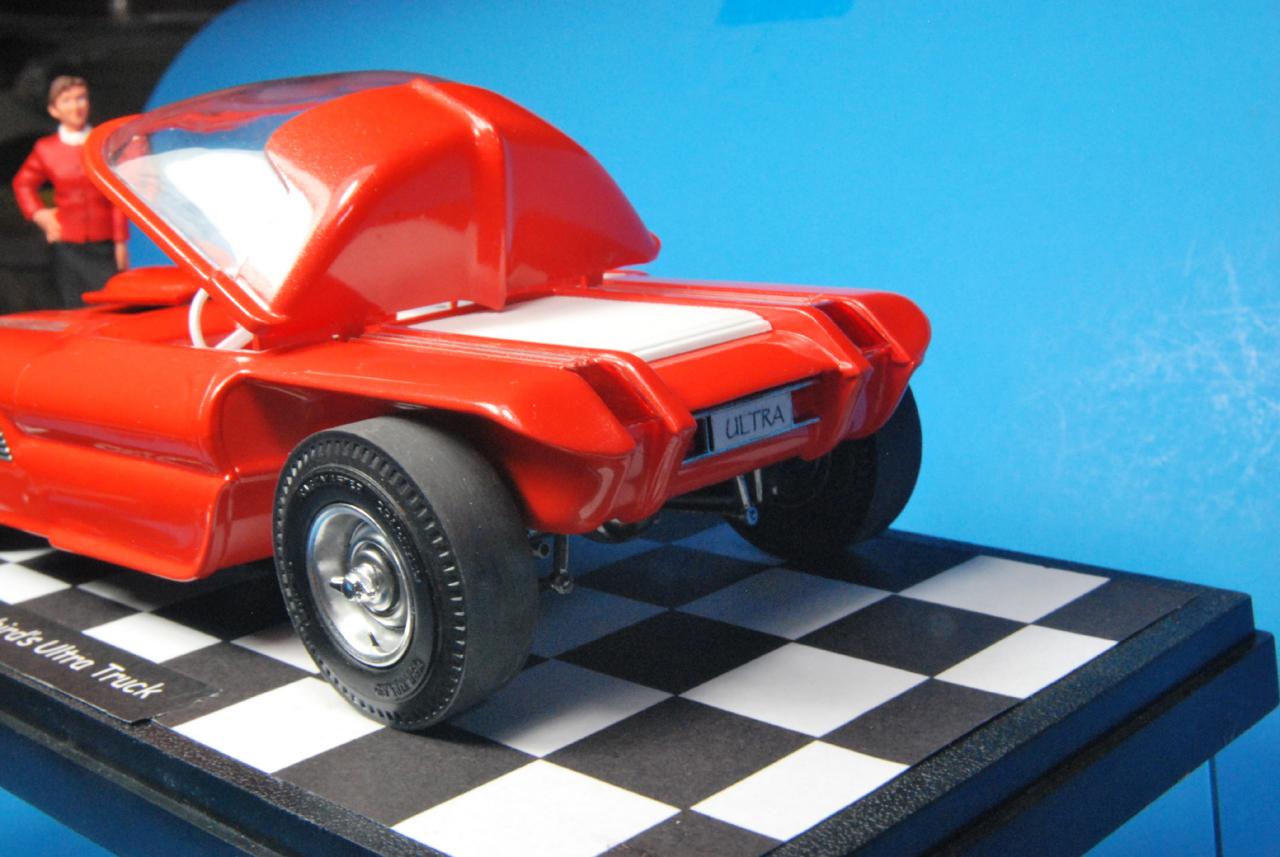
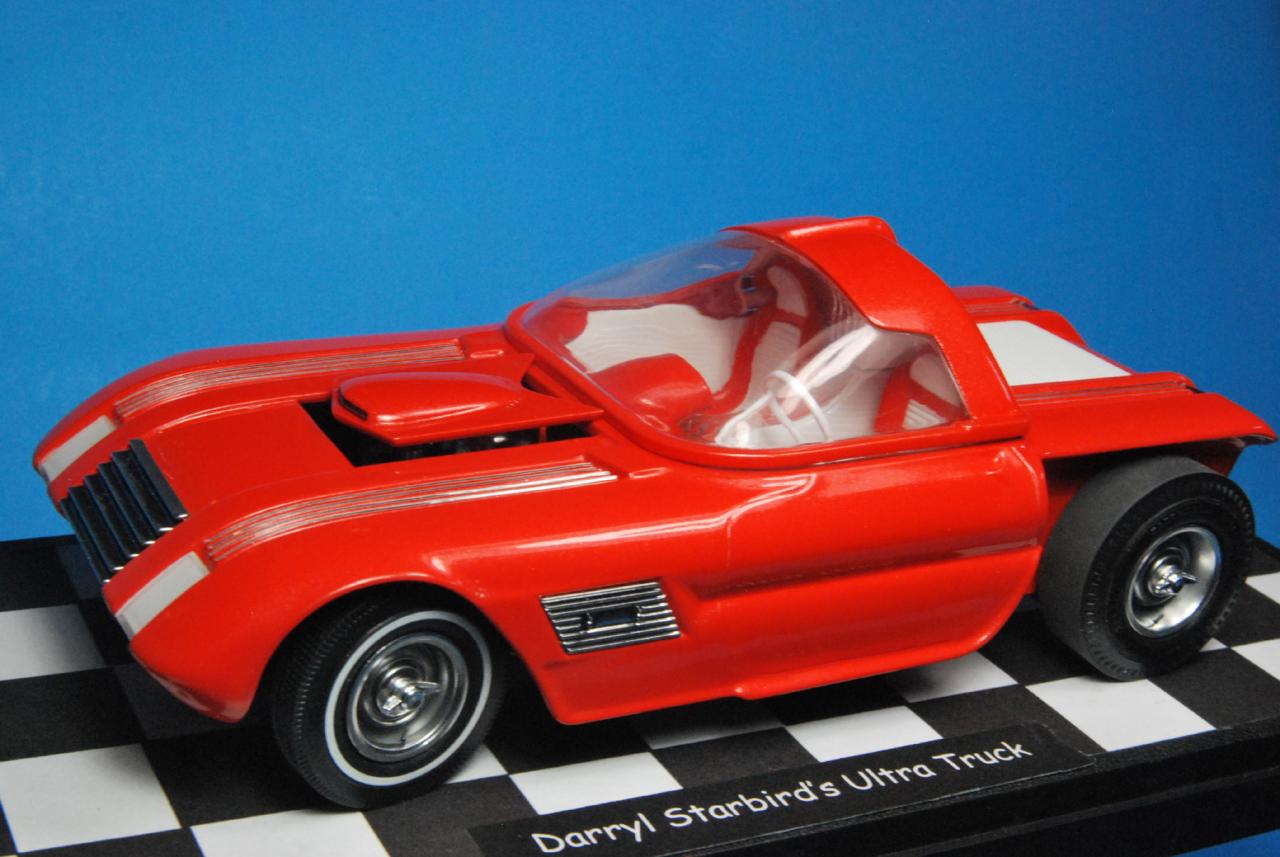
Here is my latest build. I am pretty sure this is not a truck so the post should stay here. You have to hunt in the Pick Up Truck forum for my post on Darryl Starbird's Ultra Truck custom show car. Maybe they need to add a Custom Truck forum to be correct????? The paint is airbrushed House of Kolor Kandy Oriental Blue over Orion Silver with a clear coat. Tires were from an AMT parts pack. Wheels were from the newer AMT AlaKart kit. Baby moons were from Parts by Parks. Interior buttons were PE dots. The engine was from a Revell 32 Ford 5-window coupe kit with a tourqueflight transmission from a Revell 40 Willys street rod kit. Fun old kit.
-
I do not agree with moving a custom car to the truck forum. Many who would appreciate this model and provide feedback will not look in the Truck forum. While it is technically a "truck" it is a show car. Is there a show truck forum? If not then it should be moved back to show cars.
-
Nice build. I have been looking at this kit for quite some time. I am presently on a show car kick and your build has convinced me to haul it out from under the work bench and build it! Again, nice build. I dig the color!!!
-
Not sure why this post was taken down but I am posting it again. If there is a problem could someone please let me know rather than just deleting the topic? I appreciate feedback on the model. That's how we improve!!!! Kit: Monogram Orange Hauler, 1/24th scale, kit # 2931 Incentive to Build: Communication from Darryl Starbird detailing paints used on the 1:1 truck. Body: The multi-piece body was assembled using IPS Weld-On #4 liquid cement. Gaps in the rear rolled pan were filled with strips of 0.010 inch thick Evergreen Styrene sheet. After drying for a day, the seams were wet sanded with 1000-grit wet/dry sandpaper. The air cleaner scoop was opened up. A final wet sanding of the parts was done with a 4000-grit polishing cloth and foam sanding block. The body, air cleaner, and bubble top frame were sprayed with two wet coats of Tamiya Fine White Surface primer. After drying for two days in a dehydrator, the parts were wet sanded with a 4000-grit polishing cloth. The parts were airbrushed with two wet coats of Model Master (28108) Chevy Hugger Orange cut 1:1 with Dupli-Color lacquer thinner using an Aztek A470 airbrush and 1mm nozzle. They were dried in a dehydrator for 48 hours. The parts were then airbrushed with two wet coats of Tamiya TS-65 Pearl Clear followed by 48 hours drying. Painting of the parts was finished with two wet coats of Dupli-Color Clear. After drying in a dehydrator for 72 hours, the parts were rubbed out with Novus Plastic Polish # 2 followed by a cleaning with Novus Plastic Polish #1. The bubble top frame was masked and the inside of the rear part was sprayed with Tamiya TS-27 Matt White. The bubble windshield was attached to the frame using Future and Elmer’s White Glue. The tail light recesses were covered with chrome Bare Metal Foil. The inner surfaces of the clear tail lights lenses were painted with Tamiya X-27 Clear Red and attached with Future. The clear head light covers were frosted by spraying the inner surfaces with Tamiya TS-27 Matt White and then attached with Future. The grill, side trim plates, and rear nerf bars were stripped of kit chrome using Purple Power Cleaner and redone by airbrushing Alclad II Chrome over Testor’s Gloss Black. The chrome trim pieces were attached to the body using Future. The rear vanity plate was printed on a computer, glued to a piece of Printer’s Aluminum sheet, and attached to the model with Elmer’s White Glue. The chrome trim strips in the body recesses were represented by strips of 1/64th of an inch wide chrome Mylar tape. The bed cover was airbrushed with Tamiya TS-26 Pure White. The bed cover was then sprayed with a wet coat of Tamiya TS-79 Semi-Gloss Clear and attached with Future. A chrome bar in the mouth of the air cleaner scoop was simulated with fine jeweler’s wire. Foam was added behind the scoop to represent the air filter. Engine: The kit’s engine was replaced with parts from a Revell Buick Nailhead Parts Pack which included the block, oil pan, heads, and valley cover. The engine parts were stripped of chrome using Purple Power cleaner. The block and heads were assembled with IPS Weld-On #4 and sprayed with Tamiya TS-14 Gloss Black. A hydromatic transmission from an AMT parts pack was assembled and sprayed with Model Master Stainless Steel Metallizer and attached to the block with Super Glue. Corrected stock style Buick resin valve covers from Scale Auto Details were chromed along with the oil pan, generator, and valley cover using Alclad II Chrome over Model Master Gloss Black. Valve cover breathers were turned aluminum items from Model Master. Machined aluminum engine pulleys from MAS were used. Fan belts were made from 1/64th of an inch wide live rubber from Scale Auto Details. A front cover with water pump, intake manifold, and 4-barrel carburetor from the parts box were sprayed with Tamiya TS-17 Gloss Aluminum followed by Testor’s Dull-Cote to simulated unpolished cast aluminum. An oil dip stick tube was made from 0.04 inch OD stainless steel tubing with a dip stick made from fine uninsulated wire. A turned aluminum distributor base from MAS was used with a cap from RMCM. It was wired using orange Wire Wrapping Wire from Radio Shack. The exhaust manifolds were sprayed with Tamiya TS-30 Sliver Leaf. A parts box oil filter and starter were added. Radiator hoses were made from solder and painted with Tamiya TS-29 Semi-Gloss Black with hose clamps simulated with strips of chrome Bare Metal Foil. Frame: The kit frame was sprayed with Tamiya TS-29 Semi-Gloss Black. The front suspension was sprayed with Tamiya TS-14 Gloss Black. Front springs were made by winding fine craft wire around a #8 wood screw. Front shocks were simulated with telescoping sections of K&S aluminum tubing. The rear end, shocks, and suspension parts were stripped of kit chrome using Purple Power cleaner and redone with Alclad II Chrome over Testor’s Gloss Black. The exhaust pipes and mufflers were sprayed with Tamiya TS-30 Silver Leaf. The drive shaft was made with K&S aluminum tubing and cast metal universal joints from S.A.E Limited. The kit’s working steering was retained. The kit wheels were stripped of chrome and redone with Alclad II Chrome over Testor’s Gloss Black. Holes were drilled for valve stems made from fine black insulated wire. The kit’s wheel knock-offs were attached with Elmer’s White Glue. The front tires were narrow white wall Firestones from an AMT parts pack. The rear slicks were Resin items from Ma’s Resin with the side wall inserts sprayed with Tamiya TS-29 Semi-Gloss Back. The slick’s contact surface was sanded with a coarse sanding stick. Inner front fender panels and a firewall were made from 0.01 inch thick Evergreen Styrene sheet and sprayed with Tamiya TS-29 Semi-Gloss Black. The radiator was sprayed with Model Master Aluminum Metallizer. The radiator expansion tank was painted with Model Master Brass Metallizer. Interior: The interior parts were sprayed with Tamiya Fine White Surface Primer. After drying for 24 hours in a dehydrator, the parts were airbrushed with Tamiya TS-26 Pure White and dried for another day. The white parts of the seats and center console were masked off with Tamiya Tape and sprayed with Model Master 28108 Chevy Hugger Orange. The parts were dried and then sprayed with Tamiya TS-79 Semi-Gloss Clear. Instruments were added to the gauge panel and covered with Future to represent glass covers. The chrome strips in the center console were represented with strips of 1/64th of an inch wide Chrome Mylar tape. The shift knob was painted with Model Master 28108 Chevy Hugger Orange. The floor was flocked with Model Master Orange flocking. Figure: The figure was a resin figure from Modeler’s. It was soaked in Bleche-White for 24 hours and then scrubbed with a stiff brush and dish soap and rinsed with warm water. It was air dried and then sprayed with two wet coats of Tamiya Fine White Surface primer. It was dried in a dehydrator for 24 hours. It was then brush painted with various Testor’s and Model Master paints before spraying it with two wet coats of Testor’s Dull-Cote and dried for 48 hours in a dehydrator.
-
I did post pictures and when you click on them they blow up to full screen size so you can see detail.
-
Kit: Monogram Orange Hauler, 1/24th scale, kit # 2931 Builder: Darryl W. Peters Incentive to Build: Communication from Darryl Starbird detailing paints used on the 1:1 truck. Body: The multi-piece body was assembled using IPS Weld-On #4 liquid cement. Gaps in the rear rolled pan were filled with strips of 0.010 inch thick Evergreen Styrene sheet. After drying for a day, the seams were wet sanded with 1000-grit wet/dry sandpaper. The air cleaner scoop was opened up. A final wet sanding of the parts was done with a 4000-grit polishing cloth and foam sanding block. The body, air cleaner, and bubble top frame were sprayed with two wet coats of Tamiya Fine White Surface primer. After drying for two days in a dehydrator, the parts were wet sanded with a 4000-grit polishing cloth. The parts were airbrushed with two wet coats of Model Master (28108) Chevy Hugger Orange cut 1:1 with Dupli-Color lacquer thinner using an Aztek A470 airbrush and 1mm nozzle. They were dried in a dehydrator for 48 hours. The parts were then airbrushed with two wet coats of Tamiya TS-65 Pearl Clear followed by 48 hours drying. Painting of the parts was finished with two wet coats of Dupli-Color Clear. After drying in a dehydrator for 72 hours, the parts were rubbed out with Novus Plastic Polish # 2 followed by a cleaning with Novus Plastic Polish #1. The bubble top frame was masked and the inside of the rear part was sprayed with Tamiya TS-27 Matt White. The bubble windshield was attached to the frame using Future and Elmer’s White Glue. The tail light recesses were covered with chrome Bare Metal Foil. The inner surfaces of the clear tail lights lenses were painted with Tamiya X-27 Clear Red and attached with Future. The clear head light covers were frosted by spraying the inner surfaces with Tamiya TS-27 Matt White and then attached with Future. The grill, side trim plates, and rear nerf bars were stripped of kit chrome using Purple Power Cleaner and redone by airbrushing Alclad II Chrome over Testor’s Gloss Black. The chrome trim pieces were attached to the body using Future. The rear vanity plate was printed on a computer, glued to a piece of Printer’s Aluminum sheet, and attached to the model with Elmer’s White Glue. The chrome trim strips in the body recesses were represented by strips of 1/64th of an inch wide chrome Mylar tape. The bed cover was airbrushed with Tamiya TS-26 Pure White. The bed cover was then sprayed with a wet coat of Tamiya TS-79 Semi-Gloss Clear and attached with Future. A chrome bar in the mouth of the air cleaner scoop was simulated with fine jeweler’s wire. Foam was added behind the scoop to represent the air filter. Engine: The kit’s engine was replaced with parts from a Revell Buick Nailhead Parts Pack which included the block, oil pan, heads, and valley cover. The engine parts were stripped of chrome using Purple Power cleaner. The block and heads were assembled with IPS Weld-On #4 and sprayed with Tamiya TS-14 Gloss Black. A hydromatic transmission from an AMT parts pack was assembled and sprayed with Model Master Stainless Steel Metallizer and attached to the block with Super Glue. Corrected stock style Buick resin valve covers from Scale Auto Details were chromed along with the oil pan, generator, and valley cover using Alclad II Chrome over Model Master Gloss Black. Valve cover breathers were turned aluminum items from Model Master. Machined aluminum engine pulleys from MAS were used. Fan belts were made from 1/64th of an inch wide live rubber from Scale Auto Details. A front cover with water pump, intake manifold, and 4-barrel carburetor from the parts box were sprayed with Tamiya TS-17 Gloss Aluminum followed by Testor’s Dull-Cote to simulated unpolished cast aluminum. An oil dip stick tube was made from 0.04 inch OD stainless steel tubing with a dip stick made from fine uninsulated wire. A turned aluminum distributor base from MAS was used with a cap from RMCM. It was wired using orange Wire Wrapping Wire from Radio Shack. The exhaust manifolds were sprayed with Tamiya TS-30 Sliver Leaf. A parts box oil filter and starter were added. Radiator hoses were made from solder and painted with Tamiya TS-29 Semi-Gloss Black with hose clamps simulated with strips of chrome Bare Metal Foil. Frame: The kit frame was sprayed with Tamiya TS-29 Semi-Gloss Black. The front suspension was sprayed with Tamiya TS-14 Gloss Black. Front springs were made by winding fine craft wire around a #8 wood screw. Front shocks were simulated with telescoping sections of K&S aluminum tubing. The rear end, shocks, and suspension parts were stripped of kit chrome using Purple Power cleaner and redone with Alclad II Chrome over Testor’s Gloss Black. The exhaust pipes and mufflers were sprayed with Tamiya TS-30 Silver Leaf. The drive shaft was made with K&S aluminum tubing and cast metal universal joints from S.A.E Limited. The kit’s working steering was retained. The kit wheels were stripped of chrome and redone with Alclad II Chrome over Testor’s Gloss Black. Holes were drilled for valve stems made from fine black insulated wire. The kit’s wheel knock-offs were attached with Elmer’s White Glue. The front tires were narrow white wall Firestones from an AMT parts pack. The rear slicks were Resin items from Ma’s Resin with the side wall inserts sprayed with Tamiya TS-29 Semi-Gloss Back. The slick’s contact surface was sanded with a coarse sanding stick. Inner front fender panels and a firewall were made from 0.01 inch thick Evergreen Styrene sheet and sprayed with Tamiya TS-29 Semi-Gloss Black. The radiator was sprayed with Model Master Aluminum Metallizer. The radiator expansion tank was painted with Model Master Brass Metallizer. Interior: The interior parts were sprayed with Tamiya Fine White Surface Primer. After drying for 24 hours in a dehydrator, the parts were airbrushed with Tamiya TS-26 Pure White and dried for another day. The white parts of the seats and center console were masked off with Tamiya Tape and sprayed with Model Master 28108 Chevy Hugger Orange. The parts were dried and then sprayed with Tamiya TS-79 Semi-Gloss Clear. Instruments were added to the gauge panel and covered with Future to represent glass covers. The chrome strips in the center console were represented with strips of 1/64th of an inch wide Chrome Mylar tape. The shift knob was painted with Model Master 28108 Chevy Hugger Orange. The floor was flocked with Model Master Orange flocking. Figure: The figure was a resin figure from Modeler’s. It was soaked in Bleche-White for 24 hours and then scrubbed with a stiff brush and dish soap and rinsed with warm water. It was air dried and then sprayed with two wet coats of Tamiya Fine White Surface primer. It was dried in a dehydrator for 24 hours. It was then brush painted with various Testor’s and Model Master paints before spraying it with two wet coats of Testor’s Dull-Cote and dried for 48 hours in a dehydrator.