Doctordarryl
-
Posts
160 -
Joined
-
Last visited
Content Type
Profiles
Forums
Events
Gallery
Everything posted by Doctordarryl
-
Larry, Here is a shot of the underside. The exhaust was made from solder. The "glass pack" mufflers were made from Evergreen styrene tube and sheet.

-
The tires were Modelhaus and the white walls were white resin inserts.
-
Ron, The original issue date for AMT's Car Craft Dream Rod was 1964. It was reissued in 1965 by AMT before it was turned over to MPC and they modified the mold to make the Tiger Shark and issued it in 1966. It was reissued by MPC a few years ago.
-
Latest street rod build. I used the Olds engine from the Revell '50 Olds and modified it to look like a 394 Olds. The four-barrel manifold and valve covers were from a Pontiac engine in a Blue Printer Parts Pack. The AFB four barrel was from e-bay (I don't know who made these but I would like to get more!). The exhaust manifolds were from an AMT '62 Chevy 409 kit. The body and frame were airbrushed with Testor's Root Beer. The engine block, wheels, and interior were airbrushed with Model Master Phoenician Yellow. Model Haus tires. I lowered the ride height by 2 scale inches. After these pictures I gave the wheels a black Detailer wash and it made them look more 3-D. I think this may be the eleventh Revell '32 Ford kit I built. I can't get tired of this great kit.
-
Michael, What were the colors that you used? This looks great. I like the color combination. The red interior really pops. I usually don't build stock cars but this may inspire me to build one from the case of '50 Olds kits that I have.
-
I was going to Roanoak for the IPMS Region II contest in October. What show/contest is in Norfolk in October?
-
Lee, The body was sprayed with two wet coats of Tamiya Fine White Surface Primer. The color coats are comprised of four layers, two wet coats for each layer. A base of Tamiya Metallic Blue followed by Tamiya Transparent Blue. That was followed by Tamiya Pearl Clear and topped off with Tamiya Clear. A technique I developed a few years ago uses a wet coat of airbrushed lacquer thinner on top of the last clear coat to level the finish and yield a high gloss. I airbrushed all the Tamiya paints and cut them 1:1 with Dupli-Color Lacquer Thinner. No sanding or polishing after the primer coats.
-
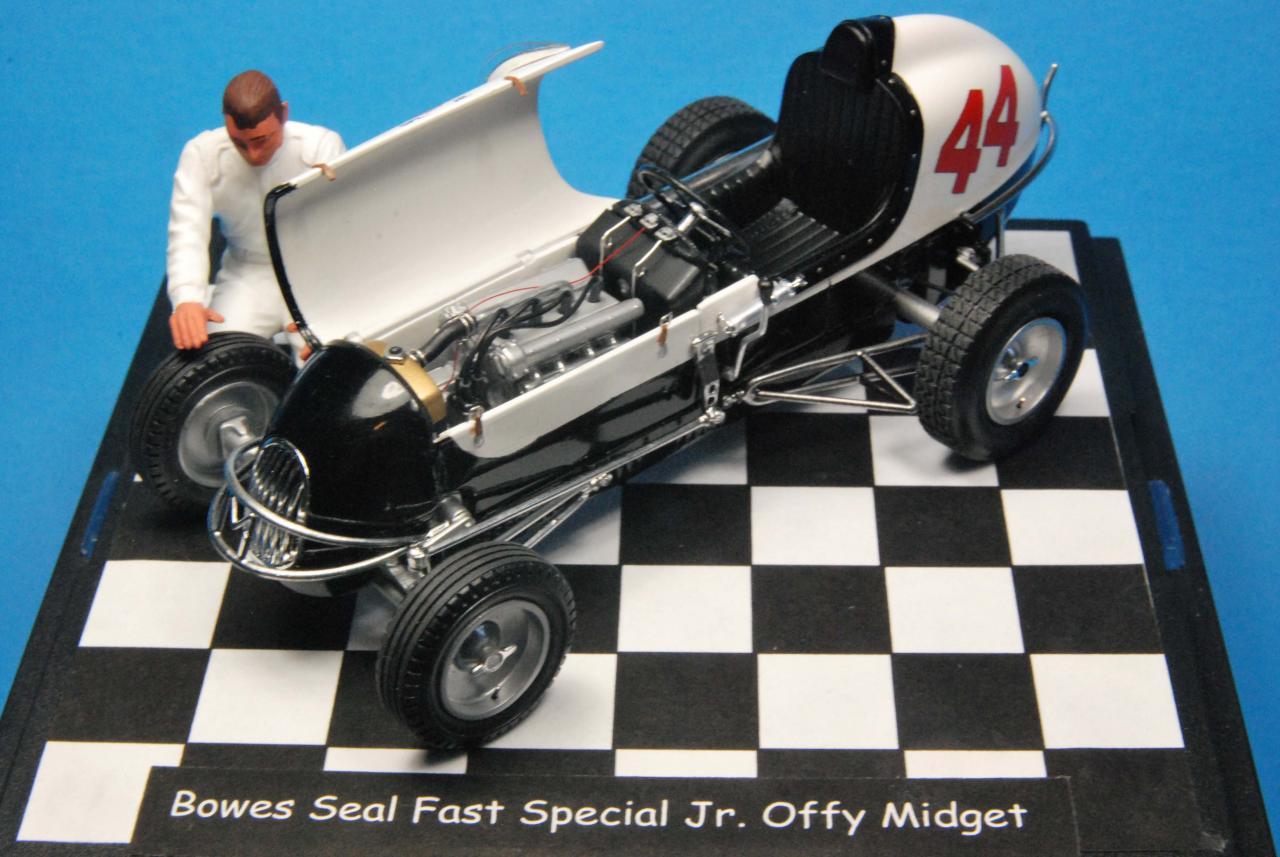
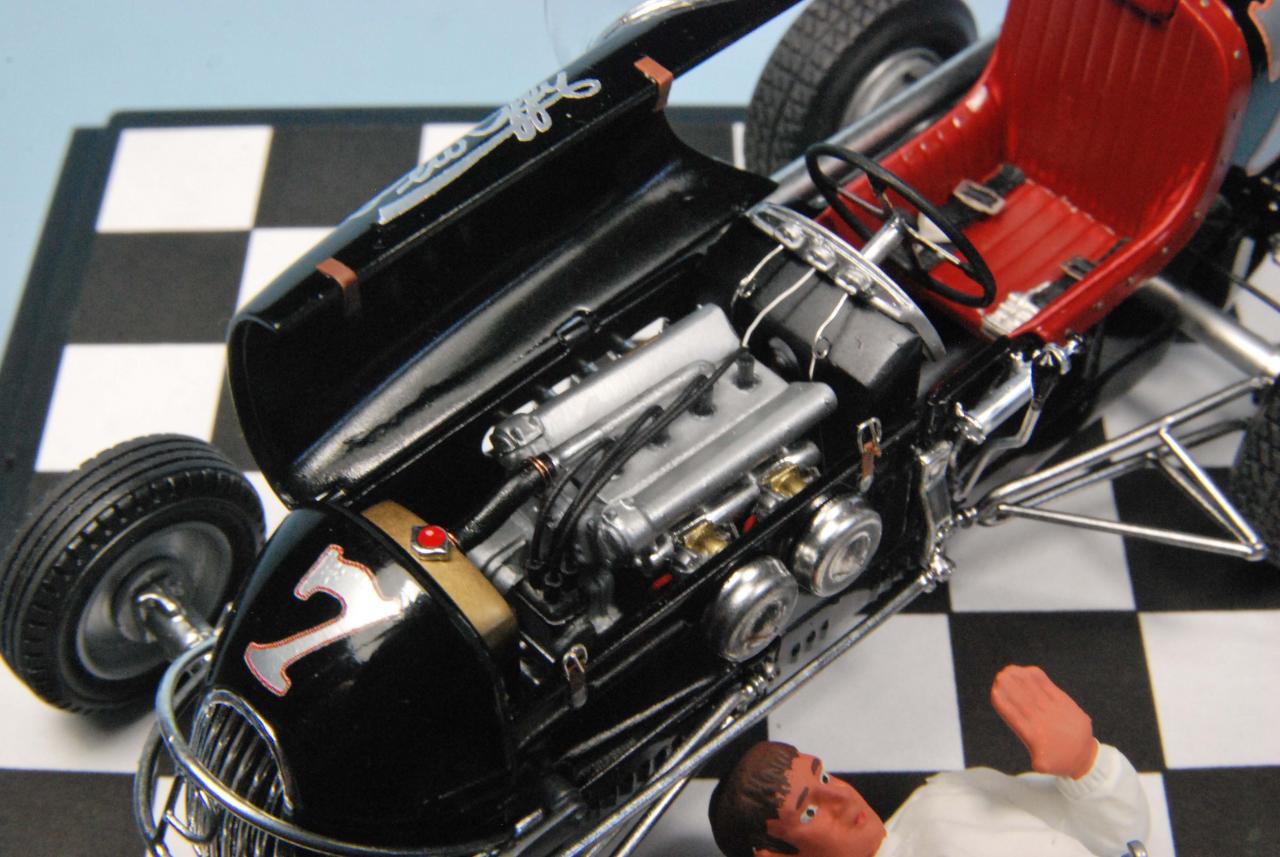
I have not posted any midget builds in awhile. Here are builds #11 and 12. Since I make 21 decal sets, I have quite a way to go to build kits with all my decals. However, it is a moving target as I will likely bring out several more midget decal sets later this year. Oh well. I am so glad that Revell brought out his fantastic pair of kits - the Offy and V8 60 Kurtis Kraft midgets. It sure helped my decal business!!!! The Bowes Seal Fast Jr. Offy midget was sprayed with Tamiya Fine White Surface Primer and then airbrushed with Tamiya Pure White. The nose and scalops were airbrushed with Tamiya Gloss Black. The body and hood were airbrushed with Tamiya Clear after applying the decals. The side nerf bars were modified to add tire deflectors by adding 0.02 inch diameter styrene rod. The front nerf bar was modified with the letter M since Rex Mays owned this car. All chrome parts were redone with Alclad II Chrome over Model Master Gloss Black. The engine is fully wired and plumbed. The hood was hinged with 1mm OD brass tubing and 0.02 inch brass wire. The Walter Pew Offy midget was airbrushed with Tamiya Gloss Black over Tamiya Fine White Primer. They were airbrushed with Tamiya Clear after applying the decals. The front and side nerf bars were modified with 0.02 inch styrene rod. All chrome parts were redone with Alclad II Chrome over Model Master Gloss Black. The hood was hinged with brass tube and wire. The engine was plumbed and wired. One club I belong to (NJIPMS) did a group build of the Revell Offy midget. I supplied free decals to all group build participants and there was a great turn out. Hopefully we will be able to display the group builds at MosquitoCon next April (2014).
-
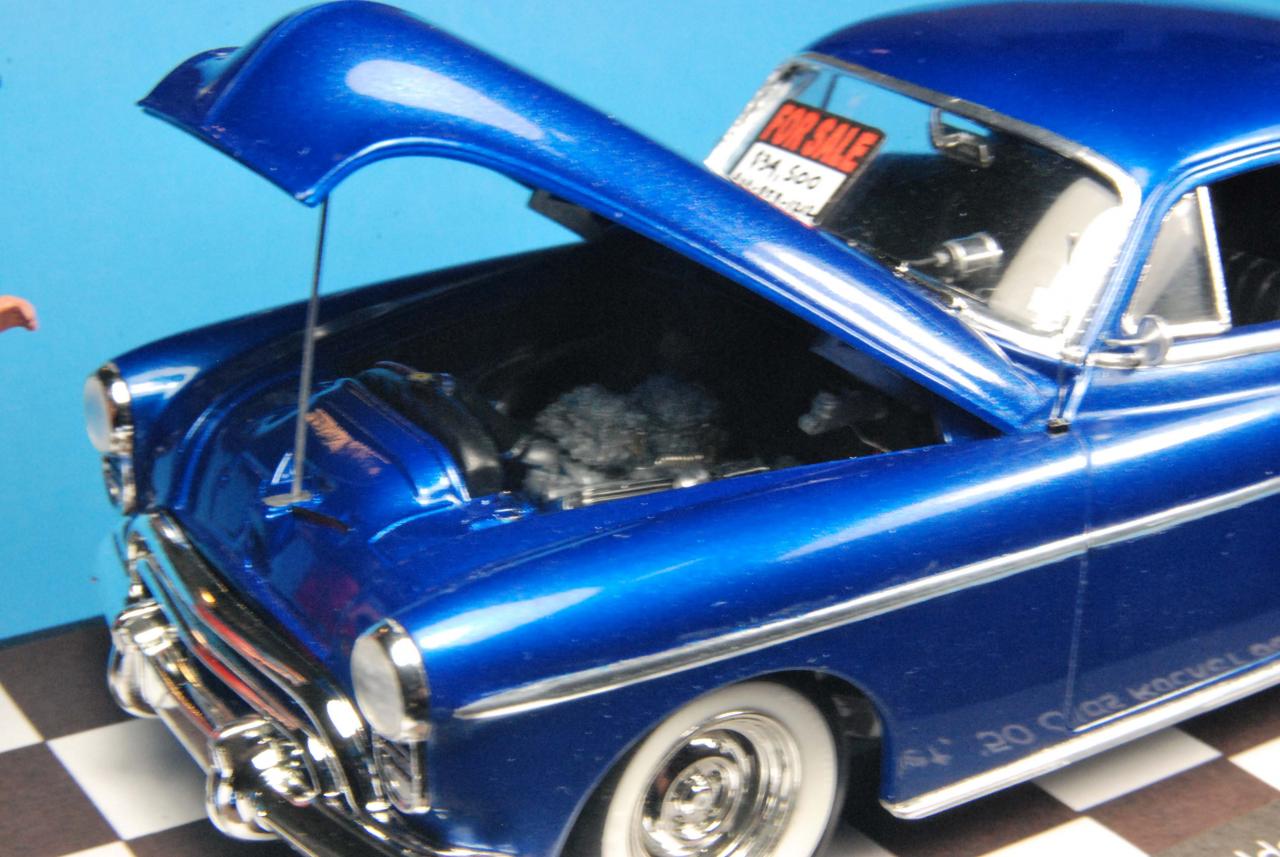
The inspiration for this build was a car I built when I lived in San Diego (a blue '49 Olds coupe with a bored 394 Olds engine with 2-fours and a '54 Olds hydro trans with a B&M shift kit) and an episode of Loud N' Fast. This is a great kit and went together well. I lowered the front by about 3 scale inches by moving the wheel mounting points on the upright higher by about 3mm. I used a modified 9" Ford rear from a Revell '41 Willys drag car. The kit engine was modified to look more like a 394 engine by remounting the oil filter housing and adding a spin on canster-type oil filter. The valve covers were for a Pontiac engine from a Blue Printer Parts Pack that were treated to Alclad II and oil breathers from Detail Master. The intake and exhaust headers were from an AMT '62 Chevy 409 kit. The AFB carbs were resin items found on e-bay (anyone know who made these - I am looking for more). The '55 Olds aircleaner was a resin item from Scale Auto Details. I replaced the kit manual trans with a hydro from a Revell '41 Willys drag car kit. The body was sprayed with Tamiya Fine White Surface Primer after cleanup and wet sanding with a 4000-grit polishing cloth. The base coat was airbrushed Tamiya Metallic Blue (TS-19), followed by Tamiya Transparent Blue (TS-72), then Tamiya Pearl Clear (TS-65), and finished off with Tamiya Clear (TS-13). Bare Metal Foil was used for the chrome trim. The wheels and tires were picked up at the NNL Nationals in Toledo last year just for this project. The interior was sprayed with Tamiya Semi-Gloss Black. Front seats from a Revell '32 Ford Sedan kit were used. An automatic shifter/console from Replicas and Miniatures Company of Maryland was used. A fun build.
-
I finally built one of these kits that I have had since the original issue. I have never seen one built at a contest so now I guess the first contest I enter with this I will see several others built! It never fails. This kit will likely never be reissued since MPC modified the Dream Rod mold to produce the Tiger Shark, the second iteration of the real show car. It was airbrushed with Tamiya Pearl White over Tamiya Fine White Surface Primer. The fogged areas were airbrushed Tamiya Clear Orange. I used an engine from the Revell '32 Ford kit. The frame and engine block were sprayed with Testor's Bronze Metallic. The chrome was redone with Alclad II Chrome over Model Master Gloss Black. The side trim was replaced with Detail Master polished hard line (aluminum rod). The shift knob has a Ford four-speed shift pattern (knob and decal available from Scale Auto Details). There is an ISCA show car sticker on the windshield (also available from Scale Auto Details). The original Dream Rod was purchased by ISCA (International Show Car Association) and its image was on the sticker. A great kit with lots of potential fiddly parts (i.e., rear suspension, doors, etc.) to make assembly difficult or impossible. However, it went together well. The ony real modification to make the model appear more like the original show car was the headlight pod. The kit item missed the mark by a mile. I grafted some headlight bezels onto the kit pod with new lenses.
-
Olds Powered '32 Ford 5-Window Hi Boy
Doctordarryl replied to Doctordarryl's topic in WIP: Model Cars
Thanks for the input. I did not take your comments as negative. I appreciate feedback and always strive to improve. I think I'll try a wash (I have to dig into my stash to see I have from the Detailer). BTW I love your wagon hi-boy and the 3-window coupe. Very nice!!!! I have been struggling with a build of the wagon and what to do with it. I almost never build without modification. I thought of building it as a hi-boy but was not sure how it would appear. You answered my question. Looks great! -
Olds Powered '32 Ford 5-Window Hi Boy
Doctordarryl replied to Doctordarryl's topic in WIP: Model Cars
All feedback is greatly appreciated. What wheels do you think would make the model? -
Olds Powered '32 Ford 5-Window Hi Boy
Doctordarryl replied to Doctordarryl's topic in WIP: Model Cars
The Moon tank is a modified kit item. The ends were airbrushed with Alclad II Chrome over Model Master Gloss Black. The plastic two piece center part of the kit tank was ditched in favor of a cut piece of K&S thick wall polished aluminum tubing that was a little longer then the kit center part. -
Olds Powered '32 Ford 5-Window Hi Boy
Doctordarryl replied to Doctordarryl's topic in WIP: Model Cars
The Root Beer was airbrushed over Tamiya Fine White Surfacer Primer. -
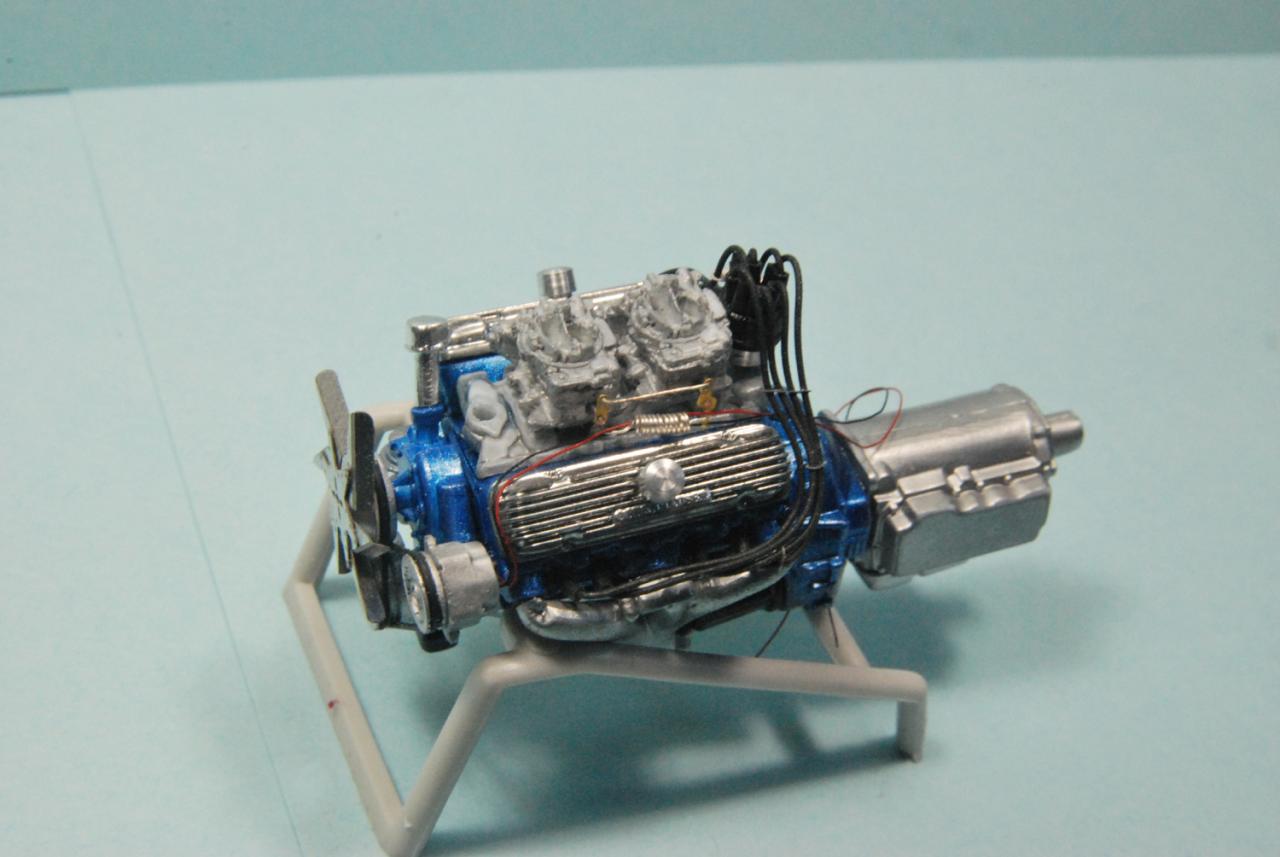
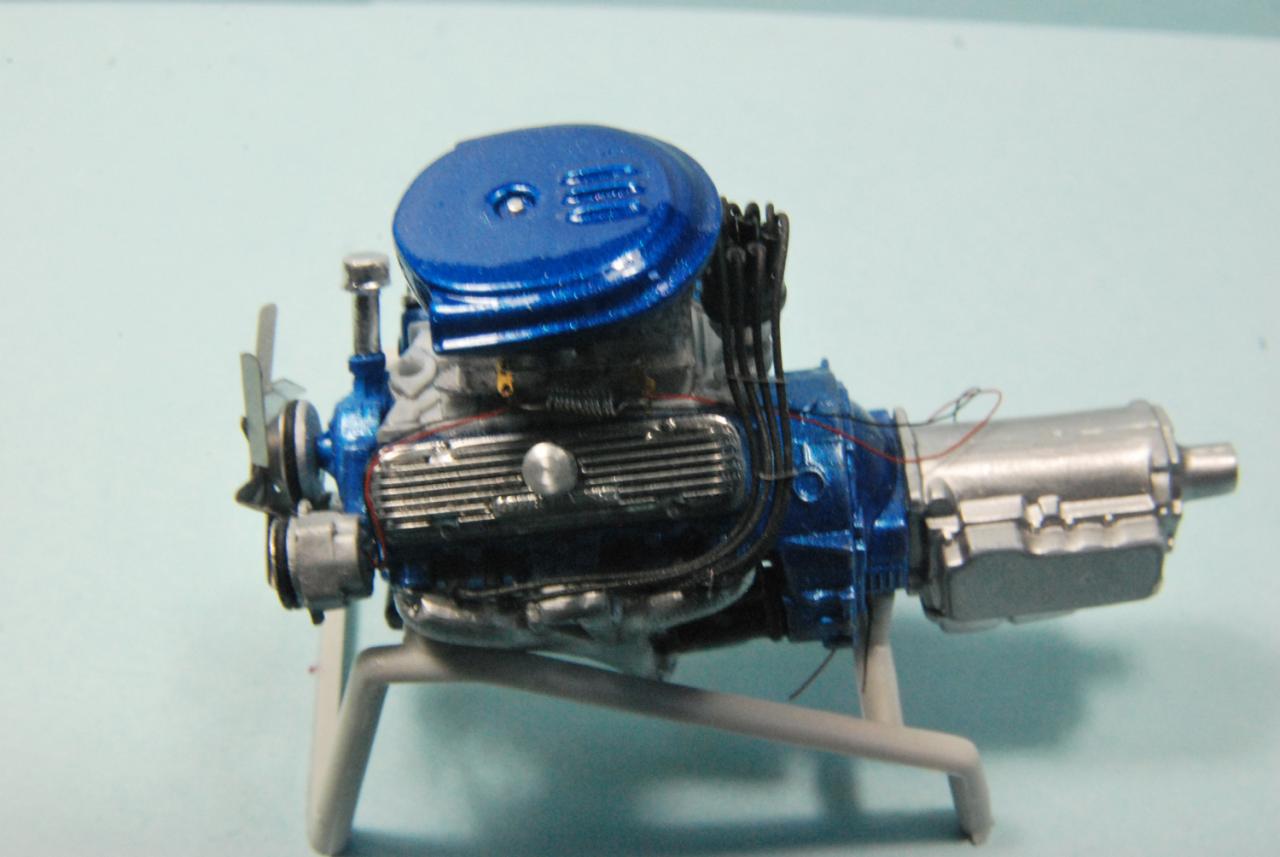
Here are some photos of a new in progress project - a 394 Olds powered '32 Ford 5-Window Hi Boy. The wheels were kit items with Modelhaus tires. The engine was from the Revell '50 Olds kit with partts from an Ertl Blue Printer parts pack Pontiac (the intake manifold and valve covers) along with block hugger headers from an AMT '62 Chevy 409 kit. The body is airbrushed with Testor's One Coat Lacquer Root Beer. I sprayed paint into a paint jar and let it sit overnight to let the metallic flakes settle (they are way out of scale). I then decanted (the correct use of that term) the paint into another paint jar and left the flake behind. The contrasting color is Model Master Phoenician Yellow lacquer, also airbrushed. Hopefully I will also have this one finished for the up coming NNL East next month. http://www.fotki.com'>Hosted on Fotki">http://www.fotki.com'>Hosted on Fotki http://www.fotki.com'>Hosted on Fotki">http://www.fotki.com'>Hosted on Fotki http://www.fotki.com'>Hosted on Fotki">http://www.fotki.com'>Hosted on Fotki http://www.fotki.com'>Hosted on Fotki">http://www.fotki.com'>Hosted on Fotki http://www.fotki.com'>Hosted on Fotki">http://www.fotki.com'>Hosted on Fotki
-
Update on the build. I have been slowed by other projects and work. Here are some up dates on the build with a mock up of the model. The foiling is finished (what a pain) and the chassis and interior are complete. Used bucket seats from a Revell '32 Ford sedan. The engine has parts from the Pontiac engine in the Ertl Blue Printer parts pack (to make it look more like a 394 Olds engine) along with an intake maniforl and exhaust manifoilds from an AMT '62 Chevy 409 kit. Olds aircleaner was a resin item from Scale Auto Details. Paint is Tamiya Metallic Blue, Tamiya Clear Blue, Tamiya Pearl Clear, Tamiya clear. It came out pretty nice and pictures don't really do it justice. Hopefully I will have this finished for the upcoming NNL East next month. http://www.fotki.com'>Hosted on Fotki">http://www.fotki.com'>Hosted on Fotki http://www.fotki.com'>Hosted on Fotki">http://www.fotki.com'>Hosted on Fotki http://www.fotki.com'>Hosted on Fotki">http://www.fotki.com'>Hosted on Fotki http://www.fotki.com'>Hosted on Fotki">http://www.fotki.com'>Hosted on Fotki http://www.fotki.com'>Hosted on Fotki">http://www.fotki.com'>Hosted on Fotki
-
Forgot to add: I cut off the standard transmission on the kit engine and added a hydro from a Revell '41 Willys drag kit (again, like what I ran in my 1:12 car).
-
I found them on eBay several years ago. They are 2-piece Carter AFBs (which is also what i ran on my 1:1 car). The valve covers, which have outer hold down bolts (the only difference between a 394 and the earlier engines (303,324,371)), were slightly modified Pontiac valve covers from a Blue Printer parts pack. I added the breathers which were Detail Master turned aluminum items. The 2-four intake is from an AMT '62 Chevy 409 as well as the exhaust headers. The intake and headers fit like they were made for the Olds engine. The headers are another difference between the 394 and earlier Olds V8s. The 394 heads had four exhaust ports very similar to a Chevy SB whereas the earlier V8s had three exhaust ports.. The heads for the earlier Olds V9 engines (303, 324, 371) had the center exhausts siamezed to one port, just like the early Cadillac engines.
-
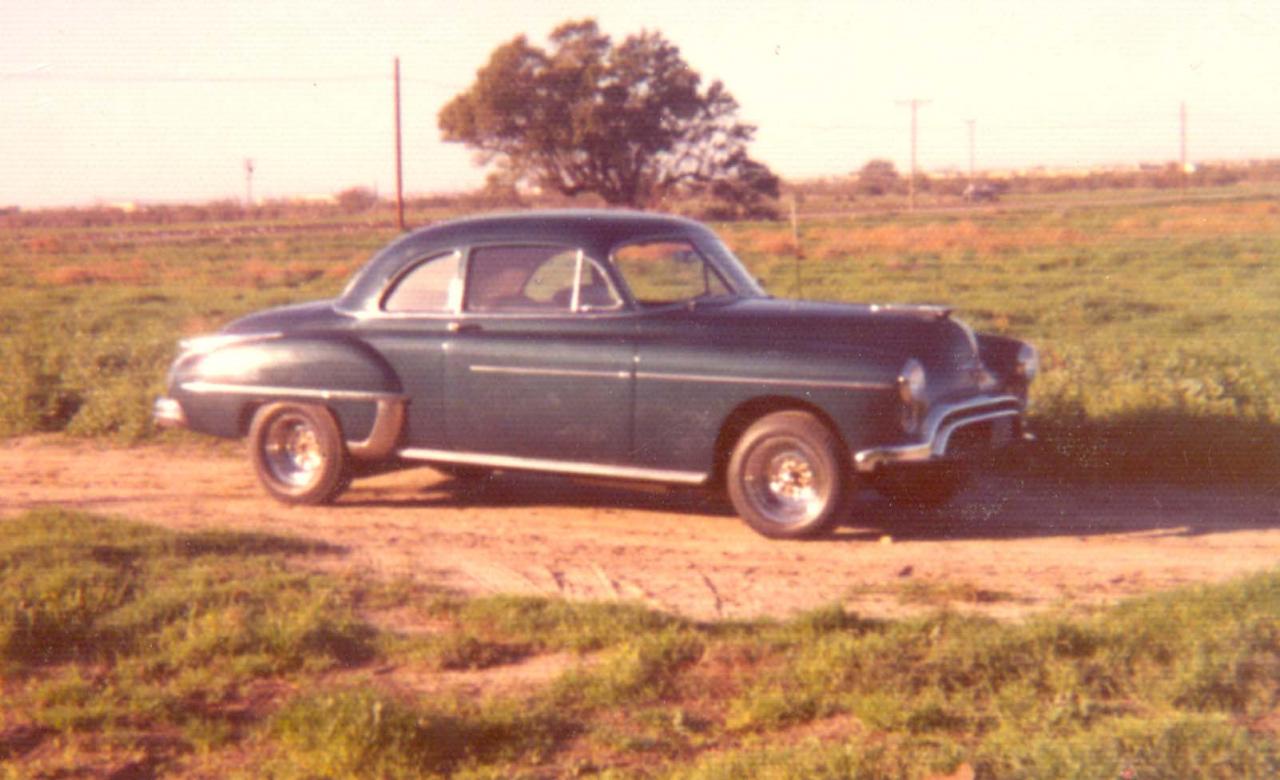
Here are some pics of the 50 Olds I am building. This build was inspired by the last 1:1 car I built when I lived in San Diego, CA (in 1971) and an episode of Loud & Fast. The chrome wheels and wide whitewalls were from the Loud & Fast 50 Olds coupe. Here I am in the engine coppartment of my '49 Olds coupe (34 years ago). A mock up of the model. The paint is as followes; Tamiya Metallic Blue, Tamiya Clear Blue, Tamiya Pearl Clear, Tamiya Clear. I modified the kit enging to appear like a 394 (which is what I had in my 1:1 Olds coupe). I can give more details on where I got the parts to do this later. The engine would not be compete without a "bat-wing" Cad/Olds aircleaner (from Scale Auto Details).
-
Wow. Is this the re-issued AMT kit? Fantastic job. Can you elaborate on modifications you did to the basic kit?
-
Here are pics of my latest Revell Kurtis Kraft Offy midget builds. I can't believe I already built 12 of these kits (11 Offys and one V-8 60). This is a very well engineered kit and I hope Revell brings out some other subjects like these (maybe some old champ cars like a Kuzma Offy - HINT, HINT - Revell marketing). Did my typical hinged hood (using 0.040 inch OD SS tube and 0.005 inch thick SS wire. Airbrushed with Tamiya TS paints. I cut the decanned and degassed paint 1:1 with Dupli-Color lacquer thinner and use an Aztek A470 airbrush at 35psi with a 1mm (yellow) nozzle. The Alclad II Chrome redone parts were airbrushed at 15psi over Model Master Black. The Walter Pew #7 Offy decals are my latest offered through Scale Auto Details. The Bowes Seal Fast Special Jr. Offy midget http://www.fotki.com'>Hosted on Fotki">http://public.fotki.com/doctordarryl/midgets/bowes-seal-fast-spl-jr.html]http://www.fotki.com'>Hosted on Fotki http://www.fotki.com'>Hosted on Fotki">http://public.fotki.com/doctordarryl/midgets/dsc-6183.html]http://www.fotki.com'>Hosted on Fotki http://www.fotki.com'>Hosted on Fotki">http://public.fotki.com/doctordarryl/midgets/dsc-6184.html]http://www.fotki.com'>Hosted on Fotki The Walter Pew Offy midget. My first midget decal set with silver numbers and logo instead of gold. http://www.fotki.com'>Hosted on Fotki">http://public.fotki.com/doctordarryl/midgets/dsc-6276.html]http://www.fotki.com'>Hosted on Fotki http://www.fotki.com'>Hosted on Fotki">http://public.fotki.com/doctordarryl/midgets/dsc-6277.html]http://www.fotki.com'>Hosted on Fotki http://www.fotki.com'>Hosted on Fotki">http://public.fotki.com/doctordarryl/midgets/dsc-6278.html]http://www.fotki.com'>Hosted on Fotki Enjoy.
-
Wally Booth's ProStock Gremlin
Doctordarryl replied to Doctordarryl's topic in WIP: Drag Racing Models
Bill, I understand. I have several of the Dyno Don Pintos along with a started junker kit I bought for the Gremlin project. I also have some of the Gapp & Roush Pinto kits. One of these days I'll build one of each. -
Wally Booth's ProStock Gremlin
Doctordarryl replied to Doctordarryl's topic in WIP: Drag Racing Models
For those interested, I have a three page write up on everything I did to build this model. Send me an e-mail at doctordwp@gmail.com and ask for the Wally Booth ProStock Gremlin writeup and I will send you an electronic copy. -
Wally Booth's ProStock Gremlin
Doctordarryl replied to Doctordarryl's topic in WIP: Drag Racing Models
Bill, I have sold a TON of the Wally Booth ProStock Gremlin decals through mail order and eBay. You are correct that Slixx has a new multicar set that includes Wally Booth's Gremlin. I think I may wind up seelling more decal sets than they will for this model since mine were available first and some folks don't want to spend money on decals for another car they will never build. The Slixx set is more expensive and is ideal for those who would want to build a Wally Booth Gremlin and Camero. I will eventually pick up a set of the Slixx decals for my collection. Slixx makes FANTASTIC decals. -
Wally Booth's ProStock Gremlin
Doctordarryl replied to Doctordarryl's topic in WIP: Drag Racing Models
The decals were from Scale Auto Details (my company) and some of my decals have been reviewed by Gregg in Model Cars Magazine. I have a Fotki album where I show many of my decals and some of the resin parts I sell. You can access the Scale Auto Details album at this link: http://public.fotki.com/doctordarryl/scaleautodetails Resin parts are available to convert the AMT (R2) '76 Gremlin into a 72-73 Gremlin. Another path is to use the 72 front end (grill/bumper and front pan) from the old AMT Gremlin Funny Car kit and cut the rear '76 bumper apart to simulate the 73 bumper/pan.