mrm
-
Posts
2,845 -
Joined
-
Last visited
Content Type
Profiles
Forums
Events
Gallery
Everything posted by mrm
-
 I couldn't agree more with this. Except I would add that that is the situation not only with the Galaxie, but with the vast majority of R2 kits. And their original vintage boxart idea may seem cool to that same old crowd, but nobody else finds it attractive. Take for example the Phantom Vicky '32 Ford they repopped. Judging by the box art, they were trying really hard NOT to sell any. Because it is a great kit full of great modern street rod parts. That's one thing that Revell is doing amazing at - their new boxart, whether of reissues or new models is just making you want to buy the model, build it and then frame the box cover.
 -
My original comment was in response of a previous comment suggesting a brand new model from a new tool. And the point I was making was that I can think of a lot of other models that would be better subject choice IF MONEY ARE INVESTED IN A BRAND NEW TOOL. That comment however has disappeared. And when it comes to subjects of brand new tooling, the list of "better choices" (better in more ways than one) that are NOT covered by other manufacturers is a mile long. Starting with '50s Buicks and ending with any of today's 1500 trucks, be it Chevy, Ford or Ram.
-
29 Ford Model A p/u with California street choper 1/25 scale
mrm replied to Jack L's topic in Car Kit News & Reviews
I'll play your game... Did I call you silly? Did I call anyone silly? So I don't know how would you even see my point and have a discussion if you don't even want to hear someone else's take. When I read your very ignorant answer, I noticed that you actually made my point about the very poor effort from manufacturers on many occasions. I only answered you on principle and I wish you all the best and Happy Holidays. -
I would have to respectfully disagree with most of that comment. Especially the last paragraph. First off, if R2 were solely in the business of making model kits, with their current offerings, pricing and competition would be out of business in a year, two max. Their kits (exclusively) are offered in Walmarts for prices ranging from $19.99 to $29.99. And they are collecting dust. They took out their displays before black Friday to make room for stuff that actually sells. Now they wheeled the pallets back out and they are staying full with the occasional John Wick Chevelle missing. And that's because of John Wick. I bought a couple. A '61 Galaxie because I thought it looked cool and a '92 Silverado because it is one of the few pick up trucks that I'm actually attracted to. Both for $19 each. Well, I'm sorry, but they are junk. In comparison, in Hobby lobby there are Revell kits too. And every other week all model kits are 40% off. That's when models are bought. And from the ones that are bought, the R2 are not the ones flying off the shelves and being restocked. If we take your number of 18 months for the average folks in the hobby, it means they need to be attracted by something to first try the hobby and then by other subjects to keep them in it. In other words you only have so many chances to "get them". And here comes the problem. To the "new-bloods" the R2 offerings are boring and unattractive with uninspiring box art. So when they decide to give the hobby a try, they go to what attracts them, which is definitely not a '70s Plymouth that they have never even heard of. And if they decide for some reason to give the hobby a try with the '61 Galaxie I got, they will face antique and not easy instructions, poor quality moldings and one-piece bumper/grille/headlights that look inferior to the 1/64 Hot Wheels Premiums. Then next time they try the Bandai Star Wars models or the Gundham robots. And they discover models that actually fit, have a higher quality feel to them and can be completed to look a lot better with a lot less effort. And then they never look back. If they even picked a car to begin with. "They can reissue old kits every two years to a brand new audience" only if those kits are attractive to that brand new audience. And they are not. And will become less and less attractive, because those kits are stuck in the'60s, while the world moves on. The only people excited to see kits that haven't been seen in eons are people who were alive eons ago. And if these are the target demographic of a business, that is a very, very short term business plan. It is literally the same as selling old movies on VHS tapes in 2024 for the "nostalgia factor".
-
I don't necessarily disagree. But how about modern Pick up trucks, SUVs, Porsches, Mercedes, post '95 Mustangs, modern Camaros, Jeeps, Japanese cars that have a huge following, exotics that every kid knows and dreams about, modern Mopars, F1 cars, rallye cars, drifters...wait... let me correct myself. I can think of about 300 cars that I would think would be a better choice investing the money for a new tooling than another Galaxie.
-
29 Ford Model A p/u with California street choper 1/25 scale
mrm replied to Jack L's topic in Car Kit News & Reviews
Well, that's a silly comment... You have no idea what my personal hot button item would be if it hit you on the forehead. I have no problem with reissues and I am well aware of the new kits that come out. After all, I found this tread, didn't I? Here's the deal tho. There is an extremely rare AMT '28 Ford sedan that would be a great seller, especially considering the Revell model A's and the endless options that come with them. But why reissue that when we can keep going the old '53 Ford PU route over and over and over... Hey, the whole country and a big chunk of the world is obsessing over square body trucks for the last couple of years now and it does not look like its slowing down, but let's reissue some halfarsed effort based on a snap-tite kits, bragging about putting actual light lenses in them, while completely ignoring the notoriously bent beds, chassis plates circa 1971 and complete lack of engine. Then we'll sell them in bundles with other boring outdated kits we are also gonna reissue with uninspiring box art, to outfits like Walmart, where they just sit until eventually disappear. I know, I know, that's AMT kits and the Round2 "let's-give-a-geezer-a-nostalgia-moment" business plan. But back to Revell and my "hot button item". I don't care that much about pick up trucks and downright hate SUVs and everything they represent. But I am absolutely amazed by the lackluster choice of models of either one, considering they pretty much rule the auto market in 1/1. What is the newest Pick Up truck that a model was made of, no matter the brand? Thank God the Germans bought Revell, so we could see some new models, like the Land Rover and the C8 Corvette. And if you are going to reissue a model that originated over half a century ago and has been periodically reissued over and over, at least ad something different that is in tune with the trends at the time of release. I know it's been discussed at nauseam, But the boring old 9" Ford rear end in all the '32 Fords end up finding it's way in the brand new (at the time) model A's. And it is still there in the recently reissued sedan. I am sorry to say this, but the car model manufacturers (except the Japanese) seem to concentrate on the demands of the "exit generation". And in my opinion that's not a very good business plan. I've been to two decent size shows in the last month or so. And the average age of not only the builders, but of the retailers on site keeps creeping up. What's Revell's plan- close shop once the old geezers die? I happened to be in Walmart pretty much every day. Sometimes twice. And all these "great reissues with original parts" just sit there. At $19.95. I have seen no kid EVER go by and be attracted by ANY of the models in that display, which is impossible to miss. They even wheeled it out before Black Friday to make space for some other things that actually sell. That alone should tell you something. The only people stopping by and looking are 40 and up. And most of them still don't buy them. Same thing at Hobby Lobby. As much as I love the Revell '29 Roadster kits, they don't exactly fly off the shelves. You know what does? The Japanese Gundham and Star Wars models, which modern instructions, attractive box art, that build into a lot better models with a lot less effort. -
The more research I do on this thing the more differences between the cars I see. So, my build seems to be going towards the chassis 061 (the last surviving original 126C2) as raced by Mario Andretti at Monza. The body I got is correct to 061 and incorrect to Gille's car at Imola. Also the front suspension is considerably different on that car (from Monza). I'll leave a special spot for Gilles. Maybe a MFH kit...
-
Thank you Pierre. Gilles was something else. Perhaps the last of the true gentlemen-drivers. In contrast I can't stand his son. This model is meant to be built as it raced at Germany after Gilles' death and Pironi's accident, when Andretti and Tambay filled in for them to finish the season. However the kit's decals have options for Imola and Long Beach and then an additional little piece for the German GP, where pretty much the only difference are the names. The kit I have to work with is missing the front wing. But then Villeneuve raced at Iola without front wing. And it was his last race which he dominated until his teammate stabbed him in the back, which ultimately may have led to his death. Also from what I understand the only surviving all original 126 C2 is chassis 061, which this kit actually represents, which is also the car Gilles used at Imola. I am in the process researching what I am actually going to model right now, which sometimes is harder than building the model. There are million pictures of 126 C2s both from the races in period and of cars in our days. Figuring out which is what and from what race is the real challenge, as there are quite few differences between them. Most likely tho, I'm going with Villeneuve's Imola race.
-
Thank you.I figured CA or Epoxy would be the go to glues. I was wondering if there were benefits to soldering stuff and any tips on that. I'll probably stick to glueing things together. I would only assume that soldering brass and steel to white metal and each other in this small of a scale would require different fluxes, different solders and different temperatures. And reinventing my hobby and going down the rabbit whole of researching all sorts of materials and tools and then learning how to use them is not something I had in mind when I thought "challenge accepted" with this kit. Unless of course I have no choice.
-
I am missing some major components. For example entire one half of the induction exhaust system of the engine. That is one intake, one turbo, one intercooler, one exhaust and all the turbos-to intercoolers plumbing. Also missing is the transmission oil cooler and some other details, like parts for rear shocks, both mirrors and the fluids reservoirs in the nose. If you have experience with these kits, what is the best way to attach parts together? I mean like the thick brass etched parts to the white metal monocoque for example. We are not talking tiny brass parts going into a hole in the white metal part, but a rather large brass plate going flat on a large white metal surface. I'm afraid that if I heat the brass enough to bond it will melt the white metal completely. There are few parts that are getting attached brass to brass, which totally make sense to be soldered, but the white metal kinda freaks me out.
-
29 Ford Model A p/u with California street choper 1/25 scale
mrm replied to Jack L's topic in Car Kit News & Reviews
My point is that would much rather see one all new tool every other year, than two reissues every quarter. Especially when the reissues have been redone to death over the past half a century and are not improved in any way. -
Looking back in the last few years building models, I noticed somewhat of a pattern of my building, which I never gave much of a thought in the past. Basically I always followed two constant lines. The first one going a familiar path and building my usual subjects of hot rods or the occasional sports car. The second is taking on a subject that is somewhat out of my comfort zone and getting obsessive over it. I enjoyed building Niki Lauda's 1:12 Ferrari from Tamiya, but spent more time searching for pictures of the real car and researching the Ferrari 312T than actually building the model. My personal favorite driver of all time is the Canadian Gilles Villeneuve and the 1/20 Fujimi model of the Ferrari he lost his life in was a natural choice for a follow up build. After doing those two cars in vastly different sizes, but attempting similar detail level, I reached some conclusions with mixed feelings. Mainly that building a Formula 1 car in high detail besides, skill, time, patience, tools also costs a lot of money and there is no way around it. There is plenty of aftermarket companies out there making kit specific detail sets just like many aftermarket generic bits and pieces. Nobody wants to spend four digit amounts on MFH kits but when all is set and done, if you want super-detailed results it will cost you the same whether you buy a MFH kit with everything in it or get a good deal on Tamiya 1/20 model and add everything to i . My most recent crazy obsessive project was the Pagani Huayra from Aoshima, which had photo etched parts I added surpassing the price of the kit with the amount of decals on it doubling that cost. I followed by the very first Mustangs I've ever built in two of the three colors I hate to work with the most. Those builds were also my very first experience with 3D printed parts. So it was time for something new I've never tried. Every year right around my birthday there is the only model car show/contest that I know of in Tennessee. The IPMS Middle Tennessee Model-Con in Murfreesboro. Altho the show this year was...well, let's just say it left a ton to be desired and raised quite few eyebrows. And that is me being as PC as I can. Not for lack of some great models or attendees either. But anyway, that's not the subject of this post. The vendors presence, altho having some familiar faces and some truly great people was not what I would call great. But if you had few bucks burning a hole in your pocket, one could manage to blow them. This being 4 days before my birthday and having my wife with me created an opportunity both from bargaining and budgeting stand point, if you know what I mean. I met a great gentleman, who was obviously selling kits from his personal stash no longer needed. Mostly Japanese kits and we were able not only to enjoy some great conversation, but also strike some deals, graciously "sponsored" by my wife. That's when I saw a red plastic box with a familiar yellow logo with a horsey under it's clear lid. When I asked what was it, I was told it is one of those projects that would make me pull my hairs, question my sanity and make me want to quit the hobby. Now he really had my attention. It is a fully detailed kit of the Ferrari 126 C2, comprising of about 220 (yes two hundred and twenty) parts made from white metal, aluminum and photo etch on various metals. All in 1:43rd scale. That means that the entire wheel/tire assembly of seven pieces (yes each wheel is 6 pieces of aluminum and photoetch) is about the size of a Hot Rod headlight. But - challenge accepted! Some of these parts can be glued, while others I believe would have to be soldered. Either way, I'm in. And I have the intention to detail this thingy as much as I can. It will be fully wired and plumbed, as long as I survive it without losing my mind. So I invite everyone to join me on my journey down Crazy Lane. I have never built one of these kits, so any advise, pointers, tricks or critiques are greatly appreciated. I already know that there are some major parts missing, so on top of everything, there will be some creativity and scratchbuilding involved, but so far I have faith that I would be able to produce a decent model of one of my all time favorite F1 cars.
-
I can think of at least 30 different cars I would consider better choice investing on a new tooling to make before another Galaxie. From any manufacturer.
-
29 Ford Model A p/u with California street choper 1/25 scale
mrm replied to Jack L's topic in Car Kit News & Reviews
How about Revell make a proper 32 Ford pick up based on their other 32s and then they can put whatever bike they want with it. It can be a Simson for all I care as long they actually make a somewhat new hot rod instead of one that has been build by everyone and their cousins going six generations back. -
Famous last words! 🤪
-
That's one mean chop. I love it.
-
Perfect
-
This is not clear coat related. The clear did exactly what it was supposed to do, which is stick to the color. There was simply no adhesion between the color and primer. This is achieved one of two ways- mechanically or chemically. Chemically is when the color is applied before the primer is 100% cured and therefore the two "fuse". This is tricky with yellow, as it will require multiple thin coats of paint right before the previous one is fully cured. Or you can create mechanical grip, by roughing up the primer underneath. This is easily achieved by simply sanding it right before painting the color on, with something like 600 or 800 grid. The most common mistake people make is to let the primer cure for days or weeks, then basically polish it super smooth, then let it sit even longer and then spray thin coats that don't affect it. And you have very weak bond between the color and primer. Which is why I sand my primer with 600, then spray a good coat of color and then if necessary sand it with higher grid, before adding more color.
-
I am in very similar place guys. I was going to finish it on time, but my truck crapped out with its front right brake caliper failing, so I spent all my time arguing with the dealership (they definitely screwed something up) and then trying to fix it and dealing with family stuff. Basically life decided it had different plans for me. I am however going to finish it, meeting deadline or not. And I would strongly encourage everyone else to do the same. The deadlline was just a motivational tool, but I don't want it to backfire and have the opposite effect.
-
That makes sense, as I had never seen them before. I was almost positive they did not come from any kit, but still I had to ask. I am trying to finish mine before the weekend.
-
Thank you Brian. The interior was fun. Detail painting that rear not so much, but I like the end result.
-
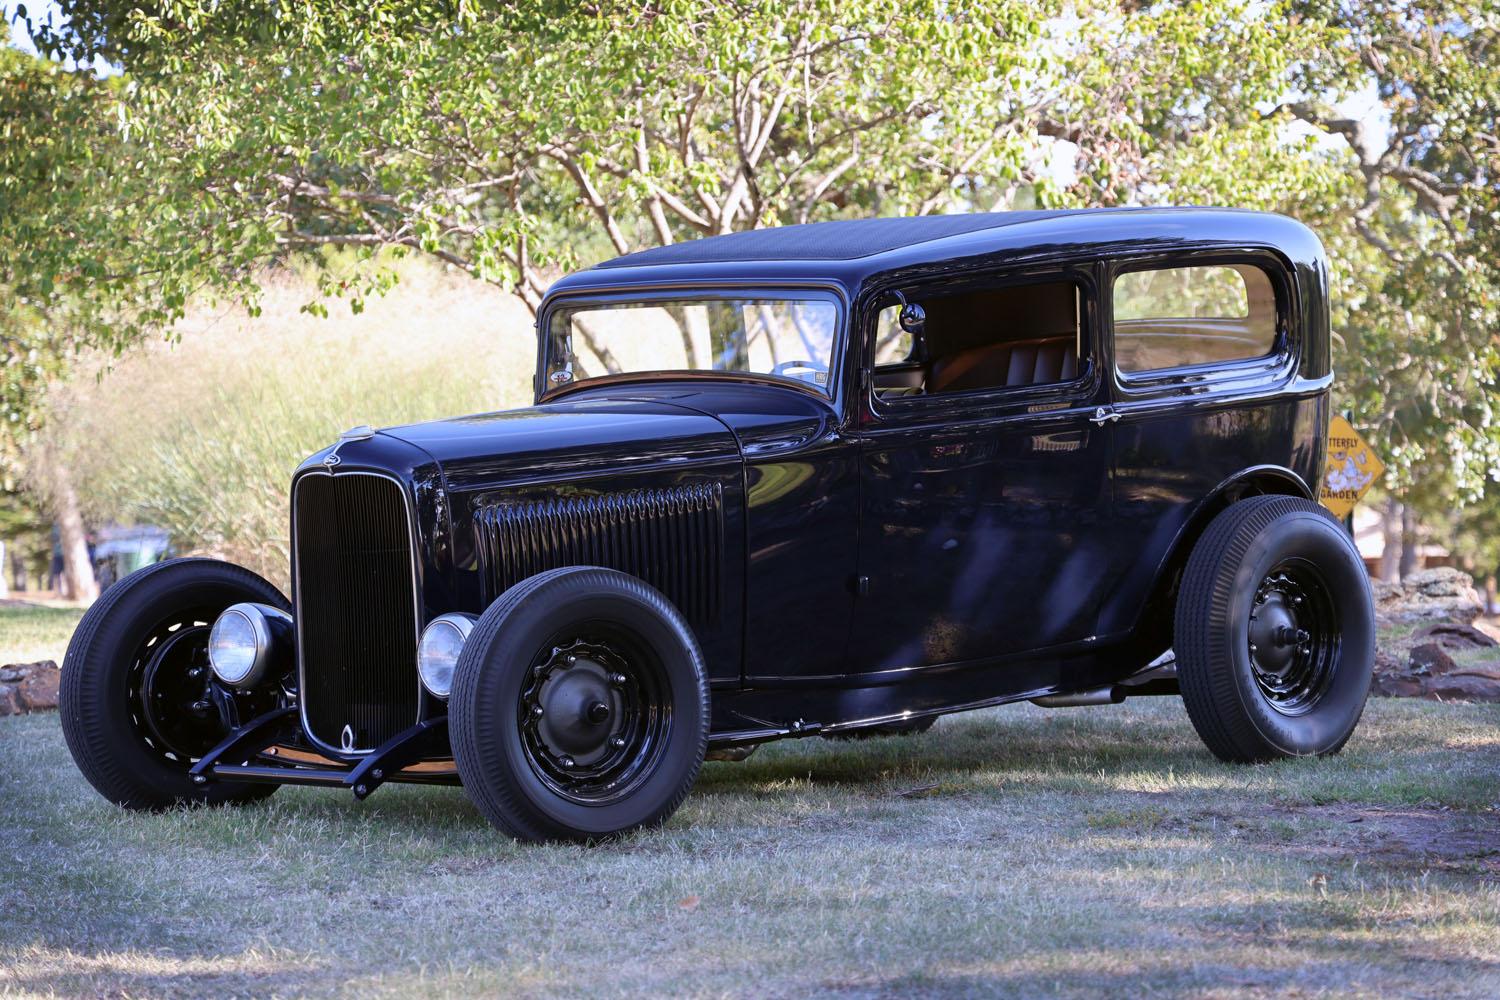
That's one really nice Deuce, Scott. You can never go wrong with red on '32 Ford, no matter the body style. I like how you kept the interior red too. I actually quite like that. My Sedan was supposed to be originally full fendered and Ferrari Red, but the plans changed dramatically. If you don't mind telling, where did these headers came from, that you have on your motor? I think they are perfect for street rods as they clear any engine mounts and come together at the back of the motor where you have the most room under the hoods.
-
I just made a thread in "Under Glass" for it. Please guys, post all your finished work here:
-
A lot of people are asking in the WIP section if there is going to be a thread to put all the completed models in. So here it is. Please post only pictures of the complete models and include a link to a wip thread if you have one.

-
Very sharp build. I love what you've done with the interior.