
91blaze
-
Posts
409 -
Joined
-
Last visited
Content Type
Profiles
Forums
Events
Gallery
Everything posted by 91blaze
-
Thanks for the ideas everybody. And to be clear, I'm looking for either a helicopter or jet turbine.
-
 Amazing work John, this could pass for real if I didn't know better.
 -
Thanks Harry, I'll look into that.
-
Thanks, but it looks like that guy already found someone to trade with. I found some of these kits on Ebay so I guess I'll go that direction unless I can find a cheaper option.
-
Where can I find a 1/25 or 1/24 scale turbine engine like that out of a helicopter. I know about the Turbine car, but all the ones I find are really expensive. Are there any helicopters in this scale or any resin castings? Also, are there any jet-type engines in this scale?
-
2012 POST APOCALYPSE/ZOMBIE HUNTER COMMUNITY BUILD
91blaze replied to Dr. Cranky's topic in Community Builds
Guess I'm kinda late to the party but might as well give it a try, I've never made a post-apocalyptic vehicle so it should be interesting. I will be using the leftover Corvette body from my '57 Nomad build. Not sure of the end results, but it will be fast and dangerous. I probably won't start the build for a few weeks while I gather parts and get an idea in my head. -
Thanks Brandon, I would have taken more outside pictures but ran out of time.
-
Thanks Chris, I'm glad you like it.
-
Thanks everybody.
-
'57 Nomad w/ Corvette Drivetrain FINISHED 6-12
91blaze replied to 91blaze's topic in WIP: Model Cars
Under Glass: http://www.modelcarsmag.com/forums/index.php?showtopic=59615 -
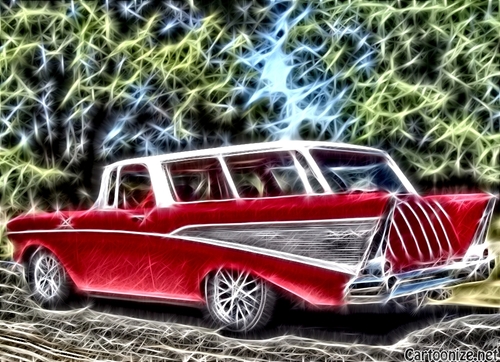
Hey everybody, just finished this Nomad using the Monogram 1957 Nomad and the Revell 2009 Corvette ZR1. I used the body and interior of the Nomad with the drivetrain and dash from the Corvette. Hope you like it. Thanks for looking. Feel free to make comments or ask questions. Here's the Workbench thread: http://www.modelcarsmag.com/forums/index.php?showtopic=59288&pid=713537&st=20&#entry713537
-
'57 Nomad w/ Corvette Drivetrain FINISHED 6-12
91blaze replied to 91blaze's topic in WIP: Model Cars
Thanks, it took a while to get everything lined up, but it works great. Got the car finished today, after many issues. Had alot of fitment issues with the exhaust, then with the interior, but I got it all worked out in the end. Here are some pictures, the good ones will be in the Under Glass section. Interior, complete with Corvette dash and seatbelts. Chassis with custom exhaust. The final product. -
'57 Nomad w/ Corvette Drivetrain FINISHED 6-12
91blaze replied to 91blaze's topic in WIP: Model Cars
Got more done this weekend, it's coming along nicely. The interior is nearly finished, just need to do some detailing, I may try to put in seatbelts. Chassis is finished, again just need to do a little detailing. Also need to finish the exhaust. Body is mostly finished, just need to finish the trim, bumpers, etc. Made the hood to open forward. It's not pretty, but it works. Just used some electric fence wire and aluminum tube. On to the pictures. The chassis and engine: The interior with bucket seats and Corvette dash: The hood: Teaser -
I like what you did with the hood, I need to try something like that sometime. Looks great.
-
'57 Nomad w/ Corvette Drivetrain FINISHED 6-12
91blaze replied to 91blaze's topic in WIP: Model Cars
Thanks, Harold, this is the first time I've used a metallic paint, and I really like it. On my future projects I will be trying different color combinations using metallic paints. Finally got stupid Photobucket to work so here are the pictures. The engine: Did some weathering: Used embossing powder to make carpet for the first time: Should be able to get more done this weekend. Thanks for looking. -
'57 Nomad w/ Corvette Drivetrain FINISHED 6-12
91blaze replied to 91blaze's topic in WIP: Model Cars
I used a cheap white primer, and it seems to be holding up well. Paint reactions still baffle me sometimes, so I usually just wing it lol. Progress is slow, but I got a little more done. The kit comes with a supercharged L57 engine but comes with parts for the non-supercharged version. The inspiration for this build was a '57 Nomad I saw at a car show last year that had a similar engine to this. It had a non-supercharged engine and I thought that looked nice. I haven't built a newer engine like this so I hope it turned out well. I will put up pictures in a little while cause Photobucket is being stupid and won't upload pictures. It keeps telling me that the Shockwave Flash plugin has crashed. Has something to do with the stupid ad video they play while it uploads. -
'57 Nomad w/ Corvette Drivetrain FINISHED 6-12
91blaze replied to 91blaze's topic in WIP: Model Cars
Thanks for the comments, I'm working on the engine right now and getting everything painted. I will have updates and more pictures on Friday. -
'57 Nomad w/ Corvette Drivetrain FINISHED 6-12
91blaze replied to 91blaze's topic in WIP: Model Cars
Painted -
'57 Nomad w/ Corvette Drivetrain FINISHED 6-12
91blaze replied to 91blaze's topic in WIP: Model Cars
Hey guys, got a little more done today. Got the interior bucket and frame finished. Also got the engine and body painted. I went with Autumn Maple Metallic. Here's some pics: Finished modifying the frame and interior bucket. More pictures with the engine, frame, and interior in final places. -
Using the body and interior from a Monogram 1957 Chevy Nomad with the drivetrain and some interior from a Revell Corvette ZR1. I have done alot to the frame of the corvette so far, but I don't have very updated pictures yet. Pictures so far: The stance I wanted was low with a rake. This is as low as I could go in the back without modifying the interior, but it worked out just fine. First pic is my initial mockup with just the wheels. The second is after lengthening the frame and doing a little work. Just like I wanted Had to lengthen the frame and make a few modifications to make everything go together correctly. Also had to lengthen the driveshaft (or whatever it's called here) a little extra to line up the engine with the Nomad's engine bay. The Nomad's parts are fairly crude, like the optional seats for example. So I had to do a little work here as well. I will have updates and pictures tomorrow. Haven't decided on the color yet, any suggestions are welcome. Keep in mind I don't have an airbrush, so rattle can only. Thanks for looking.
-
1994 Sonoma Rat Rod
91blaze replied to 91blaze's topic in WIP: Model Trucks: Pickups, Vans, SUVs, Light Commercial
Can anybody help? The engine is from a 53 Bel Air. It has a stock and custom version of the engine in the instructions. The stock engine is like the one in the photo but the custom one is completely different, as you can see in my pictures. The plugs in the stock picture are in the same place as the exhaust is on the custom version. Does anybody know how I'm supposed to wire it? -
1994 Sonoma Rat Rod
91blaze replied to 91blaze's topic in WIP: Model Trucks: Pickups, Vans, SUVs, Light Commercial
Thanks Terry, and I've seen that S10 before, it's the only chopped S10 I can find. Stupid question guys... How am I supposed to wire the inline six. All reference pictures I can find shows the plugs on the passenger side and the exhaust on the driver side, as shown in the picture. I put it together as the instructions show, but I don't understand what I need to do. Any ideas?
-
1994 Sonoma Rat Rod
91blaze replied to 91blaze's topic in WIP: Model Trucks: Pickups, Vans, SUVs, Light Commercial
Haven't had time to work on the rat, but I did get alot done with the Jeep. All I have left to do is make the exhaust and add some engine detail. When these two are done, I will put them in the Under Glass section. Got some pictures of the Honcho. I lifted it 6" and put some tires off a cheap RC car, they are roughly 35" in scale. Made the shocks and drive shafts too. Rims are from a Chevelle or some other muscle car, not sure. -
1994 Sonoma Rat Rod
91blaze replied to 91blaze's topic in WIP: Model Trucks: Pickups, Vans, SUVs, Light Commercial
Thanks for the comments, I finally have time to post pictures so here they are: The engine and frame finished: Body finished: And put together: Hope you guys like what I got so far. This is far from finished, but is acceptable to use for my project. I still need to make the windshield, grill, find a radiator, fix the exhaust. and a few little things here and there. Also need to add alot to the interior. In the meantime, I will be working on the next model for use in the same project. Just a stock Jeep Honcho with a little lift and new tires: -
1994 Sonoma Rat Rod
91blaze replied to 91blaze's topic in WIP: Model Trucks: Pickups, Vans, SUVs, Light Commercial
Got some more done today but no pictures. The body is finished and painted. Unfortunately, the roof is a little messed up, but it's acceptable. Also got the engine built and a few little things finished. I should have it finished hopefully by Wednesday because I'm using it for a school project. I will get some pictures as soon as I can.
