
stulee11
-
Posts
534 -
Joined
-
Last visited
Content Type
Profiles
Forums
Events
Gallery
Everything posted by stulee11
-
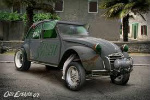
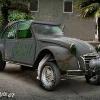
how about this one ??
-
70s Ford mild custom van
stulee11 replied to Mr Stock's topic in WIP: Model Trucks: Pickups, Vans, SUVs, Light Commercial
that colour is PIMPIN!!!!!. i love it its lookin wicked so far . -
flea market find (update) all done now in "under glass"
stulee11 replied to stulee11's topic in WIP: Model Cars
exhaust part 2 and finally i made some progress on the interor... i removed the seat guides from the side and left the front ones so i know the seats will be level. and these are the seats i will be using hope you all like the progress and as always any comments is more then welcome thanks for looking in stu -
flea market find (update) all done now in "under glass"
stulee11 replied to stulee11's topic in WIP: Model Cars
hi all not really much of a update but ...i saw a car today with the air filter relocated to pop out of the front wing. so i thought to myself i gotta do that so i did. air filter relocated i started to do the floor in the boot i dont think its to bad really for my first go... if i did anything wrong please let me know. boot as you can see i didnt have any styreen so it was a old phone topup card lol i also started to make a new exhaust as the back section was missing... so i used some old spure from the left over trees... bent it and drilled it i think its ok will look better once painted. -
65 chevy stepside truck
stulee11 replied to stulee11's topic in WIP: Model Trucks: Pickups, Vans, SUVs, Light Commercial
thanks guys for the amazin comments its means loads to me that i am doing things right lol. -
i have seen a few people on here saying to soak the model in water for a while. then put it in a zip freezer bag and put it in your freezer for either a few days or a week i'm not to sure how long... but thats ment to pop open most if not all the glue lines.
-
"65" chevy stepside pickup
stulee11 replied to stulee11's topic in WIP: Model Trucks: Pickups, Vans, SUVs, Light Commercial
she is all done and in "under glass" hope u all like her -
65 chevy stepside truck
stulee11 replied to stulee11's topic in WIP: Model Trucks: Pickups, Vans, SUVs, Light Commercial
last 2 chassis my tip and the brake detail hope you all like and as always any comments welcome good or bad thanks for looking in stu -
65 chevy stepside truck
stulee11 replied to stulee11's topic in WIP: Model Trucks: Pickups, Vans, SUVs, Light Commercial
few more interior you will have to excuse the bed as it was my first time doing real wood and i forgot to paint the bed black first... so i tried to paint it after with no so good results engine -
hi all this is my latest kit... its a "65 chevy stepside truck"...i lowered it a little at the back end...made the tail gate opening and put in real wood... i wired the engine and also added a stainless tip for the exhaust. hope you all like interior
-
BMF before paint on badges?
stulee11 replied to John Pol's topic in Model Building Questions and Answers
if i remember rightly... excatly as brian said but erasing after each layer -
"65" chevy stepside pickup
stulee11 replied to stulee11's topic in WIP: Model Trucks: Pickups, Vans, SUVs, Light Commercial
some of the interior sorry for the poor pics but i will get some better ones once she is done hope you all like thanks for looking in stu -
"65" chevy stepside pickup
stulee11 replied to stulee11's topic in WIP: Model Trucks: Pickups, Vans, SUVs, Light Commercial
hi all thanks for the brill comments they mean alot ... just a s,all update really... got the body all clear coated... and took some moch up pics for ya all hope you all like. -
you guys are going mental lol... it takes me about 2 maybe 3 weeks to get a model to look even half as good as your lot... i am overly impressed with the quality of models and the skill in such a small well TINY time line lol... well done to you all. you all should be very well chuffed with ya selfs.
-
"65" chevy stepside pickup
stulee11 replied to stulee11's topic in WIP: Model Trucks: Pickups, Vans, SUVs, Light Commercial
and finally the chassis all done home made tip hope you all enjoy all comments welcome good or bad thanks for looking in stu -
"65" chevy stepside pickup
stulee11 replied to stulee11's topic in WIP: Model Trucks: Pickups, Vans, SUVs, Light Commercial
few more chassis brake detail -
"65" chevy stepside pickup
stulee11 replied to stulee11's topic in WIP: Model Trucks: Pickups, Vans, SUVs, Light Commercial
hi all more updates for ya interiour done... engine installed into chassis... chassis done...all that left is the body to be done... hope you all like interiour engine in -
"65" chevy stepside pickup
stulee11 replied to stulee11's topic in WIP: Model Trucks: Pickups, Vans, SUVs, Light Commercial
few more dash grill and wheels as always all comments welcome good or bad thanks for looking in stu (p.s) i aint to sure weather to put the flame decals on or not... what do you guys think ??? -
"65" chevy stepside pickup
stulee11 replied to stulee11's topic in WIP: Model Trucks: Pickups, Vans, SUVs, Light Commercial
hi all small update really but the engine is 99% done... chassis is painted... dash is painted... wheels together...and grill has had it black wash. engine chassis -
good old halfords paint can't beat it lol... i use it alot on mine!
-
Paint not drying ... some thoughts on why?
stulee11 replied to Foxer's topic in Model Building Questions and Answers
i have never used that type of paint... but when i am spraying i always use rattle cans and i always use a hairdryer... i warm up the model prior to paint then as soon as i have layed the paint down i hit it with the dryer again just to get it hot enought for the paint to be touch dry... then leave it for a few days and i have never had a problem with that way. -
i built this kit not so long ago... and i was overly impressed with how it fitted together... very sweet build there dude i like it alot !!!!!
-
"65" chevy stepside pickup
stulee11 replied to stulee11's topic in WIP: Model Trucks: Pickups, Vans, SUVs, Light Commercial
dude that is one sweet ride! How did you lower the front end ? -
"65" chevy stepside pickup
stulee11 replied to stulee11's topic in WIP: Model Trucks: Pickups, Vans, SUVs, Light Commercial
lol its cool but i was looking on the box and its the same way lol... yeah i bet its a right pain in the butt... when i use to spray cars with it on it was a right gitt to get a good paint job under it . -
"65" chevy stepside pickup
stulee11 replied to stulee11's topic in WIP: Model Trucks: Pickups, Vans, SUVs, Light Commercial
thanks mate to be honest i was just following the instructions and what it looked like on the box