
stulee11
-
Posts
534 -
Joined
-
Last visited
Content Type
Profiles
Forums
Events
Gallery
Everything posted by stulee11
-
dirty donnys (vantasy)
stulee11 replied to stulee11's topic in WIP: Model Trucks: Pickups, Vans, SUVs, Light Commercial
thanks mate . I know what ya mean about the door hinges but i'm not that experienced enough to for the proper ones yet so i did the best i could . I will get some better pics in the sun when it finally comes out lol . But thanks for the tip tho... what do you mean about the next truck??? -
dirty donnys (vantasy)
stulee11 replied to stulee11's topic in WIP: Model Trucks: Pickups, Vans, SUVs, Light Commercial
thanks mate not to bad for my first proper try.. and it had to be done really lol -
dirty donnys (vantasy)
stulee11 replied to stulee11's topic in WIP: Model Trucks: Pickups, Vans, SUVs, Light Commercial
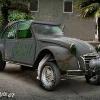
last ones now hope you like her ther is still tiny little touch ups to do but they wont make a difference so thats her done ... like i said i will get better pics wen the sun decides to come out ... and as always any comments good or bed are more then welcome... thanks for taking the time to look at her stu -
dirty donnys (vantasy)
stulee11 replied to stulee11's topic in WIP: Model Trucks: Pickups, Vans, SUVs, Light Commercial
few more lol -
dirty donnys (vantasy)
stulee11 replied to stulee11's topic in WIP: Model Trucks: Pickups, Vans, SUVs, Light Commercial
few more i did make a bed but it didnt turn out as i wanted, so i am looking out for either a dolls house bed or sofa to go in her. you cant see much of the engine but thats why in this pic i made the interior removable so you can see it better -
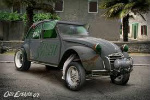
hi all i finally got her done... i found i had a few probles with this kit (1) the green decals are wrong. (2) the dash had to trimed and filed to fit propery. (3) the steering linkages didnt line up at all. (4) the fron grill was a right royal pain in the butt to get to fit. (5) the side mirrors are a pain to put together to... but other then them few lil problems i had a right ball doing this kit and she didnt turn out to bad for my first kit with me opening it all up... i did do a few learner mistakes like, i put the door pannel on before i filled and sanded it and i did knacker up the clear coat but i think i sorted it enough. well here she is i will get some better pics in the sun when it decides to come out lol.
-
i had that problem to with the engine on my one... how did the wheels line up ???? you are really making good progress with this one looks wicked.
-
thanks mate... i aint to sure if i'm going to leave that bed in yet as i dont think it turnt out as good as i wanted... but i am looking in to getting either a dolls house bed or a dolls house sofa to go in the back.
-
last one... i have been also trying to work on the door panels, BUT i did a rather silly thing and glued it on then decide to do the filler work lol... which has made this side rather impossable to sand down nic... but i have learnt from that misstake and i am doing the other side off the door lol... but as most of you all say every model is a learning curve. door panel on as you can see its rather messy but i have learnt a valuble lesson this time!!!! hope you all like the way this is turning out and stick along for the ride. thanks for looking in. stu
-
hi all small update today... i've been working on the interior and i am making the seats removable like they are in the real thing, so as i can remove the engine cover to show off the engine... i am using some locater pins in the seats and a hole in the floor. the seat the floor interior done
-
i tend to use a bent up metal coat hanger taped to the inside of the body so i dont have to touch it at all... the gloves are your choice really i dont personaly... and the drying time depends on were you put it to dry off ( if its air drying ) i leave it a day or so...( if its with aids such as hair dryer) just dry it till fully dry all over but pay more attention to creases and stuff ... i dont know anything about air brushes as i use rattle cans... hope that helps you out a bit . stu
-
hi all... progress is going slow now as its the little silly things that take the longest lol... i have got the door pannels installed just got to sand down the filler and paint n detail. and after the filler was put on so by the looks of this its going to be a little time before she is done i hope you all like the slow but steady progress. thanks for looking in. any comments good or bad are welcome . stu
-
thanks mate glad u like it ... i to would like to know how to for the next one because i do plan ti get another one
-
thanks mate... i will admit the thin post between to front door and the sliding door did snap off at the bottom ... but i was able to glue, filler and sand it back to shape lol
-
thanks mate ... i was trying to thing of ways to make a small "chandelier light" lol
-
hi all ... this aint the best made but it will do untill i find a better one lol i am going to try to get a "dolls house" bed to put in it place but for my first attempt i dont think its to bad ... hope you all like thanks for looking in stu
-
few more few more to come later hope you all are enjoying this one... i know i am lol thanks for looking in stu
-
hi all small update i finally got the last coat of clear on and the shine is looking very nice, well in my opinion lol... and on another note... i wont say what this is but can you guess
-
thanks mate. no not on this one but on the next one i do i will add a little something in the back
-
i was worried about that . I did 6 mist coats and this was the final wet coat i am hopein that being as this is the last coat i can like you say sand it out ... Its had 6 mist coats and a wet coat under this then wet sanded so hopefuly i can sand it out . Fingers crossed . Thanks all
-
its automotive colour and clear
-
hi all i am in desperate need of some help... i was putting the last coat of clear on my vantasy kit and is sort of gone wrong to say the least i think i know whats gone wrong... the clear has puddled up to thick??? but how do i fix it without wrecking the colour or decals??? thanks stu
-
another update today... after a little messing about with the dash i finally got it installed... i have made the engine cover removable so you can get a look at the engine after final assembly. hope you all like thanks for looking in stu
-
last 2 better pic's of the metalic hope you all like and as always any comments welcome good or bad. thanks for looking in stu
-
hi all small update today... now as my sons birthday is over and done with "3 yesterday" lol i managed to get some clear coat on today... so she is all down hill from today on... this is the shine after first wet coat