-
Posts
64 -
Joined
-
Last visited
Content Type
Profiles
Forums
Events
Gallery
Everything posted by Chris M
-
You are my new hero! I'm not really a bike guy, but can't deny the performance, especially of the factory backed race bikes. Someday I hope to take on a full tilt moto GP build with all the nifty photo etched parts and what not. These look to be very in depth builds based on the goodies in the first post. Anticipating some killer builds. Subscribed.
-
Impressive build! Good save from the disgrace of the "rockin' rod," also, a look, and paint job fit for a deuce coupe.
-
I'm in, I'll be working on a 32 roadster (rolling bones style), and 27 T roadster (1960's show car style) for my entries.
-
What a killer little build! I'll have to add one of these kits to my old henry iron quota for the year!
-
Great job on the "stock" appearing paint for a gasser, I love the color combo,and actually picked up a can of this paint on a whim at my LHS this past trip, nice to see it before I crack it open on something. Also, I have a half dozen of these kits for some reason, Not even sure how I ended up with them. LOL
-
Thanks Doc. Thank you also Matt, I challenged myself to finish at least a half dozen old Henry fords for the year. This will be number one, a '32 roadster is on deck, followed closely by a "T" bucket with another custom frame.
-
A little more progress this weekend. Thanks for looking!
-
Killer deuce brother. I dig the choice of rolling stock.
-
Cool little model! And you seem to still have your skills after that long of a break! Great job! I also like the instruction sheet for the picture "floor" very clever.
-
I got the paint on her, started with Duplicolor primer, to Krylon White Lacquer, then Testors White lightning pearl, the fade is Testors Icy Blue, Star Spangled Blue, Deja Blue, all decanted and Sprayed through my Paasche Talon. Clear will come tomorrow. Thanks for looking!
-
I pulled the body out of the cabinet for a quick peek and couldn't resist a mockup. Paint isn't nearly as smooth as I had hoped.
-
Great shoebox man!! The wheels are the perfect choice, and great work on the grill.
-
Beautiful build! Did you spray the dullcote direct from the can or airbrush?
-
That rustoleum antique brass metalic is a killer color, and would look very classy.
-
Wow! Thank you for the kind words, This thing has been a blast, But I'm ready to move onto another project.
-
I used .062" solder with gap filling CA glue for the chassis crossmember. Body is gassing out in a cabinet. Pics to follow. Thanks for looking.
-
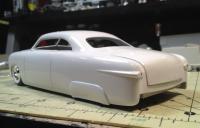
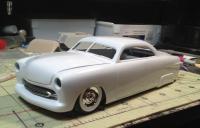
Started and stopped this one a number of times waiting on inspiration and time. Started with a Revell 5 window coupe kit, chopped a bit, sliced the center out of the frame rails for a custom cross member/bracing. Model A rear cross member, Quick change with ladder bars/model A spring, Revell parts pack Caddi, with the four singles intake. Body has been painted my take on Washington Blue.
-
I got the base coat down. Have to wait a another day or two to wetsand, Then it's back into the booth for this one.
-
We are a Subaru family, I drive an '08 Imprezza STi, wife a'05 Legacy GT,My father owned a Baja for a few years, Also the non turbo one, he ended up trading it in for a Legacy GT and buying a truck. It was a good little car. Not a ton of space in the back seats, but i'm 5'11 and can fit back there. The non turbo motors can last forever with even semi routine maintenance. It also got really good gas mileage as I recall.
-

S-10 Extreme Flatbed
Chris M replied to n8dogginz's topic in WIP: Model Trucks: Pickups, Vans, SUVs, Light Commercial
Nice start, The engine looks like an older pop of a Chevrolet 409 based on the head/valve cover shape. Only two motors share that head/ valve cover shape in the Chevy line up, one was a 409, the other a 348. They both looked identical,excep the 348 had the dipstick on the drivers side of the motor, and the 409 on the passenger side. -

Chossing the right airbrush gun
Chris M replied to reaper3's topic in Model Building Questions and Answers
As far as your airbrush is concerned, whichever type/brand you go with (Paasche talon for me) Be sure to add a quick disconnect from your hose to the gun. I'm in a holding pattern until an order from Amazon shows up with a new air valve assembly, as I stripped mine taking it on and off the hose one too many times. They're worth the $15, especially when you consider down time for ruined parts to be replaced. -
Thanks for the kind words guys! The chop was actually pretty difficult, It's chopped more in the rear than the front. These cars seem to have a lot of forward rake to the roofline that I never really noticed. Then, I leaned the rear window down, but not before moving it forward some and adding a filler piece. This was my third chop, (two others were '32 fords) and Am really happy with the way it turned out.


