Theo
-
Posts
67 -
Joined
-
Last visited
Content Type
Profiles
Forums
Events
Gallery
Everything posted by Theo
-
When did color fall out of favor?
Theo replied to Lunajammer's topic in General Automotive Talk (Trucks and Cars)
Hi all I also miss the color and style choices of the past. Remember when you could look at a sedan and tell the maker just by the styling? Last car I purchased was earlier this year for my wife, the 2 driving forces for the purchase were color and style. A Plum Crazy Challenger was the result. Seldom see another one in the parking lot of wherever we are. -
embossing-powder, replacing flocking?
Theo replied to fiatboy's topic in Model Building Questions and Answers
I use both. The embossing powder is finer and takes paint well, so you can use clear or white and paint whatever color you want. The down side to painting it is that you lose the soft texture to the touch. It does look more in scale for short nap carpet and upholstery (think 60s-70s carpets). If you are going for the more shag type appearance (think lowrider or customs carpets and upholstery) I find flocking looks better. Using the color flocking also allows you to retain the fluffy texture to the touch. I also find the embossing powder is easier to get laid down with an even layer. I do not find one or the other superior, just different depending on the look and feel you are going for. -
Hi all, Anyone managed to make a working hood hinge for the Moebius 53 Hudson Hornet? I have made many door and hood hinges, but can't seem to figure out out to get one on the Hornet given the relatively tight underhood space and the style of the mold. Would really like to do a front tilt/suicide style hood, but at this point just interested to see any examples of any working hoods for this kit. Thanks for any suggestions Theo
-
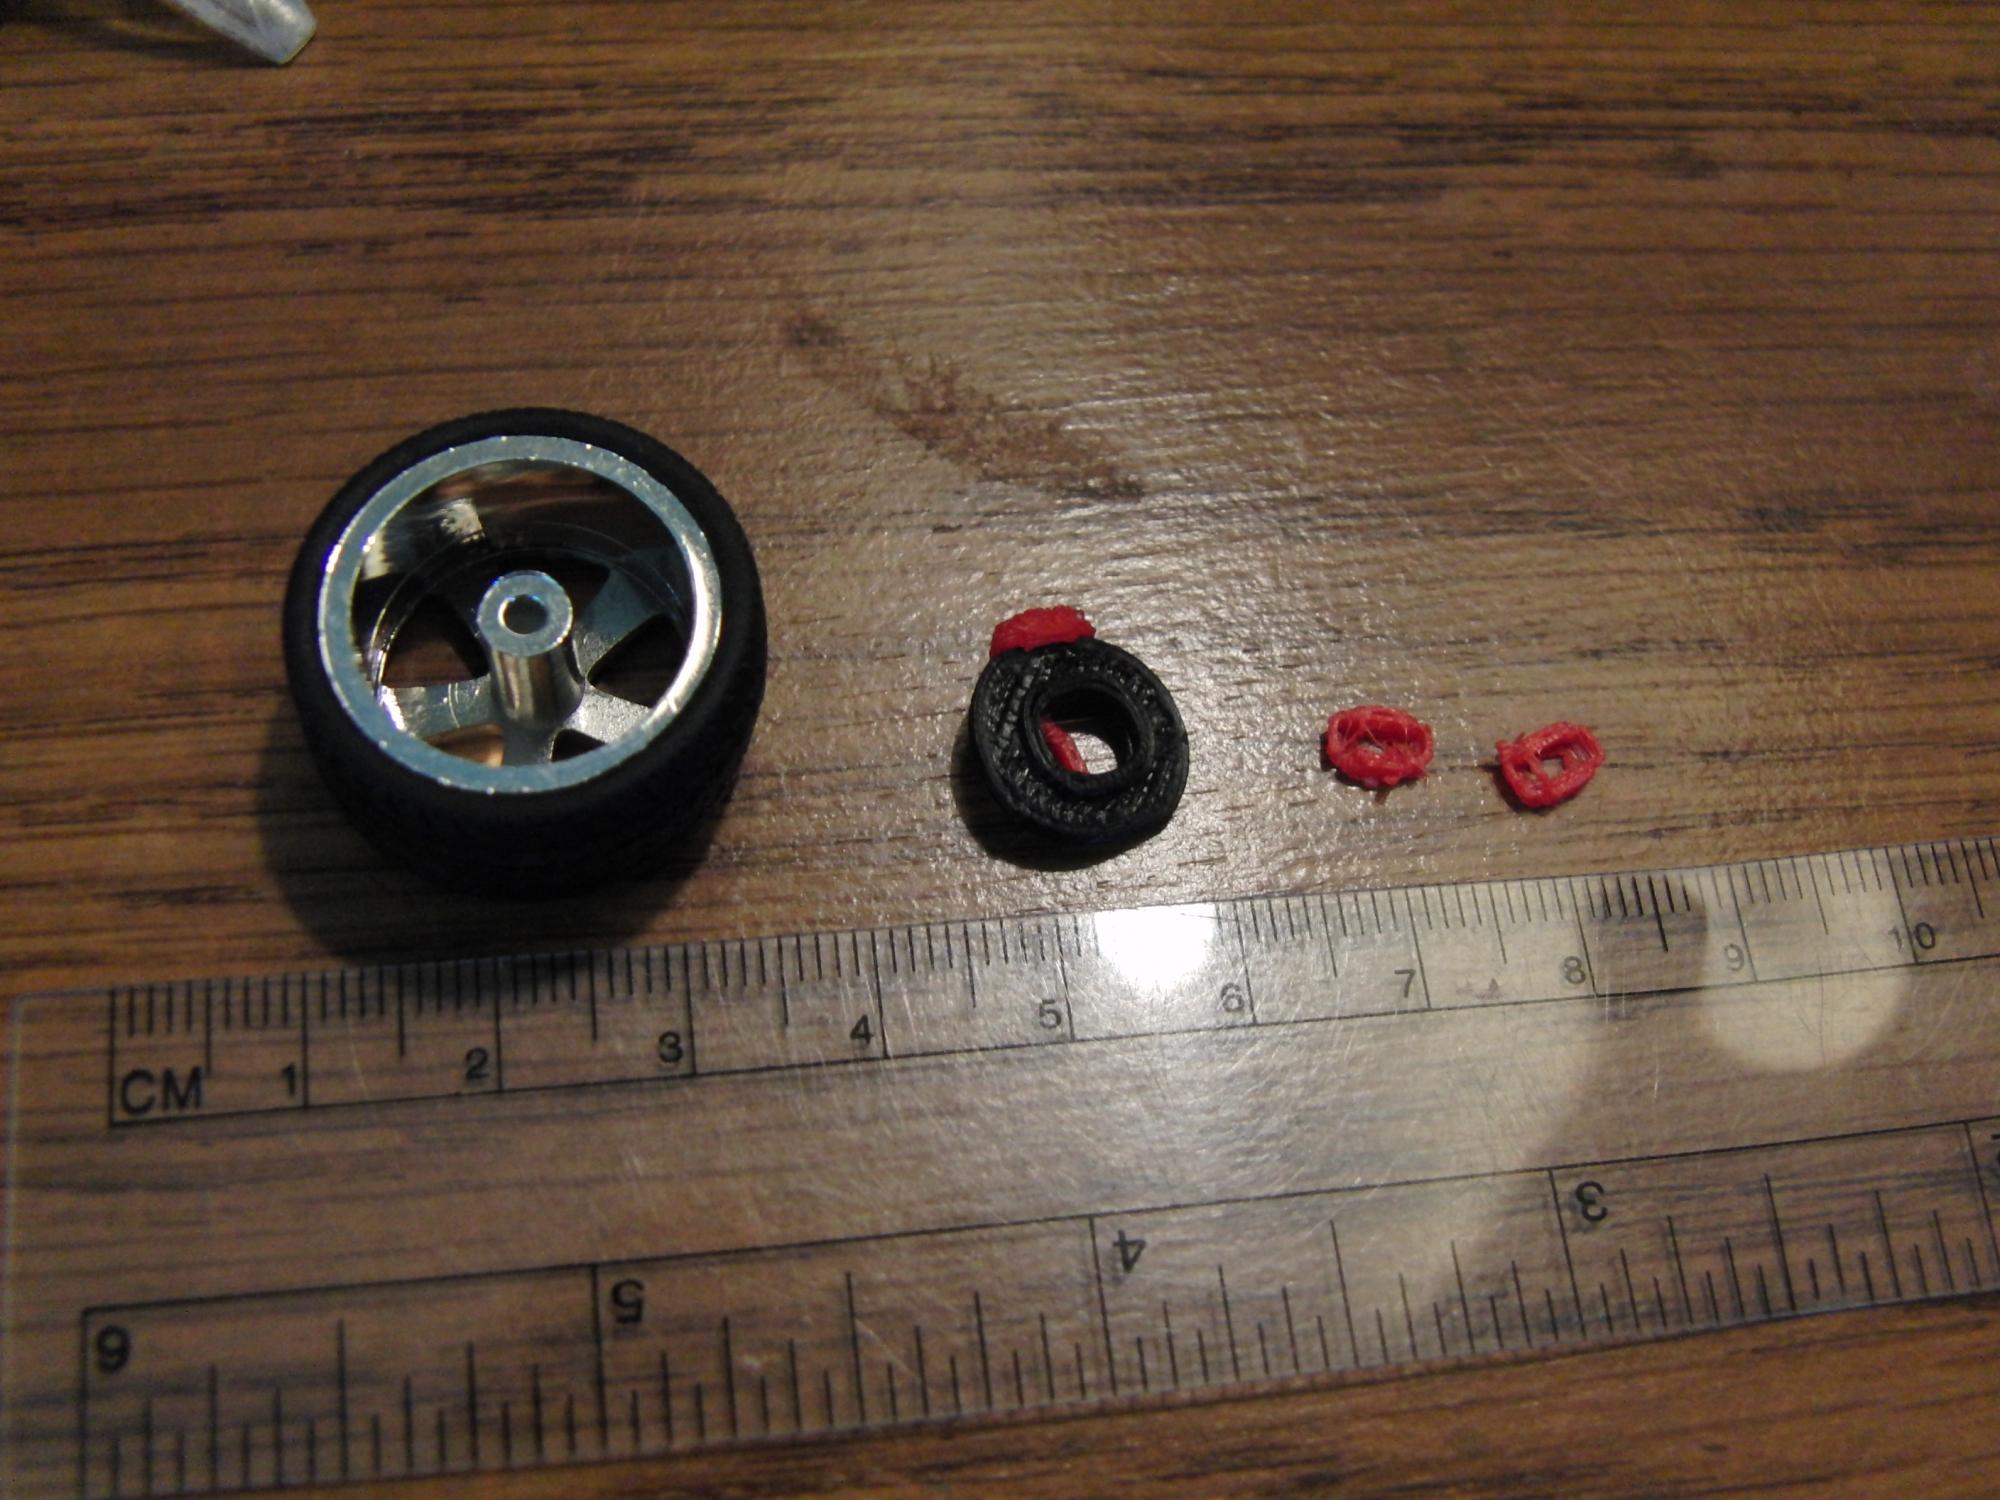
Hi iceman Please excuse my less than great photographic skills. This is a set of disc calipers fresh out of the printer. The disc is also from a prior print. These were specifically make for the Pegasus wheel shown. The pattern on the disc was my attempt at making it look like a vented disc. The calipers need a bit of clean up but not bad for such tiny pieces. Not up to par for high end resin pieces, but I can print as many as I want whenever needed, and can modify if desired. Probably not an issue for brake calipers, but for other things such as rims and such, I am hoping to eventually have some basic templates that can be easily adjusted, modified, resized, etc to allow for easy customized accessories.

-
I got the daVinci duo for Christmas. So far I am finding it to be a good consumer level home 3D printer. If you are looking at 3D printers I am sure you are already aware of some of these things but to make sure here are a couple things to keep in mind: 1. There is quite a learning curve unless you already have an extensive background in 3D CAD design. Working with the files is not always intuitive and getting everything set to print out correctly is not always straight forward. There are many things to consider that I was not aware of before getting the printer. Things like providing appropriate supports for the model, correct amount of internal structure, filament thickness, etc. 2. You should consider the output from the printer as "component" rather than a finished piece. Out of the machine (even with the highest quality settings) the models have very apparent layers and have a flat (non glossy) finish. If you want a smooth glossy finish you have to do some finishing work. Sometimes you can manipulate the orientation of the model to have the layer pattern appear as intentional. There are some pretty cool tricks to making the models smooth and glossy in addition to the usual sanding and painting, but however you do it there is some finishing work required. 3. As far as the daVinci machines specifically, I am quite happy with mine so far. The price/value is excellent and I have found machine pretty easy to use. Most of my issues have been related to operator errors rather than the machine itself. There are a couple of things about the daVinci to be aware. The filament comes in a proprietary casing and is a bit more pricey than generic filament. For me this has not been an issue and their filament seems to be of good quality. There are work arounds if you want to use generic filament but I have not felt the need to do this. Also the software that preps the model for printing (slicing program) is also proprietary and not the best around but gets the job done. It can be slow and does choke on large complex models. If this is a problem there are 3rd party software packages that can interface with the printer, but they run about $150. 4. What have I made so far? Honestly mostly little statues/action figures for my daughter (Pokemon etc). I have made a "busts" of things like Darth Vadar, a few hood ornaments and car badges for display, and a few scale parts for cars (disc brake sets with calipers, custom rear view mirrors, battery). I have a couple plans I am working on for body components to modify kits as well, but have not tried to print these out yet. Hope this helps Theo
-
Question about to primer or not to primer
Theo replied to Raiven2k16's topic in Car Aftermarket / Resin / 3D Printed
Hi all My approach to primer is somewhat more selective. Admittedly, this may be due to lower standards on my part. For perspective, I am not building for contests, just for my shelf so I am the only one who has to be satisfied with the final product. I do want things to look as good as possible, but sometimes I just want a quick, pain free build. I have been doing this for a long time, but still find painting to be somewhat Alchemy (I can do the same thing with the same materials at the same time and still get different outcomes). I sort of look at each step of painting (sanding, prep, fillers, primer, color coat, clear coat, polish) as an opportunity to make things look either better or worse, and I am not always sure which way it will go ahead of time so if I think can skip a step to get to my desired final product I will. Here is my general thought process relating to primer: 1. For me primer is absolutely required if I have done any body modifications, particularly if any sort of filler material was used. 2. If the body out of the box is pretty smooth (subjective I know) and a molded in a light color and the only prep was light sanding the edges and washing I prefer to skip the primer if using a paint designed for styrene (eg Tamiya, MM/Testors). I have never had trouble with these paints sticking to raw plastic and the body lines and details remain more crisp with only the thin coats of top coat and not the relatively thick primer layer. It is one less chance of getting a paint run or piece of dust in the finish. I have also had pretty good luck with the Rustoleum 2x Paint and Primer all in one rattle cans. I know some folks are not fans of the rattle can hardware store paints, but with multiple quick light coats I have had some pretty good finishes (with a little bit of polishing). 3. Undercarriages mostly get primer since I am never quite sure what I might want to use for fine detailing (if anything). 4. Usually skip the primer on interiors to preserve detail and save some time and number of steps. Also I tend to us a lot of "covering material" on the non-detailed parts of the interior. Floors often flocked or covered with "felt type" paper for carpeting, Seats finished with various tapes, nail polish strips, decals, embroidary floss, etc. So primer would be a waste on these areas. Hope this is useful. It is what is currently working for me, and not intended to suggest there is any "correctness" to it. Theo -
key holes - paint? foil? ...
Theo replied to crowe-t's topic in Model Building Questions and Answers
These "metal" decals look good when in place. A bit tricky to use until I got the hang of them. Available here: http://www.ebay.com/itm/chrome-metal-decals-Keyhole-2293-/170895195637?hash=item27ca25bdf5:g:ukUAAMXQBg5Rur90 -
Also, what about for resin or metal tires to give them a more rubber look?
-
Hi Metalmad Not sure of the composition, but have used over several car bodies without issues. To get the colorshift effect to work, you need to spray over a black base so I have always had black primer on the body before spraying. The more coats you spray the greater the color shift. I think I sprayed around 6-8 full coats, followed by a couple clear coats. The color shift coats dry to a semi-gloss type sheen, and polishing messes up the effect (makes it kinda blotchy), so plan on a couple coats of gloss clear on top. Overall, it handles somewhat like a candy coat; more coats deepens the effect up until a certain point when things start to look "muddy". The final appearance is pretty good indoors under ambient lighting, but the effect really pops in sunlight and under direct lighting. Hope this helps Theo
-
Hi all I started using the Micro Liquidtape a while back. It looks like, and applies. same as the Krystal Kleer, except that you apply to only 1 surface then let dry (usually only a few minutes) and you are left with a tacky but dry surface. For window, apply to the window frame and let dry, then press windows in place. Since the adhesive is dry/solid, there is no ooze to clean up. Also it allows you to reposition the windows to get them just right. The stuff has more than enough tack to hold the windows in place. Theo
-
I use Micro Liquidtape for most clear parts. It goes on like white glue. You apply to a single surface and then let dry until it is clear (usually only a few minutes). Once dry, it remains tacky so you can position and re-position windows, windshields, etc as needed until everything looks good. Then give a bit of firm pressure and things hold in place. NO residue on the clear part as the adhesive is basically a rubbery solid once dry. No more fogging from the CA "gassing out", no more drips from the squeezing out of the white glue which frequently left me with a "blob" of clear goop at the edge of the windshield.
-
Hi MADDOG You will probably get 5 answers for every 4 people who respond, but here goes. My current pattern is this. I use the Testors orange tube for parts that I know are going to need to be sanded/shaped after gluing. This is usually the case for engine blocks, trannys etc. My logic for these parts is that I want the multiple pieces to appear as a single part at the end. So to that end I am usually generous with the glue application on these parts so that seams are a bit raised and all gaps filled which I then sand down and shape prior to painting. I use CA glue for parts that are going to be visible on the completed model and either require some holding strength (eg attaching subassemblies together such as frame to chassis) and for parts that go on after painting (eg door handles, bumpers). I most like the Hobbytown and Loctite brands. I use Micro Liquidtape for most clear parts. It goes on like white glue. You apply to a single surface and then let dry until it is clear (usually only a few minutes). Once dry, it remains tacky so you can position and re-position windows, windshields, etc as needed until everything looks good. Then give a bit of firm pressure and things hold in place. NO residue on the clear part as the adhesive is basically a solid once dry. No more fogging from the CA "gassing out", no more drips from the squeezing out of the white glue which frequently left me with a "blob" of clear goop at the edge of the windshield. And Finally, I use 2 part epoxy resins if doing any major modifications. This fills any large gaps and provides good structural support. As with the Testors, I am usually pretty generous and rather sloppy with the application of this product as I know I am going to be sanding and shaping afterwards so getting a strong, gapless hold is the priority. More than you ever wanted to know, but hopefully a pearl in all that somewhere. Theo
-
Another option is to get images of the gauge faces and scale down to the appropriate size, print out on photo paper and then punch out the image with the appropriate sized hole punch. A dab of white glue and pop the gauge face in place. The sheen on the photo paper to me makes the gauge faces look quite realistic. This works very well for recessed details like gauges, not as good for surface details like radio faces.
-
I would love to see some re-issues of the renwal revival series. Anyone else remember these? I wonder if the molds survived.
-
If you have and Ikea nearby, this is a pretty nice cabinet, particularly for $65: http://www.ikea.com/us/en/catalog/products/10011055/
-
Check out DecoColor from Amazon http://www.amazon.com/Uchida-1234-6-6-Piece-Clamshell-Decocolor/dp/B0029LHN8K/ref=sr_1_15?ie=UTF8&qid=1356998073&sr=8-15&keywords=decocolors The extra fine point is the same as size the extra fine Sharpies. These are basically enamel paints and behave as such. Theo
-
Hi all, Does anyone have any experience with the products from Innovative Hobby Supply? They have what look like some interesting detailing items (ez chrome, ultracal decals). I searched the forum, but did not find any reference to them. From their website they seem more directed at slot cars, but don't see why the products wouldn't work on scale models as well. Any comments? Thanks