dpride
-
Posts
85 -
Joined
-
Last visited
Content Type
Profiles
Forums
Events
Gallery
Everything posted by dpride
-

3D printing growing as we speak
dpride replied to bbowser's topic in General Automotive Talk (Trucks and Cars)
I had a look at the Porsche stl download. It's detailed but the mesh is not very clean. I found it odd that the $15000.00 program crashed trying to open this file but the free one(open source) opened it without any problem. It would take a bit of work to shell this for printing. -
3D printing growing as we speak
dpride replied to bbowser's topic in General Automotive Talk (Trucks and Cars)
NormL said "If a set of wheels in 1:25 is costing me around 20-35.00 ..... I don't even want to imagine what a set of 1/8 would" I only build 1/4 scale models and the cost is pretty heavy for printing components. I have had quotes like $750.00 for just the wall of a M&H Racemaster slick. That's why I don't get stuff printed in Australia. The HK print cost $400.00 and was quite good. Even printing at 16 micron layers still requires cleanup and parts at 1/25th scale still look like a "stack O plywood" Norm, a lot of my work now is converting point cloud to parametric to stl to print or cnc. I guess by your description of what you are doing with the scans, you are constructing splines on a surface then using lofts to fill? I have used that method on an ultralight prop scan to get a series of profiles then lofted for cnc router. -
Is stealing electricity part of going green?
dpride replied to Harry P.'s topic in General Automotive Talk (Trucks and Cars)
What I find odd, is that a person could spend lots of time and money building a large scale, scratch built car, and only get half the comments that this thread has............. -
Thanks all for comments. I think the most amazing thing, apart from the fact they survived, is that I used to to build them without magnifying glasses.......
-
Thanks for all the comments, finding these little guys brings back a flood of good memories that are generally just filed away. I guess I was about 13 or 14 when these were built. It appears I liked the Chrysler Hemi and blue paint.
-
I recently unpacked these old models I built about 1960. They survived pretty well. The rubber and chrome have seen better days. You can see the influence of the show cars of that period in these two. I don't think I will start building anything this small again. I think I left out some of the front suspension parts or they have been lost.
-
1886 Daimler Motorkutsche: World's first automobile?
dpride replied to Harry P.'s topic in Model Cars
Well doggies.....you sure do build some good lookin' critters.. -
41 Willys Street Rod (Ready, pics link on page 2)
dpride replied to Dinky's topic in WIP: Model Cars
I don't build anything this small anymore but this is a great looking car. All your detail and the stance is just right. -
The car looks great in this color. Also, all the textures are realistic. I have one of these unbuilt kits from 2o+ years ago but I don't build this scale anymore. Good job on the car.
-
Nothing else says gasser like this model Willys. Nice execution. Love the color.
-
Thanks to all who commented, it's great to get acknowledgement for the work it takes to build these beasts.....
-
I didn't realize it had been so long since I posted in this thread. I have almost finished another car besides this one. The rubber molds I made for the fiat body were intended for a brush on urethane but the material wouldn't play. I ended up using vinyl ester tooling gelcoat and VE resin for the layup. Minimal shrinkage with maximum cost. The body is just placed on atm. It won't be green, that's the gelcoat color.
-
The tires look great..... I would assume that you turned as you grind eg: toolpost grinder or dremel. We have turned "soft" material by freezing it and working.
-
I wondered when this would reappear. The engine is one of your best.
-
a Visible V8 with a lot of additions.
-
1/16 Scale Army Vega Funny Car - Finished 10/14/2018
dpride replied to Mooneyzs's topic in WIP: Drag Racing Models
Nice work on he car. I've sent you a PM. -
I think this is a good idea, but only a friend would tell you that your nuts are too big.... I made a couple of different sizes to see how it would look. The smaller one with a 0-80 nut would be for a rail or light drag car. The larger of the two would be about street size. The brass tube is 1/8" and the larger nut is 10BA. Drill out the threads in lathe.
-
As you are spending time researching and scaling all the components, I think the headers should be scale 1 1/2" which would be a common size for that engine. They look a little too small. Just an observation. Looks good so far.
-
1/8 scale salt flat roadster.
dpride replied to comp1839's topic in WIP: Other Racing: Road Racing, Land Speed Racers
Looking good. What will you eventually use for the "salt tires" ? -
Always good to see a scratch built model, rather than something just glued together. If you don't have Photoshop,you could upload your images to Imageshack and resize them, then use the direct link to insert here. I would like to see construction shots if you have documented the build.
-
I don't usually get too involved in aircraft but I like the look of your model. If I ever built a model for myself ( we have made many for work) it would be a GeeBee racer......because they are unstable hot rods. I also followed Burt Rutan's work for a while.
-
Looks like the guys are building a 1/4 scale car in your photographs. I have made a lot of compound shapes over the years and while most of it was 1:1 car and cycle stuff, it still relates to doing the same in model form. This car has a sheet aluminum grill shell and hood. It was to be molded and made in fiberglass. Made with hardwood oval shaped mallet and sandbag. I wimped out and did the rest in plastic sheet and putty.

-
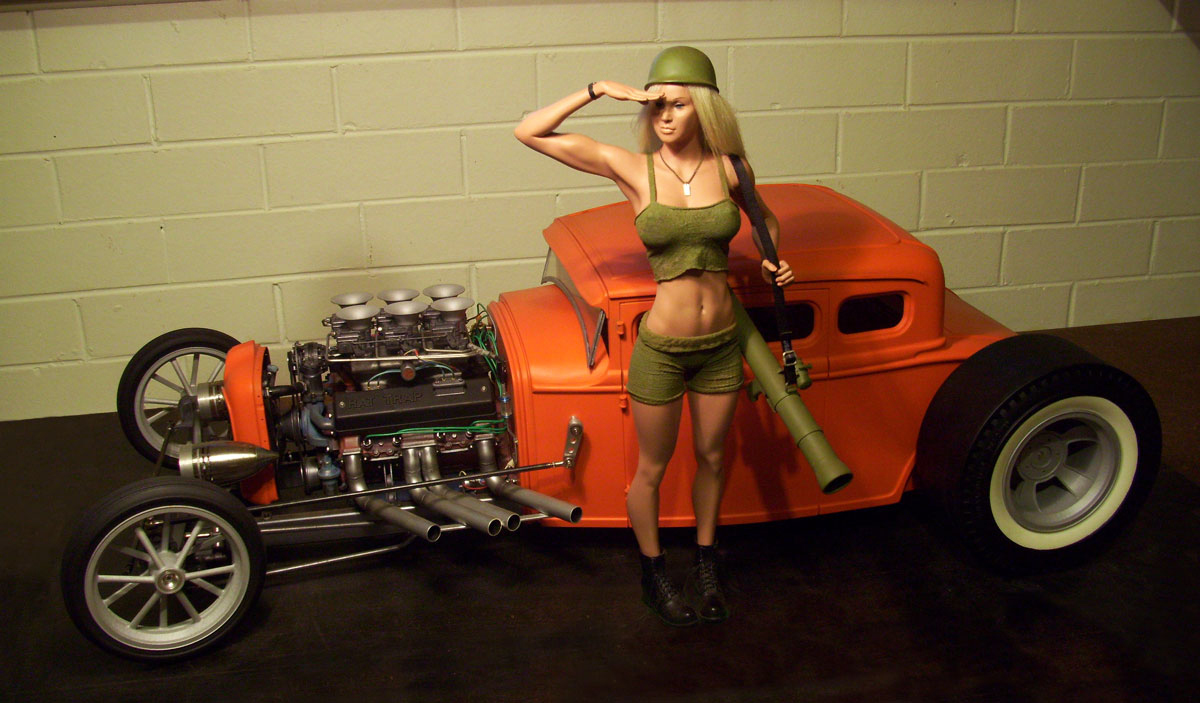
Thank you all for commenting. Ognib, The chassis for this car is RHS 18 gauge ERW steel tube. The exhuast pipes are Plastruct tube and elbows and the welds" are superglue mixed with talc. Harry P, thanks for the kind words, It's what I do for a living.....make stuff. As to this project, it's just about finished except for a few little things like putting on the door handles etc. Here is a current pic with a girl I prepared earlier.
-
Nice work on the guitars, I can relate to a lot of the setups you have pictured. I used steel in my build because it's 1/4 scale and I wanted it strong. Steel is cheap and easy to fabricate. If you are determined to do something different, then go for it. I would suggest getting a load of scrap and making a few pieces that emulate the shapes you want to produce and put them together. Clean the oxide layer off just before you weld or solder. Even the oil from your fingers will effect the join. There are probably a lot of people on this forum with more knowledge on this subject than me, I will only convey what I know has worked for me. Post pictures off your efforts.
-
If you want to attain the standard with the model you have reached with the guitars, I would consider using brass................But if you still want to go aluminum... Consider the solders available for aluminum which would be easier than tig... look on youtube for aluminum soldering. As to identifying the different alloys, very difficult! I always write (marker) or stamp the grade on the offcuts. If you are serious about welding and forming parts for the model, then I would suggest buying new material for the important parts.....do a lot of testing with the cheap scrap first. For the body, check Gerald Wingrove's models. Got a website for the guitars? I have building and playing for about as long as I have been welding. Of the 9 instruments I have at home, only one is "standard"