
Turbo590
-
Posts
470 -
Joined
-
Last visited
Content Type
Profiles
Forums
Events
Gallery
Everything posted by Turbo590
-
 Dear chuckyr, The fuel tanks and the hydraulic tank are all scratch built, taking the orginal tanks, shorten them, filling/sanding the seams..then airbrushing them with Alclad II (polished aluminum) then adding the appropriate decals. The tank steps are from the Pete Can-Do wrecker...and yes, I have a small fortune in it...long story. The air cleaners are solid turned aluminum from Jamie@ Mo'Luminum..along with the tires..the rear cab panel was one of many custom scratch built parts..Dupont ChromaBase paint for the two tone. Hopefully the dump body will be done here shortly..and all will come together nicely. This was my second build in about a year and a half. Thank you to all so far for the positive comments and feedback. Kurt McLucas
 -
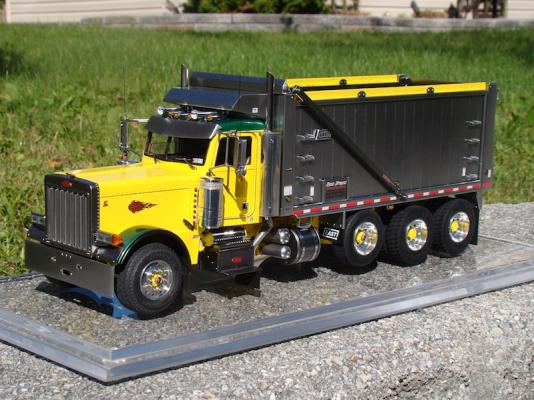
9-30-07 Well Guys.... Pictures of the completed cab and chassis as promised. Put the front bumper on at 1:30 this morning. Just a few more little things..like additional plumbing under the hood..Yes the hood does tilt..open fully..CB antenna's for the mirrors..and then to the dump body..which goes back to the work table next week... I estimate another 2-4 weeks for the completed truck..Enjoy !! She's been going together pretty easily now..Check out the rear window (CAT Window Tint) decal.... Any and all comments welcomed. Thank you, Kurt McLucas
-
Thanks, Tim.... I contacted Dave, in an email. Looks like he will be able to "hook" me up here shortly with a short nose version. Kurt McLucas
-
Guy's.. Just starting, or should I say "toying" around for possibly the next build. I am considering a GMC 9500 conventional (short hood version). I have seen the resin reproductions once floating around on Ebay..I know Dave Natale has the long hood version...Anyone that has a lead or possibly one...let's talk. GMC 9500 with a 20-25yd Dempster Garbage truck body. It might a single axle..possibly tandem..Also any suggestions on a donor kit for the chassis...I have some idea..Always looking for imput. Thanks Kurt McLucas
-
Oilman, The "CAT" engine color(s), were straight out of a genuine spray can, purchased from a local CAT dealer. For any interested party...I do have almost the entire "CAT" can, along with a 3rd party can, yellow..I would be willing to sell for a reasonable cost..plus S/H.
-
OK, Here is the real "scoop" on this piece..... I started out using the REVELL Peterbilt CAN-DO wrecker, used the cab and chassis, and sold the wrecker on Ebay..orginally going after a 379 model...THEN...I obtained a rare Italeri Pete 378 conventional, which is what I really wanted to shoot for..hood wise..on the weekends I drive a 357...I then decided to marry the front section of (Italeri) frame to the rear REVELL frame..remember 1/24 to 1/25 scale..it turned out excellent...thus the first set of pictures..THEN came the paint "disaster". Using Duplicolor primer as the base..I started shooting the frame with the Alclad II Base Gloss Black..ran out..finished it up with the Tamiya TS-14 gloss black..IT literally started eating the plastic...I was not happy at the point..my stomach just sank... By this time, I had the REVELL wrecker/chassis involved, 1 Pete 378 kit, and 2-Autocar Dump trucks involved. I just used the floors out of the kit..rest was sold on Ebay. Getting very expensive now...WRONG it keeps mounting...the story continues... The chassis was gone!! So I was able to obtain another Italeri 378 from Ebay oversea's..got it, started all over again..salvaged some parts from the orginal disaster..all of my Clint Freeman "resin" parts..(Lift axle)..and rebuilt it all over once again..I made some major improvements in added details. Alot more scratch building, and cutting the new Pete 378 frame and splicing in another 1 1/2" section for the desired length. Reprimered the unit with Duplicolor gray primer again..no problems..then using the universal black (Duplicolor) applied the first coat thin..let dry..and then the second /third coat..it started to BUBBLE... OH NO..here we go again..what the heck is going on...I had prime painting conditions (vented basement) with humidifier... Needless to say..I did not look good at all. I was heartbroken. Now how to get the paint off...reading the forum..I decided to use a closed container with brake fluid. After a few days...paint was gone..primer was exposed...but tons on fine sanding had to be done..I swore up and down... Reprimered it the 3rd time...this was it...the paint either takes..or its going on Ebay....Using the TS-14 once again..controlling the paint environment..it took...FINALLY!! I am only 38 years old...my hands are getting more gittery..my eye-sight isn't what is used to be...and my patience on this one..along with the rocketing costs...knocked me out for awhile. With all of this going on.. this is why I haven't posted in such a long time. Trying to get the details as best as I can..is what makes it. Lots of site visits to dealer lots (Peterbilt/Ti-Brook) and various other resources..all adds up. OF course the "wife" isn't/wasn't too thrilled as well... By the way..Word for the wise..I forgot to mention while soaking in the brake fluid bath..all of my specially acquired "Ebay" Clint Freeman resin parts turned to "######"..yet another major blow. The new lift axle was total scratch built..I'll post some pictures as well, along with the scratch built telescopic hoist.... Sorry to rumble on....Good story, many of you have asked....As Gene Simmons would say..It's good to be me...right..not even close. Thank you to everyone, including Tim...for the great comments...Model on!! Kurt McLucas
-
The decals were taken using my digital camera, from "real" CAT engines. Then using HP Photo and Imaging software (cropping and editing) then cut/paste into MS Word..and then printed to my HP OfficeJet 6110 printer using the Bare Metal Foil, decal paper..which is excellent to use... If you have any more questions (anyone) please feel free to ask. Thanks... Kurt McLucas
-
9-12-07 Guy's... It's been awhile for any updates on this build...Due to some "major" set backs, and work. The truck is on track for completion sometime soon. Lots of fine details to do yet. Here is a "tad" mockup...of a rolling chassis. Tons of modified and scratch built components were done. Chassis is gloss black, Alclad II (chrome/polished aluminum) used. Actual Peterbilt colors used for the cab and hood assembly..Mocha Effect and Coral Effect (Dupont ChromaBase paint...nice, but expensive for a pint) She's starting to take shape...fighting me all of the way....More pictures to come. All comments and feedback are welcomed. Thanks...Happy building to all. Kurt McLucas
-
Part One - Finished
Turbo590 replied to mackinac359's topic in WIP: Model Trucks: Big Rigs and Heavy Equipment
Tim, Very nice job indeed. This was one of my favorites from your picture collection. I love the color combination(s). Look forward to seeing part 2..with the dump box Kurt McLucas -
Anthony, Ray.... Thank you for your imput.... I have had the opportunity to buy and use Clint's items through Ebay...and yes you do pay for them. His work was outstanding..I just wish I started building years ago when he was going strong in business...and bought extra's. I can understand his issue with (re-casting's) The Pete 357 dump is just fighting me in everyway..especially on the frame. Duplicolor "gloss black" I am starting not to like..To my "high" standards, regarding finishes..I just had to strip the entire frame..(brake fluid works fine..JUST NOT ON RESINS parts...long story My Clint Freeman lift axle literally melted....Not happy...now I know. Looked in my parts box...custom building one "lift axle" as I speak...this will look cool. Sure..I have lot of free time..luckily this thing hasn't hit the wall as of yet. Anthony..I know you mentioned at one time, what you use for your frames..both for primer and paint..could you please share that with me once again..I would really appreciate it. Sorry, I haven't been on the forum as of lately...work,vacation..and now the kids all four of them are heading back to school...Well happy building to all. Thanks, Kurt Kurt McLucas
-
Guys, Maybe someone has (1) one of these available. Clint Freeman Neway (Resin) Lift axle assembly. Either new, or parts accepted. Willing to pay..can use PayPal if you would like..can also trade Peterbilt 378 parts for this as well. Thank you for looking. Kurt McLucas kgmclucas@comcast.net
-
Dave, Looks "GREAT" Pretty impressive build to tackle..and with your skill set..It will be done correctly. Please keep us all posted as always. Kurt McLucas
-
Mack R Model parts
Turbo590 replied to CITY COBRA's topic in WIP: Model Trucks: Big Rigs and Heavy Equipment
City Cobra, Check your PM...Thanks Kurt Kurt McLucas -
Dave, This will turn out to be a great project for you. Very nice so far from I can see. Please keep us posted with pictures and your progress. Kurt McLucas
-
365 project Finished!
Turbo590 replied to mackinac359's topic in WIP: Model Trucks: Big Rigs and Heavy Equipment
Tim, Very nice job !! Details..Details..Details. I would not expect anything less..AWESOME. Kurt McLucas -
Doug G, Thank you for the great comment/feedback... chuckyr....This build has been in progress since January of this year..I am aware of the size/fit of Clint's engine..THUS, all the dry fitting and placement of the hoses/turbo etc has been test fitted to the chassis and radiator prior to painting..alot of work has gone into it..I re-did the motor mounts/fan placement etc...she will drop in pretty smoothly...oil pan is correctly fitted... Thank you for looking out.....Kurt McLucas
-
Dave and Johnny..Thank you for the feedback I can't wait to get her done as well...slowly but surely. Kurt McLucas
-
Tim, nailed down the remainder of kits that would work.... Again, Good Luck with your project. Kurt McLucas
-
Try searching Ebay, or a local hobby shop if available for: a Ford l 8000 louisville delivery truck or equal to (tractor). This single axle /drive train will work just fine..wtih some modifications. I used one earlier for my Mack R model, which was a tandem out of the box... I did little over a year ago... Good Luck... Kurt McLucas
-
Here she is.........Getting closer to being finished everyday. The Alclad base black coat went on today....Thank you, Kurt Kurt McLucas
-
Ron, Scale would be 1:24...Thanks, Kurt Kurt McLucas
-
Thanks , Jerry, Ray and Tim for the comments.... Tim, could probably correct me...the 3406E and an earlier C-15 would be very similar...Being that this engine was from resin, brought challenges in its self. Actually the decals were the most difficult...Having several truck dealerships in the area, plus my cousins fleet of triaxles, getting good shots of the engine was difficult, especially from the top view..the internet helped out some... Great day outside to get some more painting done. I'll keep everyone posted,,Happy modeling as always...Kurt Kurt McLucas
-
6-9-07 Guy's.... Just completed the CAT engine that will go into the Peterbilt 357 Triaxle Dump Truck. Just a few odds/ends to complete prior to chassis install. As most of you know, my strong point is fabrication..this is where I have most of my fun..painting is not my cup of "tea"..BUT, I do have to admit..this engine did turn out A-OK. Orginally I was going to use the stock DD series 60 engine...A few notes: Clint Freeman 3406E from Ebay, New color original CAT yellow paint. Alclad chrome paint (fan blades) and decal paper from Bare Metal foil, odds/ends from the parts box. Feedback is always welcomed. Thank you for looking. Kurt McLucas
-
Guys, After numerous hours/days searching the web...I need a little help to acquire a few pictures of the top of either a CAT 3406E and or an older C-15 diesel engine. (Top of the valve covers). I am in the middle of decal making...I have several options..but the more I can be accurate the better...Thanks Kurt Kurt McLucas kgmclucas@comcast.net
-
WOW...Indeed. Very nice build. Kurt McLucas