jparsons1969
-
Posts
111 -
Joined
-
Last visited
Content Type
Profiles
Forums
Events
Gallery
Everything posted by jparsons1969
-
 Thanks for the input guys. I appreciate it.
 -
Thanks for the advice and replies, though some in my opinion came off very pompous and condescending, such as telling me where I should and shouldn't post a topic and insinuating that I am cheap. I obviously am not up to the caliber of some of the more sophisticated model building elite on this board. I'm just a regular dude who enjoys building models, been doing it for years. Once again, to the more hospitable replies, I appreciate you responding. But as for the ones who went out of their way to make me feel as an inferior dumbass, I'll not monopolize your time again. Regards
-
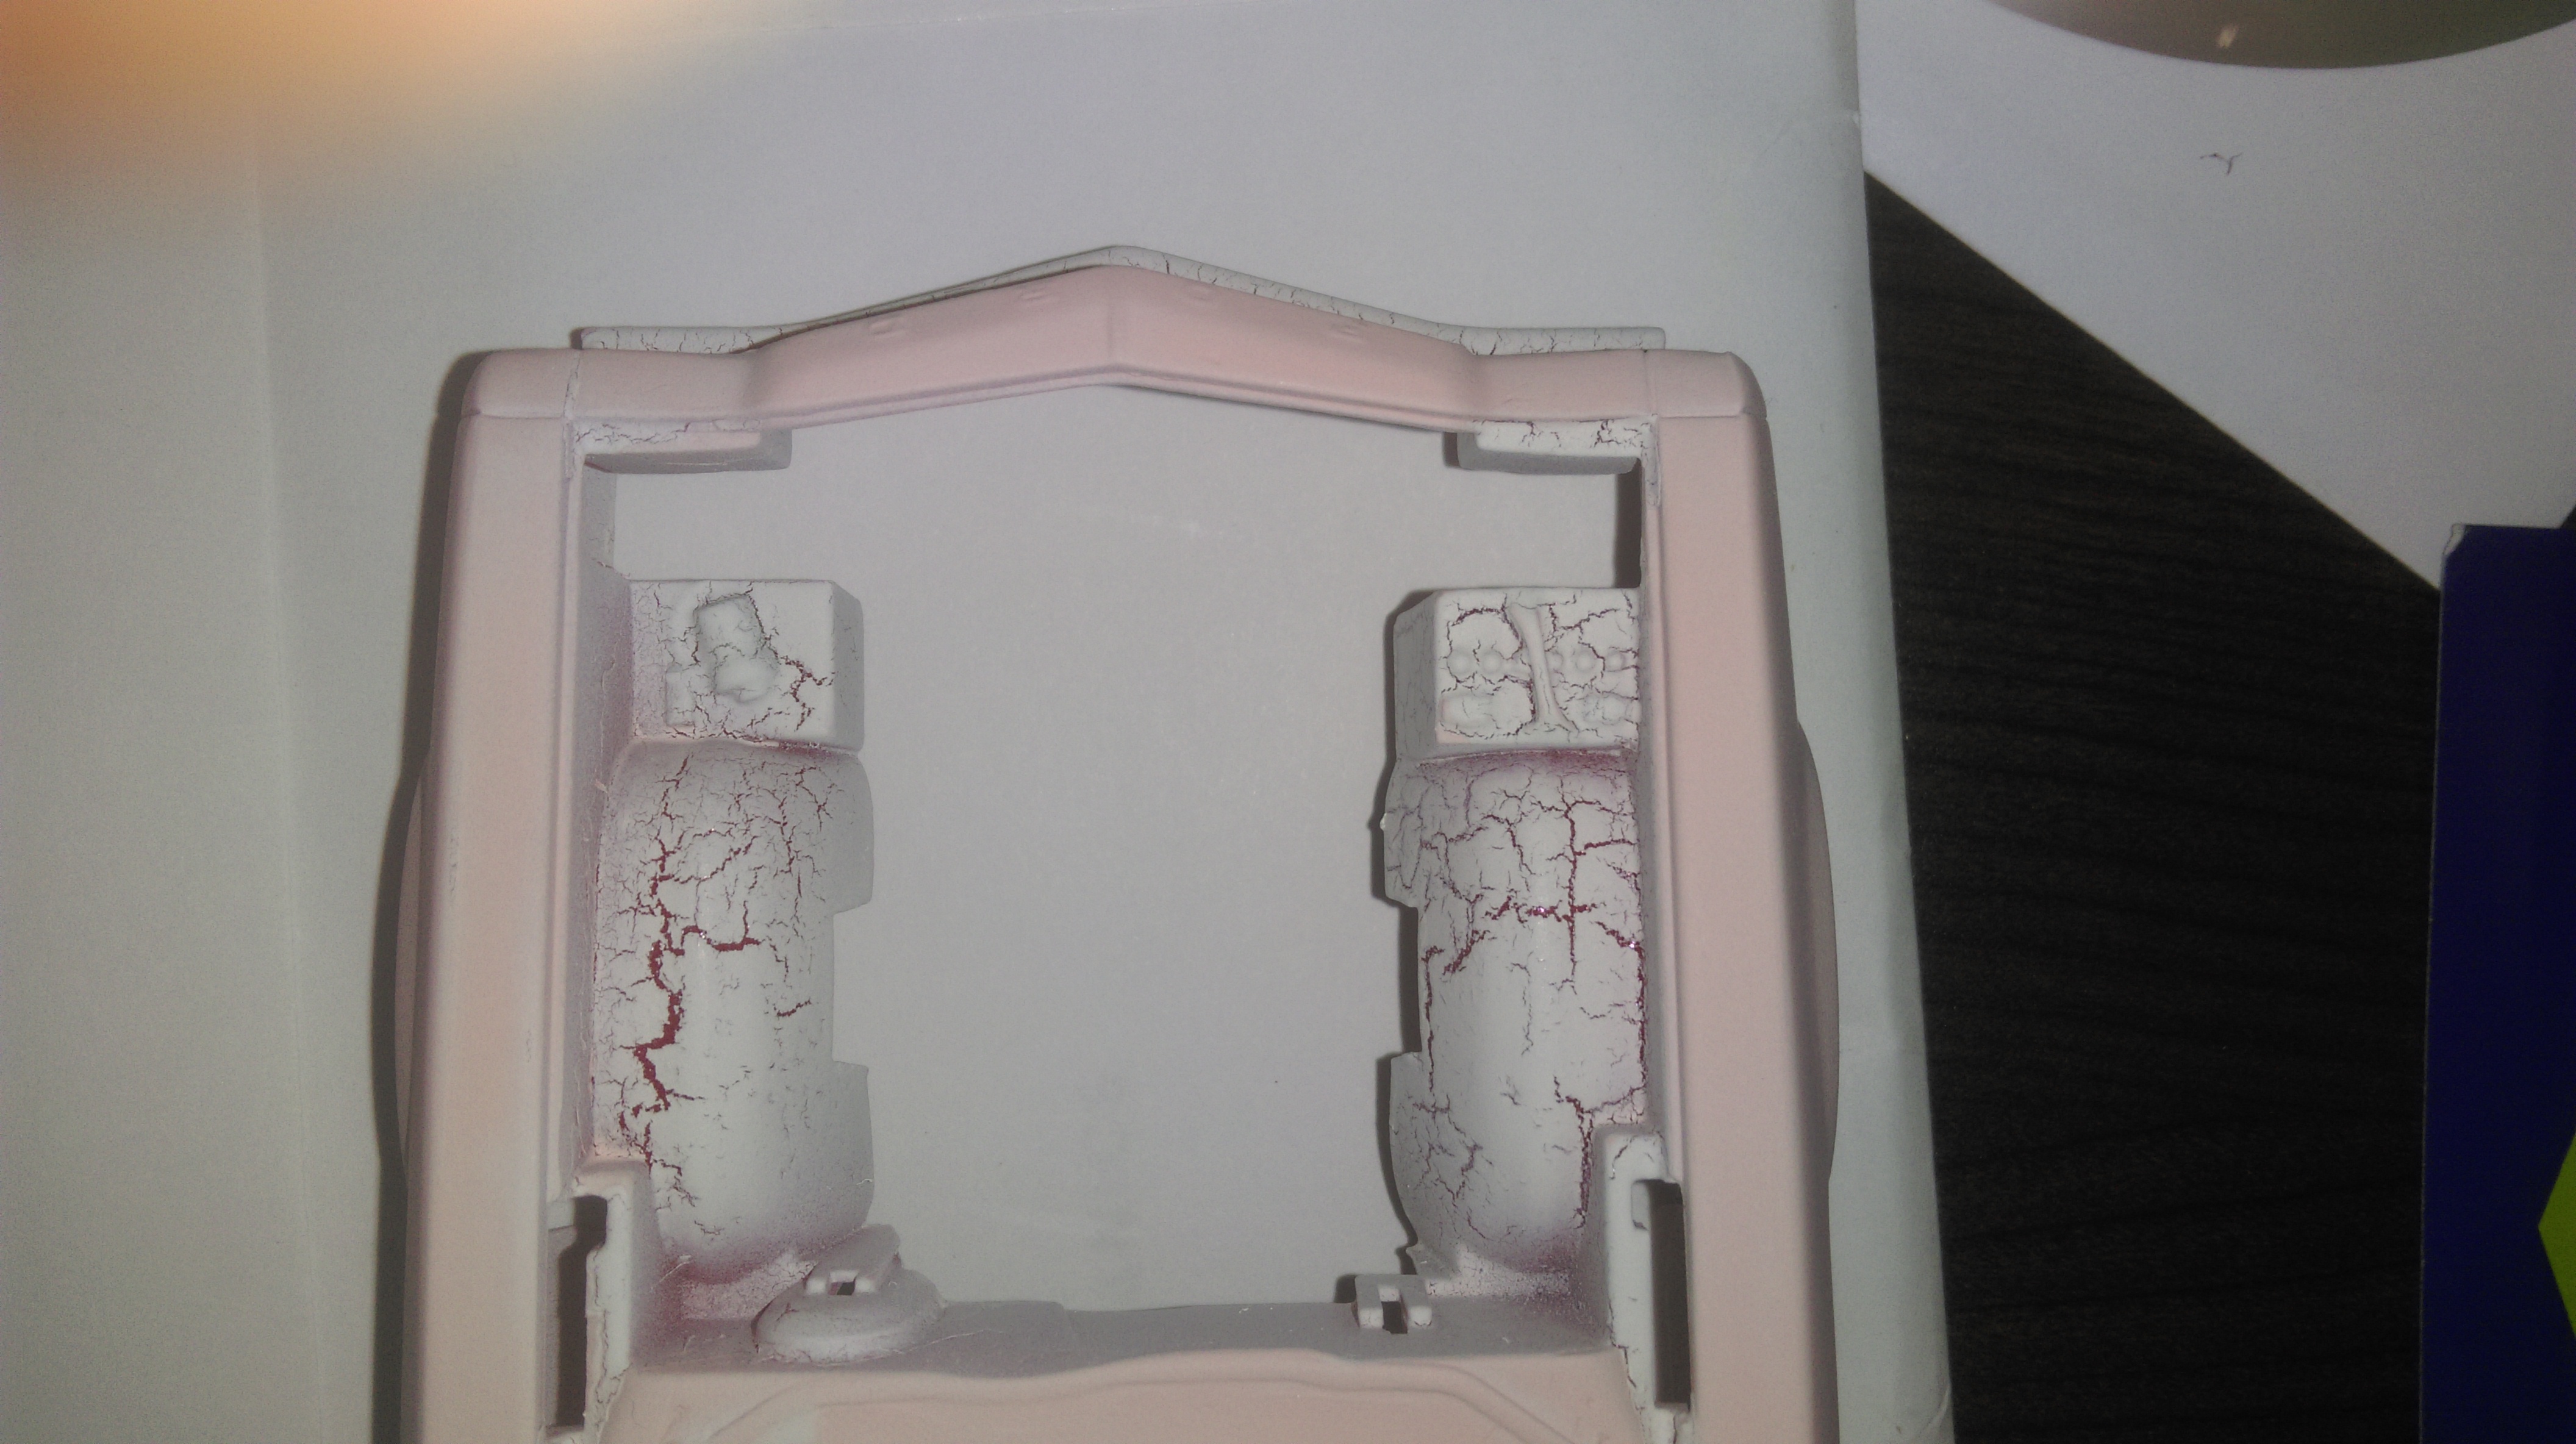
Hey guys, I recently purchased the Revell Starsky & Hutch '74 Ford Torino. After thoroughly washing and rinsing the parts, I applied Krylon White Primer to the body, hood, and parts. All parts molded in black turned out fine. However, the hood had major deep cracking issues. The body has cracking issues in the engine bay area. The rest of the body has red tint leaching out through the primer. No cracks on the other red molded parts, just red leaching through the primer. I've always used this primer before base coating on all my other kits regardless of the color the plastic is molded in, and I've never encountered this before. I stripped the primer from the hood with an acetone solution and it was just a pink mess. After stripping it, there was an oily residue on the hood. I then attempted to flame treat the hood by passing over it lightly with a torch to extract any other solvents from the plastic, but was unsuccessful as the hood is too thin and warped badly. I contacted Revell regarding the issue and they are requiring me to remove the UPC symbol from the box and mail it to them, which seems like more trouble than it's worth. At this point, I think I will apply Testor's Competition Red and see what happens with the body. I also think I will tape off the engine bay and brush apply Testor's gloss black to see if it will fill the cracking around the wheel wells. Since I have no hood, I am installing a supercharger from my parts stash, and it is what it is. Any thoughts or comments? I appreciate any input or advice on this issue as I have learned many useful tools from you guys on this forum. Thanks

-
Wow! Awesome build, incredible detail.
-
Thanks for the kind words guys. No problem donb, hopefully your kit may not have those issues. Someone else on this board posted some pictures of their build and said they didn't have any fitting issues. Their's looked really good, a whole lot better than mine.
-
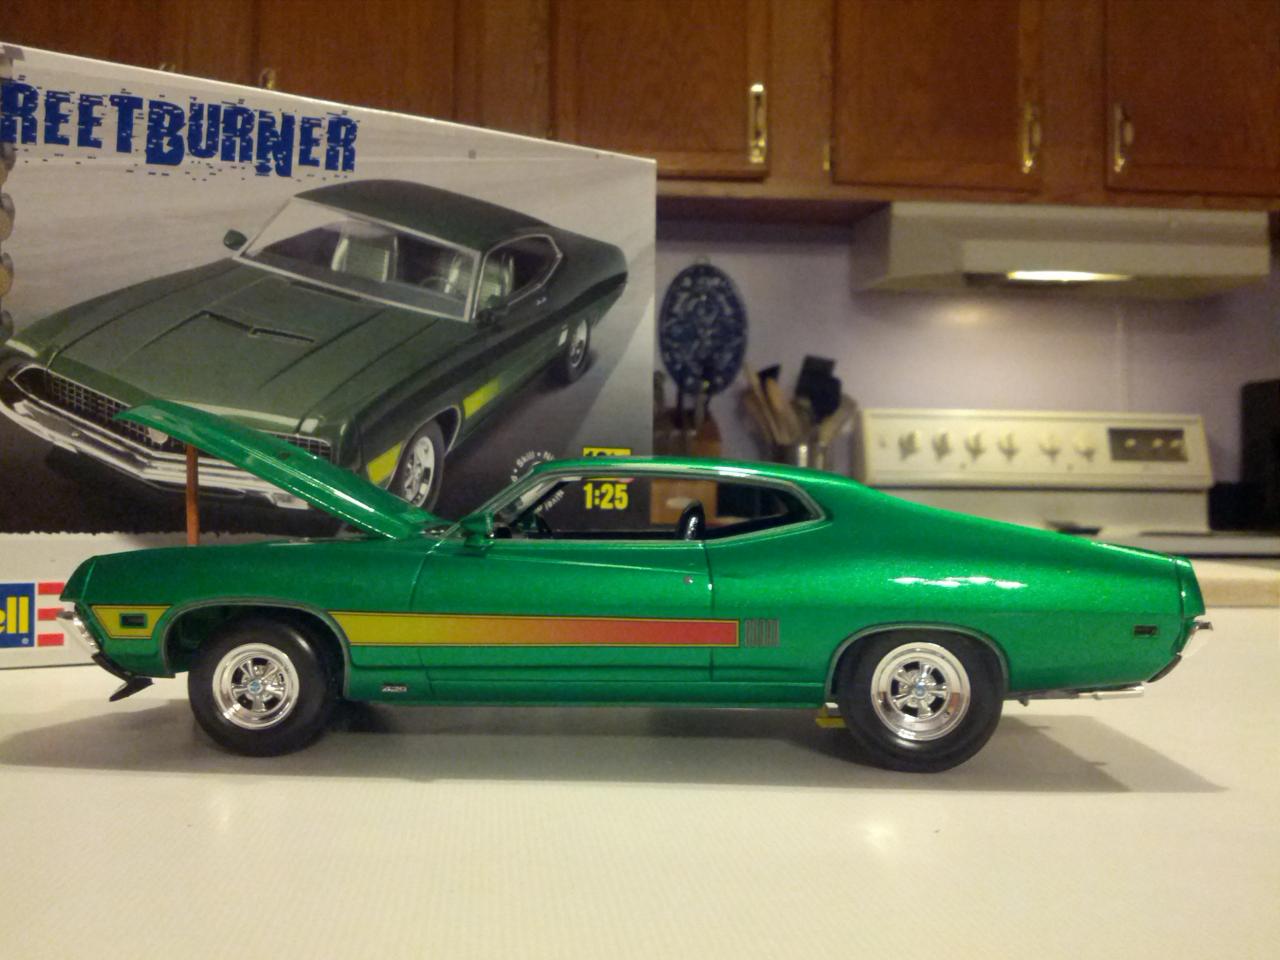
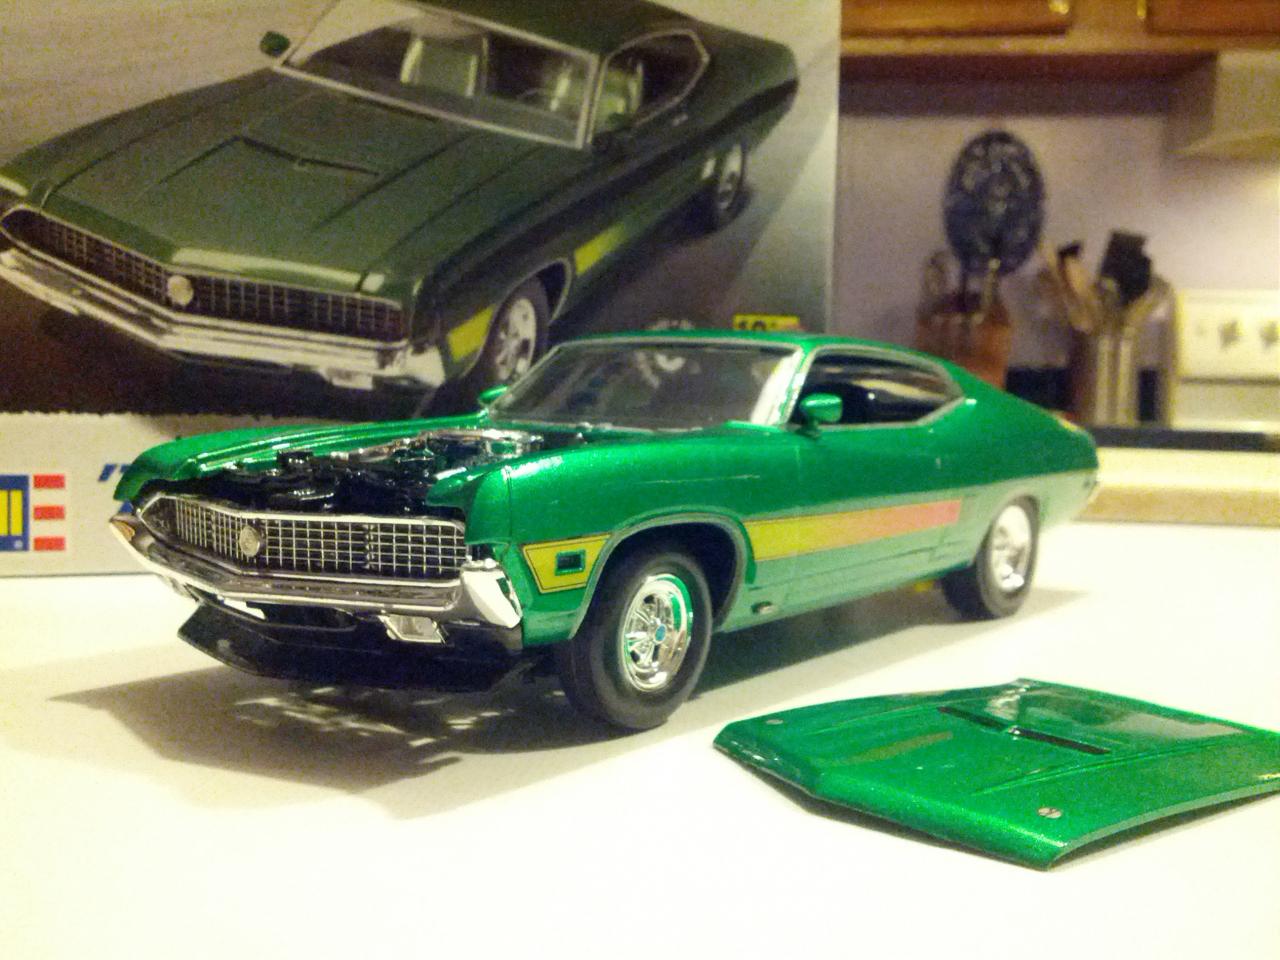
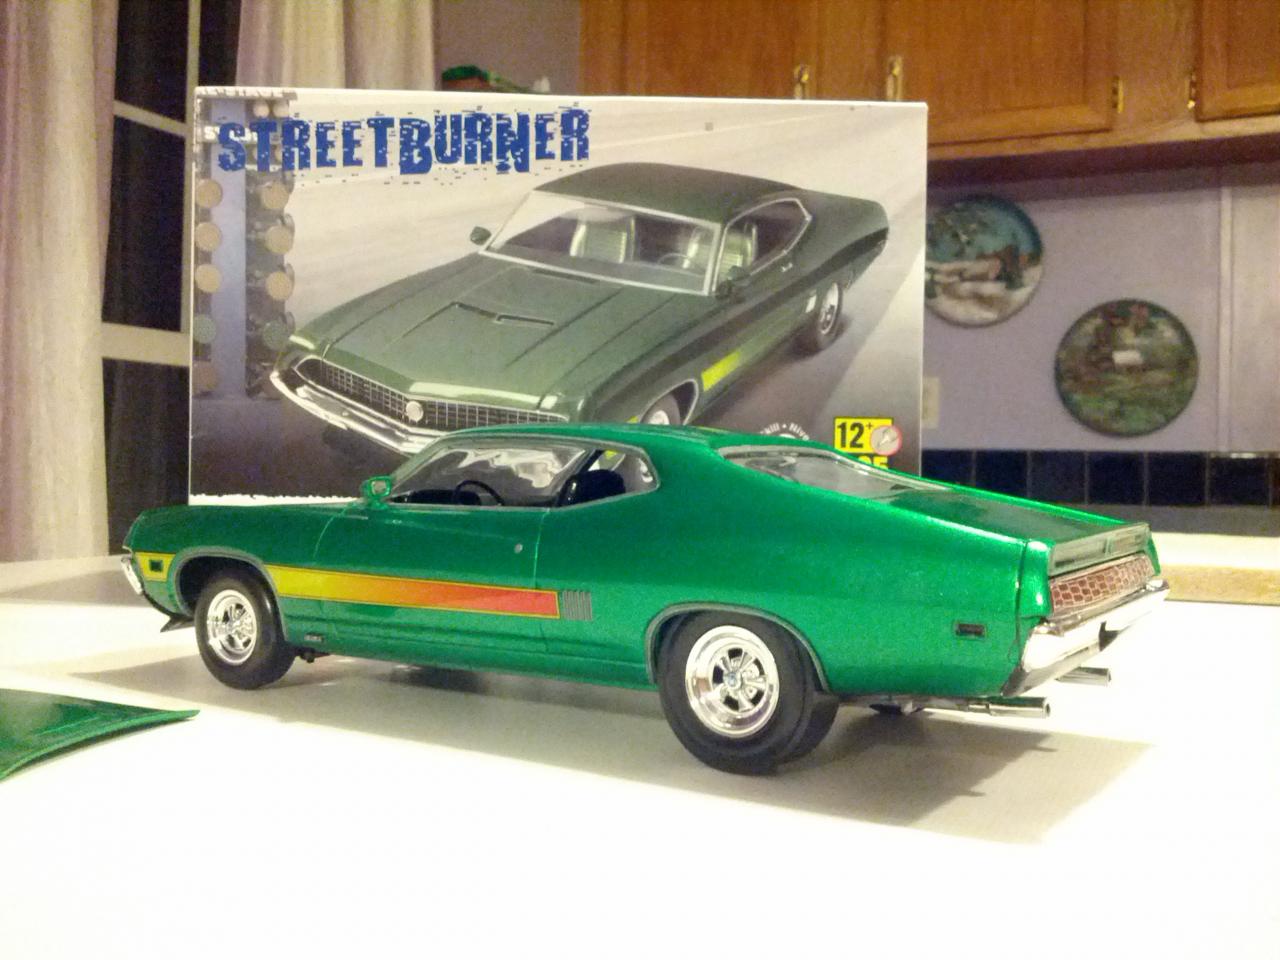
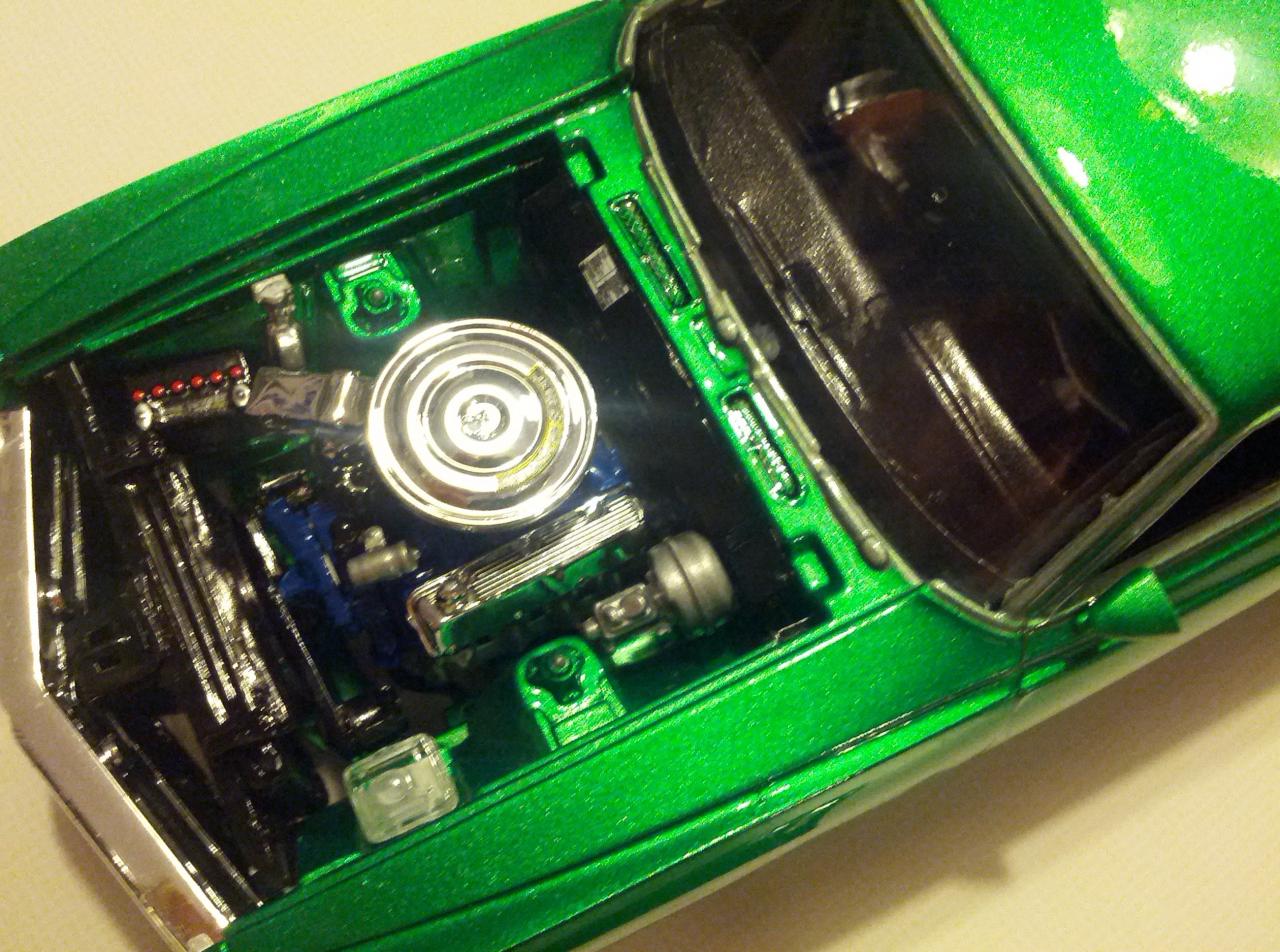
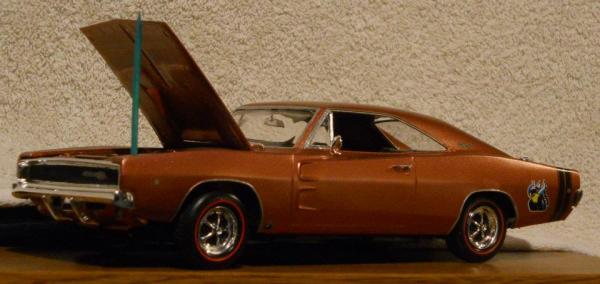
Hey guys. Just completed the Revell '70 Ford Torino. I was really excited about building this after Model Round-Up annonced this kit. I airbrushed the body with metallic green and several coats of clear. The kit did have several minor fitting issues that were a little aggrevating, but where relatively easy to overcome. First off, the directions wanted you to cut holes in the chassis to connect the muffler. The rear leaf springs absolutely will not fit into the slots provided if you assemble them by the directions. I had to reverse the direction of them, which then misaligned the passenger tires in the rear wheel-well. I then had to heat the rear axle to properly position the center of the hub. The holes in the wheels for the axle hubs were too small and had to be trimmed. The grille does not want to line up correctly on the front end due to the housing that goes around it. And the chrome door handles had so much excess flash around them that they crumbled in my hands when trying to remove it. The metal trim that goes on the car bends very easy and is very challenging to position on the car. It would take a better builder than my skills to pull off positioning the rocker panel trim. I only used the tailight screen and grille badge. The rest, I stayed away from. Seemed like a recipe to really piss me off. I'm pretty happy with the way it turned out, although it could have been better. I just took my time on it, working on the kit here and there a little at a time over a month. That seemed to work out better for my patience. Thanks for looking.
-
Looks awesome! I'm getting ready to do this kit.
-
Ahhh, there it is. Good job, Dave.
-
One of the nicest builds I've ever seen.
-
Wow! Looks a real car.
-
Beautiful work!
-
Love the purple. Awesome build.
-
Looks great. I usually don't care for new wheels on muscle cars, but this works.
-
Awesome paint job!
-
Beautiful build.
-
Thanks guys. Yes the hood stripes are a major pain. You have to scrape and press and keep working the wrinkles out without tearing them. Then, if your lucky like me one side falls off onto a piece of black electrical tape and sticks to it. You can see the blue color is pulled off of the passenger side. Every model, every model I try to assemble comes out with at least one blemish. Every time. Foil? Not me. That's just a can of worms I do not want to open. I would make a major mess out of that.
-
bbowser, The kit was a blast to build. Less parts than usual. You do have to paint in the exhaust on the underside chassis because it's molded in. No fit issues, everything went together well. The only thing I ran into is the hood will not sit down properly over the engine compartment. But I can't complain, I made it out alive.
-
Thanks for the kind words guys. Chris, that's all the pics I've got.
-
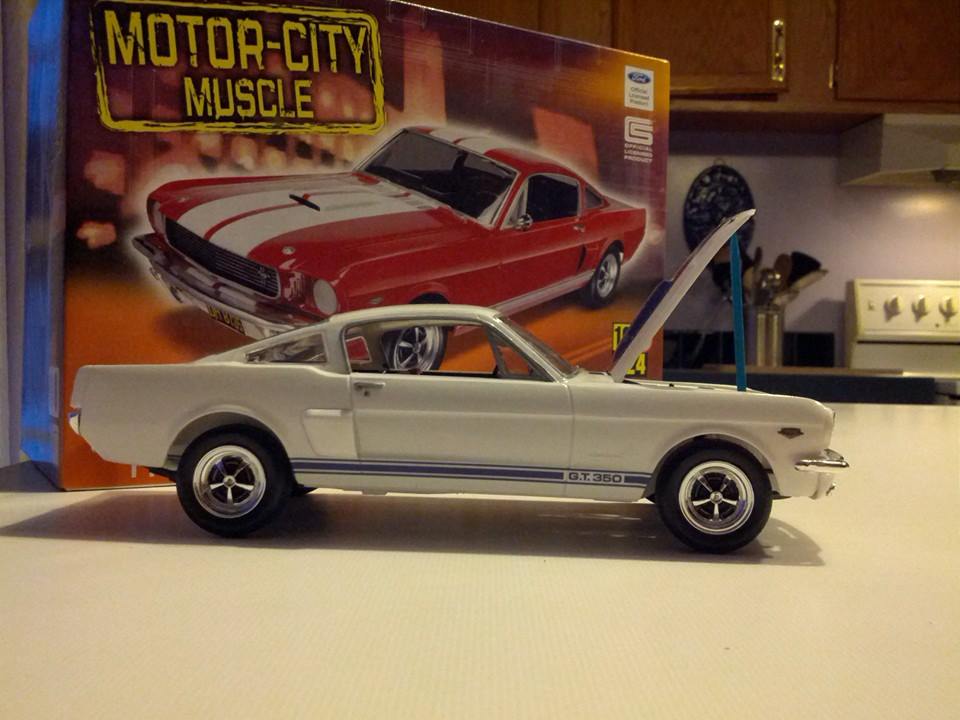
This kit is a Revell 1966 Ford Shelby GT350. When I picked up the kit at Hobby Lobby, I bought some Pearl Green airbrush paint for it. Upon opening the kit I saw the blue racing decals and decided white was the way to go for the body color. I really should have went back and got Pearl White airbrush paint, but I rattle-canned it gloss white and applied several coats of gloss clear over it. This kit went went together really well and I did a better job on the dash panel than usual as my hands are not very steady. I really enjoyed this kit and thought it turned out pretty well. Thanks for looking.
-
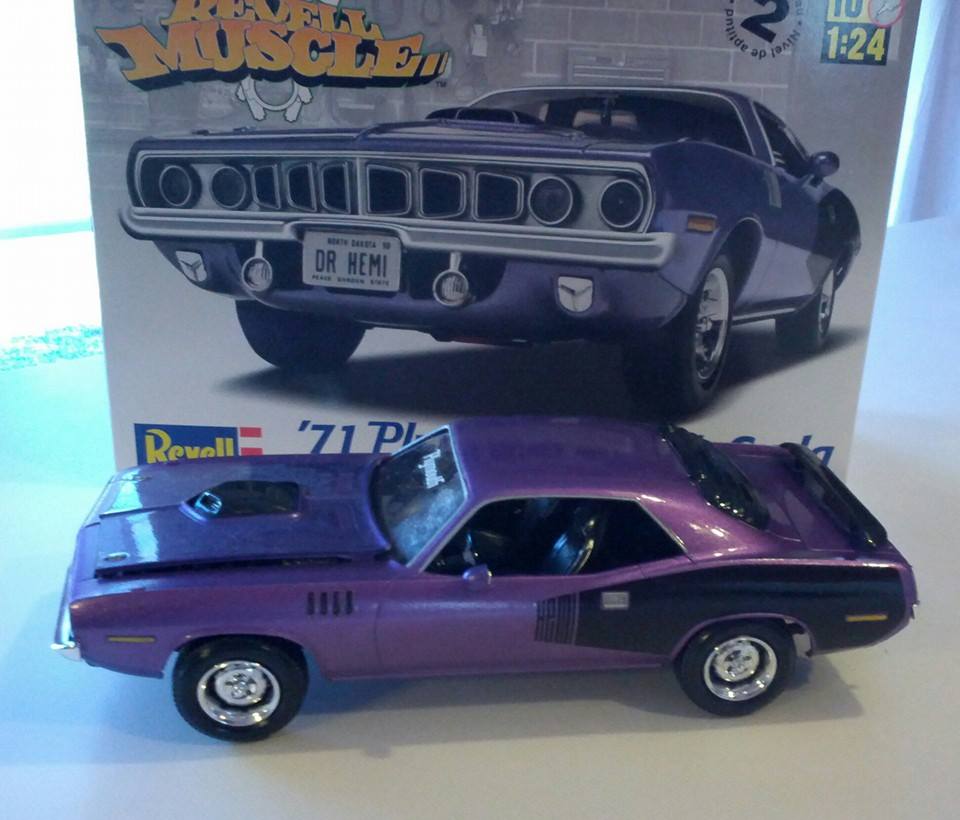
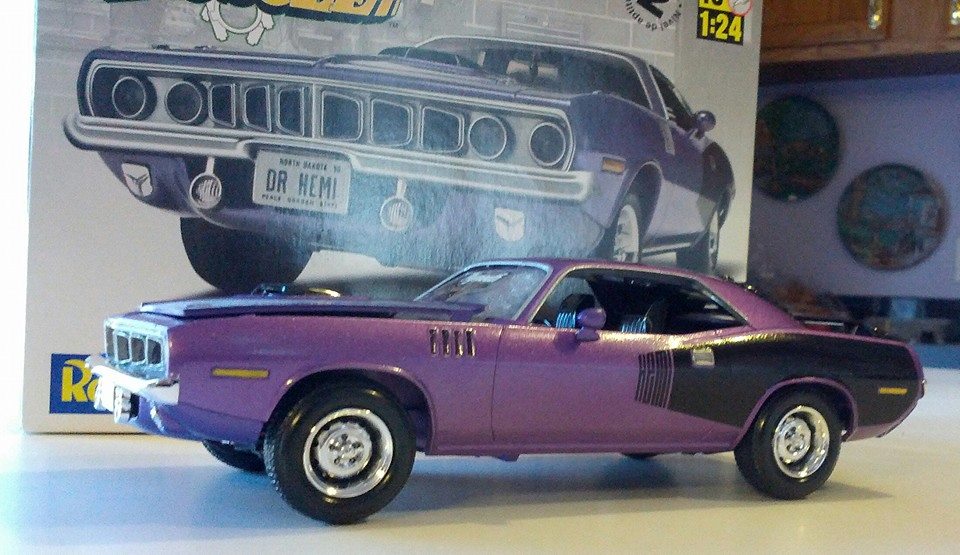
This is the Revell '71 Hemi 'Cuda kit. I originally used Wicked Colors Pearl Plumb paint but my airbush kept spitting and sputtering and totally ruined the paint job. I finally got pissed and smashed the body into shards of plastic shrapnel. After a few days, I cooled off and bought another kit and used Createx Pearl Plumb, which went on very nicely. The paint job turned out really well, although you can't tell it by my phone camera. I did mess up the windshield when I used a towel with glue on it to wipe the windshield off. Ooops. I didn't think at the time to use the windshield from the spare kit. But I can always go back and put the new one in. Overall the kit itself was really fun to put together with fewer parts and no fitting issues at all. Thanks for looking.
-
1970 Chevrolet Chevelle (weekend build)
jparsons1969 replied to Lovefordgalaxie's topic in Model Cars
Are you kidding? Looks better than anything I take a month to do. -
Beautiful
-
Beautiful build. Looks real.
-
Nice clean build.
-
Awesome job. Love it.