DustyMojave
-
Posts
365 -
Joined
-
Last visited
Content Type
Profiles
Forums
Events
Gallery
Everything posted by DustyMojave
-
 My grandfather's all-time favorite car was his '41 Willys Americar Coupe. He told a story of going to the local dealership where he'd bought the car new. It was 1943 and the middle of World War II. He went to the parts department for tune-up parts. A man in a suit came over to him at the parts counter and asked if the '41 Coupe out front was his. He replied that yes, it was his. The man identified himself as the General Manager of the dealership. He offered to trade grampa a brand new 1942 Willys plus $250 cash for the '41. Grampa thought that was pretty strange that he would offer a brand new car plus cash in trade for a 2 year old car. The Manager said that he could afford to make an offer like that because new civilian car production was stopped in the middle of the 1942 model year shortly after Pearl Harbor. Then the War Powers Administration set the prices that could be charged for new cars. Prices for used cars were only limited by what a seller could get for it. The dealer could easily sell a used car, especially one as clean as Grampa's, for far more than he could sell the new car. The new car price would have lost the dealer money rather than making him profit. So they were reluctant to sell the new one. The price allowed for a used car trade-in was not controlled. So they could trade the new one for a used car and still make a profit off re-selling the used trade-in.
 -
Some pretty strange stuff there. Except for the early K5 Blazer. Nothing strange or even particularly uncommon in that. Since it's a 2WD, all of the front and rear suspension lowering parts and such for 2WD hot rod Chevy/GMC pickups of the era bolt right on. I've seen quite a few of them built similar to that. AMT even made a model kit of that model Chevy which was recently re-issued under the Model King label.
-
I wanna see how the model comes out.
-
Nice Falcon! Much nicer than mine I had the same thoughts about a cage. My brother destroyed a 64 Plymouth Max Wedge in 1968 when a tie rod end broke in the lights at Lions Drag Strip. His time slip said "11.27 @ 127mph". Left turn into the guard rail from the right lane before getting center-punched by his competitor. He was mighty glad to have had a 4-point roll bar in it.
-
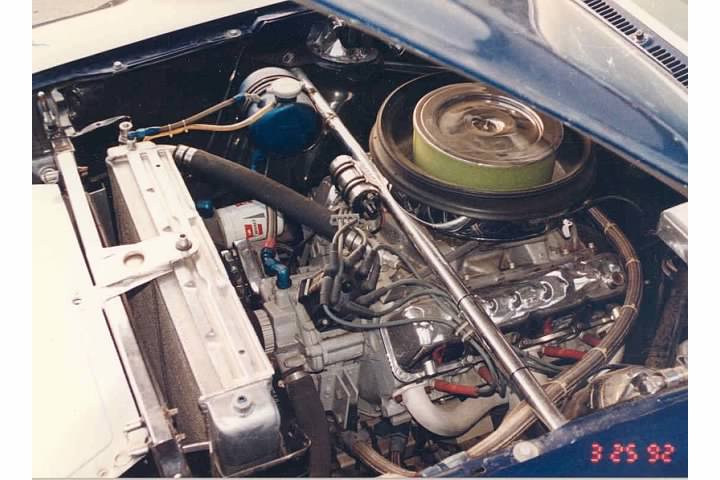
I'm not sure which Javelin that is shown above. The lack of a dry-sump tank set into the firewall assures me it is NOT a Penske 71 Javelin (YES - I can see the fender shape). It DOES appear to be a Penske Javelin. This car has a square breather box between the shock tower and the firewall. The 71 Penske cars have a cylindrical dry sump tank set into the right firewall. This was retained for 1972. The cast aluminum valve covers on the 1st photo above are incorrect for the Penske-Woods era for these cars. The photos I am providing ARE of a Penske 71 Javelin, as raced to the 72 Championship by Roy Woods Racing with George Follmer at the wheel, but essentially unchanged other than paint details from how it was as raced by Penske. Note Roger in the photos. Not only was I around as an SCCA Tech Inspector when Javelins were being raced in TransAm, I participated in professionally restoring this car 2x. After the 1st time, it got parked outdoors under sheet plastic and tarps and needed restoration again. The 2nd time we also corrected some inaccuracies in the way the car had been when we 1st got it.. These were fancy stuff unlike the way Roy Woods and Penske had prepped the cars in the day. Mainly plating where it shouldn't have been, and some old race crash damage which had been repaired to look OK, but wasn't "right". Then I was a crew member for its re-debut at Palm Springs, November, 1992 as you can see in the photo of me working under the back of the car changing the differential. Please note that these photos are part of my professional portfolio. They are copyrighted by me, Richard Parcells. I took most of them and those others with me in the picture were taken by my wife with my camera. These photos may only be copied with my express permission. If I find any of them on the internet, expect me to pursue legal recourse. 1st, the engine as requested The chrome valve covers ARE period correct. Light gray is also correct. This varied from engine to engine, so race to race. The headers are flat white, but that looks dirty VERY quickly. Blue anodize is correct for the radiator header tank on the Monte Carlo bar. There is NO cooling fan. Black is correct for the engine compartment. The Radiator is bare aluminum. Chrome is right for the shock mounts. The intake manifold is cast aluminum. Note the diagonal roll cage braces to the back of the tops of the shock towers. Here is a link to my photobucket album of the car. http://s8.photobucket.com/user/MojaveRacer104/library/PREPCo/Road%20Racers/71JavelinTransAmPenske Other Notes: -The fuel cell top is Cad plated, not red. The fuel filler neck and cap are correct as shown. - The battery is in a marine box in the right rear of the trunk. - The on-board fire system is not period correct. A single 2-1/2lb bottle on the tunnel is. - There is a Kelsey-Hayes remote brake booster and accumulator tank on the passenger floor. - The exhaust dump pipes are double on each side for a total of 4 rather than 2. They are set in tunnels. This tunnel may be seen behind the seat in the interior photo. - Where you see dark navy blue in this 1972 Roy Woods paint scheme in my photos, for 1971, substitute a somewhat lighter Sunoco blue. - The driver's seat is a Racemark brand fiberglass seat designed and marketed by Mark Donohue. An accurate miniature of it is available in the Penske-Allison Matador NASCAR kit by AMT which was re-issued a few years ago. - The interior colors are correct as shown for 1972, again substitute Sunoco blue for dark navy for a '71 car. White floor, blue roll cage, black door panels and dash top, blue anodize instrument panel, aluminum steering column cover, aluminum silver insulation on driver's floor and bottom of seat.

-
Bizarre coincidence on the avatar there! Skunkworks was doing flight testing of an F35 yesterday and when the pilot would pour on the power right over where I was working, it made an odd loud howling noise which I would NOT exactly term "stealthy". We get to see all sorts of exotic aircraft here as Skunkworks is located in an AirForce manufacturing site where most of the exotic American aircraft are developed. It's called "Plant 42. All the major military aircraft companies are there and all of the stealth fighters and and bombers have been developed there: F117s, F22s, F35s, B1s, B2s; and the Space Shuttles were all built and serviced there too. So back to the subject matter for this thread... It appears we may have cause for a cautionary note here. 2 models from different manufacturers, using different paints (1 Lacquer, 1 urethane) and using Super Clean (1 Castrol, 1 non-Castrol), have been destroyed in trying to strip them Perhaps we should recommend using Super Clean and similar strong detergent solutions only to remove paint known to be conventional enamel .
-
Thanks CadillacPat and you other guys. I think I caused some confusion over the House Of Kolor paint. As I said in post 7, it was NOT the hot automotive lacquer. It WAS the rattle can KustomKolor paint for models. BrettBarrow, what paint had you used on that AM GS Vette? (I note your avatar is the trademark of Lockheed Aircraft's Skunk Works, I drive past there and the Blackbird Airpark Museum a couple times a day 5 days a week...so I suppose you're into aircraft as well as cars) And which version of Super Clean were you using?
-
"The damage itself definatly looks to be the kind of solvent crazing one would get from a hot laquer paint or thinner." Like dropping it into a tub of acetone and water... Not wanting to be mean to GHolding, I just have strong doubts about that and don't want to try it. The styrene was definitely rubbery and the blue paint relatively "crusty" over it as though the HOK was not much affected by the Super Clean. Note the increased effect on the styrene around door lines and such.
-
So on a slight diversion, Longbox55, what do YOU suggest as "proper prep"? The directions on the HOK can are DEAD simple and essentially the same as Testors, Plastikote and Pactra and all the others have always been. "1. Apply base as directed. 2. Allow thirty minutes dry time before applying KANDY KOLOR KOAT." On the Testors can: To avoid possible wrinkling, recoat within 3 hours or after 48 hours. When using transparent colors, first spray undercoat of silver, gold or metallic copper. Spray in light mist coats to achieve desired depth of color." No other directions are supplied regarding prep by either manufacturer. Only instructions on shaking the can and how far away to spray from and temperature/humidity requirements with ventilation remarks. And NO, I'm NOT going to try acetone anywhere near styrene or throwing lit matches at my gas filler neck. Note that the color coat is "House of Kolor Kustom Kolor Kandy Color Coat Kandy Cobalt Blue" by Valspar in a rattle can purchased from the hobby department of a department store. This was NOT from a custom mixed can of paint from an automotive paint supplier. The base coat, again, was Testors rattle can 1246 silver. I've not seen any other possible compatibility issues from putting HOK spray paint in contact with Testors paint.
-
Note that there was NO damage to the plastic for the several weeks before it went into the Super Clean. ALL of the damage happened in the Super Clean. So IF the HOK paint caused this damage, it would HAVE to be that the HOK reacted with the Super Clean.
-
My son recently painted an AMT Fast & Furious Supra with Testors Metallic Silver rattle can for undercoat and top coated it with House of Kolors Kandy Cobalt Blue. He got some runs in the blue, so he decided to strip it. I provided Super Clean (post-Castrol stuff, but still in the purple jug, labelled "BioDegradable"). It softened some of the paint, but severely attacked the plastic. The body is destroyed beyond recovery unless he wants to build a crash & burn diorama. Here are some pics of the body. A couple of weeks ago I had used the same stuff to try to remove chrome from the engine of a 10-year old AMT 57 T-Birdand it took days to remove the chrome, but left the yellowish lacquer and didn't touch the styrene. I also used "Purple Power" degreaser and "LA's Totally Awesome" on that with no better luck. However none of them attacked the plastic. I'm thinking maybe the gray AMT styrene which is so soft to the touch, is vulnerable to the current formula of Super Clean. The T-Bird was molded in white styrene which is the harder stuff similar to what was used back in the 60s and 70s. I'm not a total dummy about such things, I spent 11 years in plastics R&D, 6 of that in a test lab. But I'm hoping someone has some recent experience. My friend has a chassis for a recent issue AMT 69 Barracuda molded with the gray styrene he wants to strip paint off of now and we're afraid to use the purple stuff again. I did a search of this site for removing paint before posting this. Anybody have any up-to-date suggestions on removing paint now with what is currently available? With kits retailing at $25-28 these days, such problems get expensive REAL quick.
-
Growing up in LA I saw more Fords of that era than Chevys. Fords seemed more popular with families. When a 57 Belair went by, it was uncommon enough to catch your eye. My brother's 1st car was a 56 Ford. Later he got a 64 Plymouth Max Wedge, then replaced that after totaling it in a crash at Lions Drag Strip, with a 55 Chevy. He still has the 55 Chevy, but it hasn't been driven since 1973. The Fords had a push rod V8 which was developed earlier than the Chevy. The Ford Y-Block had motor mounts under the crank pulley and on the sides of the bellhousing. To upgrade from a Y-block to a later Ford engine which has mount bosses on the sides of the block, one had to fabricate the mounts on the frame, as well as replacing the engine, bellhousing, trans and driveshaft. I've seen no evidence that Fords rusted any worse than any GM or Mopar vehicles of the same time frame. Materials and protection (or lack thereof) were virtually identical in the day. In the mid 60s, around my area, Fords of the mid-late 50s sold for more at used car lots than similar age Chevys. Even when I was in High School in the early 70s, my friends recommended that I get a Chevy because they were cheaper. That suggests the Fords of the era held their value better and the less expensive quality of the Chevys may have contributed to their seemingly greater popularity with racers and hotrodders. Oh...I started with a VW! Belairs and Fairlanes don't make good Baja Bugs and don't get 30mpg.
-
I liked this car in 1969. Definitely one of the top Funnies of the day and always looked pretty as well. After reading your comments on the decals and Aaron's, I looked close for cracks and I think maybe there is a crack above the left front wheel well. Tough to see though. So I think you overcame the problem quite well. Nice clean build.
-
I have to agree with Tulio. Nice Fords!
-
Beautifully done Tulio. So you understand where I view this model from: My 61 F100 I've owned since 1976: Starlight Blue original color with a 428 Cobra Jet and C6 with Western Slot Mags. My 1-owner 61 Falcon Wagon (I have the registration card which expired in 1961 with my family name on it and I remember the Ford that we had before it!): Algiers Bronze in bad shape (but the rust is superficial), 170 in. 6/C4 with 1975 Toyota Celica wheels.
-
Cobra Venom
DustyMojave replied to GerN's topic in 1:1 Reference Photos: Auto Shows, Personal vehicles (Cars and Trucks)
One of the better modern attempts at recreating the Cobra. -
Whatever it was...THAT left a mark!
-
The 67 Mustangs were built by Shelby to SCCA rules, NOT FIA. SCCA worked under an FIA license at the time, but SCCA Sedan and Production Class cars were NEVER held to FIA regulations. For instance, the interiors were never required by SCCA to retain floor covering, headliners and extraneous seats. Such materials were considered to contribute to the fire hazards of racing and seriously get in the way of roll bars and proper racing belts. So while stock interior side panels and dashboards were required to be in place, racers were encouraged to remove the headliner, carpets and/or floor mats and right and rear seats in Sedans. Also, dashboard faces could be altered for installation of instruments of the racer's choice. Radios, heaters, cooling and gloveboxes could also be removed. Wiper arms were allowed to be removed when rain was not imminent, but the wiper system was required to be functional otherwise, so that simply installing the arms on the shafts would make the wipers fully functional. Door latch handles and window cranks were also required to be in place and functional. 66 and earlier SCCA racers were never held to FIA requirements regarding interiors either. So if you are building a model of any year of Trans Am or SCCA Sedan Class race car, ditch the back and right seats. In later years, door windows and cranks and windwings were allowed to be removed and even the factory door and rear side panels could be replaced with aluminum or other materials. These changes came in steps as the years went by. The 1967 cars were provided with a simple 4-point roll bar just as you see in the photos. The diagonal bar and lower shoulder bar were original. The upper cross bar was added early on. The fabrication on this bar was good and because of its history was left in place. This car and most all of the others which continued to be raced got upgraded to full roll cages later on. I cut off and removed the evidence of the very crude roll cage from this original roll bar. As a Tech Inspector, I would NEVER have approved the roll cage fabrication. Mitered joints are NEVER acceptable in roll cages in race cars. The add-on cage welds appeared to have been the fabricator's 1st attempt at welding. I was nearly able to remove the forward parts of the cage from the roll bar by hand. I'm appalled that SCCA and Stock Car Tech Inspectors allowed such terrible fabrication.
-
I agree with the rest. Beautiful build. A few comments for those who intend to try their hand at this kit (any version). I was around SCCA racing working as a Tech Inspector when these were raced. I worked with a number of Shelby employees at the races and at the tracks where Shelby brought the cars to test, as well as inspecting the customer's race cars. I also was on the crew of a famous racing Tiger, which was another Shelby project of stuffing a Ford V8 into an English sports car. These days I'm a professional race car fabricator who often restores vintage racers including Shelby cars. - He got the oil cooler fittings in the front correct. They were cadmium-plated steel fittings on the original competition Cobras, not anodized aluminum. So they should not be candy red or blue, but silver. At the oil filter, he has anodized fittings... OK, maybe the team replaced a couple of fittings? For a race car, things often got changed from "factory". - The street seat belts are nicely done, but in a race car, the seat belts should be 3" competition hook latch type belts with 2" shoulder straps. - Since the stock AC windshields and similar ones on other sports cars like Vettes and Healeys had a tendency to break when the car got above 150mph at places like Riverside, we preferred they be removed and replaced with the small racing screen as provided in the competition versions of the kit (not found in the wire-wheel street version of the kit). I recall seeing it happening on a Vette that wasn't normally raced. The driver needed a change of clothes after. The screens were available from Shelby. This reduced aero drag and weight and made for something less to break, so most racers made that change. But FIA required the street windshield for their races, so Shelby reinforced the AC diecast uprights with steel for the FIA racers.
-
I too would like to see the WIP. What's under the body would be just as interesting as the outside.
-
I saw this listed in the index and thought it was going to be something I would hate! But I'm open minded so I looked... WOW! Excellent job of integrating these 2 VERY different bodies into a beautiful one. The Grady Davis paint scheme is PERFECT for it too! Just FYI for those who are not Ford GT 40 and Gulf racing fans... This paint scheme was applied to the GT40 that was bought for use on the road by Grady Davis, an executive of Gulf Oil Company. The car was raced by Grady with other professional race drivers with some success. The light blue scheme used a couple of years later by John Wyer on the Ford GT that won in 1968 and 69 and its team mates, then used on the Porsche 917s in the early 70s and other John Wyer racing team cars with Gulf Oil sponsorship, and is often imitated today, was developed from this scheme. While I've been fond since 1968 of the light blue scheme, I have ALWAYS felt this dark metallic blue was far prettier than the light blue. Mark Gustavson should see this for his "Custom Clinic"...Makes those Kustom Kemps pale by comparison of styling.
-
A note on the fabrication of these cars... While it is really popular for fabricators to TIG most everything now and to make pretty little weld beads which look like stacks of coins and to make everything out of high-grade alloy steels...In working on "Vintage" race cars, back when most were built, such techniques and materials were not the norm. For instance, the Shelby shop shop did workmanlike welds on the roll bar for the '67 and the welds to mount the tabs for the traction bars on the rear axle housing. But the welds are NOT pretty. Most automotive forums now will howl with fuss about how crappy the welds are. And in many ways, it rubbed my hair the wrong way to replicate such ugly welds in doing repairs to the old car. A later owner had installed undersized bolts in those tabs and the holes had become egged out, so the tabs on the axle and inside had to be replaced. But that is what the original welds looked like and they worked quite well for over 40 years. So in replacing damage, I struggled to replicate such ugly welds. These welds are on a desert offroad play buggy. No need to get fancy here and they aren't. But they're a LOT prettier than the Mustang. This sort of welds would be very out of place on the Mustang and would jump out at anyone who is knowledgeable about such cars.
-
Having recently completed the restoration of a 1967 Mustang Coupe Shelby Trans Am race car in 1:1 http://www.modelcarsmag.com/forums/index.php?showtopic=67624 and having plans for building a few in scale, I can give you a little advice on building these. To build an A/ Sedan 65-66 Mustang like this one, use the AMT 66 Mustang notchback/Coupe body shell; Inner fender panels, core support and firewall from the AMT 67 Mustang Fastback or GT350; chassis, engine, trans, suspension, interior from the same 67; wheels and tires from a Revell race Corvette or 32 Ford hotrod or several other recent Revell kits. Fabricate the roll cage or roll bar (depending on what era you want to represent...through 67, most had roll bars, 68 and later most had cages...Fuel cells came into requirements at that time too). Monogram 65 GT350 roll bar is fine (IIRC), but needs more braces. Roll bars and cages for these should be made of 2mm or .080 rod/tube to represent 2" OD tubing. Look at the full size Mustang photos at the above link for roll bar/cage design. Exhaust is EZ with1/8" to 5/32" tube. Straps to support the pipes to the floor should be 1" x 1/8" strap bolted through the floor. .040 x .010 plastic strip will do well enough for that. They should come to the side between the back of the door and the front of the tire. For a GTCS, AMT 66 Mustang notchback/Coupe roof and rear deck; main body shell from AMT 68 Mustang GT500 -cut at inside of rear fender top edges, front of roof, and just in front of rear spoiler. Rest of the car: chassis engine, trans, suspension, interior from same 67; wheels and tires for stock from your pick of Mustang or Torino kits from 67-69. I always thought it was a shame Ford didn't homologate the GTCS bodywork for the 68 Trans Am cars. So if you choose to do a phantom Trans Am GTCS, see the race prep info for the early Mustang above. The Revell 68 fastback kit will serve well for Chassis and some body parts for this also.
-
My thoughts for this kit are to build it as a race car. I have a couple of the kits and started on one of them when Lindberg introduced it. But then we moved and I've never pulled it back out. - Halibrand mags to replace the wires that failed on the 1st racing Cobra. - Hood scoop for the 4 Webers - Side header pipes or possibly a pair out the back - USA racing colors. White/blue Possibly like the Shelby Blue with white stripes or metallic blue with a white band across the hood. Or maybe even white with blue stripes like old family friend Briggs Cunningham's cars. - Spoilers front and rear have been considered also. They were used on the GTOs and other GT racers of the era.
-
For '67, the Mustangs were dual quad. As shown in the bottom center picture in my original post on here. 2 Holleys. The Team cars had the same gas tank and filler neck setup too. Battery is in the right rear trunk. On the original battery tray is an oil vent catch tank which is a squarish aluminum box with a breather cap on top. There is an oil cooler behind the opening where the front license plate was intended to be. The headlight openings are filled with flat aluminum plates. The chrome trim rings for the headlights are still in place. The front turn indicators are replaced with screened openings. The backup light openings in the valance are filled with aluminum plates. Here are a few more pictures: Driver's seat is fiberglass with black vinyl, way too tight for my 205 lbs. It would have fit me then, but not since I turned 30. Roll Bar Here's one of the boxes that cover the traction bars The side and door panels are the stock black vinyl ones and the dash and top are stock too. The rear seat back is replaced with a flat aluminum panel painted black. Here's the shifter and switch box. The green tape is just masking tape temporarily holding wires and such in place.