cchapman195
-
Posts
275 -
Joined
-
Last visited
Content Type
Profiles
Forums
Events
Gallery
Everything posted by cchapman195
-
Need info on how to "z" a frame
cchapman195 replied to cchapman195's topic in Model Building Questions and Answers
Thanks Bill. Very well done tutorial. I have got the kit just have not started it yet. Can't wait to try it out. -
Thanks Monty, I just saw your thread as I was going from one to the next and thought I would throw in my 2 cents. I hope it helped and glad to help an old subject get new lease on life lol.
-
Nice Jamie. Love the blue on the headers. Only thin g I can see are the tires needed to be scuffed up a little. They are to clean. Great job though.
-
Hair spray weathering question.
cchapman195 replied to cchapman195's topic in Model Building Questions and Answers
Cool thank you Cole. -
I was wondering if I have to use acrylic paint while doing the hairspray weathering technique? Or can I use enamels, lacquer to achieve the same results? I have a test body I was going to attempt this on but most "rust" color paints I have are enamel. Don't want to try something and have it not work because of my paint. Thx for any help.
-
Testors primer finish trouble.
cchapman195 replied to cchapman195's topic in Model Building Questions and Answers
Thanks Roger and Jonathon. Body is sitting in LA's totally awesome now. I ran out of primer and a friend gave me a new can of testors to use. I have gone and picked up Rustolium sandable primer that I usually use. Lesson well learned here. Use what works every time and I can save time. Thanks for responding -
How important is it to..........
cchapman195 replied to Bobdude's topic in Model Building Questions and Answers
I buy my LA Totally Awesome at any Dollar Tree, All A Dollar, etc... 32 fl oz is a dollar and 1/2 gallon is 3 dollars. Works great for stripping anything fast. I did 2 old bodies in 1 day. Great stuff. -
Testors primer finish trouble.
cchapman195 replied to cchapman195's topic in Model Building Questions and Answers
Sorry Harry, I brought up another tab as to not lose my place in the tips section and apparently posted in the tips. I will make sure I am on the right tab next time. My bad -
I have a slight issue I was hoping I can figure out. I just opened a new rattle can of Testors Flat Gray Primer. I shot a body and after waiting for 2 days and 1 day in a dehydrator I went to sand it. It has a weird color to the gray and as I sanded it it came off in little rubber like balls. The finish itself was pretty smooth but wanted to sand 1 final time. Would it be okay to reprime over with Rustolium that I usually use for primer? or shoulod I strip and start over? any help would be great. Thanks in advanced .
-
Need pointers on paint detailing a firewall
cchapman195 replied to Monty's topic in Model Building Questions and Answers
Nice Addition to a firewall Jeff. I like the idea of stretched sprue for this. I can then just run thread from the sprue. -
Beautiful truck James. Can't wait to see what you have next for us.
-
Need info on how to "z" a frame
cchapman195 replied to cchapman195's topic in Model Building Questions and Answers
Thank you Jason. This is exactly what I was looking for. simple,sweet, and cheap. I did not realize it was that easy. Now to go get a kit to cut up. -
I thought I had seen a how too on cutting and "z"ing a frame for a '32 3 window coupe but I cannot find it now. If any body has a tutorial or link that I may use as a guide it would be much appreciated. I need to know what measurements, dimensions, Size of styrene I need etc, etc, etc... Any help would be great and I thank you for any pointers.
-
Thx all.
-
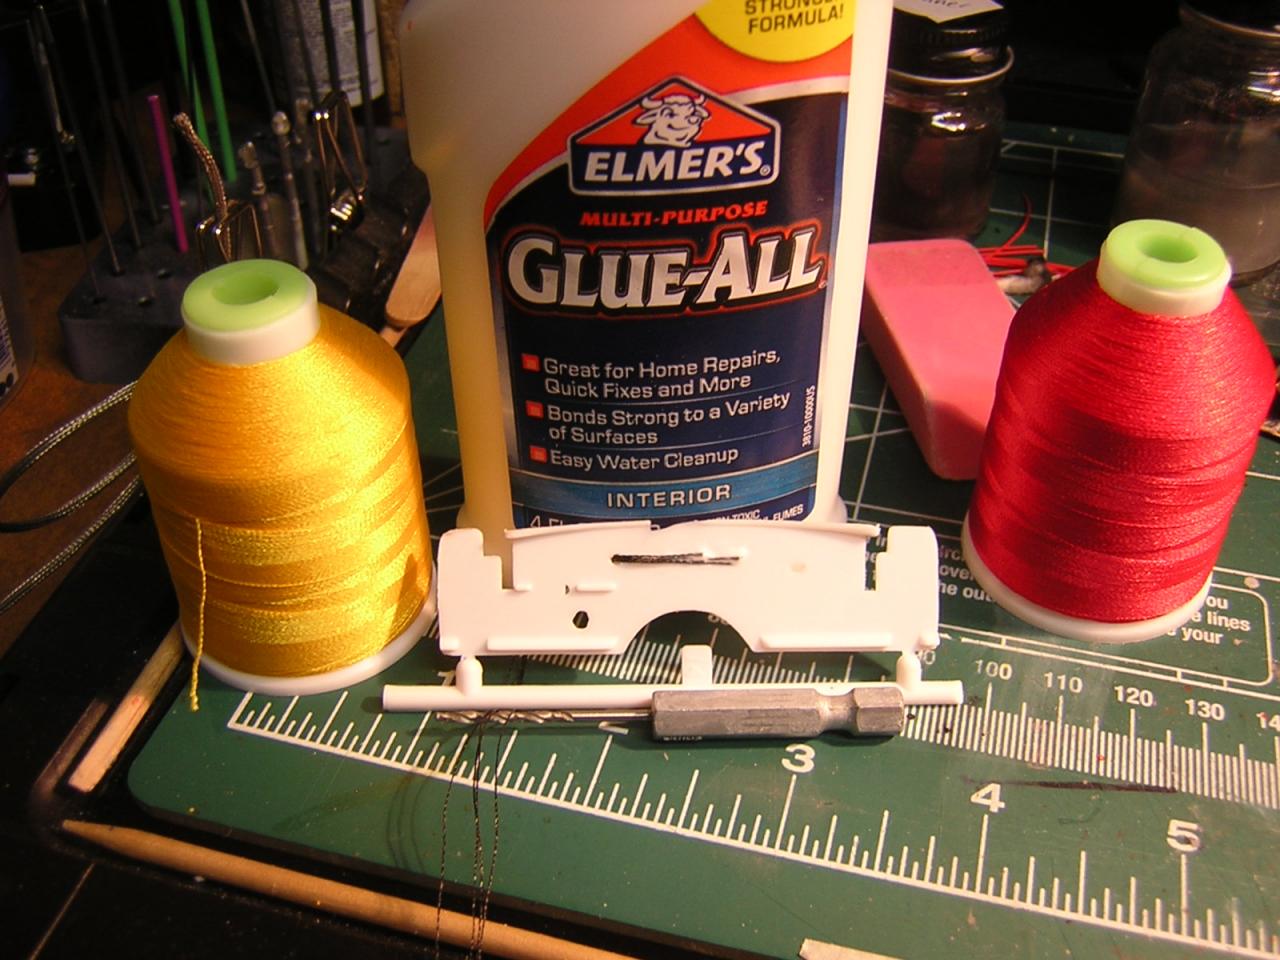
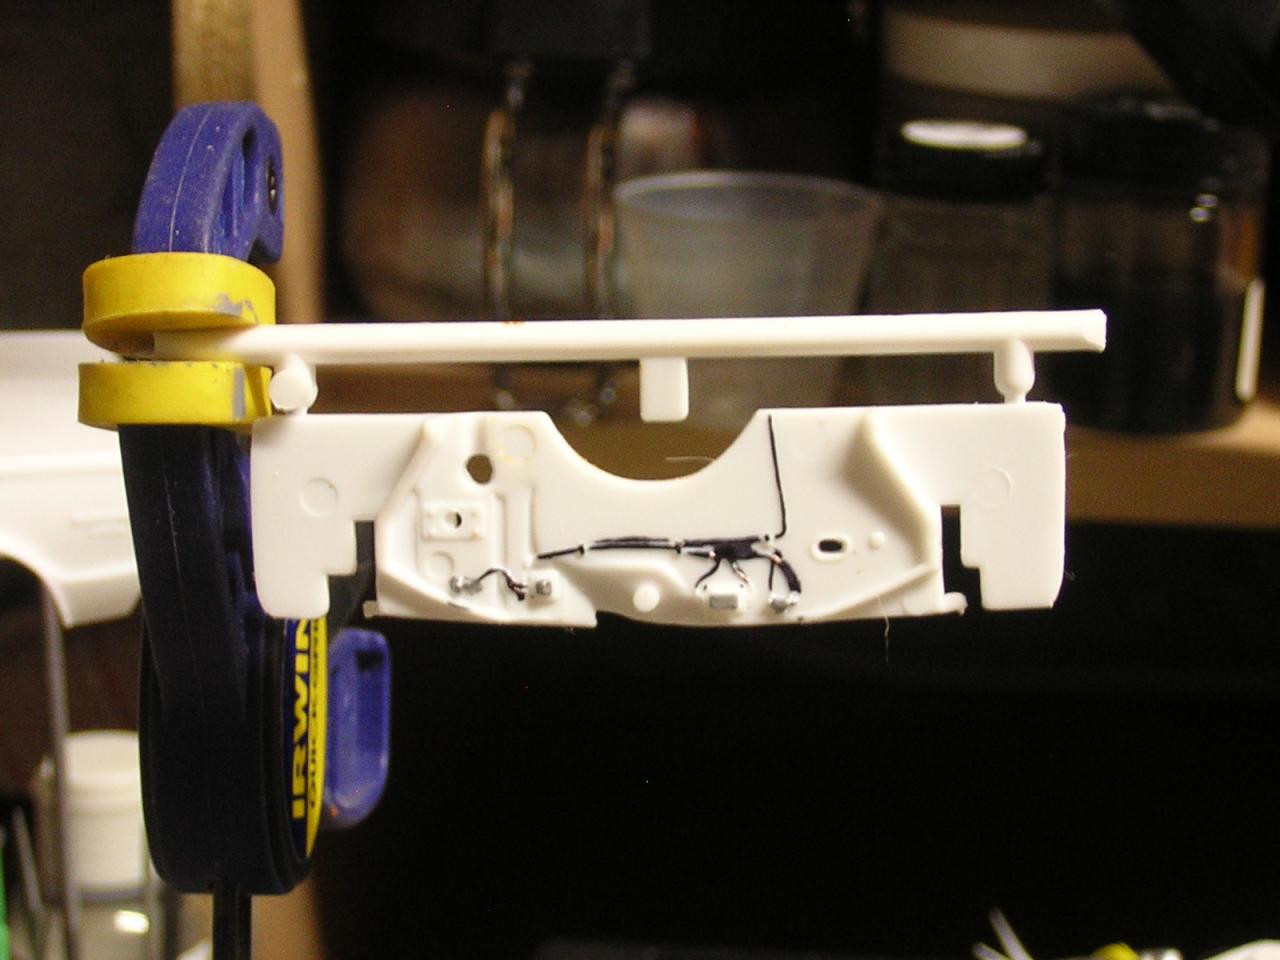
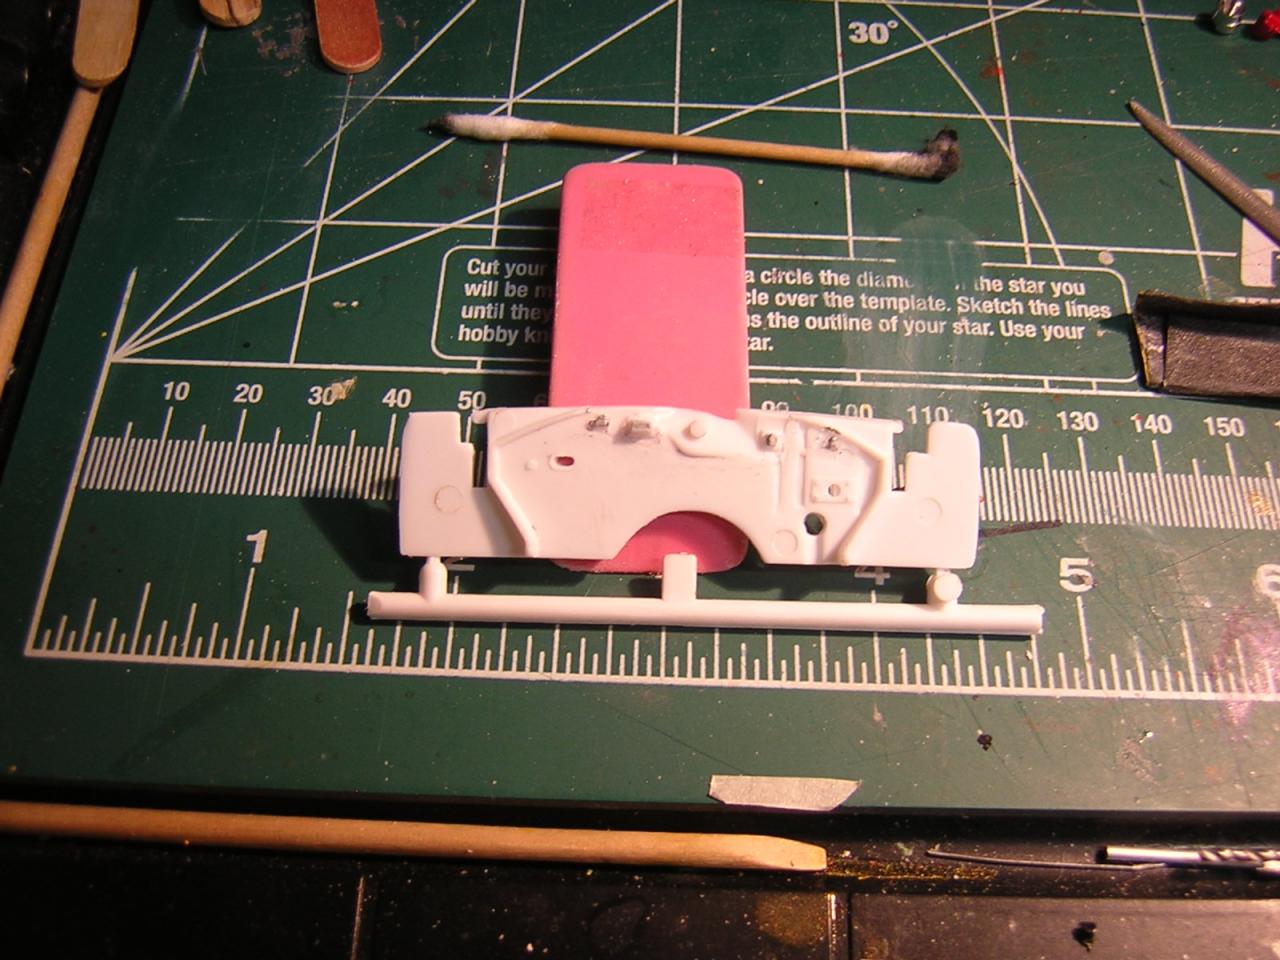
I was asked to post pics on how I do molded wire on firewalls. Here is how I do it. Just thought I would throw it out there as a tutorial. I marked the molded wires with a sharpie so you can see them. I then sanded them away with a file and 600 grit sandpaper. I then drilled a hole where the wire comes through the firewall. I then cut 4-5 pieces of black string and put through the hole I drilled. I then glued the string on the backside of the firewall with Elmer's white glue. I use this as it dries clear. I then ran the wire in the same position the molded wire was at. I used different color wire to connect to each electrical unit. Well that is it. Very simple to do and you can add any color string for the wire and also put wire to other areas of the car this way. I hope this may help someone looking to add that "finishing touch" to the engine compartment.

-
Need pointers on paint detailing a firewall
cchapman195 replied to Monty's topic in Model Building Questions and Answers
Okay here are some pics using string. First I have marked all wires with a sharpie so you can see the pattern. I then sand it down with 600 grit and file. Now drill a hole where you want wires to come from. Paint, polish firewall. Cut 4-5 black pieces of string and run through the hole you cut. Glue the string onto the backside of firewall. Then just cut and run string to the proper firewall electrical units. Glue each piece to firewall. Thats about it. You can use any color thread you want. Photo's of actual car you are building can help add other wire and actual color of wires to replicate original. Not hard to do, just have fun with it. It does make you feel a little gitty about your mad skills when you are done lol.
-
Need pointers on paint detailing a firewall
cchapman195 replied to Monty's topic in Model Building Questions and Answers
I will post some pics as soon as I can borrow a camera. Mine fell and won't work. Hopefully by this weekend I can post some. -
Need pointers on paint detailing a firewall
cchapman195 replied to Monty's topic in Model Building Questions and Answers
I use white elmer's glue as it dries clear. Just a little dab in a few areas will hold it well. I have also put 3-4 pieces of string and twisted one side together then drill a small hole with a pin vice and stick the twisted end into the hole. Then glue it on the inside of the fire wall where it will not be seen. Then you can run each piece of string as a whole wire harness and separate them into there own lines. -
Need pointers on paint detailing a firewall
cchapman195 replied to Monty's topic in Model Building Questions and Answers
Okay I know this thread was started a few years ago but in case it may help somebody now I would like to throw in a way I do wires on a firewall. I take a pic of the untouched firewall. I then sand it smooth as a baby's ....., After I paint the firewall and polish or whatever I look at the photo I took and replace the wire moldings with colored thread. That way I can continue the wiring to the final destination and it looks more real that way. It also allows me to use different color thread for different wires to add color to the engine compartment. Also a lot easier then a steady hand lol. Hope this may help. -
Custom/Show Truck
cchapman195 replied to James2's topic in WIP: Model Trucks: Pickups, Vans, SUVs, Light Commercial
This is really turning out to be an awesome build. So glad you decided to share with us. -
Indy 500 today... does anyone care?
cchapman195 replied to Harry P.'s topic in General Automotive Talk (Trucks and Cars)
I am a fan of all kinds of motorsports. I did watch today's race and thought it was a great race. Dario Francitti won for his 3rd time at Indy tying him with 2 of his best friends for 3 wins each. So next year will be great to see if one of them gets to break the 3 way tie. Nascar is my true love when it comes to racing. I do believe in order to understand racing you need to understand the mechanics of a car and how changes can effect the way they run, The way air and drafting work and come into play and it takes a bit to learn and understand but it does make racing more exciting and understandable. I Can see how people can turn on a race and say how stupid is this, they only turn left without understanding what is actually going on with the cars and drivers and pit crews as well. Great day of racing today though. -
I have not seen this in any posts yet but it is a trick I use. After I get my main coats and clear coats put on the body I polish and wax it to a finish shine. I then put Para-film down the sides and on the roof so I can handle the car while putting on the final detail and putting it all together. After I get the engine compartment details done and am totally finished putting the model together I remove the para-film and do a quick wipe down with a cleaner/ wax. Hope this will help.
-
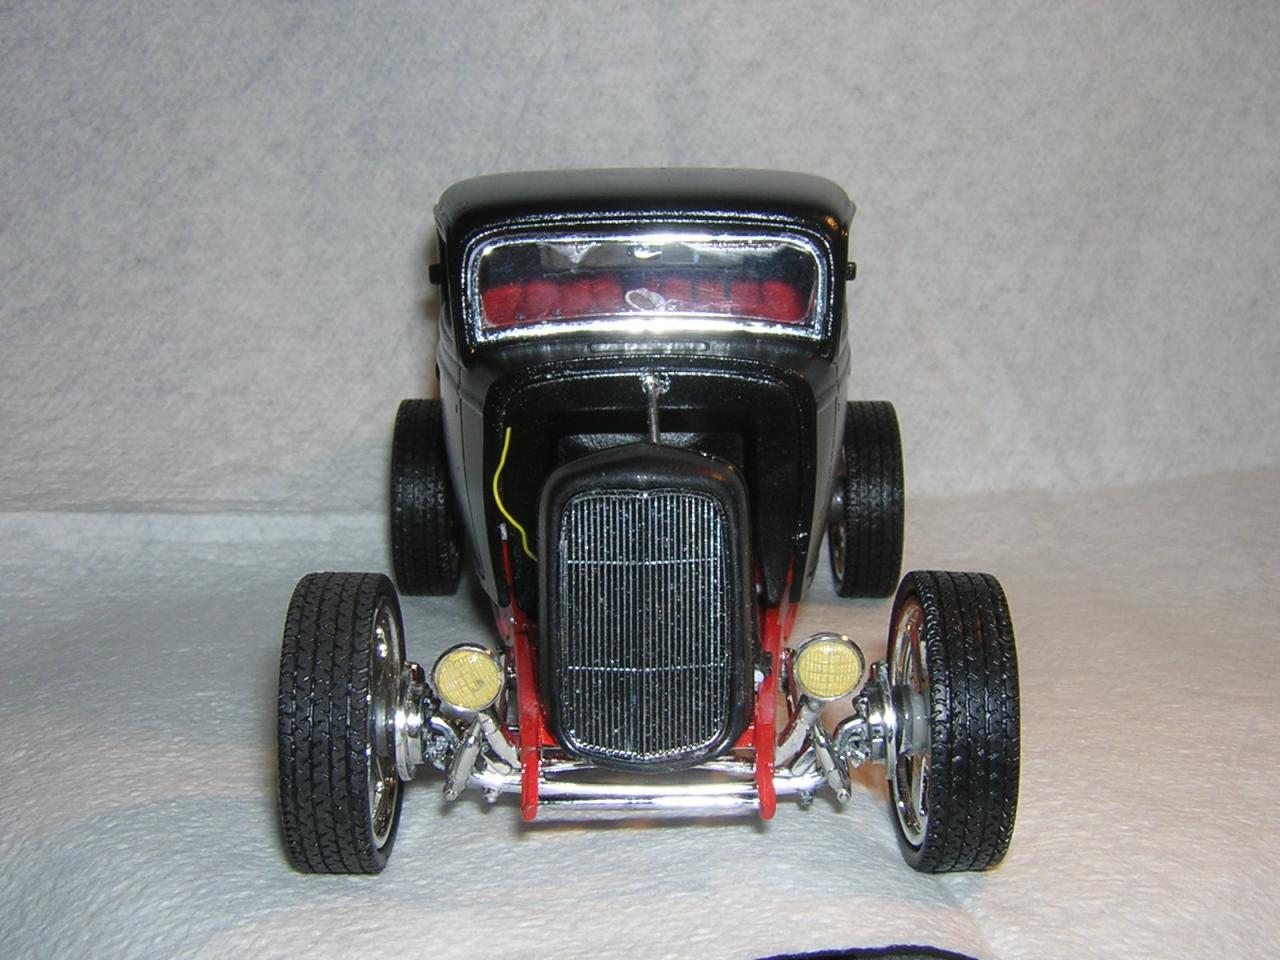
Here is my first Rat Rod. I just finished it last night. Thx to the forums here, I was able to get a lot of help and insperation for it. Next is a rust bucket. Cross yer fingers, I'm scared lol.
-
I just painted a nice two tone paint. For some reason I have glue residue stuck on the body. I used parafilm and left it in a plastic box outside after I airbrushed it. It was 92 degrees and was there for an hour before I brought it in to take off the tape and put in my dehydrator. I need to know if there is anything that can get the glue off without stripping the paint. I have soaked it in hot soapy water, soaked it in windex, scrubbed with toothbrushes and I still have clumps of glue that I cannot remove. Any help will make me a happy camper.Thx in advance for any idea's. Just a side note in case it makes a difference. I used HOK airbrush ready paints. I had put a thin coat of inner coat clear after I taped it off with Parafilm. So the wads of Parafilm or glue is on a thin layer of clear but I have not yet Clear coated it since I have all the glue on it.
-
Future Floor Polish?
cchapman195 replied to cchapman195's topic in Model Building Questions and Answers
Thx all for the help. Those articals helped a lot. I also use HOK Kosmic Kolor Komply Klear 2 with a medium reducer but it is way too shiny for a stock showroom car. thats why I thought I would try someting else. I do have to admit I like the sheen it gives for a stock vehicle.