GearUpJammer Posted December 13, 2015 Posted December 13, 2015 Haven't built one of these since my glue bombs as a kid.Now 51 and my first one since.Glad I found this site!
towman1271 Posted December 13, 2015 Posted December 13, 2015 Welcome to the site.. You can learn so many ideas & tricks from the guys on here, They are amazing on what they can do. . You are doing a great job so far on your build.. Love the color choices you picked & the painted stripes.. Look forward to seeing her done!
GearUpJammer Posted December 13, 2015 Author Posted December 13, 2015 Thanks Dave,it's been a learning experience .Taking it slow and steady and trying to absorb all the good info from the experienced guys on this site.Its far from perfect but I'm learning from my mistakes.Love the 70's trucks,already thinking about the Pete 352 for the next build.
Old Buckaroo Posted December 13, 2015 Posted December 13, 2015 Fantastic color combination and scheme !Somewhere hidden in this forum are some really good tips on mounting the cabs and hoods for the Diamond Reo's, Whites and WWS trucks. I looked but could not find it. Basically you want to have the cab and hood taped together and mount them as a unit so you dont end up with the dreaded hood gap. Also most times the front cab mount needs to be relocated on the floorpan. I trimmed mine off to get it out of the way and used pieces of styrene blocked up on the floorpan to adjust the height .
GearUpJammer Posted December 13, 2015 Author Posted December 13, 2015 Thanks for the tip Sean.I had the cab and hood taped together for the painting and noticed when I set it on the chassis it was kind of precarious.Didn't know about the hood gap.I'll pick up some styrene,think I'll need it for the sleeper as well.
gino Posted December 13, 2015 Posted December 13, 2015 welcome to the forum ! nice job on the WS, great paint work !
gatorincebu Posted December 14, 2015 Posted December 14, 2015 Vic, Welcome to the Forum and back to the hobby . You are doing a fine job on your current project. I like the paint, colors and scheme. looks good. Be Well Gator
cowboy rich Posted December 14, 2015 Posted December 14, 2015 Welcome. And all I can say is I LIkE IT nice work.
DRIPTROIT 71 Posted December 14, 2015 Posted December 14, 2015 Welcome to the forum. I like the color scheme!! I really like all the trucks with this cab!! I will probably never be able to build them all though.
GearUpJammer Posted December 14, 2015 Author Posted December 14, 2015 Thanks Brian,your builds have inspired me after seeing them on Hank's site!I like all the trucks with this cab too and had a hard time deciding which one to build.I worked as a tank washer for a trucking company in high school and I used to shuttle the trailers with some old Diamond Reo's,one Cummins powered and the other with a 318 Detroit.Love the lines of the old Whites(Western Star/Road Boss/9000/4000),Diamond Reo's and Autocars with that classic cab!
tbill Posted December 15, 2015 Posted December 15, 2015 welcome Vic, rig is looking good so far. i too really like your color combination. should be a beauty when your done.
GearUpJammer Posted December 15, 2015 Author Posted December 15, 2015 Thanks Tom!Dropped the engine in tonight.Note to self,on the next build square up the frame!Hopefully the finished product will hide the sins.Oh well,there's no turning back now.
scummy Posted December 15, 2015 Posted December 15, 2015 Yes welcome on board mate , colour scheme really suits it . If you have a round air cleaner use it instead of the square one from the kit as it makes them stand out when done . Keep up the good work mate .
Tesla Posted December 15, 2015 Posted December 15, 2015 Welcome aboard! You're doing a fine job and the color choice couldn't be better
GearUpJammer Posted December 15, 2015 Author Posted December 15, 2015 Thanks for the words of encouragement guys!
landman Posted December 15, 2015 Posted December 15, 2015 Welcome aboard. Coming along nicely for a second career start. I can see we will be watching your work.
GearUpJammer Posted December 17, 2015 Author Posted December 17, 2015 Light at the end of the tunnel...just a few more engine details to go and stripe the sleeper.Thanks for all the tips,especially Old Buckaroo for the mounting of the cab and hood.
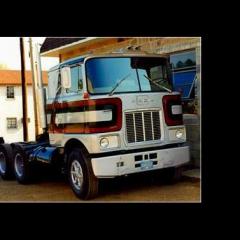
Old Buckaroo Posted December 17, 2015 Posted December 17, 2015 I have still not been able to find that great post that went into detail of mounting the cab and hood. Seems like to me one of the "Chuck" posted it. Have your cab and hood been permanently attached ? From the one picture they seem to sit a bit high which could be solved by lowering the rear and both cab mounts a touch. If you have attached them I would not mess with it at all.I really like the work you have done and at how well the paint combo looks !
GearUpJammer Posted December 17, 2015 Author Posted December 17, 2015 They are permanent now Sean.Early in the build I tried to straighten the frame with a little heat and overdid it a bit on the front.I drilled out my hood brackets so I could put brass tubing in but the front of the frame was way out so I elongated the holes because the hood was so crooked.I wound up patching the left frame rail with a piece of styrene and redrilling the hole and also notching out a little of the steering box.Basically with the hood closed it was pulling the cab to the right so I shimmed a piece of styrene under the right front axle and it solved that problem.I cut the dimples off the floor pan and put a small shim under the back of the cab but I didn't think to lower it.A lot of this stems from my frame problems early on.I figured this was the best I was going to do on the cab.I think the next kit will go together a little better and I'll know some of the pitfalls.I'll just say the truck was in a wreck and had a little work done to it?Thanks again for your advice and I look forward to it for this and future builds from everyone on the forum!
gatorincebu Posted December 17, 2015 Posted December 17, 2015 Vic, Nice job on this one. One thing to try when building a frame from AMT you need to square the ends of the crossmembers. The are angled slightly to facilitate getting them out of the mold. I usually tack all the cross members to one frame rail. Then place the other rail clamp and them glue( I use Tenax ) and then put it on the bench check square and put a weight on it. Be Well Gator
Old Buckaroo Posted December 18, 2015 Posted December 18, 2015 Vic, I never did find the post on this forum I was talking about. I did however find this jewel over at "Tims" site last night while looking at other stuff. Maybe this will help on your next WS truck.http://public.fotki.com/mackinac359/workbench-1/how-i-did-it/amt-white-western-s/Those AMT frames can be a challenge - I wish I would of been smart enough to have had a square grid to work off when I was a teenager . I dont think I ever had a straight frame or one without a twist. Those hobby mats with 1" grids are a top notch.
Recommended Posts
Create an account or sign in to comment
You need to be a member in order to leave a comment
Create an account
Sign up for a new account in our community. It's easy!
Register a new accountSign in
Already have an account? Sign in here.
Sign In Now