mr68gts Posted July 5, 2017 Posted July 5, 2017 (edited) So since I am moving and now am in Phoenix I have nothing to build. I tossed in a couple of models on the way out the door. One being the LN8000 and the other a Meng D9R. Decided to start on the LN so I spent half the day looking up reference for it. Not much to be had but I did figure out the engine at least. (Ford V225 otherwise know as a Cat 1160) Cleaned up the block half faces and got them glued together. Got a look at the belts and said OH HELL NO! lol. Luckily I did bring the Unimat lathe/mill and it's tooling with me lol. Decided to turn the pulleys from aluminum. Got most of the first steps done but still need the center hole for the crank bolt. Probably no one will see it but I know it's there so I suppose that's all that matters. Edited November 19, 2017 by mr68gts updated 1
garynygren Posted July 5, 2017 Posted July 5, 2017 Have lathe, will travel? When I go somewhere I like to bring extra socks and drawers. Never thought about a lathe. At least you have it with because the pulleys and belts on that kit are really bad. Like you said "you will the only one who will know" and that's all that matters. Gary 1
mr68gts Posted July 5, 2017 Author Posted July 5, 2017 Have lathe, will travel? lol. I was machining parts at GSL 2 years ago to finish up a model. I've taken my mini air compressor and air brush to GSL too lol. Was clearing parts over the balcony ha ha
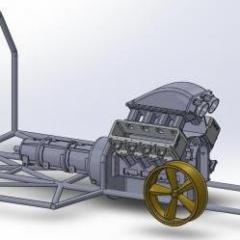
mr68gts Posted July 14, 2017 Author Posted July 14, 2017 So I devised a scheme to be able to add the reliefs to the top of the block side but mounting it in the 3 jaw chuck and milling them into the side with an end mill. Actually worked pretty darned good too! One side shows what I started with as far as the block goes. You can see my layout lines for the freeze plug locations. I may plunge the freeze plug "cups" in with an appropriate sized end mill just to simulate the freeze plugs. Last picture is the finished drivers side block. I do still need to add a boss to it for what ever is on that side mounted to the block...filters maybe? Not too familiar with these engines so I am working on assumptions and what little pics I can find on the web. Paul
Mooneyzs Posted July 14, 2017 Posted July 14, 2017 Paul... You are off to a great start on this and looking good with the pulley. I have one question... Why didn't you bring the Chevelle down.... HAHA
mr68gts Posted July 14, 2017 Author Posted July 14, 2017 Chris, not yet. As soon as the dust settles though I will be putting in an order for some brass!
Mooneyzs Posted July 14, 2017 Posted July 14, 2017 (edited) You know I am pulling your leg. I can't talk much since I haven't gotten any work done on the funny for 2 months or more now. I should of been done with it by now. Hope the new job is treating you well. Edited July 14, 2017 by Mooneyzs
DRIPTROIT 71 Posted July 14, 2017 Posted July 14, 2017 Very nice work!! Looking forward to seeing more!!
mr68gts Posted July 19, 2017 Author Posted July 19, 2017 Thanks guys. SO I finished up the harmonic balancer and the bolt for it. 2 separate pieces make up this part. Now i can finish the pulley and start from there. Chris, the promod is here here now.... in pieces but it's here lol Paul
Mooneyzs Posted July 19, 2017 Posted July 19, 2017 Paul... Engine is Looking good Buddy. Oh yeah... that's what I like to hear on the Pro Mod that is here in the valley.... not that it's in pieces. I think the Chassis spoke and needed to be in Brass anyway
mr68gts Posted July 27, 2017 Author Posted July 27, 2017 Redid a new pulley for the crank as there was some issues with the other one I machined and started machining the 6 bolts that hold it onto the balancer. One down 5 to go....lol
DrKerry Posted July 27, 2017 Posted July 27, 2017 Redid a new pulley for the crank as there was some issues with the other one I machined and started machining the 6 bolts that hold it onto the balancer. One down 5 to go....lol Here we go with these larger than life coins again!!!!!!! Gotta get me one of these so I can take photos of real car and truck parts to post on here!!!!!!!! LOL KrAzIe what can be done these days
mr68gts Posted July 27, 2017 Author Posted July 27, 2017 Here we go with these larger than life coins again!!!!!!! Gotta get me one of these so I can take photos of real car and truck parts to post on here!!!!!!!! LOL KrAzIe what can be done these days biggest problem is the giant coin takes up so much room to store.
DrKerry Posted July 27, 2017 Posted July 27, 2017 biggest problem is the giant coin takes up so much room to store. I bet, I'll have to make room for one or two.... I gotta keep up with you and John Teresi somehow with these big coins!!!!!!
mr68gts Posted August 5, 2017 Author Posted August 5, 2017 Finding information has proven difficult for this thing so I will be ordering the service manual for it in CD form off of ebay in about a week. (gotta wait on shapeways paments to be sent to paypal lol)Figure that's the best way to get the information I need to properly detail it but also it includes all the information for every truck for that model year! I am guessing that 74 for the model year would be about right. I would like to properly do the suspension for this thing. May do up brass leaf springs simply for aesthetic reason as it would look better than plastic blobs lol. I've been studying the kit and there are some close aspects to it but then they just missed the mark on the detail but this is an old kit so I can forego the complaints about lack of details.Paul
mr68gts Posted August 20, 2017 Author Posted August 20, 2017 Taking a break from Solidworks and the Chevelle for a while I've turned my attention to this thing again. I received the cd with the service manual (which includes all 1970 mode year trucks!) and there is some information I can use but I have to go through all of the disk to find it. Owell. There's another book I will be buying soon to help with the details on the engine so I will pause on that and I've started on the firewall. While a decent example of one it needs a bit of help. There are too many gaps in it to the body and quite frankly loks like poop. One side down and one more to go! I am contemplating opening the doors, (the other reason for the firewall work) so having a completed firewall will help with that if I decide to open them. I will also be correcting the interior tub as the door panels do not angle inward at the bottom which mean all new tub lol. Paul
mr68gts Posted November 19, 2017 Author Posted November 19, 2017 Little bit of an update. I've spent the last few hours building a door jam for the drivers side. I decided to go ahead and cut out the door last night. Kinda nice to be back on the bench. What little bit of it I have as we have completely moved out of our home in the mountains to put up for sale. I am doing what I can with what I have to work with. I still need to do the passenger side, mirroring what I have done on this one. It has taken a while to find enough reference for what I needed to make the door jams. I may go ahead and make the door frame also at this time, later today. I also need to add the ribbing to the floor pan. I did add the framework to the underside of it to try and tie it all into the firewall. I want to cut the hump off the firewall and make it like it is removable. (won't actually be removable but there is a lip missing and it also needs to go into the floor some.) Still lots of work to go. Paul
Darren B Posted November 23, 2017 Posted November 23, 2017 love the lathe work totally off the hook!!!
mr68gts Posted December 4, 2017 Author Posted December 4, 2017 Thank you guys! I've been trying my hand at machining the door striker pins for this but they are so small that I may not be able to do them. (at least with my lathe anyway) I may have to make them out of music wire and brass tube from Albion though. I am going to give it one more shot on the lathe and see what I can make happen. Paul
mr68gts Posted December 8, 2017 Author Posted December 8, 2017 (edited) Breaking out the supersized penny to show the door striker bolts that I managed to machine finally. Had to part them off the bar by hand with a razor saw while being mounted in the lathe then turn them around in the chuck, grabbing them by the post and machining the other side. They are simply too small to do any other way. I literally machined them with my 10x Optivisor on lol! What to do now.... hmmm.... Maybe try my hand at a latch of some sort to coincide with the bolt. I will probably epoxy magnets into the doors and behind the post to keep it closed provided I can find some small enough to make it happen. At this scale I am not even going to attempt working handles. I am going to make the hinges from brass however as I can get better strength from the brass. Edited December 8, 2017 by mr68gts
Recommended Posts
Create an account or sign in to comment
You need to be a member in order to leave a comment
Create an account
Sign up for a new account in our community. It's easy!
Register a new accountSign in
Already have an account? Sign in here.
Sign In Now