Lencor Posted August 1, 2017 Posted August 1, 2017 Here's the mostly complete roller chassis, minus the wheels & tires, steering and some of the front suspension.
Jhedir6 Posted August 1, 2017 Posted August 1, 2017 Nice start. I just got one of these too. But I have so much other stuff on the go I need to finish some of them up before starting another WiP. Looking forward to more.
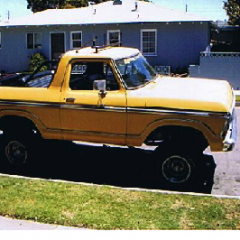
Lencor Posted August 2, 2017 Author Posted August 2, 2017 Complete rolling chassis. All suspension, steering, powertrain, drivetrain, wheels & tires installed. I deviated a little from the painting directions to better suit my taste.
espo Posted August 2, 2017 Posted August 2, 2017 Chassis looks great. Are those the kit's wheels a nd tires ?? This is not a subject I would normally build but these are starting to look better all the time so who knows.
Dave Van Posted August 2, 2017 Posted August 2, 2017 Nice work....I see Greenlight die cast has a 'off road' Bronco out....may look like what Revell will do.....stock body and chassis with new wheels, tires and roof 'wing'.
Lencor Posted August 2, 2017 Author Posted August 2, 2017 Finished the interior, went with more grayish color. I also didn't like the factory roll bar that came with it so I decided to fabricate one more to my liking (shown here being test fitted). That was a chore and a half plus going through a package of plastic rod just to get the roll bar somewhat close to what I envisioned.
cobramike Posted August 4, 2017 Posted August 4, 2017 This project is really looking nice. I have built 4 of these...addiction? Yep! When you get to doing the Windows please please post how you handle installation of them. I have had nothing but a very frustrating time with all of mine. Heck, I have even had the Windows fall out before I could finish the model on two of them. Aaarrrrggg
Lencor Posted August 4, 2017 Author Posted August 4, 2017 This project is really looking nice. I have built 4 of these...addiction? Yep! When you get to doing the Windows please please post how you handle installation of them. I have had nothing but a very frustrating time with all of mine. Heck, I have even had the Windows fall out before I could finish the model on two of them. Aaarrrrggg Well, I'm still deciding on how to do the door windows, several options come to mind. 1st is the rolled up look which isn't my favorite, 2nd is leaving them out completely but then that isn't a true Bronco look (unless the doors are completely removed), 3rd and most likely is to cut out the window and just leave the window frame which is the closest to the original look of the Bronco with the top off. The 3rd option is going to be tough since I have no clue how to do it without breaking something. As for installation I'm gonna tape the windows to the top then glue the windshield frame to the side windows before installing the windshield frame to the body.
Lencor Posted August 5, 2017 Author Posted August 5, 2017 What else is there to do on a rainy day but do some work on the Bronco. So here's where I am now, custom fabricated roll bar is finished and looks pretty good for my first time fabricating anything for a model. It's not 100 percent perfect but close enough to the look I wanted.
espo Posted August 6, 2017 Posted August 6, 2017 That does it, I'm going to get one of these. I like the pattern on the seat.
cobramike Posted August 6, 2017 Posted August 6, 2017 Well, I'm still deciding on how to do the door windows, several options come to mind. 1st is the rolled up look which isn't my favorite, 2nd is leaving them out completely but then that isn't a true Bronco look (unless the doors are completely removed), 3rd and most likely is to cut out the window and just leave the window frame which is the closest to the original look of the Bronco with the top off. The 3rd option is going to be tough since I have no clue how to do it without breaking something. As for installation I'm gonna tape the windows to the top then glue the windshield frame to the side windows before installing the windshield frame to the body. two that I built I left the rollup windows out of them. My only and best solution for that problem. As for the rear side windows now that is a completely other problem, I have installed them in every model, but the mounting points are so small that on 2 occasions the widows have literally just fallen out on their own, on the shelf, covered, and fell clean out! ARRRGGGHHH what a pia! There has to be a solution just because I can't figure it out!
Lencor Posted August 7, 2017 Author Posted August 7, 2017 More test fitting, didn't like the plastic spare tire that came with the kit so I ordered another wheel & tire and mounted that on the movable spare tire carrier, hood painted final color.
Lencor Posted August 7, 2017 Author Posted August 7, 2017 two that I built I left the rollup windows out of them. My only and best solution for that problem. As for the rear side windows now that is a completely other problem, I have installed them in every model, but the mounting points are so small that on 2 occasions the widows have literally just fallen out on their own, on the shelf, covered, and fell clean out! ARRRGGGHHH what a pia! There has to be a solution just because I can't figure it out!I'm currently researching whats the best adhesive to use for windows.
cobramike Posted August 7, 2017 Posted August 7, 2017 I'm currently researching whats the best adhesive to use for windows. More test fitting, didn't like the plastic spare tire that came with the kit so I ordered another wheel & tire and mounted that on the movable spare tire carrier, hood painted final color. putting that tire on the spare is allot better than the cheezy plastic thing. In my real 1:1 Bronco's I never had the spare covered, which in the long run probably should have been covered to prevent U V damage. STILL looks better with the tire.
Lencor Posted August 8, 2017 Author Posted August 8, 2017 Worked on the Bronco a little today. 1. Finished the front windshield 2. Finished the dash, did make a mistake painting it. Where the steering column enters the dash is supposed to be semi gloss black but the directions don't point this out, it wasn't till I finished the dash did I realize it. 3. Adding another personal touch to the front bumper by adding a "cactus smasher" push bar from Fireball Modelworks.
Lencor Posted August 10, 2017 Author Posted August 10, 2017 Finally got the push bar to adhere to the bumper using super glue this time. Then had to use a liquid chrome pen to fill in where the chrome plating came off. Then added Fireball Modelworks off-road lights to push bar for personal preference, this isn't complete yet, gonna add two more lights to the top of the bush bar then the KC Hilites decals to the light covers.
cobramike Posted August 10, 2017 Posted August 10, 2017 I ordered some parts from fireball Roberts after seeing what you have done with your build. Hopefully I will get them soon.
Lencor Posted August 18, 2017 Author Posted August 18, 2017 Finally got the front bumper finished after not working on it for a week, used Fireball Modelworks off-road lights. Took a little creativity engineering to get the lights in the perfect position to be glued.
mustang1989 Posted August 19, 2017 Posted August 19, 2017 That looks like its a pretty decent little kit. Lotsa lil' goodies in there. Good progress so far.
Lencor Posted August 28, 2017 Author Posted August 28, 2017 (edited) Well the drivers side rear fender is on. I took a long time looking at other model broncos as well as actual broncos to get it in the position that looks the closest to the real thing. After gluing it on then came the painstaking part of cutting out the fender, all I keep thinking was "man I hope I don't screw this up or cut myself". Now for the other side. Edited August 28, 2017 by Lencor
kelson Posted August 28, 2017 Posted August 28, 2017 Good work so far,best advice is just take your time.
cobramike Posted August 31, 2017 Posted August 31, 2017 Well the drivers side rear fender is on. I took a long time looking at other model broncos as well as actual broncos to get it in the position that looks the closest to the real thing. After gluing it on then came the painstaking part of cutting out the fender, all I keep thinking was "man I hope I don't screw this up or cut myself". Now for the other side. On my Bronco when I did the fender flares I first glued then in place,...then I carefully used my DREMEL with the smallest diameter drum sander #438 with 120 grit on the slowest speed and nibbled away at it very carefully till I had the fender wells shaped all the way up to the inside of the fender flares. Works great. That is if you happen to have a Dremel or similar tool in your bag of tricks. Like I have stated before on these forums "whom ever the person was that invented the DREMEL should be given a president's medal for brilliance".
Lencor Posted September 1, 2017 Author Posted September 1, 2017 On my Bronco when I did the fender flares I first glued then in place,...then I carefully used my DREMEL with the smallest diameter drum sander #438 with 120 grit on the slowest speed and nibbled away at it very carefully till I had the fender wells shaped all the way up to the inside of the fender flares. Works great. That is if you happen to have a Dremel or similar tool in your bag of tricks. Like I have stated before on these forums "whom ever the person was that invented the DREMEL should be given a president's medal for brilliance". I don't have a Dremel, I just used my basic Xacto knife and cut away the fender but sounds like it would have been easier.
cobramike Posted September 1, 2017 Posted September 1, 2017 Do yourself a huge favor and pick up a Dremel, I fought off the need for one for years, then about a year ago wifey bought one for me...I found that I use it for tons of projects, never thought I would use one, ha. It makes grinding, sanding, cutting, drilling, etc so easy. You won't be disappointed.
Recommended Posts
Create an account or sign in to comment
You need to be a member in order to leave a comment
Create an account
Sign up for a new account in our community. It's easy!
Register a new accountSign in
Already have an account? Sign in here.
Sign In Now