Csaba aka felhasznaaloo Posted February 6, 2023 Posted February 6, 2023 Started this kit that I bought years ago off ebay. My first Jo-Han kit. Nice fine detail here and there. Being a 1974 kit, I can't help but wonder how they were able to make a tool that casts such fine detail like there is on the dash, or e.g. the fender emblem script. The color scheme will be white on baby blue ? After clean-up, started out by gluing the inner fenders into the body - which was fun... The internal details of the motor (piston bores, lifters etc) tempted me to build it without gluing together... but then I just went on with it like it was any plain jane motor ? and yes it has Cadillac molded on the chrome valve covers.
Lunajammer Posted February 7, 2023 Posted February 7, 2023 Your dash detail is incredible. I agree it's a good kit. 1
Csaba aka felhasznaaloo Posted February 21, 2023 Author Posted February 21, 2023 Attached steering wheel to dash, and made a console at bottom of dash for the pedals as I wasn't able to figure out which "notch" they were supposed to go in. Started cleaning up the wheels... ...but when I popped the second one on the wheel back, it snapped. I thought I could use AMT's L60-15s, which I have in the stash, but the opening in those is a bit too large. The only tires I found around that fit are tires from the '70 Impala kit, which means that Impala will probably end up as a lowrider ? Weathered the chassis+interior bucket. And just noticed the battery is missing so I'm trying to copy a battery from another kit using household silicone as a mold and maybe "heat gun glue". Or if that fails, which is likely, I'll scratchbuild one. Thanks for looking.
Monty Posted February 21, 2023 Posted February 21, 2023 On 2/6/2023 at 7:21 PM, Lunajammer said: Your dash detail is incredible. I agree it's a good kit. Agree on the dash. Remarkable detail. As far as the kit goes, I've heard that the engine is a Cadillac with Oldsmobile valve covers. If so, maybe one of our resident experts can elaborate on that and provide recommendations on making it more accurate. (Distributor location, etc) Here's hoping someone on here can dig up a replacement tire for you. In the meantime, I'll be watching as this build progresses. 1
Can-Con Posted February 21, 2023 Posted February 21, 2023 (edited) 1 hour ago, Monty said: Agree on the dash. Remarkable detail. As far as the kit goes, I've heard that the engine is a Cadillac with Oldsmobile valve covers. If so, maybe one of our resident experts can elaborate on that and provide recommendations on making it more accurate. (Distributor location, etc) Here's hoping someone on here can dig up a replacement tire for you. In the meantime, I'll be watching as this build progresses. Other way around, Monty. It's an accurate '66 Olds 425 cid engine. Some of the kits did have CADILLAC script on the valve covers as it was shared ,along with the entire chassis with the Caddy Eldorado kits. Olds dissy in the back, Caddy in the front. The '70 Toro had a 455 engine but it was pretty well the same engine and looked mostly the same as the one in the kit. Edited February 21, 2023 by Can-Con 1
ModelcarJR Posted February 22, 2023 Posted February 22, 2023 Nice work, Csaba! I'm sure you will work the little bugs out! ? ? 1
iBorg Posted February 22, 2023 Posted February 22, 2023 I believe this is one of JoHan's best castings. Very nice build. 1
rrb124@sbcglobal.net Posted February 22, 2023 Posted February 22, 2023 Fun to see this progress! Good that you found this rare kit. When I was a teen, my parents had a 68 and a 71 Tornado. The 70 is one of my favs. 1
dino246gt Posted February 22, 2023 Posted February 22, 2023 Very nice detailing you're doing, keep it up, it looks great! 1
Csaba aka felhasznaaloo Posted February 22, 2023 Author Posted February 22, 2023 18 hours ago, Can-Con said: Other way around, Monty. It's an accurate '66 Olds 425 cid engine. Some of the kits did have CADILLAC script on the valve covers as it was shared ,along with the entire chassis with the Caddy Eldorado kits. Olds dissy in the back, Caddy in the front. The '70 Toro had a 455 engine but it was pretty well the same engine and looked mostly the same as the one in the kit.
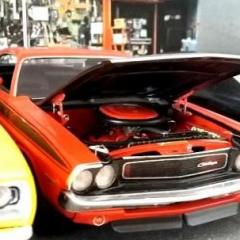
Csaba aka felhasznaaloo Posted February 22, 2023 Author Posted February 22, 2023 (edited) Thank you gents. Thought I would add a few photos. I "kind of" wired the motor: nowadays I cheat and don't drill holes, just glue everything on... this time I used material for plug wires that I used on my very first build 11 years ago: wrist watch O-rings...? they nicely simulate the way real plug wires bend smoothly and do not get kinked. I also cut up the steering damper (1st time I see this part on a model). Drilled the whole length and added some silver wire, so the front wheels will be steerable A LITTLE. The steering knuckles can pivot on the upper arms, but are supposed to be glued to the lower arms. I will not glue them, although I haven't figured out how exactly I will attach them instead. Thinking about making a small round plate with a pin in the middle, and a hoke for rhe pin in the bottom of the knuckle. The half shafts also go through the knuckles, which prevents full steering by the way. And this is what the interior looks like. I forgot to show a picture of the pedal console I made. Thanks for looking. Edited February 22, 2023 by Csaba aka felhasznaaloo Double photo 1
Csaba aka felhasznaaloo Posted March 7, 2023 Author Posted March 7, 2023 Painted the top today. Might not repaint the blue part, although it did not turn out very good. Anyway, this will not be entered in any model contest, so might just go with it.? This is Vallejo Model Air flat paint, and plan is to shoot Zero Paints clear over it.
Recommended Posts
Create an account or sign in to comment
You need to be a member in order to leave a comment
Create an account
Sign up for a new account in our community. It's easy!
Register a new accountSign in
Already have an account? Sign in here.
Sign In Now