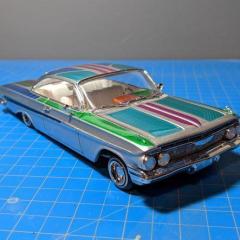
ctruss53 Posted March 14, 2023 Posted March 14, 2023 I am building my first hot rod, and of course I am doing it the hard way by building a hot rod out of a car that isn't originally a hot rod. I am trying to shape the recessed surfaces of the rear wheel openings. This car had fenders so the body sat on the fenders, and the fenders had the rear wheelwells in them. Since I cut the fenders off I am trying to figure out the best way to smoothly transition the wheelwells into the openings in the body that would have normally sat on the fenders. I don't have a good photo of the actual project, but here is a reference photo to illustrate the area I am talking about. What would be the best way to shape this, or sand this? Do I just slowly whittle away at putty with sand paper wrapped around a dowel? Or is there a better technique?
ctruss53 Posted March 14, 2023 Author Posted March 14, 2023 On second thought, when looking for this reference photo I see many hot rods are built where they fill that area in so it is flush with the body. I don't know if that would look right on this particular car though.
espo Posted March 14, 2023 Posted March 14, 2023 You mentioned that the body sat on the fenders. Would it be possible to cut away the inner fenders from the fender part and use that to fill the body area? You could fill the area with some flat stock but that may limit the back spacing of whatever wheel and tire combination you're using. As for sanding you might try some sanding sticks with different courses. Also sanding pads/sponges work well since they can be bent to conform with the shape you're trying to create.
Ace-Garageguy Posted March 14, 2023 Posted March 14, 2023 (edited) Achieving complex shapes is just a matter of trial and error as you learn, using whatever works. Carving rough shapes with various X-Acto blades, or cutting shapes into filler spreaders you drag along the work area to get an initial form works well. And you can scrape shapes and lines into plastic using woodworking chisels. As the shaping progresses, I'll use needle and riffler files, as well as sandpaper folded over to get a sharp edge, sandpaper glued to "sticks" or wrapped around dowels, nail files, etc. Edited March 14, 2023 by Ace-Garageguy 1
ctruss53 Posted March 14, 2023 Author Posted March 14, 2023 7 minutes ago, espo said: You mentioned that the body sat on the fenders. Would it be possible to cut away the inner fenders from the fender part and use that to fill the body area? You could fill the area with some flat stock but that may limit the back spacing of whatever wheel and tire combination you're using. As for sanding you might try some sanding sticks with different courses. Also sanding pads/sponges work well since they can be bent to conform with the shape you're trying to create. Great thinking. I already did this part. The rear wheel wells are glued into the body. They weren't a perfect fit though, so I am trying to fill in all the gaps and cracks to get a smooth surface.
espo Posted March 14, 2023 Posted March 14, 2023 1 minute ago, ctruss53 said: Great thinking. I already did this part. The rear wheel wells are glued into the body. They weren't a perfect fit though, so I am trying to fill in all the gaps and cracks to get a smooth surface. Depending on how much contact and support you are getting from the inner fenders consider using some L shaped stock the reinforce the joint between the two parts. The joint between the two parts will tend to flex if unsupported when sanding and the filler will crack. 1
Muncie Posted March 14, 2023 Posted March 14, 2023 In an area like this - recessed with a curved shape and inside corner, it pays off to mold the filler as close as you can instead of piling it on. Just a finger wipe will do and will eliminate a lot of sanding. 2
ctruss53 Posted March 14, 2023 Author Posted March 14, 2023 3 minutes ago, espo said: Depending on how much contact and support you are getting from the inner fenders consider using some L shaped stock the reinforce the joint between the two parts. The joint between the two parts will tend to flex if unsupported when sanding and the filler will crack. Great info. I have learned the hard way in the past about putty cracking if not supported properly. I have styrene scraps glued in around the backside of the wheel wells to strengthen the bond between the body and the wheel wells. The foundation is there. I have never successfully puttied and sanded things smooth at this scale. Small patchwork I have done, but making smooth complex surfaces like this is a little challenging.
ctruss53 Posted March 14, 2023 Author Posted March 14, 2023 5 minutes ago, Muncie said: In an area like this - recessed with a curved shape and inside corner, it pays off to mold the filler as close as you can instead of piling it on. Just a finger wipe will do and will eliminate a lot of sanding. I am already past this point. And I have probably gooped in too much putty. haha The wheel wells are glued in, there is extra styrene in there to back it all up. The putty is gooped in there. I should have asked this before I gooped in the putty.
Muncie Posted March 14, 2023 Posted March 14, 2023 If you are looking for attachment/structure as well as shape, consider an epoxy putty. There is a brand, A+B, Comes in two parts in white packages, A on one, B on the other. Unfortunately, it's a large quantity and relatively not cheap. It has many other uses. It will stick to many materials and is darn near permanent when it dries. There may be smaller packages that I haven't found. You tear off how much you need, knead the two parts together until it's completely mixed. It can be worked and molded wet (will even cure underwater). Mix it up, use some water and mold it into shape. You don't get much time and it will dry hard as a rock and ready for primer. Not easy to sand if it's even possible. Best to keep your epoxy a little under where you want it and use a spot putty or thick primer to bring it up to final shape. It's been a long time since I have used it so there may be new products out there. I noticed a two part epoxy putty in a more reasonable quantity at the local hobby shop in the gaming /figures section. I don't know it if works the same but I suspect it will.
Muncie Posted March 14, 2023 Posted March 14, 2023 2 hours ago, ctruss53 said: I am already past this point. And I have probably gooped in too much putty. haha The wheel wells are glued in, there is extra styrene in there to back it all up. The putty is gooped in there. I should have asked this before I gooped in the putty. AAARGH!, I've been there, too. Might be easier to grind it out and reapply the putty closer to the shape that it needs to be. 1
JollySipper Posted March 14, 2023 Posted March 14, 2023 What kind of putty did you use? You may could get some lacquer thinner and cotton swabs, then soak the swabs and wipe over the putty........ or put some thinner on a rag and wipe over the putty with your finger. I believe that would work, if it was 2 part? 1
ctruss53 Posted March 14, 2023 Author Posted March 14, 2023 7 minutes ago, JollySipper said: What kind of putty did you use? You may could get some lacquer thinner and cotton swabs, then soak the swabs and wipe over the putty........ or put some thinner on a rag and wipe over the putty with your finger. I believe that would work, if it was 2 part? I used Mr Hobby putty. It is not a two part putty, but you can thin it with lacquer thinner, so maybe that would work.
Muncie Posted March 14, 2023 Posted March 14, 2023 be slow, careful, and cautious - most lacquer thinner now days is mostly acetone and it will attack the plastic. If it gets too much (any?) on the plastic, it will shrink or leave a mark that will only show sometime after paint... Lacquer paints can be used on a kit if the paint is made for plastic kits (like Tamiya) or a proper sealer is applied before the lacquer (not trying to get into that question again)
ctruss53 Posted March 14, 2023 Author Posted March 14, 2023 2 minutes ago, Muncie said: be slow, careful, and cautious - most lacquer thinner now days is mostly acetone and it will attack the plastic. If it gets too much (any?) on the plastic, it will shrink or leave a mark that will only show sometime after paint... Lacquer paints can be used on a kit if the paint is made for plastic kits (like Tamiya) or a proper sealer is applied before the lacquer (not trying to get into that question again) I have both Tamiya and regular lacquer thinner.
Recommended Posts
Create an account or sign in to comment
You need to be a member in order to leave a comment
Create an account
Sign up for a new account in our community. It's easy!
Register a new accountSign in
Already have an account? Sign in here.
Sign In Now