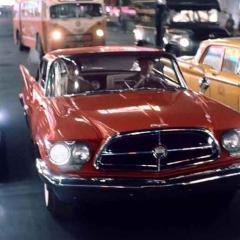
john sharisky Posted May 31, 2024 Posted May 31, 2024 (edited) The Revell Aston Martin DB5 snap kit that I'm building sort of "stock". I like the no-bumpers look. Also, no radio, antenna or outside mirrors. Both stock and "Bond" center consoles are included but I'm not using either. I filled the ejection seat hatch and bullet proof shield with kit parts (the top part of the shield only). The hole for the rear license plate was filled with Evergreen stock (same for the under-dash radar screen). The seams for the front and rear valances were meant to be covered by the bumpers. I made the front parking lights/machine gun mounts less obvious (they stuck out too much for a stock look). The green putty is Evercoat Euro-Soft. After priming I used Tamiya white for small dings and divots. Exterior color is 1965 Buick code R "Flame Red" lacquer by MCW (because I had it...). The color isn't as bright as it looks in these photos. I'm still painting it at the time of this post. I don't plan a clear coat. Wheels, spinners and open front grille (all by USCP) were coated with Molotow (I brushed it on the exhaust tips). Not called out on the instructions at all but included is the emergency brake lever. The interior floor has holes to mount the pedal assembly on the left but no LHD dashboard is included. I just received the Tamiya Aluminum Stickers that I want to use for the window trim (molded on the clear parts themselves). Not Tamiya quality but a fun, not high detail, project so far. Thanks for looking! Edited May 31, 2024 by john sharisky 4
john sharisky Posted June 9, 2024 Author Posted June 9, 2024 Coming along nicely. It has the look that I wanted. The kit headlight lenses have a center mounting lug and two smaller protrusions that fit into the chrome bucket for a correct vertical orientation. I replaced those with ones from the parts box with Molotow dabbed on their backside. Another item(s) not indicated or called out on the instructions are "stock" lenses without the mounting lugs. I just wanted to use lenses with the fluting on the outside. I forgot to mention before that I did open the left and right intakes on the lower front valance. Without the rear bumper the muffler-to-tailpipe clamps are a bit oversize and obvious. I replaced the kit tires with ones that were a little wider and with smaller ID and slightly smaller OD. These tires hug the USCP wheels better (they're no-names from the Polar Lights '64 Pontiac GTO kit). 4
Pierre Rivard Posted June 9, 2024 Posted June 9, 2024 Wonderful build John. The decision to go with printed wheels and grille add a lot of realism to this model. Great call. 1
john sharisky Posted June 9, 2024 Author Posted June 9, 2024 2 hours ago, Pierre Rivard said: Wonderful build John. The decision to go with printed wheels and grille add a lot of realism to this model. Great call. Thanks! It was the availability of these pieces that prompted my decision to buy this kit and take it in a direction that Revell maybe didn't intend.
NOBLNG Posted June 9, 2024 Posted June 9, 2024 I like the slight modifications and those wheels and tires look great on it.?? 1
Rattlecan Dan Posted June 9, 2024 Posted June 9, 2024 Very nice work. Great-looking build. Question, the first few pictures the red color seems much lighter. And did you use Tamiya pink primer? 1
john sharisky Posted June 9, 2024 Author Posted June 9, 2024 39 minutes ago, Rattlecan Dan said: Very nice work. Great-looking build. Question, the first few pictures the red color seems much lighter. And did you use Tamiya pink primer? Yes I did use Tamiya pink. The photos from my spray booth are under a warm-white fluorescent light which throws things off a bit (I should change it to LED). The photos post-polish are on under cool-white fluorescent lighting.
JNordgren42 Posted August 5, 2024 Posted August 5, 2024 Fantastic build! I'm almost certainly going to add this kit to my pile. I've gotten into electronics in a big way with a build of the Polar Lights 1/350 U.S.S. Enterprise (refit movie version). I'm rolling my own Arduino based lighting system on that one, and I'm thinking about trying to make as many of the gadgets as possible functional on a potential DB5 build. And those USCP wheels and grill look absolutely amazing with the chrome paint on them. Definitely a must buy if I pick one up.
Recommended Posts
Create an account or sign in to comment
You need to be a member in order to leave a comment
Create an account
Sign up for a new account in our community. It's easy!
Register a new accountSign in
Already have an account? Sign in here.
Sign In Now