oldcarfan Posted February 22 Posted February 22 3 minutes ago, oldcarfan said: Good choice, I wonder if am AAR 340 would fit that?
oldcarfan Posted February 22 Posted February 22 I'm calling the interior done, except for a bit of clutter that remains to be added. Because of the small size of these cars, the seats are in, and the CB is between the seats. The Fuzzbuster is on the dash and the inside is just about ready to go. I just received the 1/24th Thermos and binoculars and a couple other things. Still trying to find a tiny Rand McNally Atlas and some 1975 fast food! 1 1
Mattilacken Posted February 22 Author Posted February 22 (edited) 2025 Cannonball Run Entry list: 1. '62 Chevrolet Bel Air (W-409) 2. Ford Escort MK2 ( stitchdup) 3. ‘74 Mercedes 300TD SLC (Mattilacken) 4. ‘69 Chevrolet Camaro (atomicholliday) 5. WV type 1 Van (Fat Brian) 6. ‘69 Dodge Dart (Tim08) 7. ‘67 Ford Mustang (JimmyRiggins) 8. '70 Plymouth Superbird (Keef) 9. ’71 Renault Alpine A110( White Rabbit) 10. ‘75 Chevrolet Monza 2+2 (MeatMan) 11. Dodge Super Bee (Slusher) 12. ’70 Dodge Super Bee (Sam I Am) 13. Lamborghini Espada (Tooltime-fan) 14. ‘70 Chevrolet Malibu (KWT) 15. ‘75 Volkswagen Golf (oldcarfan) 16. ’60 Ford Starliner (blue303) 17. Shelby G.T. 350R (xbazzarex) 18. ‘73 Mercury Cougar (bill_67) 19. ‘64 Corvette Grand Sport (beans) 20. ’71 Porsche 911 T (Misha) 21. ’73 Dodge Charger (Pat Minarick) 22. ’71 Ford Maverick (bobthehobbyguy) 23. ’70 Ford Torino (kromolly) 24. ‘63 Renault Estafette (camaro69) 25. ‘73 Dodge d300 (53gmc)🏁 26. ‘71 Ford Interceptor (spencer1984) 27. ‘74 Ford Gran Torino wagon (iamsuperdan) 28. ‘58 Plymouth sports fury (Rescued Customs) 29. ‘66 Chevrolet Malibu (Chasten) 30. ’66 Fairline GT/GTA (geras24) 31. '69 Ford Galaxie (Stavanzer) Edited March 1 by Mattilacken 1
Mattilacken Posted February 23 Author Posted February 23 So i believe the MB body is ready to go to paint, or at least primer! I had to make the opening for the hood smaller after opening it, and it was not a straight forward ad two strips and done, but I needed to fill in one spot and remove in an other but I am happy with it. I have also went over all flares several times with both CA and fine putty and they feel and look smooth. Will se if it looks good after primer or if I have to battle on here are some pics of a body in white!
oldcarfan Posted February 23 Posted February 23 (edited) My ADHD brain doesn't always hold to one track the way I'd like. While working on the CannonBall Golf I remembered I needed to make some driving lights. I used to rob lights off other kits, but that gets expensive after a while. I did a tutorial about making lights last year about this, but here's an updated version for anyone wanting lights on their entry. A quick trip to Hobby Lobby, Michael's, or maybe Walmart, yields some self adhesive half round pearls to serve as the body of the light. This brand comes in a pack of assorted sizes. The largest works out in 1/24th to about a 9 inch light and the smallest is about 5 inches so you can make several sizes of lights for different uses. They also sell a faceted gem style, too, but these are the the ones you want. Drill holes in the edge and glue a piece of paperclip in for the mounts. A quick shot of primer and some gloss black and they are ready to go. You could also shoot some of your favorite chrome finish over the black for a nice chrome look. The biggest gems are close to Cibie's 9 inch Super Oscars to my eye. The next smaller gem works out to be about 7 inches and the smallest are around 6 inches. These measurements are by eyeball so your mileage may vary. The store I went to also had the different sizes sold separately if you only need one size. The push part of a thumbtack works as a 9 inch light cover with the pointy part clipped off. For the seven inch lights I use the round part of a standard paper brad with the brad part removed fits. Probably you could make covers with a hole punch if you want a flat cover instead of the slightly domed kind. Here is a look at the finished product. SpotModel sells the Marchal and Cibie decals. I saw some KC Hi-Liter decals a while back but can't find them now. Let me know if you have them. The larger white covers are thumbtacks and the smaller covers are from the brads. Now I need a hack to make clear lenses. Hope this is helpful and if anyone has a different method for making auxiliary lights, please chime in! Edited February 23 by oldcarfan Fat fingers 2 2
Mattilacken Posted February 23 Author Posted February 23 7 hours ago, oldcarfan said: Now I need a hack to make clear lenses Could this be an option? Available in different sizes. https://www.scaleproduction.de/product_info.php?info=p968_auxiliary-headlights-6mm--chrome-plated--set-of-8-.html 1
stitchdup Posted February 23 Posted February 23 7 hours ago, oldcarfan said: My ADHD brain doesn't always hold to one track the way I'd like. While working on the CannonBall Golf I remembered I needed to make some driving lights. I used to rob lights off other kits, but that gets expensive after a while. I did a tutorial about making lights last year about this, but here's an updated version for anyone wanting lights on their entry. A quick trip to Hobby Lobby, Michael's, or maybe Walmart, yields some self adhesive half round pearls to serve as the body of the light. This brand comes in a pack of assorted sizes. The largest works out in 1/24th to about a 9 inch light and the smallest is about 5 inches so you can make several sizes of lights for different uses. They also sell a faceted gem style, too, but these are the the ones you want. Drill holes in the edge and glue a piece of paperclip in for the mounts. A quick shot of primer and some gloss black and they are ready to go. You could also shoot some of your favorite chrome finish over the black for a nice chrome look. The biggest gems are close to Cibie's 9 inch Super Oscars to my eye. The next smaller gem works out to be about 7 inches and the smallest are around 6 inches. These measurements are by eyeball so your mileage may vary. The store I went to also had the different sizes sold separately if you only need one size. The push part of a thumbtack works as a 9 inch light cover with the pointy part clipped off. For the seven inch lights I use the round part of a standard paper brad with the brad part removed fits. Probably you could make covers with a hole punch if you want a flat cover instead of the slightly domed kind. Here is a look at the finished product. SpotModel sells the Marchal and Cibie decals. I saw some KC Hi-Liter decals a while back but can't find them now. Let me know if you have them. The larger white covers are thumbtacks and the smaller covers are from the brads. Now I need a hack to make clear lenses. Hope this is helpful and if anyone has a different method for making auxiliary lights, please chime in! you can get lenses from googly eyes and if you cut them close to the base they leave a small lip that could be used to clip them onto yo body. theres also half rhine stones that look close to modern crystal style led lights in the jewellery section that if you cut them into squares and place in a line look like those off road light bars 1
Mattilacken Posted February 23 Author Posted February 23 My plan was to prime today… but I got carried away with interior work. Sets are upgraded as well as the dash have received a radio and heater controls and new vents.
oldcarfan Posted February 24 Posted February 24 Got some more done on my Cannonballer. Used some of my homemade driving lights. 2 1
oldcarfan Posted February 24 Posted February 24 2 hours ago, Mattilacken said: My plan was to prime today… but I got carried away with interior work. Sets are upgraded as well as the dash have received a radio and heater controls and new vents. Sure is looking good. Is the piping plastic rod? I tried doing that a while back but just glued my fingers to various things.
stavanzer Posted February 24 Posted February 24 Can I join? No Pics yet, but Building a Fujimi 1967, Ferrari 330 P4. Not sure where I'll put the extra Fuel Tanks.
Mattilacken Posted February 24 Author Posted February 24 4 hours ago, oldcarfan said: Sure is looking good. Is the piping plastic rod? I tried doing that a while back but just glued my fingers to various things. Yes, stretched spruce actually. I hold them on with one hand and tac it with Tamiya thin glue quick setting and that works good. I did the same on the headrest many times but with some careful sanding it came out good! 2 hours ago, stavanzer said: Can I join? No Pics yet, but Building a Fujimi 1967, Ferrari 330 P4. Not sure where I'll put the extra Fuel Tanks. sure you can! I guess two priests in a Ferrari didn’t have extra tanks either! 1
Mattilacken Posted February 24 Author Posted February 24 Ooo look at those flares now after a second lap of sanding and primer. 5
oldcarfan Posted February 24 Posted February 24 7 hours ago, Mattilacken said: Ooo look at those flares now after a second lap of sanding and primer. Suh-weet!
oldcarfan Posted February 25 Posted February 25 20 hours ago, stavanzer said: Can I join? No Pics yet, but Building a Fujimi 1967, Ferrari 330 P4. Not sure where I'll put the extra Fuel Tanks. Maybe you could use two part putty to make a form fitting blow molded style of tank? 1
oldcarfan Posted February 25 Posted February 25 Been working on the Mamma Mia Landie, but took a break to do some Cannonball stuff. Haven't decided if I like the decal or not but feels fitting. Also worked on some interior bits. I've got a lunch box, a thermos, a pair of binoculars, a 6v lantern flashlight, a cassette recorder for pre-recorded notes, and a clipboard. As small as the car is, it's gonna be crowded! 3 1
Mattilacken Posted February 25 Author Posted February 25 I went ahead and made a Fuzzbuster Elite II, if anyone is interested for the file just send me a PM 2
Mattilacken Posted February 25 Author Posted February 25 I got some paint on some parts as well as the body. The body need touch up and a roof sand down due to an accident and some spotting. Dash has gotten a two tone color with black vinyl top. 2
MeatMan Posted February 26 Posted February 26 21 hours ago, Mattilacken said: I went ahead and made a Fuzzbuster Elite II, if anyone is interested for the file just send me a PM Nice, but the elite came out in 1979.
Mattilacken Posted February 26 Author Posted February 26 55 minutes ago, MeatMan said: Nice, but the elite came out in 1979. Damn! I was searching for a year on it but could not find it. Back to CAD..
MeatMan Posted February 26 Posted February 26 5 minutes ago, Mattilacken said: Damn! I was searching for a year on it but could not find it. Back to CAD.. Yeah, I did a lot of research on it too. That info came from the Henry Ford Museum. I did a drawing of the original but had to guess on the dimensions. http://www.radardetectormuseum.com/fuzzbuster_1.html
Mattilacken Posted February 26 Author Posted February 26 2 hours ago, MeatMan said: Yeah, I did a lot of research on it too. That info came from the Henry Ford Museum. I did a drawing of the original but had to guess on the dimensions. http://www.radardetectormuseum.com/fuzzbuster_1.html Nice work! I did the same. I think i set it to be about 100mm wide. Is that a file you made? Care to share?
MeatMan Posted February 26 Posted February 26 5 hours ago, Mattilacken said: Nice work! I did the same. I think i set it to be about 100mm wide. Is that a file you made? Care to share? Ok, just getting back online. I posted it to my Cults3D site for free. https://cults3d.com/en/3d-model/various/fuzzbuster-original 1
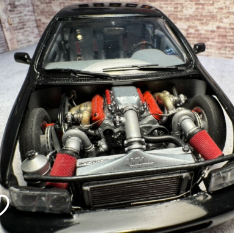
Mattilacken Posted February 26 Author Posted February 26 I have made some progress on the Oil Motor 617 today. Actually brush painted everything with my Vallejo Air colors on a wet pallet. Installed fuel pump.. need to se how it actually connects mechanicaly to the engine. I am right now working on the steering pump.. almost none of my kits have pumps, I found some parts that looks right, a throttle from the 454SS AMT kit. Turbos intake and all is painted and ready. 2
Recommended Posts
Create an account or sign in to comment
You need to be a member in order to leave a comment
Create an account
Sign up for a new account in our community. It's easy!
Register a new accountSign in
Already have an account? Sign in here.
Sign In Now