NOBLNG Posted July 19 Posted July 19 Every time I look at this I get Green Onions going through my head.😎 https://www.youtube.com/watch?v=0oox9bJaGJ8 4
FoMoCo66 Posted July 19 Posted July 19 28 minutes ago, NOBLNG said: Every time I look at this I get Green Onions going through my head.😎 https://www.youtube.com/watch?v=0oox9bJaGJ8 Me too. I also get Runaway by Del Shannon going. https://youtu.be/0S13mP_pfEc?si=RXJcxCyTmTxvW7zQ 2
Twokidsnosleep Posted July 20 Author Posted July 20 Body into final paint now and shiny A mock up pictures for motivation. Still lots to do ! 6 1
slusher Posted July 20 Posted July 20 Paint looks terrific and looking forward to more as your getting close to finishing ".. 1
Twokidsnosleep Posted July 20 Author Posted July 20 (edited) Man a Milner clone was in the ‘32 coupe days in Victoria this weekend. Wish I could have made it, would have loved to see one up close! They look like they had a blast, good weather and good media exposure Edited July 20 by Twokidsnosleep 1
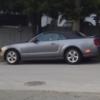
Twokidsnosleep Posted July 22 Author Posted July 22 (edited) This is a really nice tribute car photographed in a good setting A lot of intelligent hot rod guys modified the movie car and improved on it with suspension changes, replacing temperamental Rochester carbs and even keeping a bigger radiator to cool a larger engine. As I dive down hot rodding coupe’s rabbit hole, I can totally understand these mods to improve driveability, reliability and comfort. Edited July 22 by Twokidsnosleep
customline Posted July 24 Posted July 24 On 7/21/2025 at 10:10 PM, Twokidsnosleep said: This is a really nice tribute car photographed in a good setting A lot of intelligent hot rod guys modified the movie car and improved on it with suspension changes, replacing temperamental Rochester carbs and even keeping a bigger radiator to cool a larger engine. As I dive down hot rodding coupe’s rabbit hole, I can totally understand these mods to improve driveability, reliability and comfort. I know some will hate me for saying this but the iconic Milner coupe was kinda strange looking with the sectioned grille not aligning with the cowl. The car pictured above looks much better, IMHO. 2 1
Twokidsnosleep Posted July 24 Author Posted July 24 17 minutes ago, customline said: I know some will hate me for saying this but the iconic Milner coupe was kinda strange looking with the sectioned grille not aligning with the cowl. The car pictured above looks much better, IMHO. Yep I would agree The functionality of a larger cooling space was emphasized by one clone owner who had a larger displacement engine than the movie car and so wanted more surface area for cooling purposes vs smaller area to look cool. Many put in rear shocks and springs to improve highway ride and overall ride comfort. Cannot argue with that as they have to live with and use the car
Twokidsnosleep Posted July 26 Author Posted July 26 (edited) Dry run of carb location and correcting alternator position..3D print had it backwards vs the movie car imagine tuning SIX carbs😵💫 Edited July 26 by Twokidsnosleep 3
Twokidsnosleep Posted July 27 Author Posted July 27 (edited) Reversed the alternator support to duplicate the movie car location. Black one is original position to the right of the engine, mine will sit left Carbs were primed grey, painted stainless and then dry brushed aluminum for highlights Digging into the box of goodies for detail stuff Green fuel lines will look cool Edited July 27 by Twokidsnosleep 3
Twokidsnosleep Posted July 27 Author Posted July 27 (edited) Working on these in aluminum Lots to refine on them still And made and wired up the rotor as well. Red hair monster in the background vise Edited July 27 by Twokidsnosleep 4
Twokidsnosleep Posted July 27 Author Posted July 27 (edited) Found a mirror tape in my goodie box. Not bad, should have sanded the firewall smooth a bit more. maybe I will try some over my aluminum, that might be smooth enough Edited July 27 by Twokidsnosleep 5
Twokidsnosleep Posted August 2 Author Posted August 2 (edited) Got my header file printed out in a couple sizes. Need this to get the clearances right. Will have to cut the end and extend it past the door hinges as per movie car Testing Tamiya clear yellow on the green fuel lines…thin it w a bit of MHLT Working on the orientation of the header and alternator which sits quite high near the driver’s valve cover Damn photos….I don’t like that rough fan pulley, will probably just make a cleaner styrene set up there 🤔Yep it’s gone Edited August 3 by Twokidsnosleep 5
Twokidsnosleep Posted August 3 Author Posted August 3 (edited) This is the clearest engine reference photo I can find from a Milner Tribute built car the fuel lines are certainly not similar, yet this is a good find I am seriously considering opening the doors up. The hinges are the issue as they are exposed on the outside of the body. I could just use tiny magnets to make the doors pop on or off with no hinge or do a separate internal hinge🤔 Edited August 3 by Twokidsnosleep 4
Twokidsnosleep Posted August 5 Author Posted August 5 Another random movie based photo of the true star of American Graffiti …not toad 5
Twokidsnosleep Posted August 8 Author Posted August 8 (edited) Messing with my headers to make them clear the frame and steering and frame stuff Added an adjustable 6mm length of aluminum tube supported with brass rod. I don’t have final engine/frame/body position yet so will leave it adjustable and tighten it up at the end I drill small holes for a living btw Edited August 8 by Twokidsnosleep 3
meechum68 Posted August 8 Posted August 8 Gets better everytime I visit the post!! So much detail, and explanation on how to do things!!! 1
Twokidsnosleep Posted August 9 Author Posted August 9 Ok, this is a little excessive. Turn away if you have a weak stomach 😂 I despise styrene belts and plastic pulleys. Despise. So let’s try and make some metal aluminum pulleys and use a rubber belt. It is crazy and not needed, but… Aluminum stock measured, marked and inked facing the end hole drilling IMG_9297.mov Check vs a styrene part ‘The three pulleys…top left one with a broken drill lodged in it. I got it out Testing fitment with a rubber belt on the engine That was a fun Saturday morning. There was cursing and a battle with my lathe that has sat unused good year and needs some tune up love 3
Twokidsnosleep Posted August 9 Author Posted August 9 Went back out after some lunch and made a fuel filter and the piston shifter top Fuel filter ….because I got diameter too small to be a piston Piston shifter top 4
FoMoCo66 Posted August 9 Posted August 9 "Heres something to remember me bye". Pretty good looking, I've always wanted to make some parts on a lathe, but I've not had acces to one. 1
Twokidsnosleep Posted August 10 Author Posted August 10 1 hour ago, FoMoCo66 said: "Heres something to remember me bye". Pretty good looking, I've always wanted to make some parts on a lathe, but I've not had acces to one. Keep an eye on your Facebook market place or garage sales. Old lathes pop up every once in a while. For Sherline if you have some mechanical inclination, you can fix them up or buy new parts. I don’t know about those Chinese metal lathes 1
Twokidsnosleep Posted August 11 Author Posted August 11 I found some small black elastics on Amazon, apparently hair ties They look like they might work for a fan belt, $7 for a bag of one thousand 15mm resting diameter and 1mm thick
Recommended Posts
Create an account or sign in to comment
You need to be a member in order to leave a comment
Create an account
Sign up for a new account in our community. It's easy!
Register a new accountSign in
Already have an account? Sign in here.
Sign In Now