Twokidsnosleep Posted August 22 Author Posted August 22 (edited) Look out. Chrome is gonna be flying, Brother Edited August 23 by Twokidsnosleep 3
Twokidsnosleep Posted August 23 Author Posted August 23 (edited) Stl file is getting better and better some rough hand test paint early sat am while wife still asleep. White Stylenrez primer, CAT yellow Tamiya, both brushed and sharpie for the black chrome pen edging then airbrushed the rest of the prints tamiya fine white primer, CAT yellow Edited August 24 by Twokidsnosleep 2
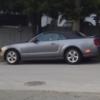
Twokidsnosleep Posted August 24 Author Posted August 24 One tried on the car. I think the paint colour nailed it. super hard to get that script right 2
Twokidsnosleep Posted August 24 Author Posted August 24 22 minutes ago, slusher said: Tag looks really nice" Thanks man Hope you are doing well 😎 1
Mattilacken Posted August 27 Posted August 27 Nice work on that sign. How if you use a super thin aluminium, from a whine bottle or such and put it on top of that one and then use a toothpick or something to shape it. 1
Twokidsnosleep Posted August 27 Author Posted August 27 2 hours ago, Mattilacken said: Nice work on that sign. How if you use a super thin aluminium, from a whine bottle or such and put it on top of that one and then use a toothpick or something to shape it. Great idea Will cut the plate off the block and try that aluminum wrap for the frame…I have some thin pop can or shim stock to try 👍🏻😎
Twokidsnosleep Posted August 30 Author Posted August 30 (edited) Bit of an engine tear down to fit a brass alternator support Was having a hard time stabilizing it until saw this reference. The resin printed supports were too weak, the brass one screws into the block Tore it all back off and got some Revell chrome paint done, will be a couple days to dry solid. Now I hope to get back on track. Edited August 30 by Twokidsnosleep
Twokidsnosleep Posted September 3 Author Posted September 3 (edited) I am waiting on chrome spray to dry on exhaust and engine parts Can’t touch that Revell for a good couple days or fingerprints. UPdate: yep it is about three days and then things seem set enough to handle without leaving fingerprints and smudges Everything I have read and seen says not to clear coat or you lose the chrome shine. Edited September 5 by Twokidsnosleep
Twokidsnosleep Posted September 6 Author Posted September 6 (edited) Dashboard done and in Then some glass. I sprayed the kit glass Tamiya smoke which looks dark and cool….but the pieces fought me going in I remembered a birdie saying the glass was green tint and I have some acrylic sprayed different clears so green it is. A good complementary colour with yelliw I am still quite a ways off from finishing and there are lots of bits and boogers to tidy up Edited September 6 by Twokidsnosleep 5
Twokidsnosleep Posted September 7 Author Posted September 7 (edited) Wasn’t digging the green. Switched it out for a tinted acrylic and I popped the hinged door off out of its support and broke the a pillar and one of the chop sections on the window frame Edited September 7 by Twokidsnosleep 2
WorldOfCarModelsCraft Posted September 7 Posted September 7 On 8/22/2025 at 5:27 PM, Twokidsnosleep said: Starting on the license plate print This is version 2.0…there will be more wow just have idea, you can print it and then try to press it on thin metal sheet. This is how it works?
Twokidsnosleep Posted September 7 Author Posted September 7 10 hours ago, WorldOfCarModelsCraft said: wow just have idea, you can print it and then try to press it on thin metal sheet. This is how it works? Yes this is my process in pictures. Haven’t quite got the frame right yet 1
Twokidsnosleep Posted September 7 Author Posted September 7 (edited) Tickets anyone? Edited September 8 by Twokidsnosleep 4
Mattilacken Posted September 8 Posted September 8 Looking good! nice touch with al the small details! 1
Twokidsnosleep Posted September 9 Author Posted September 9 Getting back on track with the engine and adding firewall details
Dan Hay Posted September 9 Posted September 9 Nice build! I’ll be starting a General Lee build soon from a 69 Camaro, they’re pretty much the same too. 1
Twokidsnosleep Posted September 13 Author Posted September 13 (edited) This is a ‘30 Edited September 13 by Twokidsnosleep
Twokidsnosleep Posted September 13 Author Posted September 13 (edited) Made new shocks for the front end to match the lowering Telescoping brass and soldered rounds saved the headlight mounts in styrene These will get Revell chromed some time today Edited September 13 by Twokidsnosleep 1
Twokidsnosleep Posted September 14 Author Posted September 14 (edited) Tubes tinted with clear yellow Tamiya Wiring harness getting organized Soldered throttle linkages up Third cement attempt of engine block into frame, this time with contact cement. Headers glued in and spark plug wiring done Edited September 14 by Twokidsnosleep 1
FoMoCo66 Posted September 14 Posted September 14 Okay, the yellow tint on the fuel lines look way better. 1
Twokidsnosleep Posted September 14 Author Posted September 14 11 minutes ago, FoMoCo66 said: Okay, the yellow tint on the fuel lines look way better. I showed that way back before as well It is just fragile so needed to be done nearing the last steps so not wiped away or chipped I changed the fuzzy black around the windscreen too as it looked weird
TopherMcGinnis Posted September 15 Posted September 15 This is looking WONDERFUL! I use E 6000 to do some final assemblies with. It's thick, so it holds stuff pretty quick and you have a little time to position. It works on paint as well. 1
Twokidsnosleep Posted September 15 Author Posted September 15 Getting close but still miles away from the finish line 3
Recommended Posts
Create an account or sign in to comment
You need to be a member in order to leave a comment
Create an account
Sign up for a new account in our community. It's easy!
Register a new accountSign in
Already have an account? Sign in here.
Sign In Now