Ryan S. Posted December 17, 2009 Share Posted December 17, 2009 (edited) I've got a problem with trying to do too many projects at once. Oh well, it's fun. Here's a mock up of where my Nomad is at right now. I've been working on getting the stance right and I think I've nailed it and was even able to maintain some ground clearance for the front end. I was able to mock up the engine bay with the big block and looks like I'm going to have to massage the firewall and rework the placement for the radiator so that there's clearance for the belts. I'll probably go with an electric, radiator mounted fan too, if I can find one. Thanks for looking, comments appriciated! <img src="http://i144.photobucket.com/albums/r185/rpsilva7/RM%201956%20Nomad/DSCN2070.jpg" border="0" class="linked-image" /> <img src="http://i144.photobucket.com/albums/r185/rpsilva7/RM%201956%20Nomad/DSCN2071.jpg" border="0" class="linked-image" /> <img src="http://i144.photobucket.com/albums/r185/rpsilva7/RM%201956%20Nomad/DSCN2072.jpg" border="0" class="linked-image" /> <img src="http://i144.photobucket.com/albums/r185/rpsilva7/RM%201956%20Nomad/DSCN2073.jpg" border="0" class="linked-image" /> Edited October 13, 2010 by Ryan S. Quote Link to comment Share on other sites More sharing options...
Dingo Posted December 17, 2009 Share Posted December 17, 2009 Very nice so far Ryan love the old Nomads I have two, one which is being built into a Camper the other will be a trailer Queen. Dingo Quote Link to comment Share on other sites More sharing options...
disabled modeler Posted December 17, 2009 Share Posted December 17, 2009 Hi ..........looks good from here! going to be cool when done.... Quote Link to comment Share on other sites More sharing options...
george 53 Posted December 17, 2009 Share Posted December 17, 2009 Ryan, you did the Radiator right, but the Engine DOES need to be set back at least 3 to 4 inches. You also gotta dent in the firewall in about another inch for more Distributor clearance and you CAN'T use a large cap distributor. At least on a real one you do. Quote Link to comment Share on other sites More sharing options...
vizio93 Posted December 17, 2009 Share Posted December 17, 2009 (edited) Looks good so far !!! Is that the color your going to keep it ? Edited December 17, 2009 by vizio93 Quote Link to comment Share on other sites More sharing options...
gilsdropshop1 Posted December 17, 2009 Share Posted December 17, 2009 Nice version of a not to often done Buick. Love the color with the graphics. looking good Ryan, this one is going to look cool when done, here is mine i did last year i also swaped out motors, put in 67 chevy bb 427f.i. with good results added some big n little pegasus wheels. two tone and interior aslo. Quote Link to comment Share on other sites More sharing options...
MikeMc Posted December 18, 2009 Share Posted December 18, 2009 Ryan, you did the Radiator right, but the Engine DOES need to be set back at least 3 to 4 inches. You also gotta dent in the firewall in about another inch for more Distributor clearance and you CAN'T use a large cap distributor. At least on a real one you do. George hit it right on...and on this one set that BBC way back for fan clearance and dimple the firewall around those heads..... see my '56 SBC which is jammed way back... Quote Link to comment Share on other sites More sharing options...
Ryan S. Posted December 18, 2009 Author Share Posted December 18, 2009 Thanks for all the comments! The final color is going to be Boyd's Lime Pearl for the majority of the body (the part thats white right now) with the traditional white back-half (the part covered in tape right now). I'll be working on moving the motor back a few inches and relieving the firewall where the heads hit it. I'm not sure if I'll just tweak the kit firewall or scratch build a new one. More to come soon, hopefully! Quote Link to comment Share on other sites More sharing options...
snakeplissken Posted December 18, 2009 Share Posted December 18, 2009 Slammed low. That's cool. Quote Link to comment Share on other sites More sharing options...
MADmodelDOCTOR Posted December 19, 2009 Share Posted December 19, 2009 Your's is looking great, Ryan. Paint sounds good. Keep it going! later, Quote Link to comment Share on other sites More sharing options...
Ryan S. Posted December 19, 2009 Author Share Posted December 19, 2009 Thanks for the comments all! I'm pretty excited to get this one coming along. Still contemplating getting 572 heads for the BB to give the impression of even more muscle. Slammed low. That's cool. Yeah, I wanted a lower stance, but not dragging on the ground low. Took some work to do it though. Scratch built new front spindles and put a lowering block between the rear leaf springs and the rear end. Quote Link to comment Share on other sites More sharing options...
Ryan S. Posted December 19, 2009 Author Share Posted December 19, 2009 Your's looks real good too! Love the red. Nice job on the BMF work. Thats probably what I'm most worried about, I haven't used it a whole lot and really don't want to mess this up! Any tips? Quote Link to comment Share on other sites More sharing options...
gilsdropshop1 Posted December 19, 2009 Share Posted December 19, 2009 Your's looks real good too! Love the red. Nice job on the BMF work. Thats probably what I'm most worried about, I haven't used it a whole lot and really don't want to mess this up! Any tips? thanks Ryan, just take your time! the biggest issue i had was the side trim, dont press to hard use a cotton swab and toothpick, real sharp xacto-blade (new) i got real lucky around window pillars and tail gate in one shot. good luck buddy! Quote Link to comment Share on other sites More sharing options...
jeffs396 Posted December 19, 2009 Share Posted December 19, 2009 Looks great Ryan! Those Western Bullets look really good on there! Quote Link to comment Share on other sites More sharing options...
Ryan S. Posted December 24, 2009 Author Share Posted December 24, 2009 So I've got the interior pretty much finished. The dash isn't glued in place yet and I'm contemplating giving the gloss green on the seats a dullcoat. I gotta say that the interior on this baby sure went together smoothly. Here's where we're at. For what its worth too, this is the car that has kind of been my inspiration. Thanks again for all the comments and for following along, I really appriciate it! Happy holidays everyone. Quote Link to comment Share on other sites More sharing options...
horsepower Posted December 24, 2009 Share Posted December 24, 2009 Ryan, you did the Radiator right, but the Engine DOES need to be set back at least 3 to 4 inches. You also gotta dent in the firewall in about another inch for more Distributor clearance and you CAN'T use a large cap distributor. At least on a real one you do. The main problem with fitting this engine into the Nomad, is it appears that the engine is the 1/24 scale monogram big block, instead of a 1/25 scale one. Quote Link to comment Share on other sites More sharing options...
Ryan S. Posted December 24, 2009 Author Share Posted December 24, 2009 The main problem with fitting this engine into the Nomad, is it appears that the engine is the 1/24 scale monogram big block, instead of a 1/25 scale one. [Ed Mcmahon] YES! You are correct sir! [/Ed Mcmahon] It is a 1/24 motor. It's going to take some shoehorning, but I'm determined to make it work. Or does it look too out of scale? I think it looks ok, and I'm certainly not trying to win any contests with this thing so dead-on accuracy isn't a big deal. Plus, I think it being bigger makes it look more menacing! Quote Link to comment Share on other sites More sharing options...
Ryan S. Posted March 11, 2010 Author Share Posted March 11, 2010 I've been working on the Nomad too. Got the rolling stock pretty finished up and was able to shoehorn that 454 under the hood by moving the radiator forward. This was my first foray into scratchbuilding headers using solder and my collectors are a little big. I might find something to do about that. The mufflers are parts box pieces that I BMF'd. They aren't glued in place yet and will be parrallel to the frame when they are. Thanks for looking. Hopefully paint will be coming soon... Quote Link to comment Share on other sites More sharing options...
Dr. Cranky Posted March 11, 2010 Share Posted March 11, 2010 I like the way it is turning out. Great colors and details. Quote Link to comment Share on other sites More sharing options...
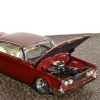
Ryan S. Posted September 23, 2010 Author Share Posted September 23, 2010 So I'm determined to wrap up some of these projects that have been hanging around for a while. Got the Nomad into paint and it's looking good. Reworked the radiator support and ended up setting the radiator forward a little and I went with an electric fan from M.A.D. rather than the motor driven fan for more clearance. This way I didn't have to set the engine back. The 454 is pretty much done. I gave it a little grease for that "driven" look. Smoothed the firewall a little. At this point, I just need to rub the paint out one if fully cures (yay enamals!), foil the trim and then final assembly really. Oh, and adjust the front of the frame to bring the front bumper closer to the grill. The thing really sticks out there and looks like a sore lip. As always, thanks for looking. Quote Link to comment Share on other sites More sharing options...
Mike Chernecki Posted September 23, 2010 Share Posted September 23, 2010 The Nomad looks great, I love the color. Back in the early '70s my uncle had a laurel green/crocus yellow '56 Nomad, I am slowly working a replica of that car. Quote Link to comment Share on other sites More sharing options...
cruz Posted September 23, 2010 Share Posted September 23, 2010 This thing is looking very cool so far, I think the radiator hose is a bit too skinny but other than that it is very nice. That green color goes very well with the white and your interior work is awesome! Quote Link to comment Share on other sites More sharing options...
Ryan S. Posted September 23, 2010 Author Share Posted September 23, 2010 This thing is looking very cool so far, I think the radiator hose is a bit too skinny but other than that it is very nice. That green color goes very well with the white and your interior work is awesome! Thanks for the comments, guys. Cruz, I was looking at the pics and thinking the same thing, I'll have to find something a little bigger. Quote Link to comment Share on other sites More sharing options...
charlie8575 Posted September 23, 2010 Share Posted September 23, 2010 The color and wheel combination look nice, Ryan. Good work. Charlie Larkin Quote Link to comment Share on other sites More sharing options...
GOTH KUSTOMS Posted September 24, 2010 Share Posted September 24, 2010 This looks great, there is one issue tho, and I have PM'ed you about it, doesn't seem like no one else picked it up, but it is a great build, paint and all go together very well, great job.... Quote Link to comment Share on other sites More sharing options...
Recommended Posts
Join the conversation
You can post now and register later. If you have an account, sign in now to post with your account.
Note: Your post will require moderator approval before it will be visible.