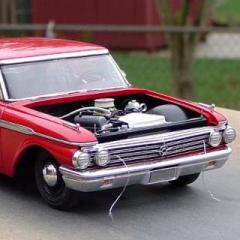
Art Laski Posted May 13, 2010 Posted May 13, 2010 (edited) Art, these are the two bits I used..I nearly wrecked the grill a couple of times because of the rate the plastic was being removed...Make extra sure you go very slowly and check your work often. It's very easy to burn through everything if you're not carefull. One of the reasons it may have been so tough for me was I used a single speed tool..You're likely better off using a multi speed version and setting it to the slowest speed for better control... I scratchbuilt the coil from 2 different sizes of evergreen rod and aluminum sheet [for the hold down bracket]. The coil that comes with the kit isn't bad though. You can drill it out and wire it if you'd like. Mine unfortunately got misplaced, so I had to go the scratchbuilding route instead. Jeff, Thanks for the tips! -Art Edited May 13, 2010 by Art Laski
Jeff Sauber Posted May 13, 2010 Author Posted May 13, 2010 Great detail going on here Jeff. I've built several of these Camaros and hope a trick I learned along the way can be useful to you. It looks like you haven't got into the bodywork yet. The rear pan fits terribly on this kit. I've glued that on, filled the seams, then rescribed them. Next, cut the lower front valence off at the body lines. It's pretty easy to make a "backer" inside the fenders so aids in the fit and gives a nice place to glue it during final assembly. This also solves an issue with the fit of the radiator support. As the kit is designed, Its real tricky to get the body on without snapping the support loose. It's a very tight fit. Without the front valence, it slides in no problem. Looking forward to more progress. Thanks for the tips, Tim. I may very well use your suggestions. The dry run mockup are getting tedious at this point with all the extra detailing, and sooner or later I'm bound to break something and ruin the progress. I was hoping to drop the core support in from above, but things are very tight and some of the plumbing is getting hung on the frame..On the other hand, if you attach the core support as per the instructions, it ends up getting hung up on the inner grill opening and inner fenders and twisted all to hell. Removing the lower front valance may be the best option.......Jeff
Foxer Posted May 14, 2010 Posted May 14, 2010 (edited) Of course I've been following this, Jeff, just been a bit silent. But, your detailing makes me lose my voice! This is looking so fine as usual. Building something you owned is my type of fun, so it's been very interesting following all the little touches. Finding the right piece to do the job right, be it PE or something made out of an old toothbrush is where you excel and I see it happening here again. Edited May 14, 2010 by Foxer
Jeff Sauber Posted May 16, 2010 Author Posted May 16, 2010 Small update today... Just finished up on the seats. Pieced together a harness for the driver's side from my scrap PE stash, and then added some photo-reduced logos...Nothing too fancy. Next up will be putting all the subassemblies together as well as adding in the remaining details to complete the interior.
Jeff Sauber Posted May 16, 2010 Author Posted May 16, 2010 (edited) Jeff, those look great, absouloutley Great. Thanks Nick, fortunately, my Camaro seats were just satin black with black belts, so it was easy to do them in scale. Some of those multi colored seat patterns on various other cars, can be a real pain to mask off and paint properly.. Edited May 16, 2010 by J. Sauber
Guest old man Posted May 17, 2010 Posted May 17, 2010 THAT IS A SUPER NICE BUILD CAN'T WAIT TO SEE YOU FINISH THIS WELL DONE I LOVE OLD CAMARO'S THEY ARE JUST COOL
Jeff Sauber Posted May 18, 2010 Author Posted May 18, 2010 Got the basic interior panels together...Still have a few more things to add in, but things are getting there. It's ashame the cool PE pedals are not easilly viewed in the finished car, but here they are by themselves...More to come.
lrlocke01 Posted May 18, 2010 Posted May 18, 2010 Your building skills are sick! This looks like another masterpiece, can't wait to see it finished.
Hillbilly Deluxe Posted May 18, 2010 Posted May 18, 2010 Fantastic looking cockpit!!! Everything looks spot on Jeff.
Romell R Posted May 18, 2010 Posted May 18, 2010 (edited) Very nice job on the interior....I always say that the interior is a project in itself that deserves just as much attention and many modellers fail in this part of the build thnking "no one is goona see it anyway" Job well done my friend! Edited May 18, 2010 by Aftashox
Jeff Sauber Posted May 18, 2010 Author Posted May 18, 2010 (edited) what, no center console? you know they had this little space in them for those seatbelt buckles when you werent using them, snapped right in. i eventually ditched the console and the horseshoe shifter for an old school B&M Quick Click shifter. it was OLD but it worked and worked very well. very nice interior work, very nice! Dave I never had the console option. Originally, my car was a column shift 2 speed power glide/307....LOL....[Granny car].. Then after the BBC/muncie swap, I added in the "short throw" hurst shifter, and one of those cheesy $8.00 fire extinguishers between the seats. I may scratchbuild that little fire bottle and add it in just for old times sake. I'll also scratchbuild a set of speaker grills for the package tray. Other than those remaining things, the interior is pretty much how it looked on my 1:1. The floor mats were those cheap black rubber "diamond plate" sets you could buy from the old Trak-Auto stores...[before they became Advance auto]. I had some vinyl material here that looks real close to those patterns on the old mats that I cut and fitted into place. Edited May 18, 2010 by J. Sauber
Jeff Sauber Posted May 18, 2010 Author Posted May 18, 2010 Very nice job on the interior....I always say that the interior is a project in itself that deserves just as much attention and many modellers fail in this part of the build thnking "no one is goona see it anyway" Job well done my friend! Thanks, I enjoy doing interiors and don't mind the extra detailing, it's ashame however that alot of the work will be hidden in the finished model. On some projects I'll just go and open up the doors, that way you have a better view of what's inside....although cutting and hinging things can really add on to the work load. For this project, I wanted to get some good detailing done, but at the same time, keep things moving at a fairly quick pace. I have several other really involved projects to get back to as soon as this one is wrapped up. This one here is sort of my "vacation" project from the other crazy stuff I do....
pharr7226 Posted May 18, 2010 Posted May 18, 2010 That interior is very nice. I'm looking forward to seeing more of this build.
Romell R Posted May 18, 2010 Posted May 18, 2010 (edited) Thanks, I enjoy doing interiors and don't mind the extra detailing, it's ashame however that alot of the work will be hidden in the finished model. On some projects I'll just go and open up the doors, that way you have a better view of what's inside....although cutting and hinging things can really add on to the work load. For this project, I wanted to get some good detailing done, but at the same time, keep things moving at a fairly quick pace. I have several other really involved projects to get back to as soon as this one is wrapped up. This one here is sort of my "vacation" project from the other crazy stuff I do.... Believe me I totally understand, Im good for cutting doors and trunks and such open im a detail man too. and everytime I tell myself "im not gonna cut anything im gonna do a simple build this time" well it just never seems to turn out a simple build LOL! anyway I love this build and im gonna keep my eye on it. keep up the outstanding work! Edited June 28, 2010 by Aftashox
Jeff Sauber Posted May 19, 2010 Author Posted May 19, 2010 Here's the finished interior bucket... Now on to the bodywork/paint, and final assembly.
Romell R Posted May 19, 2010 Posted May 19, 2010 Nice attention to detail down to the door locks... outstanding!
W-409 Posted May 19, 2010 Posted May 19, 2010 WOW!! That's so outstanding work that it interior looks like it came from Chevy factory 1969.
Nick Winter Posted May 19, 2010 Posted May 19, 2010 Jeff did you know if yours was built in Van Nuys or Norwood?
Guest Johnny Posted May 19, 2010 Posted May 19, 2010 Your building skills are sick! This looks like another masterpiece, can't wait to see it finished. Yes they are really making me sick!!! Especially compared to my building skills! Great work Jeff!
crazyjim Posted May 20, 2010 Posted May 20, 2010 I sit here in awe looking at your pics, Jeff. I try for details but I can't get anywhere close to what you do. Amazing. I look forward to drooling over your next post and hope none gets on my keyboard.
KENNEDYJR Posted May 21, 2010 Posted May 21, 2010 (edited) You do some amazingly detailed and clean work. If I remember correctly,Sauber is German for the word cleanly. Fitting I think. Edited May 21, 2010 by KENNEDYJR
Jeff Sauber Posted May 21, 2010 Author Posted May 21, 2010 Thanks so much for the kind comments, I really appreciate it.. Looks like I have caught some sort of sinus infection/chest cold or the like, so I haven't been at the bench much the last 2 days, but I'll get some updates as soon as I feel a bit better. I don't like to work much when I'm sick, I tend to get clumsy and sloppy..
Nick Winter Posted May 21, 2010 Posted May 21, 2010 (edited) Thanks so much for the kind comments, I really appreciate it.. Looks like I have caught some sort of sinus infection/chest cold or the like, so I haven't been at the bench much the last 2 days, but I'll get some updates as soon as I feel a bit better. I don't like to work much when I'm sick, I tend to get clumsy and sloppy.. Jeff that seems to be going around my dad had it and now so do I. Hope you get yourself healthy soon. Being sick sucks. Edited May 21, 2010 by Dukefan69'
Recommended Posts
Create an account or sign in to comment
You need to be a member in order to leave a comment
Create an account
Sign up for a new account in our community. It's easy!
Register a new accountSign in
Already have an account? Sign in here.
Sign In Now